- Yii 教程
- Yii - 首頁
- Yii - 概述
- Yii - 安裝
- Yii - 建立頁面
- Yii - 應用程式結構
- Yii - 入口指令碼
- Yii - 控制器
- Yii - 使用控制器
- Yii - 使用操作
- Yii - 模型
- Yii - 小部件
- Yii - 模組
- Yii - 檢視
- Yii - 佈局
- Yii - 資源
- Yii - 資源轉換
- Yii - 擴充套件
- Yii - 建立擴充套件
- Yii - HTTP 請求
- Yii - 響應
- Yii - URL 格式
- Yii - URL 路由
- Yii - URL 規則
- Yii - HTML 表單
- Yii - 驗證
- Yii - 特設驗證
- Yii - AJAX 驗證
- Yii - 會話
- Yii - 使用快閃記憶體資料
- Yii - Cookie
- Yii - 使用 Cookie
- Yii - 檔案上傳
- Yii - 格式化
- Yii - 分頁
- Yii - 排序
- Yii - 屬性
- Yii - 資料提供程式
- Yii - 資料小部件
- Yii - ListView 小部件
- Yii - GridView 小部件
- Yii - 事件
- Yii - 建立事件
- Yii - 行為
- Yii - 建立行為
- Yii - 配置
- Yii - 依賴注入
- Yii - 資料庫訪問
- Yii - 資料訪問物件
- Yii - 查詢生成器
- Yii - 活動記錄
- Yii - 資料庫遷移
- Yii - 主題
- Yii - RESTful API
- Yii - RESTful API 實戰
- Yii - 欄位
- Yii - 測試
- Yii - 快取
- Yii - 片段快取
- Yii - 別名
- Yii - 日誌記錄
- Yii - 錯誤處理
- Yii - 身份驗證
- Yii - 授權
- Yii - 本地化
- Yii - Gii
- Gii – 建立模型
- Gii – 生成控制器
- Gii – 生成模組
- Yii 有用資源
- Yii - 快速指南
- Yii - 有用資源
- Yii - 討論
Yii - 資料庫訪問
Yii DAO(資料庫訪問物件)提供了一個訪問資料庫的 API。它也是其他資料庫訪問方法(活動記錄和查詢生成器)的基礎。
Yii DAO 支援以下資料庫:
- MySQL
- MSSQL
- SQLite
- MariaDB
- PostgreSQL
- ORACLE
- CUBRID
建立資料庫連線
步驟 1 - 要建立資料庫連線,您需要建立 yii\db\Connection 類的例項。
$mydb = new yii\db\Connection([
   'dsn' => 'mysql:host=localhost;dbname=mydb',
   'username' => 'username',
   'password' => 'password',
   'charset' => 'utf8',
]);
一種常見的做法是在應用程式元件內部配置資料庫連線。例如,在基本應用程式模板中,資料庫連線配置位於 config/db.php 檔案中,如下程式碼所示。
<?php
   return [
      'class' => 'yii\db\Connection',
      'dsn' => 'mysql:host = localhost;dbname = helloworld',
      'username' => 'vladimir',
      'password' => '123574896',
      'charset' => 'utf8',
   ];
?>
步驟 2 - 要訪問資料庫連線,您可以使用此表示式。
Yii::$app->db
要配置資料庫連線,您應透過 dsn 屬性指定其 DSN(資料來源名稱)。不同資料庫的 DSN 格式有所不同:
MySQL、MariaDB - mysql:host = localhost;dbname = mydb
PostgreSQL - pgsql:host = localhost;port = 5432;dbname = mydb
SQLite - sqlite:/path/to/db/file
MS SQL Server(透過 sqlsrv 驅動程式) - sqlsrv:Server = localhost;Database = mydb
MS SQL Server(透過 mssql 驅動程式) - mssql:host = localhost;dbname = mydb
MS SQL Server(透過 dblib 驅動程式) - dblib:host = localhost;dbname = mydb
CUBRID - cubrid:dbname = mydb;host = localhost;port = 33000
Oracle - oci:dbname = //:1521/mydb
為了展示資料庫查詢的實際操作,我們需要一些資料。
準備資料庫
步驟 1 - 建立一個新的資料庫。資料庫可以透過以下兩種方式準備。
在終端中執行 mysql -u root –p。
透過 CREATE DATABASE helloworld CHARACTER SET utf8 COLLATE utf8_general_ci; 建立一個新的資料庫。
步驟 2 - 在 config/db.php 檔案中配置資料庫連線。以下配置適用於當前使用的系統。
<?php
   return [
      'class' => 'yii\db\Connection',
      'dsn' => 'mysql:host = localhost;dbname = helloworld',
      'username' => 'vladimir',
      'password' => '12345',
      'charset' => 'utf8',
   ];
?>
步驟 3 - 在根資料夾中 執行 ./yii migrate/create test_table。此命令將建立一個用於管理資料庫的資料庫遷移。遷移檔案應出現在專案根目錄的 migrations 資料夾中。
步驟 4 - 以這種方式修改遷移檔案(在本例中為 m160106_163154_test_table.php)。
<?php
   use yii\db\Schema;
   use yii\db\Migration;
   class m160106_163154_test_table extends Migration {
      public function safeUp() {
         $this->createTable("user", [
            "id" => Schema::TYPE_PK,
            "name" => Schema::TYPE_STRING,
            "email" => Schema::TYPE_STRING,
         ]);
         $this->batchInsert("user", ["name", "email"], [
            ["User1", "user1@gmail.com"],
            ["User2", "user2@gmail.com"],
            ["User3", "user3@gmail.com"],
            ["User4", "user4@gmail.com"],
            ["User5", "user5@gmail.com"],
            ["User6", "user6@gmail.com"],
            ["User7", "user7@gmail.com"],
            ["User8", "user8@gmail.com"],
            ["User9", "user9@gmail.com"],
            ["User10", "user10@gmail.com"],
            ["User11", "user11@gmail.com"],
         ]);
      }
      public function safeDown() {
         $this->dropTable('user');
      }
   }
?>
上述遷移建立了一個名為 user 的表,包含以下欄位:id、name 和 email。它還添加了一些演示使用者。
步驟 5 - 在專案根目錄中 執行 ./yii migrate 以將遷移應用於資料庫。
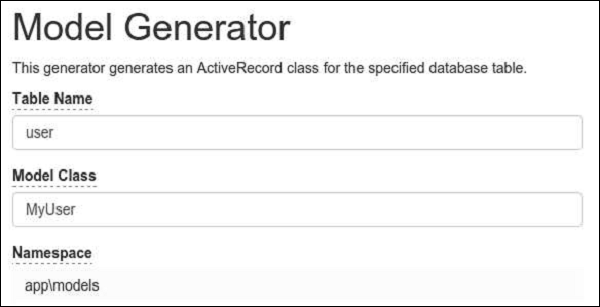
步驟 6 - 現在,我們需要為 user 表建立一個模型。為了簡單起見,我們將使用 Gii 程式碼生成工具。開啟此 url: https://:8080/index.php?r=gii。然後,單擊“模型生成器”標題下的“開始”按鈕。填寫表名(“user”)和模型類(“MyUser”),單擊“預覽”按鈕,最後單擊“生成”按鈕。
MyUser 模型應該出現在 models 目錄中。