- Spring Boot 教程
- Spring Boot - 首頁
- Spring Boot - 簡介
- Spring Boot - 快速入門
- Spring Boot - 引導
- Spring Tool Suite
- Spring Boot - Tomcat 部署
- Spring Boot - 構建系統
- Spring Boot - 程式碼結構
- Spring Bean & 依賴注入
- Spring Boot - 執行器
- Spring Boot - 啟動器
- Spring Boot - 應用屬性
- Spring Boot - 配置
- Spring Boot - 註解
- Spring Boot - 日誌
- 構建 RESTful Web 服務
- Spring Boot - 異常處理
- Spring Boot - 攔截器
- Spring Boot - Servlet 過濾器
- Spring Boot - Tomcat 埠號
- Spring Boot - Rest 模板
- Spring Boot - 檔案處理
- Spring Boot - 服務元件
- Spring Boot - Thymeleaf
- 使用 RESTful Web 服務
- Spring Boot - CORS 支援
- Spring Boot - 國際化
- Spring Boot - 排程
- Spring Boot - 啟用 HTTPS
- Spring Boot - Eureka 服務
- 使用 Eureka 進行服務註冊
- 閘道器代理伺服器和路由
- Spring Cloud 配置伺服器
- Spring Cloud 配置客戶端
- Spring Boot - Actuator
- Spring Boot - Admin 伺服器
- Spring Boot - Admin 客戶端
- Spring Boot - 啟用 Swagger2
- Spring Boot - 使用 SpringDoc OpenAPI
- Spring Boot - 建立 Docker 映象
- 追蹤微服務日誌
- Spring Boot - Flyway 資料庫
- Spring Boot - 傳送郵件
- Spring Boot - Hystrix
- Spring Boot - Web Socket
- Spring Boot - 批處理服務
- Spring Boot - Apache Kafka
- Spring Boot - Twilio
- Spring Boot - 單元測試用例
- Rest Controller 單元測試
- Spring Boot - 資料庫處理
- 保護 Web 應用程式
- Spring Boot - 使用 JWT 的 OAuth2
- Spring Boot - Google Cloud Platform
- Spring Boot - Google OAuth2 登入
- Spring Boot 資源
- Spring Boot - 快速指南
- Spring Boot - 有用資源
- Spring Boot - 討論
Spring Tool Suite,STS
Spring Tool Suite,STS 是一個 IDE(整合開發環境),非常適合開發 Spring Boot 應用程式。
下載並安裝 STS
可以從 https://springframework.tw/tools 下載 STS。
選擇作業系統(本例中為 Windows)。
下載 zip 檔案並解壓。
點選 SpringToolSuite4.exe 檔案。
Spring Tool Suite 4 啟動器對話方塊會詢問工作區位置。輸入位置,然後按“啟動”按鈕。
在 STS 中建立一個簡單的 Spring Boot 應用程式
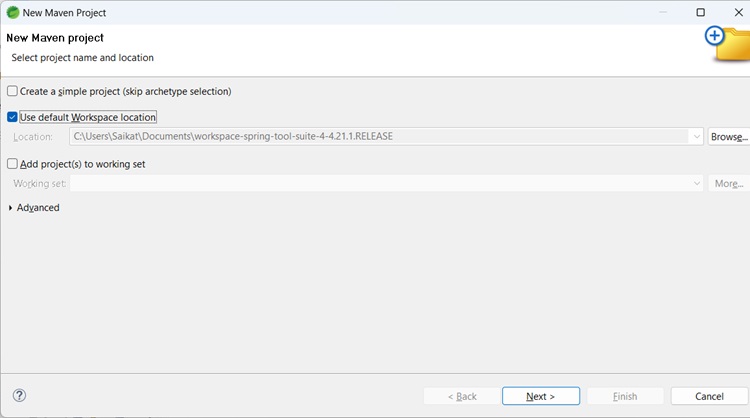
轉到檔案 -> 新建 Maven 專案。
點選下一步。將出現以下對話方塊
選擇maven-archetype-quickstart
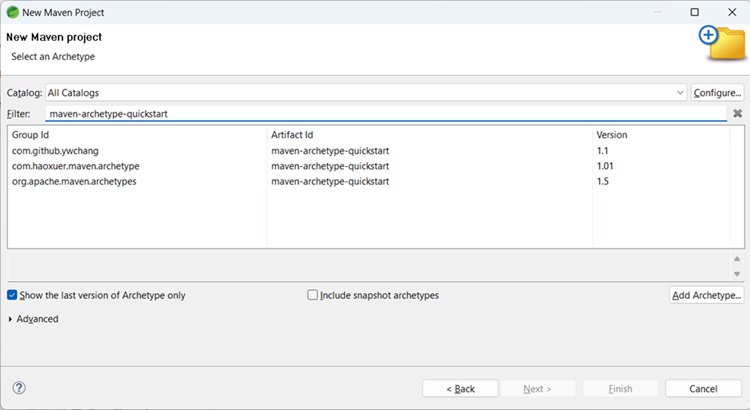
對於GroupId,輸入com.tutorialspoint,對於ArtifactId,輸入first-spring-boot-example。

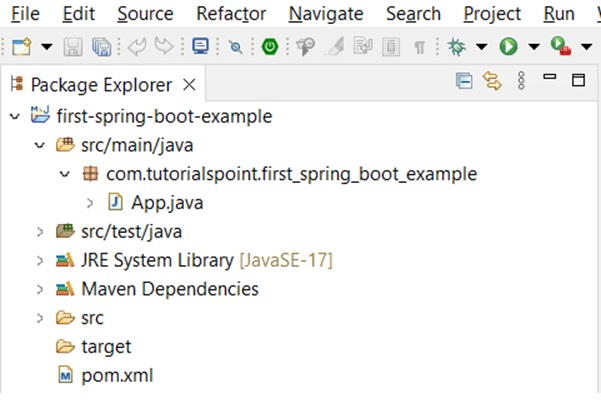
點選完成。
完成後,將建立資料夾結構 -
開啟pom.xml檔案。在dependencies下新增以下內容。
<dependency>
   <groupId>org.springframework.boot</groupId>
   <artifactId>spring-boot-autoconfigure</artifactId>
   <version>3.3.3</version>
</dependency>
此外,透過右鍵單擊專案 -> 構建路徑 -> 新增外部存檔將 Spring 框架核心 jar 新增到構建路徑
pom.xml
<?xml version="1.0" encoding="UTF-8"?>
   <project xmlns="http://maven.apache.org/POM/4.0.0" xmlns:xsi="http://www.w3.org/2001/XMLSchema-instance"
   xsi:schemaLocation="http://maven.apache.org/POM/4.0.0 http://maven.apache.org/xsd/maven-4.0.0.xsd">
   <modelVersion>4.0.0</modelVersion>
   <groupId>com.tutorialspoint</groupId>
   <artifactId>first-spring-boot-example</artifactId>
   <version>0.0.1-SNAPSHOT</version>
   <name>first-spring-boot-example</name>
   <!-- FIXME change it to the project's website -->
   <url>first-spring-boot-example</url>
   <properties>
      <project.build.sourceEncoding>UTF-8</project.build.sourceEncoding>
      <maven.compiler.release>17</maven.compiler.release>
   </properties>
   <dependencyManagement>
      <dependencies>
         <dependency>
            <groupId>org.junit</groupId>
            <artifactId>junit-bom</artifactId>
            <version>5.11.0</version>
            <type>pom</type>
            <scope>import</scope>
         </dependency>
      </dependencies>
   </dependencyManagement>
   <dependencies>
      <dependency>
         <groupId>org.springframework.boot</groupId>
         <artifactId>spring-boot-autoconfigure</artifactId>
         <version>3.3.3</version>
      </dependency>
      <dependency>
         <groupId>org.springframework.boot</groupId>
         <artifactId>spring-boot-starter-web</artifactId>
         <version>2.2.1.RELEASE</version>
      </dependency>
      <dependency>
         <groupId>org.springframework.boot</groupId>
         <artifactId>spring-boot-starter-parent</artifactId>
         <version>2.2.1.RELEASE</version>
         <type>pom</type>
      </dependency>
      <dependency>
         <groupId>org.junit.jupiter</groupId>
         <artifactId>junit-jupiter-api</artifactId>
         <scope>test</scope>
      </dependency>
      <!-- Optionally: parameterized tests support -->
      <dependency>
         <groupId>org.junit.jupiter</groupId>
         <artifactId>junit-jupiter-params</artifactId>
         <scope>test</scope>
      </dependency>
   </dependencies>
   <build>
      <pluginManagement><!-- lock down plugins versions to avoid using Maven defaults (may be moved to parent pom) -->
         <plugins>
            <!-- clean lifecycle, see https://maven.apache.org/ref/current/maven-core/lifecycles.html#clean_Lifecycle -->
            <plugin>
               <artifactId>maven-clean-plugin</artifactId>
               <version>3.4.0</version>
            </plugin>
            <!-- default lifecycle, jar packaging: see https://maven.apache.org/ref/current/maven-core/default-bindings.html#Plugin_bindings_for_jar_packaging -->
            <plugin>
               <artifactId>maven-resources-plugin</artifactId>
               <version>3.3.1</version>
            </plugin>
            <plugin>
               <artifactId>maven-compiler-plugin</artifactId>
               <version>3.13.0</version>
            </plugin>
            <plugin>
               <artifactId>maven-surefire-plugin</artifactId>
               <version>3.3.0</version>
            </plugin>
            <plugin>
               <artifactId>maven-jar-plugin</artifactId>
               <version>3.4.2</version>
            </plugin>
            <plugin>
               <artifactId>maven-install-plugin</artifactId>
               <version>3.1.2</version>
            </plugin>
            <plugin>
               <artifactId>maven-deploy-plugin</artifactId>
               <version>3.1.2</version>
            </plugin>
            <!-- site lifecycle, see https://maven.apache.org/ref/current/maven-core/lifecycles.html#site_Lifecycle -->
            <plugin>
               <artifactId>maven-site-plugin</artifactId>
               <version>3.12.1</version>
            </plugin>
            <plugin>
               <artifactId>maven-project-info-reports-plugin</artifactId>
               <version>3.6.1</version>
            </plugin>
         </plugins>
      </pluginManagement>
   </build>
</project>
在 src/main/java 下建立一個新的 Java 類,包名為com.tutorialspoint.first_spring_boot_example。將類命名為FirstSpringBootTestClass。
FirstSpringBootTest.java
package com.tutorialspoint.first_spring_boot_example;

import org.springframework.boot.SpringApplication;
import org.springframework.boot.autoconfigure.SpringBootApplication;

@SpringBootApplication
public class FirstSpringBootTest {

   public static void main(String[] args) {
      System.out.println("Hello World, this is First Spring Boot Test");
      SpringApplication.run(FirstSpringBootTest.class, args);
   }
}
輸出
從專案資源管理器中,右鍵單擊檔案FirstSpringBootTest,然後以...方式執行 -> Java 應用程式。
在控制檯中,您將看到 -
Hello World, this is First Spring Boot Test
廣告