- Spring Boot 教程
- Spring Boot - 首頁
- Spring Boot - 簡介
- Spring Boot - 快速入門
- Spring Boot - 引導
- Spring Tool Suite
- Spring Boot - Tomcat 部署
- Spring Boot - 構建系統
- Spring Boot - 程式碼結構
- Spring Bean & 依賴注入
- Spring Boot - 執行器
- Spring Boot - 啟動器
- Spring Boot - 應用屬性
- Spring Boot - 配置
- Spring Boot - 註解
- Spring Boot - 日誌
- 構建 RESTful Web 服務
- Spring Boot - 異常處理
- Spring Boot - 攔截器
- Spring Boot - Servlet 過濾器
- Spring Boot - Tomcat 埠號
- Spring Boot - Rest 模板
- Spring Boot - 檔案處理
- Spring Boot - 服務元件
- Spring Boot - Thymeleaf
- 使用 RESTful Web 服務
- Spring Boot - CORS 支援
- Spring Boot - 國際化
- Spring Boot - 排程
- Spring Boot - 啟用 HTTPS
- Spring Boot - Eureka 伺服器
- 使用 Eureka 註冊服務
- 閘道器代理伺服器和路由
- Spring Cloud 配置伺服器
- Spring Cloud 配置客戶端
- Spring Boot - Actuator
- Spring Boot - Admin 伺服器
- Spring Boot - Admin 客戶端
- Spring Boot - 啟用 Swagger2
- Spring Boot - 使用 SpringDoc OpenAPI
- Spring Boot - 建立 Docker 映象
- 跟蹤微服務日誌
- Spring Boot - Flyway 資料庫
- Spring Boot - 傳送郵件
- Spring Boot - Hystrix
- Spring Boot - WebSocket
- Spring Boot - 批處理服務
- Spring Boot - Apache Kafka
- Spring Boot - Twilio
- Spring Boot - 單元測試用例
- Rest Controller 單元測試
- Spring Boot - 資料庫處理
- 保護 Web 應用程式
- Spring Boot - 使用 JWT 的 OAuth2
- Spring Boot - Google Cloud Platform
- Spring Boot - Google OAuth2 登入
- Spring Boot 資源
- Spring Boot - 快速指南
- Spring Boot - 有用資源
- Spring Boot - 討論
Spring Boot - 快速指南
Spring Boot - 簡介
Spring Boot 是一個開源的基於 Java 的框架,用於建立微服務。它由 Pivotal 團隊開發,用於構建獨立且可用於生產環境的 Spring 應用程式。本章將向您介紹 Spring Boot,並使您熟悉其基本概念。
什麼是微服務?
微服務是一種架構,它允許開發人員獨立地開發和部署服務。每個執行的服務都有自己的程序,從而實現了輕量級模型來支援業務應用程式。
優勢
微服務為其開發人員提供了以下優勢:
- 易於部署
- 簡單的可擴充套件性
- 相容容器
- 最小配置
- 縮短生產時間
什麼是 Spring Boot?
Spring Boot 為 Java 開發人員提供了一個良好的平臺來開發獨立且可用於生產環境的 Spring 應用程式,您可以直接執行。您可以以最少的配置開始,而無需進行完整的 Spring 配置設定。
優勢
Spring Boot 為其開發人員提供了以下優勢:
- 易於理解和開發 Spring 應用程式
- 提高生產力
- 縮短開發時間
目標
Spring Boot 的設計目標如下:
- 避免在 Spring 中使用複雜的 XML 配置
- 以更簡單的方式開發可用於生產環境的 Spring 應用程式
- 減少開發時間並獨立執行應用程式
- 提供一種更簡單的應用程式入門方式
為什麼選擇 Spring Boot?
您可以選擇 Spring Boot,因為它提供了以下功能和優勢:
它提供了一種靈活的方式來配置 Java Bean、XML 配置和資料庫事務。
它提供強大的批處理功能並管理 REST 端點。
在 Spring Boot 中,所有內容都自動配置;無需手動配置。
它提供基於註解的 Spring 應用程式
簡化依賴管理
它包含嵌入式 Servlet 容器
它是如何工作的?
Spring Boot 透過使用@EnableAutoConfiguration註解根據您新增到專案中的依賴項自動配置您的應用程式。例如,如果 MySQL 資料庫位於您的類路徑中,但您沒有配置任何資料庫連線,則 Spring Boot 會自動配置一個記憶體資料庫。
Spring Boot 應用程式的入口點是包含@SpringBootApplication註解和 main 方法的類。
Spring Boot 透過使用@ComponentScan註解自動掃描專案中包含的所有元件。
Spring Boot 啟動器
對於大型專案,處理依賴管理是一項艱鉅的任務。Spring Boot 透過為開發人員提供一組依賴項來解決此問題。
例如,如果您想使用 Spring 和 JPA 進行資料庫訪問,只需在您的專案中包含spring-boot-starter-data-jpa依賴項即可。
請注意,所有 Spring Boot 啟動器都遵循相同的命名模式spring-boot-starter- *,其中 * 表示應用程式的型別。
示例
為了更好地理解,請檢視以下 Spring Boot 啟動器的說明:
Spring Boot Starter Actuator 依賴項用於監控和管理您的應用程式。其程式碼如下所示:
<dependency>
   <groupId>org.springframework.boot</groupId>
   <artifactId>spring-boot-starter-actuator</artifactId>
</dependency>
Spring Boot Starter Security 依賴項用於 Spring Security。其程式碼如下所示:
<dependency>
   <groupId>org.springframework.boot</groupId>
   <artifactId>spring-boot-starter-security</artifactId>
</dependency>
Spring Boot Starter Web 依賴項用於編寫 Rest 端點。其程式碼如下所示:
<dependency>
   <groupId>org.springframework.boot</groupId>
   <artifactId>spring-boot-starter-web</artifactId>
</dependency>
Spring Boot Starter Thyme Leaf 依賴項用於建立 Web 應用程式。其程式碼如下所示:
<dependency>
   <groupId>org.springframework.boot</groupId>
   <artifactId>spring-boot-starter-thymeleaf</artifactId>
</dependency>
Spring Boot Starter Test 依賴項用於編寫測試用例。其程式碼如下所示:
<dependency>
   <groupId>org.springframework.boot</groupId>
   <artifactId>spring-boot-starter-test</artifactId>
</dependency>
自動配置
Spring Boot 自動配置根據您在專案中新增的 JAR 依賴項自動配置您的 Spring 應用程式。例如,如果 MySQL 資料庫位於您的類路徑中,但您沒有配置任何資料庫連線,則 Spring Boot 會自動配置一個記憶體資料庫。
為此,您需要在主類檔案中新增@EnableAutoConfiguration註解或@SpringBootApplication註解。然後,您的 Spring Boot 應用程式將自動配置。
觀察以下程式碼以更好地理解:
import org.springframework.boot.SpringApplication;
import org.springframework.boot.autoconfigure.EnableAutoConfiguration;

@EnableAutoConfiguration
public class DemoApplication {
   public static void main(String[] args) {
      SpringApplication.run(DemoApplication.class, args);
   }
}
Spring Boot 應用程式
Spring Boot 應用程式的入口點是包含@SpringBootApplication註解的類。此類應具有 main 方法以執行 Spring Boot 應用程式。@SpringBootApplication註解包括自動配置、元件掃描和 Spring Boot 配置。
如果您在類中添加了@SpringBootApplication註解,則無需新增@EnableAutoConfiguration、@ComponentScan和@SpringBootConfiguration註解。@SpringBootApplication註解包含所有其他註解。
觀察以下程式碼以更好地理解:
import org.springframework.boot.SpringApplication;
import org.springframework.boot.autoconfigure.SpringBootApplication;

@SpringBootApplication
public class DemoApplication {
   public static void main(String[] args) {
      SpringApplication.run(DemoApplication.class, args);
   }
}
元件掃描
Spring Boot 應用程式在應用程式初始化時掃描所有 bean 和包宣告。您需要為您的類檔案新增@ComponentScan註解以掃描您新增到專案中的元件。
觀察以下程式碼以更好地理解:
import org.springframework.boot.SpringApplication;
import org.springframework.context.annotation.ComponentScan;

@ComponentScan
public class DemoApplication {
   public static void main(String[] args) {
      SpringApplication.run(DemoApplication.class, args);
   }
}
Spring Boot - 快速入門
本章將教您如何使用 Maven 和 Gradle 建立 Spring Boot 應用程式。
先決條件
您的系統需要滿足以下最低要求才能建立 Spring Boot 應用程式:
- Java 7
- Maven 3.2
- Gradle 2.5
Spring Boot CLI
Spring Boot CLI 是一個命令列工具,它允許我們執行 Groovy 指令碼。這是使用 Spring Boot 命令列介面建立 Spring Boot 應用程式的最簡單方法。您可以在命令提示符本身建立、執行和測試應用程式。
本節說明 Spring Boot CLI 手動安裝的步驟。如需更多幫助,您可以使用以下連結:https://docs.springframework.tw/springboot/ docs/current-SNAPSHOT/reference/htmlsingle/#getting-started-installing-springboot
您也可以從 Spring 軟體儲存庫下載 Spring CLI 發行版:https://docs.springframework.tw/spring-boot/docs/current-SNAPSHOT/reference/htmlsingle/#getting-started-manual-cli-installation
對於手動安裝,您需要使用以下兩個資料夾:
spring-boot-cli-2.0.0.BUILD-SNAPSHOT-bin.zip
spring-boot-cli-2.0.0.BUILD-SNAPSHOT-bin.tar.gz
下載後,解壓縮存檔檔案並按照 install.txt 檔案中的步驟操作。請注意,它不需要任何環境設定。
在 Windows 中,轉到命令提示符中的 Spring Boot CLI bin 目錄並執行命令spring –-version以確保 Spring CLI 正確安裝。執行該命令後,您可以看到 Spring CLI 版本,如下所示:

使用 Groovy 執行 Hello World
建立一個簡單的 Groovy 檔案,其中包含 Rest 端點指令碼,並使用 Spring Boot CLI 執行該 Groovy 檔案。為此,請觀察此處顯示的程式碼:
@Controller
class Example {
   @RequestMapping("/")
   @ResponseBody
   public String hello() {
      "Hello Spring Boot"
   }
}
現在,將 Groovy 檔案儲存為hello.groovy。請注意,在此示例中,我們將 Groovy 檔案儲存在 Spring Boot CLI bin 目錄中。現在,使用命令spring run hello.groovy執行應用程式,如下面的螢幕截圖所示:

執行 Groovy 檔案後,所需的依賴項將自動下載,它將在 Tomcat 8080 埠啟動應用程式,如下面的螢幕截圖所示:

Tomcat 啟動後,轉到 Web 瀏覽器並訪問 URL https://:8080/,您將看到輸出,如下所示。

Spring Boot - 引導
本章將解釋如何在 Spring Boot 應用程式上執行引導。
Spring Initializer
啟動 Spring Boot 應用程式的一種方法是使用 Spring Initializer。為此,您需要訪問 Spring Initializer 網頁 www.start.spring.io 並選擇您的構建、Spring Boot 版本和平臺。此外,您需要提供一個 Group、Artifact 和執行應用程式所需的依賴項。
觀察以下螢幕截圖,其中顯示了一個示例,我們添加了spring-boot-starter-web依賴項來編寫 REST 端點。
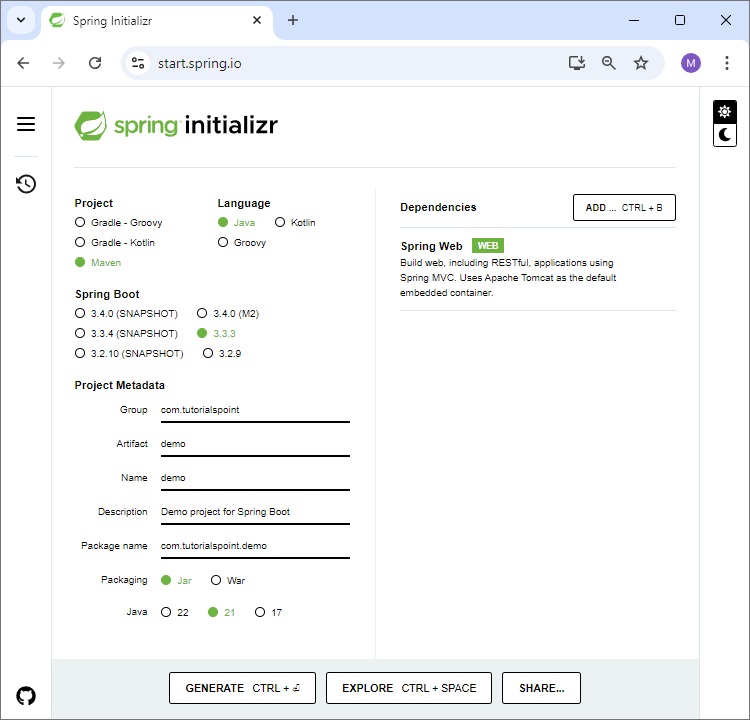
提供 Group、Artifact、依賴項、構建專案、平臺和版本後,單擊生成專案按鈕。zip 檔案將下載並解壓縮檔案。
本節將透過 Maven 和 Gradle 兩種方式向您解釋示例。
Maven
下載專案後,解壓縮檔案。現在,您的pom.xml檔案如下所示:
<?xml version = "1.0" encoding = "UTF-8"?>
<project xmlns = "http://maven.apache.org/POM/4.0.0"
   xmlns:xsi = "http://www.w3.org/2001/XMLSchema-instance"
   xsi:schemaLocation = "http://maven.apache.org/POM/4.0.0
   http://maven.apache.org/xsd/maven-4.0.0.xsd">

   <modelVersion>4.0.0</modelVersion>
   <groupId>com.tutorialspoint</groupId>
   <artifactId>demo</artifactId>
   <version>0.0.1-SNAPSHOT</version>
   <packaging>jar</packaging>

   <name>demo</name>
   <description>Demo project for Spring Boot</description>

   <parent>
      <groupId>org.springframework.boot</groupId>
      <artifactId>spring-boot-starter-parent</artifactId>
      <version>1.5.8.RELEASE</version>
      <relativePath/> <!-- lookup parent from repository -->
   </parent>

   <properties>
      <project.build.sourceEncoding>UTF-8</project.build.sourceEncoding>
      <project.reporting.outputEncoding>UTF-8</project.reporting.outputEncoding>
      <java.version>1.8</java.version>
   </properties>

   <dependencies>
      <dependency>
         <groupId>org.springframework.boot</groupId>
         <artifactId>spring-boot-starter-web</artifactId>
      </dependency>

      <dependency>
         <groupId>org.springframework.boot</groupId>
         <artifactId>spring-boot-starter-test</artifactId>
         <scope>test</scope>
      </dependency>
   </dependencies>

   <build>
      <plugins>
         <plugin>
            <groupId>org.springframework.boot</groupId>
            <artifactId>spring-boot-maven-plugin</artifactId>
         </plugin>
      </plugins>
   </build>

</project>
Gradle
下載專案後,解壓縮檔案。現在,您的build.gradle檔案如下所示:
buildscript {
   ext {
      springBootVersion = '1.5.8.RELEASE'
   }
   repositories {
      mavenCentral()
   }
   dependencies {
      classpath("org.springframework.boot:spring-boot-gradle-plugin:${springBootVersion}")
   }
}
apply plugin: 'java'
apply plugin: 'eclipse'
apply plugin: 'org.springframework.boot'

group = 'com.tutorialspoint'
version = '0.0.1-SNAPSHOT'
sourceCompatibility = 1.8

repositories {
   mavenCentral()
}
dependencies {
   compile('org.springframework.boot:spring-boot-starter-web')
   testCompile('org.springframework.boot:spring-boot-starter-test')
}
類路徑依賴項
Spring Boot 提供了許多啟動器來將 jar 新增到我們的類路徑中。例如,要編寫 Rest 端點,我們需要在我們的類路徑中新增spring-boot-starter-web依賴項。觀察下面顯示的程式碼以更好地理解:
Maven 依賴項
<dependencies>
   <dependency>
      <groupId>org.springframework.boot</groupId>
      <artifactId>spring-boot-starter-web</artifactId>
   </dependency>
</dependencies>
Gradle 依賴項
dependencies {
   compile('org.springframework.boot:spring-boot-starter-web')
}
主方法
主方法應該寫入 Spring Boot 應用程式類。此類應該用@SpringBootApplication進行註釋。這是 spring boot 應用程式的入口點以啟動。您可以在src/java/main目錄下的預設包中找到主類檔案。
在本例中,主類檔案位於src/java/main目錄下的預設包com.tutorialspoint.demo中。觀察此處顯示的程式碼以更好地理解:
package com.tutorialspoint.demo;

import org.springframework.boot.SpringApplication;
import org.springframework.boot.autoconfigure.SpringBootApplication;

@SpringBootApplication
public class DemoApplication {
   public static void main(String[] args) {
      SpringApplication.run(DemoApplication.class, args);
   }
}
編寫 REST 端點
要在 Spring Boot 應用程式主類檔案中編寫簡單的 Hello World REST 端點,請按照以下步驟操作:
首先,在類的頂部新增@RestController註釋。
現在,使用@RequestMapping註釋編寫一個請求 URI 方法。
然後,請求 URI 方法應返回Hello World字串。
現在,您的主 Spring Boot 應用程式類檔案將如下所示:
package com.tutorialspoint.demo;

import org.springframework.boot.SpringApplication;
import org.springframework.boot.autoconfigure.SpringBootApplication;
import org.springframework.web.bind.annotation.RequestMapping;
import org.springframework.web.bind.annotation.RestController;

@SpringBootApplication
@RestController

public class DemoApplication {
   public static void main(String[] args) {
      SpringApplication.run(DemoApplication.class, args);
   }
   @RequestMapping(value = "/")
   public String hello() {
      return "Hello World";
   }
}
建立可執行 JAR
讓我們建立一個可執行 JAR 檔案,以使用命令提示符中的 Maven 和 Gradle 命令執行 Spring Boot 應用程式,如下所示:
使用 Maven 命令 mvn clean install,如下所示:
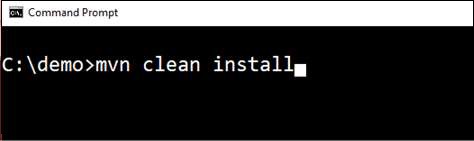
執行該命令後,您可以在命令提示符下看到BUILD SUCCESS訊息,如下所示:

使用 Gradle 命令gradle clean build,如下所示:

執行該命令後,您可以在命令提示符下看到BUILD SUCCESSFUL訊息,如下所示:

使用 Java 執行 Hello World
建立可執行 JAR 檔案後,您可以在以下目錄中找到它。
對於 Maven,您可以在 target 目錄下找到 JAR 檔案,如下所示:

對於 Gradle,您可以在build/libs目錄下找到 JAR 檔案,如下所示:

現在,使用命令java –jar <JARFILE>執行 JAR 檔案。請注意,在上面的示例中,JAR 檔名為demo-0.0.1-SNAPSHOT.jar

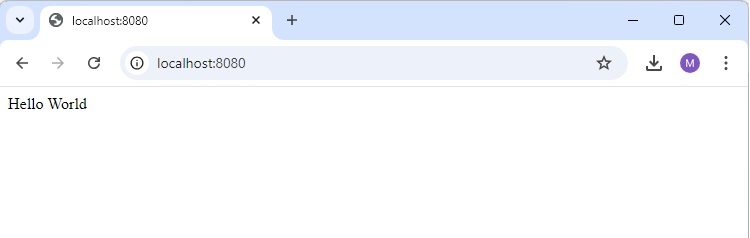
執行 jar 檔案後,您可以在控制檯視窗中看到輸出,如下所示:

現在,檢視控制檯,Tomcat 在埠 8080 (http) 上啟動。現在,轉到 Web 瀏覽器並點選 URLhttps://:8080/,您將看到如下所示的輸出:
Spring Boot - Tomcat 部署
使用 Spring Boot 應用程式,我們可以建立一個 war 檔案以部署到 Web 伺服器。在本章中,您將學習如何建立 WAR 檔案並在 Tomcat Web 伺服器中部署 Spring Boot 應用程式。
Spring Boot Servlet 初始化器
傳統的部署方式是使 Spring Boot 應用程式@SpringBootApplication類擴充套件SpringBootServletInitializer類。Spring Boot Servlet 初始化器類檔案允許您在使用 Servlet 容器啟動應用程式時配置應用程式。
JAR 檔案部署的 Spring Boot 應用程式類檔案的程式碼如下所示:
package com.tutorialspoint.demo;

import org.springframework.boot.SpringApplication;
import org.springframework.boot.autoconfigure.SpringBootApplication;

@SpringBootApplication
public class DemoApplication {
   public static void main(String[] args) {
      SpringApplication.run(DemoApplication.class, args);
   }
}
我們需要擴充套件類SpringBootServletInitializer以支援 WAR 檔案部署。Spring Boot 應用程式類檔案的程式碼如下所示:
package com.tutorialspoint.demo;

import org.springframework.boot.SpringApplication;
import org.springframework.boot.autoconfigure.SpringBootApplication;
import org.springframework.boot.builder.SpringApplicationBuilder;
import org.springframework.boot.web.servlet.support.SpringBootServletInitializer;

@SpringBootApplication
public class DemoApplication  extends SpringBootServletInitializer {
   @Override
   protected SpringApplicationBuilder configure(SpringApplicationBuilder application) {
      return application.sources(DemoApplication.class);
   }
   public static void main(String[] args) {
      SpringApplication.run(DemoApplication.class, args);
   }
}
設定主類
在 Spring Boot 中,我們需要提到應該在構建檔案中啟動的主類。為此,您可以使用以下程式碼段:
對於 Maven,在pom.xml屬性中新增啟動類,如下所示:
<start-class>com.tutorialspoint.demo.DemoApplication</start-class>
對於 Gradle,在 build.gradle 中新增主類名稱,如下所示:
mainClassName="com.tutorialspoint.demo.DemoApplication"
將打包 JAR 更新為 WAR
我們必須使用以下程式碼段將打包 JAR 更新為 WAR:
對於 Maven,在pom.xml中將打包新增為 WAR,如下所示:
<packaging>war</packaging>
對於 Gradle,在build.gradle中新增應用程式外掛和 war 外掛,如下所示:
apply plugin: ‘war’
apply plugin: ‘application’
現在,讓我們編寫一個簡單的 REST 端點來返回字串“Hello World from Tomcat”。要編寫 REST 端點,我們需要將 Spring Boot web 啟動器依賴項新增到我們的構建檔案中。
對於 Maven,使用如下所示的程式碼在 pom.xml 中新增 Spring Boot 啟動器依賴項:
<dependency>
   <groupId>org.springframework.boot</groupId>
   <artifactId>spring-boot-starter-web</artifactId>
</dependency>
對於 Gradle,使用如下所示的程式碼在build.gradle中新增 Spring Boot 啟動器依賴項:
dependencies {
   compile('org.springframework.boot:spring-boot-starter-web')
}
現在,在 Spring Boot 應用程式類檔案中使用如下所示的程式碼編寫一個簡單的 REST 端點:
package com.tutorialspoint.demo;

import org.springframework.boot.SpringApplication;
import org.springframework.boot.autoconfigure.SpringBootApplication;
import org.springframework.boot.builder.SpringApplicationBuilder;
import org.springframework.boot.web.servlet.support.SpringBootServletInitializer;
import org.springframework.web.bind.annotation.RequestMapping;
import org.springframework.web.bind.annotation.RestController;

@SpringBootApplication
@RestController
public class DemoApplication  extends SpringBootServletInitializer {
   @Override
   protected SpringApplicationBuilder configure(SpringApplicationBuilder application) {
      return application.sources(DemoApplication.class);
   }
   public static void main(String[] args) {
      SpringApplication.run(DemoApplication.class, args);
   }

   @RequestMapping(value = "/")
   public String hello() {
      return "Hello World from Tomcat";
   }
}
打包您的應用程式
現在,使用 Maven 和 Gradle 命令建立 WAR 檔案以部署到 Tomcat 伺服器,以打包您的應用程式,如下所示:
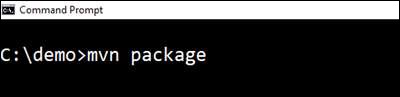
對於 Maven,使用命令mvn package打包您的應用程式。然後,將建立 WAR 檔案,您可以在 target 目錄中找到它,如下面的螢幕截圖所示:

對於 Gradle,使用命令gradle clean build打包您的應用程式。然後,將建立您的 WAR 檔案,您可以在build/libs目錄下找到它。觀察此處提供的螢幕截圖以更好地理解:

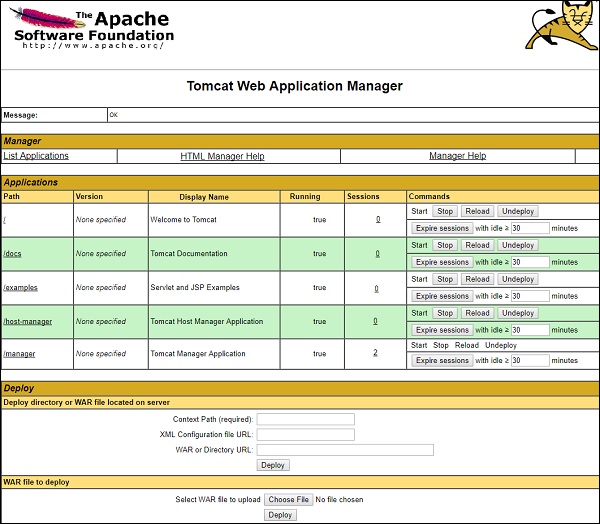
部署到 Tomcat
現在,執行 Tomcat 伺服器,並將 WAR 檔案部署到webapps目錄下。觀察此處顯示的螢幕截圖以更好地理解:

部署成功後,在 Web 瀏覽器中點選 URLhttps://:8080/demo-0.0.1-SNAPSHOT/,並觀察輸出將如下面的螢幕截圖所示:

此目的的完整程式碼如下所示。
pom.xml
<?xml version = "1.0" encoding = "UTF-8"?>
<project xmlns = "http://maven.apache.org/POM/4.0.0"
   xmlns:xsi = "http://www.w3.org/2001/XMLSchema-instance"

xsi:schemaLocation = "http://maven.apache.org/POM/4.0.0 http://maven.apache.org/xsd/maven-4.0.0.xsd">
<modelVersion>4.0.0</modelVersion>

   <groupId>com.tutorialspoint</groupId>
   <artifactId>demo</artifactId>
   <version>0.0.1-SNAPSHOT</version>
   <packaging>war</packaging>
   <name>demo</name>
   <description>Demo project for Spring Boot</description>

   <parent>
      <groupId>org.springframework.boot</groupId>
      <artifactId>spring-boot-starter-parent</artifactId>
      <version>1.5.8.RELEASE</version>
      <relativePath/> <!-- lookup parent from repository -->
   </parent>

   <properties>
      <project.build.sourceEncoding>UTF-8</project.build.sourceEncoding>
      <project.reporting.outputEncoding>UTF-8</project.reporting.outputEncoding>
      <java.version>1.8</java.version>
      <start-class>com.tutorialspoint.demo.DemoApplication</start-class>
   </properties>

   <dependencies>
      <dependency>
         <groupId>org.springframework.boot</groupId>
         <artifactId>spring-boot-starter-web</artifactId>
      </dependency>
      <dependency>
         <groupId>org.springframework.boot</groupId>
         <artifactId>spring-boot-starter-test</artifactId>
         <scope>test</scope>
      </dependency>
   </dependencies>

   <build>
      <plugins>
         <plugin>
            <groupId>org.springframework.boot</groupId>
            <artifactId>spring-boot-maven-plugin</artifactId>
         </plugin>
      </plugins>
   </build>

</project>
build.gradle
buildscript {
   ext {
      springBootVersion = '1.5.8.RELEASE'
   }
   repositories {
      mavenCentral()
   }
dependencies {
      classpath("org.springframework.boot:spring-boot-gradle-plugin:${springBootVersion}")
   }
}

apply plugin: 'java'
apply plugin: 'eclipse'
apply plugin: 'org.springframework.boot'
apply plugin: 'war'
apply plugin: 'application'

group = 'com.tutorialspoint'
version = '0.0.1-SNAPSHOT'
sourceCompatibility = 1.8
mainClassName = "com.tutorialspoint.demo.DemoApplication"

repositories {
   mavenCentral()
}
dependencies {
   compile('org.springframework.boot:spring-boot-starter-web')
   testCompile('org.springframework.boot:spring-boot-starter-test')
}
主 Spring Boot 應用程式類檔案的程式碼如下所示:
package com.tutorialspoint.demo;

import org.springframework.boot.SpringApplication;
import org.springframework.boot.autoconfigure.SpringBootApplication;
import org.springframework.boot.builder.SpringApplicationBuilder;
import org.springframework.boot.web.servlet.support.SpringBootServletInitializer;
import org.springframework.web.bind.annotation.RequestMapping;
import org.springframework.web.bind.annotation.RestController;

@SpringBootApplication
@RestController
public class DemoApplication  extends SpringBootServletInitializer {
   @Override
   protected SpringApplicationBuilder configure(SpringApplicationBuilder application) {
      return application.sources(DemoApplication.class);
   }
   public static void main(String[] args) {
      SpringApplication.run(DemoApplication.class, args);
   }

   @RequestMapping(value = "/")
   public String hello() {
      return "Hello World from Tomcat";
   }
}
Spring Boot - 構建系統
在 Spring Boot 中,選擇構建系統是一項重要的任務。我們推薦使用 Maven 或 Gradle,因為它們為依賴項管理提供了良好的支援。Spring 不太支援其他構建系統。
依賴項管理
Spring Boot 團隊提供了一系列依賴項來支援其每個版本的 Spring Boot 版本。您無需在構建配置檔案中提供依賴項的版本。Spring Boot 會根據版本自動配置依賴項版本。請記住,當您升級 Spring Boot 版本時,依賴項也會自動升級。
注意 - 如果您想為依賴項指定版本,您可以在配置檔案中指定它。但是,Spring Boot 團隊強烈建議無需為依賴項指定版本。
Maven 依賴項
對於 Maven 配置,我們應該繼承 Spring Boot Starter 父專案來管理 Spring Boot Starters 依賴項。為此,我們只需在pom.xml檔案中繼承啟動器父級,如下所示。
<parent>
   <groupId>org.springframework.boot</groupId>
   <artifactId>spring-boot-starter-parent</artifactId>
   <version>1.5.8.RELEASE</version>
</parent>
我們應該為 Spring Boot Parent Starter 依賴項指定版本號。然後對於其他啟動器依賴項,我們不需要指定 Spring Boot 版本號。觀察下面給出的程式碼:
<dependencies>
   <dependency>
      <groupId>org.springframework.boot</groupId>
      <artifactId>spring-boot-starter-web</artifactId>
   </dependency>
</dependencies>
Gradle 依賴項
我們可以直接將 Spring Boot Starters 依賴項匯入build.gradle檔案。我們不需要像 Maven 那樣為 Gradle 使用 Spring Boot 啟動父依賴項。觀察下面給出的程式碼:
buildscript {
   ext {
      springBootVersion = '1.5.8.RELEASE'
   }
   repositories {
      mavenCentral()
   }
   dependencies {
      classpath("org.springframework.boot:spring-boot-gradle-plugin:${springBootVersion}")
   }
}
同樣,在 Gradle 中,我們不需要為依賴項指定 Spring Boot 版本號。Spring Boot 會根據版本自動配置依賴項。
dependencies {
   compile('org.springframework.boot:spring-boot-starter-web')
}
Spring Boot - 程式碼結構
Spring Boot 沒有任何程式碼佈局可以一起使用。但是,有一些最佳實踐可以幫助我們。本章將詳細討論它們。
預設包
沒有包宣告的類被認為是預設包。請注意,通常不建議使用預設包宣告。當您使用預設包時,Spring Boot 會導致自動配置或元件掃描等問題。
注意 - Java 建議的包宣告命名約定是反向域名。例如 - com.tutorialspoint.myproject
典型佈局
Spring Boot 應用程式的典型佈局如下面的影像所示:

Application.java 檔案應宣告主方法以及 @SpringBootApplication。觀察下面給出的程式碼以更好地理解:
package com.tutorialspoint.myproject;

import org.springframework.boot.SpringApplication;
import org.springframework.boot.autoconfigure.SpringBootApplication;

@SpringBootApplication
public class Application {
   public static void main(String[] args) {SpringApplication.run(Application.class, args);}
}
Bean 和依賴注入
在 Spring Boot 中,我們可以使用 Spring Framework 來定義我們的 Bean 及其依賴注入。@ComponentScan註釋用於查詢 Bean,並使用@Autowired註釋進行相應的注入。
如果您遵循 Spring Boot 典型佈局,則無需為@ComponentScan註釋指定任何引數。所有元件類檔案都將自動註冊到 Spring Bean 中。
以下示例提供了有關自動連線 Rest Template 物件和為其建立 Bean 的想法:
@Bean
public RestTemplate getRestTemplate() {
   return new RestTemplate();
}
以下程式碼顯示了在主 Spring Boot 應用程式類檔案中自動連線 Rest Template 物件和 Bean 建立物件的程式碼:
package com.tutorialspoint.demo;

import org.springframework.beans.factory.annotation.Autowired;
import org.springframework.boot.SpringApplication;
import org.springframework.boot.autoconfigure.SpringBootApplication;
import org.springframework.context.annotation.Bean;
import org.springframework.web.client.RestTemplate;

@SpringBootApplication
public class DemoApplication {
@Autowired
   RestTemplate restTemplate;

   public static void main(String[] args) {
      SpringApplication.run(DemoApplication.class, args);
   }
   @Bean
   public RestTemplate getRestTemplate() {
      return new RestTemplate();
   }
}
Spring Boot - 執行器
Application Runner 和 Command Line Runner 介面允許您在 Spring Boot 應用程式啟動後執行程式碼。您可以使用這些介面在應用程式啟動後立即執行任何操作。本章將詳細討論它們。
Application Runner
Application Runner 是一個用於在 Spring Boot 應用程式啟動後執行程式碼的介面。以下示例顯示瞭如何在主類檔案上實現 Application Runner 介面。
package com.tutorialspoint.demo;

import org.springframework.boot.ApplicationArguments;
import org.springframework.boot.ApplicationRunner;
import org.springframework.boot.SpringApplication;
import org.springframework.boot.autoconfigure.SpringBootApplication;

@SpringBootApplication
public class DemoApplication implements ApplicationRunner {
   public static void main(String[] args) {
      SpringApplication.run(DemoApplication.class, args);
   }
   @Override
   public void run(ApplicationArguments arg0) throws Exception {
      System.out.println("Hello World from Application Runner");
   }
}
現在,如果您觀察控制檯視窗,在Hello World from Application Runner下方,println 語句在 Tomcat 啟動後執行。以下螢幕截圖是否相關?

Command Line Runner
Command Line Runner 是一個介面。它用於在 Spring Boot 應用程式啟動後執行程式碼。以下示例顯示瞭如何在主類檔案上實現 Command Line Runner 介面。
package com.tutorialspoint.demo;

import org.springframework.boot.CommandLineRunner;
import org.springframework.boot.SpringApplication;
import org.springframework.boot.autoconfigure.SpringBootApplication;

@SpringBootApplication
public class DemoApplication implements CommandLineRunner {
   public static void main(String[] args) {
      SpringApplication.run(DemoApplication.class, args);
   }
   @Override
   public void run(String... arg0) throws Exception {
      System.out.println("Hello world from Command Line Runner");
   }
}
檢視控制檯視窗,在“Hello world from Command Line Runner”println 語句在 Tomcat 啟動後執行。

Spring Boot - 應用屬性
Application Properties 支援我們在不同的環境中工作。在本章中,您將學習如何將屬性配置和指定到 Spring Boot 應用程式。
命令列屬性
Spring Boot 應用程式將命令列屬性轉換為 Spring Boot 環境屬性。命令列屬性優先於其他屬性源。預設情況下,Spring Boot 使用 8080 埠號啟動 Tomcat。讓我們學習如何使用命令列屬性更改埠號。
步驟 1 - 建立可執行 JAR 檔案後,使用命令java –jar <JARFILE>執行它。
步驟 2 - 使用下面給出的螢幕截圖中給出的命令,使用命令列屬性更改 Spring Boot 應用程式的埠號。

注意 - 您可以使用分隔符 - 提供多個應用程式屬性。
屬性檔案
屬性檔案用於在一個檔案中保留“N”個屬性,以便在不同的環境中執行應用程式。在 Spring Boot 中,屬性儲存在類路徑下的application.properties檔案中。
application.properties 檔案位於src/main/resources目錄中。示例application.properties檔案的程式碼如下所示:
server.port = 9090
spring.application.name = demoservice
請注意,在上面顯示的程式碼中,Spring Boot應用程式demoservice在埠9090上啟動。
YAML檔案
Spring Boot支援基於YAML的屬性配置來執行應用程式。我們可以使用application.yml檔案,而不是application.properties檔案。此YAML檔案也應儲存在類路徑中。下面給出了示例application.yml檔案:
spring:
   application:
      name: demoservice
   server:
port: 9090
外部化屬性
我們可以將屬性檔案儲存在不同的位置或路徑中,而不是將其儲存在類路徑下。在執行JAR檔案時,我們可以指定屬性檔案路徑。您可以使用以下命令在執行JAR時指定屬性檔案的位置:
-Dspring.config.location = C:\application.properties

使用@Value註解
@Value註解用於在Java程式碼中讀取環境或應用程式屬性值。讀取屬性值的語法如下所示:
@Value("${property_key_name}")
請檢視以下示例,該示例顯示了使用@Value註解在Java變數中讀取spring.application.name屬性值的語法。
@Value("${spring.application.name}")
請觀察以下程式碼以更好地理解:
import org.springframework.beans.factory.annotation.Value;
import org.springframework.boot.SpringApplication;
import org.springframework.boot.autoconfigure.SpringBootApplication;
import org.springframework.web.bind.annotation.RequestMapping;
import org.springframework.web.bind.annotation.RestController;

@SpringBootApplication
@RestController
public class DemoApplication {
   @Value("${spring.application.name}")
   private String name;
   public static void main(String[] args) {
      SpringApplication.run(DemoApplication.class, args);
   }
   @RequestMapping(value = "/")
   public String name() {
      return name;
   }
}
注意 - 如果在執行應用程式時找不到該屬性,則Spring Boot會丟擲IllegalArgument異常,例如Could not resolve placeholder 'spring.application.name' in value "${spring.application.name}"。
為了解決佔位符問題,我們可以使用以下語法設定屬性的預設值:
@Value("${property_key_name:default_value}")

@Value("${spring.application.name:demoservice}")
Spring Boot活動配置檔案
Spring Boot根據Spring活動配置檔案支援不同的屬性。例如,我們可以為開發和生產環境保留兩個單獨的檔案來執行Spring Boot應用程式。
application.properties中的Spring活動配置檔案
讓我們瞭解如何在application.properties中使用Spring活動配置檔案。預設情況下,將使用application.properties來執行Spring Boot應用程式。如果要使用基於配置檔案的屬性,我們可以為每個配置檔案保留單獨的屬性檔案,如下所示:
application.properties
server.port = 8080
spring.application.name = demoservice
application-dev.properties
server.port = 9090
spring.application.name = demoservice
application-prod.properties
server.port = 4431
spring.application.name = demoservice
在執行JAR檔案時,我們需要根據每個屬性檔案指定Spring活動配置檔案。預設情況下,Spring Boot應用程式使用application.properties檔案。設定Spring活動配置檔案的命令如下所示:

您可以在控制檯日誌中看到活動配置檔名稱,如下所示:
2017-11-26 08:13:16.322  INFO 14028 --- [
   main] com.tutorialspoint.demo.DemoApplication  :
   The following profiles are active: dev
現在,Tomcat已在埠9090(http)上啟動,如下所示:
2017-11-26 08:13:20.185  INFO 14028 --- [
   main] s.b.c.e.t.TomcatEmbeddedServletContainer :
   Tomcat started on port(s): 9090 (http)
您可以設定生產活動配置檔案,如下所示:

您可以在控制檯日誌中看到活動配置檔名稱,如下所示:
2017-11-26 08:13:16.322  INFO 14028 --- [
   main] com.tutorialspoint.demo.DemoApplication  :
   The following profiles are active: prod
現在,Tomcat已在埠4431(http)上啟動,如下所示:
2017-11-26 08:13:20.185  INFO 14028 --- [
   main] s.b.c.e.t.TomcatEmbeddedServletContainer :
   Tomcat started on port(s): 4431 (http)
application.yml的Spring活動配置檔案
讓我們瞭解如何在application.yml中保留Spring活動配置檔案。我們可以在單個application.yml檔案中保留Spring活動配置檔案屬性。無需像application.properties那樣使用單獨的檔案。
以下是在application.yml檔案中保留Spring活動配置檔案的示例程式碼。請注意,分隔符(---)用於分隔application.yml檔案中每個配置檔案。
spring:
   application:
      name: demoservice
server:
   port: 8080

---
spring:
   profiles: dev
   application:
      name: demoservice
server:
   port: 9090

---
spring:
   profiles: prod
   application:
      name: demoservice
server:
   port: 4431
設定開發活動配置檔案的命令如下所示:
您可以在控制檯日誌中看到活動配置檔名稱,如下所示:
2017-11-26 08:41:37.202  INFO 14104 --- [
   main] com.tutorialspoint.demo.DemoApplication  :
   The following profiles are active: dev
現在,Tomcat已在埠9090(http)上啟動,如下所示:
2017-11-26 08:41:46.650  INFO 14104 --- [
   main] s.b.c.e.t.TomcatEmbeddedServletContainer :
   Tomcat started on port(s): 9090 (http)
設定生產活動配置檔案的命令如下所示:
您可以在控制檯日誌中看到活動配置檔名稱,如下所示:
2017-11-26 08:43:10.743  INFO 13400 --- [
   main] com.tutorialspoint.demo.DemoApplication  :
   The following profiles are active: prod
這將啟動Tomcat在埠4431(http)上,如下所示
2017-11-26 08:43:14.473  INFO 13400 --- [
   main] s.b.c.e.t.TomcatEmbeddedServletContainer :
   Tomcat started on port(s): 4431 (http)
Spring Boot - 日誌
Spring Boot使用Apache Commons logging進行所有內部日誌記錄。Spring Boot的預設配置提供了對使用Java Util Logging、Log4j2和Logback的支援。使用這些,我們可以配置控制檯日誌記錄以及檔案日誌記錄。
如果您使用的是Spring Boot Starters,則Logback將為日誌記錄提供良好的支援。此外,Logback還提供了對Common Logging、Util Logging、Log4J和SLF4J的良好支援。
日誌格式
預設的Spring Boot日誌格式顯示在下面給出的螢幕截圖中。

它為您提供以下資訊:
日期和時間,提供日誌的日期和時間
日誌級別顯示INFO、ERROR或WARN
程序ID
---,這是一個分隔符
執行緒名稱用方括號[]括起來
日誌記錄器名稱,顯示源類名
日誌訊息
控制檯日誌輸出
預設的日誌訊息將列印到控制檯視窗。預設情況下,“INFO”、“ERROR”和“WARN”日誌訊息將列印到日誌檔案中。
如果必須啟用除錯級別日誌,請在啟動應用程式時新增除錯標誌,使用以下命令:
java –jar demo.jar --debug
您還可以將除錯模式新增到application.properties檔案中,如下所示:
debug = true
檔案日誌輸出
預設情況下,所有日誌都將列印到控制檯視窗,而不是檔案中。如果要將日誌列印到檔案中,則需要在application.properties檔案中設定logging.file或logging.path屬性。
您可以使用以下屬性指定日誌檔案路徑。請注意,日誌檔名是spring.log。
logging.path = /var/tmp/
您可以使用以下屬性指定自己的日誌檔名:
logging.file = /var/tmp/mylog.log
注意 - 檔案在達到10 MB大小時會自動輪換。
日誌級別
Spring Boot支援所有日誌記錄器級別,例如“TRACE”、“DEBUG”、“INFO”、“WARN”、“ERROR”、“FATAL”、“OFF”。您可以在application.properties檔案中定義根日誌記錄器,如下所示:
logging.level.root = WARN
注意 - Logback不支援“FATAL”級別日誌。它對映到“ERROR”級別日誌。
配置Logback
Logback支援基於XML的配置來處理Spring Boot日誌配置。日誌配置詳細資訊在logback.xml檔案中配置。logback.xml檔案應放在類路徑下。
您可以使用以下程式碼在Logback.xml檔案中配置ROOT級別日誌:
<?xml version = "1.0" encoding = "UTF-8"?>
<configuration>
   <root level = "INFO">
   </root>
</configuration>
您可以在下面給出的Logback.xml檔案中配置控制檯附加程式。
<?xml version = "1.0" encoding = "UTF-8"?>
<configuration>
   <appender name = "STDOUT" class = "ch.qos.logback.core.ConsoleAppender"></appender>
   <root level = "INFO">
      <appender-ref ref = "STDOUT"/>
   </root>
</configuration>
您可以使用以下程式碼在Logback.xml檔案中配置檔案附加程式。請注意,您需要在檔案附加程式中指定日誌檔案路徑。
<?xml version = "1.0" encoding = "UTF-8"?>
<configuration>
   <appender name = "FILE" class = "ch.qos.logback.core.FileAppender">
      <File>/var/tmp/mylog.log</File>
   </appender>
   <root level = "INFO">
      <appender-ref ref = "FILE"/>
   </root>
</configuration>
您可以在logback.xml檔案中使用以下程式碼定義日誌模式。您還可以使用以下程式碼在控制檯或檔案日誌附加程式中定義一組支援的日誌模式:
<pattern>[%d{yyyy-MM-dd'T'HH:mm:ss.sss'Z'}] [%C] [%t] [%L] [%-5p] %m%n</pattern>
完整logback.xml檔案的程式碼如下所示。您必須將其放在類路徑中。
<?xml version = "1.0" encoding = "UTF-8"?>
<configuration>
   <appender name = "STDOUT" class = "ch.qos.logback.core.ConsoleAppender">
      <encoder>
         <pattern>[%d{yyyy-MM-dd'T'HH:mm:ss.sss'Z'}] [%C] [%t] [%L] [%-5p] %m%n</pattern>
      </encoder>
   </appender>

   <appender name = "FILE" class = "ch.qos.logback.core.FileAppender">
      <File>/var/tmp/mylog.log</File>
      <encoder>
         <pattern>[%d{yyyy-MM-dd'T'HH:mm:ss.sss'Z'}] [%C] [%t] [%L] [%-5p] %m%n</pattern>
      </encoder>
   </appender>

   <root level = "INFO">
      <appender-ref ref = "FILE"/>
      <appender-ref ref = "STDOUT"/>
   </root>
</configuration>
以下程式碼顯示瞭如何在Spring Boot主類檔案中新增slf4j日誌記錄器。
package com.tutorialspoint.demo;

import org.slf4j.Logger;
import org.slf4j.LoggerFactory;
import org.springframework.boot.SpringApplication;
import org.springframework.boot.autoconfigure.SpringBootApplication;

@SpringBootApplication
public class DemoApplication {
   private static final Logger logger = LoggerFactory.getLogger(DemoApplication.class);

   public static void main(String[] args) {
      logger.info("this is a info message");
      logger.warn("this is a warn message");
      logger.error("this is a error message");
      SpringApplication.run(DemoApplication.class, args);
   }
}
您可以在控制檯視窗中看到的輸出顯示在此處:

您可以在日誌檔案中看到的輸出顯示在此處:

Spring Boot - 構建RESTful Web服務
Spring Boot為企業應用程式構建RESTful Web服務提供了非常好的支援。本章將詳細解釋如何使用Spring Boot構建RESTful Web服務。
注意 - 為了構建RESTful Web服務,我們需要將Spring Boot Starter Web依賴項新增到構建配置檔案中。
如果您是Maven使用者,請使用以下程式碼將以下依賴項新增到您的pom.xml檔案中:
<dependency>
   <groupId>org.springframework.boot</groupId>
   <artifactId>spring-boot-starter-web</artifactId>
</dependency>
如果您是Gradle使用者,請使用以下程式碼將以下依賴項新增到您的build.gradle檔案中。
compile('org.springframework.boot:spring-boot-starter-web')
完整構建配置檔案Maven構建 – pom.xml的程式碼如下所示:
<?xml version = "1.0" encoding = "UTF-8"?>
<project xmlns = "http://maven.apache.org/POM/4.0.0"
   xmlns:xsi = "http://www.w3.org/2001/XMLSchema-instance"
   xsi:schemaLocation = "http://maven.apache.org/POM/4.0.0
   http://maven.apache.org/xsd/maven-4.0.0.xsd">

   <modelVersion>4.0.0</modelVersion>
   <groupId>com.tutorialspoint</groupId>
   <artifactId>demo</artifactId>
   <version>0.0.1-SNAPSHOT</version>
   <packaging>jar</packaging>
   <name>demo</name>
   <description>Demo project for Spring Boot</description>

   <parent>
      <groupId>org.springframework.boot</groupId>
      <artifactId>spring-boot-starter-parent</artifactId>
      <version>1.5.8.RELEASE</version>
      <relativePath/>
   </parent>

   <properties>
      <project.build.sourceEncoding>UTF-8</project.build.sourceEncoding>
      <project.reporting.outputEncoding>UTF-8</project.reporting.outputEncoding>
      <java.version>1.8</java.version>
   </properties>

   <dependencies>
      <dependency>
         <groupId>org.springframework.boot</groupId>
         <artifactId>spring-boot-starter-web</artifactId>
      </dependency>
      <dependency>
         <groupId>org.springframework.boot</groupId>
         <artifactId>spring-boot-starter-test</artifactId>
         <scope>test</scope>
      </dependency>
   </dependencies>

   <build>
      <plugins>
         <plugin>
            <groupId>org.springframework.boot</groupId>
            <artifactId>spring-boot-maven-plugin</artifactId>
         </plugin>
      </plugins>
   </build>

</project>
完整構建配置檔案Gradle構建 – build.gradle的程式碼如下所示:
buildscript {
   ext {
      springBootVersion = '1.5.8.RELEASE'
   }
   repositories {
      mavenCentral()
   }
   dependencies {
      classpath("org.springframework.boot:spring-boot-gradle-plugin:${springBootVersion}")
   }
}

apply plugin: 'java'
apply plugin: 'eclipse'
apply plugin: 'org.springframework.boot'

group = 'com.tutorialspoint'
version = '0.0.1-SNAPSHOT'
sourceCompatibility = 1.8

repositories {
   mavenCentral()
}
dependencies {
   compile('org.springframework.boot:spring-boot-starter-web')
   testCompile('org.springframework.boot:spring-boot-starter-test')
}
在繼續構建RESTful Web服務之前,建議您瞭解以下註解:
Rest控制器
@RestController註解用於定義RESTful Web服務。它提供JSON、XML和自定義響應。其語法如下所示:
@RestController
public class ProductServiceController {
}
請求對映
@RequestMapping註解用於定義訪問REST端點的請求URI。我們可以定義請求方法來使用和生成物件。預設請求方法是GET。
@RequestMapping(value = "/products")
public ResponseEntity<Object> getProducts() { }
請求體
@RequestBody註解用於定義請求體內容型別。
public ResponseEntity<Object> createProduct(@RequestBody Product product) {
}
路徑變數
@PathVariable註解用於定義自定義或動態請求URI。請求URI中的路徑變數定義為花括號{},如下所示:
public ResponseEntity<Object> updateProduct(@PathVariable("id") String id) {
}
請求引數
@RequestParam註解用於從請求URL讀取請求引數。預設情況下,它是一個必需的引數。我們也可以為請求引數設定預設值,如下所示:
public ResponseEntity<Object> getProduct(
   @RequestParam(value = "name", required = false, defaultValue = "honey") String name) {
}
GET API
預設的HTTP請求方法是GET。此方法不需要任何請求體。您可以傳送請求引數和路徑變數來定義自定義或動態URL。
下面顯示了定義HTTP GET請求方法的示例程式碼。在此示例中,我們使用HashMap儲存Product。請注意,我們使用POJO類作為要儲存的產品。
此處,請求URI為/products,它將從HashMap儲存庫返回產品列表。以下是包含GET方法REST端點的控制器類檔案。
package com.tutorialspoint.demo.controller;

import java.util.HashMap;
import java.util.Map;

import org.springframework.http.HttpStatus;
import org.springframework.http.ResponseEntity;
import org.springframework.web.bind.annotation.RequestMapping;
import org.springframework.web.bind.annotation.RestController;

import com.tutorialspoint.demo.model.Product;

@RestController
public class ProductServiceController {
   private static Map<String, Product> productRepo = new HashMap<>();
   static {
      Product honey = new Product();
      honey.setId("1");
      honey.setName("Honey");
      productRepo.put(honey.getId(), honey);

      Product almond = new Product();
      almond.setId("2");
      almond.setName("Almond");
      productRepo.put(almond.getId(), almond);
   }
   @RequestMapping(value = "/products")
   public ResponseEntity<Object> getProduct() {
      return new ResponseEntity<>(productRepo.values(), HttpStatus.OK);
   }
}
POST API
HTTP POST請求用於建立資源。此方法包含請求體。我們可以傳送請求引數和路徑變數來定義自定義或動態URL。
以下示例顯示了定義HTTP POST請求方法的示例程式碼。在此示例中,我們使用HashMap儲存Product,其中Product是POJO類。
此處,請求URI為/products,它將在將產品儲存到HashMap儲存庫後返回字串。
package com.tutorialspoint.demo.controller;

import java.util.HashMap;
import java.util.Map;

import org.springframework.http.HttpStatus;
import org.springframework.http.ResponseEntity;
import org.springframework.web.bind.annotation.RequestBody;
import org.springframework.web.bind.annotation.RequestMapping;
import org.springframework.web.bind.annotation.RequestMethod;
import org.springframework.web.bind.annotation.RestController;

import com.tutorialspoint.demo.model.Product;

@RestController
public class ProductServiceController {
   private static Map<String, Product> productRepo = new HashMap<>();

   @RequestMapping(value = "/products", method = RequestMethod.POST)
   public ResponseEntity<Object> createProduct(@RequestBody Product product) {
      productRepo.put(product.getId(), product);
      return new ResponseEntity<>("Product is created successfully", HttpStatus.CREATED);
   }
}
PUT API
HTTP PUT請求用於更新現有資源。此方法包含請求體。我們可以傳送請求引數和路徑變數來定義自定義或動態URL。
以下示例顯示瞭如何定義HTTP PUT請求方法。在此示例中,我們使用HashMap更新現有的Product,其中Product是POJO類。
此處,請求URI為/products/{id},它將在將產品新增到HashMap儲存庫後返回字串。請注意,我們使用了路徑變數{id},它定義了需要更新的產品ID。
package com.tutorialspoint.demo.controller;

import java.util.HashMap;
import java.util.Map;

import org.springframework.http.HttpStatus;
import org.springframework.http.ResponseEntity;
import org.springframework.web.bind.annotation.PathVariable;
import org.springframework.web.bind.annotation.RequestBody;
import org.springframework.web.bind.annotation.RequestMapping;
import org.springframework.web.bind.annotation.RequestMethod;
import org.springframework.web.bind.annotation.RestController;
import com.tutorialspoint.demo.model.Product;

@RestController
public class ProductServiceController {
   private static Map<String, Product> productRepo = new HashMap<>();

   @RequestMapping(value = "/products/{id}", method = RequestMethod.PUT)
   public ResponseEntity<Object> updateProduct(@PathVariable("id") String id, @RequestBody Product product) {
      productRepo.remove(id);
      product.setId(id);
      productRepo.put(id, product);
      return new ResponseEntity<>("Product is updated successsfully", HttpStatus.OK);
   }
}
DELETE API
HTTP Delete請求用於刪除現有資源。此方法不包含任何請求體。我們可以傳送請求引數和路徑變數來定義自定義或動態URL。
以下示例顯示瞭如何定義HTTP DELETE請求方法。在此示例中,我們使用HashMap刪除現有的產品,它是一個POJO類。
請求URI為/products/{id},它將在從HashMap儲存庫刪除產品後返回字串。我們使用了路徑變數{id},它定義了需要刪除的產品ID。
package com.tutorialspoint.demo.controller;

import java.util.HashMap;
import java.util.Map;

import org.springframework.http.HttpStatus;
import org.springframework.http.ResponseEntity;
import org.springframework.web.bind.annotation.PathVariable;
import org.springframework.web.bind.annotation.RequestBody;
import org.springframework.web.bind.annotation.RequestMapping;
import org.springframework.web.bind.annotation.RequestMethod;
import org.springframework.web.bind.annotation.RestController;

import com.tutorialspoint.demo.model.Product;

@RestController
public class ProductServiceController {
   private static Map<String, Product> productRepo = new HashMap<>();

   @RequestMapping(value = "/products/{id}", method = RequestMethod.DELETE)
   public ResponseEntity<Object> delete(@PathVariable("id") String id) {
      productRepo.remove(id);
      return new ResponseEntity<>("Product is deleted successsfully", HttpStatus.OK);
   }
}
本節為您提供了完整的原始碼集。請觀察以下程式碼及其各自的功能:
Spring Boot主應用程式類 – DemoApplication.java
package com.tutorialspoint.demo;

import org.springframework.boot.SpringApplication;
import org.springframework.boot.autoconfigure.SpringBootApplication;

@SpringBootApplication
public class DemoApplication {
   public static void main(String[] args) {
      SpringApplication.run(DemoApplication.class, args);
   }
}
POJO類 – Product.java
package com.tutorialspoint.demo.model;

public class Product {
   private String id;
   private String name;

   public String getId() {
      return id;
   }
   public void setId(String id) {
      this.id = id;
   }
   public String getName() {
      return name;
   }
   public void setName(String name) {
      this.name = name;
   }
}
Rest控制器類 – ProductServiceController.java
package com.tutorialspoint.demo.controller;

import java.util.HashMap;
import java.util.Map;

import org.springframework.http.HttpStatus;
import org.springframework.http.ResponseEntity;
import org.springframework.web.bind.annotation.PathVariable;
import org.springframework.web.bind.annotation.RequestBody;
import org.springframework.web.bind.annotation.RequestMapping;
import org.springframework.web.bind.annotation.RequestMethod;
import org.springframework.web.bind.annotation.RestController;

import com.tutorialspoint.demo.model.Product;

@RestController
public class ProductServiceController {
   private static Map<String, Product> productRepo = new HashMap<>();
   static {
      Product honey = new Product();
      honey.setId("1");
      honey.setName("Honey");
      productRepo.put(honey.getId(), honey);

      Product almond = new Product();
      almond.setId("2");
      almond.setName("Almond");
      productRepo.put(almond.getId(), almond);
   }

   @RequestMapping(value = "/products/{id}", method = RequestMethod.DELETE)
   public ResponseEntity<Object> delete(@PathVariable("id") String id) {
      productRepo.remove(id);
      return new ResponseEntity<>("Product is deleted successsfully", HttpStatus.OK);
   }

   @RequestMapping(value = "/products/{id}", method = RequestMethod.PUT)
   public ResponseEntity<Object> updateProduct(@PathVariable("id") String id, @RequestBody Product product) {
      productRepo.remove(id);
      product.setId(id);
      productRepo.put(id, product);
      return new ResponseEntity<>("Product is updated successsfully", HttpStatus.OK);
   }

   @RequestMapping(value = "/products", method = RequestMethod.POST)
   public ResponseEntity<Object> createProduct(@RequestBody Product product) {
      productRepo.put(product.getId(), product);
      return new ResponseEntity<>("Product is created successfully", HttpStatus.CREATED);
   }

   @RequestMapping(value = "/products")
   public ResponseEntity<Object> getProduct() {
      return new ResponseEntity<>(productRepo.values(), HttpStatus.OK);
   }
}
您可以建立一個可執行的JAR檔案,並使用以下Maven或Gradle命令執行Spring Boot應用程式,如下所示:
對於Maven,請使用以下命令:
mvn clean install
在“BUILD SUCCESS”之後,您可以在target目錄下找到JAR檔案。
對於Gradle,請使用以下命令:
gradle clean build
在“BUILD SUCCESSFUL”之後,您可以在build/libs目錄下找到JAR檔案。
您可以使用以下命令執行JAR檔案:
java –jar <JARFILE>
這將在Tomcat埠8080上啟動應用程式,如下所示:

現在在POSTMAN應用程式中點選以下URL並檢視輸出。
GET API URL為:https://:8080/products
POST API URL為:https://:8080/products

PUT API URL為:https://:8080/products/3

DELETE API URL為:https://:8080/products/3

Spring Boot - 異常處理
在API中處理異常和錯誤並向客戶端傳送正確的響應對於企業應用程式來說非常重要。在本章中,我們將學習如何在Spring Boot中處理異常。
在繼續進行異常處理之前,讓我們瞭解以下註解。
控制器建議
@ControllerAdvice 是一個註解,用於全域性處理異常。
異常處理器
@ExceptionHandler 是一個註解,用於處理特定的異常並向客戶端傳送自定義響應。
您可以使用以下程式碼建立 @ControllerAdvice 類來全域性處理異常:
package com.tutorialspoint.demo.exception;

import org.springframework.web.bind.annotation.ControllerAdvice;

@ControllerAdvice
   public class ProductExceptionController {
}
定義一個擴充套件 RuntimeException 類的類。
package com.tutorialspoint.demo.exception;

public class ProductNotfoundException extends RuntimeException {
   private static final long serialVersionUID = 1L;
}
您可以定義 @ExceptionHandler 方法來處理異常,如所示。此方法應用於編寫 Controller Advice 類檔案。
@ExceptionHandler(value = ProductNotfoundException.class)

public ResponseEntity<Object> exception(ProductNotfoundException exception) {
}
現在,使用下面給出的程式碼從 API 中丟擲異常。
@RequestMapping(value = "/products/{id}", method = RequestMethod.PUT)
public ResponseEntity<Object> updateProduct() {
   throw new ProductNotfoundException();
}
處理異常的完整程式碼如下所示。在此示例中,我們使用 PUT API 更新產品。在此,在更新產品時,如果找不到產品,則返回響應錯誤訊息“產品未找到”。請注意,**ProductNotFoundException** 異常類應擴充套件 **RuntimeException**。
package com.tutorialspoint.demo.exception;
public class ProductNotfoundException extends RuntimeException {
   private static final long serialVersionUID = 1L;
}
全域性處理異常的 Controller Advice 類如下所示。我們可以在此類檔案中定義任何異常處理程式方法。
package com.tutorialspoint.demo.exception;

import org.springframework.http.HttpStatus;
import org.springframework.http.ResponseEntity;
import org.springframework.web.bind.annotation.ControllerAdvice;
import org.springframework.web.bind.annotation.ExceptionHandler;

@ControllerAdvice
public class ProductExceptionController {
   @ExceptionHandler(value = ProductNotfoundException.class)
   public ResponseEntity<Object> exception(ProductNotfoundException exception) {
      return new ResponseEntity<>("Product not found", HttpStatus.NOT_FOUND);
   }
}
產品服務 API 控制器檔案如下所示,用於更新產品。如果找不到產品,則會丟擲 **ProductNotFoundException** 類。
package com.tutorialspoint.demo.controller;

import java.util.HashMap;
import java.util.Map;

import org.springframework.http.HttpStatus;
import org.springframework.http.ResponseEntity;
import org.springframework.web.bind.annotation.PathVariable;
import org.springframework.web.bind.annotation.RequestBody;
import org.springframework.web.bind.annotation.RequestMapping;
import org.springframework.web.bind.annotation.RequestMethod;
import org.springframework.web.bind.annotation.RestController;

import com.tutorialspoint.demo.exception.ProductNotfoundException;
import com.tutorialspoint.demo.model.Product;

@RestController
public class ProductServiceController {
   private static Map<String, Product> productRepo = new HashMap<>();
   static {
      Product honey = new Product();
      honey.setId("1");
      honey.setName("Honey");
      productRepo.put(honey.getId(), honey);

      Product almond = new Product();
      almond.setId("2");
      almond.setName("Almond");
      productRepo.put(almond.getId(), almond);
   }

   @RequestMapping(value = "/products/{id}", method = RequestMethod.PUT)
   public ResponseEntity<Object> updateProduct(@PathVariable("id") String id, @RequestBody Product product) {
      if(!productRepo.containsKey(id))throw new ProductNotfoundException();
      productRepo.remove(id);
      product.setId(id);
      productRepo.put(id, product);
      return new ResponseEntity<>("Product is updated successfully", HttpStatus.OK);
   }
}
主 Spring Boot 應用程式類檔案的程式碼如下所示:
package com.tutorialspoint.demo;

import org.springframework.boot.SpringApplication;
import org.springframework.boot.autoconfigure.SpringBootApplication;

@SpringBootApplication
public class DemoApplication {
   public static void main(String[] args) {
      SpringApplication.run(DemoApplication.class, args);
   }
}
產品 POJO 類的程式碼如下所示:
package com.tutorialspoint.demo.model;
public class Product {
   private String id;
   private String name;

   public String getId() {
      return id;
   }
   public void setId(String id) {
      this.id = id;
   }
   public String getName() {
      return name;
   }
   public void setName(String name) {
      this.name = name;
   }
}
Maven 構建 - pom.xml 的程式碼如下所示:
<?xml version = "1.0" encoding = "UTF-8"?>
<project xmlns = "http://maven.apache.org/POM/4.0.0"
   xmlns:xsi = "http://www.w3.org/2001/XMLSchema-instance"
   xsi:schemaLocation = "http://maven.apache.org/POM/4.0.0
   http://maven.apache.org/xsd/maven-4.0.0.xsd">

   <modelVersion>4.0.0</modelVersion>
   <groupId>com.tutorialspoint</groupId>
   <artifactId>demo</artifactId>
   <version>0.0.1-SNAPSHOT</version>
   <packaging>jar</packaging>
   <name>demo</name>
   <description>Demo project for Spring Boot</description>

   <parent>
      <groupId>org.springframework.boot</groupId>
      <artifactId>spring-boot-starter-parent</artifactId>
      <version>1.5.8.RELEASE</version>
      <relativePath/>
   </parent>

   <properties>
      <project.build.sourceEncoding>UTF-8</project.build.sourceEncoding>
      <project.reporting.outputEncoding>UTF-8</project.reporting.outputEncoding>
      <java.version>1.8</java.version>
   </properties>

   <dependencies>
      <dependency>
         <groupId>org.springframework.boot</groupId>
         <artifactId>spring-boot-starter-web</artifactId>
      </dependency>
      <dependency>
         <groupId>org.springframework.boot</groupId>
         <artifactId>spring-boot-starter-test</artifactId>
         <scope>test</scope>
      </dependency>
   </dependencies>

   <build>
      <plugins>
         <plugin>
            <groupId>org.springframework.boot</groupId>
            <artifactId>spring-boot-maven-plugin</artifactId>
         </plugin>
      </plugins>
   </build>

</project>
Gradle 構建 - build.gradle 的程式碼如下所示:
buildscript {
   ext {
      springBootVersion = '1.5.8.RELEASE'
   }
   repositories {
      mavenCentral()
   }
   dependencies {
      classpath("org.springframework.boot:spring-boot-gradle-plugin:${springBootVersion}")
   }
}
apply plugin: 'java'
apply plugin: 'eclipse'
apply plugin: 'org.springframework.boot'

group = 'com.tutorialspoint'
version = '0.0.1-SNAPSHOT'
sourceCompatibility = 1.8

repositories {
   mavenCentral()
}
dependencies {
   compile('org.springframework.boot:spring-boot-starter-web')
   testCompile('org.springframework.boot:spring-boot-starter-test')
}
您可以建立一個可執行的 JAR 檔案,並使用 Maven 或 Gradle 命令執行 Spring Boot 應用程式:
對於 Maven,您可以使用以下命令:
mvn clean install
在“BUILD SUCCESS”之後,您可以在target目錄下找到JAR檔案。
對於 Gradle,您可以使用以下命令:
gradle clean build
在“BUILD SUCCESSFUL”之後,您可以在build/libs目錄下找到JAR檔案。
您可以使用以下命令執行 JAR 檔案:
java –jar <JARFILE>
這將在Tomcat埠8080上啟動應用程式,如下所示:

現在在 POSTMAN 應用程式中點選以下 URL,您可以看到如下所示的輸出:
更新 URL:https://:8080/products/3
Spring Boot - 攔截器
您可以在 Spring Boot 中使用攔截器在以下情況下執行操作:
在將請求傳送到控制器之前
在將響應傳送到客戶端之前
例如,您可以使用攔截器在將請求傳送到控制器之前新增請求頭,並在將響應傳送到客戶端之前新增響應頭。
要使用攔截器,您需要建立一個支援它的 **@Component** 類,並且它應該實現 **HandlerInterceptor** 介面。
以下是在使用攔截器時您應該瞭解的三個方法:
**preHandle()** 方法 - 用於在將請求傳送到控制器之前執行操作。此方法應返回 true 以將響應返回給客戶端。
**postHandle()** 方法 - 用於在將響應傳送到客戶端之前執行操作。
**afterCompletion()** 方法 - 用於在完成請求和響應後執行操作。
觀察以下程式碼以更好地理解:
@Component
public class ProductServiceInterceptor implements HandlerInterceptor {
   @Override
   public boolean preHandle(
      HttpServletRequest request, HttpServletResponse response, Object handler) throws Exception {

      return true;
   }
   @Override
   public void postHandle(
      HttpServletRequest request, HttpServletResponse response, Object handler,
      ModelAndView modelAndView) throws Exception {}

   @Override
   public void afterCompletion(HttpServletRequest request, HttpServletResponse response,
      Object handler, Exception exception) throws Exception {}
}
您需要使用 **WebMvcConfigurerAdapter** 將此攔截器註冊到 **InterceptorRegistry**,如下所示:
@Component
public class ProductServiceInterceptorAppConfig extends WebMvcConfigurerAdapter {
   @Autowired
   ProductServiceInterceptor productServiceInterceptor;

   @Override
   public void addInterceptors(InterceptorRegistry registry) {
      registry.addInterceptor(productServiceInterceptor);
   }
}
在下面給出的示例中,我們將點選 GET 產品 API,它會給出如下所示的輸出:
攔截器類 ProductServiceInterceptor.java 的程式碼如下所示:
package com.tutorialspoint.demo.interceptor;

import javax.servlet.http.HttpServletRequest;
import javax.servlet.http.HttpServletResponse;

import org.springframework.stereotype.Component;
import org.springframework.web.servlet.HandlerInterceptor;
import org.springframework.web.servlet.ModelAndView;

@Component
public class ProductServiceInterceptor implements HandlerInterceptor {
   @Override
   public boolean preHandle
      (HttpServletRequest request, HttpServletResponse response, Object handler)
      throws Exception {

      System.out.println("Pre Handle method is Calling");
      return true;
   }
   @Override
   public void postHandle(HttpServletRequest request, HttpServletResponse response,
      Object handler, ModelAndView modelAndView) throws Exception {

      System.out.println("Post Handle method is Calling");
   }
   @Override
   public void afterCompletion
      (HttpServletRequest request, HttpServletResponse response, Object
      handler, Exception exception) throws Exception {

      System.out.println("Request and Response is completed");
   }
}
將攔截器註冊到攔截器登錄檔 - ProductServiceInterceptorAppConfig.java 的應用程式配置類檔案的程式碼如下所示:
package com.tutorialspoint.demo.interceptor;

import org.springframework.beans.factory.annotation.Autowired;
import org.springframework.stereotype.Component;
import org.springframework.web.servlet.config.annotation.InterceptorRegistry;
import org.springframework.web.servlet.config.annotation.WebMvcConfigurerAdapter;

@Component
public class ProductServiceInterceptorAppConfig extends WebMvcConfigurerAdapter {
   @Autowired
   ProductServiceInterceptor productServiceInterceptor;

   @Override
   public void addInterceptors(InterceptorRegistry registry) {
      registry.addInterceptor(productServiceInterceptor);
   }
}
控制器類檔案 ProductServiceController.java 的程式碼如下所示:
package com.tutorialspoint.demo.controller;

import java.util.HashMap;
import java.util.Map;

import org.springframework.http.HttpStatus;
import org.springframework.http.ResponseEntity;
import org.springframework.web.bind.annotation.PathVariable;
import org.springframework.web.bind.annotation.RequestBody;
import org.springframework.web.bind.annotation.RequestMapping;
import org.springframework.web.bind.annotation.RequestMethod;
import org.springframework.web.bind.annotation.RestController;
import com.tutorialspoint.demo.exception.ProductNotfoundException;
import com.tutorialspoint.demo.model.Product;

@RestController
public class ProductServiceController {
   private static Map<String, Product> productRepo = new HashMap<>();
   static {
      Product honey = new Product();
      honey.setId("1");
      honey.setName("Honey");
      productRepo.put(honey.getId(), honey);
      Product almond = new Product();
      almond.setId("2");
      almond.setName("Almond");
      productRepo.put(almond.getId(), almond);
   }
   @RequestMapping(value = "/products")
   public ResponseEntity<Object> getProduct() {
      return new ResponseEntity<>(productRepo.values(), HttpStatus.OK);
   }
}
產品 Product.java 的 POJO 類的程式碼如下所示:
package com.tutorialspoint.demo.model;

public class Product {
   private String id;
   private String name;

   public String getId() {
      return id;
   }
   public void setId(String id) {
      this.id = id;
   }
   public String getName() {
      return name;
   }
   public void setName(String name) {
      this.name = name;
   }
}
主 Spring Boot 應用程式類檔案 **DemoApplication.java** 的程式碼如下所示:
package com.tutorialspoint.demo;

import org.springframework.boot.SpringApplication;
import org.springframework.boot.autoconfigure.SpringBootApplication;

@SpringBootApplication
public class DemoApplication {
   public static void main(String[] args) {
      SpringApplication.run(DemoApplication.class, args);
   }
}
Maven 構建 - **pom.xml** 的程式碼如下所示:
<?xml version = "1.0" encoding = "UTF-8"?>
<project xmlns = "http://maven.apache.org/POM/4.0.0" xmlns:xsi = "
   http://www.w3.org/2001/XMLSchema-instance"
   xsi:schemaLocation = "http://maven.apache.org/POM/4.0.0
   http://maven.apache.org/xsd/maven-4.0.0.xsd">

   <modelVersion>4.0.0</modelVersion>
   <groupId>com.tutorialspoint</groupId>
   <artifactId>demo</artifactId>
   <version>0.0.1-SNAPSHOT</version>
   <packaging>jar</packaging>
   <name>demo</name>
   <description>Demo project for Spring Boot</description>

   <parent>
      <groupId>org.springframework.boot</groupId>
      <artifactId>spring-boot-starter-parent</artifactId>
      <version>1.5.8.RELEASE</version>
      <relativePath/>
   </parent>

   <properties>
      <project.build.sourceEncoding>UTF-8</project.build.sourceEncoding>
      <project.reporting.outputEncoding>UTF-8</project.reporting.outputEncoding>
      <java.version>1.8</java.version>
   </properties>

   <dependencies>
      <dependency>
         <groupId>org.springframework.boot</groupId>
         <artifactId>spring-boot-starter-web</artifactId>
      </dependency>

      <dependency>
         <groupId>org.springframework.boot</groupId>
         <artifactId>spring-boot-starter-test</artifactId>
         <scope>test</scope>
      </dependency>
   </dependencies>

   <build>
      <plugins>
         <plugin>
            <groupId>org.springframework.boot</groupId>
            <artifactId>spring-boot-maven-plugin</artifactId>
         </plugin>
      </plugins>
   </build>

</project>
Gradle 構建 **build.gradle** 的程式碼如下所示:
buildscript {
   ext {
      springBootVersion = '1.5.8.RELEASE'
   }
   repositories {
      mavenCentral()
   }
   dependencies {
      classpath("org.springframework.boot:spring-boot-gradle-plugin:${springBootVersion}")
   }
}
apply plugin: 'java'
apply plugin: 'eclipse'
apply plugin: 'org.springframework.boot'
group = 'com.tutorialspoint'
version = '0.0.1-SNAPSHOT'
sourceCompatibility = 1.8

repositories {
   mavenCentral()
}
dependencies {
   compile('org.springframework.boot:spring-boot-starter-web')
   testCompile('org.springframework.boot:spring-boot-starter-test')
}
您可以建立一個可執行的 JAR 檔案,並使用以下 Maven 或 Gradle 命令執行 Spring Boot 應用程式。
對於 Maven,請使用如下所示的命令:
mvn clean install
在“BUILD SUCCESS”之後,您可以在target目錄下找到JAR檔案。
對於 Gradle,請使用如下所示的命令:
gradle clean build
在“BUILD SUCCESSFUL”之後,您可以在build/libs目錄下找到JAR檔案。
您可以使用以下命令執行 JAR 檔案:
java –jar <JARFILE>
現在,應用程式已在 Tomcat 埠 8080 上啟動,如下所示:
現在在 POSTMAN 應用程式中點選以下 URL,您可以看到如下所示的輸出:
GET API:**https://:8080/products**
在控制檯視窗中,您可以看到在攔截器中新增的 System.out.println 語句,如下面的螢幕截圖所示:

Spring Boot - Servlet 過濾器
過濾器是一個用於攔截應用程式的 HTTP 請求和響應的物件。透過使用過濾器,我們可以在兩個例項中執行兩個操作:
- 在將請求傳送到控制器之前
- 在將響應傳送到客戶端之前。
以下程式碼顯示了帶有 @Component 註解的 Servlet Filter 實現類的示例程式碼。
@Component
public class SimpleFilter implements Filter {
   @Override
   public void destroy() {}

   @Override
   public void doFilter
      (ServletRequest request, ServletResponse response, FilterChain filterchain)
      throws IOException, ServletException {}

   @Override
   public void init(FilterConfig filterconfig) throws ServletException {}
}
以下示例顯示了在將請求傳送到控制器之前從 ServletRequest 物件讀取遠端主機和遠端地址的程式碼。
在 doFilter() 方法中,我們添加了 System.out.println 語句以列印遠端主機和遠端地址。
package com.tutorialspoint.demo;

import java.io.IOException;

import javax.servlet.Filter;
import javax.servlet.FilterChain;
import javax.servlet.FilterConfig;
import javax.servlet.ServletException;
import javax.servlet.ServletRequest;
import javax.servlet.ServletResponse;

import org.springframework.stereotype.Component;

@Component
public class SimpleFilter implements Filter {
   @Override
   public void destroy() {}

   @Override
   public void doFilter(ServletRequest request, ServletResponse response, FilterChain filterchain)
      throws IOException, ServletException {

      System.out.println("Remote Host:"+request.getRemoteHost());
      System.out.println("Remote Address:"+request.getRemoteAddr());
      filterchain.doFilter(request, response);
   }

   @Override
   public void init(FilterConfig filterconfig) throws ServletException {}
}
在 Spring Boot 主應用程式類檔案中,我們添加了返回“Hello World”字串的簡單 REST 端點。
package com.tutorialspoint.demo;

import org.springframework.boot.SpringApplication;
import org.springframework.boot.autoconfigure.SpringBootApplication;
import org.springframework.web.bind.annotation.RequestMapping;
import org.springframework.web.bind.annotation.RestController;

@SpringBootApplication
@RestController
public class DemoApplication {
   public static void main(String[] args) {
      SpringApplication.run(DemoApplication.class, args);
   }
   @RequestMapping(value = "/")
   public String hello() {
      return "Hello World";
   }
}
Maven 構建 - **pom.xml** 的程式碼如下所示:
<?xml version = "1.0" encoding = "UTF-8"?>
<project xmlns = "http://maven.apache.org/POM/4.0.0" xmlns:xsi = "
   http://www.w3.org/2001/XMLSchema-instance"
   xsi:schemaLocation = "http://maven.apache.org/POM/4.0.0
   http://maven.apache.org/xsd/maven-4.0.0.xsd">

   <modelVersion>4.0.0</modelVersion>
   <groupId>com.tutorialspoint</groupId>
   <artifactId>demo</artifactId>
   <version>0.0.1-SNAPSHOT</version>
   <packaging>jar</packaging>
   <name>demo</name>
   <description>Demo project for Spring Boot</description>

   <parent>
      <groupId>org.springframework.boot</groupId>
      <artifactId>spring-boot-starter-parent</artifactId>
      <version>1.5.8.RELEASE</version>
      <relativePath/>
   </parent>

   <properties>
      <project.build.sourceEncoding>UTF-8</project.build.sourceEncoding>
      <project.reporting.outputEncoding>UTF-8</project.reporting.outputEncoding>
      <java.version>1.8</java.version>
   </properties>

   <dependencies>
      <dependency>
         <groupId>org.springframework.boot</groupId>
         <artifactId>spring-boot-starter-web</artifactId>
      </dependency>

      <dependency>
         <groupId>org.springframework.boot</groupId>
         <artifactId>spring-boot-starter-test</artifactId>
         <scope>test</scope>
      </dependency>
   </dependencies>

   <build>
      <plugins>
         <plugin>
            <groupId>org.springframework.boot</groupId>
            <artifactId>spring-boot-maven-plugin</artifactId>
         </plugin>
      </plugins>
   </build>

</project>
Gradle 構建 - build.gradle 的程式碼如下所示:
buildscript {
   ext {
      springBootVersion = '1.5.8.RELEASE'
   }
   repositories {
      mavenCentral()
   }
   dependencies {
      classpath("org.springframework.boot:spring-boot-gradle-plugin:${springBootVersion}")
   }
}

apply plugin: 'java'
apply plugin: 'eclipse'
apply plugin: 'org.springframework.boot'

group = 'com.tutorialspoint'
version = '0.0.1-SNAPSHOT'
sourceCompatibility = 1.8

repositories {
   mavenCentral()
}
dependencies {
   compile('org.springframework.boot:spring-boot-starter-web')
   testCompile('org.springframework.boot:spring-boot-starter-test')
}
您可以建立一個可執行的 JAR 檔案,並使用以下所示的 Maven 或 Gradle 命令執行 Spring Boot 應用程式:
對於 Maven,請使用如下所示的命令:
mvn clean install
構建成功後,您可以在 target 目錄下找到 JAR 檔案。
對於 Gradle,請使用如下所示的命令:
gradle clean build
構建成功後,您可以在 build/libs 目錄下找到 JAR 檔案。
現在,使用以下命令執行 JAR 檔案
java –jar <JARFILE>
您可以看到應用程式已在 Tomcat 埠 8080 上啟動。
現在點選 URL **https://:8080/** 並檢視輸出 Hello World。它應該如下所示:
然後,您可以在控制檯日誌中看到遠端主機和遠端地址,如下所示:

Spring Boot - Tomcat 埠號
Spring Boot 允許您在不同的埠號上多次執行相同的應用程式。在本章中,您將詳細瞭解這一點。請注意,預設埠號為 8080。
自定義埠
在 **application.properties** 檔案中,我們可以為屬性 server.port 設定自定義埠號
server.port = 9090
在 **application.yml** 檔案中,您可以找到如下內容:
server:
   port: 9090
隨機埠
在 **application.properties** 檔案中,我們可以為屬性 server.port 設定隨機埠號
server.port = 0
在 **application.yml** 檔案中,您可以找到如下內容:
server:
   port: 0
**注意** - 如果在啟動 Spring Boot 應用程式時 **server.port** 號為 0,則 Tomcat 會使用隨機埠號。
Spring Boot - Rest 模板
Rest Template 用於建立使用 RESTful Web 服務的應用程式。您可以使用 **exchange()** 方法使用所有 HTTP 方法使用 Web 服務。下面給出的程式碼顯示瞭如何建立 Rest Template 的 Bean 以自動連線 Rest Template 物件。
package com.tutorialspoint.demo;

import org.springframework.boot.SpringApplication;
import org.springframework.boot.autoconfigure.SpringBootApplication;
import org.springframework.context.annotation.Bean;
import org.springframework.web.client.RestTemplate;

@SpringBootApplication
public class DemoApplication {
   public static void main(String[] args) {
      SpringApplication.run(DemoApplication.class, args);
   }
   @Bean
   public RestTemplate getRestTemplate() {
      return new RestTemplate();
   }
}
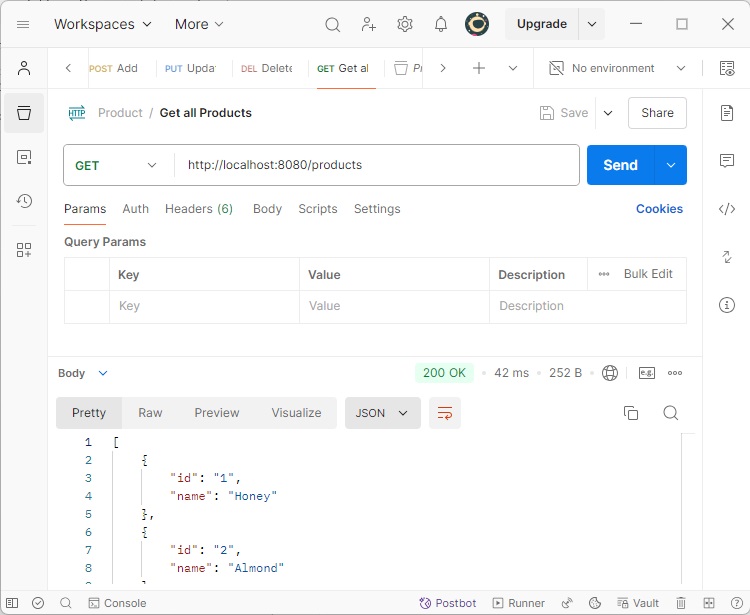
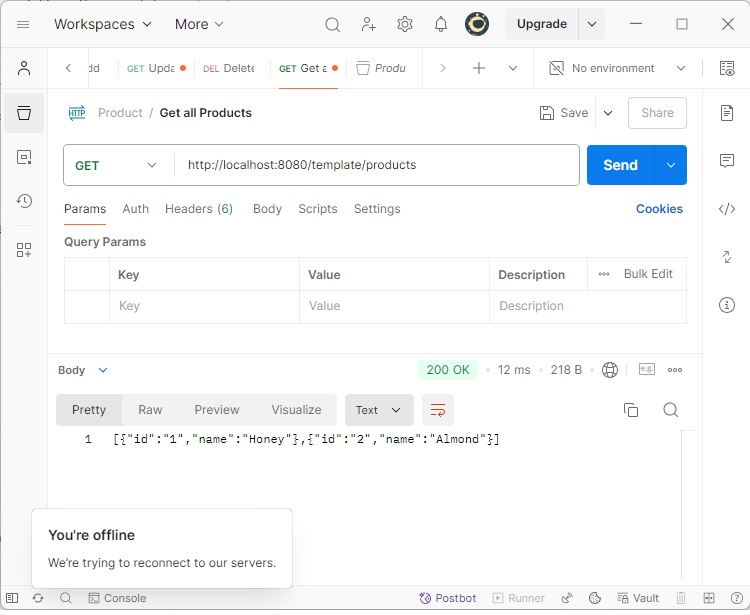
GET
使用 RestTemplate - exchange() 方法使用 GET API
假設此 URL **https://:8080/products** 返回以下 JSON,我們將使用以下程式碼使用 Rest Template 使用此 API 響應:
[
   {
      "id": "1",
      "name": "Honey"
   },
   {
      "id": "2",
      "name": "Almond"
   }
]
您需要遵循以下幾點來使用 API:
- 自動連線 Rest Template 物件。
- 使用 HttpHeaders 設定請求頭。
- 使用 HttpEntity 包裝請求物件。
- 為 Exchange() 方法提供 URL、HttpMethod 和返回型別。
@RestController
public class ConsumeWebService {
   @Autowired
   RestTemplate restTemplate;

   @RequestMapping(value = "/template/products")
   public String getProductList() {
      HttpHeaders headers = new HttpHeaders();
      headers.setAccept(Arrays.asList(MediaType.APPLICATION_JSON));
      HttpEntity <String> entity = new HttpEntity<String>(headers);

      return restTemplate.exchange("
         https://:8080/products", HttpMethod.GET, entity, String.class).getBody();
   }
}
POST
使用 RestTemplate - exchange() 方法使用 POST API
假設此 URL **https://:8080/products** 返回如下所示的響應,我們將使用 Rest Template 使用此 API 響應。
下面給出的程式碼是請求體:
{
   "id":"3",
   "name":"Ginger"
}
下面給出的程式碼是響應體:
Product is created successfully
您需要遵循以下幾點來使用 API:
自動連線 Rest Template 物件。
使用 HttpHeaders 設定請求頭。
使用 HttpEntity 包裝請求物件。在這裡,我們包裝 Product 物件以將其傳送到請求體。
為 exchange() 方法提供 URL、HttpMethod 和返回型別。
@RestController
public class ConsumeWebService {
   @Autowired
   RestTemplate restTemplate;

   @RequestMapping(value = "/template/products", method = RequestMethod.POST)
   public String createProducts(@RequestBody Product product) {
      HttpHeaders headers = new HttpHeaders();
      headers.setAccept(Arrays.asList(MediaType.APPLICATION_JSON));
      HttpEntity<Product> entity = new HttpEntity<Product>(product,headers);

      return restTemplate.exchange(
         "https://:8080/products", HttpMethod.POST, entity, String.class).getBody();
   }
}
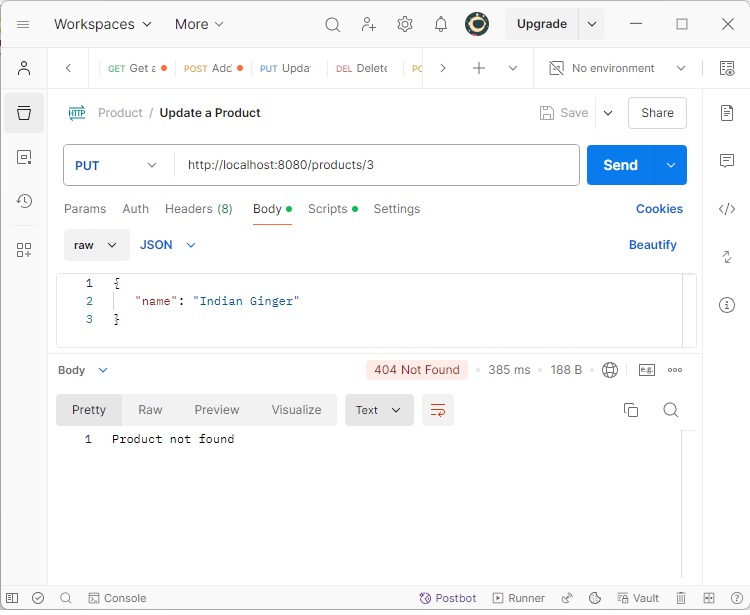
PUT
使用 RestTemplate - exchange() 方法使用 PUT API
假設此 URL **https://:8080/products/3** 返回以下響應,我們將使用 Rest Template 使用此 API 響應。
下面給出的程式碼是請求體:
{
   "name":"Indian Ginger"
}
下面給出的程式碼是響應體:
Product is updated successfully
您需要遵循以下幾點來使用 API:
自動連線 Rest Template 物件。
使用 HttpHeaders 設定請求頭。
使用 HttpEntity 包裝請求物件。在這裡,我們包裝 Product 物件以將其傳送到請求體。
為 exchange() 方法提供 URL、HttpMethod 和返回型別。
@RestController
public class ConsumeWebService {
   @Autowired
   RestTemplate restTemplate;

   @RequestMapping(value = "/template/products/{id}", method = RequestMethod.PUT)
   public String updateProduct(@PathVariable("id") String id, @RequestBody Product product) {
      HttpHeaders headers = new HttpHeaders();
      headers.setAccept(Arrays.asList(MediaType.APPLICATION_JSON));
      HttpEntity<Product> entity = new HttpEntity<Product>(product,headers);

      return restTemplate.exchange(
         "https://:8080/products/"+id, HttpMethod.PUT, entity, String.class).getBody();
   }
}
DELETE
使用 RestTemplate - exchange() 方法使用 DELETE API
假設此 URL **https://:8080/products/3** 返回以下響應,我們將使用 Rest Template 使用此 API 響應。
下面顯示的程式碼行是響應體:
Product is deleted successfully
您需要遵循以下幾點來使用 API:
自動連線 Rest Template 物件。
使用 HttpHeaders 設定請求頭。
使用 HttpEntity 包裝請求物件。
為 exchange() 方法提供 URL、HttpMethod 和返回型別。
@RestController
public class ConsumeWebService {
   @Autowired
   RestTemplate restTemplate;

   @RequestMapping(value = "/template/products/{id}", method = RequestMethod.DELETE)
   public String deleteProduct(@PathVariable("id") String id) {
      HttpHeaders headers = new HttpHeaders();
      headers.setAccept(Arrays.asList(MediaType.APPLICATION_JSON));
      HttpEntity<Product> entity = new HttpEntity<Product>(headers);

      return restTemplate.exchange(
         "https://:8080/products/"+id, HttpMethod.DELETE, entity, String.class).getBody();
   }
}
完整的 Rest Template 控制器類檔案如下所示:
package com.tutorialspoint.demo.controller;

import java.util.Arrays;

import org.springframework.beans.factory.annotation.Autowired;
import org.springframework.http.HttpEntity;
import org.springframework.http.HttpHeaders;
import org.springframework.http.HttpMethod;
import org.springframework.http.MediaType;

import org.springframework.web.bind.annotation.PathVariable;
import org.springframework.web.bind.annotation.RequestBody;
import org.springframework.web.bind.annotation.RequestMapping;
import org.springframework.web.bind.annotation.RequestMethod;
import org.springframework.web.bind.annotation.RestController;
import org.springframework.web.client.RestTemplate;

import com.tutorialspoint.demo.model.Product;

@RestController
public class ConsumeWebService {
   @Autowired
   RestTemplate restTemplate;

   @RequestMapping(value = "/template/products")
   public String getProductList() {
      HttpHeaders headers = new HttpHeaders();
      headers.setAccept(Arrays.asList(MediaType.APPLICATION_JSON));
      HttpEntity<String> entity = new HttpEntity<String>(headers);

      return restTemplate.exchange(
         "https://:8080/products", HttpMethod.GET, entity, String.class).getBody();
   }
   @RequestMapping(value = "/template/products", method = RequestMethod.POST)
   public String createProducts(@RequestBody Product product) {
      HttpHeaders headers = new HttpHeaders();
      headers.setAccept(Arrays.asList(MediaType.APPLICATION_JSON));
      HttpEntity<Product> entity = new HttpEntity<Product>(product,headers);

      return restTemplate.exchange(
         "https://:8080/products", HttpMethod.POST, entity, String.class).getBody();
   }
   @RequestMapping(value = "/template/products/{id}", method = RequestMethod.PUT)
   public String updateProduct(@PathVariable("id") String id, @RequestBody Product product) {
      HttpHeaders headers = new HttpHeaders();
      headers.setAccept(Arrays.asList(MediaType.APPLICATION_JSON));
      HttpEntity<Product> entity = new HttpEntity<Product>(product,headers);

      return restTemplate.exchange(
         "https://:8080/products/"+id, HttpMethod.PUT, entity, String.class).getBody();
   }
   @RequestMapping(value = "/template/products/{id}", method = RequestMethod.DELETE)
   public String deleteProduct(@PathVariable("id") String id) {
      HttpHeaders headers = new HttpHeaders();
      headers.setAccept(Arrays.asList(MediaType.APPLICATION_JSON));
      HttpEntity<Product> entity = new HttpEntity<Product>(headers);

      return restTemplate.exchange(
         "https://:8080/products/"+id, HttpMethod.DELETE, entity, String.class).getBody();
   }
}
Spring Boot 應用程式類 - DemoApplication.java 的程式碼如下所示:
package com.tutorialspoint.demo;

import org.springframework.boot.SpringApplication;
import org.springframework.boot.autoconfigure.SpringBootApplication;

@SpringBootApplication
public class DemoApplication {
   public static void main(String[] args) {
      SpringApplication.run(DemoApplication.class, args);
   }
}
Maven 構建 - pom.xml 的程式碼如下所示:
<?xml version = "1.0" encoding = "UTF-8"?>
<project xmlns = "http://maven.apache.org/POM/4.0.0"
   xmlns:xsi = "http://www.w3.org/2001/XMLSchema-instance"
   xsi:schemaLocation = "http://maven.apache.org/POM/4.0.0
   http://maven.apache.org/xsd/maven-4.0.0.xsd">

   <modelVersion>4.0.0</modelVersion>
   <groupId>com.tutorialspoint</groupId>
   <artifactId>demo</artifactId>
   <version>0.0.1-SNAPSHOT</version>
   <packaging>jar</packaging>
   <name>demo</name>
   <description>Demo project for Spring Boot</description>

   <parent>
      <groupId>org.springframework.boot</groupId>
      <artifactId>spring-boot-starter-parent</artifactId>
      <version>1.5.8.RELEASE</version>
      <relativePath/>
   </parent>

   <properties>
      <project.build.sourceEncoding>UTF-8</project.build.sourceEncoding>
      <project.reporting.outputEncoding>UTF-8</project.reporting.outputEncoding>
      <java.version>1.8</java.version>
   </properties>

   <dependencies>
      <dependency>
         <groupId>org.springframework.boot</groupId>
         <artifactId>spring-boot-starter-web</artifactId>
      </dependency>

      <dependency>
         <groupId>org.springframework.boot</groupId>
         <artifactId>spring-boot-starter-test</artifactId>
         <scope>test</scope>
      </dependency>
   </dependencies>

   <build>
      <plugins>
         <plugin>
            <groupId>org.springframework.boot</groupId>
            <artifactId>spring-boot-maven-plugin</artifactId>
         </plugin>
      </plugins>
   </build>

</project>
Gradle 構建 - build.gradle 的程式碼如下所示:
buildscript {
   ext {
      springBootVersion = '1.5.8.RELEASE'
   }
   repositories {
      mavenCentral()
   }
   dependencies {
      classpath("org.springframework.boot:spring-boot-gradle-plugin:${springBootVersion}")
   }
}

apply plugin: 'java'
apply plugin: 'eclipse'
apply plugin: 'org.springframework.boot'

group = 'com.tutorialspoint'
version = '0.0.1-SNAPSHOT'
sourceCompatibility = 1.8

repositories {
   mavenCentral()
}
dependencies {
   compile('org.springframework.boot:spring-boot-starter-web')
   testCompile('org.springframework.boot:spring-boot-starter-test')
}
您可以建立一個可執行的 JAR 檔案,並使用以下 Maven 或 Gradle 命令執行 Spring Boot 應用程式:
對於 Maven,您可以使用以下命令:
mvn clean install
在“BUILD SUCCESS”之後,您可以在target目錄下找到JAR檔案。
對於 Gradle,您可以使用以下命令:
gradle clean build
“構建成功”後,您可以在 build/libs 目錄下找到 JAR 檔案。
現在,使用以下命令執行 JAR 檔案:
java –jar <JARFILE>
現在,應用程式已在 Tomcat 埠 8080 上啟動。
現在在 POSTMAN 應用程式中點選以下 URL,您可以看到輸出。
透過 Rest Template 獲取產品 - **https://:8080/template/products**
建立產品 POST - **https://:8080/template/products**
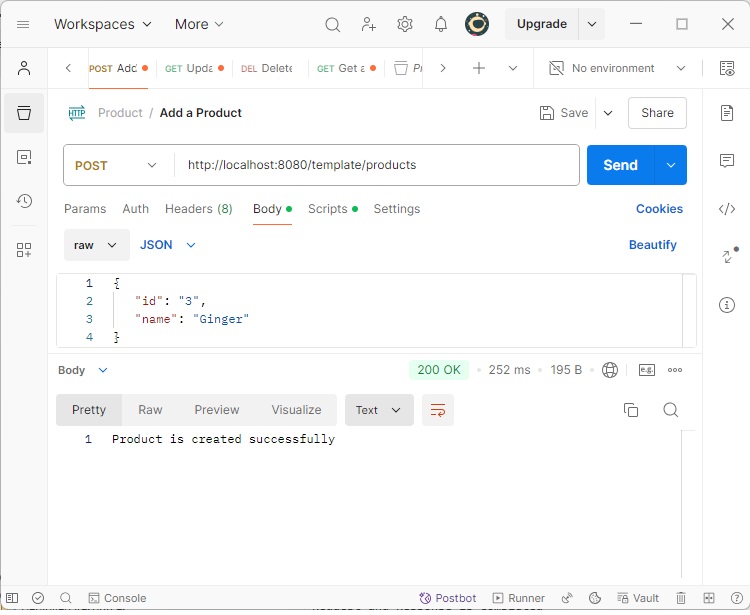
更新產品 PUT - **https://:8080/template/products/3**
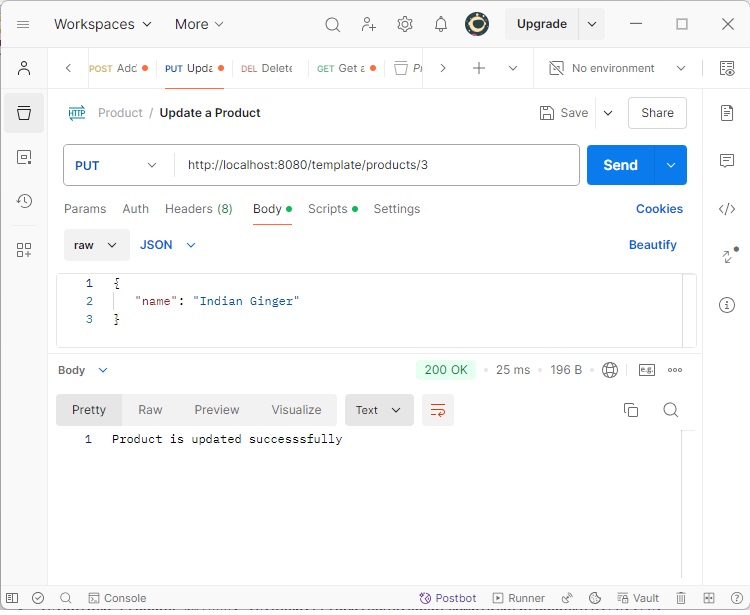
刪除產品 - **https://:8080/template/products/3**
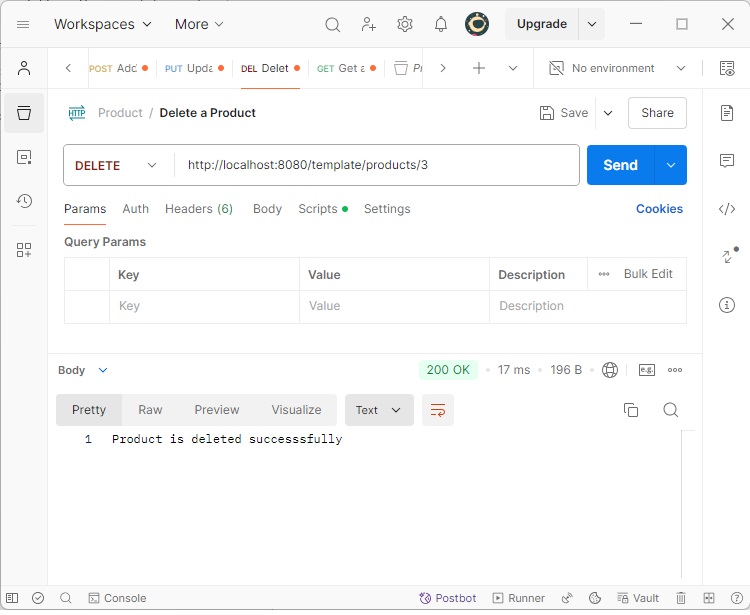
Spring Boot - 檔案處理
在本章中,您將學習如何使用 Web 服務上傳和下載檔案。
檔案上傳
要上傳檔案,您可以使用 **MultipartFile** 作為請求引數,並且此 API 應使用多部分表單資料值。觀察下面給出的程式碼:
@RequestMapping(value = "/upload", method = RequestMethod.POST, consumes = MediaType.MULTIPART_FORM_DATA_VALUE)

public String fileUpload(@RequestParam("file") MultipartFile file) {
   return null;
}
完整的程式碼如下所示:
package com.tutorialspoint.demo.controller;

import java.io.File;
import java.io.FileOutputStream;
import java.io.IOException;

import org.springframework.http.MediaType;
import org.springframework.web.bind.annotation.RequestMapping;
import org.springframework.web.bind.annotation.RequestMethod;
import org.springframework.web.bind.annotation.RequestParam;
import org.springframework.web.bind.annotation.RestController;
import org.springframework.web.multipart.MultipartFile;

@RestController
public class FileUploadController {
   @RequestMapping(value = "/upload", method = RequestMethod.POST,
      consumes = MediaType.MULTIPART_FORM_DATA_VALUE)

   public String fileUpload(@RequestParam("file") MultipartFile file) throws IOException {
      File convertFile = new File("/var/tmp/"+file.getOriginalFilename());
      convertFile.createNewFile();
      FileOutputStream fout = new FileOutputStream(convertFile);
      fout.write(file.getBytes());
      fout.close();
      return "File is upload successfully";
   }
}
檔案下載
對於檔案下載,您應該使用 InputStreamResource 下載檔案。我們需要在響應中設定 HttpHeader **Content-Disposition**,並需要指定應用程式的響應媒體型別。
**注意** - 在以下示例中,檔案應在應用程式執行的指定路徑上可用。
@RequestMapping(value = "/download", method = RequestMethod.GET)
public ResponseEntity<Object> downloadFile() throws IOException  {
   String filename = "/var/tmp/mysql.png";
   File file = new File(filename);
   InputStreamResource resource = new InputStreamResource(new FileInputStream(file));
   HttpHeaders headers = new HttpHeaders();

   headers.add("Content-Disposition", String.format("attachment; filename=\"%s\"", file.getName()));
   headers.add("Cache-Control", "no-cache, no-store, must-revalidate");
   headers.add("Pragma", "no-cache");
   headers.add("Expires", "0");

   ResponseEntity<Object>
   responseEntity = ResponseEntity.ok().headers(headers).contentLength(file.length()).contentType(
      MediaType.parseMediaType("application/txt")).body(resource);

   return responseEntity;
}
完整的程式碼如下所示:
package com.tutorialspoint.demo.controller;

import java.io.File;
import java.io.FileInputStream;
import java.io.IOException;

import org.springframework.core.io.InputStreamResource;
import org.springframework.http.HttpHeaders;
import org.springframework.http.MediaType;
import org.springframework.http.ResponseEntity;
import org.springframework.web.bind.annotation.RequestMapping;
import org.springframework.web.bind.annotation.RequestMethod;
import org.springframework.web.bind.annotation.RestController;

@RestController
public class FileDownloadController {
   @RequestMapping(value = "/download", method = RequestMethod.GET)
   public ResponseEntity<Object> downloadFile() throws IOException  {
      String filename = "/var/tmp/mysql.png";
      File file = new File(filename);
      InputStreamResource resource = new InputStreamResource(new FileInputStream(file));
      HttpHeaders headers = new HttpHeaders();

      headers.add("Content-Disposition", String.format("attachment; filename=\"%s\"", file.getName()));
      headers.add("Cache-Control", "no-cache, no-store, must-revalidate");
      headers.add("Pragma", "no-cache");
      headers.add("Expires", "0");

      ResponseEntity<Object>
      responseEntity = ResponseEntity.ok().headers(headers).contentLength(
         file.length()).contentType(MediaType.parseMediaType("application/txt")).body(resource);

      return responseEntity;
   }
}
主 Spring Boot 應用程式如下所示:
package com.tutorialspoint.demo;

import org.springframework.boot.SpringApplication;
import org.springframework.boot.autoconfigure.SpringBootApplication;

@SpringBootApplication
public class DemoApplication {
   public static void main(String[] args) {
      SpringApplication.run(DemoApplication.class, args);
   }
}
Maven 構建 - pom.xml 的程式碼如下所示:
<?xml version = "1.0" encoding = "UTF-8"?>
<project xmlns = "http://maven.apache.org/POM/4.0.0"
   xmlns:xsi = "http://www.w3.org/2001/XMLSchema-instance"
   xsi:schemaLocation = "http://maven.apache.org/POM/4.0.0
   http://maven.apache.org/xsd/maven-4.0.0.xsd">

   <modelVersion>4.0.0</modelVersion>
   <groupId>com.tutorialspoint</groupId>
   <artifactId>demo</artifactId>
   <version>0.0.1-SNAPSHOT</version>
   <packaging>jar</packaging>
   <name>demo</name>
   <description>Demo project for Spring Boot</description>

   <parent>
      <groupId>org.springframework.boot</groupId>
      <artifactId>spring-boot-starter-parent</artifactId>
      <version>1.5.8.RELEASE</version>
      <relativePath/>
   </parent>

   <properties>
      <project.build.sourceEncoding>UTF-8</project.build.sourceEncoding>
      <project.reporting.outputEncoding>UTF-8</project.reporting.outputEncoding>
      <java.version>1.8</java.version>
   </properties>

   <dependencies>
      <dependency>
         <groupId>org.springframework.boot</groupId>
         <artifactId>spring-boot-starter-web</artifactId>
      </dependency>

      <dependency>
         <groupId>org.springframework.boot</groupId>
         <artifactId>spring-boot-starter-test</artifactId>
         <scope>test</scope>
      </dependency>
   </dependencies>

   <build>
      <plugins>
         <plugin>
            <groupId>org.springframework.boot</groupId>
            <artifactId>spring-boot-maven-plugin</artifactId>
         </plugin>
      </plugins>
   </build>

</project>
Gradle 構建 - build.gradle 的程式碼如下所示:
buildscript {
   ext {
      springBootVersion = '1.5.8.RELEASE'
   }
   repositories {
      mavenCentral()
   }
   dependencies {
      classpath("org.springframework.boot:spring-boot-gradle-plugin:${springBootVersion}")
   }
}

apply plugin: 'java'
apply plugin: 'eclipse'
apply plugin: 'org.springframework.boot'

group = 'com.tutorialspoint'
version = '0.0.1-SNAPSHOT'
sourceCompatibility = 1.8

repositories {
   mavenCentral()
}
dependencies {
   compile('org.springframework.boot:spring-boot-starter-web')
   testCompile('org.springframework.boot:spring-boot-starter-test')
}
現在您可以建立一個可執行的 JAR 檔案,並使用下面給出的 Maven 或 Gradle 命令執行 Spring Boot 應用程式。
對於 Maven,使用以下命令:
mvn clean install
在“BUILD SUCCESS”之後,您可以在 target 目錄下找到 JAR 檔案。
對於 Gradle,您可以使用以下命令:
sgradle clean build
“構建成功”後,您可以在 build/libs 目錄下找到 JAR 檔案。
現在,使用以下命令執行 JAR 檔案:
java –jar <JARFILE>
這將在Tomcat埠8080上啟動應用程式,如下所示:
現在在 POSTMAN 應用程式中訪問以下 URL,您將看到以下輸出:
檔案上傳 - https://:8080/upload
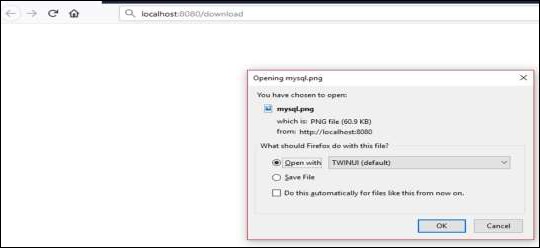
檔案下載 - https://:8080/upload
Spring Boot - 服務元件
服務元件是包含 @Service 註解的類檔案。這些類檔案用於在不同的層編寫業務邏輯,與 @RestController 類檔案分離。建立服務元件類檔案的邏輯如下所示:
public interface ProductService {
}
實現帶有 @Service 註解的介面的類如下所示:
@Service
public class ProductServiceImpl implements ProductService {
}
請注意,在本教程中,我們使用 產品服務 API 來儲存、檢索、更新和刪除產品。我們在 @RestController 類檔案中本身編寫了業務邏輯。現在,我們將業務邏輯程式碼從控制器移到服務元件。
您可以建立一個包含新增、編輯、獲取和刪除方法的介面,使用以下程式碼所示:
package com.tutorialspoint.demo.service;

import java.util.Collection;
import com.tutorialspoint.demo.model.Product;

public interface ProductService {
   public abstract void createProduct(Product product);
   public abstract void updateProduct(String id, Product product);
   public abstract void deleteProduct(String id);
   public abstract Collection<Product> getProducts();
}
以下程式碼將允許您建立一個實現 ProductService 介面並帶有 @Service 註解的類,並編寫儲存、檢索、刪除和更新產品的業務邏輯。
package com.tutorialspoint.demo.service;

import java.util.Collection;
import java.util.HashMap;
import java.util.Map;
import org.springframework.stereotype.Service;
import com.tutorialspoint.demo.model.Product;

@Service
public class ProductServiceImpl implements ProductService {
   private static Map<String, Product> productRepo = new HashMap<>();
   static {
      Product honey = new Product();
      honey.setId("1");
      honey.setName("Honey");
      productRepo.put(honey.getId(), honey);

      Product almond = new Product();
      almond.setId("2");
      almond.setName("Almond");
      productRepo.put(almond.getId(), almond);
   }
   @Override
   public void createProduct(Product product) {
      productRepo.put(product.getId(), product);
   }
   @Override
   public void updateProduct(String id, Product product) {
      productRepo.remove(id);
      product.setId(id);
      productRepo.put(id, product);
   }
   @Override
   public void deleteProduct(String id) {
      productRepo.remove(id);

   }
   @Override
   public Collection<Product> getProducts() {
      return productRepo.values();
   }
}
此處的程式碼顯示了 Rest Controller 類檔案,這裡我們 @Autowired 了 ProductService 介面並呼叫了其方法。
package com.tutorialspoint.demo.controller;

import org.springframework.beans.factory.annotation.Autowired;
import org.springframework.http.HttpStatus;
import org.springframework.http.ResponseEntity;
import org.springframework.web.bind.annotation.PathVariable;
import org.springframework.web.bind.annotation.RequestBody;
import org.springframework.web.bind.annotation.RequestMapping;
import org.springframework.web.bind.annotation.RequestMethod;
import org.springframework.web.bind.annotation.RestController;

import com.tutorialspoint.demo.model.Product;
import com.tutorialspoint.demo.service.ProductService;

@RestController
public class ProductServiceController {
   @Autowired
   ProductService productService;

   @RequestMapping(value = "/products")
   public ResponseEntity<Object> getProduct() {
      return new ResponseEntity<>(productService.getProducts(), HttpStatus.OK);
   }
   @RequestMapping(value = "/products/{id}", method = RequestMethod.PUT)
   public ResponseEntity<Object>
      updateProduct(@PathVariable("id") String id, @RequestBody Product product) {

      productService.updateProduct(id, product);
      return new ResponseEntity<>("Product is updated successsfully", HttpStatus.OK);
   }
   @RequestMapping(value = "/products/{id}", method = RequestMethod.DELETE)
   public ResponseEntity<Object> delete(@PathVariable("id") String id) {
      productService.deleteProduct(id);
      return new ResponseEntity<>("Product is deleted successsfully", HttpStatus.OK);
   }
   @RequestMapping(value = "/products", method = RequestMethod.POST)
   public ResponseEntity<Object> createProduct(@RequestBody Product product) {
      productService.createProduct(product);
      return new ResponseEntity<>("Product is created successfully", HttpStatus.CREATED);
   }
}
此處顯示了 POJO 類 – Product.java 的程式碼:
package com.tutorialspoint.demo.model;

public class Product {
   private String id;
   private String name;

   public String getId() {
      return id;
   }
   public void setId(String id) {
      this.id = id;
   }
   public String getName() {
      return name;
   }
   public void setName(String name) {
      this.name = name;
   }
}
下面給出一個主要的 Spring Boot 應用程式:
package com.tutorialspoint.demo;

import org.springframework.boot.SpringApplication;
import org.springframework.boot.autoconfigure.SpringBootApplication;

@SpringBootApplication
public class DemoApplication {
   public static void main(String[] args) {
      SpringApplication.run(DemoApplication.class, args);
   }
}
下面顯示了 Maven 構建 - pom.xml 的程式碼:
<?xml version = "1.0" encoding = "UTF-8"?>
<project xmlns = "http://maven.apache.org/POM/4.0.0"
   xmlns:xsi = "http://www.w3.org/2001/XMLSchema-instance"
   xsi:schemaLocation = "http://maven.apache.org/POM/4.0.0
   http://maven.apache.org/xsd/maven-4.0.0.xsd">

   <modelVersion>4.0.0</modelVersion>
   <groupId>com.tutorialspoint</groupId>
   <artifactId>demo</artifactId>
   <version>0.0.1-SNAPSHOT</version>
   <packaging>jar</packaging>
   <name>demo</name>
   <description>Demo project for Spring Boot</description>

   <parent>
      <groupId>org.springframework.boot</groupId>
      <artifactId>spring-boot-starter-parent</artifactId>
      <version>1.5.8.RELEASE</version>
      <relativePath/>
   </parent>

   <properties>
      <project.build.sourceEncoding>UTF-8</project.build.sourceEncoding>
      <project.reporting.outputEncoding>UTF-8</project.reporting.outputEncoding>
      <java.version>1.8</java.version>
   </properties>

   <dependencies>
      <dependency>
         <groupId>org.springframework.boot</groupId>
         <artifactId>spring-boot-starter-web</artifactId>
      </dependency>

      <dependency>
         <groupId>org.springframework.boot</groupId>
         <artifactId>spring-boot-starter-test</artifactId>
         <scope>test</scope>
      </dependency>
   </dependencies>

   <build>
      <plugins>
         <plugin>
            <groupId>org.springframework.boot</groupId>
            <artifactId>spring-boot-maven-plugin</artifactId>
         </plugin>
      </plugins>
   </build>

</project>
下面顯示了 Gradle 構建 - build.gradle 的程式碼:
buildscript {
   ext {
      springBootVersion = '1.5.8.RELEASE'
   }
   repositories {
      mavenCentral()
   }
   dependencies {
      classpath("org.springframework.boot:spring-boot-gradle-plugin:${springBootVersion}")
   }
}

apply plugin: 'java'
apply plugin: 'eclipse'
apply plugin: 'org.springframework.boot'

group = 'com.tutorialspoint'
version = '0.0.1-SNAPSHOT'
sourceCompatibility = 1.8

repositories {
   mavenCentral()
}
dependencies {
   compile('org.springframework.boot:spring-boot-starter-web')
   testCompile('org.springframework.boot:spring-boot-starter-test')
}
您可以建立一個可執行的 JAR 檔案,並使用下面給出的 Maven 或 Gradle 命令執行 Spring Boot 應用程式。
對於 Maven,請使用如下所示的命令:
mvn clean install
在“BUILD SUCCESS”之後,您可以在target目錄下找到JAR檔案。
對於 Gradle,您可以使用以下命令:
gradle clean build
“構建成功”後,您可以在 build/libs 目錄下找到 JAR 檔案。
使用以下命令執行 JAR 檔案:
java –jar <JARFILE>
現在,應用程式已在 Tomcat 埠 8080 上啟動,如下圖所示:

現在在 POSTMAN 應用程式中訪問以下 URL,您將看到以下輸出:
GET API URL 為 - https://:8080/products
POST API URL 為 - https://:8080/products
PUT API URL 為 - https://:8080/products/3
DELETE API URL 為 - https://:8080/products/3
Spring Boot - Thymeleaf
Thymeleaf 是一個基於 Java 的庫,用於建立 Web 應用程式。它為在 Web 應用程式中提供 XHTML/HTML5 提供了良好的支援。在本章中,您將詳細瞭解 Thymeleaf。
Thymeleaf 模板
Thymeleaf 將您的檔案轉換為格式良好的 XML 檔案。它包含以下 6 種類型的模板:
- XML
- 有效 XML
- XHTML
- 有效 XHTML
- HTML5
- 傳統 HTML5
除了傳統 HTML5 之外的所有模板都指的是格式良好的有效 XML 檔案。傳統 HTML5 允許我們在網頁中呈現 HTML5 標籤,包括未關閉的標籤。
Web 應用程式
您可以使用 Thymeleaf 模板在 Spring Boot 中建立 Web 應用程式。您需要按照以下步驟使用 Thymeleaf 在 Spring Boot 中建立 Web 應用程式。
使用以下程式碼建立一個 @Controller 類檔案,將請求 URI 重定向到 HTML 檔案:
package com.tutorialspoint.demo.controller;

import org.springframework.stereotype.Controller;
import org.springframework.web.bind.annotation.RequestMapping;

@Controller
public class WebController {
   @RequestMapping(value = "/index")
   public String index() {
      return "index";
   }
}
在上面的示例中,請求 URI 為 /index,並將控制權重定向到 index.html 檔案。請注意,index.html 檔案應放置在 templates 目錄下,所有 JS 和 CSS 檔案應放置在類路徑中的 static 目錄下。在所示的示例中,我們使用 CSS 檔案來更改文字的顏色。
您可以使用以下程式碼並在單獨的資料夾 css 中建立一個 CSS 檔案,並將檔案命名為 styles.css:
h4 {
   color: red;
}
下面給出了 index.html 檔案的程式碼:
<!DOCTYPE html>
<html>
   <head>
      <meta charset = "ISO-8859-1" />
      <link href = "css/styles.css" rel = "stylesheet"/>
      <title>Spring Boot Application</title>
   </head>
   <body>
      <h4>Welcome to Thymeleaf Spring Boot web application</h4>
   </body>
</html>
下面給出了專案資源管理器的螢幕截圖:

現在,我們需要在構建配置檔案中新增 Spring Boot Starter Thymeleaf 依賴項。
Maven 使用者可以將以下依賴項新增到 pom.xml 檔案中:
<dependency>
   <groupId>org.springframework.boot</groupId>
   <artifactId>spring-boot-starter-thymeleaf</artifactId>
</dependency>
Gradle 使用者可以在 build.gradle 檔案中新增以下依賴項:
compile group: 'org.springframework.boot', name: 'spring-boot-starter-thymeleaf'
主 Spring Boot 應用程式類檔案的程式碼如下所示:
package com.tutorialspoint.demo;

import org.springframework.boot.SpringApplication;
import org.springframework.boot.autoconfigure.SpringBootApplication;

@SpringBootApplication
public class DemoApplication {
   public static void main(String[] args) {
      SpringApplication.run(DemoApplication.class, args);
   }
}
下面給出了 Maven - pom.xml 的程式碼:
<?xml version = "1.0" encoding = "UTF-8"?>
<project xmlns = "http://maven.apache.org/POM/4.0.0"
   xmlns:xsi = "http://www.w3.org/2001/XMLSchema-instance"
   xsi:schemaLocation = "http://maven.apache.org/POM/4.0.0
   http://maven.apache.org/xsd/maven-4.0.0.xsd">

   <modelVersion>4.0.0</modelVersion>
   <groupId>com.tutorialspoint</groupId>
   <artifactId>demo</artifactId>
   <version>0.0.1-SNAPSHOT</version>
   <packaging>jar</packaging>
   <name>demo</name>
   <description>Demo project for Spring Boot</description>

   <parent>
      <groupId>org.springframework.boot</groupId>
      <artifactId>spring-boot-starter-parent</artifactId>
      <version>1.5.8.RELEASE</version>
      <relativePath />
   </parent>

   <properties>
      <project.build.sourceEncoding>UTF-8</project.build.sourceEncoding>
      <project.reporting.outputEncoding>UTF-8</project.reporting.outputEncoding>
      <java.version>1.8</java.version>
   </properties>

   <dependencies>
      <dependency>
         <groupId>org.springframework.boot</groupId>
         <artifactId>spring-boot-starter-web</artifactId>
      </dependency>

      <dependency>
         <groupId>org.springframework.boot</groupId>
         <artifactId>spring-boot-starter-test</artifactId>
         <scope>test</scope>
      </dependency>

      <dependency>
         <groupId>org.springframework.boot</groupId>
         <artifactId>spring-boot-starter-thymeleaf</artifactId>
      </dependency>
   </dependencies>

   <build>
      <plugins>
         <plugin>
            <groupId>org.springframework.boot</groupId>
            <artifactId>spring-boot-maven-plugin</artifactId>
         </plugin>
      </plugins>
   </build>

</project>
下面給出了 Gradle - build.gradle 的程式碼:
buildscript {
   ext {
      springBootVersion = '1.5.8.RELEASE'
   }
   repositories {
      mavenCentral()
   }
   dependencies {
      classpath("org.springframework.boot:spring-boot-gradle-plugin:${springBootVersion}")
   }
}

apply plugin: 'java'
apply plugin: 'eclipse'
apply plugin: 'org.springframework.boot'

group = 'com.tutorialspoint'
version = '0.0.1-SNAPSHOT'
sourceCompatibility = 1.8

repositories {
   mavenCentral()
}
dependencies {
   compile('org.springframework.boot:spring-boot-starter-web')
   compile group: 'org.springframework.boot', name: 'spring-boot-starter-thymeleaf'
   testCompile('org.springframework.boot:spring-boot-starter-test')
}
您可以建立一個可執行的 JAR 檔案,並使用以下 Maven 或 Gradle 命令執行 spring boot 應用程式:
對於 Maven,請使用如下所示的命令:
mvn clean install
在“BUILD SUCCESS”之後,您可以在target目錄下找到JAR檔案。
對於 Gradle,請使用如下所示的命令:
gradle clean build
在“BUILD SUCCESSFUL”之後,您可以在build/libs目錄下找到JAR檔案。
使用此處給出的命令執行 JAR 檔案:
java –jar <JARFILE>
現在,應用程式已在 Tomcat 埠 8080 上啟動,如下所示:
現在在您的 Web 瀏覽器中訪問該 URL,您將看到以下輸出:
https://:8080/index

使用 RESTful Web 服務
本章將詳細討論如何使用 jQuery AJAX 使用 RESTful Web 服務。
建立一個簡單的 Spring Boot Web 應用程式,並編寫一個控制器類檔案,該檔案用於重定向到 HTML 檔案以使用 RESTful Web 服務。
我們需要在構建配置檔案中新增 Spring Boot starter Thymeleaf 和 Web 依賴項。
對於 Maven 使用者,請在您的 pom.xml 檔案中新增以下依賴項。
<dependency>
   <groupId>org.springframework.boot</groupId>
   <artifactId>spring-boot-starter-thymeleaf</artifactId>
</dependency>

<dependency>
   <groupId>org.springframework.boot</groupId>
   <artifactId>spring-boot-starter-web</artifactId>
</dependency>
對於 Gradle 使用者,請在您的 build.gradle 檔案中新增以下依賴項:
compile group: ‘org.springframework.boot’, name: ‘spring-boot-starter-thymeleaf’
compile(‘org.springframework.boot:spring-boot-starter-web’)
下面給出了 @Controller 類檔案的程式碼:
@Controller
public class ViewController {
}
您可以定義請求 URI 方法以重定向到 HTML 檔案,如下所示:
@RequestMapping(“/view-products”)
public String viewProducts() {
   return “view-products”;
}
@RequestMapping(“/add-products”)
public String addProducts() {
   return “add-products”;
}
此 API https://:9090/products 應在響應中返回以下 JSON,如下所示:
[
   {
      "id": "1",
      "name": "Honey"
   },
   {
      "id": "2",
      "name": "Almond"
   }
]
現在,在類路徑中的 templates 目錄下建立一個 view-products.html 檔案。
在 HTML 檔案中,我們添加了 jQuery 庫並編寫了在頁面載入時使用 RESTful Web 服務的程式碼。
<script src = "https://ajax.googleapis.com/ajax/libs/jquery/3.2.1/jquery.min.js"></script>

<script>
$(document).ready(function(){
   $.getJSON("https://:9090/products", function(result){
      $.each(result, function(key,value) {
         $("#productsJson").append(value.id+" "+value.name+" ");
      });
   });
});
</script>
POST 方法和此 URL https://:9090/products 應包含以下請求正文和響應正文。
下面給出了請求正文的程式碼:
{
   "id":"3",
   "name":"Ginger"
}
下面給出了響應正文的程式碼:
Product is created successfully
現在,在類路徑中的 templates 目錄下建立 add-products.html 檔案。
在 HTML 檔案中,我們添加了 jQuery 庫並編寫了在單擊按鈕時將表單提交到 RESTful Web 服務的程式碼。
<script src = "https://ajax.googleapis.com/ajax/libs/jquery/3.2.1/jquery.min.js"></script>
<script>
   $(document).ready(function() {
      $("button").click(function() {
         var productmodel = {
            id : "3",
            name : "Ginger"
         };
         var requestJSON = JSON.stringify(productmodel);
         $.ajax({
            type : "POST",
            url : "https://:9090/products",
            headers : {
               "Content-Type" : "application/json"
            },
            data : requestJSON,
            success : function(data) {
               alert(data);
            },
            error : function(data) {
            }
         });
      });
   });
</script>
下面給出了完整的程式碼。
Maven - pom.xml 檔案
<?xml version = "1.0" encoding = "UTF-8"?>
<project xmlns = "http://maven.apache.org/POM/4.0.0"
   xmlns:xsi = "http://www.w3.org/2001/XMLSchema-instance"
   xsi:schemaLocation = "http://maven.apache.org/POM/4.0.0
   http://maven.apache.org/xsd/maven-4.0.0.xsd">

   <modelVersion>4.0.0</modelVersion>
   <groupId>com.tutorialspoint</groupId>
   <artifactId>demo</artifactId>
   <version>0.0.1-SNAPSHOT</version>
   <packaging>jar</packaging>
   <name>demo</name>
   <description>Demo project for Spring Boot</description>

   <parent>
      <groupId>org.springframework.boot</groupId>
      <artifactId>spring-boot-starter-parent</artifactId>
      <version>1.5.8.RELEASE</version>
      <relativePath />
   </parent>

   <properties>
      <project.build.sourceEncoding>UTF-8</project.build.sourceEncoding>
      <project.reporting.outputEncoding>UTF-8</project.reporting.outputEncoding>
      <java.version>1.8</java.version>
   </properties>

   <dependencies>
      <dependency>
         <groupId>org.springframework.boot</groupId>
         <artifactId>spring-boot-starter-web</artifactId>
      </dependency>

      <dependency>
         <groupId>org.springframework.boot</groupId>
         <artifactId>spring-boot-starter-test</artifactId>
         <scope>test</scope>
      </dependency>

      <dependency>
         <groupId>org.springframework.boot</groupId>
         <artifactId>spring-boot-starter-thymeleaf</artifactId>
      </dependency>
   </dependencies>

   <build>
      <plugins>
         <plugin>
            <groupId>org.springframework.boot</groupId>
            <artifactId>spring-boot-maven-plugin</artifactId>
         </plugin>
      </plugins>
   </build>

</project>
下面給出了 Gradle - build.gradle 的程式碼:
buildscript {
   ext {
      springBootVersion = ‘1.5.8.RELEASE’
   }
   repositories {
      mavenCentral()
   }
   dependencies {
      classpath("org.springframework.boot:spring-boot-gradle-plugin:${springBootVersion}")
   }
}

apply plugin: ‘java’
apply plugin: ‘eclipse’
apply plugin: ‘org.springframework.boot’

group = ‘com.tutorialspoint’
version = ‘0.0.1-SNAPSHOT’
sourceCompatibility = 1.8

repositories {
   mavenCentral()
}

dependencies {
   compile(‘org.springframework.boot:spring-boot-starter-web’)
   compile group: ‘org.springframework.boot’, name: ‘spring-boot-starter-thymeleaf’
   testCompile(‘org.springframework.boot:spring-boot-starter-test’)
}
下面給出了控制器類檔案 - ViewController.java:
package com.tutorialspoint.demo.controller;

import org.springframework.stereotype.Controller;
import org.springframework.web.bind.annotation.RequestMapping;

@Controller
public class ViewController {
   @RequestMapping(“/view-products”)
   public String viewProducts() {
      return “view-products”;
   }
   @RequestMapping(“/add-products”)
   public String addProducts() {
      return “add-products”;
   }
}
下面給出了 view-products.html 檔案:
<!DOCTYPE html>
<html>
   <head>
      <meta charset = "ISO-8859-1"/>
      <title>View Products</title>
      <script src = "https://ajax.googleapis.com/ajax/libs/jquery/3.2.1/jquery.min.js"></script>

      <script>
         $(document).ready(function(){
            $.getJSON("https://:9090/products", function(result){
               $.each(result, function(key,value) {
                  $("#productsJson").append(value.id+" "+value.name+" ");
               });
            });
         });
      </script>
   </head>

   <body>
      <div id = "productsJson"> </div>
   </body>
</html>
下面給出了 add-products.html 檔案:
<!DOCTYPE html>
<html>
   <head>
      <meta charset = "ISO-8859-1" />
      <title>Add Products</title>
      <script src = "https://ajax.googleapis.com/ajax/libs/jquery/3.2.1/jquery.min.js"></script>

      <script>
         $(document).ready(function() {
            $("button").click(function() {
               var productmodel = {
                  id : "3",
                  name : "Ginger"
               };
               var requestJSON = JSON.stringify(productmodel);
               $.ajax({
                  type : "POST",
                  url : "https://:9090/products",
                  headers : {
                     "Content-Type" : "application/json"
                  },
                  data : requestJSON,
                  success : function(data) {
                     alert(data);
                  },
                  error : function(data) {
                  }
               });
            });
         });
      </script>
   </head>

   <body>
      <button>Click here to submit the form</button>
   </body>
</html>
下面給出了主 Spring Boot 應用程式類檔案:
package com.tutorialspoint.demo;

import org.springframework.boot.SpringApplication;
import org.springframework.boot.autoconfigure.SpringBootApplication;

@SpringBootApplication
public class DemoApplication {
   public static void main(String[] args) {
      SpringApplication.run(DemoApplication.class, args);
   }
}
現在,您可以建立一個可執行的 JAR 檔案,並使用以下 Maven 或 Gradle 命令執行 Spring Boot 應用程式。
對於 Maven,請使用以下命令:
mvn clean install
在“BUILD SUCCESS”之後,您可以在target目錄下找到JAR檔案。
對於 Gradle,請使用以下命令:
gradle clean build
在“BUILD SUCCESSFUL”之後,您可以在build/libs目錄下找到JAR檔案。
使用以下命令執行 JAR 檔案:
java –jar <JARFILE>
現在,應用程式已在 Tomcat 埠 8080 上啟動。
現在在您的 Web 瀏覽器中訪問該 URL,您將看到以下輸出:
https://:8080/view-products
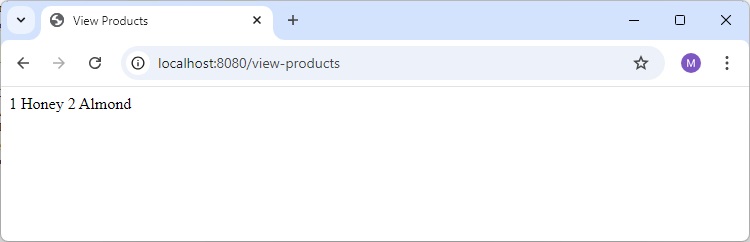
https://:8080/add-products
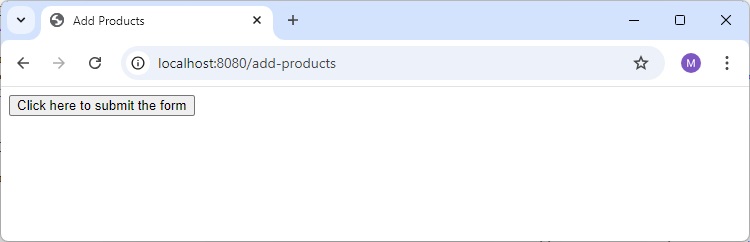
現在,單擊 點選此處提交表單 按鈕,您將看到以下結果:
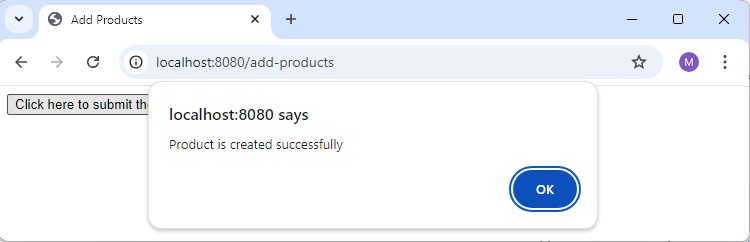
現在,訪問檢視產品 URL 並檢視建立的產品。
https://:8080/view-products
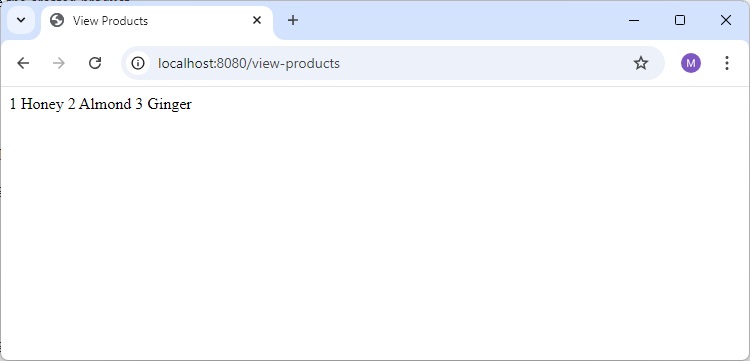
Angular JS
要使用 Angular JS 使用 API,您可以使用以下示例:
使用以下程式碼建立 Angular JS 控制器以使用 GET API - https://:9090/products:
angular.module('demo', [])
.controller('Hello', function($scope, $http) {
   $http.get('https://:9090/products').
   then(function(response) {
      $scope.products = response.data;
   });
});
使用以下程式碼建立 Angular JS 控制器以使用 POST API - https://:9090/products:
angular.module('demo', [])
.controller('Hello', function($scope, $http) {
   $http.post('https://:9090/products',data).
   then(function(response) {
      console.log("Product created successfully");
   });
});
注意 - Post 方法資料表示以 JSON 格式建立產品的請求正文。
Spring Boot - CORS 支援
跨源資源共享 (CORS) 是一種安全概念,允許限制在 Web 瀏覽器中實現的資源。它可以防止 JavaScript 程式碼針對不同來源生成或使用請求。
例如,您的 Web 應用程式正在 8080 埠上執行,並且您正在使用 JavaScript 嘗試從 9090 埠使用 RESTful Web 服務。在這種情況下,您將在 Web 瀏覽器上遇到跨源資源共享安全問題。
解決此問題需要兩個要求:
RESTful Web 服務應支援跨源資源共享。
RESTful Web 服務應用程式應允許從 8080 埠訪問 API。
在本章中,我們將詳細瞭解如何為 RESTful Web 服務應用程式啟用跨源請求。
在控制器方法中啟用 CORS
我們需要使用 @CrossOrigin 註解為控制器方法設定 RESTful Web 服務的來源。此 @CrossOrigin 註解支援特定的 REST API,而不是整個應用程式。
@RequestMapping(value = "/products")
@CrossOrigin(origins = "https://:8080")

public ResponseEntity<Object> getProduct() {
   return null;
}
全域性 CORS 配置
我們需要定義所示的 @Bean 配置以全域性地將 CORS 配置支援設定為您的 Spring Boot 應用程式。
@Bean
public WebMvcConfigurer corsConfigurer() {
   return new WebMvcConfigurerAdapter() {
      @Override
      public void addCorsMappings(CorsRegistry registry) {
         registry.addMapping("/products").allowedOrigins("https://:9000");
      }
   };
}
下面給出了在主 Spring Boot 應用程式中全域性設定 CORS 配置的程式碼。
package com.tutorialspoint.demo;

import org.springframework.boot.SpringApplication;
import org.springframework.boot.autoconfigure.SpringBootApplication;
import org.springframework.context.annotation.Bean;
import org.springframework.web.servlet.config.annotation.CorsRegistry;
import org.springframework.web.servlet.config.annotation.WebMvcConfigurer;
import org.springframework.web.servlet.config.annotation.WebMvcConfigurerAdapter;

@SpringBootApplication
public class DemoApplication {
   public static void main(String[] args) {
      SpringApplication.run(DemoApplication.class, args);
   }
   @Bean
   public WebMvcConfigurer corsConfigurer() {
      return new WebMvcConfigurerAdapter() {
         @Override
         public void addCorsMappings(CorsRegistry registry) {
            registry.addMapping("/products").allowedOrigins("https://:8080");
         }
      };
   }
}
現在,您可以建立一個在 8080 埠上執行的 Spring Boot Web 應用程式,以及可以在 9090 埠上執行的 RESTful Web 服務應用程式。有關 RESTful Web 服務實現的更多詳細資訊,您可以參考本教程中標題為 使用 RESTful Web 服務 的章節。
Spring Boot - 國際化
國際化是一個使您的應用程式能夠適應不同的語言和地區而無需對原始碼進行工程更改的過程。換句話說,國際化是本地化的準備。
在本章中,我們將詳細瞭解如何在 Spring Boot 中實現國際化。
依賴項
我們需要 Spring Boot Starter Web 和 Spring Boot Starter Thymeleaf 依賴項才能在 Spring Boot 中開發 Web 應用程式。
Maven
<dependency>
   <groupId>org.springframework.boot</groupId>
   <artifactId>spring-boot-starter-web</artifactId>
</dependency>

<dependency>
   <groupId>org.springframework.boot</groupId>
   <artifactId>spring-boot-starter-thymeleaf</artifactId>
</dependency>
Gradle
compile('org.springframework.boot:spring-boot-starter-web')
compile group: 'org.springframework.boot', name: 'spring-boot-starter-thymeleaf'
LocaleResolver
我們需要確定應用程式的預設語言環境。我們需要在 Spring Boot 應用程式中新增 LocaleResolver bean。
@Bean
public LocaleResolver localeResolver() {
   SessionLocaleResolver sessionLocaleResolver = new SessionLocaleResolver();
   sessionLocaleResolver.setDefaultLocale(Locale.US);
   return sessionLocaleResolver;
}
LocaleChangeInterceptor
LocaleChangeInterceptor 用於根據新增到請求中的語言引數的值更改新的語言環境。
@Bean
public LocaleChangeInterceptor localeChangeInterceptor() {
   LocaleChangeInterceptor localeChangeInterceptor = new LocaleChangeInterceptor();
   localeChangeInterceptor.setParamName("language");
   return localeChangeInterceptor;
}
為了實現此效果,我們需要將 LocaleChangeInterceptor 新增到應用程式的註冊攔截器中。配置類應擴充套件 WebMvcConfigurerAdapter 類並覆蓋 addInterceptors() 方法。
@Override
public void addInterceptors(InterceptorRegistry registry) {
   registry.addInterceptor(localeChangeInterceptor());
}
訊息源
Spring Boot 應用程式預設從類路徑下的src/main/resources資料夾獲取訊息源。預設語言環境的訊息檔名應為message.properties,每個語言環境的檔案應命名為messages_XX.properties。“XX”表示語言環境程式碼。
所有訊息屬性都應作為鍵值對使用。如果在語言環境中找不到任何屬性,則應用程式使用 messages.properties 檔案中的預設屬性。
預設的 messages.properties 將如下所示:
welcome.text=Hi Welcome to Everyone
法語 messages_fr.properties 將如下所示:
welcome.text=Salut Bienvenue à tous
注意 - 訊息原始檔應儲存為“UTF-8”檔案格式。
HTML 檔案
在 HTML 檔案中,使用語法#{key}顯示屬性檔案中的訊息。
<h1 th:text = "#{welcome.text}"></h1>
完整的程式碼如下所示
Maven – pom.xml
<?xml version = "1.0" encoding = "UTF-8"?>
<project xmlns = "http://maven.apache.org/POM/4.0.0"
   xmlns:xsi = "http://www.w3.org/2001/XMLSchema-instance"
   xsi:schemaLocation = "http://maven.apache.org/POM/4.0.0
   http://maven.apache.org/xsd/maven-4.0.0.xsd">

   <modelVersion>4.0.0</modelVersion>
   <groupId>com.tutorialspoint</groupId>
   <artifactId>demo</artifactId>
   <version>0.0.1-SNAPSHOT</version>
   <packaging>jar</packaging>
   <name>demo</name>
   <description>Demo project for Spring Boot</description>

   <parent>
      <groupId>org.springframework.boot</groupId>
      <artifactId>spring-boot-starter-parent</artifactId>
      <version>1.5.8.RELEASE</version>
      <relativePath />
   </parent>

   <properties>
      <project.build.sourceEncoding>UTF-8</project.build.sourceEncoding>
      <project.reporting.outputEncoding>UTF-8</project.reporting.outputEncoding>
      <java.version>1.8</java.version>
   </properties>

   <dependencies>
      <dependency>
         <groupId>org.springframework.boot</groupId>
         <artifactId>spring-boot-starter-web</artifactId>
      </dependency>

      <dependency>
         <groupId>org.springframework.boot</groupId>
         <artifactId>spring-boot-starter-test</artifactId>
         <scope>test</scope>
      </dependency>

      <dependency>
         <groupId>org.springframework.boot</groupId>
         <artifactId>spring-boot-starter-thymeleaf</artifactId>
      </dependency>
   </dependencies>

   <build>
      <plugins>
         <plugin>
            <groupId>org.springframework.boot</groupId>
            <artifactId>spring-boot-maven-plugin</artifactId>
         </plugin>
      </plugins>
   </build>
</project>
Gradle – build.gradle
buildscript {
   ext {
      springBootVersion = '1.5.8.RELEASE'
   }
   repositories {
      mavenCentral()
   }
   dependencies {
      classpath("org.springframework.boot:spring-boot-gradle-plugin:${springBootVersion}")
   }
}
apply plugin: 'java'
apply plugin: 'eclipse'
apply plugin: 'org.springframework.boot'

group = 'com.tutorialspoint'
version = '0.0.1-SNAPSHOT'
sourceCompatibility = 1.8

repositories {
   mavenCentral()
}
dependencies {
   compile('org.springframework.boot:spring-boot-starter-web')
   compile group: 'org.springframework.boot', name: 'spring-boot-starter-thymeleaf'
   testCompile('org.springframework.boot:spring-boot-starter-test')
}
主要的 Spring Boot 應用程式類檔案如下所示:
package com.tutorialspoint.demo;

import org.springframework.boot.SpringApplication;
import org.springframework.boot.autoconfigure.SpringBootApplication;

@SpringBootApplication
public class DemoApplication {
   public static void main(String[] args) {
      SpringApplication.run(DemoApplication.class, args);
   }
}
控制器類檔案如下所示:
package com.tutorialspoint.demo.controller;

import org.springframework.stereotype.Controller;
import org.springframework.web.bind.annotation.RequestMapping;

@Controller
public class ViewController {
   @RequestMapping("/locale")
   public String locale() {
      return "locale";
   }
}
支援國際化的配置類
package com.tutorialspoint.demo;

import java.util.Locale;

import org.springframework.context.annotation.Bean;
import org.springframework.context.annotation.Configuration;
import org.springframework.web.servlet.LocaleResolver;
import org.springframework.web.servlet.config.annotation.InterceptorRegistry;
import org.springframework.web.servlet.config.annotation.WebMvcConfigurerAdapter;
import org.springframework.web.servlet.i18n.LocaleChangeInterceptor;
import org.springframework.web.servlet.i18n.SessionLocaleResolver;

@Configuration
public class Internationalization extends WebMvcConfigurerAdapter {
   @Bean
   public LocaleResolver localeResolver() {
      SessionLocaleResolver sessionLocaleResolver = new SessionLocaleResolver();
      sessionLocaleResolver.setDefaultLocale(Locale.US);
      return sessionLocaleResolver;
   }
   @Bean
   public LocaleChangeInterceptor localeChangeInterceptor() {
      LocaleChangeInterceptor localeChangeInterceptor = new LocaleChangeInterceptor();
      localeChangeInterceptor.setParamName("language");
      return localeChangeInterceptor;
   }
   @Override
   public void addInterceptors(InterceptorRegistry registry) {
      registry.addInterceptor(localeChangeInterceptor());
   }
}
訊息源 – messages.properties 如下所示:
welcome.text = Hi Welcome to Everyone
訊息源 – message_fr.properties 如下所示:
welcome.text = Salut Bienvenue à tous
HTML 檔案 locale.html 應放置在類路徑下的 templates 目錄下,如下所示:
<!DOCTYPE html>
<html>
   <head>
      <meta charset = "ISO-8859-1"/>
      <title>Internationalization</title>
   </head>
   <body>
      <h1 th:text = "#{welcome.text}"></h1>
   </body>
</html>
您可以建立一個可執行的 JAR 檔案,並使用以下 Maven 或 Gradle 命令執行 Spring Boot 應用程式:
對於 Maven,使用以下命令:
mvn clean install
在“BUILD SUCCESS”之後,您可以在target目錄下找到JAR檔案。
對於 Gradle,使用以下命令:
gradle clean build
在“BUILD SUCCESSFUL”之後,您可以在build/libs目錄下找到JAR檔案。
現在,使用如下所示的命令執行 JAR 檔案:
java –jar <JARFILE>
您會發現應用程式已在 Tomcat 埠 8080 上啟動。
現在在您的 Web 瀏覽器中訪問 URL https://:8080/locale,您將看到以下輸出:

URL https://:8080/locale?language=fr 將為您提供如下所示的輸出:
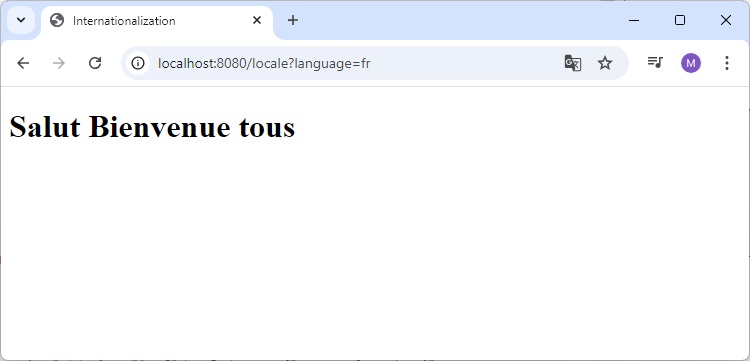
Spring Boot - 排程
排程是按特定時間段執行任務的過程。Spring Boot 為在 Spring 應用程式上編寫排程程式提供了良好的支援。
Java Cron 表示式
Java Cron 表示式用於配置 CronTrigger 的例項,CronTrigger 是 org.quartz.Trigger 的子類。有關 Java cron 表示式的更多資訊,您可以參考此連結:
https://docs.oracle.com/cd/E12058_01/doc/doc.1014/e12030/cron_expressions.htm
@EnableScheduling 註解用於為您的應用程式啟用排程程式。此註解應新增到主 Spring Boot 應用程式類檔案中。
@SpringBootApplication
@EnableScheduling

public class DemoApplication {
   public static void main(String[] args) {
      SpringApplication.run(DemoApplication.class, args);
   }
}
@Scheduled 註解用於在特定時間段內觸發排程程式。
@Scheduled(cron = "0 * 9 * * ?")
public void cronJobSch() throws Exception {
}
以下是一個示例程式碼,它演示瞭如何每天從上午 9:00 開始到上午 9:59 結束,每分鐘執行一次任務
package com.tutorialspoint.demo.scheduler;

import java.text.SimpleDateFormat;
import java.util.Date;
import org.springframework.scheduling.annotation.Scheduled;
import org.springframework.stereotype.Component;

@Component
public class Scheduler {
   @Scheduled(cron = "0 * 9 * * ?")
   public void cronJobSch() {
      SimpleDateFormat sdf = new SimpleDateFormat("yyyy-MM-dd HH:mm:ss.SSS");
      Date now = new Date();
      String strDate = sdf.format(now);
      System.out.println("Java cron job expression:: " + strDate);
   }
}
以下螢幕截圖顯示了應用程式如何在 09:03:23 啟動,以及從那時起每分鐘執行一次 cron 作業排程程式任務。

固定速率
固定速率排程程式用於在特定時間執行任務。它不會等待上一個任務完成。值應以毫秒為單位。示例程式碼如下所示:
@Scheduled(fixedRate = 1000)
public void fixedRateSch() {
}
這裡有一個示例程式碼,用於從應用程式啟動開始每秒執行一次任務:
package com.tutorialspoint.demo.scheduler;

import java.text.SimpleDateFormat;
import java.util.Date;
import org.springframework.scheduling.annotation.Scheduled;
import org.springframework.stereotype.Component;

@Component
public class Scheduler {
   @Scheduled(fixedRate = 1000)
   public void fixedRateSch() {
      SimpleDateFormat sdf = new SimpleDateFormat("yyyy-MM-dd HH:mm:ss.SSS");

      Date now = new Date();
      String strDate = sdf.format(now);
      System.out.println("Fixed Rate scheduler:: " + strDate);
   }
}
觀察以下螢幕截圖,它顯示了應用程式在 09:12:00 啟動,之後每秒執行一次固定速率排程程式任務。

固定延遲
固定延遲排程程式用於在特定時間執行任務。它應該等待上一個任務完成。值應以毫秒為單位。示例程式碼如下所示:
@Scheduled(fixedDelay = 1000, initialDelay = 1000)
public void fixedDelaySch() {
}
這裡,initialDelay 是應用程式啟動後第一次執行任務之前需要等待的時間(以毫秒為單位)。
以下是一個示例,演示如何在應用程式啟動完成後 3 秒後每秒執行一次任務:
package com.tutorialspoint.demo.scheduler;

import java.text.SimpleDateFormat;
import java.util.Date;
import org.springframework.scheduling.annotation.Scheduled;
import org.springframework.stereotype.Component;

@Component
public class Scheduler {
   @Scheduled(fixedDelay = 1000, initialDelay = 3000)
   public void fixedDelaySch() {
      SimpleDateFormat sdf = new SimpleDateFormat("yyyy-MM-dd HH:mm:ss.SSS");
      Date now = new Date();
      String strDate = sdf.format(now);
      System.out.println("Fixed Delay scheduler:: " + strDate);
   }
}
觀察以下螢幕截圖,它顯示了應用程式在 09:18:39 啟動,並且每 3 秒後,固定延遲排程程式任務每秒執行一次。

Spring Boot - 啟用 HTTPS
預設情況下,Spring Boot 應用程式在啟動時使用 HTTP 8080 埠。
您需要按照以下步驟在 Spring Boot 應用程式中配置 HTTPS 和埠 443:
獲取 SSL 證書 - 建立自簽名證書或從證書頒發機構獲取證書
啟用 HTTPS 和 443 埠
自簽名證書
要建立自簽名證書,Java 執行時環境附帶證書管理實用程式 keytool。此實用程式用於建立自簽名證書。它在以下程式碼中顯示:
keytool -genkey -alias tomcat -storetype PKCS12 -keyalg RSA -keysize 2048 -keystore keystore.p12 -validity 3650
Enter keystore password:
   Re-enter new password:
   What is your first and last name?
   [Unknown]:
   What is the name of your organizational unit?
   [Unknown]:
   What is the name of your organization?
   [Unknown]:
   What is the name of your City or Locality?
   [Unknown]:
   What is the name of your State or Province?
   [Unknown]:
   What is the two-letter country code for this unit?
   [Unknown]:
   Is CN = Unknown, OU=Unknown, O = Unknown, L = Unknown, ST = Unknown, C = Unknown correct?
   [no]: yes
此程式碼將生成一個名為 keystore.p12 的 PKCS12 金鑰庫檔案,證書別名名為 tomcat。
配置 HTTPS
我們需要將伺服器埠設定為 443,並將金鑰庫檔案路徑、金鑰庫密碼、金鑰庫型別和金鑰別名提供給 application.properties 檔案。請觀察以下程式碼:
server.port: 443
server.ssl.key-store: keystore.p12
server.ssl.key-store-password: springboot
server.ssl.keyStoreType: PKCS12
server.ssl.keyAlias: tomcat
如果您使用 YAML 屬性,則可以使用以下 application.yml:
server:
   port: 443
   ssl:
      key-store: keystore.p12
      key-store-password: springboot
      keyStoreType: PKCS12
      keyAlias: tomcat
您可以建立一個可執行的 JAR 檔案,並使用以下 Maven 或 Gradle 命令執行 Spring Boot 應用程式。
對於 Maven,您可以使用以下命令:
mvn clean install
在“BUILD SUCCESS”之後,您可以在target目錄下找到JAR檔案。
對於 Gradle,您可以使用以下命令
gradle clean build
在“BUILD SUCCESSFUL”之後,您可以在build/libs目錄下找到JAR檔案。
現在,使用以下命令執行 JAR 檔案:
java –jar <JARFILE>
現在,應用程式已在 Tomcat 埠 443 上啟動,並使用 https,如下所示:

Spring Boot - Eureka 伺服器
Eureka Server 是一個應用程式,它儲存有關所有客戶端服務應用程式的資訊。每個微服務都將註冊到 Eureka 伺服器,並且 Eureka 伺服器知道在每個埠和 IP 地址上執行的所有客戶端應用程式。Eureka Server 也稱為發現伺服器。
在本章中,我們將詳細瞭解如何構建 Eureka 伺服器。
構建 Eureka 伺服器
Eureka Server 與 Spring Cloud 捆綁在一起。為此,我們需要開發 Eureka 伺服器並在預設埠 8761 上執行它。
訪問 Spring Initializer 主頁 https://start.spring.io/ 並下載帶有 Eureka 伺服器依賴項的 Spring Boot 專案。它在下面的螢幕截圖中顯示:
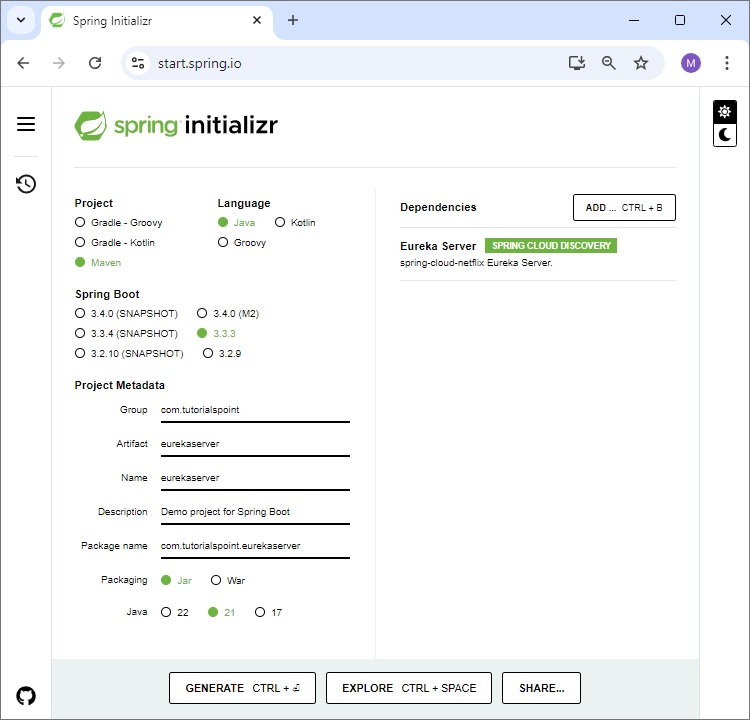
在主 Spring Boot 應用程式類檔案中下載專案後,我們需要新增 @EnableEurekaServer 註解。@EnableEurekaServer 註解用於使您的 Spring Boot 應用程式充當 Eureka 伺服器。
主 Spring Boot 應用程式類檔案的程式碼如下所示:
package com.tutorialspoint.eurekaserver;

import org.springframework.boot.SpringApplication;
import org.springframework.boot.autoconfigure.SpringBootApplication;
import org.springframework.cloud.netflix.eureka.server.EnableEurekaServer;

@SpringBootApplication
@EnableEurekaServer
public class EurekaserverApplication {
   public static void main(String[] args) {
      SpringApplication.run(EurekaserverApplication.class, args);
   }
}
確保在您的構建配置檔案中添加了 Spring Cloud Eureka Server 依賴項。
Maven 使用者依賴項的程式碼如下所示:
<dependency>
<groupId>org.springframework.cloud</groupId>
   <artifactId>spring-cloud-starter-eureka-server</artifactId>
</dependency>
Gradle 使用者依賴項的程式碼如下所示:
compile('org.springframework.cloud:spring-cloud-starter-eureka-server')
完整的構建配置檔案如下所示:
Maven pom.xml
<?xml version = "1.0" encoding = "UTF-8"?>
<project xmlns = "http://maven.apache.org/POM/4.0.0"
   xmlns:xsi = "http://www.w3.org/2001/XMLSchema-instance"
   xsi:schemaLocation = "http://maven.apache.org/POM/4.0.0
   http://maven.apache.org/xsd/maven-4.0.0.xsd">

   <modelVersion>4.0.0</modelVersion>
   <groupId>com.tutorialspoint</groupId>
   <artifactId>eurekaserver</artifactId>
   <version>0.0.1-SNAPSHOT</version>
   <packaging>jar</packaging>
   <name>eurekaserver</name>
   <description>Demo project for Spring Boot</description>

   <parent>
      <groupId>org.springframework.boot</groupId>
      <artifactId>spring-boot-starter-parent</artifactId>
      <version>1.5.9.RELEASE</version>
      <relativePath/> <!-- lookup parent from repository -->
   </parent>

   <properties>
      <project.build.sourceEncoding>UTF-8</project.build.sourceEncoding>
      <project.reporting.outputEncoding>UTF-8</project.reporting.outputEncoding>
      <java.version>1.8</java.version>
      <spring-cloud.version>Edgware.RELEASE</spring-cloud.version>
   </properties>

   <dependencies>
      <dependency>
         <groupId>org.springframework.cloud</groupId>
         <artifactId>spring-cloud-starter-eureka-server</artifactId>
      </dependency>

      <dependency>
         <groupId>org.springframework.boot</groupId>
         <artifactId>spring-boot-starter-test</artifactId>
         <scope>test</scope>
      </dependency>
   </dependencies>

   <dependencyManagement>
      <dependencies>
         <dependency>
            <groupId>org.springframework.cloud</groupId>
            <artifactId>spring-cloud-dependencies</artifactId>
            <version>${spring-cloud.version}</version>
            <type>pom</type>
            <scope>import</scope>
         </dependency>
      </dependencies>
   </dependencyManagement>

   <build>
      <plugins>
         <plugin>
            <groupId>org.springframework.boot</groupId>
            <artifactId>spring-boot-maven-plugin</artifactId>
         </plugin>
      </plugins>
   </build>

</project>
Gradle – build.gradle
buildscript {
   ext {
      springBootVersion = '1.5.9.RELEASE'
   }
   repositories {
      mavenCentral()
   }
   dependencies {
      classpath("org.springframework.boot:spring-boot-gradle-plugin:${springBootVersion}")
   }
}

apply plugin: 'java'
apply plugin: 'eclipse'
apply plugin: 'org.springframework.boot'

group = 'com.tutorialspoint'
version = '0.0.1-SNAPSHOT'
sourceCompatibility = 1.8

repositories {
   mavenCentral()
}
ext {
   springCloudVersion = 'Edgware.RELEASE'
}
dependencies {
   compile('org.springframework.cloud:spring-cloud-starter-eureka-server')
   testCompile('org.springframework.boot:spring-boot-starter-test')
}
dependencyManagement {
   imports {
      mavenBom "org.springframework.cloud:spring-cloud-dependencies:${springCloudVersion}"
   }
}
預設情況下,Eureka Server 將自身註冊到發現中。您應該將以下給定的配置新增到您的 application.properties 檔案或 application.yml 檔案中。
application.properties 檔案如下所示:
eureka.client.registerWithEureka = false
eureka.client.fetchRegistry = false
server.port = 8761
application.yml 檔案如下所示:
eureka:
   client:
      registerWithEureka: false
      fetchRegistry: false
server:
   port: 8761
現在,您可以建立一個可執行的 JAR 檔案,並使用以下所示的 Maven 或 Gradle 命令執行 Spring Boot 應用程式:
對於 Maven,請使用如下所示的命令:
mvn clean install
在“BUILD SUCCESS”之後,您可以在target目錄下找到JAR檔案。
對於 Gradle,您可以使用以下命令:
gradle clean build
在“BUILD SUCCESSFUL”之後,您可以在build/libs目錄下找到JAR檔案。
現在,使用以下命令執行 JAR 檔案:
java –jar <JARFILE>
您會發現應用程式已在 Tomcat 埠 8761 上啟動,如下所示:

現在,在您的 Web 瀏覽器中訪問 URL https://:8761/,您會發現 Eureka Server 在埠 8761 上執行,如下所示:
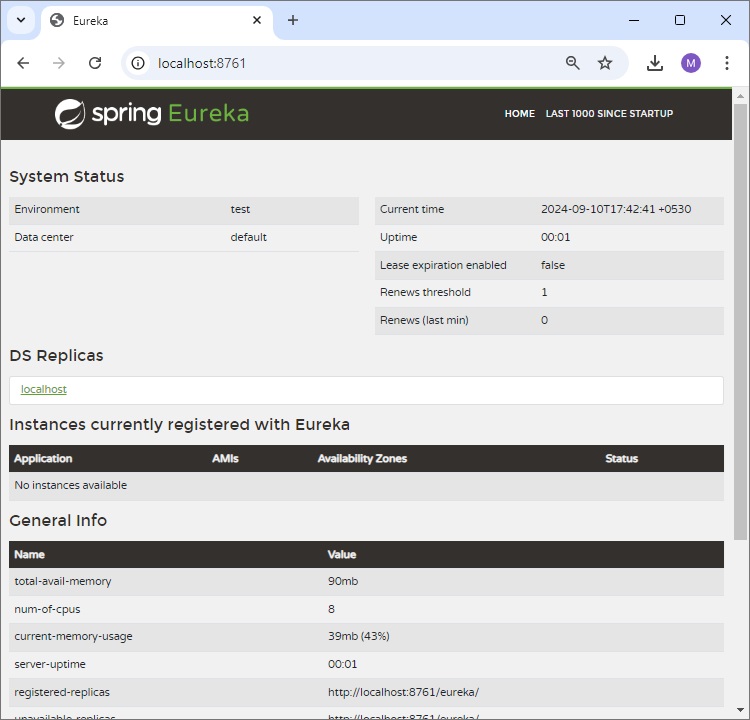
使用 Eureka 註冊服務
在本章中,您將詳細瞭解如何將 Spring Boot 微服務應用程式註冊到 Eureka Server。在註冊應用程式之前,請確保 Eureka Server 在埠 8761 上執行,或者先構建 Eureka Server 並執行它。有關構建 Eureka 伺服器的更多資訊,您可以參考上一章。
首先,您需要在我們的構建配置檔案中新增以下依賴項,以便將微服務註冊到 Eureka 伺服器。
Maven 使用者可以將以下依賴項新增到pom.xml檔案中:
<dependency>
   <groupId>org.springframework.cloud</groupId>
   <artifactId>spring-cloud-starter-eureka</artifactId>
</dependency>
Gradle 使用者可以將以下依賴項新增到build.gradle檔案中:
compile('org.springframework.cloud:spring-cloud-starter-eureka')
現在,我們需要在主 Spring Boot 應用程式類檔案中新增 @EnableEurekaClient 註解。@EnableEurekaClient 註解使您的 Spring Boot 應用程式充當 Eureka 客戶端。
主 Spring Boot 應用程式如下所示:
package com.tutorialspoint.eurekaclient;

import org.springframework.boot.SpringApplication;
import org.springframework.boot.autoconfigure.SpringBootApplication;
import org.springframework.cloud.netflix.eureka.EnableEurekaClient;

@SpringBootApplication
@EnableEurekaClient
public class EurekaclientApplication {
   public static void main(String[] args) {
      SpringApplication.run(EurekaclientApplication.class, args);
   }
}
要將 Spring Boot 應用程式註冊到 Eureka Server,我們需要在我們的 application.properties 檔案或 application.yml 檔案中新增以下配置,並在我們的配置中指定 Eureka Server URL。
application.yml 檔案的程式碼如下所示:
eureka:
   client:
      serviceUrl:
         defaultZone: https://:8761/eureka
      instance:
      preferIpAddress: true
spring:
   application:
      name: eurekaclient
application.properties 檔案的程式碼如下所示:
eureka.client.serviceUrl.defaultZone  = https://:8761/eureka
eureka.client.instance.preferIpAddress = true
spring.application.name = eurekaclient
現在,新增 Rest 端點以在主 Spring Boot 應用程式中返回字串,並在構建配置檔案中新增 Spring Boot Starter Web 依賴項。請觀察以下程式碼:
package com.tutorialspoint.eurekaclient;

import org.springframework.boot.SpringApplication;
import org.springframework.boot.autoconfigure.SpringBootApplication;
import org.springframework.cloud.netflix.eureka.EnableEurekaClient;
import org.springframework.web.bind.annotation.RequestMapping;
import org.springframework.web.bind.annotation.RestController;

@SpringBootApplication
@EnableEurekaClient
@RestController
public class EurekaclientApplication {
   public static void main(String[] args) {
      SpringApplication.run(EurekaclientApplication.class, args);
   }
   @RequestMapping(value = "/")
   public String home() {
      return "Eureka Client application";
   }
}
整個配置檔案如下所示。
對於 Maven 使用者 - pom.xml
<?xml version = "1.0" encoding = "UTF-8"?>
<project xmlns = "http://maven.apache.org/POM/4.0.0"
   xmlns:xsi = "http://www.w3.org/2001/XMLSchema-instance"
   xsi:schemaLocation = "http://maven.apache.org/POM/4.0.0
   http://maven.apache.org/xsd/maven-4.0.0.xsd">

   <modelVersion>4.0.0</modelVersion>
   <groupId>com.tutorialspoint</groupId>
   <artifactId>eurekaclient</artifactId>
   <version>0.0.1-SNAPSHOT</version>
   <packaging>jar</packaging>

   <name>eurekaclient</name>
   <description>Demo project for Spring Boot</description>

   <parent>
      <groupId>org.springframework.boot</groupId>
      <artifactId>spring-boot-starter-parent</artifactId>
      <version>1.5.9.RELEASE</version>
      <relativePath/> <!-- lookup parent from repository -->
   </parent>

   <properties>
      <project.build.sourceEncoding>UTF-8</project.build.sourceEncoding>
      <project.reporting.outputEncoding>UTF-8</project.reporting.outputEncoding>
      <java.version>1.8</java.version>
      <spring-cloud.version>Edgware.RELEASE</spring-cloud.version>
   </properties>

   <dependencies>
      <dependency>
         <groupId>org.springframework.cloud</groupId>
         <artifactId>spring-cloud-starter-eureka</artifactId>
      </dependency>
      <dependency>
         <groupId>org.springframework.boot</groupId>
         <artifactId>spring-boot-starter-web</artifactId>
      </dependency>
      <dependency>
         <groupId>org.springframework.boot</groupId>
         <artifactId>spring-boot-starter-test</artifactId>
         <scope>test</scope>
      </dependency>
   </dependencies>

   <dependencyManagement>
      <dependencies>
         <dependency>
            <groupId>org.springframework.cloud</groupId>
            <artifactId>spring-cloud-dependencies</artifactId>
            <version>${spring-cloud.version}</version>
            <type>pom</type>
            <scope>import</scope>
         </dependency>
      </dependencies>
   </dependencyManagement>

   <build>
      <plugins>
         <plugin>
            <groupId>org.springframework.boot</groupId>
            <artifactId>spring-boot-maven-plugin</artifactId>
         </plugin>
      </plugins>
   </build>

</projecta>
對於 Gradle 使用者 – build.gradle
buildscript {
   ext {
      springBootVersion = '1.5.9.RELEASE'
   }
   repositories {
      mavenCentral()
   }
   dependencies {
      classpath("org.springframework.boot:spring-boot-gradle-plugin:${springBootVersion}")
   }
}

apply plugin: 'java'
apply plugin: 'eclipse'
apply plugin: 'org.springframework.boot'

group = 'com.tutorialspoint'
version = '0.0.1-SNAPSHOT'
sourceCompatibility = 1.8

repositories {
   mavenCentral()
}
ext {
   springCloudVersion = 'Edgware.RELEASE'
}
dependencies {
   compile('org.springframework.cloud:spring-cloud-starter-eureka')
   testCompile('org.springframework.boot:spring-boot-starter-test')
   compile('org.springframework.boot:spring-boot-starter-web')
}
dependencyManagement {
   imports {
      mavenBom "org.springframework.cloud:spring-cloud-dependencies:${springCloudVersion}"
   }
}
您可以建立一個可執行的 JAR 檔案,並使用以下 Maven 或 Gradle 命令執行 Spring Boot 應用程式:
對於 Maven,您可以使用以下命令:
mvn clean install
在“BUILD SUCCESS”之後,您可以在target目錄下找到JAR檔案。
對於 Gradle,您可以使用以下命令:
gradle clean build
在“BUILD SUCCESSFUL”之後,您可以在build/libs目錄下找到JAR檔案。
現在,使用如下所示的命令執行 JAR 檔案:
java –jar <JARFILE>
現在,應用程式已在 Tomcat 埠 8080 上啟動,並且 Eureka Client 應用程式已註冊到 Eureka Server,如下所示:

在您的 Web 瀏覽器中訪問 URL https://:8761/,您會看到 Eureka Client 應用程式已註冊到 Eureka Server。

現在在您的 Web 瀏覽器中訪問 URL https://:8080/,並檢視 Rest 端點的輸出。

Spring Boot - Zuul 代理伺服器和路由
Zuul Server 是一個閘道器應用程式,它處理所有請求並執行微服務應用程式的動態路由。Zuul Server 也稱為邊緣伺服器。
例如,/api/user 對映到使用者服務,/api/products 對映到產品服務,Zuul Server 會動態地將請求路由到相應的後端應用程式。
在本章中,我們將詳細瞭解如何在 Spring Boot 中建立 Zuul Server 應用程式。
建立 Zuul Server 應用程式
Zuul 伺服器與 Spring Cloud 依賴項捆綁在一起。您可以從 Spring Initializer 頁面https://start.spring.io/下載 Spring Boot 專案,並選擇 Zuul Server 依賴項。

在您的主 Spring Boot 應用程式上新增 @EnableZuulProxy 註解。@EnableZuulProxy 註解用於使您的 Spring Boot 應用程式充當 Zuul 代理伺服器。
package com.tutorialspoint.zuulserver;

import org.springframework.boot.SpringApplication;
import org.springframework.boot.autoconfigure.SpringBootApplication;
import org.springframework.cloud.netflix.zuul.EnableZuulProxy;

@SpringBootApplication
@EnableZuulProxy
public class ZuulserverApplication {
   public static void main(String[] args) {
      SpringApplication.run(ZuulserverApplication.class, args);
   }
}
您需要在構建配置檔案中新增 Spring Cloud Starter Zuul 依賴項。
Maven 使用者需要在您的 pom.xml 檔案中新增以下依賴項:
<dependency>
   <groupId>org.springframework.cloud</groupId>
   <artifactId>spring-cloud-starter-zuul</artifactId>
</dependency>
對於 Gradle 使用者,請在您的 build.gradle 檔案中新增以下依賴項:
compile('org.springframework.cloud:spring-cloud-starter-zuul')
對於 Zuul 路由,請在您的 application.properties 檔案或 application.yml 檔案中新增以下屬性。
spring.application.name = zuulserver
zuul.routes.products.path = /api/demo/**
zuul.routes.products.url = https://:8080/
server.port = 8111
這意味著對 /api/demo/ 的 http 呼叫將轉發到產品服務。例如,/api/demo/products 將轉發到 /products。
yaml 檔案使用者可以使用以下所示的 application.yml 檔案:
server:
   port: 8111
spring:
   application:
      name: zuulserver
zuul:

routes:
   products:
      path: /api/demo/**
      url: https://:8080/
注意 - 在透過 Zuul 代理進行路由之前,https://:8080/ 應用程式應已在執行。
完整的構建配置檔案如下所示。
Maven 使用者可以使用以下提供的 pom.xml 檔案:
<?xml version = "1.0" encoding = "UTF-8"?>
<project xmlns = "http://maven.apache.org/POM/4.0.0"
   xmlns:xsi = "http://www.w3.org/2001/XMLSchema-instance"
   xsi:schemaLocation = "http://maven.apache.org/POM/4.0.0
   http://maven.apache.org/xsd/maven-4.0.0.xsd">

   <modelVersion>4.0.0</modelVersion>
   <groupId>com.tutorialspoint</groupId>
   <artifactId>zuulserver</artifactId>
   <version>0.0.1-SNAPSHOT</version>
   <packaging>jar</packaging>

   <name>zuulserver</name>
   <description>Demo project for Spring Boot</description>

   <parent>
      <groupId>org.springframework.boot</groupId>
      <artifactId>spring-boot-starter-parent</artifactId>
      <version>1.5.9.RELEASE</version>
      <relativePath/> <!-- lookup parent from repository -->
   </parent>

   <properties>
      <project.build.sourceEncoding>UTF-8</project.build.sourceEncoding>
      <project.reporting.outputEncoding>UTF-8</project.reporting.outputEncoding>
      <java.version>1.8</java.version>
      <spring-cloud.version>Edgware.RELEASE</spring-cloud.version>
   </properties>

   <dependencies>
      <dependency>
         <groupId>org.springframework.cloud</groupId>
         <artifactId>spring-cloud-starter-zuul</artifactId>
      </dependency>

      <dependency>
         <groupId>org.springframework.boot</groupId>
         <artifactId>spring-boot-starter-test</artifactId>
         <scope>test</scope>
      </dependency>
   </dependencies>

   <dependencyManagement>
      <dependencies>
         <dependency>
            <groupId>org.springframework.cloud</groupId>
            <artifactId>spring-cloud-dependencies</artifactId>
            <version>${spring-cloud.version}</version>
            <type>pom</type>
            <scope>import</scope>
         </dependency>
      </dependencies>
   </dependencyManagement>

   <build>
      <plugins>
         <plugin>
            <groupId>org.springframework.boot</groupId>
            <artifactId>spring-boot-maven-plugin</artifactId>
         </plugin>
      </plugins>
   </build>
</project>
Gradle 使用者可以使用以下提供的 build.gradle 檔案:
buildscript {
   ext {
      springBootVersion = '1.5.9.RELEASE'
   }
   repositories {
      mavenCentral()
   }
   dependencies {
      classpath("org.springframework.boot:spring-boot-gradle-plugin:${springBootVersion}")
   }
}

apply plugin: 'java'
apply plugin: 'eclipse'
apply plugin: 'org.springframework.boot'

group = 'com.tutorialspoint'
version = '0.0.1-SNAPSHOT'
sourceCompatibility = 1.8

repositories {
   mavenCentral()
}
ext {
   springCloudVersion = 'Edgware.RELEASE'
}
dependencies {
   compile('org.springframework.cloud:spring-cloud-starter-zuul')
   testCompile('org.springframework.boot:spring-boot-starter-test')
}
dependencyManagement {
   imports {
      mavenBom "org.springframework.cloud:spring-cloud-dependencies:${springCloudVersion}"
   }
}
您可以建立一個可執行的 JAR 檔案,並使用下面給出的 Maven 或 Gradle 命令執行 Spring Boot 應用程式。
對於 Maven,您可以使用以下命令:
mvn clean install
在“BUILD SUCCESS”之後,您可以在target目錄下找到JAR檔案。
對於 Gradle,您可以使用以下提供的命令:
gradle clean build
在“BUILD SUCCESSFUL”之後,您可以在build/libs目錄下找到JAR檔案。
現在,使用以下顯示的命令執行 JAR 檔案:
java –jar <JARFILE>
您會發現應用程式已在 Tomcat 埠 8111 上啟動,如下所示。

現在,在您的 Web 瀏覽器中訪問 URL https://:8111/api/demo/products,您可以看到 /products REST 端點的輸出,如下所示:
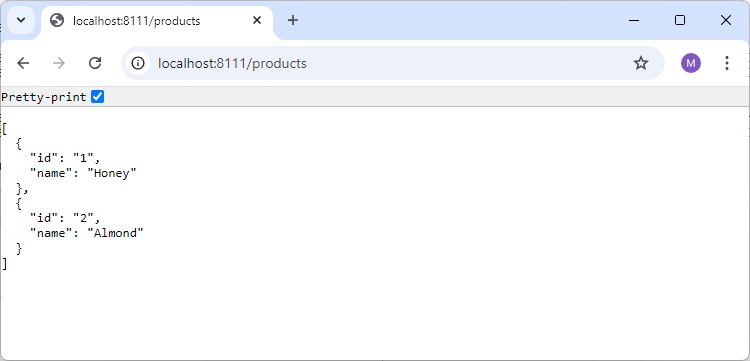
Spring Boot - 雲配置伺服器
Spring Cloud Configuration Server 是一個集中式應用程式,用於管理所有與應用程式相關的配置屬性。在本節中,您將詳細瞭解如何建立 Spring Cloud Configuration 伺服器。
建立 Spring Cloud Configuration 伺服器
首先,從 Spring Initializer 頁面下載 Spring Boot 專案,並選擇 Spring Cloud Config Server 依賴項。請觀察以下螢幕截圖:

現在,在您的構建配置檔案中新增 Spring Cloud Config 伺服器依賴項,如下所述:
Maven 使用者可以將以下依賴項新增到 pom.xml 檔案中。
<dependency>
   <groupId>org.springframework.cloud</groupId>
   <artifactId>spring-cloud-config-server</artifactId>
</dependency>
Gradle 使用者可以在您的 build.gradle 檔案中新增以下依賴項。
compile('org.springframework.cloud:spring-cloud-config-server')
現在,在您的主 Spring Boot 應用程式類檔案中新增 @EnableConfigServer 註解。@EnableConfigServer 註解使您的 Spring Boot 應用程式充當配置伺服器。
主要的 Spring Boot 應用程式類檔案如下所示:
package com.tutorialspoint.configserver;

import org.springframework.boot.SpringApplication;
import org.springframework.boot.autoconfigure.SpringBootApplication;
import org.springframework.cloud.config.server.EnableConfigServer;

@SpringBootApplication
@EnableConfigServer
public class ConfigserverApplication {
   public static void main(String[] args) {
      SpringApplication.run(ConfigserverApplication.class, args);
   }
}
現在,將以下配置新增到您的屬性檔案中,並將 application.properties 檔案替換為 bootstrap.properties 檔案。請觀察以下程式碼:
server.port = 8888
spring.cloud.config.server.native.searchLocations=file:///C:/configprop/
SPRING_PROFILES_ACTIVE=native
配置伺服器在 Tomcat 埠 8888 上執行,並且應用程式配置屬性從本機搜尋位置載入。
現在,在 file:///C:/configprop/ 中,放置您的客戶端應用程式 - application.properties 檔案。例如,您的客戶端應用程式名稱為 config-client,則將您的 application.properties 檔案重新命名為 config-client.properties 並將屬性檔案放置在路徑 file:///C:/configprop/ 上。
config-client 屬性檔案的程式碼如下所示:
welcome.message = Welcome to Spring cloud config server
完整的構建配置檔案如下所示:
Maven 使用者可以使用以下提供的 pom.xml:
<?xml version = "1.0" encoding = "UTF-8"?>
<project xmlns = "http://maven.apache.org/POM/4.0.0"
   xmlns:xsi = "http://www.w3.org/2001/XMLSchema-instance"
   xsi:schemaLocation = "http://maven.apache.org/POM/4.0.0
   http://maven.apache.org/xsd/maven-4.0.0.xsd">

   <modelVersion>4.0.0</modelVersion>
   <groupId>com.tutorialspoint</groupId>
   <artifactId>configserver</artifactId>
   <version>0.0.1-SNAPSHOT</version>
   <packaging>jar</packaging>

   <name>configserver</name>
   <description>Demo project for Spring Boot</description>
   <parent>
      <groupId>org.springframework.boot</groupId>
      <artifactId>spring-boot-starter-parent</artifactId>
      <version>1.5.9.RELEASE</version>
      <relativePath/> <!-- lookup parent from repository -->
   </parent>

   <properties>
      <project.build.sourceEncoding>UTF-8</project.build.sourceEncoding>
      <project.reporting.outputEncoding>UTF-8</project.reporting.outputEncoding>
      <java.version>1.8</java.version>
      <spring-cloud.version>Edgware.RELEASE</spring-cloud.version>
   </properties>

   <dependencies>
      <dependency>
         <groupId>org.springframework.cloud</groupId>
         <artifactId>spring-cloud-config-server</artifactId>
      </dependency>
      <dependency>
         <groupId>org.springframework.boot</groupId>
         <artifactId>spring-boot-starter-test</artifactId>
         <scope>test</scope>
      </dependency>
   </dependencies>

   <dependencyManagement>
      <dependencies>
         <dependency>
            <groupId>org.springframework.cloud</groupId>
            <artifactId>spring-cloud-dependencies</artifactId>
            <version>${spring-cloud.version}</version>
            <type>pom</type>
            <scope>import</scope>
         </dependency>
      </dependencies>
   </dependencyManagement>

   <build>
      <plugins>
         <plugin>
            <groupId>org.springframework.boot</groupId>
            <artifactId>spring-boot-maven-plugin</artifactId>
         </plugin>
      </plugins>
   </build>

</project>
Gradle 使用者可以使用以下提供的 build.gradle 檔案:
<scope>import</scope>
</dependency>
</dependencies>
buildscript {
   ext {
      springBootVersion = '1.5.9.RELEASE'
   }
   repositories {
      mavenCentral()
   }
   dependencies {
      classpath("org.springframework.boot:spring-boot-gradle-plugin:${springBootVersion}")
   }
}
apply plugin: 'java'
apply plugin: 'eclipse'
apply plugin: 'org.springframework.boot'

group = 'com.tutorialspoint'
version = '0.0.1-SNAPSHOT'
sourceCompatibility = 1.8

repositories {
   mavenCentral()
}
ext {
   springCloudVersion = 'Edgware.RELEASE'
}
dependencies {
   compile('org.springframework.cloud:spring-cloud-config-server')
   testCompile('org.springframework.boot:spring-boot-starter-test')
}
dependencyManagement {
   imports {
      mavenBom "org.springframework.cloud:spring-cloud-dependencies:${springCloudVersion}"
   }
}
現在,建立一個可執行的 JAR 檔案,並使用以下 Maven 或 Gradle 命令執行 Spring Boot 應用程式:
對於 Maven,使用以下命令:
mvn clean install
在“BUILD SUCCESS”之後,您可以在target目錄下找到JAR檔案。
對於 Gradle,請使用以下提供的命令:
gradle clean build
在“BUILD SUCCESSFUL”之後,您可以在build/libs目錄下找到JAR檔案。
使用以下命令執行 JAR 檔案:
java –jar <JARFILE>
現在,應用程式已在 Tomcat 埠 8888 上啟動,如下所示:

現在,在您的 Web 瀏覽器中訪問 URL https://:8888/config-client/default/master,您可以看到您的 config-client 應用程式配置屬性,如下所示。

Spring Boot - 雲配置客戶端
某些應用程式可能需要配置屬性,這些屬性可能需要更改,開發人員可能需要將其關閉或重新啟動應用程式才能執行此操作。但是,這可能會導致生產環境中的停機時間,並且需要重新啟動應用程式。Spring Cloud Configuration Server 允許開發人員載入新的配置屬性,而無需重新啟動應用程式且無需任何停機時間。
使用 Spring Cloud Configuration 伺服器
首先,從 https://start.spring.io/下載 Spring Boot 專案,並選擇 Spring Cloud Config Client 依賴項。現在,在您的構建配置檔案中新增 Spring Cloud Starter Config 依賴項。
Maven 使用者可以將以下依賴項新增到 pom.xml 檔案中。
<dependency>
   <groupId>org.springframework.cloud</groupId>
   <artifactId>spring-cloud-starter-config</artifactId>
</dependency>
Gradle 使用者可以將以下依賴項新增到 build.gradle 檔案中。
compile('org.springframework.cloud:spring-cloud-starter-config')
現在,您需要將 @RefreshScope 註解新增到您的主 Spring Boot 應用程式中。@RefreshScope 註解用於從配置伺服器載入配置屬性值。
package com.example.configclient;

import org.springframework.boot.SpringApplication;
import org.springframework.boot.autoconfigure.SpringBootApplication;
import org.springframework.cloud.context.config.annotation.RefreshScope;

@SpringBootApplication
@RefreshScope
public class ConfigclientApplication {
   public static void main(String[] args) {
      SpringApplication.run(ConfigclientApplication.class, args);
   }
}
現在,在您的 application.properties 檔案中新增配置伺服器 URL 並提供您的應用程式名稱。
注意 - 在啟動配置客戶端應用程式之前,應執行 https://:8888 配置伺服器。
spring.application.name = config-client
spring.cloud.config.uri = https://:8888
以下程式碼用於編寫一個簡單的 REST 端點,以從配置伺服器讀取歡迎訊息:
package com.example.configclient;

import org.springframework.beans.factory.annotation.Value;
import org.springframework.boot.SpringApplication;
import org.springframework.boot.autoconfigure.SpringBootApplication;
import org.springframework.cloud.context.config.annotation.RefreshScope;
import org.springframework.web.bind.annotation.RequestMapping;
import org.springframework.web.bind.annotation.RestController;

@SpringBootApplication
@RefreshScope
@RestController
public class ConfigclientApplication {
   @Value("${welcome.message}")
   String welcomeText;

   public static void main(String[] args) {
      SpringApplication.run(ConfigclientApplication.class, args);
   }
   @RequestMapping(value = "/")
   public String welcomeText() {
      return welcomeText;
   }
}
您可以建立一個可執行的 JAR 檔案,並使用以下 Maven 或 Gradle 命令執行 Spring Boot 應用程式:
對於 Maven,您可以使用以下顯示的命令:
mvn clean install
在“BUILD SUCCESS”之後,您可以在target目錄下找到JAR檔案。
對於 Gradle,您可以使用以下命令:
gradle clean build
在“BUILD SUCCESSFUL”之後,您可以在build/libs目錄下找到JAR檔案。
現在,使用此處顯示的命令執行 JAR 檔案:
java –jar <JARFILE>
現在,應用程式已在 Tomcat 埠 8080 上啟動,如下所示:
您可以在控制檯視窗中看到日誌;config-client 應用程式正在從 https://:8888 獲取配置。
2017-12-08 12:41:57.682  INFO 1104 --- [
   main] c.c.c.ConfigServicePropertySourceLocator :
   Fetching config from server at: https://:8888
現在訪問 URL https://:8080/,歡迎訊息將從配置伺服器載入。

現在,轉到配置伺服器上更改屬性值,然後訪問執行器端點 POST URL https://:8080/refresh,並在 URL https://:8080/ 中檢視新的配置屬性值。
Spring Boot - Actuator
Spring Boot Actuator 提供安全的端點,用於監控和管理您的 Spring Boot 應用程式。預設情況下,所有執行器端點都是安全的。在本節中,您將詳細瞭解如何為您的應用程式啟用 Spring Boot 執行器。
啟用 Spring Boot 執行器
要為您的 Spring Boot 應用程式啟用 Spring Boot 執行器端點,我們需要在構建配置檔案中新增 Spring Boot Starter Actuator 依賴項。
Maven 使用者可以在您的 pom.xml 檔案中新增以下依賴項。
<dependency> <groupId>org.springframework.boot</groupId> <artifactId>spring-boot-starter-actuator</artifactId> </dependency>
Gradle 使用者可以在您的 build.gradle 檔案中新增以下依賴項。
compile group: 'org.springframework.boot', name: 'spring-boot-starter-actuator'
在 application.properties 檔案中,我們需要停用執行器端點的安全性。
management.security.enabled = false
YAML 檔案使用者可以在您的 application.yml 檔案中新增以下屬性。
management:
security:
enabled: false
如果要使用單獨的埠號來訪問 Spring Boot 執行器端點,請在 application.properties 檔案中新增管理埠號。
management.port = 9000
YAML 檔案使用者可以在您的 application.yml 檔案中新增以下屬性。
management: port: 9000
現在,您可以建立一個可執行的 JAR 檔案,並使用以下 Maven 或 Gradle 命令執行 Spring Boot 應用程式。
對於 Maven,您可以使用以下命令:
mvn clean install
在“BUILD SUCCESS”之後,您可以在target目錄下找到JAR檔案。
對於 Gradle,您可以使用以下命令:
gradle clean build
在“BUILD SUCCESSFUL”之後,您可以在build/libs目錄下找到JAR檔案。
現在,您可以使用以下命令執行 JAR 檔案:
java –jar <JARFILE>
現在,應用程式已在 Tomcat 埠 8080 上啟動。請注意,如果您指定了管理埠號,則同一應用程式將在兩個不同的埠號上執行。
以下是一些重要的 Spring Boot 執行器端點。您可以在 Web 瀏覽器中輸入它們並監控應用程式的行為。
| 端點 | 用法 |
|---|---|
| /metrics | 檢視應用程式指標,例如使用的記憶體、空閒記憶體、執行緒、類、系統正常執行時間等。 |
| /env | 檢視應用程式中使用的環境變數列表。 |
| /beans | 檢視 Spring Bean 及其型別、作用域和依賴項。 |
| /health | 檢視應用程式健康狀況。 |
| /info | 檢視有關 Spring Boot 應用程式的資訊。 |
| /trace | 檢視 REST 端點跟蹤列表。 |
Spring Boot - Admin 伺服器
使用 Spring Boot Actuator 端點監控應用程式稍微有些困難。因為,如果您有“n”個應用程式,每個應用程式都有單獨的執行器端點,從而使監控變得困難。Spring Boot Admin Server 是一個用於管理和監控微服務應用程式的應用程式。
為了處理這種情況,CodeCentric 團隊提供了一個 Spring Boot Admin UI,用於在一個地方管理和監控所有 Spring Boot 應用程式執行器端點。
要構建 Spring Boot Admin Server,我們需要在構建配置檔案中新增以下依賴項。
Maven 使用者可以在您的 pom.xml 檔案中新增以下依賴項:
<dependency> <groupId>de.codecentric</groupId> <artifactId>spring-boot-admin-server</artifactId> <version>1.5.5</version> </dependency> <dependency> <groupId>de.codecentric</groupId> <artifactId>spring-boot-admin-server-ui</artifactId> <version>1.5.5</version> </dependency>
Gradle 使用者可以在您的 build.gradle 檔案中新增以下依賴項:
compile group: 'de.codecentric', name: 'spring-boot-admin-server', version: '1.5.5' compile group: 'de.codecentric', name: 'spring-boot-admin-server-ui', version: '1.5.5'
在您的主 Spring Boot 應用程式類檔案中新增 @EnableAdminServer 註解。@EnableAdminServer 註解用於使您的應用程式成為 Admin Server 以監控所有其他微服務。
package com.tutorialspoint.adminserver;
import org.springframework.boot.SpringApplication;
import org.springframework.boot.autoconfigure.SpringBootApplication;
import de.codecentric.boot.admin.config.EnableAdminServer;
@SpringBootApplication
@EnableAdminServer
public class AdminserverApplication {
public static void main(String[] args) {
SpringApplication.run(AdminserverApplication.class, args);
}
}
現在,在 application.properties 檔案中定義伺服器埠和應用程式名稱,如下所示:
server.port = 9090 spring.application.name = adminserver
對於 YAML 使用者,請使用以下屬性在 application.yml 檔案中定義埠號和應用程式名稱。
server:
port: 9090
spring:
application:
name: adminserver
構建配置檔案如下所示。
對於 Maven 使用者 - pom.xml
<?xml version = "1.0" encoding = "UTF-8"?>
<project xmlns = "http://maven.apache.org/POM/4.0.0"
xmlns:xsi = "http://www.w3.org/2001/XMLSchema-instance"
xsi:schemaLocation = "http://maven.apache.org/POM/4.0.0
http://maven.apache.org/xsd/maven-4.0.0.xsd">
<modelVersion>4.0.0</modelVersion>
<groupId>com.tutorialspoint</groupId>
<artifactId>adminserver</artifactId>
<version>0.0.1-SNAPSHOT</version>
<packaging>jar</packaging>
<name>adminserver</name>
<description>Demo project for Spring Boot</description>
<parent>
<groupId>org.springframework.boot</groupId>
<artifactId>spring-boot-starter-parent</artifactId>
<version>1.5.9.RELEASE</version>
<relativePath /> <!-- lookup parent from repository -->
</parent>
<properties>
<project.build.sourceEncoding>UTF-8</project.build.sourceEncoding>
<project.reporting.outputEncoding>UTF-8</project.reporting.outputEncoding>
<java.version>1.8</java.version>
</properties>
<dependencies>
<dependency>
<groupId>org.springframework.boot</groupId>
<artifactId>spring-boot-starter</artifactId>
</dependency>
<dependency>
<groupId>de.codecentric</groupId>
<artifactId>spring-boot-admin-server</artifactId>
<version>1.5.5</version>
</dependency>
<dependency>
<groupId>de.codecentric</groupId>
<artifactId>spring-boot-admin-server-ui</artifactId>
<version>1.5.5</version>
</dependency>
<dependency>
<groupId>org.springframework.boot</groupId>
<artifactId>spring-boot-starter-test</artifactId>
<scope>test</scope>
</dependency>
</dependencies>
<build>
<plugins>
<plugin>
<groupId>org.springframework.boot</groupId>
<artifactId>spring-boot-maven-plugin</artifactId>
</plugin>
</plugins>
</build>
</project>
對於 Gradle 使用者 - build.gradle 檔案
buildscript {
ext {
springBootVersion = '1.5.9.RELEASE'
}
repositories {
mavenCentral()
}
dependencies {
classpath("org.springframework.boot:spring-boot-gradle-plugin:${springBootVersion}")
}
}
apply plugin: 'java'
apply plugin: 'eclipse'
apply plugin: 'org.springframework.boot'
group = 'com.tutorialspoint'
version = '0.0.1-SNAPSHOT'
sourceCompatibility = 1.8
repositories {
mavenCentral()
}
dependencies {
compile('org.springframework.boot:spring-boot-starter')
compile group: 'de.codecentric', name: 'spring-boot-admin-server', version: '1.5.5'
compile group: 'de.codecentric', name: 'spring-boot-admin-server-ui', version: '1.5.5'
testCompile('org.springframework.boot:spring-boot-starter-test')
}
您可以建立一個可執行的 JAR 檔案,並使用以下 Maven 或 Gradle 命令執行 Spring Boot 應用程式:
對於 Maven,請使用此處顯示的命令:
mvn clean install
在“BUILD SUCCESS”之後,您可以在 target 目錄下找到 JAR 檔案。
對於 Gradle,請使用此處顯示的命令:
gradle clean build
“構建成功”後,您可以在 build/libs 目錄下找到 JAR 檔案。
現在,使用以下提供的命令執行 JAR 檔案:
java –jar <JARFILE>
現在,應用程式已在 Tomcat 埠 9090 上啟動,如下所示:

現在,從您的 Web 瀏覽器訪問以下 URL 並檢視 Admin Server UI。
https://:9090/

Spring Boot - Admin 客戶端
要透過 Spring Boot Admin Server 監控和管理您的微服務應用程式,您應該新增 Spring Boot Admin 啟動器客戶端依賴項,並在應用程式屬性檔案中指出 Admin Server URI。
注意 - 為了監控應用程式,您應該為您的微服務應用程式啟用 Spring Boot Actuator 端點。
首先,在構建配置檔案中新增以下 Spring Boot Admin 啟動器客戶端依賴項和 Spring Boot 啟動器執行器依賴項。
Maven 使用者可以在您的 pom.xml 檔案中新增以下依賴項:
<dependency> <groupId>de.codecentric</groupId> <artifactId>spring-boot-admin-starter-client</artifactId> <version>1.5.5</version> </dependency> <dependency> <groupId>org.springframework.boot</groupId> <artifactId>spring-boot-starter-actuator</artifactId> </dependency>
Gradle 使用者可以在您的 build.gradle 檔案中新增以下依賴項。
compile group: 'de.codecentric', name: 'spring-boot-admin-starter-client', version: '1.5.5'
compile('org.springframework.boot:spring-boot-starter-actuator')
現在,將 Spring Boot Admin Server URL 新增到您的 application.properties 檔案中。
對於屬性檔案使用者,請在 application.properties 檔案中新增以下屬性。
spring.boot.admin.url = https://:9090/
對於 YAML 使用者,請在 application.yml 檔案中新增以下屬性。
spring:
boot:
admin:
url: https://:9000/
現在,建立一個可執行的 JAR 檔案,並使用以下 Maven 或 Gradle 命令執行 Spring Boot 應用程式。
對於 Maven,您可以使用如下所示的命令:
mvn clean install
在“BUILD SUCCESS”之後,您可以在target目錄下找到JAR檔案。
對於 Gradle,您可以使用以下命令:
gradle clean build
在“BUILD SUCCESSFUL”之後,您可以在build/libs目錄下找到JAR檔案。
現在,使用以下命令執行 JAR 檔案:
java –jar <JARFILE>
現在,應用程式已在 Tomcat 埠 9090 上啟動,如下所示:
現在,從您的 Web 瀏覽器訪問以下 URL,檢視您的 Spring Boot 應用程式是否已註冊到 Spring Boot Admin Server。
https://:9090/

現在,點選詳細資訊按鈕,並在 Admin Server UI 中檢視執行器端點。

Spring Boot - 啟用 Swagger2
Swagger2 是一個開源專案,用於為 RESTful Web 服務生成 REST API 文件。它提供了一個使用者介面,可以透過 Web 瀏覽器訪問我們的 RESTful Web 服務。
要在 Spring Boot 應用程式中啟用 Swagger2,您需要在構建配置檔案中新增以下依賴項。
<dependency> <groupId>io.springfox</groupId> <artifactId>springfox-swagger2</artifactId> <version>2.7.0</version> </dependency> <dependency> <groupId>io.springfox</groupId> <artifactId>springfox-swagger-ui</artifactId> <version>2.7.0</version> </dependency>
對於 Gradle 使用者,請在您的 build.gradle 檔案中新增以下依賴項。
compile group: 'io.springfox', name: 'springfox-swagger2', version: '2.7.0' compile group: 'io.springfox', name: 'springfox-swagger-ui', version: '2.7.0'
現在,在您的主 Spring Boot 應用程式中新增 @EnableSwagger2 註解。@EnableSwagger2 註解用於為您的 Spring Boot 應用程式啟用 Swagger2。
主 Spring Boot 應用程式的程式碼如下所示:
package com.tutorialspoint.swaggerdemo;
import org.springframework.boot.SpringApplication;
import org.springframework.boot.autoconfigure.SpringBootApplication;
import springfox.documentation.swagger2.annotations.EnableSwagger2;
@SpringBootApplication
@EnableSwagger2
public class SwaggerDemoApplication {
public static void main(String[] args) {
SpringApplication.run(SwaggerDemoApplication.class, args);
}
}
接下來,建立 Docket Bean 以配置 Spring Boot 應用程式的 Swagger2。我們需要定義基本包以配置 Swagger2 的 REST API。
@Bean
public Docket productApi() {
return new Docket(DocumentationType.SWAGGER_2).select()
.apis(RequestHandlerSelectors.basePackage("com.tutorialspoint.swaggerdemo")).build();
}
現在,將此 Bean 新增到主 Spring Boot 應用程式類檔案本身,您的主 Spring Boot 應用程式類將如下所示:
package com.tutorialspoint.swaggerdemo;
import org.springframework.boot.SpringApplication;
import org.springframework.boot.autoconfigure.SpringBootApplication;
import org.springframework.context.annotation.Bean;
import springfox.documentation.builders.RequestHandlerSelectors;
import springfox.documentation.spi.DocumentationType;
import springfox.documentation.spring.web.plugins.Docket;
import springfox.documentation.swagger2.annotations.EnableSwagger2;
@SpringBootApplication
@EnableSwagger2
public class SwaggerDemoApplication {
public static void main(String[] args) {
SpringApplication.run(SwaggerDemoApplication.class, args);
}
@Bean
public Docket productApi() {
return new Docket(DocumentationType.SWAGGER_2).select()
.apis(RequestHandlerSelectors.basePackage("com.tutorialspoint.swaggerdemo")).build();
}
}
現在,在您的構建配置檔案中新增以下 Spring Boot Starter Web 依賴項以編寫 REST 端點,如下所示:
Maven 使用者可以在您的 pom.xml 檔案中新增以下依賴項:
<dependency> <groupId>org.springframework.boot</groupId> <artifactId>spring-boot-starter-web</artifactId> </dependency>
Gradle 使用者可以在 build.gradle 檔案中新增以下依賴項:
compile('org.springframework.boot:spring-boot-starter-web')
現在,此處顯示了在 Rest Controller 檔案中構建兩個簡單的 RESTful Web 服務 GET 和 POST 的程式碼:
package com.tutorialspoint.swaggerdemo;
import java.util.ArrayList;
import java.util.List;
import org.springframework.web.bind.annotation.RequestMapping;
import org.springframework.web.bind.annotation.RequestMethod;
import org.springframework.web.bind.annotation.RestController;
@RestController
public class SwaggerAPIController {
@RequestMapping(value = "/products", method = RequestMethod.GET)
public List<String> getProducts() {
List<String> productsList = new ArrayList<>();
productsList.add("Honey");
productsList.add("Almond");
return productsList;
}
@RequestMapping(value = "/products", method = RequestMethod.POST)
public String createProduct() {
return "Product is saved successfully";
}
}
完整的構建配置檔案如下所示:
Maven – pom.xml
<?xml version = "1.0" encoding = "UTF-8"?>
<project xmlns = "http://maven.apache.org/POM/4.0.0"
xmlns:xsi = "http://www.w3.org/2001/XMLSchema-instance"
xsi:schemaLocation = "http://maven.apache.org/POM/4.0.0
http://maven.apache.org/xsd/maven-4.0.0.xsd">
<modelVersion>4.0.0</modelVersion>
<groupId>com.tutorialspoint</groupId>
<artifactId>swagger-demo</artifactId>
<version>0.0.1-SNAPSHOT</version>
<packaging>jar</packaging>
<name>swagger-demo</name>
<description>Demo project for Spring Boot</description>
<parent>
<groupId>org.springframework.boot</groupId>
<artifactId>spring-boot-starter-parent</artifactId>
<version>1.5.9.RELEASE</version>
<relativePath /> <!-- lookup parent from repository -->
</parent>
<properties>
<project.build.sourceEncoding>UTF-8</project.build.sourceEncoding>
<project.reporting.outputEncoding>UTF-8</project.reporting.outputEncoding>
<java.version>1.8</java.version>
</properties>
<dependencies>
<dependency>
<groupId>org.springframework.boot</groupId>
<artifactId>spring-boot-starter-web</artifactId>
</dependency>
<dependency>
<groupId>org.springframework.boot</groupId>
<artifactId>spring-boot-starter-test</artifactId>
<scope>test</scope>
</dependency>
<dependency>
<groupId>io.springfox</groupId>
<artifactId>springfox-swagger2</artifactId>
<version>2.7.0</version>
</dependency>
<dependency>
<groupId>io.springfox</groupId>
<artifactId>springfox-swagger-ui</artifactId>
<version>2.7.0</version>
</dependency>
</dependencies>
<build>
<plugins>
<plugin>
<groupId>org.springframework.boot</groupId>
<artifactId>spring-boot-maven-plugin</artifactId>
</plugin>
</plugins>
</build>
</project>
Gradle – build.gradle
buildscript {
ext {
springBootVersion = '1.5.9.RELEASE'
}
repositories {
mavenCentral()
}
dependencies {
classpath("org.springframework.boot:spring-boot-gradle-plugin:${springBootVersion}")
}
}
apply plugin: 'java'
apply plugin: 'eclipse'
apply plugin: 'org.springframework.boot'
group = 'com.tutorialspoint'
version = '0.0.1-SNAPSHOT'
sourceCompatibility = 1.8
repositories {
mavenCentral()
} dependencies {
compile('org.springframework.boot:spring-boot-starter-web')
testCompile('org.springframework.boot:spring-boot-starter-test')
compile group: 'io.springfox', name: 'springfox-swagger2', version: '2.7.0'
compile group: 'io.springfox', name: 'springfox-swagger-ui', version: '2.7.0'
}
您可以建立一個可執行的 JAR 檔案,並使用以下 Maven 或 Gradle 命令執行 Spring Boot 應用程式。
對於 Maven,您可以使用此處顯示的命令:
mvn clean install
在“BUILD SUCCESS”之後,您可以在target目錄下找到JAR檔案。
對於 Gradle,您可以使用此處顯示的命令:
gradle clean build
在“BUILD SUCCESSFUL”之後,您可以在build/libs目錄下找到JAR檔案。
現在,使用此處顯示的命令執行 JAR 檔案:
java –jar <JARFILE>
現在,應用程式將在 Tomcat 埠 8080 上啟動,如下所示:
現在,在您的 Web 瀏覽器中訪問 URL,檢視 Swagger API 功能。
https://:8080/swagger-ui.html

Spring Boot - 建立 Docker 映象
Docker 是一種容器管理服務,可以簡化構建和部署。如果您是 Docker 初學者,可以透過此連結詳細瞭解它:https://tutorialspoint.tw/docker/index.htm
在本章中,我們將瞭解如何使用 Maven 和 Gradle 依賴項為您的 Spring Boot 應用程式建立 Docker 映象。
建立 Dockerfile
首先,在src/main/docker目錄下建立一個名為Dockerfile的檔案,內容如下所示。請注意,此檔案對於建立 Docker 映象至關重要。
FROM java:8 VOLUME /tmp ADD dockerapp-0.0.1-SNAPSHOT.jar app.jar RUN bash -c 'touch /app.jar' ENTRYPOINT ["java","-Djava.security.egd=file:/dev/./urandom","-jar","/app.jar"]
Maven
對於 Maven,將 Docker Maven 外掛新增到您的構建配置檔案pom.xml中。
<properties>
<docker.image.prefix>spring-boot-tutorialspoint</docker.image.prefix>
</properties>
<build>
<plugins>
<plugin>
<groupId>com.spotify</groupId>
<artifactId>docker-maven-plugin</artifactId>
<version>1.0.0</version>
<configuration>
<imageName>${docker.image.prefix}/${project.artifactId}</imageName>
<dockerDirectory>src/main/docker</dockerDirectory>
<resources>
<resource>
<directory>${project.build.directory}</directory>
<include>${project.build.finalName}.jar</include>
</resource>
</resources>
</configuration>
</plugin>
<plugin>
<groupId>org.springframework.boot</groupId>
<artifactId>spring-boot-maven-plugin</artifactId>
</plugin>
</plugins>
</build>
完整的 pom.xml 檔案如下所示:
<?xml version = "1.0" encoding = "UTF-8"?>
<project xmlns = "http://maven.apache.org/POM/4.0.0"
xmlns:xsi = "http://www.w3.org/2001/XMLSchema-instance"
xsi:schemaLocation = "http://maven.apache.org/POM/4.0.0
http://maven.apache.org/xsd/maven-4.0.0.xsd">
<modelVersion>4.0.0</modelVersion>
<groupId>com.tutorialspoint</groupId>
<artifactId>dockerapp</artifactId>
<version>0.0.1-SNAPSHOT</version>
<packaging>jar</packaging>
<name>dockerapp</name>
<description>Demo project for Spring Boot</description>
<parent>
<groupId>org.springframework.boot</groupId>
<artifactId>spring-boot-starter-parent</artifactId>
<version>1.5.9.RELEASE</version>
<relativePath /> <!-- lookup parent from repository -->
</parent>
<properties>
<project.build.sourceEncoding>UTF-8</project.build.sourceEncoding>
<project.reporting.outputEncoding>UTF-8</project.reporting.outputEncoding>
<java.version>1.8</java.version>
<docker.image.prefix>spring-boot-tutorialspoint</docker.image.prefix>
</properties>
<dependencies>
<dependency>
<groupId>org.springframework.boot</groupId>
<artifactId>spring-boot-starter-web</artifactId>
</dependency>
<dependency>
<groupId>org.springframework.boot</groupId>
<artifactId>spring-boot-starter-test</artifactId>
<scope>test</scope>
</dependency>
</dependencies>
<build>
<plugins>
<plugin>
<groupId>com.spotify</groupId>
<artifactId>docker-maven-plugin</artifactId>
<version>1.0.0</version>
<configuration>
<imageName>${docker.image.prefix}/${project.artifactId}</imageName>
<dockerDirectory>src/main/docker</dockerDirectory>
<resources>
<resource>
<directory>${project.build.directory}</directory>
<include>${project.build.finalName}.jar</include>
</resource>
</resources>
</configuration>
</plugin>
<plugin>
<groupId>org.springframework.boot</groupId>
<artifactId>spring-boot-maven-plugin</artifactId>
</plugin>
</plugins>
</build>
</project>
現在,您可以使用 Maven 命令mvn package docker:build執行您的應用程式。

注意 - 在tcp://:2375上啟用 Expose 守護程式,無需 TLS。
構建成功後,您可以在控制檯上看到如下所示的輸出:
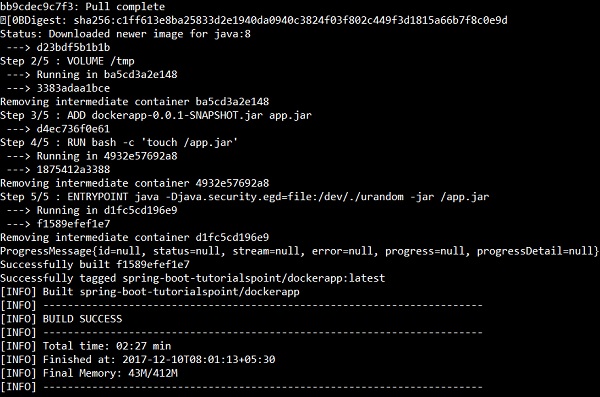
現在,使用 docker images 命令檢視 Docker 映象,並在控制檯上檢視映象資訊。

Gradle
要使用 Gradle 構建配置構建 Docker 映象,我們需要新增docker外掛,並需要編寫一個任務buildDocker來建立 Docker 映象。
Gradle Docker 配置程式碼如下所示。
buildscript {
.....
dependencies {
.....
classpath('se.transmode.gradle:gradle-docker:1.2')
}
}
group = 'spring-boot-tutorialspoint'
.....
apply plugin: 'docker'
task buildDocker(type: Docker, dependsOn: build) {
applicationName = jar.baseName
dockerfile = file('src/main/docker/Dockerfile')
doFirst {
copy {
from jar
into stageDir
}
}
}
完整的 build.gradle 檔案如下所示。
buildscript {
ext {
springBootVersion = '1.5.9.RELEASE'
}
repositories {
mavenCentral()
}
dependencies {
classpath("org.springframework.boot:spring-boot-gradle-plugin:${springBootVersion}")
classpath('se.transmode.gradle:gradle-docker:1.2')
}
}
group = 'spring-boot-tutorialspoint'
apply plugin: 'java'
apply plugin: 'eclipse'
apply plugin: 'org.springframework.boot'
apply plugin: 'docker'
group = 'com.tutorialspoint'
version = '0.0.1-SNAPSHOT'
sourceCompatibility = 1.8
repositories {
mavenCentral()
}
dependencies {
compile('org.springframework.boot:spring-boot-starter-web')
testCompile('org.springframework.boot:spring-boot-starter-test')
}
task buildDocker(type: Docker, dependsOn: build) {
applicationName = jar.baseName
dockerfile = file('src/main/docker/Dockerfile')
doFirst {
copy {
from jar
into stageDir
}
}
}
現在,使用以下命令建立 Docker 映象:
gradle build buildDocker

執行命令後,您可以在控制檯視窗中看到 BUILD SUCCESSFUL 日誌。

現在,使用docker images命令檢視 Docker 映象,並在控制檯上檢視映象資訊。

Spring Boot - 追蹤微服務日誌
如果出現任何問題,大多數開發人員都會遇到追蹤日誌的困難。這可以透過 Spring Cloud Sleuth 和 ZipKin 伺服器解決 Spring Boot 應用程式。
Spring Cloud Sleuth
Spring cloud Sleuth 日誌以以下格式列印:
[application-name,traceid,spanid,zipkin-export]
其中,
Application-name = 應用程式的名稱
Traceid = 呼叫相同服務或一個服務到另一個服務時,每個請求和響應的 traceid 都相同。
Spanid = Span Id 與 Trace Id 一起列印。Span Id 在每個請求和響應中都不同,從一個服務呼叫到另一個服務。
Zipkin-export = 預設情況下為 false。如果為 true,日誌將匯出到 Zipkin 伺服器。
現在,在您的構建配置檔案中新增 Spring Cloud Starter Sleuth 依賴項,如下所示:
Maven 使用者可以在您的 pom.xml 檔案中新增以下依賴項:
<dependency> <groupId>org.springframework.cloud</groupId> <artifactId>spring-cloud-starter-sleuth</artifactId> </dependency>
Gradle 使用者可以在您的 build.gradle 檔案中新增以下依賴項:
compile('org.springframework.cloud:spring-cloud-starter-sleuth')
現在,將日誌新增到您的 Spring Boot 應用程式 Rest Controller 類檔案,如下所示:
package com.tutorialspoint.sleuthapp;
import java.util.logging.Level;
import java.util.logging.Logger;
import org.springframework.boot.SpringApplication;
import org.springframework.boot.autoconfigure.SpringBootApplication;
import org.springframework.web.bind.annotation.RequestMapping;
import org.springframework.web.bind.annotation.RestController;
@SpringBootApplication
@RestController
public class SleuthappApplication {
private static final Logger LOG = Logger.getLogger(SleuthappApplication.class.getName());
public static void main(String[] args) {
SpringApplication.run(SleuthappApplication.class, args);
}
@RequestMapping("/")
public String index() {
LOG.log(Level.INFO, "Index API is calling");
return "Welcome Sleuth!";
}
}
現在,在 application.properties 檔案中新增應用程式名稱,如下所示:
spring.application.name = tracinglogs
構建配置檔案的完整程式碼如下所示:
Maven – pom.xml
<?xml version = "1.0" encoding = "UTF-8"?>
<project xmlns = "http://maven.apache.org/POM/4.0.0"
xmlns:xsi = "http://www.w3.org/2001/XMLSchema-instance"
xsi:schemaLocation = "http://maven.apache.org/POM/4.0.0
http://maven.apache.org/xsd/maven-4.0.0.xsd">
<modelVersion>4.0.0</modelVersion>
<groupId>com.tutorialspoint</groupId>
<artifactId>sleuthapp</artifactId>
<version>0.0.1-SNAPSHOT</version>
<packaging>jar</packaging>
<name>sleuthapp</name>
<description>Demo project for Spring Boot</description>
<parent>
<groupId>org.springframework.boot</groupId>
<artifactId>spring-boot-starter-parent</artifactId>
<version>1.5.9.RELEASE</version>
<relativePath/> <!-- lookup parent from repository -->
</parent>
<properties>
<project.build.sourceEncoding>UTF-8</project.build.sourceEncoding>
<project.reporting.outputEncoding>UTF-8</project.reporting.outputEncoding>
<java.version>1.8</java.version>
<spring-cloud.version>Edgware.RELEASE</spring-cloud.version>
</properties>
<dependencies>
<dependency>
<groupId>org.springframework.cloud</groupId>
<artifactId>spring-cloud-starter-sleuth</artifactId>
</dependency>
<dependency>
<groupId>org.springframework.boot</groupId>
<artifactId>spring-boot-starter-web</artifactId>
</dependency>
<dependency>
<groupId>org.springframework.boot</groupId>
<artifactId>spring-boot-starter-test</artifactId>
<scope>test</scope>
</dependency>
</dependencies>
<dependencyManagement>
<dependencies>
<dependency>
<groupId>org.springframework.cloud</groupId>
<artifactId>spring-cloud-dependencies</artifactId>
<version>${spring-cloud.version}</version>
<type>pom</type>
<scope>import</scope>
</dependency>
</dependencies>
</dependencyManagement>
<build>
<plugins>
<plugin>
<groupId>org.springframework.boot</groupId>
<artifactId>spring-boot-maven-plugin</artifactId>
</plugin>
</plugins>
</build>
</project>
Gradle – build.gradle
buildscript {
ext {
springBootVersion = '1.5.9.RELEASE'
}
repositories {
mavenCentral()
}
dependencies {
classpath("org.springframework.boot:spring-boot-gradle-plugin:${springBootVersion}")
}
}
apply plugin: 'java'
apply plugin: 'eclipse'
apply plugin: 'org.springframework.boot'
group = 'com.tutorialspoint'
version = '0.0.1-SNAPSHOT'
sourceCompatibility = 1.8
repositories {
mavenCentral()
}
ext {
springCloudVersion = 'Edgware.RELEASE'
}
dependencies {
compile('org.springframework.cloud:spring-cloud-starter-sleuth')
compile('org.springframework.boot:spring-boot-starter-web')
testCompile('org.springframework.boot:spring-boot-starter-test')
}
dependencyManagement {
imports {
mavenBom "org.springframework.cloud:spring-cloud-dependencies:${springCloudVersion}"
}
}
您可以建立一個可執行的 JAR 檔案,並使用以下 Maven 或 Gradle 命令執行 Spring Boot 應用程式。
對於 Maven,您可以使用以下命令:
mvn clean install
在“BUILD SUCCESS”之後,您可以在target目錄下找到JAR檔案。
對於 Gradle,您可以使用以下命令:
gradle clean build
在“BUILD SUCCESSFUL”之後,您可以在build/libs目錄下找到JAR檔案。
現在,使用此處顯示的命令執行 JAR 檔案:
java –jar <JARFILE>
現在,應用程式已在 Tomcat 埠 8080 上啟動。
現在,在您的 Web 瀏覽器中訪問 URL,檢視控制檯日誌中的輸出。
https://:8080/
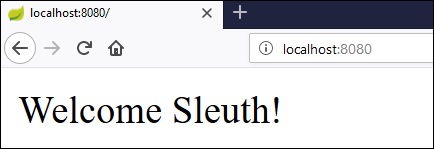
您可以在控制檯視窗中看到以下日誌。觀察日誌以以下格式列印 [應用程式名稱、traceid、spanid、zipkin-export]

Zipkin 伺服器
Zipkin 是一款應用程式,用於監控和管理 Spring Boot 應用程式的 Spring Cloud Sleuth 日誌。要構建 Zipkin 伺服器,我們需要在構建配置檔案中新增 Zipkin UI 和 Zipkin Server 依賴項。
Maven 使用者可以在您的 pom.xml 檔案中新增以下依賴項:
<dependency> <groupId>io.zipkin.java</groupId> <artifactId>zipkin-server</artifactId> </dependency> <dependency> <groupId>io.zipkin.java</groupId> <artifactId>zipkin-autoconfigure-ui</artifactId> </dependency>
Gradle 使用者可以在您的 build.gradle 檔案中新增以下依賴項:
compile('io.zipkin.java:zipkin-autoconfigure-ui')
compile('io.zipkin.java:zipkin-server')
現在,在 application 屬性檔案中配置 server.port = 9411。
對於屬性檔案使用者,請在 application.properties 檔案中新增以下屬性。
server.port = 9411
對於 YAML 使用者,請在 application.yml 檔案中新增以下屬性。
server: port: 9411
在您的主 Spring Boot 應用程式類檔案中新增 @EnableZipkinServer 註解。@EnableZipkinServer 註解用於啟用您的應用程式充當 Zipkin 伺服器。
package com.tutorialspoint.zipkinapp;
import org.springframework.boot.SpringApplication;
import org.springframework.boot.autoconfigure.SpringBootApplication;
import zipkin.server.EnableZipkinServer;
@SpringBootApplication
@EnableZipkinServer
public class ZipkinappApplication {
public static void main(String[] args) {
SpringApplication.run(ZipkinappApplication.class, args);
}
}
完整構建配置檔案的程式碼如下所示。
Maven – pom.xml
<?xml version = "1.0" encoding = "UTF-8"?>
<project xmlns = "http://maven.apache.org/POM/4.0.0"
xmlns:xsi = "http://www.w3.org/2001/XMLSchema-instance"
xsi:schemaLocation = "http://maven.apache.org/POM/4.0.0
http://maven.apache.org/xsd/maven-4.0.0.xsd">
<modelVersion>4.0.0</modelVersion>
<groupId>com.tutorialspoint</groupId>
<artifactId>zipkinapp</artifactId>
<version>0.0.1-SNAPSHOT</version>
<packaging>jar</packaging>
<name>zipkinapp</name>
<description>Demo project for Spring Boot</description>
<parent>
<groupId>org.springframework.boot</groupId>
<artifactId>spring-boot-starter-parent</artifactId>
<version>1.5.9.RELEASE</version>
<relativePath /> <!-- lookup parent from repository -->
</parent>
<properties>
<project.build.sourceEncoding>UTF-8</project.build.sourceEncoding>
<project.reporting.outputEncoding>UTF-8</project.reporting.outputEncoding>
<java.version>1.8</java.version>
<spring-cloud.version>Edgware.RELEASE</spring-cloud.version>
</properties>
<dependencies>
<dependency>
<groupId>io.zipkin.java</groupId>
<artifactId>zipkin-server</artifactId>
</dependency>
<dependency>
<groupId>io.zipkin.java</groupId>
<artifactId>zipkin-autoconfigure-ui</artifactId>
</dependency>
<dependency>
<groupId>org.springframework.boot</groupId>
<artifactId>spring-boot-starter-test</artifactId>
<scope>test</scope>
</dependency>
</dependencies>
<dependencyManagement>
<dependencies>
<dependency>
<groupId>org.springframework.cloud</groupId>
<artifactId>spring-cloud-dependencies</artifactId>
<version>${spring-cloud.version}</version>
<type>pom</type>
<scope>import</scope>
</dependency>
</dependencies>
</dependencyManagement>
<build>
<plugins>
<plugin>
<groupId>org.springframework.boot</groupId>
<artifactId>spring-boot-maven-plugin</artifactId>
</plugin>
</plugins>
</build>
</project>
Gradle – build.gradle
buildscript {
ext {
springBootVersion = '1.5.9.RELEASE'
}
repositories {
mavenCentral()
}
dependencies {
classpath("org.springframework.boot:spring-boot-gradle-plugin:${springBootVersion}")
}
}
apply plugin: 'java'
apply plugin: 'eclipse'
apply plugin: 'org.springframework.boot'
group = 'com.tutorialspoint'
version = '0.0.1-SNAPSHOT'
sourceCompatibility = 1.8
repositories {
mavenCentral()
}
ext {
springCloudVersion = 'Edgware.RELEASE'
}
dependencies {
compile('io.zipkin.java:zipkin-autoconfigure-ui')
compile('io.zipkin.java:zipkin-server')
testCompile('org.springframework.boot:spring-boot-starter-test')
}
dependencyManagement {
imports {
mavenBom "org.springframework.cloud:spring-cloud-dependencies:${springCloudVersion}"
}
}
您可以建立一個可執行的 JAR 檔案,並使用以下 Maven 或 Gradle 命令執行 Spring Boot 應用程式:
對於 Maven,使用以下命令:
mvn clean install
在“BUILD SUCCESS”之後,您可以在target目錄下找到JAR檔案。
對於 Gradle,請使用以下提供的命令:
gradle clean build
在“BUILD SUCCESSFUL”之後,您可以在build/libs目錄下找到JAR檔案。
使用以下命令執行 JAR 檔案:
java –jar <JARFILE>
現在,應用程式已在 Tomcat 埠 9411 上啟動,如下所示:

現在,訪問以下 URL 並檢視 Zipkin 伺服器 UI。
https://:9411/zipkin/

然後,在您的客戶端服務應用程式中新增以下依賴項,並指出 Zipkin Server URL 以透過 Zipkin UI 追蹤微服務日誌。
現在,在您的構建配置檔案中新增 Spring Cloud Starter Zipkin 依賴項,如下所示:
Maven 使用者可以在 pom.xml 檔案中新增以下依賴項:
<dependency> <groupId>org.springframework.cloud</groupId> <artifactId>spring-cloud-sleuth-zipkin</artifactId> </dependency>
Gradle 使用者可以在 build.gradle 檔案中新增以下依賴項:
compile('org.springframework.cloud:spring-cloud-sleuth-zipkin')
現在,在您的 Spring Boot 應用程式中新增Always Sampler Bean以將日誌匯出到 Zipkin 伺服器。
@Bean
public AlwaysSampler defaultSampler() {
return new AlwaysSampler();
}
如果您新增 AlwaysSampler Bean,則 Spring Sleuth Zipkin 匯出選項將自動從 false 更改為 true。
接下來,在客戶端服務 application.properties 檔案中配置您的 Zipkin Server 基本 URL。
spring.zipkin.baseUrl = https://:9411/zipkin/
然後,提供 trace id 並找到 Zipkin UI 中的跟蹤。
https://:9411/zipkin/traces/{traceid}/
Spring Boot - Flyway 資料庫
Flyway 是一款版本控制應用程式,可以輕鬆可靠地在所有例項中演變您的資料庫模式。要了解更多關於 Flyway 的資訊,您可以使用此連結:www.flywaydb.org
許多軟體專案使用關係資料庫。這需要處理資料庫遷移,也常稱為模式遷移。
在本章中,您將詳細瞭解如何在 Spring Boot 應用程式中配置 Flyway 資料庫。
配置 Flyway 資料庫
首先,從 Spring Initializer 頁面下載 Spring Boot 專案www.start.spring.io並選擇以下依賴項:
- Spring Boot Starter Web
- Flyway
- MySQL
- JDBC
Maven 使用者可以在 pom.xml 檔案中新增以下依賴項。
<dependency> <groupId>org.flywaydb</groupId> <artifactId>flyway-core</artifactId> </dependency> <dependency> <groupId>org.springframework.boot</groupId> <artifactId>spring-boot-starter-jdbc</artifactId> </dependency> <dependency> <groupId>org.springframework.boot</groupId> <artifactId>spring-boot-starter-web</artifactId> </dependency> <dependency> <groupId>mysql</groupId> <artifactId>mysql-connector-java</artifactId> </dependency> <dependency> <groupId>org.springframework.boot</groupId> <artifactId>spring-boot-starter-test</artifactId> <scope>test</scope> </dependency>
Gradle 使用者可以在 build.gradle 檔案中新增以下依賴項。
compile('org.flywaydb:flyway-core')
compile('org.springframework.boot:spring-boot-starter-jdbc')
compile('org.springframework.boot:spring-boot-starter-web')
compile('mysql:mysql-connector-java')
在 application 屬性中,我們需要配置資料庫屬性以建立 DataSource,還需要在 application 屬性中配置 flyway 屬性。
對於屬性檔案使用者,請在 application.properties 檔案中新增以下屬性。
spring.application.name = flywayapp spring.datasource.driverClassName = com.mysql.jdbc.Driver spring.datasource.url = jdbc:mysql://:3306/USERSERVICE?autoreconnect=true spring.datasource.username = root spring.datasource.password = root spring.datasource.testOnBorrow = true spring.datasource.testWhileIdle = true spring.datasource.timeBetweenEvictionRunsMillis = 60000 spring.datasource.minEvictableIdleTimeMillis = 30000 spring.datasource.validationQuery = SELECT 1 spring.datasource.max-active = 15 spring.datasource.max-idle = 10 spring.datasource.max-wait = 8000 flyway.url = jdbc:mysql://:3306/mysql flyway.schemas = USERSERVICE flyway.user = root flyway.password = root
YAML 使用者可以在 application.yml 檔案中新增以下屬性。
spring:
application:
name: flywayapp
datasource:
driverClassName: com.mysql.jdbc.Driver
url: "jdbc:mysql://:3306/USERSERVICE?autoreconnect=true"
password: "root"
username: "root"
testOnBorrow: true
testWhileIdle: true
timeBetweenEvictionRunsMillis: 60000
minEvictableIdleTimeMillis: 30000
validationQuery: SELECT 1
max-active: 15
max-idle: 10
max-wait: 8000
flyway:
url: jdbc:mysql://:3306/mysql
schemas: USERSERVICE
user: "root"
password: "root"
現在,在src/main/resources/db/migration目錄下建立一個 SQL 檔案。將 SQL 檔案命名為“V1__Initial.sql”。
CREATE TABLE USERS (ID INT AUTO_INCREMENT PRIMARY KEY, USERID VARCHAR(45)); INSERT INTO USERS (ID, USERID) VALUES (1, 'tutorialspoint.com');
主 Spring Boot 應用程式類檔案的程式碼如下所示:
package com.tutorialspoint.flywayapp;
import org.springframework.boot.SpringApplication;
import org.springframework.boot.autoconfigure.SpringBootApplication;
@SpringBootApplication
public class FlywayappApplication {
public static void main(String[] args) {
SpringApplication.run(FlywayappApplication.class, args);
}
}
完整的構建配置檔案如下所示。
Maven – pom.xml
<?xml version = "1.0" encoding = "UTF-8"?>
<project xmlns = "http://maven.apache.org/POM/4.0.0"
xmlns:xsi = "http://www.w3.org/2001/XMLSchema-instance"
xsi:schemaLocation = "http://maven.apache.org/POM/4.0.0
http://maven.apache.org/xsd/maven-4.0.0.xsd">
<modelVersion>4.0.0</modelVersion>
<groupId>com.tutorialspoint</groupId>
<artifactId>flywayapp</artifactId>
<version>0.0.1-SNAPSHOT</version>
<packaging>jar</packaging>
<name>flywayapp</name>
<description>Demo project for Spring Boot</description>
<parent>
<groupId>org.springframework.boot</groupId>
<artifactId>spring-boot-starter-parent</artifactId>
<version>1.5.9.RELEASE</version>
<relativePath/> <!-- lookup parent from repository -->
</parent>
<properties>
<project.build.sourceEncoding>UTF-8</project.build.sourceEncoding>
<project.reporting.outputEncoding>UTF-8</project.reporting.outputEncoding>
<java.version>1.8</java.version>
</properties>
<dependencies>
<dependency>
<groupId>org.flywaydb</groupId>
<artifactId>flyway-core</artifactId>
</dependency>
<dependency>
<groupId>org.springframework.boot</groupId>
<artifactId>spring-boot-starter-jdbc</artifactId>
</dependency>
<dependency>
<groupId>org.springframework.boot</groupId>
<artifactId>spring-boot-starter-web</artifactId>
</dependency>
<dependency>
<groupId>mysql</groupId>
<artifactId>mysql-connector-java</artifactId>
</dependency>
</dependencies>
<build>
<plugins>
<plugin>
<groupId>org.springframework.boot</groupId>
<artifactId>spring-boot-maven-plugin</artifactId>
</plugin>
</plugins>
</build>
</project>
Gradle – build.gradle
buildscript {
ext {
springBootVersion = '1.5.9.RELEASE'
}
repositories {
mavenCentral()
}
dependencies {
classpath("org.springframework.boot:spring-boot-gradle-plugin:${springBootVersion}")
}
}
apply plugin: 'java'
apply plugin: 'eclipse'
apply plugin: 'org.springframework.boot'
group = 'com.tutorialspoint'
version = '0.0.1-SNAPSHOT'
sourceCompatibility = 1.8
repositories {
mavenCentral()
}
dependencies {
compile('org.flywaydb:flyway-core')
compile('org.springframework.boot:spring-boot-starter-jdbc')
compile('org.springframework.boot:spring-boot-starter-web')
compile('mysql:mysql-connector-java')
testCompile('org.springframework.boot:spring-boot-starter-test')
}
您可以建立一個可執行的 JAR 檔案,並使用下面給出的 Maven 或 Gradle 命令執行 Spring Boot 應用程式。
對於 Maven,您可以使用此處顯示的命令:
mvn clean install
在“BUILD SUCCESS”之後,您可以在target目錄下找到JAR檔案。
對於 Gradle,您可以使用此處顯示的命令:
gradle clean build
在“BUILD SUCCESSFUL”之後,您可以在build/libs目錄下找到JAR檔案。
現在,使用以下命令執行 JAR 檔案:
java –jar <JARFILE>
現在,Tomcat 在埠 8080 上啟動,您可以在控制檯視窗中看到 flyway 資料庫日誌,如下所示。

您現在可以轉到資料庫並執行 select 查詢。

Spring Boot - 傳送郵件
透過使用 Spring Boot RESTful Web 服務,您可以使用 Gmail 傳輸層安全性發送電子郵件。在本章中,讓我們詳細瞭解如何使用此功能。
首先,我們需要在構建配置檔案中新增 Spring Boot Starter Mail 依賴項。
Maven 使用者可以將以下依賴項新增到 pom.xml 檔案中。
<dependency> <groupId>org.springframework.boot</groupId> <artifactId>spring-boot-starter-mail</artifactId> </dependency>
Gradle 使用者可以在您的 build.gradle 檔案中新增以下依賴項。
compile('org.springframework.boot:spring-boot-starter-mail')
主 Spring Boot 應用程式類檔案的程式碼如下所示:
package com.tutorialspoint.emailapp;
import org.springframework.boot.SpringApplication;
import org.springframework.boot.autoconfigure.SpringBootApplication;
@SpringBootApplication
public class EmailappApplication {
public static void main(String[] args) {
SpringApplication.run(EmailappApplication.class, args);
}
}
您可以在 Rest Controller 類檔案中編寫一個簡單的 Rest API 以傳送電子郵件,如下所示。
package com.tutorialspoint.emailapp;
import org.springframework.web.bind.annotation.RequestMapping;
import org.springframework.web.bind.annotation.RestController;
@RestController
public class EmailController {
@RequestMapping(value = "/sendemail")
public String sendEmail() {
return "Email sent successfully";
}
}
您可以編寫一個方法來發送帶附件的電子郵件。定義 mail.smtp 屬性並使用 PasswordAuthentication。
private void sendmail() throws AddressException, MessagingException, IOException {
Properties props = new Properties();
props.put("mail.smtp.auth", "true");
props.put("mail.smtp.starttls.enable", "true");
props.put("mail.smtp.host", "smtp.gmail.com");
props.put("mail.smtp.port", "587");
Session session = Session.getInstance(props, new javax.mail.Authenticator() {
protected PasswordAuthentication getPasswordAuthentication() {
return new PasswordAuthentication("tutorialspoint@gmail.com", "<your password>");
}
});
Message msg = new MimeMessage(session);
msg.setFrom(new InternetAddress("tutorialspoint@gmail.com", false));
msg.setRecipients(Message.RecipientType.TO, InternetAddress.parse("tutorialspoint@gmail.com"));
msg.setSubject("Tutorials point email");
msg.setContent("Tutorials point email", "text/html");
msg.setSentDate(new Date());
MimeBodyPart messageBodyPart = new MimeBodyPart();
messageBodyPart.setContent("Tutorials point email", "text/html");
Multipart multipart = new MimeMultipart();
multipart.addBodyPart(messageBodyPart);
MimeBodyPart attachPart = new MimeBodyPart();
attachPart.attachFile("/var/tmp/image19.png");
multipart.addBodyPart(attachPart);
msg.setContent(multipart);
Transport.send(msg);
}
現在,從 Rest API 呼叫上述 sendmail() 方法,如下所示:
@RequestMapping(value = "/sendemail")
public String sendEmail() throws AddressException, MessagingException, IOException {
sendmail();
return "Email sent successfully";
}
注意 - 在傳送電子郵件之前,請在您的 Gmail 帳戶設定中啟用允許安全性較低的應用。
完整的構建配置檔案如下所示。
Maven – pom.xml
<?xml version = "1.0" encoding = "UTF-8"?>
<project xmlns = "http://maven.apache.org/POM/4.0.0"
xmlns:xsi = "http://www.w3.org/2001/XMLSchema-instance"
xsi:schemaLocation = "http://maven.apache.org/POM/4.0.0
http://maven.apache.org/xsd/maven-4.0.0.xsd">
<modelVersion>4.0.0</modelVersion>
<groupId>com.tutorialspoint</groupId>
<artifactId>emailapp</artifactId>
<version>0.0.1-SNAPSHOT</version>
<packaging>jar</packaging>
<name>emailapp</name>
<description>Demo project for Spring Boot</description>
<parent>
<groupId>org.springframework.boot</groupId>
<artifactId>spring-boot-starter-parent</artifactId>
<version>1.5.9.RELEASE</version>
<relativePath/> <!-- lookup parent from repository -->
</parent>
<properties>
<project.build.sourceEncoding>UTF-8</project.build.sourceEncoding>
<project.reporting.outputEncoding>UTF-8</project.reporting.outputEncoding>
<java.version>1.8</java.version>
</properties>
<dependencies>
<dependency>
<groupId>org.springframework.boot</groupId>
<artifactId>spring-boot-starter-web</artifactId>
</dependency>
<dependency>
<groupId>org.springframework.boot</groupId>
<artifactId>spring-boot-starter-mail</artifactId>
</dependency>
<dependency>
<groupId>org.springframework.boot</groupId>
<artifactId>spring-boot-starter</artifactId>
</dependency>
<dependency>
<groupId>org.springframework.boot</groupId>
<artifactId>spring-boot-starter-test</artifactId>
<scope>test</scope>
</dependency>
</dependencies>
<build>
<plugins>
<plugin>
<groupId>org.springframework.boot</groupId>
<artifactId>spring-boot-maven-plugin</artifactId>
</plugin>
</plugins>
</build>
</project>
Gradle – build.gradle
buildscript {
ext {
springBootVersion = '1.5.9.RELEASE'
}
repositories {
mavenCentral()
}
dependencies {
classpath("org.springframework.boot:spring-boot-gradle-plugin:${springBootVersion}")
}
}
apply plugin: 'java'
apply plugin: 'eclipse'
apply plugin: 'org.springframework.boot'
group = 'com.tutorialspoint'
version = '0.0.1-SNAPSHOT'
sourceCompatibility = 1.8
repositories {
mavenCentral()
}
dependencies {
compile('org.springframework.boot:spring-boot-starter-web')
compile('org.springframework.boot:spring-boot-starter-mail')
testCompile('org.springframework.boot:spring-boot-starter-test')
}
現在,您可以建立一個可執行的 JAR 檔案,並使用以下所示的 Maven 或 Gradle 命令執行 Spring Boot 應用程式:
對於 Maven,您可以使用如下所示的命令:
mvn clean install
在“BUILD SUCCESS”之後,您可以在target目錄下找到JAR檔案。
對於 Gradle,您可以使用以下命令:
gradle clean build
在“BUILD SUCCESSFUL”之後,您可以在build/libs目錄下找到JAR檔案。
現在,使用以下提供的命令執行 JAR 檔案:
java –jar <JARFILE>
您可以看到應用程式已在 Tomcat 埠 8080 上啟動。

現在,從您的 Web 瀏覽器訪問以下 URL,您將收到一封電子郵件。
https://:8080/sendemail


Spring Boot - Hystrix
Hystrix 是來自 Netflix 的一個庫。Hystrix 隔離服務之間的訪問點,阻止它們之間出現級聯故障,並提供回退選項。
例如,當您呼叫第三方應用程式時,傳送響應需要更多時間。因此,此時,控制權將轉到回退方法,並將自定義響應返回到您的應用程式。
在本章中,您將瞭解如何在 Spring Boot 應用程式中實現 Hystrix。
首先,我們需要在構建配置檔案中新增 Spring Cloud Starter Hystrix 依賴項。
Maven 使用者可以在 pom.xml 檔案中新增以下依賴項:
<dependency> <groupId>org.springframework.cloud</groupId> <artifactId>spring-cloud-starter-hystrix</artifactId> </dependency>
Gradle 使用者可以在 build.gradle 檔案中新增以下依賴項:
compile('org.springframework.cloud:spring-cloud-starter-hystrix')
現在,將 @EnableHystrix 註解新增到您的主 Spring Boot 應用程式類檔案。@EnableHystrix 註解用於在您的 Spring Boot 應用程式中啟用 Hystrix 功能。
主 Spring Boot 應用程式類檔案的程式碼如下所示:
package com.tutorialspoint.hystrixapp;
import org.springframework.boot.SpringApplication;
import org.springframework.boot.autoconfigure.SpringBootApplication;
import org.springframework.cloud.netflix.hystrix.EnableHystrix;
@SpringBootApplication
@EnableHystrix
public class HystrixappApplication {
public static void main(String[] args) {
SpringApplication.run(HystrixappApplication.class, args);
}
}
現在編寫一個簡單的 Rest Controller,使其在請求時間 3 秒後返回字串。
@RequestMapping(value = "/")
public String hello() throws InterruptedException {
Thread.sleep(3000);
return "Welcome Hystrix";
}
現在,為 Rest API 新增 @Hystrix 命令和 @HystrixProperty,並定義以毫秒為單位的超時值。
@HystrixCommand(fallbackMethod = "fallback_hello", commandProperties = {
@HystrixProperty(name = "execution.isolation.thread.timeoutInMilliseconds", value = "1000")
})
接下來,如果請求響應時間過長,則定義回退方法 fallback_hello()。
private String fallback_hello() {
return "Request fails. It takes long time to response";
}
包含 REST API 和 Hystrix 屬性的完整 Rest Controller 類檔案如下所示:
@RequestMapping(value = "/")
@HystrixCommand(fallbackMethod = "fallback_hello", commandProperties = {
@HystrixProperty(name = "execution.isolation.thread.timeoutInMilliseconds", value = "1000")
})
public String hello() throws InterruptedException {
Thread.sleep(3000);
return "Welcome Hystrix";
}
private String fallback_hello() {
return "Request fails. It takes long time to response";
}
在此示例中,REST API 編寫在主 Spring Boot 應用程式類檔案本身中。
package com.tutorialspoint.hystrixapp;
import org.springframework.boot.SpringApplication;
import com.netflix.hystrix.contrib.javanica.annotation.HystrixProperty;
import org.springframework.boot.autoconfigure.SpringBootApplication;
import org.springframework.cloud.netflix.hystrix.EnableHystrix;
import org.springframework.web.bind.annotation.RequestMapping;
import org.springframework.web.bind.annotation.RestController;
import com.netflix.hystrix.contrib.javanica.annotation.HystrixCommand;
@SpringBootApplication
@EnableHystrix
@RestController
public class HystrixappApplication {
public static void main(String[] args) {
SpringApplication.run(HystrixappApplication.class, args);
}
@RequestMapping(value = "/")
@HystrixCommand(fallbackMethod = "fallback_hello", commandProperties = {
@HystrixProperty(name = "execution.isolation.thread.timeoutInMilliseconds", value = "1000")
})
public String hello() throws InterruptedException {
Thread.sleep(3000);
return "Welcome Hystrix";
}
private String fallback_hello() {
return "Request fails. It takes long time to response";
}
}
完整的構建配置檔案如下所示。
Maven - pom.xml 檔案
<?xml version = "1.0" encoding = "UTF-8"?>
<project xmlns = "http://maven.apache.org/POM/4.0.0"
xmlns:xsi = "http://www.w3.org/2001/XMLSchema-instance"
xsi:schemaLocation = "http://maven.apache.org/POM/4.0.0
http://maven.apache.org/xsd/maven-4.0.0.xsd">
<modelVersion>4.0.0</modelVersion>
<groupId>com.tutorialspoint</groupId>
<artifactId>hystrixapp</artifactId>
<version>0.0.1-SNAPSHOT</version>
<packaging>jar</packaging>
<name>hystrixapp</name>
<description>Demo project for Spring Boot</description>
<parent>
<groupId>org.springframework.boot</groupId>
<artifactId>spring-boot-starter-parent</artifactId>
<version>1.5.9.RELEASE</version>
<relativePath/> <!-- lookup parent from repository -->
</parent>
<properties>
<project.build.sourceEncoding>UTF-8</project.build.sourceEncoding>
<project.reporting.outputEncoding>UTF-8</project.reporting.outputEncoding>
<java.version>1.8</java.version>
<spring-cloud.version>Edgware.RELEASE</spring-cloud.version>
</properties>
<dependencies>
<dependency>
<groupId>org.springframework.cloud</groupId>
<artifactId>spring-cloud-starter-hystrix</artifactId>
</dependency>
<dependency>
<groupId>org.springframework.boot</groupId>
<artifactId>spring-boot-starter-web</artifactId>
</dependency>
<dependency>
<groupId>org.springframework.boot</groupId>
<artifactId>spring-boot-starter-test</artifactId>
<scope>test</scope>
</dependency>
</dependencies>
<dependencyManagement>
<dependencies>
<dependency>
<groupId>org.springframework.cloud</groupId>
<artifactId>spring-cloud-dependencies</artifactId>
<version>${spring-cloud.version}</version>
<type>pom</type>
<scope>import</scope>
</dependency>
</dependencies>
</dependencyManagement>
<build>
<plugins>
<plugin>
<groupId>org.springframework.boot</groupId>
<artifactId>spring-boot-maven-plugin</artifactId>
</plugin>
</plugins>
</build>
</project>
Gradle – build.gradle
buildscript {
ext {
springBootVersion = '1.5.9.RELEASE'
}
repositories {
mavenCentral()
}
dependencies {
classpath("org.springframework.boot:spring-boot-gradle-plugin:${springBootVersion}")
}
}
apply plugin: 'java'
apply plugin: 'eclipse'
apply plugin: 'org.springframework.boot'
group = 'com.tutorialspoint'
version = '0.0.1-SNAPSHOT'
sourceCompatibility = 1.8
repositories {
mavenCentral()
}
ext {
springCloudVersion = 'Edgware.RELEASE'
}
dependencies {
compile('org.springframework.cloud:spring-cloud-starter-hystrix')
compile('org.springframework.boot:spring-boot-starter-web')
testCompile('org.springframework.boot:spring-boot-starter-test')
}
dependencyManagement {
imports {
mavenBom "org.springframework.cloud:spring-cloud-dependencies:${springCloudVersion}"
}
}
您可以建立一個可執行的 JAR 檔案,並使用以下 Maven 或 Gradle 命令執行 Spring Boot 應用程式:
對於 Maven,使用如下所示的命令:
mvn clean install
在“BUILD SUCCESS”之後,您可以在target目錄下找到JAR檔案。
對於 Gradle,使用如下所示的命令:
gradle clean build
在“BUILD SUCCESSFUL”之後,您可以在build/libs目錄下找到JAR檔案。
現在,使用以下提供的命令執行 JAR 檔案:
java –jar <JARFILE>
這將在Tomcat埠8080上啟動應用程式,如下所示:

現在,從您的 Web 瀏覽器中訪問 URL https://:8080/,並檢視 Hystrix 響應。API 需要 3 秒才能響應,但 Hystrix 超時時間為 1 秒。

Spring Boot - WebSocket
在本章中,讓我們瞭解如何使用 Spring Boot 和 WebSockets 構建互動式 Web 應用程式。
要在 Spring Boot 中使用 Web Socket 構建互動式 Web 應用程式,您需要新增以下依賴項。
Maven 使用者應在 pom.xml 檔案中新增以下依賴項。
<dependency> <groupId>org.springframework.boot</groupId> <artifactId>spring-boot-starter-websocket</artifactId> </dependency> <dependency> <groupId>org.webjars</groupId> <artifactId>webjars-locator</artifactId> </dependency> <dependency> <groupId>org.webjars</groupId> <artifactId>sockjs-client</artifactId> <version>1.0.2</version> </dependency> <dependency> <groupId>org.webjars</groupId> <artifactId>stomp-websocket</artifactId> <version>2.3.3</version> </dependency> <dependency> <groupId>org.webjars</groupId> <artifactId>bootstrap</artifactId> <version>3.3.7</version> </dependency> <dependency> <groupId>org.webjars</groupId> <artifactId>jquery</artifactId> <version>3.1.0</version> </dependency>
Gradle 使用者可以在 build.gradle 檔案中新增以下依賴項:
compile("org.springframework.boot:spring-boot-starter-websocket")
compile("org.webjars:webjars-locator")
compile("org.webjars:sockjs-client:1.0.2")
compile("org.webjars:stomp-websocket:2.3.3")
compile("org.webjars:bootstrap:3.3.7")
compile("org.webjars:jquery:3.1.0")
讓我們建立一個訊息處理控制器來處理 STOMP 訊息。STOMP 訊息可以路由到 @Controller 類檔案。例如,GreetingController 對映到處理目標為“/hello”的訊息。
package com.tutorialspoint.websocketapp;
import org.springframework.messaging.handler.annotation.MessageMapping;
import org.springframework.messaging.handler.annotation.SendTo;
import org.springframework.stereotype.Controller;
@Controller
public class GreetingController {
@MessageMapping("/hello")
@SendTo("/topic/greetings")
public Greeting greeting(HelloMessage message) throws Exception {
Thread.sleep(1000); // simulated delay
return new Greeting("Hello, " + message.getName() + "!");
}
}
現在,為 STOMP 訊息配置 Spring。編寫一個 WebSocketConfig 類檔案,該檔案擴充套件 AbstractWebSocketMessageBrokerConfigurer 類,如下所示。
package com.tutorialspoint.websocketapp;
import org.springframework.context.annotation.Configuration;
import org.springframework.messaging.simp.config.MessageBrokerRegistry;
import org.springframework.web.socket.config.annotation.AbstractWebSocketMessageBrokerConfigurer;
import org.springframework.web.socket.config.annotation.EnableWebSocketMessageBroker;
import org.springframework.web.socket.config.annotation.StompEndpointRegistry;
@Configuration
@EnableWebSocketMessageBroker
public class WebSocketConfig extends AbstractWebSocketMessageBrokerConfigurer {
@Override
public void configureMessageBroker(MessageBrokerRegistry config) {
config.enableSimpleBroker("/topic");
config.setApplicationDestinationPrefixes("/app");
}
@Override
public void registerStompEndpoints(StompEndpointRegistry registry) {
registry.addEndpoint("/tutorialspoint-websocket").withSockJS();
}
}
@EnableWebSocketMessageBroker 註解用於配置 Web Socket 訊息代理以建立 STOMP 端點。
您可以在 src/main/resources/static/index.html 下建立一個瀏覽器客戶端檔案,如下所示:
<!DOCTYPE html>
<html>
<head>
<title>Hello WebSocket</title>
<link href = "/webjars/bootstrap/css/bootstrap.min.css" rel = "stylesheet">
<link href = "/main.css" rel = "stylesheet">
<script src = "/webjars/jquery/jquery.min.js"></script>
<script src = "/webjars/sockjs-client/sockjs.min.js"></script>
<script src = "/webjars/stomp-websocket/stomp.min.js"></script>
<script src = "/app.js"></script>
</head>
<body>
<noscript>
<h2 style = "color: #ff0000">
Seems your browser doesn't support Javascript! Websocket relies on Javascript being
enabled. Please enable Javascript and reload this page!
</h2>
</noscript>
<div id = "main-content" class = "container">
<div class = "row">
<div class = "col-md-6">
<form class = "form-inline">
<div class = "form-group">
<label for = "connect">WebSocket connection:</label>
<button id = "connect" class = "btn btn-default" type = "submit">Connect</button>
<button id = "disconnect" class = "btn btn-default" type = "submit" disabled = "disabled">Disconnect
</button>
</div>
</form>
</div>
<div class = "col-md-6">
<form class = "form-inline">
<div class = "form-group">
<label for = "name">What is your name?</label>
<input type = "text" id = "name" class = "form-control" placeholder = "Your name here...">
</div>
<button id = "send" class = "btn btn-default" type = "submit">Send</button>
</form>
</div>
</div>
<div class = "row">
<div class = "col-md-12">
<table id = "conversation" class = "table table-striped">
<thead>
<tr>
<th>Greetings</th>
</tr>
</thead>
<tbody id = "greetings"></tbody>
</table>
</div>
</div>
</div>
</body>
</html>
讓我們建立一個 app.js 檔案,使用 STOMP 消費和生成訊息。
var stompClient = null;
function setConnected(connected) {
$("#connect").prop("disabled", connected);
$("#disconnect").prop("disabled", !connected);
if (connected) {
$("#conversation").show();
} else {
$("#conversation").hide();
}
$("#greetings").html("");
}
function connect() {
var socket = new SockJS('/tutorialspoint-websocket');
stompClient = Stomp.over(socket);
stompClient.connect({}, function (frame) {
setConnected(true);
console.log('Connected: ' + frame);
stompClient.subscribe('/topic/greetings', function (greeting) {
showGreeting(JSON.parse(greeting.body).content);
});
});
}
function disconnect() {
if (stompClient !== null) {
stompClient.disconnect();
}
setConnected(false);
console.log("Disconnected");
}
function sendName() {
stompClient.send("/app/hello", {}, JSON.stringify({'name': $("#name").val()}));
}
function showGreeting(message) {
$("#greetings").append("<tr><td>" + message + "</td></tr>");
}
$(function () {
$( "form" ).on('submit', function (e) {e.preventDefault();});
$( "#connect" ).click(function() { connect(); });
$( "#disconnect" ).click(function() { disconnect(); });
$( "#send" ).click(function() { sendName(); });
});
主 Spring Boot 應用程式的程式碼如下所示。
package com.tutorialspoint.websocketapp;
import org.springframework.boot.SpringApplication;
import org.springframework.boot.autoconfigure.SpringBootApplication;
@SpringBootApplication
public class WebsocketappApplication {
public static void main(String[] args) {
SpringApplication.run(WebsocketappApplication.class, args);
}
}
完整的構建配置檔案如下所示。
Maven – pom.xml
<?xml version = "1.0" encoding = "UTF-8"?>
<project xmlns = "http://maven.apache.org/POM/4.0.0"
xmlns:xsi = "http://www.w3.org/2001/XMLSchema-instance"
xsi:schemaLocation = "http://maven.apache.org/POM/4.0.0
http://maven.apache.org/xsd/maven-4.0.0.xsd">
<modelVersion>4.0.0</modelVersion>
<groupId>com.tutorialspoint</groupId>
<artifactId>websocketapp</artifactId>
<version>0.0.1-SNAPSHOT</version>
<packaging>jar</packaging>
<name>websocketapp</name>
<description>Demo project for Spring Boot</description>
<parent>
<groupId>org.springframework.boot</groupId>
<artifactId>spring-boot-starter-parent</artifactId>
<version>1.5.9.RELEASE</version>
</parent>
<dependencies>
<dependency>
<groupId>org.springframework.boot</groupId>
<artifactId>spring-boot-starter-websocket</artifactId>
</dependency>
<dependency>
<groupId>org.webjars</groupId>
<artifactId>webjars-locator</artifactId>
</dependency>
<dependency>
<groupId>org.webjars</groupId>
<artifactId>sockjs-client</artifactId>
<version>1.0.2</version>
</dependency>
<dependency>
<groupId>org.webjars</groupId>
<artifactId>stomp-websocket</artifactId>
<version>2.3.3</version>
</dependency>
<dependency>
<groupId>org.webjars</groupId>
<artifactId>bootstrap</artifactId>
<version>3.3.7</version>
</dependency>
<dependency>
<groupId>org.webjars</groupId>
<artifactId>jquery</artifactId>
<version>3.1.0</version>
</dependency>
<dependency>
<groupId>org.springframework.boot</groupId>
<artifactId>spring-boot-starter-test</artifactId>
<scope>test</scope>
</dependency>
</dependencies>
<properties>
<java.version>1.8</java.version>
</properties>
<build>
<plugins>
<plugin>
<groupId>org.springframework.boot</groupId>
<artifactId>spring-boot-maven-plugin</artifactId>
</plugin>
</plugins>
</build>
</project>
Gradle – build.gradle
buildscript {
repositories {
mavenCentral()
}
dependencies {
classpath("org.springframework.boot:spring-boot-gradle-plugin:1.5.9.RELEASE")
}
}
apply plugin: 'java'
apply plugin: 'eclipse'
apply plugin: 'org.springframework.boot'
jar {
baseName = 'websocketapp'
version = '0.1.0'
}
sourceCompatibility = 1.8
targetCompatibility = 1.8
repositories {
mavenCentral()
}
dependencies {
compile("org.springframework.boot:spring-boot-starter-websocket")
compile("org.webjars:webjars-locator")
compile("org.webjars:sockjs-client:1.0.2")
compile("org.webjars:stomp-websocket:2.3.3")
compile("org.webjars:bootstrap:3.3.7")
compile("org.webjars:jquery:3.1.0")
testCompile("org.springframework.boot:spring-boot-starter-test")
}
Spring Boot - 批處理服務
您可以建立一個可執行的 JAR 檔案,並使用 Maven 或 Gradle 命令執行 Spring Boot 應用程式,如下所示:
對於 Maven,您可以使用以下命令:
mvn clean install
在“BUILD SUCCESS”之後,您可以在target目錄下找到JAR檔案。
對於 Gradle,您可以使用以下命令:
gradle clean build
在“BUILD SUCCESSFUL”之後,您可以在build/libs目錄下找到JAR檔案。
使用此處給出的命令執行 JAR 檔案:
java –jar <JARFILE>
現在,應用程式已在 Tomcat 埠 8080 上啟動,如下所示。

現在,在您的 Web 瀏覽器中訪問 URL https://:8080/,連線 Web Socket 併發送問候語並接收訊息。
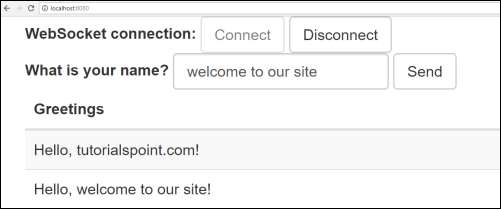
批處理服務是一個在單個任務中執行多個命令的過程。在本章中,您將學習如何在 Spring Boot 應用程式中建立批處理服務。
讓我們考慮一個將 CSV 檔案內容儲存到 HSQLDB 的示例。
要建立批處理服務程式,我們需要在構建配置檔案中新增 Spring Boot Starter Batch 依賴項和 HSQLDB 依賴項。
Maven 使用者可以在 pom.xml 檔案中新增以下依賴項。
<dependency> <groupId>org.springframework.boot</groupId> <artifactId>spring-boot-starter-batch</artifactId> </dependency> <dependency> <groupId>org.hsqldb</groupId> <artifactId>hsqldb</artifactId> </dependency>
Gradle 使用者可以在 build.gradle 檔案中新增以下依賴項。
compile("org.springframework.boot:spring-boot-starter-batch")
compile("org.hsqldb:hsqldb")
現在,在類路徑資源 - src/main/resources 下新增簡單的 CSV 資料檔案,並將檔案命名為 file.csv,如下所示:
William,John Mike, Sebastian Lawarance, Lime
接下來,為 HSQLDB 編寫 SQL 指令碼 - 在類路徑資源目錄下 - request_fail_hystrix_timeout
DROP TABLE USERS IF EXISTS; CREATE TABLE USERS ( user_id BIGINT IDENTITY NOT NULL PRIMARY KEY, first_name VARCHAR(20), last_name VARCHAR(20) );
為 USERS 模型建立一個 POJO 類,如下所示:
package com.tutorialspoint.batchservicedemo;
public class User {
private String lastName;
private String firstName;
public User() {
}
public User(String firstName, String lastName) {
this.firstName = firstName;
this.lastName = lastName;
}
public void setFirstName(String firstName) {
this.firstName = firstName;
}
public String getFirstName() {
return firstName;
}
public String getLastName() {
return lastName;
}
public void setLastName(String lastName) {
this.lastName = lastName;
}
@Override
public String toString() {
return "firstName: " + firstName + ", lastName: " + lastName;
}
}
現在,建立一箇中間處理器,在從 CSV 檔案讀取資料和將資料寫入 SQL 之前執行操作。
package com.tutorialspoint.batchservicedemo;
import org.slf4j.Logger;
import org.slf4j.LoggerFactory;
import org.springframework.batch.item.ItemProcessor;
public class UserItemProcessor implements ItemProcessor<User, User> {
private static final Logger log = LoggerFactory.getLogger(UserItemProcessor.class);
@Override
public User process(final User user) throws Exception {
final String firstName = user.getFirstName().toUpperCase();
final String lastName = user.getLastName().toUpperCase();
final User transformedPerson = new User(firstName, lastName);
log.info("Converting (" + user + ") into (" + transformedPerson + ")");
return transformedPerson;
}
}
讓我們建立一個批處理配置檔案,從 CSV 讀取資料並寫入 SQL 檔案,如下所示。我們需要在配置類檔案中新增 @EnableBatchProcessing 註解。@EnableBatchProcessing 註解用於為您的 Spring Boot 應用程式啟用批處理操作。
package com.tutorialspoint.batchservicedemo;
import javax.sql.DataSource;
import org.springframework.batch.core.Job;
import org.springframework.batch.core.Step;
import org.springframework.batch.core.configuration.annotation.EnableBatchProcessing;
import org.springframework.batch.core.configuration.annotation.JobBuilderFactory;
import org.springframework.batch.core.configuration.annotation.StepBuilderFactory;
import org.springframework.batch.core.launch.support.RunIdIncrementer;
import org.springframework.batch.item.database.BeanPropertyItemSqlParameterSourceProvider;
import org.springframework.batch.item.database.JdbcBatchItemWriter;
import org.springframework.batch.item.file.FlatFileItemReader;
import org.springframework.batch.item.file.mapping.BeanWrapperFieldSetMapper;
import org.springframework.batch.item.file.mapping.DefaultLineMapper;
import org.springframework.batch.item.file.transform.DelimitedLineTokenizer;
import org.springframework.beans.factory.annotation.Autowired;
import org.springframework.context.annotation.Bean;
import org.springframework.context.annotation.Configuration;
import org.springframework.core.io.ClassPathResource;
@Configuration
@EnableBatchProcessing
public class BatchConfiguration {
@Autowired
public JobBuilderFactory jobBuilderFactory;
@Autowired
public StepBuilderFactory stepBuilderFactory;
@Autowired
public DataSource dataSource;
@Bean
public FlatFileItemReader<User> reader() {
FlatFileItemReader<User> reader = new FlatFileItemReader<User>();
reader.setResource(new ClassPathResource("file.csv"));
reader.setLineMapper(new DefaultLineMapper<User>() {
{
setLineTokenizer(new DelimitedLineTokenizer() {
{
setNames(new String[] { "firstName", "lastName" });
}
});
setFieldSetMapper(new BeanWrapperFieldSetMapper<User>() {
{
setTargetType(User.class);
}
});
}
});
return reader;
}
@Bean
public UserItemProcessor processor() {
return new UserItemProcessor();
}
@Bean
public JdbcBatchItemWriter<User> writer() {
JdbcBatchItemWriter<User> writer = new JdbcBatchItemWriter<User>();
writer.setItemSqlParameterSourceProvider(new BeanPropertyItemSqlParameterSourceProvider<User>());
writer.setSql("INSERT INTO USERS (first_name, last_name) VALUES (:firstName, :lastName)");
writer.setDataSource(dataSource);
return writer;
}
@Bean
public Job importUserJob(JobCompletionNotificationListener listener) {
return jobBuilderFactory.get("importUserJob").incrementer(
new RunIdIncrementer()).listener(listener).flow(step1()).end().build();
}
@Bean
public Step step1() {
return stepBuilderFactory.get("step1").<User, User>chunk(10).reader(reader()).processor(processor()).writer(writer()).build();
}
}
reader() 方法用於從 CSV 檔案讀取資料,而 writer() 方法用於將資料寫入 SQL。
接下來,我們將不得不編寫一個作業完成通知偵聽器類 - 用於在作業完成之後發出通知。
package com.tutorialspoint.batchservicedemo;
import java.sql.ResultSet;
import java.sql.SQLException;
import java.util.List;
import org.slf4j.Logger;
import org.slf4j.LoggerFactory;
import org.springframework.batch.core.BatchStatus;
import org.springframework.batch.core.JobExecution;
import org.springframework.batch.core.listener.JobExecutionListenerSupport;
import org.springframework.beans.factory.annotation.Autowired;
import org.springframework.jdbc.core.JdbcTemplate;
import org.springframework.jdbc.core.RowMapper;
import org.springframework.stereotype.Component;
@Component
public class JobCompletionNotificationListener extends JobExecutionListenerSupport {
private static final Logger log = LoggerFactory.getLogger(JobCompletionNotificationListener.class);
private final JdbcTemplate jdbcTemplate;
@Autowired
public JobCompletionNotificationListener(JdbcTemplate jdbcTemplate) {
this.jdbcTemplate = jdbcTemplate;
}
@Override
public void afterJob(JobExecution jobExecution) {
if (jobExecution.getStatus() == BatchStatus.COMPLETED) {
log.info("!!! JOB FINISHED !! It's time to verify the results!!");
List<User> results = jdbcTemplate.query(
"SELECT first_name, last_name FROM USERS", new RowMapper<User>() {
@Override
public User mapRow(ResultSet rs, int row) throws SQLException {
return new User(rs.getString(1), rs.getString(2));
}
});
for (User person : results) {
log.info("Found <" + person + "> in the database.");
}
}
}
}
現在,建立一個可執行的 JAR 檔案,並使用以下 Maven 或 Gradle 命令執行 Spring Boot 應用程式。
對於 Maven,使用如下所示的命令:
mvn clean install
在“BUILD SUCCESS”之後,您可以在target目錄下找到JAR檔案。
對於 Gradle,您可以使用以下命令:
gradle clean build
在“BUILD SUCCESSFUL”之後,您可以在build/libs目錄下找到JAR檔案。
使用此處給出的命令執行 JAR 檔案:
java –jar <JARFILE>
您可以在控制檯視窗中看到輸出,如下所示:

Spring Boot - Apache Kafka
Apache Kafka 是一個開源專案,用於基於容錯訊息系統釋出和訂閱訊息。它速度快、可擴充套件且分散式設計。如果您是 Kafka 的初學者,或者希望對其有更深入的瞭解,請參考此連結:www.tutorialspoint.com/apache_kafka/
在本章中,我們將瞭解如何在 Spring Boot 應用程式中實現 Apache Kafka。
首先,我們需要在構建配置檔案中新增 Spring Kafka 依賴項。
Maven 使用者可以在 pom.xml 檔案中新增以下依賴項。
<dependency> <groupId>org.springframework.kafka</groupId> <artifactId>spring-kafka</artifactId> <version>2.1.0.RELEASE</version> </dependency>
Gradle 使用者可以在 build.gradle 檔案中新增以下依賴項。
compile group: 'org.springframework.kafka', name: 'spring-kafka', version: '2.1.0.RELEASE'
生成訊息
要將訊息生成到 Apache Kafka,我們需要為生產者配置定義配置類,如下所示:
package com.tutorialspoint.kafkademo;
import java.util.HashMap;
import java.util.Map;
import org.apache.kafka.clients.producer.ProducerConfig;
import org.apache.kafka.common.serialization.StringSerializer;
import org.springframework.context.annotation.Bean;
import org.springframework.context.annotation.Configuration;
import org.springframework.kafka.core.DefaultKafkaProducerFactory;
import org.springframework.kafka.core.KafkaTemplate;
import org.springframework.kafka.core.ProducerFactory;
@Configuration
public class KafkaProducerConfig {
@Bean
public ProducerFactory<String, String> producerFactory() {
Map<String, Object> configProps = new HashMap<>();
configProps.put(ProducerConfig.BOOTSTRAP_SERVERS_CONFIG, "localhost:9092");
configProps.put(ProducerConfig.KEY_SERIALIZER_CLASS_CONFIG, StringSerializer.class);
configProps.put(ProducerConfig.VALUE_SERIALIZER_CLASS_CONFIG, StringSerializer.class);
return new DefaultKafkaProducerFactory<>(configProps);
}
@Bean
public KafkaTemplate<String, String> kafkaTemplate() {
return new KafkaTemplate<>(producerFactory());
}
}
要釋出訊息,自動裝配 Kafka Template 物件並生成訊息,如下所示。
@Autowired
private KafkaTemplate<String, String> kafkaTemplate;
public void sendMessage(String msg) {
kafkaTemplate.send(topicName, msg);
}
消費訊息
要消費訊息,我們需要編寫一個消費者配置類檔案,如下所示。
package com.tutorialspoint.kafkademo;
import java.util.HashMap;
import java.util.Map;
import org.apache.kafka.clients.consumer.ConsumerConfig;
import org.apache.kafka.common.serialization.StringDeserializer;
import org.springframework.context.annotation.Bean;
import org.springframework.context.annotation.Configuration;
import org.springframework.kafka.annotation.EnableKafka;
import org.springframework.kafka.config.ConcurrentKafkaListenerContainerFactory;
import org.springframework.kafka.core.ConsumerFactory;
import org.springframework.kafka.core.DefaultKafkaConsumerFactory;
@EnableKafka
@Configuration
public class KafkaConsumerConfig {
@Bean
public ConsumerFactory<String, String> consumerFactory() {
Map<String, Object> props = new HashMap<>();
props.put(ConsumerConfig.BOOTSTRAP_SERVERS_CONFIG, "localhost:2181");
props.put(ConsumerConfig.GROUP_ID_CONFIG, "group-id");
props.put(ConsumerConfig.KEY_DESERIALIZER_CLASS_CONFIG, StringDeserializer.class);
props.put(ConsumerConfig.VALUE_DESERIALIZER_CLASS_CONFIG, StringDeserializer.class);
return new DefaultKafkaConsumerFactory<>(props);
}
@Bean
public ConcurrentKafkaListenerContainerFactory<String, String> kafkaListenerContainerFactory() {
ConcurrentKafkaListenerContainerFactory<String, String>
factory = new ConcurrentKafkaListenerContainerFactory<>();
factory.setConsumerFactory(consumerFactory());
return factory;
}
}
接下來,編寫一個偵聽器來偵聽訊息。
@KafkaListener(topics = "tutorialspoint", groupId = "group-id")
public void listen(String message) {
System.out.println("Received Messasge in group - group-id: " + message);
}
讓我們從主 Spring Boot 應用程式類檔案的 ApplicationRunner 類 run 方法中呼叫 sendMessage() 方法,並從同一個類檔案中消費訊息。
您的主 Spring Boot 應用程式類檔案程式碼如下所示:
package com.tutorialspoint.kafkademo;
import org.springframework.beans.factory.annotation.Autowired;
import org.springframework.boot.ApplicationArguments;
import org.springframework.boot.ApplicationRunner;
import org.springframework.boot.SpringApplication;
import org.springframework.boot.autoconfigure.SpringBootApplication;
import org.springframework.kafka.annotation.KafkaListener;
import org.springframework.kafka.core.KafkaTemplate;
@SpringBootApplication
public class KafkaDemoApplication implements ApplicationRunner {
@Autowired
private KafkaTemplate<String, String> kafkaTemplate;
public void sendMessage(String msg) {
kafkaTemplate.send("tutorialspoint", msg);
}
public static void main(String[] args) {
SpringApplication.run(KafkaDemoApplication.class, args);
}
@KafkaListener(topics = "tutorialspoint", groupId = "group-id")
public void listen(String message) {
System.out.println("Received Messasge in group - group-id: " + message);
}
@Override
public void run(ApplicationArguments args) throws Exception {
sendMessage("Hi Welcome to Spring For Apache Kafka");
}
}
完整構建配置檔案的程式碼如下所示。
Maven – pom.xml
<?xml version = "1.0" encoding = "UTF-8"?>
<project xmlns = "http://maven.apache.org/POM/4.0.0"
xmlns:xsi = "http://www.w3.org/2001/XMLSchema-instance"
xsi:schemaLocation = "http://maven.apache.org/POM/4.0.0
http://maven.apache.org/xsd/maven-4.0.0.xsd">
<modelVersion>4.0.0</modelVersion>
<groupId>com.tutorialspoint</groupId>
<artifactId>kafka-demo</artifactId>
<version>0.0.1-SNAPSHOT</version>
<packaging>jar</packaging>
<name>kafka-demo</name>
<description>Demo project for Spring Boot</description>
<parent>
<groupId>org.springframework.boot</groupId>
<artifactId>spring-boot-starter-parent</artifactId>
<version>1.5.9.RELEASE</version>
<relativePath /> <!-- lookup parent from repository -->
</parent>
<properties>
<project.build.sourceEncoding>UTF-8</project.build.sourceEncoding>
<project.reporting.outputEncoding>UTF-8</project.reporting.outputEncoding>
<java.version>1.8</java.version>
</properties>
<dependencies>
<dependency>
<groupId>org.springframework.boot</groupId>
<artifactId>spring-boot-starter</artifactId>
</dependency>
<dependency>
<groupId>org.springframework.kafka</groupId>
<artifactId>spring-kafka</artifactId>
<version>2.1.0.RELEASE</version>
</dependency>
<dependency>
<groupId>org.springframework.boot</groupId>
<artifactId>spring-boot-starter-test</artifactId>
<scope>test</scope>
</dependency>
</dependencies>
<build>
<plugins>
<plugin>
<groupId>org.springframework.boot</groupId>
<artifactId>spring-boot-maven-plugin</artifactId>
</plugin>
</plugins>
</build>
</project>
Gradle – build.gradle
buildscript {
ext {
springBootVersion = '1.5.9.RELEASE'
}
repositories {
mavenCentral()
}
dependencies {
classpath("org.springframework.boot:spring-boot-gradle-plugin:${springBootVersion}")
}
}
apply plugin: 'java'
apply plugin: 'eclipse'
apply plugin: 'org.springframework.boot'
group = 'com.tutorialspoint'
version = '0.0.1-SNAPSHOT'
sourceCompatibility = 1.8
repositories {
mavenCentral()
}
dependencies {
compile('org.springframework.boot:spring-boot-starter')
compile group: 'org.springframework.kafka', name: 'spring-kafka', version: '2.1.0.RELEASE'
testCompile('org.springframework.boot:spring-boot-starter-test')
}
現在,建立一個可執行的 JAR 檔案,並使用以下 Maven 或 Gradle 命令執行 Spring Boot 應用程式,如下所示:
對於 Maven,使用如下所示的命令:
mvn clean install
在“BUILD SUCCESS”之後,您可以在target目錄下找到JAR檔案。
對於 Gradle,使用如下所示的命令:
gradle clean build
在“BUILD SUCCESSFUL”之後,您可以在build/libs目錄下找到JAR檔案。
使用此處給出的命令執行 JAR 檔案:
java –jar <JARFILE>
您可以在控制檯視窗中看到輸出。
Spring Boot - Twilio
Twilio 是一個第三方應用程式,用於從我們的應用程式傳送簡訊和撥打電話。它允許我們以程式設計方式傳送簡訊和撥打電話。
在本章中,您將學習如何使用 Spring Boot 和 Twilio 實現傳送簡訊和撥打電話。
注意:我們使用 Twilio 中的試用賬戶傳送簡訊和撥打電話。您可以在 www.twilio.com 瞭解更多關於 Twilio 的資訊。
首先,我們需要在構建配置檔案中新增 Twilio 依賴項。
Maven 使用者可以在 pom.xml 檔案中新增以下依賴項。
<dependency> <groupId>com.twilio.sdk</groupId> <artifactId>twilio</artifactId> <version>7.16.1</version> </dependency>
Gradle 使用者可以在 build.gradle 檔案中新增以下依賴項。
compile group: "com.twilio.sdk", name:"twilio", version: "7.16.1"
現在,在靜態塊中使用 ACCOUNT_SID 和 AUTH_ID 初始化 Twilio 賬戶,如下所示:
static {
Twilio.init(ACCOUNT_SID, AUTH_ID);
}
傳送簡訊
要傳送簡訊,我們需要向 Message.create() 方法提供發件號碼和收件號碼。我們還需要為 Message.creator() 方法提供訊息正文內容,如下所示:
Message.creator(new PhoneNumber("to-number"), new PhoneNumber("from-number"),
"Message from Spring Boot Application").create();
主 Spring Boot 應用程式類檔案如下所示。
package com.tutorialspoint.smsdemo;
import org.springframework.boot.ApplicationArguments;
import org.springframework.boot.ApplicationRunner;
import org.springframework.boot.SpringApplication;
import org.springframework.boot.autoconfigure.SpringBootApplication;
import com.twilio.Twilio;
import com.twilio.rest.api.v2010.account.Message;
import com.twilio.type.PhoneNumber;
@SpringBootApplication
public class SmsdemoApplication implements ApplicationRunner {
private final static String ACCOUNT_SID = "<your-account-sid>";
private final static String AUTH_ID = "<your-auth-id>";
static {
Twilio.init(ACCOUNT_SID, AUTH_ID);
}
public static void main(String[] args) {
SpringApplication.run(SmsdemoApplication.class, args);
}
@Override
public void run(ApplicationArguments arg0) throws Exception {
Message.creator(new PhoneNumber("to-number"), new PhoneNumber("from-number"),
"Message from Spring Boot Application").create();
}
}
構建配置檔案的完整程式碼如下所示:
Maven – pom.xml
<?xml version = "1.0" encoding = "UTF-8"?>
<project xmlns = "http://maven.apache.org/POM/4.0.0"
xmlns:xsi = "http://www.w3.org/2001/XMLSchema-instance"
xsi:schemaLocation = "http://maven.apache.org/POM/4.0.0
http://maven.apache.org/xsd/maven-4.0.0.xsd">
<modelVersion>4.0.0</modelVersion>
<groupId>com.tutorialspoint</groupId>
<artifactId>smsdemo</artifactId>
<version>0.0.1-SNAPSHOT</version>
<packaging>jar</packaging>
<name>smsdemo</name>
<description>Demo project for Spring Boot</description>
<parent>
<groupId>org.springframework.boot</groupId>
<artifactId>spring-boot-starter-parent</artifactId>
<version>1.5.9.RELEASE</version>
<relativePath /> <!-- lookup parent from repository -->
</parent>
<properties>
<project.build.sourceEncoding>UTF-8</project.build.sourceEncoding>
<project.reporting.outputEncoding>UTF-8</project.reporting.outputEncoding>
<java.version>1.8</java.version>
</properties>
<dependencies>
<dependency>
<groupId>org.springframework.boot</groupId>
<artifactId>spring-boot-starter</artifactId>
</dependency>
<dependency>
<groupId>org.springframework.boot</groupId>
<artifactId>spring-boot-starter-test</artifactId>
<scope>test</scope>
</dependency>
<dependency>
<groupId>com.twilio.sdk</groupId>
<artifactId>twilio</artifactId>
<version>7.16.1</version>
</dependency>
</dependencies>
<build>
<plugins>
<plugin>
<groupId>org.springframework.boot</groupId>
<artifactId>spring-boot-maven-plugin</artifactId>
</plugin>
</plugins>
</build>
</project>
Gradle – build.gradle
buildscript {
ext {
springBootVersion = '1.5.9.RELEASE'
}
repositories {
mavenCentral()
}
dependencies {
classpath("org.springframework.boot:spring-boot-gradle-plugin:${springBootVersion}")
}
}
apply plugin: 'java'
apply plugin: 'eclipse'
apply plugin: 'org.springframework.boot'
group = 'com.tutorialspoint'
version = '0.0.1-SNAPSHOT'
sourceCompatibility = 1.8
repositories {
mavenCentral()
}
dependencies {
compile('org.springframework.boot:spring-boot-starter')
testCompile('org.springframework.boot:spring-boot-starter-test')
compile group: "com.twilio.sdk", name:"twilio", version: "7.11.+"
}
您可以建立一個可執行的 JAR 檔案,並使用以下 Maven 或 Gradle 命令執行 spring boot 應用程式:
對於 Maven,使用如下所示的命令:
mvn clean install
在“BUILD SUCCESS”之後,您可以在target目錄下找到JAR檔案。
對於 Gradle,使用如下所示的命令:
gradle clean build
在“BUILD SUCCESSFUL”之後,您可以在build/libs目錄下找到JAR檔案。
使用如下所示的命令執行 JAR 檔案:
java –jar <JARFILE>
現在,您將收到傳送到“收件號碼”的簡訊。
訊息已收到“收件號碼”。
Sent from your Twilio trail account - Message from Spring Boot Application
注意:在此示例中,我們使用了試用賬戶。因此,在傳送簡訊之前,您應該驗證號碼。
語音通話
要使用 Twilio 撥打電話,我們需要呼叫 Call.creator() 方法。對於此方法,我們需要提供收件號碼、發件號碼和語音提示,如下所示。
Call.creator(new PhoneNumber("<to-number>"), new PhoneNumber("<from-number>"),
new URI("http://demo.twilio.com/docs/voice.xml")).create();
主 Spring Boot 應用程式類檔案的程式碼如下所示。
package com.tutorialspoint.smsdemo;
import java.net.URI;
import org.springframework.boot.ApplicationArguments;
import org.springframework.boot.ApplicationRunner;
import org.springframework.boot.SpringApplication;
import org.springframework.boot.autoconfigure.SpringBootApplication;
import com.twilio.Twilio;
import com.twilio.rest.api.v2010.account.Call;
import com.twilio.type.PhoneNumber;
@SpringBootApplication
public class SmsdemoApplication implements ApplicationRunner {
private final static String ACCOUNT_SID = "<ACCOUNT-SID>";
private final static String AUTH_ID = "AUTH-ID";
static {
Twilio.init(ACCOUNT_SID, AUTH_ID);
}
public static void main(String[] args) {
SpringApplication.run(SmsdemoApplication.class, args);
}
@Override
public void run(ApplicationArguments arg0) throws Exception {
Call.creator(new PhoneNumber("<to-number>"), new PhoneNumber("<from-number>"),
new URI("http://demo.twilio.com/docs/voice.xml")).create();
}
}
完整構建配置檔案的程式碼如下所示:
Maven – pom.xml
<?xml version = "1.0" encoding = "UTF-8"?>
<project xmlns = "http://maven.apache.org/POM/4.0.0"
xmlns:xsi = "http://www.w3.org/2001/XMLSchema-instance"
xsi:schemaLocation = "http://maven.apache.org/POM/4.0.0
http://maven.apache.org/xsd/maven-4.0.0.xsd">
<modelVersion>4.0.0</modelVersion>
<groupId>com.tutorialspoint</groupId>
<artifactId>smsdemo</artifactId>
<version>0.0.1-SNAPSHOT</version>
<packaging>jar</packaging>
<name>smsdemo</name>
<description>Demo project for Spring Boot</description>
<parent>
<groupId>org.springframework.boot</groupId>
<artifactId>spring-boot-starter-parent</artifactId>
<version>1.5.9.RELEASE</version>
<relativePath /> <!-- lookup parent from repository -->
</parent>
<properties>
<project.build.sourceEncoding>UTF-8</project.build.sourceEncoding>
<project.reporting.outputEncoding>UTF-8</project.reporting.outputEncoding>
<java.version>1.8</java.version>
</properties>
<dependencies>
<dependency>
<groupId>org.springframework.boot</groupId>
<artifactId>spring-boot-starter</artifactId>
</dependency>
<dependency>
<groupId>org.springframework.boot</groupId>
<artifactId>spring-boot-starter-test</artifactId>
<scope>test</scope>
</dependency>
<dependency>
<groupId>com.twilio.sdk</groupId>
<artifactId>twilio</artifactId>
<version>7.16.1</version>
</dependency>
</dependencies>
<build>
<plugins>
<plugin>
<groupId>org.springframework.boot</groupId>
<artifactId>spring-boot-maven-plugin</artifactId>
</plugin>
</plugins>
</build>
</project>
Gradle – build.gradle
buildscript {
ext {
springBootVersion = '1.5.9.RELEASE'
}
repositories {
mavenCentral()
}
dependencies {
classpath("org.springframework.boot:spring-boot-gradle-plugin:${springBootVersion}")
}
}
apply plugin: 'java'
apply plugin: 'eclipse'
apply plugin: 'org.springframework.boot'
group = 'com.tutorialspoint'
version = '0.0.1-SNAPSHOT'
sourceCompatibility = 1.8
repositories {
mavenCentral()
}
dependencies {
compile('org.springframework.boot:spring-boot-starter')
testCompile('org.springframework.boot:spring-boot-starter-test')
compile group: "com.twilio.sdk", name:"twilio", version: "7.11.+"
}
您可以建立一個可執行的 JAR 檔案,並使用以下 Maven 或 Gradle 命令執行 Spring Boot 應用程式。
對於 Maven,使用如下所示的命令:
mvn clean install
在“BUILD SUCCESS”之後,您可以在target目錄下找到JAR檔案。
對於 Gradle,使用如下所示的命令:
gradle clean build
在“BUILD SUCCESSFUL”之後,您可以在build/libs目錄下找到JAR檔案。
現在,使用此處提供的命令執行 JAR 檔案:
java –jar <JARFILE>
現在,您將收到來自 Twilio 的“收件號碼”的電話。
接聽電話後按任意鍵,您將聽到來自 https://demo.twilio.com/docs/voice.xml 的語音提示。
注意:在此示例中,我們使用了試用賬戶。因此,在撥打電話之前,您應該驗證號碼。
Spring Boot - 單元測試用例
單元測試是開發人員進行的一種測試,以確保各個單元或元件的功能正常工作。
在本教程中,我們將瞭解如何使用 Mockito 和 Web Controller 編寫單元測試用例。
Mockito
要將 Mockito 模擬注入 Spring Bean,我們需要在構建配置檔案中新增 Mockito-core 依賴項。
Maven 使用者可以在 pom.xml 檔案中新增以下依賴項。
<dependency> <groupId>org.mockito</groupId> <artifactId>mockito-core</artifactId> <version>2.13.0</version> </dependency> <dependency> <groupId>org.springframework.boot</groupId> <artifactId>spring-boot-starter-test</artifactId> <scope>test</scope> </dependency>
Gradle 使用者可以在 build.gradle 檔案中新增以下依賴項。
compile group: 'org.mockito', name: 'mockito-core', version: '2.13.0'
testCompile('org.springframework.boot:spring-boot-starter-test')
此處提供了編寫服務類(包含返回字串值的方法)的程式碼。
package com.tutorialspoint.mockitodemo;
import org.springframework.stereotype.Service;
@Service
public class ProductService {
public String getProductName() {
return "Honey";
}
}
現在,將 ProductService 類注入另一個服務類檔案,如下所示。
package com.tutorialspoint.mockitodemo;
import org.springframework.beans.factory.annotation.Autowired;
import org.springframework.stereotype.Service;
@Service
public class OrderService {
@Autowired
ProductService productService;
public OrderService(ProductService productService) {
this.productService = productService;
}
public String getProductName() {
return productService.getProductName();
}
}
主要的 Spring Boot 應用程式類檔案如下所示:
package com.tutorialspoint.mockitodemo;
import org.springframework.boot.SpringApplication;
import org.springframework.boot.autoconfigure.SpringBootApplication;
@SpringBootApplication
public class MockitoDemoApplication {
public static void main(String[] args) {
SpringApplication.run(MockitoDemoApplication.class, args);
}
}
然後,為測試配置應用程式上下文。@Profile(“test”) 註解用於在測試用例執行時配置類。
package com.tutorialspoint.mockitodemo;
import org.mockito.Mockito;
import org.springframework.context.annotation.Bean;
import org.springframework.context.annotation.Configuration;
import org.springframework.context.annotation.Primary;
import org.springframework.context.annotation.Profile;
@Profile("test")
@Configuration
public class ProductServiceTestConfiguration {
@Bean
@Primary
public ProductService productService() {
return Mockito.mock(ProductService.class);
}
}
現在,您可以為 Order Service 編寫單元測試用例,位於 src/test/resources 包下。
package com.tutorialspoint.mockitodemo;
import org.junit.Assert;
import org.junit.Test;
import org.junit.runner.RunWith;
import org.mockito.Mockito;
import org.springframework.beans.factory.annotation.Autowired;
import org.springframework.boot.test.context.SpringBootTest;
import org.springframework.test.context.ActiveProfiles;
import org.springframework.test.context.junit4.SpringJUnit4ClassRunner;
@SpringBootTest
@ActiveProfiles("test")
@RunWith(SpringJUnit4ClassRunner.class)
public class MockitoDemoApplicationTests {
@Autowired
private OrderService orderService;
@Autowired
private ProductService productService;
@Test
public void whenUserIdIsProvided_thenRetrievedNameIsCorrect() {
Mockito.when(productService.getProductName()).thenReturn("Mock Product Name");
String testName = orderService.getProductName();
Assert.assertEquals("Mock Product Name", testName);
}
}
構建配置檔案的完整程式碼如下所示。
Maven – pom.xml
<?xml version = "1.0" encoding = "UTF-8"?>
<project xmlns = "http://maven.apache.org/POM/4.0.0"
xmlns:xsi = "http://www.w3.org/2001/XMLSchema-instance"
xsi:schemaLocation = "http://maven.apache.org/POM/4.0.0
http://maven.apache.org/xsd/maven-4.0.0.xsd">
<modelVersion>4.0.0</modelVersion>
<groupId>com.tutorialspoint</groupId>
<artifactId>mockito-demo</artifactId>
<version>0.0.1-SNAPSHOT</version>
<packaging>jar</packaging>
<name>mockito-demo</name>
<description>Demo project for Spring Boot</description>
<parent>
<groupId>org.springframework.boot</groupId>
<artifactId>spring-boot-starter-parent</artifactId>
<version>1.5.9.RELEASE</version>
<relativePath /> <!-- lookup parent from repository -->
</parent>
<properties>
<project.build.sourceEncoding>UTF-8</project.build.sourceEncoding>
<project.reporting.outputEncoding>UTF-8</project.reporting.outputEncoding>
<java.version>1.8</java.version>
</properties>
<dependencies>
<dependency>
<groupId>org.springframework.boot</groupId>
<artifactId>spring-boot-starter</artifactId>
</dependency>
<dependency>
<groupId>org.mockito</groupId>
<artifactId>mockito-core</artifactId>
<version>2.13.0</version>
</dependency>
<dependency>
<groupId>org.springframework.boot</groupId>
<artifactId>spring-boot-starter-test</artifactId>
<scope>test</scope>
</dependency>
</dependencies>
<build>
<plugins>
<plugin>
<groupId>org.springframework.boot</groupId>
<artifactId>spring-boot-maven-plugin</artifactId>
</plugin>
</plugins>
</build>
</project>
Gradle – build.gradle
buildscript {
ext {
springBootVersion = '1.5.9.RELEASE'
}
repositories {
mavenCentral()
}
dependencies {
classpath("org.springframework.boot:spring-boot-gradle-plugin:${springBootVersion}")
}
}
apply plugin: 'java'
apply plugin: 'eclipse'
apply plugin: 'org.springframework.boot'
group = 'com.tutorialspoint'
version = '0.0.1-SNAPSHOT'
sourceCompatibility = 1.8
repositories {
mavenCentral()
}
dependencies {
compile('org.springframework.boot:spring-boot-starter')
compile group: 'org.mockito', name: 'mockito-core', version: '2.13.0'
testCompile('org.springframework.boot:spring-boot-starter-test')
}
您可以建立一個可執行的 JAR 檔案,並使用以下 Maven 或 Gradle1 命令執行 Spring Boot 應用程式。
對於 Maven,您可以使用如下所示的命令:
mvn clean install
您可以在控制檯視窗中看到測試結果。

對於 Gradle,您可以使用以下命令:
gradle clean build
您可以在控制檯視窗中看到其餘結果。

Spring Boot - Rest Controller 單元測試
Spring Boot 提供了一種簡單的方法來為 Rest Controller 檔案編寫單元測試。藉助 SpringJUnit4ClassRunner 和 MockMvc,我們可以建立一個 Web 應用程式上下文,為 Rest Controller 檔案編寫單元測試。
單元測試應編寫在 src/test/java 目錄下,編寫測試的類路徑資源應放置在 src/test/resources 目錄下。
要編寫單元測試,我們需要在構建配置檔案中新增 Spring Boot Starter Test 依賴項,如下所示。
<dependency> <groupId>org.springframework.boot</groupId> <artifactId>spring-boot-starter-test</artifactId> <scope>test</scope> </dependency>
Gradle 使用者可以在您的 build.gradle 檔案中新增以下依賴項。
testCompile('org.springframework.boot:spring-boot-starter-test')
在編寫測試用例之前,我們應該首先構建 RESTful Web 服務。有關構建 RESTful Web 服務的更多資訊,請參閱本教程中提供的同一章節。
為 REST Controller 編寫單元測試
在本節中,讓我們瞭解如何為 REST Controller 編寫單元測試。
首先,我們需要建立一個抽象類檔案,使用 MockMvc 建立 Web 應用程式上下文,並定義 mapToJson() 和 mapFromJson() 方法,以將 Java 物件轉換為 JSON 字串,並將 JSON 字串轉換為 Java 物件。
package com.tutorialspoint.demo;
import java.io.IOException;
import org.junit.runner.RunWith;
import org.springframework.beans.factory.annotation.Autowired;
import org.springframework.boot.test.context.SpringBootTest;
import org.springframework.test.context.junit4.SpringJUnit4ClassRunner;
import org.springframework.test.context.web.WebAppConfiguration;
import org.springframework.test.web.servlet.MockMvc;
import org.springframework.test.web.servlet.setup.MockMvcBuilders;
import org.springframework.web.context.WebApplicationContext;
import com.fasterxml.jackson.core.JsonParseException;
import com.fasterxml.jackson.core.JsonProcessingException;
import com.fasterxml.jackson.databind.JsonMappingException;
import com.fasterxml.jackson.databind.ObjectMapper;
@RunWith(SpringJUnit4ClassRunner.class)
@SpringBootTest(classes = DemoApplication.class)
@WebAppConfiguration
public abstract class AbstractTest {
protected MockMvc mvc;
@Autowired
WebApplicationContext webApplicationContext;
protected void setUp() {
mvc = MockMvcBuilders.webAppContextSetup(webApplicationContext).build();
}
protected String mapToJson(Object obj) throws JsonProcessingException {
ObjectMapper objectMapper = new ObjectMapper();
return objectMapper.writeValueAsString(obj);
}
protected <T> T mapFromJson(String json, Class<T> clazz)
throws JsonParseException, JsonMappingException, IOException {
ObjectMapper objectMapper = new ObjectMapper();
return objectMapper.readValue(json, clazz);
}
}
接下來,編寫一個擴充套件 AbstractTest 類的類檔案,併為每個方法(如 GET、POST、PUT 和 DELETE)編寫單元測試。
GET API 測試用例的程式碼如下所示。此 API 用於檢視產品列表。
@Test
public void getProductsList() throws Exception {
String uri = "/products";
MvcResult mvcResult = mvc.perform(MockMvcRequestBuilders.get(uri)
.accept(MediaType.APPLICATION_JSON_VALUE)).andReturn();
int status = mvcResult.getResponse().getStatus();
assertEquals(200, status);
String content = mvcResult.getResponse().getContentAsString();
Product[] productlist = super.mapFromJson(content, Product[].class);
assertTrue(productlist.length > 0);
}
POST API 測試用例的程式碼如下所示。此 API 用於建立產品。
@Test
public void createProduct() throws Exception {
String uri = "/products";
Product product = new Product();
product.setId("3");
product.setName("Ginger");
String inputJson = super.mapToJson(product);
MvcResult mvcResult = mvc.perform(MockMvcRequestBuilders.post(uri)
.contentType(MediaType.APPLICATION_JSON_VALUE).content(inputJson)).andReturn();
int status = mvcResult.getResponse().getStatus();
assertEquals(201, status);
String content = mvcResult.getResponse().getContentAsString();
assertEquals(content, "Product is created successfully");
}
下面給出 PUT API 測試用例的程式碼。此 API 用於更新現有產品。
@Test
public void updateProduct() throws Exception {
String uri = "/products/2";
Product product = new Product();
product.setName("Lemon");
String inputJson = super.mapToJson(product);
MvcResult mvcResult = mvc.perform(MockMvcRequestBuilders.put(uri)
.contentType(MediaType.APPLICATION_JSON_VALUE).content(inputJson)).andReturn();
int status = mvcResult.getResponse().getStatus();
assertEquals(200, status);
String content = mvcResult.getResponse().getContentAsString();
assertEquals(content, "Product is updated successsfully");
}
下面給出 Delete API 測試用例的程式碼。此 API 將刪除現有產品。
@Test
public void deleteProduct() throws Exception {
String uri = "/products/2";
MvcResult mvcResult = mvc.perform(MockMvcRequestBuilders.delete(uri)).andReturn();
int status = mvcResult.getResponse().getStatus();
assertEquals(200, status);
String content = mvcResult.getResponse().getContentAsString();
assertEquals(content, "Product is deleted successsfully");
}
下面給出完整的 Controller 測試類檔案 -
package com.tutorialspoint.demo;
import static org.junit.Assert.assertEquals;
import static org.junit.Assert.assertTrue;
import org.junit.Before;
import org.junit.Test;
import org.springframework.http.MediaType;
import org.springframework.test.web.servlet.MvcResult;
import org.springframework.test.web.servlet.request.MockMvcRequestBuilders;
import com.tutorialspoint.demo.model.Product;
public class ProductServiceControllerTest extends AbstractTest {
@Override
@Before
public void setUp() {
super.setUp();
}
@Test
public void getProductsList() throws Exception {
String uri = "/products";
MvcResult mvcResult = mvc.perform(MockMvcRequestBuilders.get(uri)
.accept(MediaType.APPLICATION_JSON_VALUE)).andReturn();
int status = mvcResult.getResponse().getStatus();
assertEquals(200, status);
String content = mvcResult.getResponse().getContentAsString();
Product[] productlist = super.mapFromJson(content, Product[].class);
assertTrue(productlist.length > 0);
}
@Test
public void createProduct() throws Exception {
String uri = "/products";
Product product = new Product();
product.setId("3");
product.setName("Ginger");
String inputJson = super.mapToJson(product);
MvcResult mvcResult = mvc.perform(MockMvcRequestBuilders.post(uri)
.contentType(MediaType.APPLICATION_JSON_VALUE)
.content(inputJson)).andReturn();
int status = mvcResult.getResponse().getStatus();
assertEquals(201, status);
String content = mvcResult.getResponse().getContentAsString();
assertEquals(content, "Product is created successfully");
}
@Test
public void updateProduct() throws Exception {
String uri = "/products/2";
Product product = new Product();
product.setName("Lemon");
String inputJson = super.mapToJson(product);
MvcResult mvcResult = mvc.perform(MockMvcRequestBuilders.put(uri)
.contentType(MediaType.APPLICATION_JSON_VALUE)
.content(inputJson)).andReturn();
int status = mvcResult.getResponse().getStatus();
assertEquals(200, status);
String content = mvcResult.getResponse().getContentAsString();
assertEquals(content, "Product is updated successsfully");
}
@Test
public void deleteProduct() throws Exception {
String uri = "/products/2";
MvcResult mvcResult = mvc.perform(MockMvcRequestBuilders.delete(uri)).andReturn();
int status = mvcResult.getResponse().getStatus();
assertEquals(200, status);
String content = mvcResult.getResponse().getContentAsString();
assertEquals(content, "Product is deleted successsfully");
}
}
您可以建立一個可執行的 JAR 檔案,並使用下面給出的 Maven 或 Gradle 命令執行 Spring Boot 應用程式。
對於 Maven,您可以使用以下命令:
mvn clean install
現在,您可以在控制檯視窗中檢視測試結果。
對於 Gradle,您可以使用以下命令:
gradle clean build
您可以在控制檯視窗中看到其餘結果,如下所示。
Spring Boot - 資料庫處理
Spring Boot 為建立資料庫的 DataSource 提供了非常好的支援。我們不需要編寫任何額外的程式碼來在 Spring Boot 中建立 DataSource。只需新增依賴項並進行配置詳細資訊就足以建立 DataSource 並連線資料庫。
在本章中,我們將使用 Spring Boot JDBC 驅動程式連線來連線資料庫。
首先,我們需要在構建配置檔案中新增 Spring Boot Starter JDBC 依賴項。
Maven 使用者可以在 pom.xml 檔案中新增以下依賴項。
<dependency> <groupId>org.springframework.boot</groupId> <artifactId>spring-boot-starter-jdbc</artifactId> </dependency>
Gradle 使用者可以在 build.gradle 檔案中新增以下依賴項。
compile('org.springframework.boot:spring-boot-starter-jdbc')
連線到 H2 資料庫
要連線 H2 資料庫,我們需要在構建配置檔案中新增 H2 資料庫依賴項。
對於 Maven 使用者,請在您的 pom.xml 檔案中新增以下依賴項。
<dependency> <groupId>com.h2database</groupId> <artifactId>h2</artifactId> </dependency>
對於 Gradle 使用者,請在您的 build.gradle 檔案中新增以下依賴項。
compile('com.h2database:h2')
我們需要在類路徑 src/main/resources 目錄下建立 schema.sql 檔案和 data.sql 檔案以連線 H2 資料庫。
schema.sql 檔案如下所示。
CREATE TABLE PRODUCT (ID INT PRIMARY KEY, PRODUCT_NAME VARCHAR(25));
data.sql 檔案如下所示。
INSERT INTO PRODUCT (ID,PRODUCT_NAME) VALUES (1,'Honey'); INSERT INTO PRODUCT (ID,PRODUCT_NAME) VALUES (2,'Almond');
連線 MySQL
要連線 MySQL 資料庫,我們需要將 MySQL 依賴項新增到我們的構建配置檔案中。
對於 Maven 使用者,請在您的 pom.xml 檔案中新增以下依賴項。
<dependency> <groupId>mysql</groupId> <artifactId>mysql-connector-java</artifactId> </dependency>
對於 Gradle 使用者,請在您的 build.gradle 檔案中新增以下依賴項。
compile('mysql:mysql-connector-java')
現在,在 MySQL 中建立資料庫和表,如下所示 -

對於屬性檔案使用者,請在 application.properties 檔案中新增以下屬性。
spring.datasource.driverClassName = com.mysql.jdbc.Driver spring.datasource.url = jdbc:mysql://:3306/PRODUCTSERVICE?autoreconnect = true spring.datasource.username = root spring.datasource.password = root spring.datasource.testOnBorrow = true spring.datasource.testWhileIdle = true spring.datasource.timeBetweenEvictionRunsMillis = 60000 spring.datasource.minEvictableIdleTimeMillis = 30000 spring.datasource.validationQuery = SELECT 1 spring.datasource.max-active = 15 spring.datasource.max-idle = 10 spring.datasource.max-wait = 8000
對於 YAML 使用者,請在 application.yml 檔案中新增以下屬性。
spring:
datasource:
driverClassName: com.mysql.jdbc.Driver
url: "jdbc:mysql://:3306/PRODUCTSERVICE?autoreconnect=true"
username: "root"
password: "root"
testOnBorrow: true
testWhileIdle: true
timeBetweenEvictionRunsMillis: 60000
minEvictableIdleTimeMillis: 30000
validationQuery: SELECT 1
max-active: 15
max-idle: 10
max-wait: 8000
連線 Redis
Redis 是一個開源資料庫,用於儲存記憶體中的資料結構。要在 Spring Boot 應用程式中連線 Redis 資料庫,我們需要在構建配置檔案中新增 Redis 依賴項。
Maven 使用者應在您的 pom.xml 檔案中新增以下依賴項。
<dependency> <groupId>org.springframework.boot</groupId> <artifactId>spring-boot-starter-redis</artifactId> </dependency>
Gradle 使用者應在您的 build.gradle 檔案中新增以下依賴項。
compile('org.springframework.boot:spring-boot-starter-data-redis')
對於 Redis 連線,我們需要使用 RedisTemplate。對於 RedisTemplate,我們需要提供 JedisConnectionFactory 的詳細資訊。
@Bean
JedisConnectionFactory jedisConnectionFactory() {
JedisConnectionFactory jedisConFactory = new JedisConnectionFactory();
jedisConFactory.setHostName("localhost");
jedisConFactory.setPort(6000);
jedisConFactory.setUsePool(true);
return jedisConFactory;
}
@Bean
public RedisTemplate<String, Object> redisTemplate() {
RedisTemplate<String, Object> template = new RedisTemplate<>();
template.setConnectionFactory(jedisConnectionFactory());
template.setKeySerializer(new StringRedisSerializer());
template.setHashKeySerializer(new StringRedisSerializer());
template.setHashValueSerializer(new StringRedisSerializer());
template.setValueSerializer(new StringRedisSerializer());
return template;
}
現在自動連線 RedisTemplate 類並從 Redis 資料庫訪問資料。
@Autowired RedisTemplate<String, Object> redis; Map<Object,Object> datalist = redis.opsForHash().entries(“Redis_code_index_key”);
JDBCTemplate
要在 Spring Boot 應用程式中使用 JdbcTemplate 訪問關係資料庫,我們需要在構建配置檔案中新增 Spring Boot Starter JDBC 依賴項。
然後,如果您 @Autowired JdbcTemplate 類,Spring Boot 會自動連線資料庫併為 JdbcTemplate 物件設定 Datasource。
@Autowired
JdbcTemplate jdbcTemplate;
Collection<Map<String, Object>> rows = jdbc.queryForList("SELECT QUERY");
@Repository 註解應該新增到類檔案中。@Repository 註解用於為您的 Spring Boot 應用程式建立資料庫儲存庫。
@Repository
public class ProductServiceDAO {
}
多個 DataSource
我們可以在單個 Spring Boot 應用程式中保留 'n' 個 DataSource。此處給出的示例顯示瞭如何在 Spring Boot 應用程式中建立多個數據源。現在,在 application 屬性檔案中新增兩個資料來源配置詳細資訊。
對於屬性檔案使用者,請將以下屬性新增到您的 application.properties 檔案中。
spring.dbProductService.driverClassName = com.mysql.jdbc.Driver spring.dbProductService.url = jdbc:mysql://:3306/PRODUCTSERVICE?autoreconnect = true spring.dbProductService.username = root spring.dbProductService.password = root spring.dbProductService.testOnBorrow = true spring.dbProductService.testWhileIdle = true spring.dbProductService.timeBetweenEvictionRunsMillis = 60000 spring.dbProductService.minEvictableIdleTimeMillis = 30000 spring.dbProductService.validationQuery = SELECT 1 spring.dbProductService.max-active = 15 spring.dbProductService.max-idle = 10 spring.dbProductService.max-wait = 8000 spring.dbUserService.driverClassName = com.mysql.jdbc.Driver spring.dbUserService.url = jdbc:mysql://:3306/USERSERVICE?autoreconnect = true spring.dbUserService.username = root spring.dbUserService.password = root spring.dbUserService.testOnBorrow = true spring.dbUserService.testWhileIdle = true spring.dbUserService.timeBetweenEvictionRunsMillis = 60000 spring.dbUserService.minEvictableIdleTimeMillis = 30000 spring.dbUserService.validationQuery = SELECT 1 spring.dbUserService.max-active = 15 spring.dbUserService.max-idle = 10 spring.dbUserService.max-wait = 8000
Yaml 使用者應在您的 application.yml 檔案中新增以下屬性。
spring:
dbProductService:
driverClassName: com.mysql.jdbc.Driver
url: "jdbc:mysql://:3306/PRODUCTSERVICE?autoreconnect=true"
password: "root"
username: "root"
testOnBorrow: true
testWhileIdle: true
timeBetweenEvictionRunsMillis: 60000
minEvictableIdleTimeMillis: 30000
validationQuery: SELECT 1
max-active: 15
max-idle: 10
max-wait: 8000
dbUserService:
driverClassName: com.mysql.jdbc.Driver
url: "jdbc:mysql://:3306/USERSERVICE?autoreconnect=true"
password: "root"
username: "root"
testOnBorrow: true
testWhileIdle: true
timeBetweenEvictionRunsMillis: 60000
minEvictableIdleTimeMillis: 30000
validationQuery: SELECT 1
max-active: 15
max-idle: 10
max-wait: 8000
現在,建立一個配置類來為多個數據源建立 DataSource 和 JdbcTemplate。
import javax.sql.DataSource;
import org.springframework.beans.factory.annotation.Autowired;
import org.springframework.beans.factory.annotation.Qualifier;
import org.springframework.boot.autoconfigure.jdbc.DataSourceBuilder;
import org.springframework.boot.context.properties.ConfigurationProperties;
import org.springframework.context.annotation.Bean;
import org.springframework.context.annotation.Configuration;
import org.springframework.context.annotation.Primary;
import org.springframework.jdbc.core.JdbcTemplate;
@Configuration
public class DatabaseConfig {
@Bean(name = "dbProductService")
@ConfigurationProperties(prefix = "spring.dbProductService")
@Primary
public DataSource createProductServiceDataSource() {
return DataSourceBuilder.create().build();
}
@Bean(name = "dbUserService")
@ConfigurationProperties(prefix = "spring.dbUserService")
public DataSource createUserServiceDataSource() {
return DataSourceBuilder.create().build();
}
@Bean(name = "jdbcProductService")
@Autowired
public JdbcTemplate createJdbcTemplate_ProductService(@Qualifier("dbProductService") DataSource productServiceDS) {
return new JdbcTemplate(productServiceDS);
}
@Bean(name = "jdbcUserService")
@Autowired
public JdbcTemplate createJdbcTemplate_UserService(@Qualifier("dbUserService") DataSource userServiceDS) {
return new JdbcTemplate(userServiceDS);
}
}
然後,使用 @Qualifier 註解自動連線 JDBCTemplate 物件。
@Qualifier("jdbcProductService")
@Autowired
JdbcTemplate jdbcTemplate;
@Qualifier("jdbcUserService")
@Autowired
JdbcTemplate jdbcTemplate;
Spring Boot - 保護 Web 應用程式
如果在類路徑上添加了 Spring Boot Security 依賴項,則 Spring Boot 應用程式會自動要求所有 HTTP 端點進行基本身份驗證。端點“/”和“/home”不需要任何身份驗證。所有其他端點都需要身份驗證。
要將 Spring Boot Security 新增到您的 Spring Boot 應用程式中,我們需要在構建配置檔案中新增 Spring Boot Starter Security 依賴項。
Maven 使用者可以在 pom.xml 檔案中新增以下依賴項。
<dependency> <groupId>org.springframework.boot</groupId> <artifactId>spring-boot-starter-security</artifactId> </dependency>
Gradle 使用者可以在 build.gradle 檔案中新增以下依賴項。
compile("org.springframework.boot:spring-boot-starter-security")
保護 Web 應用程式
首先,使用 Thymeleaf 模板建立一個不安全的 Web 應用程式。
然後,在src/main/resources/templates目錄下建立一個 home.html 檔案。
<!DOCTYPE html>
<html xmlns = "http://www.w3.org/1999/xhtml"
xmlns:th = "http://www.thymeleaf.org"
xmlns:sec = "http://www.thymeleaf.org/thymeleaf-extras-springsecurity3">
<head>
<title>Spring Security Example</title>
</head>
<body>
<h1>Welcome!</h1>
<p>Click <a th:href = "@{/hello}">here</a> to see a greeting.</p>
</body>
</html>
使用 Thymeleaf 模板在 HTML 檔案中定義的簡單檢視/hello。
現在,在src/main/resources/templates目錄下建立一個 hello.html。
<!DOCTYPE html>
<html xmlns = "http://www.w3.org/1999/xhtml"
xmlns:th = "http://www.thymeleaf.org"
xmlns:sec = "http://www.thymeleaf.org/thymeleaf-extras-springsecurity3">
<head>
<title>Hello World!</title>
</head>
<body>
<h1>Hello world!</h1>
</body>
</html>
現在,我們需要為 home 和 hello 檢視設定 Spring MVC - 檢視控制器。
為此,建立一個擴充套件 WebMvcConfigurerAdapter 的 MVC 配置檔案。
package com.tutorialspoint.websecuritydemo;
import org.springframework.context.annotation.Configuration;
import org.springframework.web.servlet.config.annotation.ViewControllerRegistry;
import org.springframework.web.servlet.config.annotation.WebMvcConfigurerAdapter;
@Configuration
public class MvcConfig extends WebMvcConfigurerAdapter {
@Override
public void addViewControllers(ViewControllerRegistry registry) {
registry.addViewController("/home").setViewName("home");
registry.addViewController("/").setViewName("home");
registry.addViewController("/hello").setViewName("hello");
registry.addViewController("/login").setViewName("login");
}
}
現在,將 Spring Boot Starter security 依賴項新增到您的構建配置檔案中。
Maven 使用者可以在 pom.xml 檔案中新增以下依賴項。
<dependency> <groupId>org.springframework.boot</groupId> <artifactId>spring-boot-starter-security</artifactId> </dependency>
Gradle 使用者可以在 build.gradle 檔案中新增以下依賴項。
compile("org.springframework.boot:spring-boot-starter-security")
現在,建立一個 Web 安全配置文 件,用於透過基本身份驗證保護應用程式以訪問 HTTP 端點。
package com.tutorialspoint.websecuritydemo;
import org.springframework.beans.factory.annotation.Autowired;
import org.springframework.context.annotation.Configuration;
import org.springframework.security.config.annotation.authentication.builders.AuthenticationManagerBuilder;
import org.springframework.security.config.annotation.web.builders.HttpSecurity;
import org.springframework.security.config.annotation.web.configuration.WebSecurityConfigurerAdapter;
import org.springframework.security.config.annotation.web.configuration.EnableWebSecurity;
@Configuration
@EnableWebSecurity
public class WebSecurityConfig extends WebSecurityConfigurerAdapter {
@Override
protected void configure(HttpSecurity http) throws Exception {
http
.authorizeRequests()
.antMatchers("/", "/home").permitAll()
.anyRequest().authenticated()
.and()
.formLogin()
.loginPage("/login")
.permitAll()
.and()
.logout()
.permitAll();
}
@Autowired
public void configureGlobal(AuthenticationManagerBuilder auth) throws Exception {
auth
.inMemoryAuthentication()
.withUser("user").password("password").roles("USER");
}
}
現在,在src/main/resources目錄下建立一個 login.html 檔案,以允許使用者透過登入螢幕訪問 HTTP 端點。
<!DOCTYPE html>
<html xmlns = "http://www.w3.org/1999/xhtml" xmlns:th = "http://www.thymeleaf.org"
xmlns:sec = "http://www.thymeleaf.org/thymeleaf-extras-springsecurity3">
<head>
<title>Spring Security Example </title>
</head>
<body>
<div th:if = "${param.error}">
Invalid username and password.
</div>
<div th:if = "${param.logout}">
You have been logged out.
</div>
<form th:action = "@{/login}" method = "post">
<div>
<label> User Name : <input type = "text" name = "username"/> </label>
</div>
<div>
<label> Password: <input type = "password" name = "password"/> </label>
</div>
<div>
<input type = "submit" value = "Sign In"/>
</div>
</form>
</body>
</html>
最後,更新 hello.html 檔案 - 以允許使用者從應用程式登出並在下面顯示當前使用者名稱 -
<!DOCTYPE html>
<html xmlns = "http://www.w3.org/1999/xhtml" xmlns:th = "http://www.thymeleaf.org"
xmlns:sec = "http://www.thymeleaf.org/thymeleaf-extras-springsecurity3">
<head>
<title>Hello World!</title>
</head>
<body>
<h1 th:inline = "text">Hello [[${#httpServletRequest.remoteUser}]]!</h1>
<form th:action = "@{/logout}" method = "post">
<input type = "submit" value = "Sign Out"/>
</form>
</body>
</html>
下面給出主 Spring Boot 應用程式的程式碼 -
package com.tutorialspoint.websecuritydemo;
import org.springframework.boot.SpringApplication;
import org.springframework.boot.autoconfigure.SpringBootApplication;
@SpringBootApplication
public class WebsecurityDemoApplication {
public static void main(String[] args) {
SpringApplication.run(WebsecurityDemoApplication.class, args);
}
}
構建配置檔案的完整程式碼如下所示。
Maven – pom.xml
<?xml version = "1.0" encoding = "UTF-8"?>
<project xmlns = "http://maven.apache.org/POM/4.0.0"
xmlns:xsi = "http://www.w3.org/2001/XMLSchema-instance"
xsi:schemaLocation = "http://maven.apache.org/POM/4.0.0
http://maven.apache.org/xsd/maven-4.0.0.xsd">
<modelVersion>4.0.0</modelVersion>
<groupId>com.tutorialspoint</groupId>
<artifactId>websecurity-demo</artifactId>
<version>0.0.1-SNAPSHOT</version>
<packaging>jar</packaging>
<name>websecurity-demo</name>
<description>Demo project for Spring Boot</description>
<parent>
<groupId>org.springframework.boot</groupId>
<artifactId>spring-boot-starter-parent</artifactId>
<version>1.5.9.RELEASE</version>
<relativePath/> <!-- lookup parent from repository -->
</parent>
<properties>
<project.build.sourceEncoding>UTF-8</project.build.sourceEncoding>
<project.reporting.outputEncoding>UTF-8</project.reporting.outputEncoding>
<java.version>1.8</java.version>
</properties>
<dependencies>
<dependency>
<groupId>org.springframework.boot</groupId>
<artifactId>spring-boot-starter-security</artifactId>
</dependency>
<dependency>
<groupId>org.springframework.boot</groupId>
<artifactId>spring-boot-starter-thymeleaf</artifactId>
</dependency>
<dependency>
<groupId>org.springframework.boot</groupId>
<artifactId>spring-boot-starter-web</artifactId>
</dependency>
<dependency>
<groupId>org.springframework.boot</groupId>
<artifactId>spring-boot-starter-test</artifactId>
<scope>test</scope>
</dependency>
<dependency>
<groupId>org.springframework.security</groupId>
<artifactId>spring-security-test</artifactId>
<scope>test</scope>
</dependency>
</dependencies>
<build>
<plugins>
<plugin>
<groupId>org.springframework.boot</groupId>
<artifactId>spring-boot-maven-plugin</artifactId>
</plugin>
</plugins>
</build>
</project>
Gradle – build.gradle
buildscript {
ext {
springBootVersion = '1.5.9.RELEASE'
}
repositories {
mavenCentral()
}
dependencies {
classpath("org.springframework.boot:spring-boot-gradle-plugin:${springBootVersion}")
}
}
apply plugin: 'java'
apply plugin: 'eclipse'
apply plugin: 'org.springframework.boot'
group = 'com.tutorialspoint'
version = '0.0.1-SNAPSHOT'
sourceCompatibility = 1.8
repositories {
mavenCentral()
}
dependencies {
compile('org.springframework.boot:spring-boot-starter-security')
compile('org.springframework.boot:spring-boot-starter-thymeleaf')
compile('org.springframework.boot:spring-boot-starter-web')
testCompile('org.springframework.boot:spring-boot-starter-test')
testCompile('org.springframework.security:spring-security-test')
}
現在,建立一個可執行的 JAR 檔案,並使用以下 Maven 或 Gradle 命令執行 Spring Boot 應用程式。
Maven 使用者可以使用如下所示的命令 -
mvn clean install
在“BUILD SUCCESS”之後,您可以在 target 目錄下找到 JAR 檔案。
Gradle 使用者可以使用如下所示的命令 -
gradle clean build
在“BUILD SUCCESSFUL”之後,您可以在build/libs目錄下找到JAR檔案。
現在,使用以下顯示的命令執行 JAR 檔案:
java –jar <JARFILE>
在您的 Web 瀏覽器中訪問 URLhttps://:8080/。您可以看到如下所示的輸出。


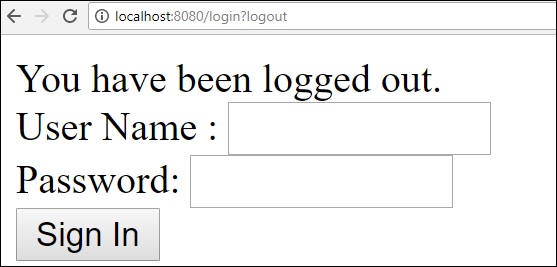

Spring Boot - 使用 JWT 的 OAuth2
在本章中,您將詳細瞭解 Spring Boot Security 機制以及 OAuth2 與 JWT。
授權伺服器
授權伺服器是 Web API 安全性的最高架構元件。授權伺服器充當集中式授權點,允許您的應用程式和 HTTP 端點識別應用程式的功能。
資源伺服器
資源伺服器是一個應用程式,它向客戶端提供訪問令牌以訪問資源伺服器 HTTP 端點。它是包含 HTTP 端點、靜態資源和動態網頁的庫的集合。
OAuth2
OAuth2 是一種授權框架,它使應用程式 Web 安全效能夠訪問客戶端的資源。要構建 OAuth2 應用程式,我們需要關注授權型別(授權碼)、客戶端 ID 和客戶端金鑰。
JWT 令牌
JWT 令牌是 JSON Web 令牌,用於表示在雙方之間保護的宣告。您可以在www.jwt.io/瞭解更多關於 JWT 令牌的資訊。
現在,我們將構建一個 OAuth2 應用程式,該應用程式透過 JWT 令牌啟用授權伺服器和資源伺服器的使用。
您可以使用以下步驟透過訪問資料庫來實現帶有 JWT 令牌的 Spring Boot Security。
首先,我們需要在構建配置檔案中新增以下依賴項。
Maven 使用者可以在您的 pom.xml 檔案中新增以下依賴項。
<dependency> <groupId>org.springframework.boot</groupId> <artifactId>spring-boot-starter-jdbc</artifactId> </dependency> <dependency> <groupId>org.springframework.boot</groupId> <artifactId>spring-boot-starter-security</artifactId> </dependency> <dependency> <groupId>org.springframework.boot</groupId> <artifactId>spring-boot-starter-web</artifactId> </dependency> <dependency> <groupId>org.springframework.security.oauth</groupId> <artifactId>spring-security-oauth2</artifactId> </dependency> <dependency> <groupId>org.springframework.security</groupId> <artifactId>spring-security-jwt</artifactId> </dependency> <dependency> <groupId>com.h2database</groupId> <artifactId>h2</artifactId> </dependency> <dependency> <groupId>org.springframework.boot</groupId> <artifactId>spring-boot-starter-test</artifactId> <scope>test</scope> </dependency> <dependency> <groupId>org.springframework.security</groupId> <artifactId>spring-security-test</artifactId> <scope>test</scope> </dependency>
Gradle 使用者可以在 build.gradle 檔案中新增以下依賴項。
compile('org.springframework.boot:spring-boot-starter-security')
compile('org.springframework.boot:spring-boot-starter-web')
testCompile('org.springframework.boot:spring-boot-starter-test')
testCompile('org.springframework.security:spring-security-test')
compile("org.springframework.security.oauth:spring-security-oauth2")
compile('org.springframework.security:spring-security-jwt')
compile("org.springframework.boot:spring-boot-starter-jdbc")
compile("com.h2database:h2:1.4.191")
其中,
Spring Boot Starter Security - 實現 Spring Security
Spring Security OAuth2 - 實現 OAUTH2 結構以啟用授權伺服器和資源伺服器。
Spring Security JWT - 為 Web 安全生成 JWT 令牌
Spring Boot Starter JDBC - 訪問資料庫以確保使用者可用與否。
Spring Boot Starter Web - 編寫 HTTP 端點。
H2 資料庫 - 儲存用於身份驗證和授權的使用者的資訊。
完整的構建配置檔案如下所示。
<?xml version = "1.0" encoding = "UTF-8"?>
<project xmlns = "http://maven.apache.org/POM/4.0.0"
xmlns:xsi = "http://www.w3.org/2001/XMLSchema-instance"
xsi:schemaLocation = "http://maven.apache.org/POM/4.0.0
http://maven.apache.org/xsd/maven-4.0.0.xsd">
<modelVersion>4.0.0</modelVersion>
<groupId>com.tutorialspoint</groupId>
<artifactId>websecurityapp</artifactId>
<version>0.0.1-SNAPSHOT</version>
<packaging>jar</packaging>
<name>websecurityapp</name>
<description>Demo project for Spring Boot</description>
<parent>
<groupId>org.springframework.boot</groupId>
<artifactId>spring-boot-starter-parent</artifactId>
<version>1.5.9.RELEASE</version>
<relativePath /> <!-- lookup parent from repository -->
</parent>
<properties>
<project.build.sourceEncoding>UTF-8</project.build.sourceEncoding>
<project.reporting.outputEncoding>UTF-8</project.reporting.outputEncoding>
<java.version>1.8</java.version>
</properties>
<dependencies>
<dependency>
<groupId>org.springframework.boot</groupId>
<artifactId>spring-boot-starter-jdbc</artifactId>
</dependency>
<dependency>
<groupId>org.springframework.boot</groupId>
<artifactId>spring-boot-starter-security</artifactId>
</dependency>
<dependency>
<groupId>org.springframework.boot</groupId>
<artifactId>spring-boot-starter-web</artifactId>
</dependency>
<dependency>
<groupId>org.springframework.security.oauth</groupId>
<artifactId>spring-security-oauth2</artifactId>
</dependency>
<dependency>
<groupId>org.springframework.security</groupId>
<artifactId>spring-security-jwt</artifactId>
</dependency>
<dependency>
<groupId>com.h2database</groupId>
<artifactId>h2</artifactId>
</dependency>
<dependency>
<groupId>org.springframework.boot</groupId>
<artifactId>spring-boot-starter-test</artifactId>
<scope>test</scope>
</dependency>
<dependency>
<groupId>org.springframework.security</groupId>
<artifactId>spring-security-test</artifactId>
<scope>test</scope>
</dependency>
</dependencies>
<build>
<plugins>
<plugin>
<groupId>org.springframework.boot</groupId>
<artifactId>spring-boot-maven-plugin</artifactId>
</plugin>
</plugins>
</build>
</project>
Gradle – build.gradle
buildscript {
ext {
springBootVersion = '1.5.9.RELEASE'
}
repositories {
mavenCentral()
}
dependencies {
classpath("org.springframework.boot:spring-boot-gradle-plugin:${springBootVersion}")
}
}
apply plugin: 'java'
apply plugin: 'eclipse'
apply plugin: 'org.springframework.boot'
group = 'com.tutorialspoint'
version = '0.0.1-SNAPSHOT'
sourceCompatibility = 1.8
repositories {
mavenCentral()
}
dependencies {
compile('org.springframework.boot:spring-boot-starter-security')
compile('org.springframework.boot:spring-boot-starter-web')
testCompile('org.springframework.boot:spring-boot-starter-test')
testCompile('org.springframework.security:spring-security-test')
compile("org.springframework.security.oauth:spring-security-oauth2")
compile('org.springframework.security:spring-security-jwt')
compile("org.springframework.boot:spring-boot-starter-jdbc")
compile("com.h2database:h2:1.4.191")
}
現在,在主 Spring Boot 應用程式中,新增 @EnableAuthorizationServer 和 @EnableResourceServer 註解,以在同一應用程式中充當 Auth 伺服器和資源伺服器。
此外,您可以使用以下程式碼編寫一個簡單的 HTTP 端點,以使用 JWT 令牌透過 Spring Security 訪問 API。
package com.tutorialspoint.websecurityapp;
import org.springframework.boot.SpringApplication;
import org.springframework.boot.autoconfigure.SpringBootApplication;
import org.springframework.security.oauth2.config.annotation.web.configuration.EnableAuthorizationServer;
import org.springframework.security.oauth2.config.annotation.web.configuration.EnableResourceServer;
import org.springframework.web.bind.annotation.RequestMapping;
import org.springframework.web.bind.annotation.RestController;
@SpringBootApplication
@EnableAuthorizationServer
@EnableResourceServer
@RestController
public class WebsecurityappApplication {
public static void main(String[] args) {
SpringApplication.run(WebsecurityappApplication.class, args);
}
@RequestMapping(value = "/products")
public String getProductName() {
return "Honey";
}
}
使用以下程式碼定義 POJO 類以儲存用於身份驗證的使用者的資訊。
package com.tutorialspoint.websecurityapp;
import java.util.ArrayList;
import java.util.Collection;
import org.springframework.security.core.GrantedAuthority;
public class UserEntity {
private String username;
private String password;
private Collection<GrantedAuthority> grantedAuthoritiesList = new ArrayList<>();
public String getPassword() {
return password;
}
public void setPassword(String password) {
this.password = password;
}
public Collection<GrantedAuthority> getGrantedAuthoritiesList() {
return grantedAuthoritiesList;
}
public void setGrantedAuthoritiesList(Collection<GrantedAuthority> grantedAuthoritiesList) {
this.grantedAuthoritiesList = grantedAuthoritiesList;
}
public String getUsername() {
return username;
}
public void setUsername(String username) {
this.username = username;
}
}
現在,使用以下程式碼並定義 CustomUser 類,該類擴充套件 org.springframework.security.core.userdetails.User 類以進行 Spring Boot 身份驗證。
package com.tutorialspoint.websecurityapp;
import org.springframework.security.core.userdetails.User;
public class CustomUser extends User {
private static final long serialVersionUID = 1L;
public CustomUser(UserEntity user) {
super(user.getUsername(), user.getPassword(), user.getGrantedAuthoritiesList());
}
}
您可以建立 @Repository 類以從資料庫讀取使用者資訊並將其傳送到自定義使用者服務,還可以新增授予的許可權“ROLE_SYSTEMADMIN”。
package com.tutorialspoint.websecurityapp;
import java.sql.ResultSet;
import java.util.ArrayList;
import java.util.Collection;
import java.util.List;
import org.springframework.beans.factory.annotation.Autowired;
import org.springframework.jdbc.core.JdbcTemplate;
import org.springframework.security.core.GrantedAuthority;
import org.springframework.security.core.authority.SimpleGrantedAuthority;
import org.springframework.stereotype.Repository;
@Repository
public class OAuthDao {
@Autowired
private JdbcTemplate jdbcTemplate;
public UserEntity getUserDetails(String username) {
Collection<GrantedAuthority> grantedAuthoritiesList = new ArrayList<>();
String userSQLQuery = "SELECT * FROM USERS WHERE USERNAME=?";
List<UserEntity> list = jdbcTemplate.query(userSQLQuery, new String[] { username },
(ResultSet rs, int rowNum) -> {
UserEntity user = new UserEntity();
user.setUsername(username);
user.setPassword(rs.getString("PASSWORD"));
return user;
});
if (list.size() > 0) {
GrantedAuthority grantedAuthority = new SimpleGrantedAuthority("ROLE_SYSTEMADMIN");
grantedAuthoritiesList.add(grantedAuthority);
list.get(0).setGrantedAuthoritiesList(grantedAuthoritiesList);
return list.get(0);
}
return null;
}
}
您可以建立一個自定義使用者詳細資訊服務類,該類擴充套件 org.springframework.security.core.userdetails.UserDetailsService 以呼叫 DAO 儲存庫類,如下所示。
package com.tutorialspoint.websecurityapp;
import org.springframework.beans.factory.annotation.Autowired;
import org.springframework.security.core.userdetails.UserDetailsService;
import org.springframework.security.core.userdetails.UsernameNotFoundException;
import org.springframework.stereotype.Service;
@Service
public class CustomDetailsService implements UserDetailsService {
@Autowired
OAuthDao oauthDao;
@Override
public CustomUser loadUserByUsername(final String username) throws UsernameNotFoundException {
UserEntity userEntity = null;
try {
userEntity = oauthDao.getUserDetails(username);
CustomUser customUser = new CustomUser(userEntity);
return customUser;
} catch (Exception e) {
e.printStackTrace();
throw new UsernameNotFoundException("User " + username + " was not found in the database");
}
}
}
接下來,建立一個 @configuration 類以啟用 Web 安全性,定義密碼編碼器 (BCryptPasswordEncoder),並定義 AuthenticationManager bean。安全配置類應擴充套件 WebSecurityConfigurerAdapter 類。
package com.tutorialspoint.websecurityapp;
import org.springframework.beans.factory.annotation.Autowired;
import org.springframework.context.annotation.Bean;
import org.springframework.context.annotation.Configuration;
import org.springframework.security.authentication.AuthenticationManager;
import org.springframework.security.config.annotation.authentication.builders.AuthenticationManagerBuilder;
import org.springframework.security.config.annotation.method.configuration.EnableGlobalMethodSecurity;
import org.springframework.security.config.annotation.web.builders.HttpSecurity;
import org.springframework.security.config.annotation.web.builders.WebSecurity;
import org.springframework.security.config.annotation.web.configuration.EnableWebSecurity;
import org.springframework.security.config.annotation.web.configuration.WebSecurityConfigurerAdapter;
import org.springframework.security.config.http.SessionCreationPolicy;
import org.springframework.security.crypto.bcrypt.BCryptPasswordEncoder;
import org.springframework.security.crypto.password.PasswordEncoder;
@Configuration
@EnableWebSecurity
@EnableGlobalMethodSecurity(prePostEnabled = true)
public class SecurityConfiguration extends WebSecurityConfigurerAdapter {
@Autowired
private CustomDetailsService customDetailsService;
@Bean
public PasswordEncoder encoder() {
return new BCryptPasswordEncoder();
}
@Override
@Autowired
protected void configure(AuthenticationManagerBuilder auth) throws Exception {
auth.userDetailsService(customDetailsService).passwordEncoder(encoder());
}
@Override
protected void configure(HttpSecurity http) throws Exception {
http.authorizeRequests().anyRequest().authenticated().and().sessionManagement()
.sessionCreationPolicy(SessionCreationPolicy.NEVER);
}
@Override
public void configure(WebSecurity web) throws Exception {
web.ignoring();
}
@Override
@Bean
public AuthenticationManager authenticationManagerBean() throws Exception {
return super.authenticationManagerBean();
}
}
現在,定義 OAuth2 配置類以新增客戶端 ID、客戶端金鑰、定義 JwtAccessTokenConverter、私鑰和公鑰以用於令牌簽名金鑰和驗證金鑰,以及為令牌有效期和範圍配置 ClientDetailsServiceConfigurer。
package com.tutorialspoint.websecurityapp;
import org.springframework.beans.factory.annotation.Autowired;
import org.springframework.beans.factory.annotation.Qualifier;
import org.springframework.context.annotation.Bean;
import org.springframework.context.annotation.Configuration;
import org.springframework.security.authentication.AuthenticationManager;
import org.springframework.security.oauth2.config.annotation.configurers.ClientDetailsServiceConfigurer;
import org.springframework.security.oauth2.config.annotation.web.configuration.AuthorizationServerConfigurerAdapter;
import org.springframework.security.oauth2.config.annotation.web.configurers.AuthorizationServerEndpointsConfigurer;
import org.springframework.security.oauth2.config.annotation.web.configurers.AuthorizationServerSecurityConfigurer;
import org.springframework.security.oauth2.provider.token.store.JwtAccessTokenConverter;
import org.springframework.security.oauth2.provider.token.store.JwtTokenStore;
@Configuration
public class OAuth2Config extends AuthorizationServerConfigurerAdapter {
private String clientid = "tutorialspoint";
private String clientSecret = "my-secret-key";
private String privateKey = "private key";
private String publicKey = "public key";
@Autowired
@Qualifier("authenticationManagerBean")
private AuthenticationManager authenticationManager;
@Bean
public JwtAccessTokenConverter tokenEnhancer() {
JwtAccessTokenConverter converter = new JwtAccessTokenConverter();
converter.setSigningKey(privateKey);
converter.setVerifierKey(publicKey);
return converter;
}
@Bean
public JwtTokenStore tokenStore() {
return new JwtTokenStore(tokenEnhancer());
}
@Override
public void configure(AuthorizationServerEndpointsConfigurer endpoints) throws Exception {
endpoints.authenticationManager(authenticationManager).tokenStore(tokenStore())
.accessTokenConverter(tokenEnhancer());
}
@Override
public void configure(AuthorizationServerSecurityConfigurer security) throws Exception {
security.tokenKeyAccess("permitAll()").checkTokenAccess("isAuthenticated()");
}
@Override
public void configure(ClientDetailsServiceConfigurer clients) throws Exception {
clients.inMemory().withClient(clientid).secret(clientSecret).scopes("read", "write")
.authorizedGrantTypes("password", "refresh_token").accessTokenValiditySeconds(20000)
.refreshTokenValiditySeconds(20000);
}
}
現在,使用 openssl 建立私鑰和公鑰。
您可以使用以下命令生成私鑰。
openssl genrsa -out jwt.pem 2048 openssl rsa -in jwt.pem
您可以使用以下命令生成公鑰。
openssl rsa -in jwt.pem -pubout
對於 1.5 版本之後的 Spring Boot 版本,請在您的 application.properties 檔案中新增以下屬性以定義 OAuth2 資源過濾器順序。
security.oauth2.resource.filter-order=3
YAML 檔案使用者可以在 YAML 檔案中新增以下屬性。
security:
oauth2:
resource:
filter-order: 3
現在,在類路徑資源src/main/resources/directory下建立 schema.sql 和 data.sql 檔案以將應用程式連線到 H2 資料庫。
schema.sql 檔案如下所示 -
CREATE TABLE USERS (ID INT PRIMARY KEY, USERNAME VARCHAR(45), PASSWORD VARCHAR(60));
data.sql 檔案如下所示 -
INSERT INTO USERS (ID, USERNAME,PASSWORD) VALUES ( 1, 'tutorialspoint@gmail.com','$2a$08$fL7u5xcvsZl78su29x1ti.dxI.9rYO8t0q5wk2ROJ.1cdR53bmaVG'); INSERT INTO USERS (ID, USERNAME,PASSWORD) VALUES ( 2, 'myemail@gmail.com','$2a$08$fL7u5xcvsZl78su29x1ti.dxI.9rYO8t0q5wk2ROJ.1cdR53bmaVG');
注意 - 密碼應以 Bcrypt 編碼器的格式儲存在資料庫表中。
您可以建立一個可執行的 JAR 檔案,並使用以下 Maven 或 Gradle 命令執行 Spring Boot 應用程式。
對於 Maven,您可以使用以下命令:
mvn clean install
在“BUILD SUCCESS”之後,您可以在target目錄下找到JAR檔案。
對於 Gradle,您可以使用以下命令:
gradle clean build
在“BUILD SUCCESSFUL”之後,您可以在build/libs目錄下找到JAR檔案。
現在,使用此處顯示的命令執行 JAR 檔案:
java –jar <JARFILE>
應用程式在 Tomcat 埠 8080 上啟動。
現在透過 POSTMAN 訪問 POST 方法 URL 以獲取 OAUTH2 令牌。
https://:8080/oauth/token
現在,新增請求標頭,如下所示 -
Authorization - 使用您的客戶端 ID 和客戶端金鑰的基本身份驗證。
Content Type - application/x-www-form-urlencoded
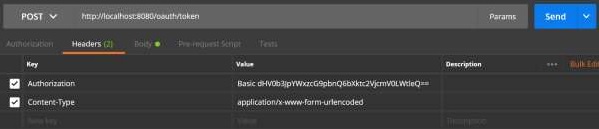
現在,新增請求引數,如下所示 -
- grant_type = password
- username = 您的使用者名稱
- password = 您的密碼
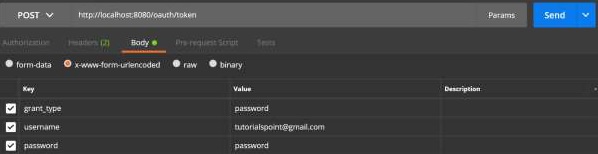
現在,訪問 API 並獲取 access_token,如下所示 -

現在,在請求標頭中使用 Bearer 訪問令牌訪問資源伺服器 API,如下所示。
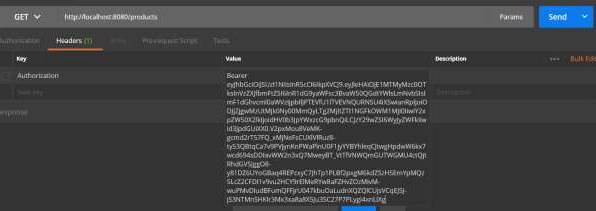
然後,您可以看到如下所示的輸出 -

Spring Boot - Google Cloud Platform
Google Cloud Platform 提供雲計算服務,這些服務在雲環境中執行 Spring Boot 應用程式。在本章中,我們將瞭解如何在 GCP App Engine 平臺上部署 Spring Boot 應用程式。
首先,從 Spring Initializer 頁面www.start.spring.io下載 Gradle 構建 Spring Boot 應用程式。觀察以下螢幕截圖。
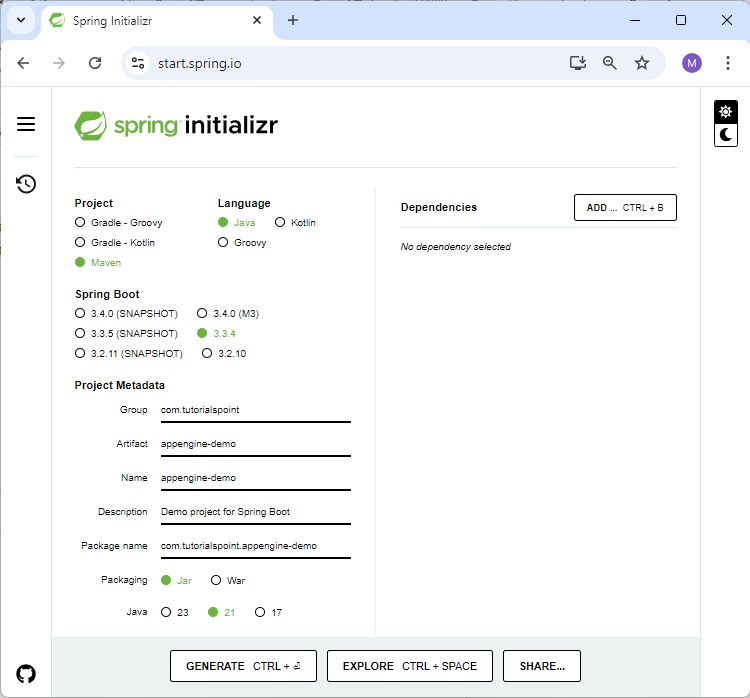
現在,在 build.gradle 檔案中,新增 Google Cloud appengine 外掛和 appengine 類路徑依賴項。
build.gradle 檔案的程式碼如下所示 -
buildscript {
ext {
springBootVersion = '1.5.9.RELEASE'
}
repositories {
mavenCentral()
}
dependencies {
classpath("org.springframework.boot:spring-boot-gradle-plugin:${springBootVersion}")
classpath 'com.google.cloud.tools:appengine-gradle-plugin:1.3.3'
}
}
apply plugin: 'java'
apply plugin: 'eclipse'
apply plugin: 'org.springframework.boot'
apply plugin: 'com.google.cloud.tools.appengine'
group = 'com.tutorialspoint'
version = '0.0.1-SNAPSHOT'
sourceCompatibility = 1.8
repositories {
mavenCentral()
}
dependencies {
compile('org.springframework.boot:spring-boot-starter-web')
testCompile('org.springframework.boot:spring-boot-starter-test')
}
現在,編寫一個簡單的 HTTP 端點,它返回字串“success”,如下所示 -
package com.tutorialspoint.appenginedemo;
import org.springframework.boot.SpringApplication;
import org.springframework.boot.autoconfigure.SpringBootApplication;
import org.springframework.web.bind.annotation.RequestMapping;
import org.springframework.web.bind.annotation.RestController;
@SpringBootApplication
@RestController
public class AppengineDemoApplication {
public static void main(String[] args) {
SpringApplication.run(AppengineDemoApplication.class, args);
}
@RequestMapping(value = "/")
public String success() {
return "APP Engine deployment success";
}
}
接下來,在 src/main/appengine 目錄下新增 app.yml 檔案,如下所示 -
runtime: java env: flex handlers: - url: /.* script: this field is required, but ignored
現在,轉到 Google Cloud 控制檯,然後單擊頁面頂部的“啟用 Google Cloud Shell”。

現在,使用 Google Cloud Shell 將您的原始檔和 Gradle 檔案移動到 Google Cloud 機器的主目錄中。

現在,執行命令 gradle appengineDeploy,它會將您的應用程式部署到 Google Cloud App Engine 中。
注意 - GCP 應啟用計費,並且在將應用程式部署到 App Engine 之前,您應在 GCP 中建立 App Engine 平臺。
將您的應用程式部署到 GCP App Engine 平臺需要幾分鐘時間。
構建成功後,您可以在控制檯視窗中看到服務 URL。
現在,訪問服務 URL 並檢視輸出。

Google Cloud SQL
要將 Google Cloud SQL 連線到您的 Spring Boot 應用程式,您應將以下屬性新增到您的 application.properties 檔案中。
JDBC URL 格式
jdbc:mysql://google/<DATABASE-NAME>?cloudSqlInstance = <GOOGLE_CLOUD_SQL_INSTANCE_NAME> &socketFactory = com.google.cloud.sql.mysql.SocketFactory&user = <USERNAME>&password = <PASSWORD>
注意 - Spring Boot 應用程式和 Google Cloud SQL 應位於同一 GCP 專案中。
application.properties 檔案如下所示。
spring.dbProductService.driverClassName = com.mysql.jdbc.Driver spring.dbProductService.url = jdbc:mysql://google/PRODUCTSERVICE?cloudSqlInstance = springboot-gcp-cloudsql:asia-northeast1:springboot-gcp-cloudsql-instance&socketFactory = com.google.cloud.sql.mysql.SocketFactory&user = root&password = rootspring.dbProductService.username = root spring.dbProductService.password = root spring.dbProductService.testOnBorrow = true spring.dbProductService.testWhileIdle = true spring.dbProductService.timeBetweenEvictionRunsMillis = 60000 spring.dbProductService.minEvictableIdleTimeMillis = 30000 spring.dbProductService.validationQuery = SELECT 1 spring.dbProductService.max-active = 15 spring.dbProductService.max-idle = 10 spring.dbProductService.max-wait = 8000
YAML 檔案使用者可以將以下屬性新增到您的 application.yml 檔案中。
spring:
datasource:
driverClassName: com.mysql.jdbc.Driver
url: "jdbc:mysql://google/PRODUCTSERVICE?cloudSqlInstance=springboot-gcp-cloudsql:asia-northeast1:springboot-gcp-cloudsql-instance&socketFactory=com.google.cloud.sql.mysql.SocketFactory&user=root&password=root"
password: "root"
username: "root"
testOnBorrow: true
testWhileIdle: true
validationQuery: SELECT 1
max-active: 15
max-idle: 10
max-wait: 8000
Spring Boot - Google OAuth2 登入
在本章中,我們將瞭解如何使用帶有 Gradle 構建的 Spring Boot 應用程式新增 Google OAuth2 登入。
首先,在您的構建配置檔案中新增 Spring Boot OAuth2 安全依賴項,您的構建配置檔案如下所示。
buildscript {
ext {
springBootVersion = '1.5.8.RELEASE'
}
repositories {
mavenCentral()
}
dependencies {
classpath("org.springframework.boot:spring-boot-gradle-plugin:${springBootVersion}")
}
}
apply plugin: 'java'
apply plugin: 'eclipse'
apply plugin: 'org.springframework.boot'
group = 'com.tutorialspoint.projects'
version = '0.0.1-SNAPSHOT'
sourceCompatibility = 1.8
repositories {
mavenCentral()
}
dependencies {
compile('org.springframework.boot:spring-boot-starter')
testCompile('org.springframework.boot:spring-boot-starter-test')
compile('org.springframework.security.oauth:spring-security-oauth2')
compile('org.springframework.boot:spring-boot-starter-web')
testCompile('org.springframework.boot:spring-boot-starter-test')
}
現在,新增 HTTP 端點以在透過 Spring Boot 進行身份驗證後從 Google 讀取使用者主體,如以下 Spring Boot 應用程式類檔案所示:
package com.tutorialspoint.projects.googleservice;
import java.security.Principal;
import org.springframework.boot.SpringApplication;
import org.springframework.boot.autoconfigure.SpringBootApplication;
import org.springframework.web.bind.annotation.RequestMapping;
import org.springframework.web.bind.annotation.RestController;
@SpringBootApplication
@RestController
public class GoogleserviceApplication {
public static void main(String[] args) {
SpringApplication.run(GoogleserviceApplication.class, args);
}
@RequestMapping(value = "/user")
public Principal user(Principal principal) {
return principal;
}
}
現在,編寫一個配置檔案以啟用 Web 安全的 OAuth2SSO 並刪除 index.html 檔案的身份驗證,如下所示:
package com.tutorialspoint.projects.googleservice;
import org.springframework.boot.autoconfigure.security.oauth2.client.EnableOAuth2Sso;
import org.springframework.context.annotation.Configuration;
import org.springframework.security.config.annotation.web.builders.HttpSecurity;
import org.springframework.security.config.annotation.web.configuration.WebSecurityConfigurerAdapter;
@Configuration
@EnableOAuth2Sso
public class WebSecurityConfiguration extends WebSecurityConfigurerAdapter {
@Override
protected void configure(HttpSecurity http) throws Exception {
http
.csrf()
.disable()
.antMatcher("/**")
.authorizeRequests()
.antMatchers("/", "/index.html")
.permitAll()
.anyRequest()
.authenticated();
}
}
接下來,在靜態資源下新增 index.html 檔案,並新增連結以重定向到使用者 HTTP 端點以讀取 Google 使用者主體,如下所示:
<!DOCTYPE html>
<html>
<head>
<meta charset = "ISO-8859-1">
<title>Insert title here</title>
</head>
<body>
<a href = "user">Click here to Google Login</a>
</body>
</html>
注意 - 在 Google Cloud 控制檯中,啟用 Gmail 服務、分析服務和 Google+ 服務 API。
然後,轉到“憑據”部分並建立憑據,然後選擇“OAuth 客戶端 ID”。

接下來,在 OAuth2 同意螢幕中提供產品名稱。
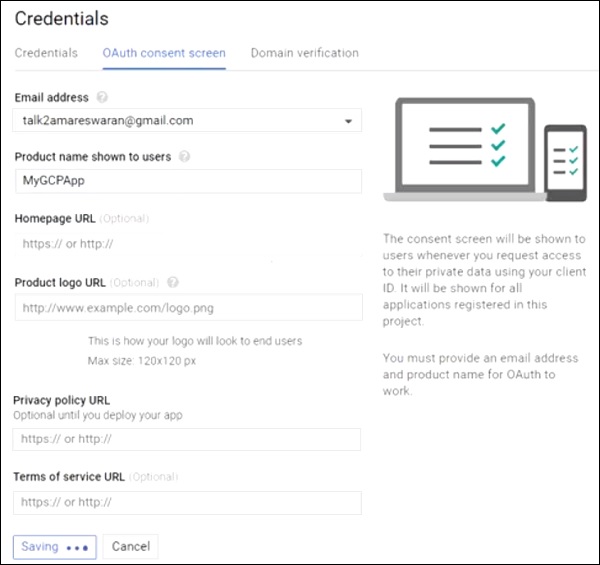
接下來,將應用程式型別選擇為“Web 應用程式”,並提供授權的 JavaScript 來源和授權的重定向 URI。
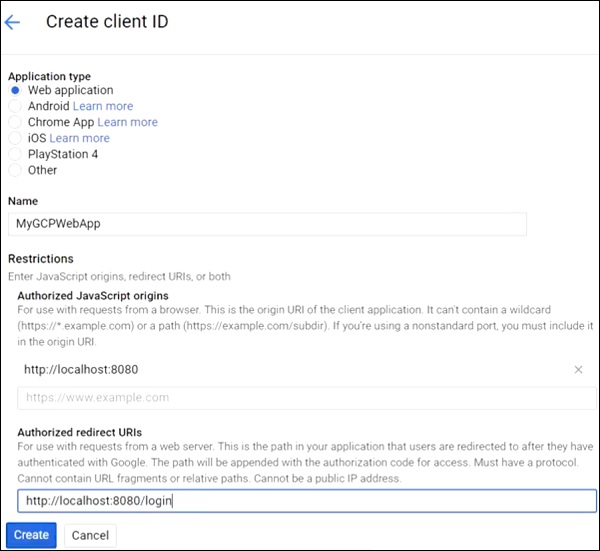
現在,您的 OAuth2 客戶端 ID 和客戶端金鑰已建立。
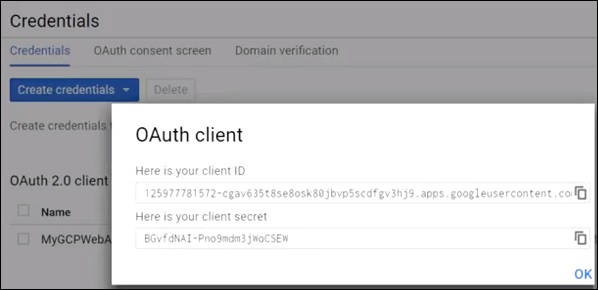
接下來,在您的應用程式屬性檔案中新增客戶端 ID 和客戶端金鑰。
security.oauth2.client.clientId = <CLIENT_ID> security.oauth2.client.clientSecret = <CLIENT_SECRET> security.oauth2.client.accessTokenUri = https://www.googleapis.com/oauth2/v3/token security.oauth2.client.userAuthorizationUri = https://#/o/oauth2/auth security.oauth2.client.tokenName = oauth_token security.oauth2.client.authenticationScheme = query security.oauth2.client.clientAuthenticationScheme = form security.oauth2.client.scope = profile email security.oauth2.resource.userInfoUri = https://www.googleapis.com/userinfo/v2/me security.oauth2.resource.preferTokenInfo = false
現在,您可以建立一個可執行的 JAR 檔案,並使用以下 Gradle 命令執行 Spring Boot 應用程式。
對於 Gradle,您可以使用以下命令:
gradle clean build
在“BUILD SUCCESSFUL”之後,您可以在build/libs目錄下找到JAR檔案。
使用命令 java –jar <JARFILE> 執行 JAR 檔案,應用程式將在 Tomcat 埠 8080 上啟動。
現在訪問 URL https://:8080/ 並點選 Google 登入連結。

它將重定向到 Google 登入螢幕,並提供 Gmail 登入詳細資訊。

如果登入成功,我們將收到 Gmail 使用者的主體物件。