- Spring Boot 教程
- Spring Boot - 首頁
- Spring Boot - 簡介
- Spring Boot - 快速入門
- Spring Boot - 啟動
- Spring Tool Suite
- Spring Boot - Tomcat 部署
- Spring Boot - 構建系統
- Spring Boot - 程式碼結構
- Spring Bean & 依賴注入
- Spring Boot - 執行器
- Spring Boot - 啟動器
- Spring Boot - 應用屬性
- Spring Boot - 配置
- Spring Boot - 註解
- Spring Boot - 日誌
- 構建 RESTful Web 服務
- Spring Boot - 異常處理
- Spring Boot - 攔截器
- Spring Boot - Servlet 過濾器
- Spring Boot - Tomcat 埠號
- Spring Boot - Rest 模板
- Spring Boot - 檔案處理
- Spring Boot - 服務元件
- Spring Boot - Thymeleaf
- 使用 RESTful Web 服務
- Spring Boot - CORS 支援
- Spring Boot - 國際化
- Spring Boot - 定時任務
- Spring Boot - 啟用 HTTPS
- Spring Boot - Eureka 伺服器
- 使用 Eureka 註冊服務
- 閘道器代理伺服器和路由
- Spring Cloud 配置伺服器
- Spring Cloud 配置客戶端
- Spring Boot - Actuator
- Spring Boot - Admin 伺服器
- Spring Boot - Admin 客戶端
- Spring Boot - 啟用 Swagger2
- Spring Boot - 使用 SpringDoc OpenAPI
- Spring Boot - 建立 Docker 映象
- 追蹤微服務日誌
- Spring Boot - Flyway 資料庫
- Spring Boot - 傳送郵件
- Spring Boot - Hystrix
- Spring Boot - Web Socket
- Spring Boot - 批處理服務
- Spring Boot - Apache Kafka
- Spring Boot - Twilio
- Spring Boot - 單元測試用例
- Rest Controller 單元測試
- Spring Boot - 資料庫處理
- 保護 Web 應用
- Spring Boot - 使用 JWT 的 OAuth2
- Spring Boot - Google Cloud Platform
- Spring Boot - Google OAuth2 登入
- Spring Boot 資源
- Spring Boot - 快速指南
- Spring Boot - 有用資源
- Spring Boot - 討論
Spring Boot - Google OAuth2 登入
本章我們將學習如何使用 Gradle 構建的 Spring Boot 應用新增 Google OAuth2 登入。
首先,在你的構建配置檔案中新增 Spring Boot OAuth2 安全依賴項,如下所示。
buildscript {
   ext {
      springBootVersion = '3.3.4'
   }
   repositories {
      mavenCentral()
   }
   dependencies {
      classpath("org.springframework.boot:spring-boot-gradle-plugin:${springBootVersion}")
   }
}

apply plugin: 'java'
apply plugin: 'eclipse'
apply plugin: 'org.springframework.boot'

group = 'com.tutorialspoint.projects'
version = '0.0.1-SNAPSHOT'
sourceCompatibility = 21

repositories {
   mavenCentral()
}
dependencies {
   compile('org.springframework.boot:spring-boot-starter')
   testCompile('org.springframework.boot:spring-boot-starter-test')
   compile('org.springframework.security.oauth:spring-security-oauth2-client')
   compile('org.springframework.boot:spring-boot-starter-web')
   testCompile('org.springframework.boot:spring-boot-starter-test')
}
現在,新增 HTTP 端點,以便在 Spring Boot 主應用程式類檔案中透過 Spring Boot 身份驗證後從 Google 讀取使用者主體,如下所示:
package com.tutorialspoint.projects.googleservice;

import java.security.Principal;

import org.springframework.boot.SpringApplication;
import org.springframework.boot.autoconfigure.SpringBootApplication;
import org.springframework.web.bind.annotation.GetMapping;
import org.springframework.web.bind.annotation.RestController;

@SpringBootApplication
@RestController
public class GoogleserviceApplication {
   public static void main(String[] args) {
      SpringApplication.run(GoogleserviceApplication.class, args);
   }
   @GetMapping(value = "/user")
   public Principal user(Principal principal) {
      return principal;
   }
}
現在,編寫一個配置檔案來啟用 Web 安全的 OAuth2SSO,並刪除 index.html 檔案的認證,如下所示:
package com.tutorialspoint.projects.googleservice;

import org.springframework.context.annotation.Bean;
import org.springframework.context.annotation.Configuration;
import org.springframework.security.config.Customizer;
import org.springframework.security.config.annotation.web.builders.HttpSecurity;
import org.springframework.security.config.annotation.web.configuration.EnableWebSecurity;
import org.springframework.security.config.annotation.web.configurers.AbstractHttpConfigurer;
import org.springframework.security.web.SecurityFilterChain;

@Configuration
@EnableWebSecurity
public class WebSecurityConfig {

@Bean
protected SecurityFilterChain filterChain(HttpSecurity http) throws Exception {
   return http
      .csrf(AbstractHttpConfigurer::disable)
         .authorizeHttpRequests(
            request -> request
               .requestMatchers("/").permitAll()
               .requestMatchers("/home").permitAll()
               .anyRequest().authenticated()
         )
         .formLogin(form -> form.loginPage("/login")
            .permitAll())
            .logout(config -> config
            .logoutSuccessUrl("/")
            .permitAll())
         .oauth2Client(Customizer.withDefaults())
         .oauth2Login(Customizer.withDefaults())
      .build();
   }
}
接下來,在靜態資源下新增 index.html 檔案,並新增連結以重定向到使用者 HTTP 端點以讀取 Google 使用者主體,如下所示:
<!DOCTYPE html>
<html>
   <head>
      <meta charset = "ISO-8859-1">
      <title>Insert title here</title>
   </head>
   <body>
      <a href = "user">Click here to Google Login</a>
   </body>
</html>
注意 - 在 Google Cloud 控制檯中,啟用 Gmail 服務、分析服務和 Google+ 服務 API。
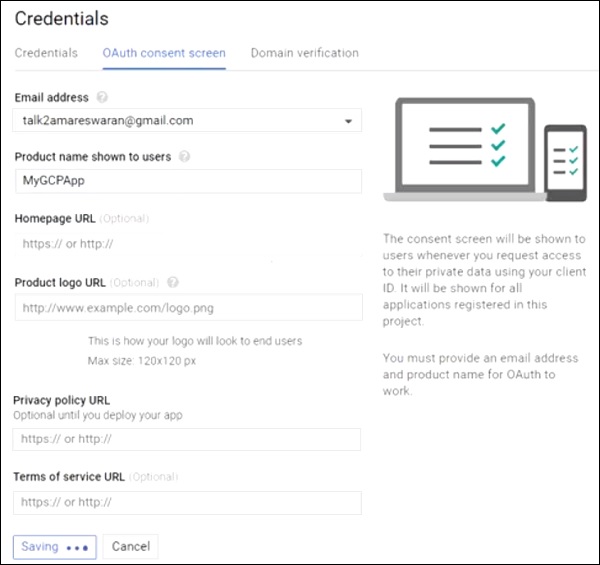
然後,轉到“憑據”部分並建立一個憑據,然後選擇 OAuth 客戶端 ID。

接下來,在 OAuth2 同意螢幕中提供產品名稱。
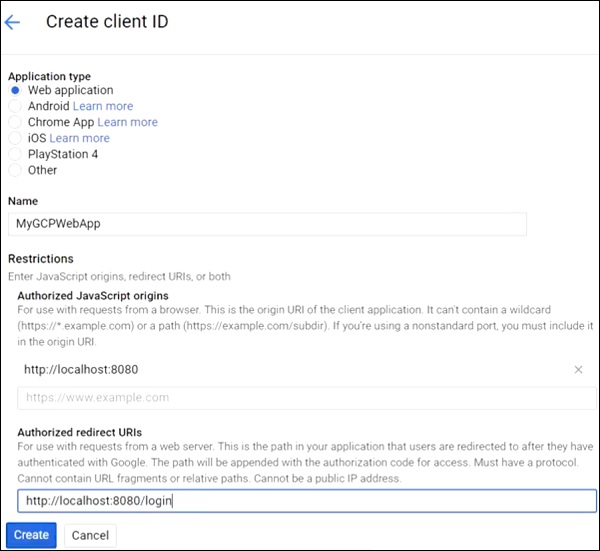
接下來,選擇“Web 應用程式”作為應用程式型別,提供授權的 JavaScript 源和授權的重定向 URI。
現在,你的 OAuth2 客戶端 ID 和客戶端金鑰已建立。
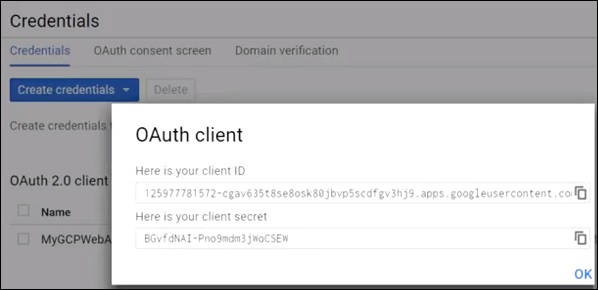
接下來,在你的應用程式屬性檔案中新增客戶端 ID 和客戶端金鑰。
spring.security.oauth2.client.registration.google.clientId = <CLIENT_ID>
spring.security.oauth2.client.registration.google.client-secret= <CLIENT_SECRET>
spring.security.oauth2.client.registration.google.authorization-grant-type=client_credentials
現在,你可以建立一個可執行的 JAR 檔案,並使用以下 Gradle 命令執行 Spring Boot 應用程式。
對於 Gradle,你可以使用如下所示的命令:
gradle clean build
“BUILD SUCCESSFUL”之後,你可以在 build/libs 目錄下找到 JAR 檔案。
使用命令 java –jar <JARFILE> 執行 JAR 檔案,應用程式將在 Tomcat 埠 8080 上啟動。
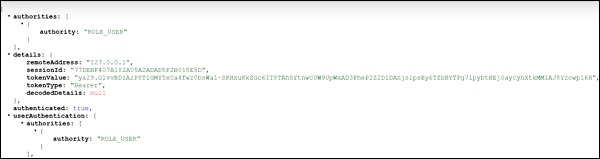
現在訪問 URL https://:8080/ 並單擊 Google 登入連結。

它將重定向到 Google 登入螢幕,並提供 Gmail 登入詳細資訊。

如果登入成功,我們將收到 Gmail 使用者的主體物件。