- React Native 教程
- React Native - 首頁
- 核心概念
- React Native - 概述
- React Native - 環境搭建
- React Native - 應用
- React Native - 狀態
- React Native - 屬性
- React Native - 樣式
- React Native - Flexbox
- React Native - ListView
- React Native - 文字輸入
- React Native - ScrollView
- React Native - 圖片
- React Native - HTTP
- React Native - 按鈕
- React Native - 動畫
- React Native - 除錯
- React Native - 路由
- React Native - 執行 IOS
- React Native - 執行 Android
- 元件和 API
- React Native - View
- React Native - WebView
- React Native - Modal
- React Native - ActivityIndicator
- React Native - Picker
- React Native - 狀態列
- React Native - Switch
- React Native - Text
- React Native - Alert
- React Native - 地理位置
- React Native - AsyncStorage
- React Native 有用資源
- React Native 快速指南
- React Native - 有用資源
- React Native - 討論
React Native 快速指南
React Native - 概述
為了更好地理解 React Native 的概念,我們將借用官方文件中的一些內容 -
React Native 允許您僅使用 JavaScript 構建移動應用程式。它使用與 React 相同的設計,讓您能夠從宣告式元件中構建豐富的移動 UI。使用 React Native,您不會構建移動 Web 應用、HTML5 應用或混合應用;您構建的是真正的移動應用,與使用 Objective-C 或 Java 構建的應用無法區分。React Native 使用與常規 iOS 和 Android 應用相同的 UI 基本構建塊。您只需使用 JavaScript 和 React 將這些構建塊組合在一起。
React Native 特性
以下是 React Native 的特性 -
React - 這是一個使用 JavaScript 構建 Web 和移動應用程式的框架。
Native - 您可以使用由 JavaScript 控制的原生元件。
平臺 - React Native 支援 IOS 和 Android 平臺。
React Native 優勢
以下是 React Native 的優勢 -
JavaScript - 您可以使用現有的 JavaScript 知識構建原生移動應用程式。
程式碼共享 - 您可以在不同的平臺上共享大部分程式碼。
社群 - React 和 React Native 周圍的社群非常龐大,您將能夠找到所需的任何答案。
React Native 限制
以下是 React Native 的限制 -
原生元件 - 如果您想建立尚未建立的原生功能,則需要編寫一些平臺特定的程式碼。
React Native - 環境搭建
要設定 React Native 的環境,您需要安裝幾個東西。我們將使用 OSX 作為我們的構建平臺。
| 序號 | 軟體 | 描述 |
|---|---|---|
| 1 | NodeJS 和 NPM | 您可以按照我們的 NodeJS 環境搭建 教程來安裝 NodeJS。 |
步驟 1:安裝 create-react-native-app
在您的系統中成功安裝 NodeJS 和 NPM 後,您可以繼續安裝 create-react-native-app(全域性安裝,如下所示)。
C:\Users\Tutorialspoint> npm install -g create-react-native-app
步驟 2:建立專案
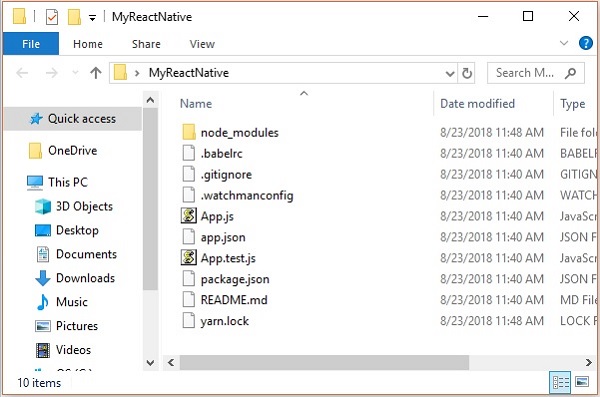
瀏覽所需的資料夾並建立一個新的 React Native 專案,如下所示。
C:\Users\Tutorialspoint>cd Desktop
C:\Users\Tutorialspoint\Desktop>create-react-native-app MyReactNative
執行上述命令後,將建立一個具有指定名稱的資料夾,其中包含以下內容。
步驟 3:NodeJS Python Jdk8
確保您的系統中已安裝 Python NodeJS 和 jdk8,如果未安裝,請安裝它們。除了這些之外,建議安裝最新版本的 yarn 以避免某些問題。
步驟 4:安裝 React Native CLI
您可以使用 install -g react-native-cli 命令在 npm 上安裝 React Native 命令列介面,如下所示。
npm install -g react-native-cli

步驟 5:啟動 React Native
要驗證安裝,請瀏覽專案資料夾並嘗試使用 start 命令啟動專案。
C:\Users\Tutorialspoint\Desktop>cd MyReactNative
C:\Users\Tutorialspoint\Desktop\MyReactNative>npm start
如果一切順利,您將獲得如下所示的二維碼。
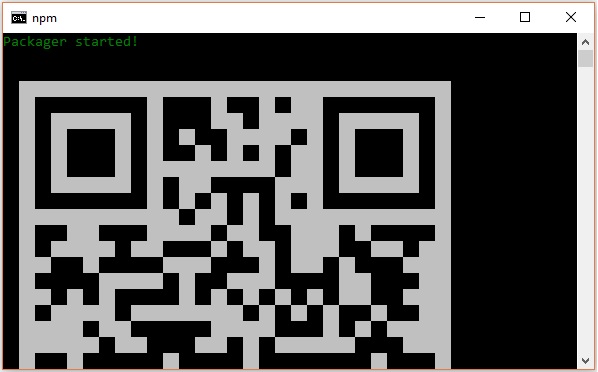
按照說明,在您的 Android 裝置上執行 React Native 應用的一種方法是使用 Expo。在您的 Android 裝置上安裝 Expo 客戶端並掃描上面獲得的二維碼。
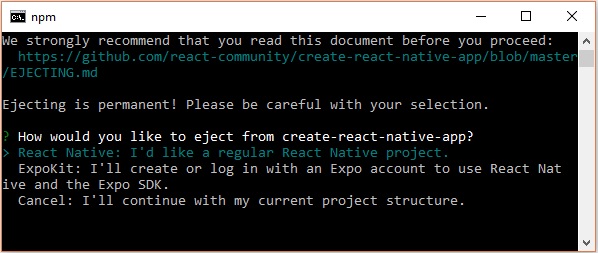
步驟 6:彈出專案
如果您想使用 Android Studio 執行 Android 模擬器,請按 ctrl+c 退出當前命令列。
然後,執行執行 彈出命令 如下
npm run eject
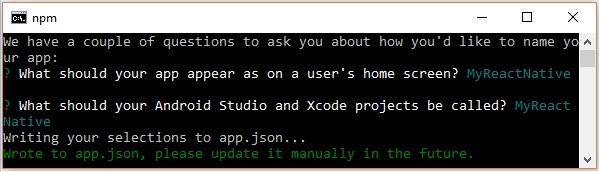
這會提示您彈出選項,使用箭頭選擇第一個選項並按 Enter。
然後,您應該建議在主螢幕上顯示應用名稱以及 Android Studio 和 Xcode 專案的專案名稱。
儘管您的專案已成功彈出,但您可能會收到以下錯誤 -
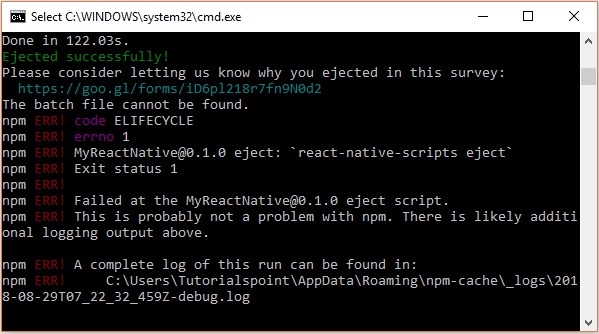
忽略此錯誤並使用以下命令為 Android 執行 React Native -
react-native run-android
但是,在此之前,您需要安裝 Android Studio。
步驟 7:安裝 Android Studio
訪問網頁 https://developer.android.com/studio/ 並下載 Android Studio。

下載其安裝檔案後,雙擊它並繼續安裝。

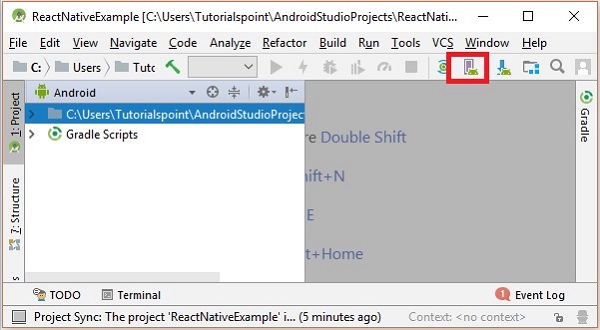
步驟 8:配置 AVD 管理器
要配置 AVD 管理器,請點選選單欄中的相應圖示。
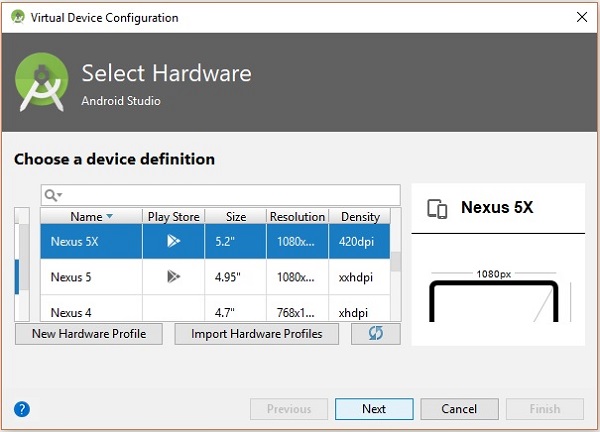
步驟 9:配置 AVD 管理器
選擇裝置定義,建議使用 Nexus 5X。
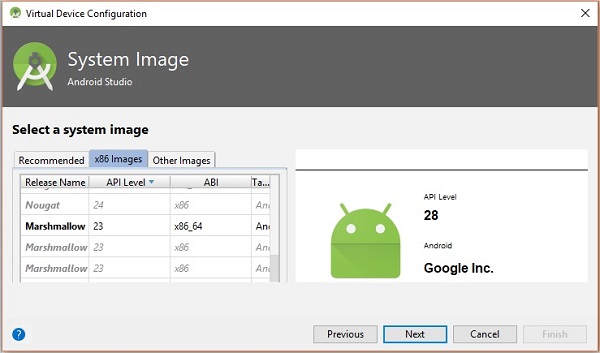
點選下一步按鈕,您將看到一個系統映像視窗。選擇x86 映像選項卡。
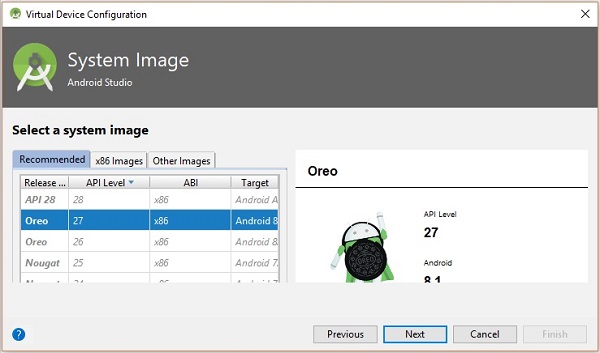
然後,選擇棉花糖並點選下一步。
最後,點選完成按鈕以完成 AVD 配置。
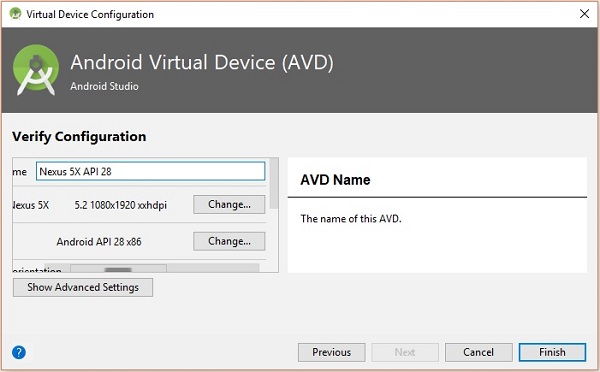
配置虛擬裝置後,點選操作列下的播放按鈕以啟動您的 Android 模擬器。

步驟 10:執行 Android
開啟命令提示符,瀏覽您的專案資料夾,然後執行react-native run-android命令。
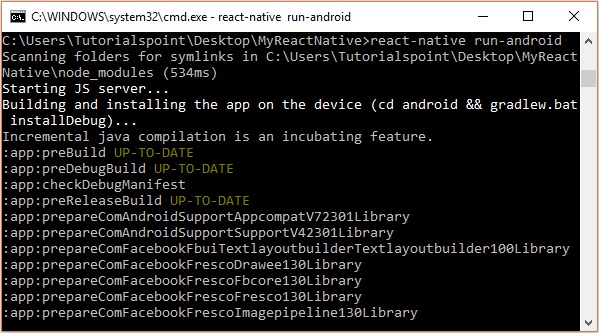
然後,您的應用執行將在另一個提示符中開始,您可以看到其狀態。

在您的 Android 模擬器中,您可以看到預設應用的執行情況,如下所示 -
步驟 11:local.properties
在您的專案資料夾SampleReactNative/android(在本例中)中開啟android資料夾。建立一個名為local.properties的檔案,並在其中新增以下路徑。
sdk.dir = /C:\\Users\\Tutorialspoint\\AppData\\Local\\Android\\Sdk
這裡,用您的使用者名稱替換Tutorialspoint。
步驟 12:熱過載
要構建應用程式,請修改 App.js,更改將自動更新到 Android 模擬器上。
如果沒有,請點選 Android 模擬器,按ctrl+m,然後選擇啟用熱過載選項。
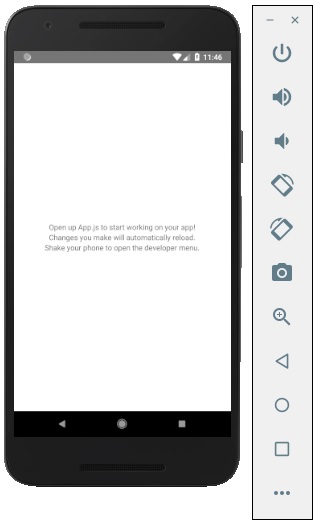
React Native - 應用
如果您開啟預設應用程式,您可以觀察到 app.js 檔案如下所示
import React from 'react';
import { StyleSheet, Text, View } from 'react-native';

export default class App extends React.Component {
   render() {
      return (
         <View style = {styles.container}>
            <Text>Open up App.js to start working on your app!</Text>
            <Text>Changes you make will automatically reload.</Text>
            <Text>Shake your phone to open the developer menu.</Text>
         </View>
      );
   }
}

const styles = StyleSheet.create({
   container: {
      flex: 1,
      backgroundColor: '#fff',
      alignItems: 'center',
      justifyContent: 'center',
   },
});
輸出

Hello world
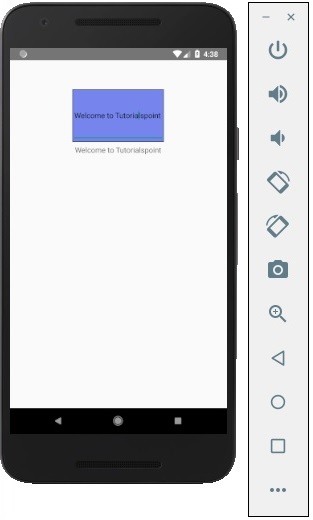
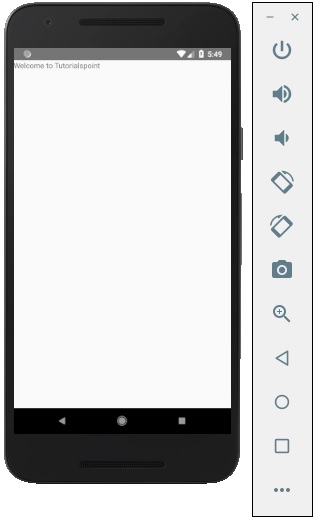
要顯示一條簡單的訊息“歡迎來到 Tutorialspoint”,請刪除 CSS 部分並將要列印的訊息包裝在<text></text>標籤內,並放置在<view></view>中,如下所示。
import React from 'react';
import { StyleSheet, Text, View } from 'react-native';

export default class App extends React.Component {
   render() {
      return (
         <View>
            <Text>Welcome to Tutorialspoint</Text>
         </View>
      );
   }
}
React Native - 狀態
React 元件內部的資料由狀態和屬性管理。在本章中,我們將討論狀態。
狀態和屬性的區別
狀態是可變的,而屬性是不可變的。這意味著狀態將來可以更新,而屬性不能更新。
使用狀態
這是我們的根元件。我們只是匯入了Home,它將在大多數章節中使用。
App.js
import React from 'react';
import { StyleSheet, Text, View } from 'react-native';

export default class App extends React.Component {
   state = {
      myState: 'Lorem ipsum dolor sit amet, consectetur adipisicing elit, used do eiusmod
      tempor incididunt ut labore et dolore magna aliqua. Ut enim ad minim veniam, quis
      nostrud exercitation ullamco laboris nisi ut aliquip ex ea commodo consequat.
      Duis aute irure dolor in reprehenderit in voluptate velit esse cillum dolore eu
      fugiat nulla pariatur. Excepteur sint occaecat cupidatat non proident, sunt in
      culpa qui officia deserunt mollit anim id est laborum.'
   }
   render() {
      return (
      <View>
         <Text> {this.state.myState} </Text>
      </View>
      );
   }
}
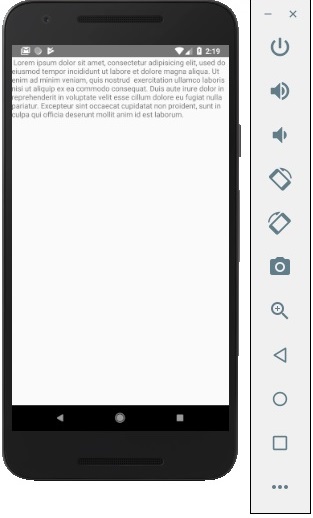
我們可以在模擬器中看到來自狀態的文字,如以下螢幕截圖所示。
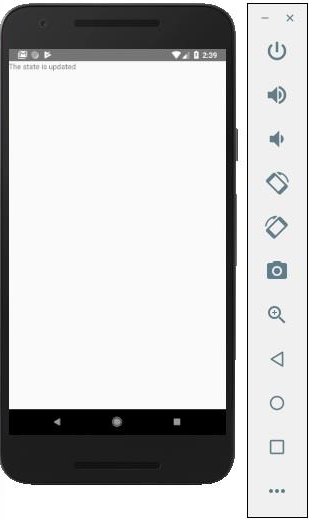
更新狀態
由於狀態是可變的,我們可以透過建立deleteState函式並使用onPress = {this.deleteText}事件呼叫它來更新它。
Home.js
import React, { Component } from 'react'
import { Text, View } from 'react-native'

class Home extends Component {
   state = {
      myState: 'Lorem ipsum dolor sit amet, consectetur adipisicing elit, sed
         do eiusmod tempor incididunt ut labore et dolore magna aliqua.
         Ut enim ad minim veniam, quis nostrud exercitation ullamco laboris nisi
         ut aliquip ex ea commodo consequat. Duis aute irure dolor in reprehenderit
         in voluptate velit esse cillum dolore eu fugiat nulla pariatur.
         Excepteur sint occaecat cupidatat non proident, sunt in culpa qui officia
         deserunt mollit anim id est laborum.'
   }
   updateState = () ⇒ this.setState({ myState: 'The state is updated' })
   render() {
      return (
         <View>
            <Text onPress = {this.updateState}>
               {this.state.myState}
            </Text>
         </View>
      );
   }
}
export default Home;
注意 - 在所有章節中,我們將對有狀態(容器)元件使用類語法,對無狀態(展示)元件使用函式語法。我們將在下一章中學習更多關於元件的資訊。
我們還將學習如何對updateState使用箭頭函式語法。您應該記住,此語法使用詞法作用域,並且this關鍵字將繫結到環境物件(類)。這有時會導致意外行為。
定義方法的另一種方法是使用 EC5 函式,但在這種情況下,我們需要在建構函式中手動繫結this。請考慮以下示例以瞭解這一點。
class Home extends Component {
   constructor() {
      super()
      this.updateState = this.updateState.bind(this)
   }
   updateState() {
      //
   }
   render() {
      //
   }
}
React Native - 屬性
在上一章中,我們向您展示瞭如何使用可變狀態。在本章中,我們將向您展示如何組合狀態和屬性。
展示元件應透過傳遞屬性獲取所有資料。只有容器元件應該具有狀態。
容器元件
我們現在將瞭解什麼是容器元件以及它是如何工作的。
理論
現在我們將更新我們的容器元件。此元件將處理狀態並將屬性傳遞給展示元件。
容器元件僅用於處理狀態。所有與檢視(樣式等)相關的功能都將在展示元件中處理。
示例
如果我們想使用上一章中的示例,我們需要從 render 函式中刪除Text元素,因為此元素用於向用戶呈現文字。這應該在展示元件內部。
讓我們回顧一下下面示例中的程式碼。我們將匯入PresentationalComponent並將其傳遞給 render 函式。
在匯入PresentationalComponent並將其傳遞給 render 函式後,我們需要傳遞屬性。我們將透過將myText = {this.state.myText}和deleteText = {this.deleteText}新增到<PresentationalComponent>來傳遞屬性。現在,我們可以在展示元件內部訪問它。
App.js
import React from 'react';
import { StyleSheet, Text, View } from 'react-native';
import PresentationalComponent from './PresentationalComponent'

export default class App extends React.Component {
   state = {
      myState: 'Lorem ipsum dolor sit amet, consectetur adipisicing elit, used do eiusmod
      tempor incididunt ut labore et dolore magna aliqua. Ut enim ad minim veniam, quis
      nostrud exercitation ullamco laboris nisi ut aliquip ex ea commodo consequat. Duis
      aute irure dolor in reprehenderit in voluptate velit esse cillum dolore eu fugiat
      nulla pariatur. Excepteur sint occaecat cupidatat non proident, sunt in culpa qui
      officia deserunt mollit anim id est laborum.'
   }
   updateState = () => {
      this.setState({ myState: 'The state is updated' })
   }
   render() {
      return (
         <View>
            <PresentationalComponent myState = {this.state.myState} updateState = {this.updateState}/>
         </View>
      );
   }
}
展示元件
我們現在將瞭解什麼是展示元件以及它是如何工作的。
理論
展示元件應該只用於向用戶呈現檢視。這些元件沒有狀態。它們將所有資料和函式作為屬性接收。
最佳實踐是儘可能多地使用展示元件。
示例
正如我們在上一章中提到的,我們對展示元件使用 EC6 函式語法。
我們的元件將接收屬性、返回檢視元素、使用{props.myText}呈現文字,並在使用者點選文字時呼叫{props.deleteText}函式。
PresentationalComponent.js
import React, { Component } from 'react'
import { Text, View } from 'react-native'

const PresentationalComponent = (props) => {
   return (
      <View>
         <Text onPress = {props.updateState}>
            {props.myState}
         </Text>
      </View>
   )
}
export default PresentationalComponent
現在,我們具有與狀態章節中相同的的功能。唯一的區別是我們重構了程式碼到容器和展示元件。
您可以執行應用程式並檢視以下螢幕截圖中的文字。

如果您點選文字,它將從螢幕上移除。
React Native - 樣式
有幾種方法可以在 React Native 中設定元素的樣式。
您可以使用style屬性內聯新增樣式。但是,這不是最佳實踐,因為程式碼可能難以閱讀。
在本章中,我們將使用StyleSheet進行樣式設定。
容器元件
在本節中,我們將簡化上一章中的容器元件。
App.js
import React from 'react';
import { StyleSheet, Text, View } from 'react-native';
import PresentationalComponent from './PresentationalComponent'

export default class App extends React.Component {
   state = {
      myState: 'This is my state'
   }
   render() {
      return (
         <View>
            <PresentationalComponent myState = {this.state.myState}/>
         </View>
      );
   }
}
展示元件
在以下示例中,我們將匯入StyleSheet。在檔案底部,我們將建立樣式表並將其分配給styles常量。請注意,我們的樣式採用駝峰命名法,並且我們不使用px或%進行樣式設定。
要將樣式應用於我們的文字,我們需要將style = {styles.myText}屬性新增到Text元素。
PresentationalComponent.js
import React, { Component } from 'react'
import { Text, View, StyleSheet } from 'react-native'

const PresentationalComponent = (props) => {
   return (
      <View>
         <Text style = {styles.myState}>
            {props.myState}
         </Text>
      </View>
   )
}
export default PresentationalComponent

const styles = StyleSheet.create ({
   myState: {
      marginTop: 20,
      textAlign: 'center',
      color: 'blue',
      fontWeight: 'bold',
      fontSize: 20
   }
})
當我們執行應用程式時,我們將收到以下輸出。
React Native - Flexbox
為了適應不同的螢幕尺寸,React Native 提供了Flexbox支援。
我們將使用React Native - 樣式章節中使用的相同程式碼。我們只會更改PresentationalComponent。
佈局
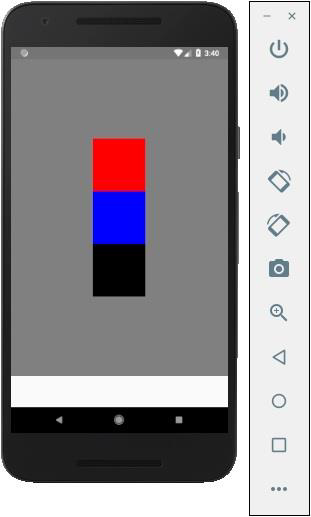
為了實現所需的佈局,flexbox 提供了三個主要屬性 - flexDirection justifyContent和alignItems。
下表顯示了所有可能的選項。
| 屬性 | 值 | 描述 |
|---|---|---|
| flexDirection | 'column', 'row' | 用於指定元素是垂直排列還是水平排列。 |
| justifyContent | 'center', 'flex-start', 'flex-end', 'space-around', 'space-between' | 用於確定元素在容器內如何分佈。 |
| alignItems | 'center', 'flex-start', 'flex-end', 'stretched' | 用於確定元素在容器內沿次要軸(與flexDirection相反)如何分佈。 |
如果您想垂直對齊專案並將其居中,則可以使用以下程式碼。
App.js
import React, { Component } from 'react'
import { View, StyleSheet } from 'react-native'

const Home = (props) => {
   return (
      <View style = {styles.container}>
         <View style = {styles.redbox} />
         <View style = {styles.bluebox} />
         <View style = {styles.blackbox} />
      </View>
   )
}

export default Home

const styles = StyleSheet.create ({
   container: {
      flexDirection: 'column',
      justifyContent: 'center',
      alignItems: 'center',
      backgroundColor: 'grey',
      height: 600
   },
   redbox: {
      width: 100,
      height: 100,
      backgroundColor: 'red'
   },
   bluebox: {
      width: 100,
      height: 100,
      backgroundColor: 'blue'
   },
   blackbox: {
      width: 100,
      height: 100,
      backgroundColor: 'black'
   },
})
輸出
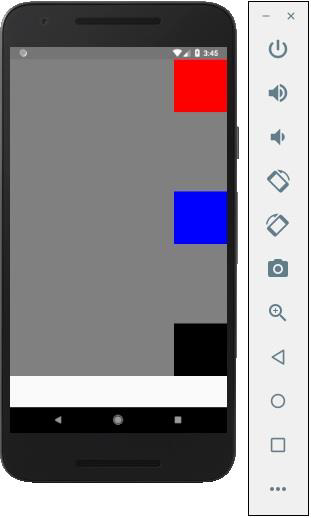
如果需要將專案移動到右側並在它們之間新增空格,則可以使用以下程式碼。
App.js
import React, { Component } from 'react'
import { View, StyleSheet } from 'react-native'

const App = (props) => {
   return (
      <View style = {styles.container}>
         <View style = {styles.redbox} />
         <View style = {styles.bluebox} />
         <View style = {styles.blackbox} />
      </View>
   )
}

export default App

const styles = StyleSheet.create ({
   container: {
      flexDirection: 'column',
      justifyContent: 'space-between',
      alignItems: 'flex-end',
      backgroundColor: 'grey',
      height: 600
   },
   redbox: {
      width: 100,
      height: 100,
      backgroundColor: 'red'
   },
   bluebox: {
      width: 100,
      height: 100,
      backgroundColor: 'blue'
   },
   blackbox: {
      width: 100,
      height: 100,
      backgroundColor: 'black'
   },
})
React Native - ListView
在本章中,我們將向您展示如何在 React Native 中建立列表。我們將 List 匯入到我們的 Home 元件中並在螢幕上顯示它。
App.js
import React from 'react'
import List from './List.js'

const App = () => {
   return (
      <List />
   )
}
export default App
要建立列表,我們將使用 map() 方法。這將遍歷專案陣列,並渲染每個專案。
List.js
import React, { Component } from 'react'
import { Text, View, TouchableOpacity, StyleSheet } from 'react-native'

class List extends Component {
   state = {
      names: [
         {
            id: 0,
            name: 'Ben',
         },
         {
            id: 1,
            name: 'Susan',
         },
         {
            id: 2,
            name: 'Robert',
         },
         {
            id: 3,
            name: 'Mary',
         }
      ]
   }
   alertItemName = (item) => {
      alert(item.name)
   }
   render() {
      return (
         <View>
            {
               this.state.names.map((item, index) => (
                  <TouchableOpacity
                     key = {item.id}
                     style = {styles.container}
                     onPress = {() => this.alertItemName(item)}>
                     <Text style = {styles.text}>
                        {item.name}
                     </Text>
                  </TouchableOpacity>
               ))
            }
         </View>
      )
   }
}
export default List

const styles = StyleSheet.create ({
   container: {
      padding: 10,
      marginTop: 3,
      backgroundColor: '#d9f9b1',
      alignItems: 'center',
   },
   text: {
      color: '#4f603c'
   }
})
當我們執行應用程式時,我們將看到名稱列表。
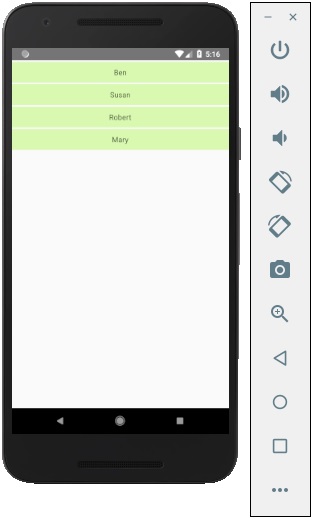
您可以點選列表中的每個專案以觸發顯示名稱的警報。

React Native - 文字輸入
在本章中,我們將向您展示如何在 React Native 中使用 TextInput 元素。
Home 元件將匯入並渲染輸入。
App.js
import React from 'react';
import Inputs from './inputs.js'

const App = () => {
   return (
      <Inputs />
   )
}
export default App
輸入
我們將定義初始狀態。
定義初始狀態後,我們將建立 handleEmail 和 handlePassword 函式。這些函式用於更新狀態。
login() 函式只會警示當前狀態的值。
我們還將向文字輸入新增其他一些屬性,以停用自動大寫,刪除 Android 裝置上的底部邊框並設定佔位符。
inputs.js
import React, { Component } from 'react'
import { View, Text, TouchableOpacity, TextInput, StyleSheet } from 'react-native'

class Inputs extends Component {
   state = {
      email: '',
      password: ''
   }
   handleEmail = (text) => {
      this.setState({ email: text })
   }
   handlePassword = (text) => {
      this.setState({ password: text })
   }
   login = (email, pass) => {
      alert('email: ' + email + ' password: ' + pass)
   }
   render() {
      return (
         <View style = {styles.container}>
            <TextInput style = {styles.input}
               underlineColorAndroid = "transparent"
               placeholder = "Email"
               placeholderTextColor = "#9a73ef"
               autoCapitalize = "none"
               onChangeText = {this.handleEmail}/>

            <TextInput style = {styles.input}
               underlineColorAndroid = "transparent"
               placeholder = "Password"
               placeholderTextColor = "#9a73ef"
               autoCapitalize = "none"
               onChangeText = {this.handlePassword}/>

            <TouchableOpacity
               style = {styles.submitButton}
               onPress = {
                  () => this.login(this.state.email, this.state.password)
               }>
               <Text style = {styles.submitButtonText}> Submit </Text>
            </TouchableOpacity>
         </View>
      )
   }
}
export default Inputs

const styles = StyleSheet.create({
   container: {
      paddingTop: 23
   },
   input: {
      margin: 15,
      height: 40,
      borderColor: '#7a42f4',
      borderWidth: 1
   },
   submitButton: {
      backgroundColor: '#7a42f4',
      padding: 10,
      margin: 15,
      height: 40,
   },
   submitButtonText:{
      color: 'white'
   }
})
每當我們在其中一個輸入欄位中鍵入內容時,狀態都會更新。當我們點選 Submit 按鈕時,輸入文字將顯示在對話方塊中。
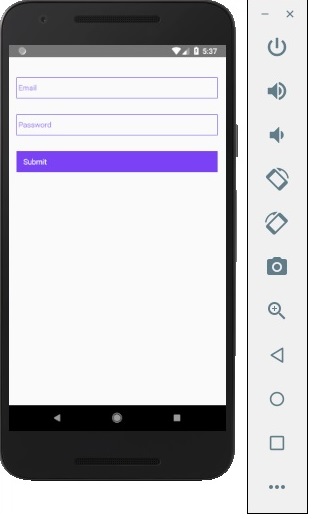
每當我們在其中一個輸入欄位中鍵入內容時,狀態都會更新。當我們點選 Submit 按鈕時,輸入文字將顯示在對話方塊中。

React Native - ScrollView
在本章中,我們將向您展示如何使用 ScrollView 元素。
我們將再次建立 ScrollViewExample.js 並將其匯入 Home。
App.js
import React from 'react';
import ScrollViewExample from './scroll_view.js';

const App = () => {
   return (
      <ScrollViewExample />
   )
}export default App
Scrollview 將渲染名稱列表。我們將在狀態中建立它。
ScrollView.js
import React, { Component } from 'react';
import { Text, Image, View, StyleSheet, ScrollView } from 'react-native';

class ScrollViewExample extends Component {
   state = {
      names: [
         {'name': 'Ben', 'id': 1},
         {'name': 'Susan', 'id': 2},
         {'name': 'Robert', 'id': 3},
         {'name': 'Mary', 'id': 4},
         {'name': 'Daniel', 'id': 5},
         {'name': 'Laura', 'id': 6},
         {'name': 'John', 'id': 7},
         {'name': 'Debra', 'id': 8},
         {'name': 'Aron', 'id': 9},
         {'name': 'Ann', 'id': 10},
         {'name': 'Steve', 'id': 11},
         {'name': 'Olivia', 'id': 12}
      ]
   }
   render() {
      return (
         <View>
            <ScrollView>
               {
                  this.state.names.map((item, index) => (
                     <View key = {item.id} style = {styles.item}>
                        <Text>{item.name}</Text>
                     </View>
                  ))
               }
            </ScrollView>
         </View>
      )
   }
}
export default ScrollViewExample

const styles = StyleSheet.create ({
   item: {
      flexDirection: 'row',
      justifyContent: 'space-between',
      alignItems: 'center',
      padding: 30,
      margin: 2,
      borderColor: '#2a4944',
      borderWidth: 1,
      backgroundColor: '#d2f7f1'
   }
})
當我們執行應用程式時,我們將看到可滾動的名稱列表。
React Native - 圖片
在本章中,我們將瞭解如何在 React Native 中使用影像。
新增影像
讓我們在 src 資料夾內建立一個名為 img 的新資料夾。我們將在該資料夾內新增我們的影像(myImage.png)。
我們將在主螢幕上顯示影像。
App.js
import React from 'react';
import ImagesExample from './ImagesExample.js'

const App = () => {
   return (
      <ImagesExample />
   )
}
export default App
可以使用以下語法訪問本地影像。
image_example.js
import React, { Component } from 'react'
import { Image } from 'react-native'

const ImagesExample = () => (
   <Image source = {require('C:/Users/Tutorialspoint/Desktop/NativeReactSample/logo.png')} />
)
export default ImagesExample
輸出

螢幕密度
React Native 提供了一種使用 @2x, @3x 字尾為不同裝置最佳化影像的方法。應用程式只會載入特定螢幕密度所需的影像。
以下是 img 資料夾內影像的名稱。
my-image@2x.jpg
my-image@3x.jpg
網路影像
使用網路影像時,我們需要 source 屬性而不是 require。建議為網路影像定義 width 和 height。
App.js
import React from 'react';
import ImagesExample from './image_example.js'

const App = () => {
   return (
      <ImagesExample />
   )
}
export default App
image_example.js
import React, { Component } from 'react'
import { View, Image } from 'react-native'

const ImagesExample = () => (
   <Image source = {{uri:'https://pbs.twimg.com/profile_images/486929358120964097/gNLINY67_400x400.png'}}
   style = {{ width: 200, height: 200 }}
   />
)
export default ImagesExample
輸出

React Native - HTTP
在本章中,我們將向您展示如何使用 fetch 處理網路請求。
App.js
import React from 'react';
import HttpExample from './http_example.js'

const App = () => {
   return (
      <HttpExample />
   )
}
export default App
使用 Fetch
我們將使用 componentDidMount 生命週期方法在元件掛載後立即從伺服器載入資料。此函式將向伺服器傳送 GET 請求,返回 JSON 資料,將輸出記錄到控制檯並更新我們的狀態。
http_example.js
import React, { Component } from 'react'
import { View, Text } from 'react-native'

class HttpExample extends Component {
   state = {
      data: ''
   }
   componentDidMount = () => {
      fetch('https://jsonplaceholder.typicode.com/posts/1', {
         method: 'GET'
      })
      .then((response) => response.json())
      .then((responseJson) => {
         console.log(responseJson);
         this.setState({
            data: responseJson
         })
      })
      .catch((error) => {
         console.error(error);
      });
   }
   render() {
      return (
         <View>
            <Text>
               {this.state.data.body}
            </Text>
         </View>
      )
   }
}
export default HttpExample
輸出

React Native - 按鈕
在本章中,我們將向您展示 React Native 中的可觸控元件。我們稱它們為“可觸控的”,因為它們提供了內建動畫,並且我們可以使用 onPress 屬性來處理觸控事件。
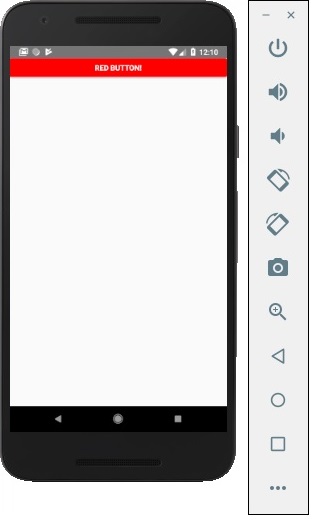
Facebook 提供了 Button 元件,它可以用作通用按鈕。請考慮以下示例以瞭解相同內容。
App.js
import React, { Component } from 'react'
import { Button } from 'react-native'

const App = () => {
   const handlePress = () => false
   return (
      <Button
         onPress = {handlePress}
         title = "Red button!"
         color = "red"
      />
   )
}
export default App
如果預設的 Button 元件不滿足您的需求,則可以使用以下元件之一代替。
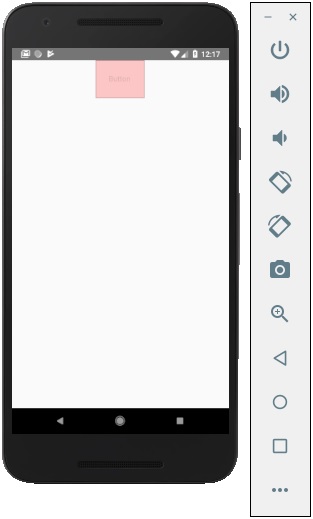
Touchable Opacity
此元素將在觸控時更改元素的不透明度。
App.js
import React from 'react'
import { TouchableOpacity, StyleSheet, View, Text } from 'react-native'

const App = () => {
   return (
      <View style = {styles.container}>
         <TouchableOpacity>
            <Text style = {styles.text}>
               Button
            </Text>
         </TouchableOpacity>
      </View>
   )
}
export default App

const styles = StyleSheet.create ({
   container: {
      alignItems: 'center',
   },
   text: {
      borderWidth: 1,
      padding: 25,
      borderColor: 'black',
      backgroundColor: 'red'
   }
})
Touchable Highlight
當用戶按下元素時,它會變暗,並且底層顏色將透出來。
App.js
import React from 'react'
import { View, TouchableHighlight, Text, StyleSheet } from 'react-native'

const App = (props) => {
   return (
      <View style = {styles.container}>
         <TouchableHighlight>
            <Text style = {styles.text}>
               Button
            </Text>
         </TouchableHighlight>
      </View>
   )
}
export default App

const styles = StyleSheet.create ({
   container: {
      alignItems: 'center',
   },
   text: {
      borderWidth: 1,
      padding: 25,
      borderColor: 'black',
      backgroundColor: 'red'
   }
})
Touchable Native Feedback
這將在按下元素時模擬墨水動畫。
App.js
import React from 'react'
import { View, TouchableNativeFeedback, Text, StyleSheet } from 'react-native'

const Home = (props) => {
   return (
      <View style = {styles.container}>
         <TouchableNativeFeedback>
            <Text style = {styles.text}>
               Button
            </Text>
         </TouchableNativeFeedback>
      </View>
   )
}
export default Home

const styles = StyleSheet.create ({
   container: {
      alignItems: 'center',
   },
   text: {
      borderWidth: 1,
      padding: 25,
      borderColor: 'black',
      backgroundColor: 'red'
   }
})
Touchable Without Feedback
當您想要處理觸控事件而沒有任何動畫時,應該使用此方法。通常,此元件的使用頻率不高。
<TouchableWithoutFeedback>
   <Text>
      Button
   </Text>
</TouchableWithoutFeedback>
React Native - 動畫
在本章中,我們將向您展示如何在 React Native 中使用 LayoutAnimation。
動畫元件
我們將 myStyle 設定為狀態的屬性。此屬性用於設定 PresentationalAnimationComponent 內元素的樣式。
我們還將建立兩個函式 - expandElement 和 collapseElement。這些函式將更新狀態中的值。第一個將使用 spring 預設動畫,而第二個將具有 linear 預設。我們也將它們作為道具傳遞。Expand 和 Collapse 按鈕分別呼叫 expandElement() 和 collapseElement() 函式。
在此示例中,我們將動態更改框的寬度和高度。由於 Home 元件將保持不變,因此我們只會更改 Animations 元件。
App.js
import React, { Component } from 'react'
import { View, StyleSheet, Animated, TouchableOpacity } from 'react-native'

class Animations extends Component {
   componentWillMount = () => {
      this.animatedWidth = new Animated.Value(50)
      this.animatedHeight = new Animated.Value(100)
   }
   animatedBox = () => {
      Animated.timing(this.animatedWidth, {
         toValue: 200,
         duration: 1000
      }).start()
      Animated.timing(this.animatedHeight, {
         toValue: 500,
         duration: 500
      }).start()
   }
   render() {
      const animatedStyle = { width: this.animatedWidth, height: this.animatedHeight }
      return (
         <TouchableOpacity style = {styles.container} onPress = {this.animatedBox}>
            <Animated.View style = {[styles.box, animatedStyle]}/>
         </TouchableOpacity>
      )
   }
}
export default Animations

const styles = StyleSheet.create({
   container: {
      justifyContent: 'center',
      alignItems: 'center'
   },
   box: {
      backgroundColor: 'blue',
      width: 50,
      height: 100
   }
})
React Native - 除錯
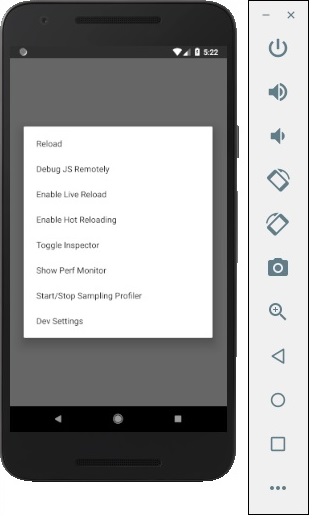
React Native 提供了一些有助於除錯程式碼的方法。
在應用程式開發者選單中
您可以透過按 command + D 在 IOS 模擬器上開啟開發者選單。
在 Android 模擬器上,您需要按 command + M。

Reload - 用於重新載入模擬器。您可以使用快捷鍵 command + R
Debug JS Remotely - 用於在瀏覽器開發者控制檯中啟用除錯。
Enable Live Reload - 用於在儲存程式碼時啟用即時重新載入。偵錯程式將在 localhost:8081/debugger-ui 開啟。
Start Systrace - 用於啟動基於 Android 標記的效能分析工具。
Show Inspector - 用於開啟檢查器,您可以在其中找到有關元件的資訊。您可以使用快捷鍵 command + I
Show Perf Monitor - Perf monitor 用於跟蹤應用程式的效能。
React Native - 路由
在本章中,我們將瞭解 React Native 中的導航。
步驟 1:安裝 Router
首先,我們需要安裝 Router。我們將在本章中使用 React Native Router Flux。您可以從專案資料夾中的終端執行以下命令。
npm i react-native-router-flux --save
步驟 2:整個應用程式
由於我們希望我們的路由器處理整個應用程式,因此我們將在 index.ios.js 中新增它。對於 Android,您可以在 index.android.js 中執行相同的操作。
App.js
import React, { Component } from 'react';
import { AppRegistry, View } from 'react-native';
import Routes from './Routes.js'

class reactTutorialApp extends Component {
   render() {
      return (
         <Routes />
      )
   }
}
export default reactTutorialApp
AppRegistry.registerComponent('reactTutorialApp', () => reactTutorialApp)
步驟 3:新增 Router
現在,我們將在 components 資料夾內建立 Routes 元件。它將返回帶有多個場景的 Router。每個場景都需要 key, component 和 title。Router 使用 key 屬性在場景之間切換,component 將在螢幕上渲染,title 將顯示在導航欄中。我們還可以將 initial 屬性設定為要最初渲染的場景。
Routes.js
import React from 'react'
import { Router, Scene } from 'react-native-router-flux'
import Home from './Home.js'
import About from './About.js'

const Routes = () => (
   <Router>
      <Scene key = "root">
         <Scene key = "home" component = {Home} title = "Home" initial = {true} />
         <Scene key = "about" component = {About} title = "About" />
      </Scene>
   </Router>
)
export default Routes
步驟 4:建立元件
我們已經從前面的章節中獲得了 Home 元件;現在,我們需要新增 About 元件。我們將新增 goToAbout 和 goToHome 函式以在場景之間切換。
Home.js
import React from 'react'
import { TouchableOpacity, Text } from 'react-native';
import { Actions } from 'react-native-router-flux';

const Home = () => {
   const goToAbout = () => {
      Actions.about()
   }
   return (
      <TouchableOpacity style = {{ margin: 128 }} onPress = {goToAbout}>
         <Text>This is HOME!</Text>
      </TouchableOpacity>
   )
}
export default Home
About.js
import React from 'react'
import { TouchableOpacity, Text } from 'react-native'
import { Actions } from 'react-native-router-flux'

const About = () => {
   const goToHome = () => {
      Actions.home()
   }
   return (
      <TouchableOpacity style = {{ margin: 128 }} onPress = {goToHome}>
         <Text>This is ABOUT</Text>
      </TouchableOpacity>
   )
}
export default About
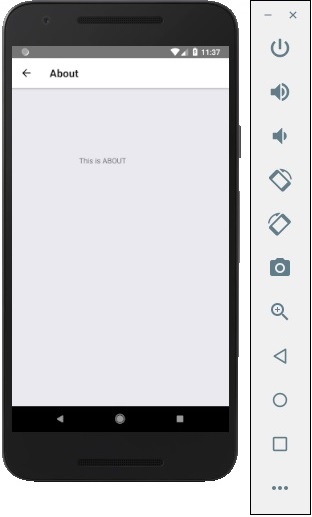
應用程式將渲染初始 Home 螢幕。
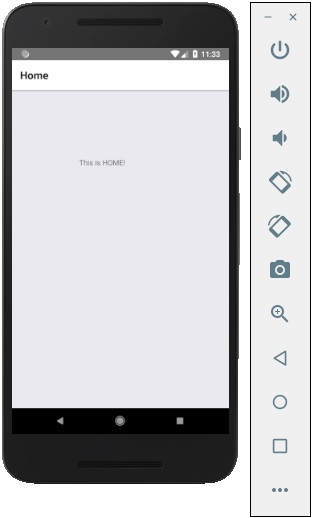
您可以按按鈕切換到關於螢幕。後退箭頭將出現;您可以使用它返回到上一螢幕。
React Native - 執行 IOS
如果您想在 IOS 模擬器中測試您的應用程式,您只需在終端中開啟應用程式的根資料夾並執行 -
react-native run-ios
上述命令將啟動模擬器並執行應用程式。
我們還可以指定要使用的裝置。
react-native run-ios --simulator "iPhone 5s
在模擬器中開啟應用程式後,您可以按 IOS 上的 command + D 開啟開發者選單。您可以在我們的 除錯章節中檢視更多相關資訊。
您還可以透過按 command + R 重新載入 IOS 模擬器。
React Native - 執行 Android
我們可以透過在終端中執行以下程式碼在 Android 平臺上執行 React Native 應用程式。
react-native run-android
在 Android 裝置上執行應用程式之前,您需要在 開發者選項 中啟用 USB 除錯。
啟用 USB 除錯 後,您可以插入您的裝置並執行上面給出的程式碼片段。
原生 Android 模擬器速度很慢。我們建議下載 Genymotion 來測試您的應用程式。
可以透過按 command + M 訪問開發者選單。
React Native - View
View 是 React Native 中最常見的元素。您可以將其視為 Web 開發中使用的 div 元素的等效項。
用例
現在讓我們看看一些常見的用例。
當您需要將元素包裝在容器內時,可以使用 View 作為容器元素。
當您想要在父元素內巢狀更多元素時,父元素和子元素都可以是 View。它可以擁有任意數量的子元素。
當您想要設定不同元素的樣式時,您可以將它們放在 View 內,因為它支援 style 屬性、flexbox 等。
View 還支援合成觸控事件,這對於不同的目的很有用。
我們已經在前面的章節中使用了 View,並且幾乎在所有後續章節中也將使用它。View 可以被認為是 React Native 中的預設元素。在下面給出的示例中,我們將巢狀兩個 View 和一個文字。
App.js
import React, { Component } from 'react'
import { View, Text } from 'react-native'

const App = () => {
   return (
      <View>
         <View>
            <Text>This is my text</Text>
         </View>
      </View>
   )
}
export default App
輸出

React Native - WebView
在本章中,我們將學習如何使用 WebView。當您想將網頁內聯渲染到您的移動應用程式時,可以使用它。
使用 WebView
HomeContainer 將是一個容器元件。
App.js
import React, { Component } from 'react'
import WebViewExample from './web_view_example.js'

const App = () => {
   return (
      <WebViewExample/>
   )
}
export default App;
讓我們在 src/components/home 資料夾內建立一個名為 WebViewExample.js 的新檔案。
web_view_example.js
import React, { Component } from 'react'
import { View, WebView, StyleSheet }

from 'react-native'
const WebViewExample = () => {
   return (
      <View style = {styles.container}>
         <WebView
         source = {{ uri:
         'https://www.google.com/?gws_rd=cr,ssl&ei=SICcV9_EFqqk6ASA3ZaABA#q=tutorialspoint' }}
         />
      </View>
   )
}
export default WebViewExample;

const styles = StyleSheet.create({
   container: {
      height: 350,
   }
})
上面的程式將生成以下輸出。

React Native - Modal
在本章中,我們將向您展示如何在 React Native 中使用模態元件。
現在讓我們建立一個新檔案:ModalExample.js
我們將把邏輯放在 ModalExample 中。我們可以透過執行 toggleModal 來更新初始狀態。
透過執行 toggleModal 更新初始狀態後,我們將 visible 屬性設定為我們的模態。此屬性將在狀態更改時更新。
onRequestClose 是 Android 裝置所必需的。
App.js
import React, { Component } from 'react'
import WebViewExample from './modal_example.js'

const Home = () => {
   return (
      <WebViewExample/>
   )
}
export default Home;
modal_example.js
import React, { Component } from 'react';
import { Modal, Text, TouchableHighlight, View, StyleSheet}

from 'react-native'
class ModalExample extends Component {
   state = {
      modalVisible: false,
   }
   toggleModal(visible) {
      this.setState({ modalVisible: visible });
   }
   render() {
      return (
         <View style = {styles.container}>
            <Modal animationType = {"slide"} transparent = {false}
               visible = {this.state.modalVisible}
               onRequestClose = {() => { console.log("Modal has been closed.") } }>

               <View style = {styles.modal}>
                  <Text style = {styles.text}>Modal is open!</Text>

                  <TouchableHighlight onPress = {() => {
                     this.toggleModal(!this.state.modalVisible)}}>

                     <Text style = {styles.text}>Close Modal</Text>
                  </TouchableHighlight>
               </View>
            </Modal>

            <TouchableHighlight onPress = {() => {this.toggleModal(true)}}>
               <Text style = {styles.text}>Open Modal</Text>
            </TouchableHighlight>
         </View>
      )
   }
}
export default ModalExample

const styles = StyleSheet.create ({
   container: {
      alignItems: 'center',
      backgroundColor: '#ede3f2',
      padding: 100
   },
   modal: {
      flex: 1,
      alignItems: 'center',
      backgroundColor: '#f7021a',
      padding: 100
   },
   text: {
      color: '#3f2949',
      marginTop: 10
   }
})
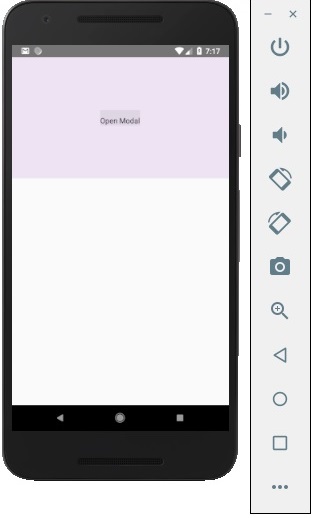
我們的起始螢幕將如下所示 -
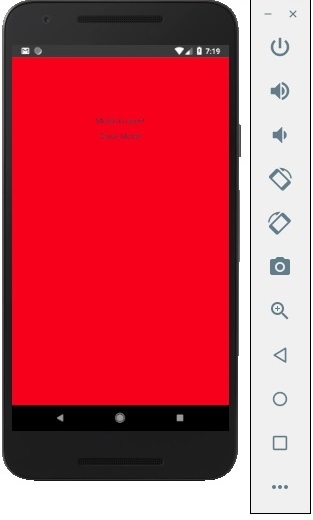
如果我們點選按鈕,模態將開啟。
React Native - ActivityIndicator
在本章中,我們將向您展示如何在 React Native 中使用活動指示器。
步驟 1:App
App 元件將用於匯入和顯示我們的 ActivityIndicator。
App.js
import React from 'react'
import ActivityIndicatorExample from './activity_indicator_example.js'

const Home = () => {
   return (
      <ActivityIndicatorExample />
   )
}
export default Home
步驟 2:ActivityIndicatorExample
Animating 屬性是一個布林值,用於顯示活動指示器。後者在元件掛載 6 秒後關閉。這是使用 closeActivityIndicator() 函式完成的。
activity_indicator_example.js
import React, { Component } from 'react';
import { ActivityIndicator, View, Text, TouchableOpacity, StyleSheet } from 'react-native';

class ActivityIndicatorExample extends Component {
   state = { animating: true }

   closeActivityIndicator = () => setTimeout(() => this.setState({
   animating: false }), 60000)

   componentDidMount = () => this.closeActivityIndicator()
   render() {
      const animating = this.state.animating
      return (
         <View style = {styles.container}>
            <ActivityIndicator
               animating = {animating}
               color = '#bc2b78'
               size = "large"
               style = {styles.activityIndicator}/>
         </View>
      )
   }
}
export default ActivityIndicatorExample

const styles = StyleSheet.create ({
   container: {
      flex: 1,
      justifyContent: 'center',
      alignItems: 'center',
      marginTop: 70
   },
   activityIndicator: {
      flex: 1,
      justifyContent: 'center',
      alignItems: 'center',
      height: 80
   }
})
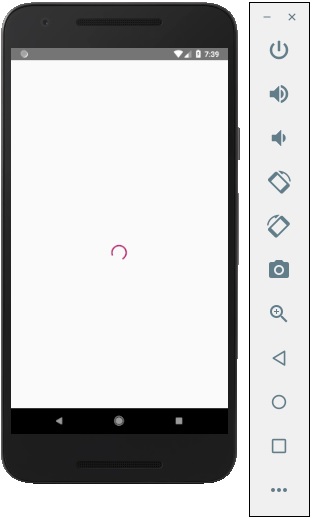
當我們執行應用程式時,我們將看到螢幕上的載入器。它將在 6 秒後消失。
React Native - Picker
在本章中,我們將建立一個具有兩個可用選項的簡單 Picker。
步驟 1:建立檔案
這裡,我們將使用App.js資料夾作為展示元件。
App.js
import React from 'react'
import PickerExample from './PickerExample.js'

const App = () => {
   return (
      <PickerExample />
   )
}
export default App
步驟 2:邏輯
this.state.user 用於控制選擇器。
當選擇使用者時,將觸發updateUser函式。
PickerExample.js
import React, { Component } from 'react';
import { View, Text, Picker, StyleSheet } from 'react-native'

class PickerExample extends Component {
   state = {user: ''}
   updateUser = (user) => {
      this.setState({ user: user })
   }
   render() {
      return (
         <View>
            <Picker selectedValue = {this.state.user} onValueChange = {this.updateUser}>
               <Picker.Item label = "Steve" value = "steve" />
               <Picker.Item label = "Ellen" value = "ellen" />
               <Picker.Item label = "Maria" value = "maria" />
            </Picker>
            <Text style = {styles.text}>{this.state.user}</Text>
         </View>
      )
   }
}
export default PickerExample

const styles = StyleSheet.create({
   text: {
      fontSize: 30,
      alignSelf: 'center',
      color: 'red'
   }
})
輸出
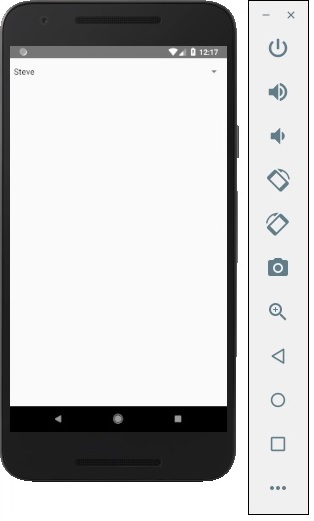
如果點選名稱,它會提示你三個選項,如下所示:
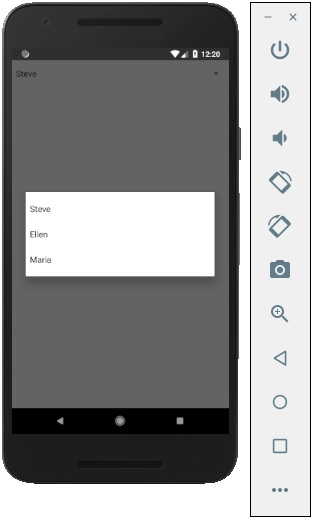
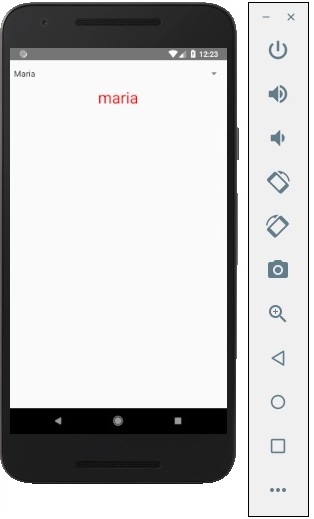
你可以選擇其中一個,輸出結果如下。
React Native - 狀態列
在本節中,我們將向您展示如何在 React Native 中控制狀態列的外觀。
狀態列易於使用,您只需設定屬性即可更改它。
hidden 屬性可用於隱藏狀態列。在我們的示例中,它被設定為false。這是預設值。
barStyle 可以有三個值 – dark-content、light-content 和 default。
此元件還有其他一些可用的屬性。其中一些是 Android 或 iOS 特定的。您可以在官方文件中檢視。
App.js
import React, { Component } from 'react';
import { StatusBar } from 'react-native'

const App = () => {
   return (
      <StatusBar barStyle = "dark-content" hidden = {false} backgroundColor = "#00BCD4" translucent = {true}/>
   )
}
export default App
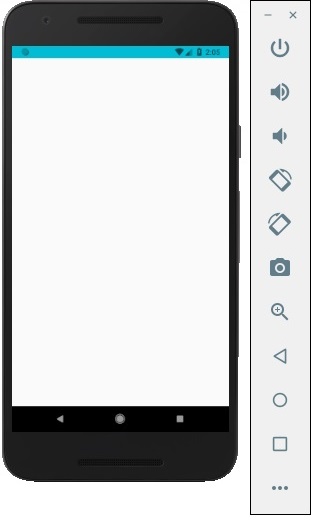
如果我們執行應用程式,狀態列將可見,內容將具有深色。
輸出
React Native - Switch
在本節中,我們將分幾個步驟解釋Switch元件。
步驟 1:建立檔案
我們將使用HomeContainer元件進行邏輯處理,但我們需要建立展示元件。
現在讓我們建立一個新檔案:SwitchExample.js。
步驟 2:邏輯
我們正在將值從state和切換開關項的函式傳遞給SwitchExample元件。切換函式將用於更新狀態。
App.js
import React, { Component } from 'react'
import { View } from 'react-native'
import SwitchExample from './switch_example.js'

export default class HomeContainer extends Component {
   constructor() {
      super();
      this.state = {
         switch1Value: false,
      }
   }
   toggleSwitch1 = (value) => {
      this.setState({switch1Value: value})
      console.log('Switch 1 is: ' + value)
   }
   render() {
      return (
         <View>
            <SwitchExample
            toggleSwitch1 = {this.toggleSwitch1}
            switch1Value = {this.state.switch1Value}/>
         </View>
      );
   }
}
步驟 3:展示
Switch 元件接受兩個 props。onValueChange prop 在使用者按下開關後將觸發我們的切換函式。value prop 繫結到HomeContainer元件的狀態。
switch_example.js
import React, { Component } from 'react'
import { View, Switch, StyleSheet }

from 'react-native'

export default SwitchExample = (props) => {
   return (
      <View style = {styles.container}>
         <Switch
         onValueChange = {props.toggleSwitch1}
         value = {props.switch1Value}/>
      </View>
   )
}
const styles = StyleSheet.create ({
   container: {
      flex: 1,
      alignItems: 'center',
      marginTop: 100
   }
})
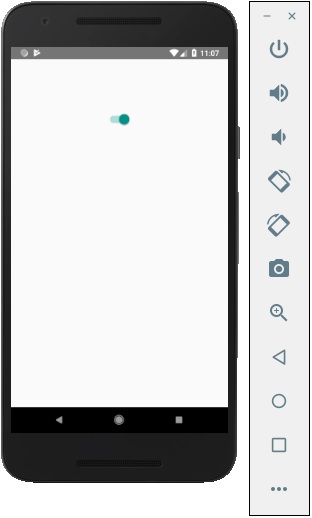
如果我們按下開關,狀態將被更新。您可以在控制檯中檢查值。
輸出
React Native - Text
在本節中,我們將討論 React Native 中的Text元件。
此元件可以巢狀,並且可以從父級繼承屬性到子級。這在很多方面都很有用。我們將向您展示首字母大寫、樣式化單詞或文字部分等的示例。
步驟 1:建立檔案
我們將要建立的檔案是text_example.js
步驟 2:App.js
在此步驟中,我們將建立一個簡單的容器。
App.js
import React, { Component } from 'react'
import TextExample from './text_example.js'

const App = () => {
   return (
      <TextExample/>
   )
}
export default App
步驟 3:文字
在此步驟中,我們將使用繼承模式。styles.text 將應用於所有Text元件。
您還可以注意到我們如何為文字的某些部分設定其他樣式屬性。重要的是要知道所有子元素都具有傳遞給它們的父級樣式。
text_example.js
import React, { Component } from 'react';
import { View, Text, Image, StyleSheet } from 'react-native'

const TextExample = () => {
   return (
      <View style = {styles.container}>
         <Text style = {styles.text}>
            <Text style = {styles.capitalLetter}>
               L
            </Text>

            <Text>
               orem ipsum dolor sit amet, sed do eiusmod.
            </Text>

            <Text>
               Ut enim ad <Text style = {styles.wordBold}>minim </Text> veniam,
               quis aliquip ex ea commodo consequat.
            </Text>

            <Text style = {styles.italicText}>
               Duis aute irure dolor in reprehenderit in voluptate velit esse cillum.
            </Text>

            <Text style = {styles.textShadow}>
               Excepteur sint occaecat cupidatat non proident, sunt in culpa qui officia
               deserunt mollit anim id est laborum.
            </Text>
         </Text>

      </View>
   )
}
export default TextExample

const styles = StyleSheet.create ({
   container: {
      alignItems: 'center',
      marginTop: 100,
      padding: 20
   },
   text: {
      color: '#41cdf4',
   },
   capitalLetter: {
      color: 'red',
      fontSize: 20
   },
   wordBold: {
      fontWeight: 'bold',
      color: 'black'
   },
   italicText: {
      color: '#37859b',
      fontStyle: 'italic'
   },
   textShadow: {
      textShadowColor: 'red',
      textShadowOffset: { width: 2, height: 2 },
      textShadowRadius : 5
   }
})
您將收到以下輸出:

React Native - Alert
在本節中,我們將瞭解如何建立自定義Alert元件。
步驟 1:App.js
import React from 'react'
import AlertExample from './alert_example.js'

const App = () => {
   return (
      <AlertExample />
   )
}
export default App
步驟 2:alert_example.js
我們將建立一個按鈕來觸發showAlert函式。
import React from 'react'
import { Alert, Text, TouchableOpacity, StyleSheet } from 'react-native'

const AlertExample = () => {
   const showAlert = () =>{
      Alert.alert(
         'You need to...'
      )
   }
   return (
      <TouchableOpacity onPress = {showAlert} style = {styles.button}>
         <Text>Alert</Text>
      </TouchableOpacity>
   )
}
export default AlertExample

const styles = StyleSheet.create ({
   button: {
      backgroundColor: '#4ba37b',
      width: 100,
      borderRadius: 50,
      alignItems: 'center',
      marginTop: 100
   }
})
輸出
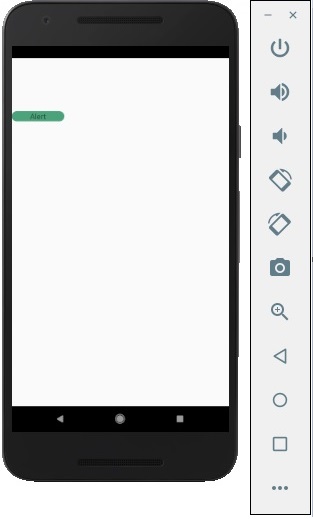
單擊按鈕後,您將看到以下內容:

React Native - 地理位置
在本節中,我們將向您展示如何使用Geolocation。
步驟 1:App.js
import React from 'react'
import GeolocationExample from './geolocation_example.js'

const App = () => {
   return (
      <GeolocationExample />
   )
}
export default App
步驟 2:地理位置
我們將首先設定初始狀態,該狀態將儲存初始位置和最後位置。
現在,我們需要在元件掛載時使用navigator.geolocation.getCurrentPosition獲取裝置的當前位置。我們將對響應進行字串化,以便我們可以更新狀態。
navigator.geolocation.watchPosition 用於跟蹤使用者的 位置。我們還在此步驟中清除觀察程式。
AsyncStorageExample.js
import React, { Component } from 'react'
import { View, Text, Switch, StyleSheet} from 'react-native'

class SwichExample extends Component {
   state = {
      initialPosition: 'unknown',
      lastPosition: 'unknown',
   }
   watchID: ?number = null;
   componentDidMount = () => {
      navigator.geolocation.getCurrentPosition(
         (position) => {
            const initialPosition = JSON.stringify(position);
            this.setState({ initialPosition });
         },
         (error) => alert(error.message),
         { enableHighAccuracy: true, timeout: 20000, maximumAge: 1000 }
      );
      this.watchID = navigator.geolocation.watchPosition((position) => {
         const lastPosition = JSON.stringify(position);
         this.setState({ lastPosition });
      });
   }
   componentWillUnmount = () => {
      navigator.geolocation.clearWatch(this.watchID);
   }
   render() {
      return (
         <View style = {styles.container}>
            <Text style = {styles.boldText}>
               Initial position:
            </Text>

            <Text>
               {this.state.initialPosition}
            </Text>

            <Text style = {styles.boldText}>
               Current position:
            </Text>

            <Text>
               {this.state.lastPosition}
            </Text>
         </View>
      )
   }
}
export default SwichExample

const styles = StyleSheet.create ({
   container: {
      flex: 1,
      alignItems: 'center',
      marginTop: 50
   },
   boldText: {
      fontSize: 30,
      color: 'red',
   }
})
React Native - AsyncStorage
在本節中,我們將向您展示如何使用AsyncStorage持久化您的資料。
步驟 1:展示
在此步驟中,我們將建立App.js檔案。
import React from 'react'
import AsyncStorageExample from './async_storage_example.js'

const App = () => {
   return (
      <AsyncStorageExample />
   )
}
export default App
步驟 2:邏輯
初始狀態中的Name為空字串。元件掛載時,我們將從持久儲存中更新它。
setName將獲取我們輸入欄位中的文字,使用AsyncStorage儲存它並更新狀態。
async_storage_example.js
import React, { Component } from 'react'
import { StatusBar } from 'react-native'
import { AsyncStorage, Text, View, TextInput, StyleSheet } from 'react-native'

class AsyncStorageExample extends Component {
   state = {
      'name': ''
   }
   componentDidMount = () => AsyncStorage.getItem('name').then((value) => this.setState({ 'name': value }))

   setName = (value) => {
      AsyncStorage.setItem('name', value);
      this.setState({ 'name': value });
   }
   render() {
      return (
         <View style = {styles.container}>
            <TextInput style = {styles.textInput} autoCapitalize = 'none'
            onChangeText = {this.setName}/>
            <Text>
               {this.state.name}
            </Text>
         </View>
      )
   }
}
export default AsyncStorageExample

const styles = StyleSheet.create ({
   container: {
      flex: 1,
      alignItems: 'center',
      marginTop: 50
   },
   textInput: {
      margin: 5,
      height: 100,
      borderWidth: 1,
      backgroundColor: '#7685ed'
   }
})
當我們執行應用程式時,我們可以透過在輸入欄位中鍵入來更新文字。