- Meteor 教程
- Meteor - 首頁
- Meteor - 概述
- Meteor - 環境搭建
- Meteor - 第一個應用
- Meteor - 模板
- Meteor - 集合
- Meteor - 表單
- Meteor - 事件
- Meteor - Session
- Meteor - Tracker
- Meteor - 包
- Meteor - 核心 API
- Meteor - 檢查
- Meteor - Blaze
- Meteor - 定時器
- Meteor - EJSON
- Meteor - HTTP
- Meteor - 郵件
- Meteor - 資源
- Meteor - 安全性
- Meteor - 排序
- Meteor - 賬戶
- Meteor - 方法
- Meteor - Package.js
- Meteor - 釋出與訂閱
- Meteor - 架構
- Meteor - 部署
- Meteor - 在移動裝置上執行
- Meteor - 待辦事項應用
- Meteor - 最佳實踐
- Meteor 有用資源
- Meteor - 快速指南
- Meteor - 有用資源
- Meteor - 討論
Meteor - 待辦事項應用
本章將學習如何建立一個簡單的待辦事項應用。
步驟1 - 建立應用
開啟命令提示符並執行以下命令:
C:\Users\username\Desktop>meteor create todo-app
要檢視應用,你需要使用meteor命令執行應用,然後訪問https://:3000
C:\Users\username\Desktop\todo-app>meteor
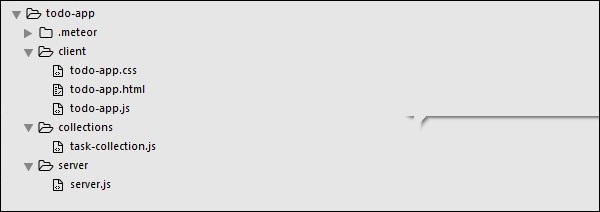
步驟2 - 建立資料夾和檔案
我們將重構預設的檔案結構。讓我們建立一個client資料夾,在其中建立todo-app.html,todo-app.css和todo-app.js。
C:\Users\username\Desktop\todo-app>mkdir client
C:\Users\username\Desktop\todo-app\client>touch todo-app.html
C:\Users\username\Desktop\todo-app\client>touch todo-app.js
我們還將建立一個server資料夾,並在其中包含server.js檔案。
C:\Users\username\Desktop\todo-app>mkdir server
C:\Users\username\Desktop\todo-app\server>touch server.js
最後,讓我們建立一個collections資料夾,並在其中包含task-collection.js檔案。
C:\Users\username\Desktop\todo-app>mkdir server
C:\Users\username\Desktop\todo-app\collections>touch task-collection.js
你可以檢視下圖中的應用結構:
步驟3 - client/todo-app.html
我們的第一步是為應用建立HTML。我們需要一個輸入欄位來新增新的任務。任務將以列表的形式顯示,並具有刪除和勾選功能。我們還將提供顯示或隱藏已完成任務的功能。
<head>
   <title>Todo App</title>
</head>

<body>
   <h1>Todo List ({{incompleteCount}})</h1>

   <label class = "hide-completed">
      <input type = "checkbox" checked = "{{hideCompleted}}" />
      Hide Completed Tasks
   </label>

   <form class = "new-task">
      <input type = "text" name = "text" placeholder = "Add new tasks" />
   </form>

   <ul>
      {{#each tasks}}
         {{> task}}
      {{/each}}
   </ul>
</body>

<template name = "task">
   <li class = "{{#if checked}}checked{{/if}}">
      <button class = "delete">x</button>
      <input type = "checkbox" checked = "{{checked}}" class = "toggle-checked" />
      <span>{{username}} - {{text}}</span>
   </li>
</template>
步驟4 - collections/task-collection.js
在這裡,我們將建立一個新的MongoDB集合,以便在伺服器端和客戶端都能使用它。
Tasks = new Mongo.Collection("tasks");
步驟5 - server/server.js
我們將在伺服器端定義應用的方法。這些方法將從客戶端呼叫。在這個檔案中,我們還將釋出資料庫查詢。
// Publishing tasks from the server...

Meteor.publish("tasks", function () {
   return Tasks.find({});
});

// Methods for handling MongoDb Tasks collection data...

Meteor.methods({

   addTask: function (text) {

      Tasks.insert({
         text: text,
         createdAt: new Date(),
      });
   },

   deleteTask: function (taskId) {
      var task = Tasks.findOne(taskId);
      Tasks.remove(taskId);
   },

   setChecked: function (taskId, setChecked) {
      var task = Tasks.findOne(taskId);
      Tasks.update(taskId, { $set: { checked: setChecked} });
   }
});
步驟6 - client/todo-app.js
這是主要的客戶端JavaScript檔案。這個檔案也可以被重構,但是我們將在這裡編寫所有客戶端程式碼。首先,我們訂閱在伺服器端釋出的task集合。然後,我們建立helpers來處理應用邏輯,最後,我們定義將呼叫伺服器端方法的events。
// Subscribing to the published tasks
Meteor.subscribe("tasks");

// Show/Hide functionality
Template.body.helpers({

   tasks: function () {

      if (Session.get("hideCompleted")) {

         // If hide completed is checked, filter tasks
         return Tasks.find({checked: {$ne: true}}, {sort: {createdAt: -1}});
      } else {

         // Otherwise, return all of the tasks
         return Tasks.find({}, {sort: {createdAt: -1}});
      }
   },

   hideCompleted: function () {
      return Session.get("hideCompleted");
   },

   incompleteCount: function () {
      return Tasks.find({checked: {$ne: true}}).count();
   }
});

// Events for creating new tasks and Show/Hide functionality.
// Calling methods from the server

Template.body.events({

   "submit .new-task": function (event) {
      event.preventDefault();
      var text = event.target.text.value;

      Meteor.call("addTask", text);
      event.target.text.value = "";
   },

   "change .hide-completed input": function (event) {
      Session.set("hideCompleted", event.target.checked);
   }
});

// Events for Deleting and Check/Uncheck functionality
Template.task.events({

   "click .toggle-checked": function () {

      // Set the checked property to the opposite of its current value
      Meteor.call("setChecked", this._id, ! this.checked);
   },

   "click .delete": function () {
      Meteor.call("deleteTask", this._id);
   }
});
步驟7 - 部署
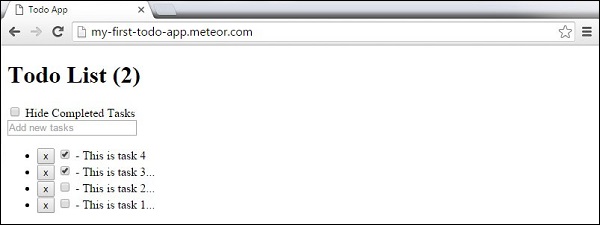
完成開發後,我們可以從命令提示符視窗部署應用。我們的應用部署名稱將是my-first-todo-app。
C:\Users\username\Desktop\todo-app>meteor deploy my-first-todo-app
我們可以開啟http://my-first-todo-app.meteor.com/來開始使用我們的應用。
廣告