- TurboGears 教程
- TurboGears - 首頁
- TurboGears - 概述
- TurboGears - 環境配置
- TurboGears - 第一個程式
- TurboGears - 依賴項
- TurboGears - 服務模板
- TurboGears - HTTP 方法
- Genshi 模板語言
- TurboGears - 包含檔案
- TurboGears - JSON 渲染
- TurboGears - URL 層次結構
- TurboGears - Toscawidgets 表單
- TurboGears - 資料驗證
- TurboGears - Flash 訊息
- TurboGears - Cookie 和 Session
- TurboGears - 快取
- TurboGears - SQLAlchemy
- TurboGears - 建立模型
- TurboGears - CRUD 操作
- TurboGears - DataGrid
- TurboGears - 分頁
- TurboGears - 管理員訪問
- 授權與認證
- TurboGears - 使用MongoDB
- TurboGears - 腳手架
- TurboGears - 鉤子
- TurboGears - 編寫擴充套件
- TurboGears - 可插拔應用程式
- TurboGears - RESTful 應用程式
- TurboGears - 部署
- TurboGears 有用資源
- TurboGears - 快速指南
- TurboGears - 有用資源
- TurboGears - 討論
TurboGears - 使用MongoDB
TurboGears 也支援 MongoDB 文件資料庫。它使用 Ming,一個物件文件對映器 API。Ming 的用法與 SQLAlchemy 非常相似。Ming 查詢語言使得將基於 SQLAlchemy 的 TurboGears 專案移植到 Ming 成為可能。
什麼是 PyMongo
PyMongo 是一個 Python 發行版,包含用於處理 MongoDB 的工具。Ming 擴充套件了 PyMongo,提供:
- 宣告式模型
- 模式驗證和轉換
- 模式演變
- 純記憶體 MongoDB 實現
- 工作單元
- 標識對映
- 一對多、多對一和多對多關係
首先,你需要下載並安裝 MongoDB。最新的 MongoDB 發行版可以從 https://www.mongodb.org/downloads 下載
在 Windows 上,透過提供 -dbpath 選項啟動 MongoDB 伺服器:
C:\mongodb\bin>Mongod --dbpath d:\mongo
D:\mongo 資料夾被指定用於儲存 MongoDB 資料庫。伺服器開始監聽 https://:27017。現在,要啟動 MongoDB shell,請使用以下命令:
C:\mongodb\bin>Mongo
我們的 MongoDB 環境現在已經準備好了。
現在使用 -ming 選項建立一個 TurboGears 專案:
gearbox quickstart --ming Hello
這個快速啟動專案將提供一個身份驗證和授權層,類似於 SQLAlchemy 版本提供的那個。此應用程式現在將嘗試連線到本地機器埠 27017 上的伺服器。專案資料夾中的 development.ini 檔案包含以下設定:
ming.url = mongodb://:27017/
ming.db = hello
使用以下命令設定專案:
Python setup.py develop
專案資料夾包含 models 子資料夾,其中包含以下檔案:
__init__.py - 這是設定資料庫訪問的地方。你的集合應該匯入到這個模組中。例如,我們將在該包中新增 student 集合。
session.py - 此檔案定義了資料庫連線的會話。每次必須宣告MappedClass以指定會話來執行查詢時,都需要匯入它。
auth.py - 如果你在快速啟動中啟用了身份驗證和授權,則會建立此檔案。它定義了三個集合repoze.who,它進一步依賴於:User、Group 和 Permission。
定義你的集合
預設情況下,TurboGears 以宣告模式配置 Ming。這類似於 SQLAlchemy 的宣告式支援,需要每個模型都繼承自 MappedClass 類。
MappedClass 要求內部提供一個 __mongometa__ 子類,該子類進一步提供有關儲存文件的集合名稱和用於儲存文件的會話的詳細資訊。
MappedClass 還包含文件中欄位的定義。Ming 的 odm 模組定義了不同型別的欄位屬性:
- FieldProperty
- ForeignIdProperty
- RelationProperty
ming.schema 模組定義了以下資料型別:
- ming.schema.Anything
- ming.schema.Array
- ming.schema.Binary
- ming.schema.Bool
- ming.schema.Float
- ming.schema.Int
- ming.schema.ObjectId
- ming.schema.Scalar
- ming.schema.String
要在此模型中新增 student 集合,請將以下程式碼另存為 hello/models 資料夾中的 student.py。
Hello\models\student.py
from ming import schema
from ming.odm import MappedClass
from ming.odm import FieldProperty, ForeignIdProperty
from hello.model import DBSession

Class student(MappedClass):
   class __mongometa__:
      session = DBSession
      name = 'student'

   _id = FieldProperty(schema.ObjectId)
   name = FieldProperty(schema.String(required = True))
   city = FieldProperty(schema.String(if_missing = ''))
   address = FieldProperty(schema.String(if_missing = ''))
   pincode = FieldProperty(schema.String(if_missing = ''))
最後,將此模型包含在 hello\models\__init__.py 中
# Import your model modules here.
from hello.model.auth import User, Group, Permission
from hello.model.student import student
要設定這些模型,請執行以下 gearbox 命令:
Gearbox setup-app
使用以下 gearbox 命令啟動伺服器:
Gearbox serve –reload –debug
開啟此應用程式的主頁 (https://:8080/) 並使用管理員憑據登入。此應用程式的管理頁面將顯示已設定的模型列表。(使用者名稱:manager,密碼:managepass)
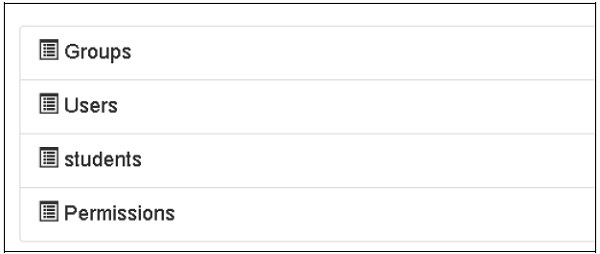
也可以在 MongoDB Web 介面以及 MongoDB shell 中驗證集合的建立。
ODMSession 用於使用以下函式執行多個數據庫操作:
- model.query.find()
- model.query.find_and_modify()
- model.remove()
- model.update()
- model.flush()
設計 ToscoWidget 表單
我們現在將設計一個 ToscoWidget 表單來輸入學生資料並將其新增到 student 模型的基礎表中。
以下是建立 studentform.py 的程式碼:
Hello\controllers\studentform.py
import tw2.core as twc
import tw2.forms as twf

class StudentForm(twf.Form):

   class child(twf.TableLayout):
      name = twf.TextField(size = 20)
      city = twf.TextField()
      address = twf.TextArea("",rows = 5, cols = 30)
      pincode = twf.NumberField()

   action = '/save_record'
   submit = twf.SubmitButton(value = 'Submit')
在應用程式的 Rootcontroller '/add' URL 中呼叫 add() 函式,該函式將在瀏覽器中開啟上面設計的表單。然後,其提交按鈕將呼叫 save_record() 函式。它檢索表單資料並將其儲存到 student 表中,然後將應用程式重定向到 '/listrec' URL,該 URL 公開了 studentlist 模板。
此活動的 root.py 如下所示:
Hello/controllers/root.py
from hello.lib.base import BaseController
from tg import expose, flash, redirect, request,url, lurl
from tg import redirect, validate
from hello import model
from hello.model import DBSession
from hello.model.student import student

from hello.controllers.studentform import StudentForm

class RootController(BaseController):
   @expose()
   def index(self):
      return "<h1>Hello World</h1>"

   @expose ("hello.templates.studentlist")
   def listrec(self):
      entries = student.query.find()
      return dict(entries = entries)

   @expose('hello.templates.studentform')
   def add(self, *args, **kw):
      return dict(page = 'studentform', form = StudentForm)

   @expose()
   def save_record(self, **kw):
      newstudent = student(name = kw['name'],city = kw['city'],
         address = kw['address'], pincode = kw['pincode'])
      DBSession.flush()
      flash(message = "new entry added successfully")
      redirect("/listrec")
以下模板是在 templates 資料夾中建立的:
Hello\templates\studentform.html
<!DOCTYPE html>
<html xmlns = "http://www.w3.org/1999/xhtml"
   xmlns:py = "http://genshi.edgewall.org/" lang = "en">

   <head>
      <title>Student Registration Form</title>
   </head>


   <body>
      <div id = "getting_started">
         ${form.display(value = dict(title = 'Enter data'))}
      </div>
   </body>

</html>
Hello\templates\studentlist.html
<html xmlns = "http://www.w3.org/1999/xhtml"
   xmlns:py = "http://genshi.edgewall.org/">

   <head>
      <link rel = "stylesheet" type = "text/css" media = "screen"
         href = ${tg.url('/css/style.css')}" />
      <title>Welcome to TurboGears</title>
   </head>

   <body>
      <h1>Welcome to TurboGears</h1>

      <py:with vars = "flash = tg.flash_obj.render('flash', use_js = False)">
         <div py:if = "flash" py:replace = "Markup(flash)" />
      </py:with>

      <h2>Current Entries</h2>

      <table border = '1'>
         <thead>
            <tr>
               <th>Name</th>
               <th>City</th>
               <th>Address</th>
               <th>Pincode</th>
            </tr>
         </thead>

         <tbody>
            <py:for each = "entry in entries">
               <tr>
                  <td>${entry.name}</td>
                  <td>${entry.city}</td>
                  <td>${entry.address}</td>
                  <td>${entry.pincode}</td>
               </tr>
            </py:for>
         </tbody>
      </table>

   </body>

</html>
重新啟動伺服器並在瀏覽器中輸入 https://:8080/add:
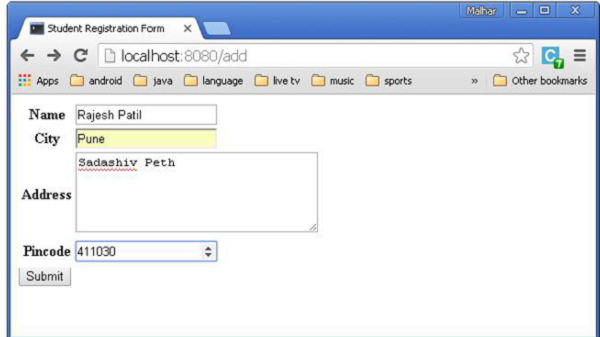
每次新增資料並按下提交按鈕時,都將顯示當前條目的列表。
