- TurboGears 教程
- TurboGears - 首頁
- TurboGears - 概述
- TurboGears - 環境
- TurboGears - 第一個程式
- TurboGears - 依賴項
- TurboGears - 服務模板
- TurboGears - HTTP 方法
- Genshi 模板語言
- TurboGears - 包含
- TurboGears - JSON 渲染
- TurboGears - URL 層次結構
- TurboGears - Toscawidgets 表單
- TurboGears - 驗證
- TurboGears - 快閃記憶體訊息
- TurboGears - Cookie 和會話
- TurboGears - 快取
- TurboGears - Sqlalchemy
- TurboGears - 建立模型
- TurboGears - CRUD 操作
- TurboGears - 資料網格
- TurboGears - 分頁
- TurboGears - 管理員訪問
- 授權和身份驗證
- TurboGears - 使用 MongoDB
- TurboGears - 腳手架
- TurboGears - 鉤子
- TurboGears - 編寫擴充套件
- TurboGears - 可插拔應用程式
- TurboGears - RESTful 應用程式
- TurboGears - 部署
- TurboGears 有用資源
- TurboGears - 快速指南
- TurboGears - 有用資源
- TurboGears - 討論
TurboGears – CRUD 操作
以下會話方法執行 CRUD 操作:
DBSession.add(模型物件) - 將記錄插入對映表。
DBSession.delete(模型物件) - 從表中刪除記錄。
DBSession.query(模型).all() - 從表中檢索所有記錄(對應於 SELECT 查詢)。
您可以使用 filter 屬性對檢索到的記錄集應用篩選器。例如,為了檢索 students 表中 city = 'Hyderabad' 的記錄,請使用以下語句:
DBSession.query(model.student).filter_by(city = ’Hyderabad’).all()
我們現在將瞭解如何透過控制器 URL 與模型互動。
首先,讓我們設計一個 ToscaWidgets 表單來輸入學生的資料
Hello\hello\controllers.studentform.py
import tw2.core as twc
import tw2.forms as twf

class StudentForm(twf.Form):
   class child(twf.TableLayout):
      name = twf.TextField(size = 20)
      city = twf.TextField()
      address = twf.TextArea("",rows = 5, cols = 30)
      pincode = twf.NumberField()

   action = '/save_record'
   submit = twf.SubmitButton(value = 'Submit')
在 RootController(Hello 應用程式的 root.py)中,新增以下函式對映 '/add' URL:
from hello.controllers.studentform import StudentForm

class RootController(BaseController):
   @expose('hello.templates.studentform')
   def add(self, *args, **kw):
      return dict(page='studentform', form = StudentForm)
將以下 HTML 程式碼另存為 templates 資料夾中的 studentform.html:
<!DOCTYPE html>
<html xmlns = "http://www.w3.org/1999/xhtml"
   xmlns:py = "http://genshi.edgewall.org/"
   lang = "en">

   <head>
      <title>Student Registration Form</title>
   </head>

   <body>
      <div id = "getting_started">
         ${form.display(value = dict(title = 'Enter data'))}
      </div>
   </body>

</html>
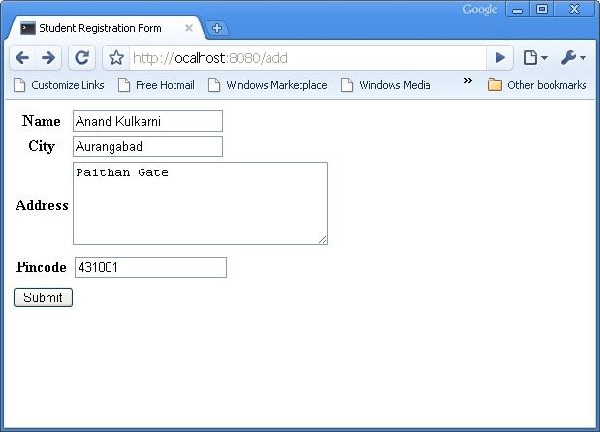
啟動伺服器後,在瀏覽器中輸入 https://:8080/add。以下學生資訊表單將在瀏覽器中開啟:
以上表單設計為提交到 '/save_record' URL。因此,需要在 root.py 中新增 save_record() 函式來公開它。來自 studentform 的資料由此函式作為 dict() 物件接收。它用於在底層 student 模型的學生表中新增新記錄。
@expose()
#@validate(form = AdmissionForm, error_handler = index1)

def save_record(self, **kw):
   newstudent = student(name = kw['name'],city = kw['city'],
      address = kw['address'], pincode = kw['pincode'])
   DBSession.add(newstudent)
   flash(message = "new entry added successfully")
   redirect("/listrec")
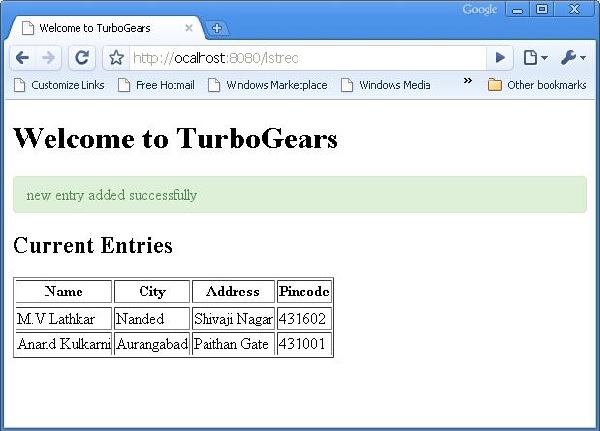
請注意,成功新增後,瀏覽器將重定向到 '/listrec' URL。此 URL 由 listrec() 函式公開。此函式選擇學生表中的所有記錄,並以 dict 物件的形式將它們傳送到 studentlist.html 模板。此 listrec() 函式如下所示:
@expose ("hello.templates.studentlist")
def listrec(self):
   entries = DBSession.query(student).all()
   return dict(entries = entries)
studentlist.html 模板使用 py:for 指令遍歷 entries 字典物件。studentlist.html 模板如下所示:
<html xmlns = "http://www.w3.org/1999/xhtml"
   xmlns:py = "http://genshi.edgewall.org/">

   <head>
      <link rel = "stylesheet" type = "text/css" media = "screen"
         href = "${tg.url('/css/style.css')}" />
      <title>Welcome to TurboGears</title>
   </head>

   <body>
      <h1>Welcome to TurboGears</h1>

      <py:with vars = "flash = tg.flash_obj.render('flash', use_js = False)">
         <div py:if = "flash" py:replace = "Markup(flash)" />
      </py:with>

      <h2>Current Entries</h2>

      <table border = '1'>
         <thead>
            <tr>
               <th>Name</th>
               <th>City</th>
               <th>Address</th>
               <th>Pincode</th>
            </tr>
         </thead>

         <tbody>
            <py:for each = "entry in entries">
               <tr>
                  <td>${entry.name}</td>
                  <td>${entry.city}</td>
                  <td>${entry.address}</td>
                  <td>${entry.pincode}</td>
               </tr>
            </py:for>
         </tbody>

      </table>

   </body>
</html>
現在重新訪問 https://:8080/add 並輸入表單中的資料。透過點選提交按鈕,它將把瀏覽器帶到 studentlist.html。它還會顯示一條“新記錄新增成功”的訊息。