- TurboGears 教程
- TurboGears - 首頁
- TurboGears - 概述
- TurboGears - 環境
- TurboGears - 第一個程式
- TurboGears - 依賴項
- TurboGears - 服務模板
- TurboGears - HTTP 方法
- Genshi 模板語言
- TurboGears - 包含
- TurboGears - JSON 渲染
- TurboGears - URL 層次結構
- TurboGears - Toscawidgets 表單
- TurboGears - 驗證
- TurboGears - 快閃記憶體訊息
- TurboGears - Cookie 和會話
- TurboGears - 快取
- TurboGears - Sqlalchemy
- TurboGears - 建立模型
- TurboGears - CRUD 操作
- TurboGears - 資料網格
- TurboGears - 分頁
- TurboGears - 管理員訪問
- 授權和身份驗證
- TurboGears - 使用 MongoDB
- TurboGears - 腳手架
- TurboGears - 鉤子
- TurboGears - 編寫擴充套件
- TurboGears - 可插拔應用程式
- TurboGears - RESTful 應用程式
- TurboGears - 部署
- TurboGears 有用資源
- TurboGears - 快速指南
- TurboGears - 有用資源
- TurboGears - 討論
TurboGears 快速指南
TurboGears - 概述
什麼是 Web 框架?
Web 應用程式框架或簡稱 Web 框架表示一組庫和模組,它使 Web 應用程式開發人員能夠編寫應用程式,而無需擔心諸如協議、執行緒管理等底層細節。
什麼是 TurboGears?
TurboGears 是一個用 Python 編寫的 Web 應用程式框架。最初由 Kevin Dangoor 於 2005 年建立,其最新版本 TurboGears(版本 2.3.7)由 Mark Ramm 和 Florent Aide 領導的開發人員團隊管理。
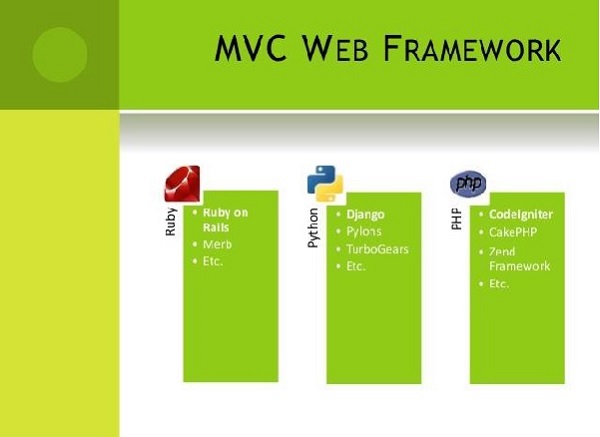
TurboGears 遵循模型-檢視-控制器正規化,就像大多數現代 Web 框架(如 Rails、Django、Struts 等)一樣。
模型檢視控制器
MVC 是一種用於開發 Web 應用程式的軟體設計模式。模型檢視控制器模式由三個部分組成:
模型 - 模式最低層負責維護資料。
檢視 - 負責向用戶顯示所有或部分資料。
控制器 - 控制模型和檢視之間互動的軟體程式碼。
MVC 很受歡迎,因為它將應用程式邏輯與使用者介面層隔離開,並支援關注點分離。在這裡,控制器接收應用程式的所有請求,然後與模型一起準備檢視所需的所有資料。然後,檢視使用控制器準備的資料生成最終的可呈現響應。MVC 抽象可以以圖形方式表示如下:

模型
模型負責管理應用程式的資料。它響應來自檢視的請求,並且它還響應來自控制器的更新自身指令。
檢視
以特定格式呈現資料,由控制器決定呈現資料。它們是基於指令碼的模板系統,非常易於與 AJAX 技術整合。
控制器
控制器負責響應使用者輸入並對資料模型物件執行互動。控制器接收輸入,驗證輸入,然後執行修改資料模型狀態的業務操作。
TurboGears 建立在許多庫和工具之上。這些工具在 TurboGears 的不同版本之間有所變化。當前版本(版本 2.3.7)的元件列在下面。
SQLAlchemy
它是一個開源 SQL 工具包,為 Python 程式碼提供物件關係對映 (ORM)。

Genshi
此模板引擎用於構建 TG 應用程式的前端。Web 模板系統將模板與某個資料來源結合以呈現動態網頁。
ToscaWidgets
這是一個用於生成帶有伺服器端控制元件的 HTML 表單的小部件庫。Tosca 還充當與 JavaScript 小部件和工具包連線的中介軟體。
Gearbox
它提供了一組命令來管理專案和服務 TurboGears 應用程式。TurboGears 應用程式可以部署在任何符合 WSGI 的 Web 伺服器上。
Web 伺服器閘道器介面 (WSGI) 已被採用作為 Python Web 應用程式開發的標準。WSGI 是 Web 伺服器和 Web 應用程式之間通用介面的規範。wsgiref 包是 WSGI 的參考實現。它用於為 Web TurboGears Web 框架新增 WSGI 支援。此包中的 simple_server 模組實現了一個簡單的 HTTP 伺服器,該伺服器服務於 WSGI 應用程式。我們將使用它來測試在本教程中開發的應用程式。
TurboGears - 環境
先決條件
Python 2.6 或更高版本。早期版本的 TurboGears 與 Python 3.X 不相容。最新版本聲稱可以在 Python 3.X 上正常工作。但是,TurboGears 的官方文件仍然基於 Python 2.7 環境。
以下命令安裝 virtualenv:
pip install virtualenv
此命令需要管理員許可權。在 Linux/Mac OS 上在 pip 之前新增sudo。如果您使用的是 Windows,請以管理員身份登入。在 Ubuntu 上,可以使用其包管理器安裝 virtualenv。
Sudo apt-get install virtualenv
安裝完成後,新的虛擬環境將在資料夾中建立。
mkdir newproj
cd newproj
virtualenv venv
要啟用相應的環境,在Linux/OS X上
venv/bin/activate
在Windows上
venv\scripts\activate
現在我們準備好在該環境中安裝 TurboGears。透過以下命令可以進行 TurboGears 的最小安裝:
pip install TurboGears2
上述命令可以在沒有虛擬環境的情況下直接執行以進行系統範圍的安裝。
要安裝 TurboGears 以及開發工具,請使用以下命令:
pip install tg.devtools
TurboGears - 第一個程式
TurboGears 具有最小模式,可以快速建立單檔案應用程式。可以使用最少的依賴項快速構建簡單的示例和服務。
TG 應用程式中的 Application 類繼承自TGController類。此類中的方法可透過tg模組中的@expose裝飾器訪問。在我們的第一個應用程式中,index()方法被對映為我們應用程式的根目錄。TGController 類也需要從tg模組匯入。
from tg import expose, TGController
class MyController(TGController):
   @expose()
   def index(self):
      return 'Hello World turbogears'
接下來,設定應用程式的配置並宣告應用程式物件。AppConfig類的建構函式在這裡接受兩個引數 - 將最小屬性設定為 true 和控制器類。
config = AppConfig(minimal = True, root_controller = RootController())
application = config.make_wsgi_app()
此處的make_wsgi_app()函式構建應用程式物件。
為了提供此應用程式,我們現在需要啟動 HTTP 伺服器。如前所述,我們將使用wsgiref包中的simple_server模組來設定和啟動它。此模組具有make_server()方法,該方法需要埠號和應用程式物件作為引數。
from wsgiref.simple_server import make_server
server = make_server('', 8080, application)
server.serve_forever()
這意味著我們的應用程式將在 localhost 的 8080 埠上提供服務。
以下是我們的第一個 TurboGears 應用程式的完整程式碼:
app.py
from wsgiref.simple_server import make_server
from tg import expose, TGController, AppConfig

class MyController(TGController):

   @expose()
   def index(self):
      return 'Hello World TurboGears'

config = AppConfig(minimal = True, root_controller = MyController())
application = config.make_wsgi_app()

print "Serving on port 8080..."
server = make_server('', 8080, application)
server.serve_forever()
從 Python shell 執行上述指令碼。
Python app.py
在瀏覽器的位址列中輸入https://:8080以檢視“Hello World TurboGears”訊息。
TurboGears 的tg.devtools包含 Gearbox。它是一組命令,可用於管理更復雜的 TG 專案。可以透過以下 Gearbox 命令快速建立完整堆疊專案:
gearbox quickstart HelloWorld
這將建立一個名為HelloWorld的專案。
TurboGears - 依賴項
TurboGears 專案包含以下目錄:
Config - 專案設定和配置所在位置
Controllers - 所有專案控制器,Web 應用程式的邏輯
i018n - 支援的語言的翻譯檔案
Lib - 實用程式 Python 函式和類
Model - 資料庫模型
Public Static Files - CSS、JavaScript 和影像
Templates - 我們的控制器公開的模板。
Tests - 執行的測試集。
Websetup - 在應用程式設定時執行的功能。
如何安裝專案
現在需要安裝此專案。專案的基本目錄中已提供setup.py。執行此指令碼時將安裝專案依賴項。
Python setup.py develop
預設情況下,在專案設定時會安裝以下依賴項:
- Beaker
- Genshi
- zope.sqlalchemy
- sqlalchemy
- alembic
- repoze.who
- tw2.forms
- tgext.admin ≥ 0.6.1
- WebHelpers2
- babel
安裝後,透過在 shell 中發出以下命令在開發伺服器上啟動服務專案:
Gearbox serve –reload –debug
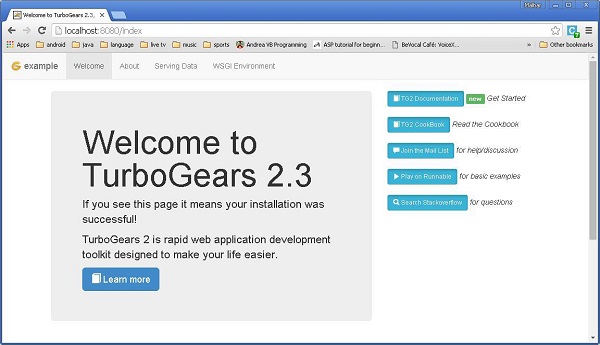
按照上述命令為預構建的示例專案提供服務。在瀏覽器中開啟https://:8080。這個現成的示例應用程式簡要介紹了 TurboGears 框架本身。
在此 Hello 專案中,預設控制器在 controllers 目錄中建立為Hello/hello/controllers.root.py。讓我們使用以下程式碼修改 root.py:
from hello.lib.base import BaseController
from tg import expose, flash

class RootController(BaseController):
   movie = MovieController()
   @expose()
   def index(self):
      return "<h1>Hello World</h1>"

   @expose()
   def _default(self, *args, **kw):
      return "This page is not ready"
準備好基本的工作應用程式後,可以在控制器類中新增更多檢視。在上面的Mycontroller類中,添加了一個新方法sayHello()。@expose()裝飾器將/sayHello URL 附加到它。此函式旨在從 URL 中接受名稱作為引數。
透過“gearbox serve”命令啟動伺服器後,https://:8080。即使輸入以下 URL,也會在瀏覽器中顯示 Hello World 訊息:
https://:8080/
https://:8080/index
所有這些 URL 都對映到RootController.index()方法。此類還具有_default()方法,當 URL 未對映到任何特定函式時將呼叫該方法。對 URL 的響應透過 @expose() 裝飾器對映到函式。
可以從 URL 向公開的函式傳送引數。以下函式從 URL 讀取名稱引數。
@expose()
def sayHello(self, name):
   return '<h3>Hello %s</h3>' %name
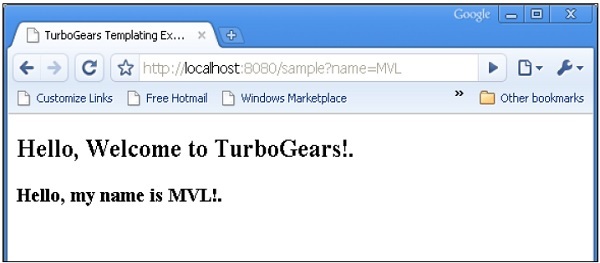
瀏覽器中將顯示以下輸出作為對 URL 的響應:https://:8080/?name=MVL
Hello MVL
TurboGears 自動將 URL 引數對映到函式引數。我們的 RootController 類繼承自 BaseController。這在應用程式的lib 資料夾中的base.py中定義。
其程式碼如下:
from tg import TGController, tmpl_context
from tg import request

__all__ = ['BaseController']

def __call__(self, environ, context):
   tmpl_context.identity = request.identity
   return TGController.__call__(self, environ, context)
TGController.__call__將請求路由到的控制器方法分派出去。
TurboGears - 服務模板
儘管可以透過 HTML 內容返回到瀏覽器,但對於更高階的輸出,始終建議使用模板引擎。在由 Gearbox “快速啟動” 的完整堆疊專案中,Genshi 被啟用為預設的模板渲染器。在最小應用程式中,Genshi(或任何其他模板引擎,例如 jinja)需要安裝和啟用。Genshi 模板引擎允許使用純 xhtml 編寫模板,並在編譯時對其進行驗證以檢測問題並防止提供損壞的頁面。
模板透過使用點表示法來引用。在我們的 Hello 專案中,提供了一個 templates 目錄來儲存模板網頁。因此,**sample.html** 將被引用為 **hello.templates.sample**(未提及副檔名)。TurboGears 透過 expose 裝飾器渲染此模板,以透過 **tg.render_template()** 函式將其與控制器方法連結。
公開的控制器函式返回一個 Python 字典物件。此字典物件依次傳遞給連結的模板。模板中的佔位符將使用字典值填充。
首先,讓我們顯示一個帶有純 html 指令碼的網頁。公開的控制器返回一個 **空字典物件**,因為我們不打算傳送任何資料到 HTML 指令碼中進行解析。
如何建立示例 HTML
我們的 **sample.html** 如下所示。確保將其儲存在專案的 templates 目錄中。
<html>
   <head>
      <title>TurboGears Templating Example</title>
   </head>

   <body>
      <h2>Hello, Welcome to TurboGears!.</h2>
   </body>
</html>
在 **root.py** 中新增 **sample()** 函式,並透過它公開 sample.html。
@expose("hello.templates.sample")
   def sample(self):
      return {}
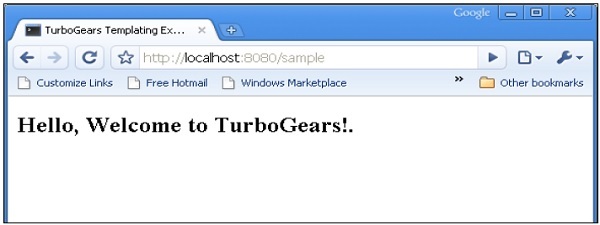
在啟動 Web 伺服器後輸入 URL **https://:8080/sample**,瀏覽器將顯示以下結果。
如上所述,字典物件作為引數集合傳送到 Genshi 模板。此模板包含“佔位符”,這些佔位符將使用從控制器接收的引數動態填充。
讓我們更改 **sample()** 函式以將字典物件傳送到 sample 模板。
@expose("hello.templates.sample")
   def sample(self,name):
      mydata = {'person':name}
      return mydata
在 templates 資料夾中建立 **sample.html**(**templates\sample.html**)
<html>
   <head>
      <title>TurboGears Templating Example</title>
   </head>

   <body>
      <h2>Hello, my name is ${person}!.</h2>
   </body>
</html>
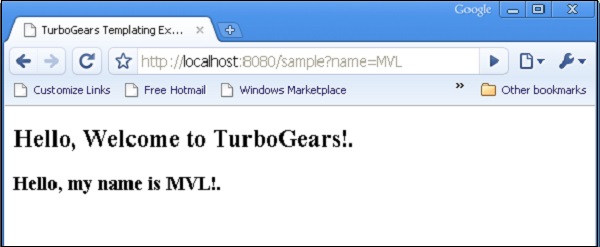
在上面的 HTML 程式碼中,**${person}** 是佔位符。在瀏覽器中輸入 **https://:8080/sample?name=MVL** 作為 URL。此 URL 對映到我們根控制器中的 **sample()** 方法。它返回一個字典物件。這由 templates 目錄中連結的模板頁面 sample.html 獲取。然後,網頁中的 ${person} 將被 MVL 替換。
也可以在控制器函式中訪問 HTML 表單資料。HTML 表單用於傳送表單資料。
TurboGears - HTTP 方法
HTTP 協議是全球資訊網中資料通訊的基礎。此協議中定義了從指定 URL 檢索資料的不同方法。下表總結了不同的 HTTP 方法:
| 序號 | HTTP 方法及描述 |
|---|---|
| 1 | GET 以未加密的形式將資料傳送到伺服器。最常見的方法。 |
| 2 | HEAD 與 GET 相同,但沒有響應主體 |
| 3 | POST 用於將 HTML 表單資料傳送到伺服器。POST 方法接收的資料不會被伺服器快取。 |
| 4 | PUT 用上傳的內容替換目標資源的所有當前表示形式。 |
| 5 | DELETE 刪除 URL 指定的目標資源的所有當前表示形式 |
建立 HTML 表單
讓我們建立一個 HTML 表單並將表單資料傳送到 URL。將以下指令碼儲存為 login.html
<html>
   <body>
      <form action = "https://:8080/login" method = "get">
         <p>Enter Name:</p>
         <p><input type = "text" name = "nm" /></p>
         <p><input type = "submit" value = "submit" /></p>
      </form>
   </body>
</html>
此表單中輸入的資料將提交到 **'/login' URL**。現在建立一個控制器函式 **loginpage()** 並將上述 html 頁面公開給它。
@expose("hello.templates.login")
   def loginpage(self):
      return {}
為了接收表單資料,提供一個 **login()** 控制器,該控制器具有表單屬性作為其引數。這裡 **'nm'** 是登入表單中文字輸入欄位的名稱,在 login() 函式中使用相同的名稱作為引數。
@expose("hello.templates.sample")
   def login(self, nm):
      name = nm
      return {'person':name}
可以看出,從登入表單接收到的資料被髮送到 sample.html 模板(之前使用過)。它由 **Genshi 模板引擎** 解析以生成以下輸出:
POST 方法
當 HTML 表單使用 POST 方法將資料分派到 action 屬性中的 URL 時,表單資料不會在 URL 中公開。編碼後的資料由控制器函式以 **dict** 引數接收。下面的 **kw** 引數是儲存表單資料的字典物件。
HTML 表單包含兩個文字輸入欄位。
<html>
   <body>

      <form action = "https://:8080/marks" method = "post">
         <p>Marks in Physics:</p>
         <p><input type = "text" name = "phy" /></p>
         <p>Marks in Maths:</p>
         <p><input type = "text" name = "maths" /></p>
         <p><input type = "submit" value = "submit" /></p>
      </form>

   </body>
</html>
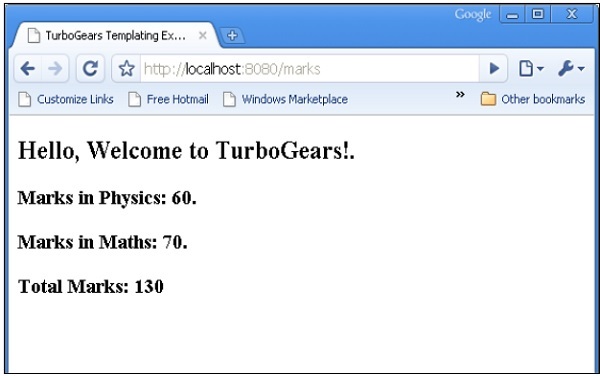
**marks()** 控制器接收表單資料並將其傳送到 **sample.html** 模板。**root.py** 的程式碼如下:
from hello.lib.base import BaseController
from tg import expose, request

class RootController(BaseController):
   @expose("hello.templates.marks")
   def marksform(self):
      return {}

   @expose("hello.templates.sample")
   def marks(self, **kw):
      phy = kw['phy']
      maths = kw['maths']
      ttl = int(phy)+int(maths)
      mydata = {'phy':phy, 'maths':maths, 'total':ttl}
      return mydata
最後,sample.html 模板如下:
<html>
   <head>
      <title>TurboGears Templating Example</title>
   </head>

   <body>
      <h2>Hello, Welcome to TurboGears!.</h2>
      <h3>Marks in Physics: ${phy}.</h3>
      <h3>Marks in Maths: ${maths}.</h3>
      <h3>Total Marks: ${total}</h3>
   </body>

</html>
啟動伺服器(如果尚未執行)
Gearbox server –reload –debug
在瀏覽器中輸入 **https://::8080/marksform**
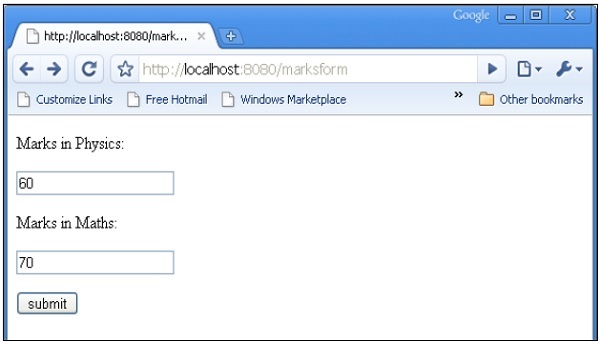
**sample.html** 將呈現以下輸出:
TurboGears - Genshi 模板語言
Genshi 是一種基於 XML 的模板語言。它類似於 **Kid**,Kid 曾是早期版本的 TurboGears 的模板引擎。Genshi 和 Kid 都受到其他知名模板語言(如 **HSLT、TAL** 和 **PHP**)的啟發。
Genshi 模板由處理指令組成。這些指令是模板中的元素和屬性。Genshi 指令在名稱空間 http://genshi.edgewall.org/ 中定義。因此,需要在模板的根元素中宣告此名稱空間。
<html xmlns = "http://www.w3.org/1999/xhtml"
   xmlns:py = "http://genshi.edgewall.org/"
   lang = "en">
...
</html>
以上宣告意味著預設名稱空間設定為 XHTML,而 Genshi 指令具有 'py' 字首。
Genshi 指令
Genshi 中定義了許多指令。以下列表枚舉了 Genshi 指令:
- py:if
- py:choose
- py:for
- py:def
- py:match
- py:with
- py:replace
- py:content
- py:attrs
- py:strip
條件節
Genshi 提供了兩個用於條件渲染內容的指令:py:if 和 py:choose。
py:if
僅當 **if 子句** 中的表示式計算結果為 true 時,才會渲染此指令元素的內容。假設模板上下文中的資料為 **{‘foo’:True, ‘bar’:’Hello’}**,則以下指令:
<div>
   <b py:if = "foo">${bar}</b>
</div>
將產生以下結果
Hello
但是,如果 **'foo' 設定為 False**,則不會渲染此輸出。
此指令也可以用作元素。在這種情況下,**<py:if>** 必須由相應的 **</py:if>** 關閉。
<div>
   <py:if test = "foo">
      <b>${bar}</b>
   </py:if>
</div>
py:choose
可以使用 **py:choose** 結合 **py:when** 和 **py:otherwise** 指令進行高階條件處理。此功能類似於 **C/C++** 中的 **switch-case** 結構。
**py:choose** 指令中的表示式將使用 **py:when** 替代項標識的不同值進行檢查,並將渲染相應的內容。可以在 **py:otherwise** 指令的形式下提供預設替代項。
<div py:choose = "foo”>
   <span py:when = "0">0</span>
   <span py:when = "1">1</span>
   <span py:otherwise = "">2</span>
</div>
以下示例說明了 **py:choose** 和 **py:when** 指令的使用。HTML 表單將資料釋出到 /marks URL。**marks()** 函式重定向分數並將結果以字典物件的形式傳送到 **total.html** 模板。透過使用 **py:choose** 和 **py:when** 指令實現 **結果及格/不及格** 的條件顯示。
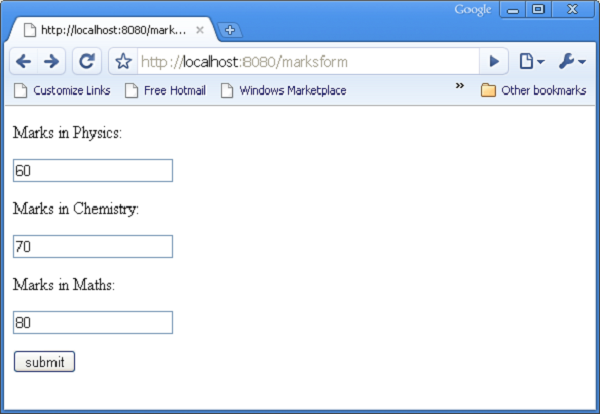
輸入分數的 HTML 指令碼(**marks.html**)如下:
<html>
   <body>
      <form action = "https://:8080/marks" method = "post">
         <p>Marks in Physics:</p>
         <p><input type = "text" name = "phy" /></p>
         <p>Marks in Maths:</p>
         <p><input type = "text" name = "maths" /></p>
         <p><input type = "submit" value = "submit" /></p>
      </form>
   </body>
</html>
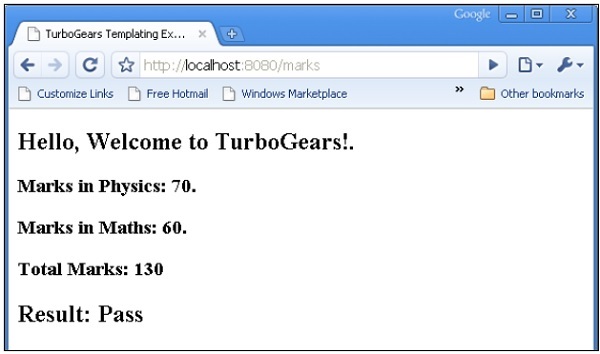
**root.py** 的完整程式碼如下。**marks()** 控制器將分數和結果傳送到 **total.html** 模板:
from hello.lib.base import BaseController
from tg import expose, request

class RootController(BaseController):
   @expose("hello.templates.marks")
      def marksform(self):
      return {}

   @expose("hello.templates.total")
      def marks(self, **kw):
      phy = kw['phy']
      maths = kw['maths']
      ttl = int(phy)+int(maths)
      avg = ttl/2

      if avg ≥ 50:
         mydata = {'phy':phy, 'maths':maths, 'total':ttl, 'result':2}
      else:
         mydata = {'phy':phy, 'maths':maths, 'total':ttl,'result':1}

      return mydata
templates 資料夾中的 **total.html** 接收字典資料並在 html 輸出中按如下方式有條件地解析它:
<html xmlns = "http://www.w3.org/1999/xhtml"
   xmlns:py = "http://genshi.edgewall.org/"
   lang = "en">

   <head>
      <title>TurboGears Templating Example</title>
   </head>

   <body>
      <h2>Hello, Welcome to TurboGears!.</h2>
      <h3>Marks in Physics: ${phy}.</h3>
      <h3>Marks in Maths: ${maths}.</h3>
      <h3>Total Marks: ${total}</h3>

      <div py:choose = "result">
         <span py:when = "1"><h2>Result: Fail</h2></span>
         <span py:when = "2"><h2>Result: Pass</h2></span>
      </div>

   </body>
</html>
啟動伺服器(如果尚未執行)
Gearbox server –reload –debug
在瀏覽器中輸入 **https://::8080/marksform**
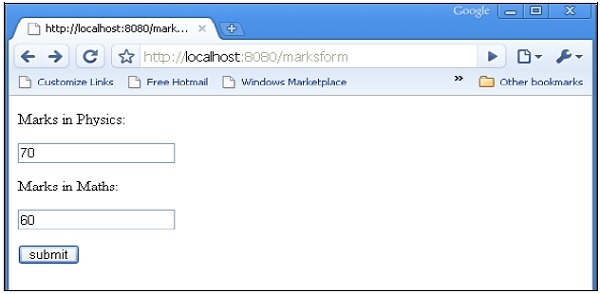
**total.html** 將呈現以下輸出:
py:for
py:for 指令中的元素將為可迭代物件(通常是 Python 列表物件)中的每個專案重複。如果 **items = [1,2,3]** 存在於模板上下文中,則可以透過以下 py:for 指令對其進行迭代:
<ul>
   <li py:for = "item in items">${item}</li>
</ul>
將呈現以下輸出:
1
2
3
以下示例顯示了使用 py:for 指令在 total.html 模板中渲染的 HTML 表單資料,也可以按如下方式使用:
<py:for each = "item in items">
   <li>${item}</li>
</py:for>
HTML 表單指令碼
<html>
   <body>

      <form action = "https://:8080/loop" method="post">
         <p>Marks in Physics:</p>
         <p><input type = "text" name = "phy" /></p>
         <p>Marks in Chemistry:</p>
         <p><input type = "text" name = "che" /></p>
         <p>Marks in Maths:</p>
         <p><input type = "text" name = "maths" /></p>
         <p><input type = "submit" value = "submit" /></p>
      </form>

   </body>
</html>
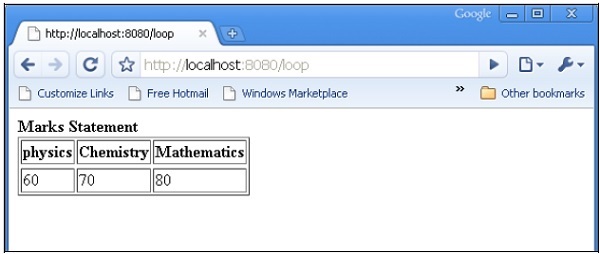
**loop()** 控制器讀取表單資料並將其以列表物件的形式傳送到 total.template。
from hello.lib.base import BaseController
from tg import expose, request

class RootController(BaseController):
   @expose("hello.templates.marks")
   def marksform(self):
   return {}

   @expose("hello.templates.temp")
   def loop(self, **kw):
      phy = kw['phy']
      maths = kw['maths']
      che = kw['che']
      l1 = []
      l1.append(phy)
      l1.append(che)
      l1.append(maths)

   return ({'subjects':['physics', 'Chemistry', 'Mathematics'], 'marks':l1})
temp.html 模板使用 py:for 迴圈以表格的形式渲染 dict 物件的內容。
<html xmlns = "http://www.w3.org/1999/xhtml"
   xmlns:py = "http://genshi.edgewall.org/" lang = "en">

   <body>
      <b>Marks Statement</b>
      <table border = '1'>
         <thead>
            <py:for each = "key in subjects"><th>${key}</th></py:for>
         </thead>
         <tr>
            <py:for each = "key in marks"><td>${key}</td></py:for>
         </tr>
      </table>
   </body>
</html>
啟動伺服器(如果尚未執行)
gearbox server –reload –debug
在瀏覽器中輸入 **https://::8080/marksform**。
提交上述表單後,瀏覽器將顯示以下輸出。
py:def
此指令用於建立宏。宏是可重用的模板程式碼片段。與 Python 函式非常相似,它具有名稱,並且可以可選地具有引數。此宏的輸出可以插入模板中的任何位置。
py:def 指令遵循以下語法:
<p py:def = "greeting(name)">
   Hello, ${name}!
</p>
此宏可以使用變數值渲染到 'name' 引數。
${greeting('world')}
${greeting('everybody)}
此指令也可以使用另一種語法版本,如下所示:
<py:def function = "greeting(name)">
   <p>Hello, ${name}! </p>
</py:def>
在以下示例中,**root.py** 中的 **macro()** 控制器將一個具有兩個鍵 name1 和 name2 的 **dict** 物件傳送到 macro.html 模板。
from hello.lib.base import BaseController
from tg import expose, request

class RootController(BaseController):
   @expose('hello.templates.macro')
   def macro(self):
      return {'name1':'TutorialPoint', 'name2':'TurboGears'}
此 macro.html 模板包含一個名為 greeting 的宏的定義。它用於為從控制器接收的資料生成問候語訊息。
<html xmlns = "http://www.w3.org/1999/xhtml"
   xmlns:py = "http://genshi.edgewall.org/"
   lang = "en">

   <body>
      <h2>py:def example</h2>

      <div>
         <div py:def = "greeting(name)">
            Hello, Welcome to ${name}!
         </div>

         <b>
            ${greeting(name1)}
            ${greeting(name2)}
         </b>

      </div>
   </body>
</html>
使用 gearbox 啟動伺服器
gearbox serve –reload –debug
透過在瀏覽器中輸入以下 URL 呼叫 macro() 控制器:
https://:8080/macro
瀏覽器將呈現以下輸出:

py:with
此指令允許您將表示式分配給區域性變數。這些區域性變數使表示式內部更簡潔且更高效。
假設模板的上下文資料中給出了 x = 50,則以下為 py:with 指令:
<div>
   <span py:with = "y = 50; z = x+y">$x $y $z</span>
</div>
它將產生以下輸出:
50 50 100
py:with 指令也提供了一個替代版本:
<div>
   <py:with = "y = 50; z = x+y">$x $y $z</py:with>
</div>
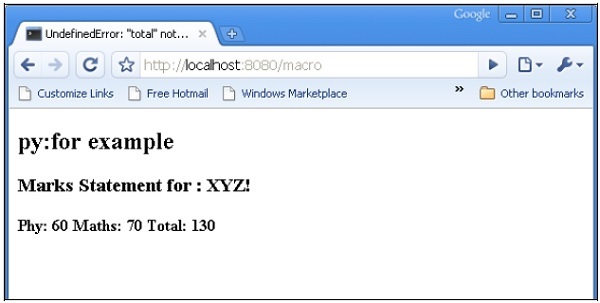
在以下示例中,macro() 控制器返回一個具有 name、phy 和 maths 鍵的 dict 物件。
from hello.lib.base import BaseController
from tg import expose, request

class RootController(BaseController):
   @expose('hello.templates.macro')
   def macro(self):
      return {'name':'XYZ', 'phy':60, 'maths':70}
macro.html 模板使用 py:with 指令新增 phy 和 maths 鍵的值。
<html xmlns = "http://www.w3.org/1999/xhtml"
   xmlns:py = "http://genshi.edgewall.org/"
   lang = "en">

   <body>
      <h2>py:with example</h2>
      <h3>Marks Statement for : ${name}!</h3>

      <b>Phy: $phy Maths: $maths
         <span py:with = "ttl = phy+maths">Total: $ttl</span>
      </b>

   </body>

</html>
瀏覽器將對 URL **https://:8080/macro** 響應以下輸出
結構操作指令
**py:attrs** 指令新增、修改或刪除元素的屬性。
<ul>
   <li py:attrs = "foo">Bar</li>
</ul>
如果 **foo = {‘class’:’collapse’}** 存在於模板上下文中,則上述程式碼段將渲染以下內容。
<ul>
   <li class = "collapse">Bar</li>
</ul>
**py:content** 指令使用表示式計算結果替換任何巢狀內容:
<ul>
   <li py:content = "bar">Hello</li>
</ul>
在上下文資料中給定 bar = 'Bye',這將產生以下結果
<ul>
   <li>Bye</li>
</ul>
**py:replace** 指令使用表示式計算結果替換元素本身:
<div>
   <span py:replace = "bar">Hello</span>
</div>
如果上下文資料中給定 bar = 'Bye',則會生成
<div>
   Bye
</div>
TurboGears - 包含
另一個 XML 文件(尤其是 HTML 文件)的內容可以透過在當前文件中使用包含標籤來包含。為了啟用這種包含,必須在 HTML 文件的根元素中宣告 XInclude 名稱空間。
<html xmlns = "http://www.w3.org/1999/xhtml" xmlns:xi = "http://www.w3.org/2001/XInclude >
以上宣告指定 include 指令包含'xi' 字首。要在當前文件中新增另一個 html 頁面的內容,請按如下方式使用 xi:include 指令:
<xi:include href = "somepage.html" />
在下面的示例中,root.py 包含 include() 控制器,它公開 include.html。
from hello.lib.base import BaseController
from tg import expose, request

class RootController(BaseController):
   @expose('hello.templates.include')
   def include(self):
      return {}
頭部和頁尾 HTML
在 include.html 中,聲明瞭 include 名稱空間,並添加了 heading.html 和 footer.html 的內容。以下是 templates\include.html 的 HTML 指令碼:
<html xmlns = "http://www.w3.org/1999/xhtml"
   xmlns:xi = "http://www.w3.org/2001/XInclude">

   <head>
      <title>TurboGears Templating Example</title>
   </head>

   <body>
      <xi:include href = "heading.html" />
      <h2>main content </h2>
      <xi:include href = "footer.html" />
   </body>

</html>
以下是 templates\heading.html 程式碼:
<html>
   <head>
      <title>TurboGears Templating Example</title>
   </head>

   <body>
      <h1>This is page Header</h1>
   </body>
</html>
以下是 templates\footer.html
<html>
   <head>
      <title>TurboGears Templating Example</title>
   </head>

   <body>
      <h3>This is page footer</h3>
   </body>
</html>
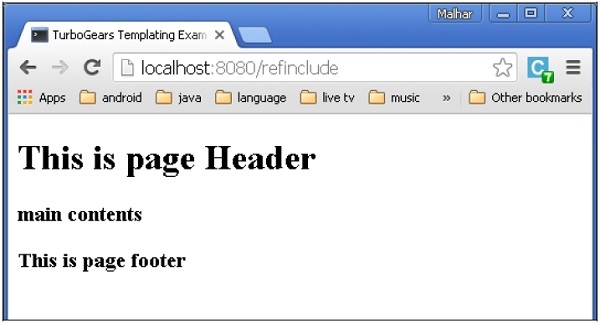
使用 gearbox 啟動開發,並在瀏覽器中輸入https://:8080/include。呈現的輸出將如下所示:

這樣就可以實現檢視的模組化構建。如果 xi:include 指令中提到的資源不可用,則會引發錯誤。在這種情況下,可以使用 xi:fallback 載入備用資源。
<xi:include href = “main.html”>
   <xi:fallback href = ”default.html”/>
</xi.include>
內容的包含可以是動態的,因為 href 屬性可以包含表示式。
在 root.py 中新增以下控制器。
@expose('hello.templates.ref-include')
   def refinclude(self):
      return {'pages':['heading','main','footer']}
將以下程式碼儲存為 templates 資料夾中的 ref-include.html。
<html xmlns = "http://www.w3.org/1999/xhtml"
   xmlns:py = "http://genshi.edgewall.org/"
   xmlns:xi = "http://www.w3.org/2001/XInclude">

   <head>
      <title>TurboGears Templating Example</title>
   </head>

   <body>
      <xi:include href = "${name}.html" py:for = "name in pages" />
   </body>

</html>
在啟動伺服器之前,請確保 templates 資料夾中包含 heading.html、main.html 和 footer.html。在瀏覽器中輸入https://:8082/refinclude以獲取以下輸出
TurboGears - JSON 渲染
@expose() 裝飾器預設情況下會呈現 html 內容。但是,這可以設定為json 內容型別。TurboGears 透過tg.jsonify.JSONEncoder (**kwargs) 類支援 json 渲染。要渲染 json 資料,只需將 json 作為內容型別傳遞給 expose 裝飾器即可。
@expose('json')
def jsondata(self, **kwargs):
   return dict(hello = 'World')
如果在瀏覽器中輸入'/jsondata' URL,它將透過顯示以下內容進行響應:
{"hello": "World"}
jsonp 渲染
jsonp 代表 json with padding。它的工作原理類似於 json 輸出,只是它提供了一個 application/javascript 響應,並呼叫一個 javascript 函式,將控制器返回的所有值作為函式引數提供。
要啟用 jsonp 渲染,您必須首先將其追加到應用程式中的必需引擎列表中 - config/app_cfg.py -
base_config.renderers.append('jsonp')
按如下方式編寫您的 expose 裝飾器:
@expose('json')
@expose('jsonp')
def jsonpdata (self, **kwargs):
   return dict(hello = 'World')
訪問 /jsonpdata?callback = callme 時,您應該看到:
callme({"hello": "World"});
TurboGears - URL 層次結構
有時,Web 應用程式可能需要具有多個級別的 URL 結構。TurboGears 可以遍歷物件層次結構以找到可以處理您的請求的適當方法。
使用 gearbox “快速啟動” 的專案在專案的 lib 資料夾中有一個 BaseController 類。它可用作 'Hello/hello/lib/base.py'。它充當所有子控制器的基類。為了在應用程式中新增 URL 的子級,設計一個名為 BlogController 的子類,該類派生自 BaseController。
此 BlogController 有兩個控制器函式,index() 和 post()。兩者都旨在分別公開一個模板,即 blog.html 和 post.html。
注意 - 這些模板放在一個子資料夾中 - templates/blog
class BlogController(BaseController):

   @expose('hello.templates.blog.blog')
   def index(self):
      return {}

   @expose('hello.templates.blog.post')
   def post(self):
      from datetime import date
      now = date.today().strftime("%d-%m-%y")
      return {'date':now}
現在在 RootController 類(在 root.py 中)中宣告此類的物件,如下所示:
class RootController(BaseController):
   blog = BlogController()
其他頂級 URL 的控制器函式將像以前一樣存在於此類中。
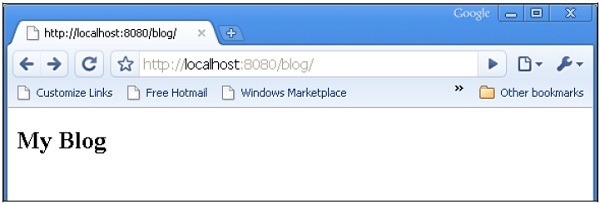
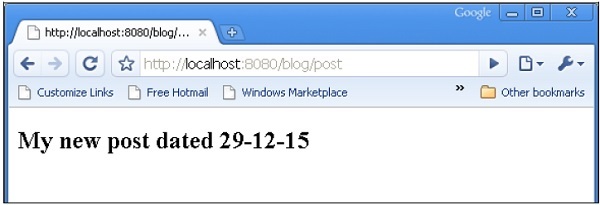
當輸入 URL https://:8080/blog/ 時,它將對映到 BlogController 類中的 index() 控制器函式。類似地,https://:8080/blog/post 將呼叫 post() 函式。
blog.html 和 post.html 的程式碼如下所示:
Blog.html

<html>
   <body>
      <h2>My Blog</h2>
   </body>
</html>

post.html

<html>
   <body>
      <h2>My new post dated $date</h2>
   </body>
</html>
當輸入 URL https://:8080/blog/ 時,它將生成以下輸出:
當輸入 URL https://:8080/blog/post 時,它將生成以下輸出:
TurboGears – ToscaWidgets 表單
任何 Web 應用程式最基本的一個方面是為使用者呈現使用者介面。HTML 提供了一個<form>標籤,用於設計介面。可以適當地使用表單元素,例如文字輸入、單選按鈕、選擇等。使用者輸入的資料以 Http 請求訊息的形式透過 GET 或 POST 方法提交到伺服器端指令碼。
伺服器端指令碼必須從 http 請求資料中重新建立表單元素。因此,為此目的,表單元素必須定義兩次 - 一次在 HTML 中,另一次在伺服器端指令碼中。
使用 HTML 表單的另一個缺點是難以(如果不是不可能的話)動態渲染表單元素。HTML 本身不提供任何方法來驗證使用者的輸入。
ToscaWidgets2
TurboGears 依賴於 ToscaWidgets2,這是一個靈活的表單渲染和驗證庫。使用 ToscaWidgets,我們可以在 Python 指令碼中定義表單欄位,並使用 HTML 模板渲染它們。也可以對 tw2 欄位應用驗證。
ToscaWidgets 庫是許多模組的集合。下面列出了一些重要的模組:
tw2.core - 它提供了核心功能。此模組中的 Widget 不適合終端使用者使用。
tw2.forms - 這是一個基本的表單庫。它包含用於欄位、欄位集和表單的小部件。
tw2.dynforms - 這包含動態表單功能。
tw2.sqla - 這是 SQLAlchemy 資料庫的介面。
tw2.forms
它包含一個 Form 類,作為自定義表單的基礎。有一個 TableForm 類,可用於在兩列表中渲染欄位。ListForm 在無序列表中呈現其欄位。
| 序號 | 欄位和描述 |
|---|---|
| 1 | TextField 單行文字輸入欄位 |
| 2 | TextArea 多行文字輸入欄位 |
| 3 | CheckBox 顯示帶標籤的可選中矩形框 |
| 4 | CheckBoxList 複選框的多選組 |
| 5 | RadioButton 用於選擇/取消選擇的切換按鈕 |
| 6 | RadioButtonList 一組互斥的單選按鈕 |
| 7 | PasswordField 類似於 Textfield,但輸入鍵不會顯示 |
| 8 | CalendarDatePicker 允許使用者選擇日期 |
| 9 | SubmitButton 提交表單的按鈕 |
| 10 | ImageButton 帶影像的單擊按鈕 |
| 11 | SingleSelectField 啟用從列表中選擇單個專案 |
| 12 | MultipleSelectField 啟用從列表中選擇多個專案 |
| 13 | FileField 用於上傳檔案的欄位 |
| 14 | EmailField 電子郵件輸入欄位 |
| 15 | URLField 輸入 URL 的欄位 |
| 16 | NumberField 數字微調框 |
| 17 | RangeField 數字滑塊 |
在下面的示例中,使用其中一些小部件構建了一個表單。雖然大多數這些小部件都在 tw2.forms 中定義,但 CalendarDateField 在 tw2.Dynforms 模組中定義。因此,這兩個模組以及 tw2.core 在開頭都被匯入了:
import tw2.core as twc
import tw2.forms as twf
import tw2.dynforms as twd
ToscaWidgets 表單是從tw2.forms.form基類派生的類。所需的 Widget 放在 Layout 物件中。在此示例中,使用TableLayout。Widget 在兩列表中呈現。第一列顯示標題,第二列顯示輸入或選擇欄位。
使用以下建構函式建立 TextField 物件:
twf.TextField(size, value = None)
如果未提及,TextField 物件將採用預設大小,並且最初為空白。在宣告 TextArea 物件時,可以提及行數和列數。
twf.TextArea("",rows = 5, cols = 30)
NumberField 物件是一個 TextField,它只能接受數字。在右側邊框上生成上下箭頭以增加或減少其中的數字。初始值也可以作為建構函式中的引數指定。
twf.NumberField(value)
在 CalendarDatePicker 框的右側,顯示一個日曆按鈕。按下時,會彈出一個日期選擇器。使用者可以在框中手動鍵入日期或從日期選擇器中選擇。
twd.CalendarDatePicker()
EmailField 物件呈現一個 TextField,但其中的文字必須採用電子郵件格式。
EmailID = twf.EmailField()
以下表單還具有 RadioButtonList。此類的建構函式包含一個 List 物件作為 options 引數的值。將為每個選項呈現一個單選按鈕。預設選擇由 value 引數指定。
twf.RadioButtonList(options = ["option1","option2"],value = option1)
CheckBoxList 為列表中的每個選項呈現複選框。
twf.CheckBoxList(options = [option1, option2, option3])
下拉列表在此 ToscaWidgets 庫中稱為 SingleSelectfield。對應於 options 引數的 List 物件中的專案構成下拉列表。可見標題設定為 prompt_text 引數的值。
twf.SingleSelectField(prompt_text = 'text', options=['item1', 'item2', 'item3'])
預設情況下,表單會顯示一個 Submit 按鈕,其標題為“儲存”。為了顯示其他標題,請建立 SubmitButton 物件並將其指定為 value 引數。
twf.SubmitButton(value = 'Submit')
表單提交到一個 URL,該 URL 指定為表單的 action 引數的值。預設情況下,表單資料透過 http POST 方法提交。
action = 'URL'
在以下程式碼中,使用上述解釋的小部件設計了一個名為 AdmissionForm 的表單。在 RootController 類之前將此程式碼新增到 root.py 中。
class AdmissionForm(twf.Form):
   class child(twf.TableLayout):
      NameOfStudent = twf.TextField(size = 20)
      AddressForCorrespondance = twf.TextArea("", rows = 5, cols = 30)
      PINCODE = twf.NumberField(value = 431602)
      DateOfBirth = twd.CalendarDatePicker()
      EmailID = twf.EmailField()
      Gender = twf.RadioButtonList(options = ["Male","Female"],value = 'Male')
      Subjects = twf.CheckBoxList(options = ['TurboGears', 'Flask', 'Django', 'Pyramid'])

      MediumOfInstruction = twf.SingleSelectField(prompt_text = 'choose',
         options = ['English', 'Hindi', 'Marathi', 'Telugu'])

      action = '/save_form'
      submit = twf.SubmitButton(value ='Submit')
現在將此程式碼儲存為 templates 目錄中的twform.html。
<!DOCTYPE html>
<html xmlns = "http://www.w3.org/1999/xhtml"
   xmlns:py = "http://genshi.edgewall.org/"
   lang = "en">

   <head>
      <title>TurboGears Form Example</title>
   </head>

   <body>
      <div id = "tw form">
         ${form.display(value = dict(title = 'default title'))}
      </div>
   </body>

</html>
在 RootController 類(在 root.py 中)中,新增以下控制器函式:
@expose('hello.templates.twform')
def twform(self, *args, **kw):
   return dict(page = 'twform', form = MovieForm)
在 AdmissionForm 類中,我們有stipulated/save_form作為操作 URL。因此,在 RootController 中新增save_form()函式。
@expose()
def save_movie(self, **kw):
   return str(kw)
確保伺服器正在執行(使用 gearbox serve)。在瀏覽器中輸入https://:8080/twform。
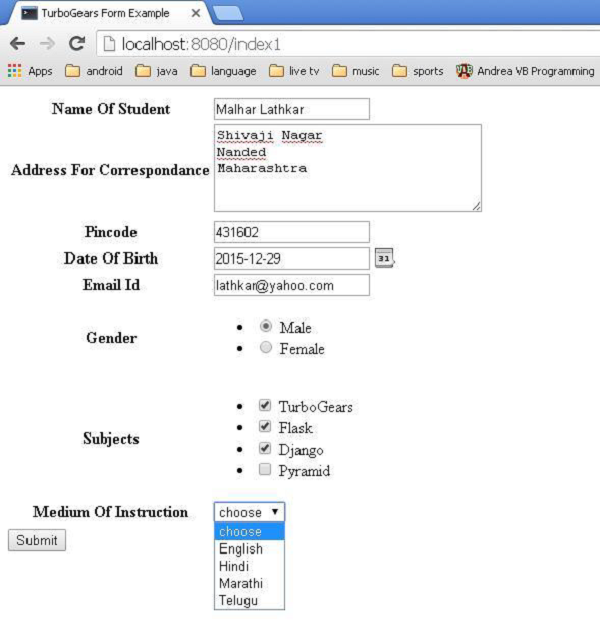
按下提交按鈕會將此資料釋出到save_form() URL,該 URL 將以字典物件的形式顯示錶單資料。
{
   'EmailID': u'lathkar@yahoo.com',
   'NameOfStudent': u'Malhar Lathkar',
   'Gender': u'Male',
   'PINCODE': u'431602',
   'DateOfBirth': u'2015-12-29',
   'Subjects': [u'TurboGears', u'Flask', u'Django'],
   'MediumOfInstruction': u'',
   'AddressForCorrespondance': u'Shivaji Nagar\r\nNanded\r\nMaharashtra'
}
TurboGears – 驗證
一個好的表單小部件庫應該具有輸入驗證功能。例如,使用者應該被迫在必填欄位中輸入資料,或者驗證電子郵件欄位是否包含有效的電子郵件,而無需使用任何其他程式設計方法(如 JavaScript 函式)進行驗證。
早期版本的 ToscaWidgets 表單庫用於依賴於 FormEncode 模組以進行驗證支援。ToscaWidgets2 現在在 tw2.core 模組中提供了內建的驗證支援。但是,仍然可以使用 FormEncode 驗證技術。
為了使 ToscaWidgets 表單服從驗證,使用@validate 裝飾器。
@validate(form, error_handler, validators)
'form'是要驗證的 ToscaWidgets 表單物件。
'error-handler'是用於處理表單錯誤的控制器方法。
'validators'是一個包含 FormEncode 驗證器的字典物件。
驗證器型別
tw2.core 模組包含一個驗證器類,其他驗證器從該類繼承。也可以基於它設計自定義驗證器。下面描述了一些重要的驗證器:
LengthValidator - 檢查值是否具有規定的長度。最小和最大限制由 min 和 max 引數定義。可以將長度低於和高於 min 和 max 的自定義訊息指定為 tooshort 和 toolong 引數。
tw2.core.LengthValidator(min = minval, max = maxval,
   msgs = { 'tooshort': (‘message for short length’),
   'toolong': (‘message for long length)})
RangeValidator − 通常與 RangeField 一起使用。它用於驗證數值欄位的值是否在最小值和最大值限制範圍內。可以自定義 tooshort 和 toolong 引數的訊息。
tw2.core.RangeValidator(min = minval, max = maxval,
   msgs = { 'tooshort': (‘message for short length’),
   'toolong': (‘message for long length)})
IntValidator − 此類派生自 RangeValidator。它通常用於驗證普通文字欄位中的輸入是否包含整數資料。可以設定最小值和最大值限制以及錯誤訊息。此外,可以將非整數輸入的錯誤訊息指定為 'notint' 引數。
tw2.core.IntValidator(msgs = {‘notint’:’Must be Integer’})
OneOfValidator − 此驗證器強制使用者只能從列表中可用的選項中選擇一個值。
tw2.core.OneOfValidator(values = [option1, option2,..],
   msgs = {‘notinlist’:’Not in List’}}
DateValidator − 非常有用,可以確保使用者輸入的日期有效。日期格式(預設為 Y-M-D)和錯誤訊息可自定義。還可以指定最小和最大日期限制。DateTimeValidator 也可用於驗證 DateTime 類的物件。
tw2.core.DateValidator(msgs = {format = ’%Y-%m-%d’,
   'baddatetime': ('baddate', ('Must follow date format $format_str'))}
EmailValidator − 根據有效的電子郵件地址驗證使用者輸入。此類繼承自更通用的 RegexValidator。
tw2.core.EmailValidator(msgs = {'badregex': ('bademail',
   ('Must be a valid email address')) }
UrlValidator − 此類也繼承自 RegexValidator。它驗證使用者輸入是否為有效的 URL。
tw2.core.UrlValidator(msgs = {'badregex': ('badurl', ('Must be a valid URL’)) }
MatchValidator − 確認一個欄位的值是否與另一個欄位匹配。這在要求使用者選擇和確認密碼欄位的情況下特別有用。下面顯示了 MatchValidator 的典型用法:
import tw2.core as twc
import tw2.forms as twf

  class AdmissionForm(twf.Form):
      class child(twf.TableLayout):
         validator = twc.MatchValidator('pw', 'pwconfirm')
         pw = twf.PasswordField()
         pwconfirm = twf.PasswordField()
還可以構建一個複合驗證器,如果任何一個檢查透過,則希望驗證成功。在其他情況下,您可能希望只有在輸入透過所有檢查時,驗證才成功。為此,tw2.core 提供了 Any 和 All 驗證器,它們是可擴充套件的 CompoundValidator 的子類。
TurboGears – 快閃記憶體訊息
TurboGears 提供了一個非常方便的訊息系統,用於以非干擾的方式向用戶通知資訊。tg 模組中的 TGFlash 類提供對快閃記憶體訊息的支援,這些訊息儲存在普通 cookie 中。此類支援在伺服器端以及透過 JavaScript 在客戶端獲取快閃記憶體訊息。
TGFlash 類的 render() 方法,當從 Python 本身使用時,可以從模板中呼叫以呈現快閃記憶體訊息。如果在 JavaScript 中使用,它會提供一個 WebFlash 物件。它公開 payload() 和 render() 方法來獲取當前快閃記憶體訊息並從 JavaScript 呈現它。
當使用 'quickstart' 建立 TurboGears 專案時,它有一個 Master.html 模板。它包含該快閃記憶體物件變數的定義。從控制器接收到的此快閃記憶體訊息的內容替換了此模板中標記的佔位符。
<py:with vars = "flash = tg.flash_obj.render('flash', use_js = False)">
   <div py:if = "flash" py:replace = "Markup(flash)" />
</py:with>
tg.flash_obj 是 WebFlash 物件,透過包含 master.html 模板,可以在任何呈現的模板內部使用它。此物件允許檢索當前快閃記憶體訊息並顯示它。
快閃記憶體訊息儲存在 cookie 中(預設名稱為 webflash),方法是使用 tg.flash() 方法。然後將訊息和狀態引數傳遞給它。
tg.flash('Message', 'status')
如果呼叫的 flash 方法執行重定向,則快閃記憶體將在重定向頁面中可見。如果方法直接公開模板,則快閃記憶體將在模板本身中可見。
可以透過將 CSS 樣式應用於狀態程式碼來自定義快閃記憶體訊息的外觀。'quickstarted' 專案包含錯誤、警告、資訊和確定狀態程式碼,這些程式碼由樣式表 public/css/style.css 自定義。還可以新增更多具有樣式的狀態程式碼。
#flash > .warning {
   color: #c09853;
   background-color: #fcf8e3;
   border-color: #fbeed5;
}

#flash > .ok {
   color: #468847;
   background-color: #dff0d8;
   border-color: #d6e9c6;
}

#flash > .error {
   color: #b94a48;
   background-color: #f2dede;
   border-color: #eed3d7;
}

#flash > .info {
   color: #3a87ad;
   background-color: #d9edf7;
   border-color: #bce8f1;
}
此外部樣式表需要包含在模板中:
<link rel = "stylesheet" type = "text/css" media = "screen"
   href = "${tg.url('/css/style.css')}" />
任何快閃記憶體訊息支援的配置都可以透過為 TGFlash 物件的 configure() 方法設定引數或在 app_cfg.py(在 config 資料夾中)中設定引數來實現。可配置的引數為:
| 序號 | 引數 & 描述 |
|---|---|
| 1 | flash.cookie_name 用於儲存快閃記憶體訊息的 cookie 的名稱。預設為 webflash。 |
| 2 | flash.default_status 如果未指定,則為預設訊息狀態(預設為 ok) |
| 3 | flash.template 呈現時用作 快閃記憶體模板。 |
| 4 | flash.allow_html 開啟/關閉 快閃記憶體訊息中的轉義,預設情況下不允許 HTML。 |
| 5 | flash.js_call 從 JavaScript 顯示快閃記憶體時將執行的 JavaScript 程式碼。預設為 webflash.render() |
| 6 | flash.js_template 用於替換快閃記憶體訊息的完整 JavaScript 支援的 string.Template 例項。 |
pop_payload() − 函式 獲取當前快閃記憶體訊息、狀態 和相關資訊。獲取快閃記憶體訊息將刪除 cookie。
render(container_id, use_js=True) − 在模板內呈現快閃記憶體訊息或為其提供 Javascript 支援。
container_id 是顯示訊息的 DIV,而 use_js 在將快閃記憶體呈現為 HTML 或用於 JavaScript 使用之間切換。
status − 只獲取當前快閃記憶體狀態,獲取快閃記憶體狀態將刪除 cookie。
message − 只獲取當前快閃記憶體訊息,獲取快閃記憶體訊息將刪除 cookie。
如何建立簡單的快閃記憶體訊息?
在以下示例中,在根控制器類中提供了 flash() 方法。它呼叫一個 flash() 訊息,該訊息呈現給公開的模板 flash.html
from hello.lib.base import BaseController
from tg import expose, flash, redirect, request

class RootController(BaseController):
   @expose('hello.templates.flash')
   def flash(self, user = None):

      if user:
         flash(message = "Welcome "+user,status = "ok")
      else:
         flash(message = "Welcome Guest",status = "info")
      return {}
在 templates 資料夾中建立 flash.html 的程式碼如下
<html xmlns = "http://www.w3.org/1999/xhtml"
   xmlns:py = "http://genshi.edgewall.org/"
   xmlns:xi = "http://www.w3.org/2001/XInclude">

   <head>
      <title>TurboGears 2.3: Flash messages>/title>
      <link rel = "stylesheet" type = "text/css" media = "screen"
         href = "${tg.url('/css/style.css')}" />

      <py:with vars = "flash = tg.flash_obj.render('flash', use_js = False)">
         <div py:if = "flash" py:replace = "Markup(flash)" />
      </py:with>

   </head>

   <body>
      <h2>Hello TurboGears</h2>
   </body>

</html>
啟動伺服器並在瀏覽器中輸入 https://:8080/flash?user=MVL
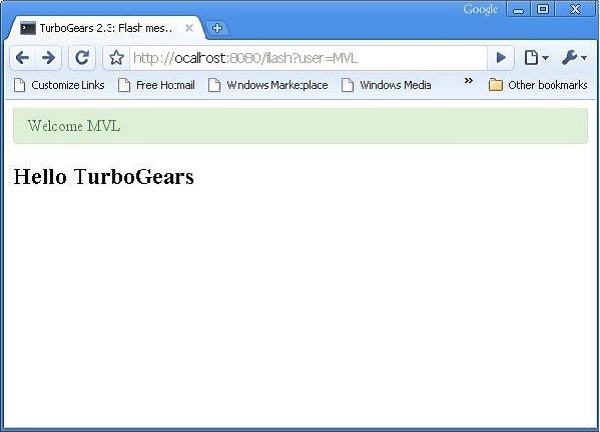
將 URL 更改為 https://:8080/flash 並檢視快閃記憶體訊息,其格式根據 style.css 中的定義有所不同。

TurboGears – Cookie 和會話
通常需要儲存與使用者瀏覽器關聯的簡單瀏覽資料。會話是最常用的技術。會話表示不需要以更持久的方式(如磁碟檔案或資料庫)儲存的資料。
但是,TurboGears 中的會話資料可以由檔案系統、資料庫或雜湊 cookie 值支援。少量會話資料通常儲存在 cookie 中,但對於大量會話資料,則使用 MemCache。
MemCache 是一個系統級守護程序。它提供對快取資料的快速訪問,並且具有極強的可擴充套件性。但是,它僅適用於安全伺服器,因此必須由系統管理員維護和保護。
Beaker 在會話管理中的作用
TurboGears 使用 Beaker 進行會話管理。gearbox 快速啟動的專案預設配置為使用雜湊 cookie 儲存會話資料。
每次客戶端連線時,會話中介軟體(Beaker)都會使用在配置檔案中定義的 cookie 名稱檢查 cookie。如果找不到 cookie,它將在瀏覽器中設定。在所有後續訪問中,中介軟體將找到 cookie 並使用它。
為了啟用會話管理,應透過以下匯入語句將會話類合併到專案中:
from tg import session
在會話變數中儲存資料:
session[‘key’] = value
session.save()
檢索會話變數:
return session[‘key’]
請注意,您需要顯式儲存會話才能將您的鍵儲存在該會話中。
會話物件的 delete() 方法將擦除所有使用者會話:
session.delete()
儘管在任何給定的生產環境中刪除所有使用者會話並不常見,但您通常會在完成可用性或功能測試後執行此操作以進行清理。
下面是一個演示會話的簡單示例。RootController 類有一個 setsession() 方法,該方法設定一個會話變數。
from hello.lib.base import BaseController
from tg import expose, session
class RootController(BaseController):

   @expose()
   def setsession(self):
      session['user'] = 'MVL'
      session.save()

      str = "<b>sessionVariable set to "+session['user']
      str = str+"<br><a href = '/getsession'>click here to retrieve</a></b>"
      return str

   @expose()
   def getsession(self):
      return "<b>value of session variable retrieved " +session['user'] +"</b>"
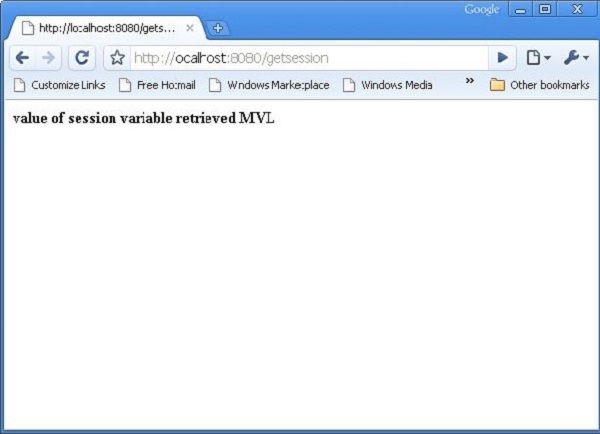
輸入 https://:8080/setsession

瀏覽器中的連結指向 https://:8080/getsession,它檢索並顯示會話變數:
TurboGears – 快取
為了提高 Web 應用程式的效能,尤其是在涉及冗長操作時,會使用快取技術。TurboGears 提供兩種型別的快取技術:
全頁快取
它在 HTTP 協議級別工作,透過讓使用者的瀏覽器或中間代理伺服器(如 Squid)攔截請求並返回檔案的快取副本,從而避免對伺服器的整個請求。
應用程式級快取
這在應用程式伺服器內工作,以快取計算出的值,通常是複雜資料庫查詢的結果,以便將來的請求可以避免重新計算這些值。對於 Web 應用程式,應用程式級快取提供了一種靈活的方式來快取複雜查詢的結果,以便給定控制器方法的總負載可以減少到幾個使用者特定或情況特定的查詢,以及模板的渲染開銷。
應用程式級快取
如前所述,'quickstarted' TurboGears 專案配置為啟用 Beaker 包以支援快取。Beaker 支援以下用於快取儲存的後端:
memory − 用於每個程序儲存。它非常快。
filesystem − 每個程序儲存以及多程序。
DBM 資料庫 − 每個程序、多程序,速度相當快。
SQLAlchemy 資料庫 − 每個資料庫伺服器儲存。與上述選項相比,速度較慢。
Memcached − 基於多伺服器記憶體的快取。
控制器快取
對於快速控制器快取,可以使用 cached() 裝飾器。整個控制器主體根據請求的各種引數進行快取。tg.decorators.cached() 裝飾器的定義如下
tg.decorators.cached(key, expire, type,
   query-args, cache_headers, invalidate_on_startup, cache_response)
引數的描述如下:
| 序號 | 引數 & 描述 |
|---|---|
| 1 | key 指定用於生成快取鍵的控制器引數。 |
| 2 | expire 快取過期前的時間(秒),預設為“永不過期”。 |
| 3 | Type dbm、memory、file、memcached 或 None。 |
| 4 | cache_headers 指示響應頭的標頭名稱元組。 |
| 5 | invalidate_on_startup 如果為 True,則每次應用程式啟動或重新啟動時都會使快取失效。 |
| 6 | cache_response 響應是否應快取,預設為 True。 |
以下是一個控制器快取的示例:
@cached(expire = 100, type = 'memory')
@expose()
def simple(self):
   return "This is a cached controller!"
模板級快取
如果 Genshi 模板引擎的內容沒有更改,則它會從快取中檢索模板。此快取的預設大小為 25。預設情況下,模板的自動重新載入為真。為了提高效能,可以在 app_cfg.py 中進行以下設定:
[app:main]
genshi.max_cache_size = 100
auto_reload_templates = false
要快取模板,您只需從呈現快取模板的控制器返回 tg_cache 選項即可。
tg_cache 是一個字典,它接受以下鍵:
key − 快取鍵。預設值:None。
expire − 快取必須保持活動狀態的時間。預設值:永不過期
型別 − memory, dbm, memcached。預設值:dbm。
以下示例說明了模板快取 -
@expose(hello.templates.user')
def user(self, username):
   return dict(user = username, tg_cache = dict(key = user, expire = 900))
TurboGears – SQLAlchemy
雖然可以在 TurboGears 應用程式中使用 SQL 對任何關係資料庫執行 CRUD 操作,但建議使用 SQLAlchemy,這是一個強大的 Python 工具包,是一個強大的物件關係對映器,它為應用程式開發人員提供了 SQL 的全部功能和靈活性。除了透過 SQLAlchemy 支援基於 SQL 的資料庫外,TurboGears 還透過 Ming 支援 MongoDB 資料庫。在本節中,將討論 SQLAlchemy 的功能。
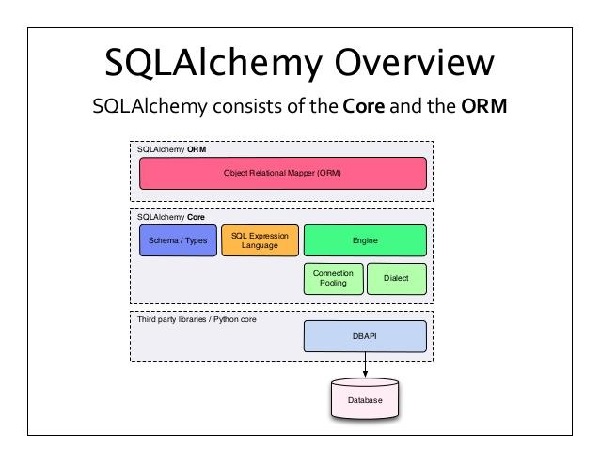
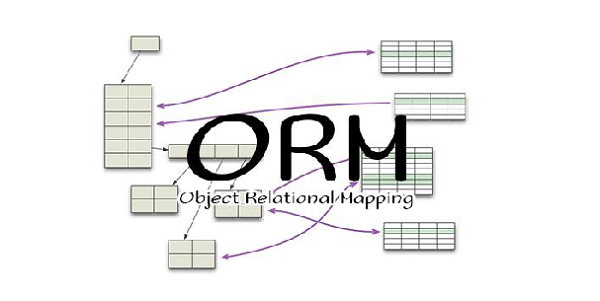
什麼是 ORM(物件關係對映)?
大多數程式語言平臺都是面向物件的。另一方面,RDBMS 伺服器中的資料儲存為表。物件關係對映是一種將物件引數對映到底層 RDBMS 表結構的技術。ORM API 提供執行 CRUD 操作的方法,而無需編寫原始 SQL 語句。
當使用 gearbox 工具包中的“quickstart”命令建立 TurboGears 專案時,以下配置設定預設情況下啟用 SQLAlchemy 支援 -
config['use_sqlalchemy'] = True
config['sqlalchemy.url'] = 'sqlite:///devdata.db'
“quickstarted”專案還在其中建立了一個 models 包。例如,“Hello”專案將擁有 Hello\hello\model。在此包中建立了以下檔案 -
__init__.py − 這是設定資料庫訪問的地方。應用程式的模型物件在此模組中匯入。它還具有 DBSession - 一個全域性會話管理器,以及一個 DeclarativeBase,它是所有模型類的基類。
auth.py − 這是定義身份驗證堆疊使用的模型的地方。其他資料庫模型儲存在此包中,作為單獨的模組,並在 __init__.py 中新增。
TurboGears – 建立模型
讓我們新增一個學生模型,它將在我們的sqlite資料庫中設定一個學生表。
Hello\hello\model\student.py
from sqlalchemy import *
from sqlalchemy.orm import mapper, relation, relation, backref
from sqlalchemy import Table, ForeignKey, Column
from sqlalchemy.types import Integer, Unicode, DateTime

from hello.model import DeclarativeBase, metadata, DBSession
from datetime import datetime

class student(DeclarativeBase):
   __tablename__ = 'student'

   uid = Column(Integer, primary_key = True)
   name = Column(Unicode(20), nullable = False, default = '')
   city = Column(Unicode(20), nullable = False, default = '')
   address = Column(Unicode(100), nullable = False, default = '')
   pincode = Column(Unicode(10), nullable = False, default = '')
現在將此模型新增到init_model()函式中,該函式位於__init__.py內。此函式已包含其中的 auth 模型。在它下面新增我們的學生模型。
# Import your model modules here.
from hello.model.auth import User, Group, Permission
from hello.model.student import student
如果希望在設定模型時使用某些資料初始化表,請將其新增到 websetup 包中的 bootstrap.py 中。在bootstrap()函式中新增以下語句。
s1 = model.student()
s1.name = 'M.V.Lathkar'
s1.city = 'Nanded'
s1.address = 'Shivaji Nagar'
s1.pincode = '431602'

model.DBSession.add(s1)
model.DBSession.flush()
transaction.commit()
透過執行 gearbox 的 setup-app 命令初始化模型 -
gearbox setup-app
SQLAlchemy 的 Session 物件管理 ORM 物件的所有永續性操作。
TurboGears – CRUD 操作
以下會話方法執行 CRUD 操作 -
DBSession.add(模型物件) − 將記錄插入對映表。
DBSession.delete(模型物件) − 從表中刪除記錄。
DBSession.query(模型).all() − 從表中檢索所有記錄(對應於 SELECT 查詢)。
您可以透過使用 filter 屬性將過濾器應用於檢索到的記錄集。例如,為了檢索 students 表中 city = 'Hyderabad' 的記錄,請使用以下語句 -
DBSession.query(model.student).filter_by(city = ’Hyderabad’).all()
我們現在將瞭解如何透過控制器 URL 與模型互動。
首先讓我們設計一個 ToscaWidgets 表單來輸入學生的資料
Hello\hello\controllers.studentform.py
import tw2.core as twc
import tw2.forms as twf

class StudentForm(twf.Form):
   class child(twf.TableLayout):
      name = twf.TextField(size = 20)
      city = twf.TextField()
      address = twf.TextArea("",rows = 5, cols = 30)
      pincode = twf.NumberField()

   action = '/save_record'
   submit = twf.SubmitButton(value = 'Submit')
在 RootController(Hello 應用程式的 root.py)中,新增以下函式對映“/add”URL -
from hello.controllers.studentform import StudentForm

class RootController(BaseController):
   @expose('hello.templates.studentform')
   def add(self, *args, **kw):
      return dict(page='studentform', form = StudentForm)
將以下 HTML 程式碼另存為模板資料夾中的studentform.html -
<!DOCTYPE html>
<html xmlns = "http://www.w3.org/1999/xhtml"
   xmlns:py = "http://genshi.edgewall.org/"
   lang = "en">

   <head>
      <title>Student Registration Form</title>
   </head>

   <body>
      <div id = "getting_started">
         ${form.display(value = dict(title = 'Enter data'))}
      </div>
   </body>

</html>
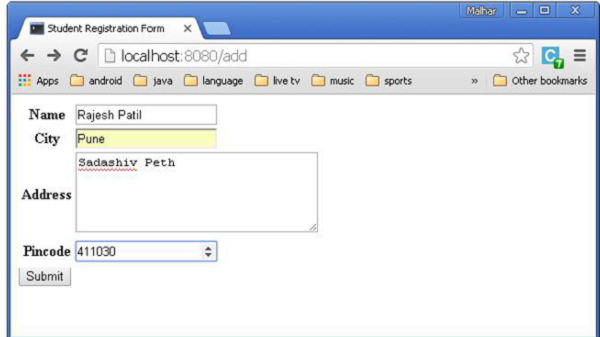
在啟動伺服器後,在瀏覽器中輸入https://:8080/add。以下學生資訊表單將在瀏覽器中開啟 -
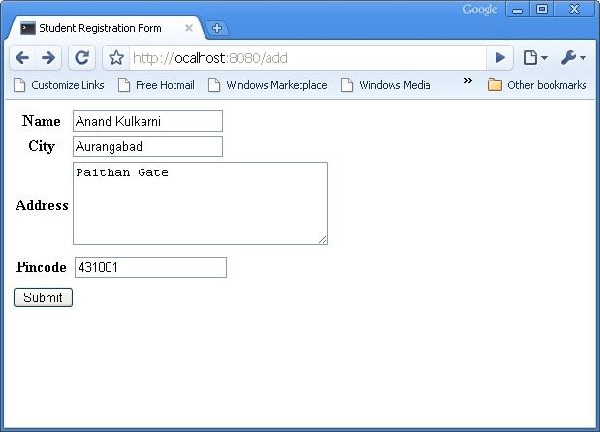
上面表單設計為提交到'/save_record' URL。因此,需要在root.py中新增save_record()函式來公開它。來自 studentform 的資料由此函式作為dict()物件接收。它用於在學生模型底層的學生表中新增新記錄。
@expose()
#@validate(form = AdmissionForm, error_handler = index1)
def save_record(self, **kw):
newstudent = student(name = kw['name'],city = kw['city'],
address = kw['address'], pincode = kw['pincode'])
DBSession.add(newstudent)
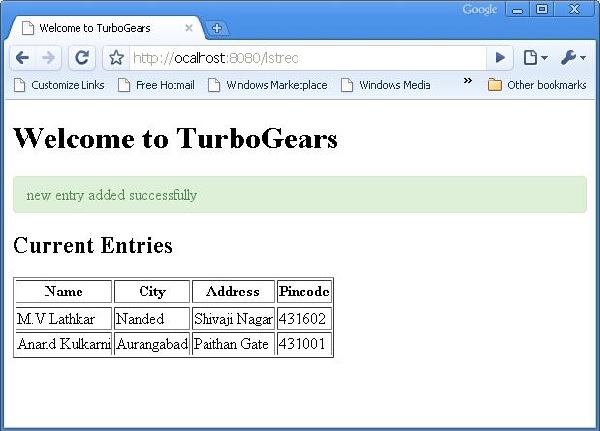
flash(message = "new entry added successfully")
redirect("/listrec")
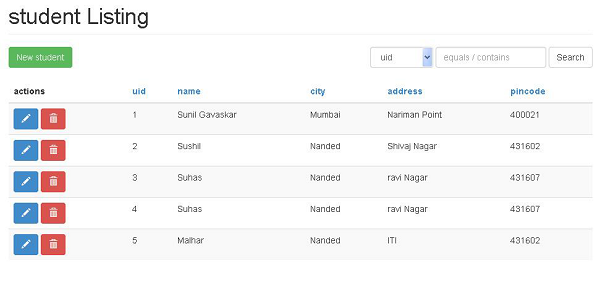
請注意,成功新增後,瀏覽器將重定向到'/listrec' URL。此 URL 由listrec() 函式公開。此函式選擇學生表中的所有記錄,並將它們以 dict 物件的形式傳送到 studentlist.html 模板。此listrec()函式如下 -
@expose ("hello.templates.studentlist")
def listrec(self):
   entries = DBSession.query(student).all()
   return dict(entries = entries)
studentlist.html 模板使用 py:for 指令迭代 entries 字典物件。studentlist.html 模板如下 -
<html xmlns = "http://www.w3.org/1999/xhtml"
   xmlns:py = "http://genshi.edgewall.org/">

   <head>
      <link rel = "stylesheet" type = "text/css" media = "screen"
         href = "${tg.url('/css/style.css')}" />
      <title>Welcome to TurboGears</title>
   </head>

   <body>
      <h1>Welcome to TurboGears</h1>

      <py:with vars = "flash = tg.flash_obj.render('flash', use_js = False)">
         <div py:if = "flash" py:replace = "Markup(flash)" />
      </py:with>

      <h2>Current Entries</h2>

      <table border = '1'>
         <thead>
            <tr>
               <th>Name</th>
               <th>City</th>
               <th>Address</th>
               <th>Pincode</th>
            </tr>
         </thead>

         <tbody>
            <py:for each = "entry in entries">
               <tr>
                  <td>${entry.name}</td>
                  <td>${entry.city}</td>
                  <td>${entry.address}</td>
                  <td>${entry.pincode}</td>
               </tr>
            </py:for>
         </tbody>

      </table>

   </body>
</html>
現在重新訪問https://:8080/add並在表單中輸入資料。透過單擊提交按鈕,它將把瀏覽器帶到 studentlist.html。它還會顯示“新記錄新增成功”訊息。
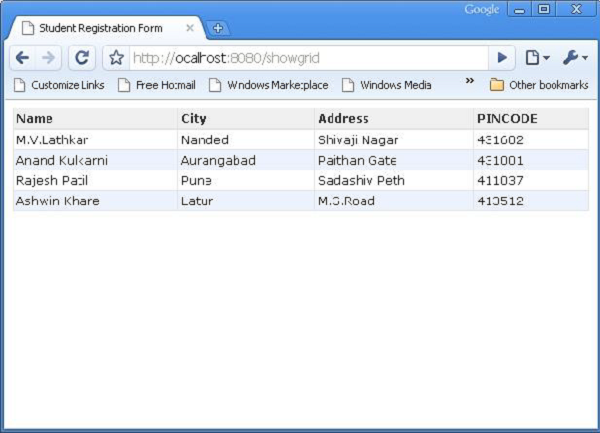
TurboGears – 資料網格
ToscaWidgets 包含一個 DataGrid 控制元件,它提供了一種以表格形式快速呈現資料的方法。DataGrid 物件宣告如下 -
from tw2.forms import DataGrid
student_grid = DataGrid(fields = [('Name', 'name'),('City', 'city'),
   ('Address','address'), ('PINCODE', 'pincode')])
現在,showgrid() 函式檢索學生表中的所有記錄並將資料公開到 grid.html 模板。首先是 showgrid() 函式的程式碼,然後是 grid.html 程式碼 -
showgrid()
@expose('hello.templates.grid')
def showgrid(self):
   data = DBSession.query(student).all()
   return dict(page = 'grid', grid = student_grid, data = data)
grid.html
<!DOCTYPE html>
<html xmlns = "http://www.w3.org/1999/xhtml"
   xmlns:py = "http://genshi.edgewall.org/"
   lang = "en">

   <head>
      <title>Student Registration Form</title>
   </head>

   <body>
      <div id = "getting_started">
         <div>${grid.display(value = data)}</div>
      </div>
   </body>

</html>
當在瀏覽器中輸入https://:8080/showlist URL 時,將顯示以下表格資料 -
TurboGears – 分頁
TurboGears 提供了一個名為 paginate() 的便捷裝飾器,用於將輸出劃分為頁面。此裝飾器與 expose() 裝飾器組合使用。@Paginate() 裝飾器將查詢結果的字典物件作為引數。此外,每頁記錄數由 items_per_page 屬性的值決定。確保將 paginate 函式從 tg.decorators 匯入到您的程式碼中。
將 root.py 中的 listrec() 函式重寫如下 -
from tg.decorators import paginate
class RootController(BaseController):
   @expose ("hello.templates.studentlist")
   @paginate("entries", items_per_page = 3)

   def listrec(self):
      entries = DBSession.query(student).all()
      return dict(entries = entries)
每頁專案設定為三個。
在 studentlist.html 模板中,透過在 py:for 指令下方新增 tmpl_context.paginators.entries.pager() 來啟用頁面導航。此模板的程式碼應如下 -
<html xmlns = "http://www.w3.org/1999/xhtml"
   xmlns:py = "http://genshi.edgewall.org/">

   <head>
      <link rel = "stylesheet" type = "text/css" media = "screen"
         href = "${tg.url('/css/style.css')}" />
      <title>Welcome to TurboGears</title>
   </head>

   <body>

      <h1>Welcome to TurboGears</h1>

      <py:with vars = "flash = tg.flash_obj.render('flash', use_js = False)">
         <div py:if = "flash" py:replace = "Markup(flash)" />
      </py:with>

      <h2>Current Entries</h2>

      <table border = '1'>
         <thead>
            <tr>
               <th>Name</th>
               <th>City</th>
               <th>Address</th>
               <th>Pincode</th>
            </tr>
         </thead>

         <tbody>
            <py:for each = "entry in entries">
               <tr>
                  <td>${entry.name}</td>
                  <td>${entry.city}</td>
                  <td>${entry.address}</td>
                  <td>${entry.pincode}</td>
               </tr>
            </py:for>

            <div>${tmpl_context.paginators.entries.pager()}</div>
         </tbody>

      </table>

   </body>

</html>
在瀏覽器中輸入https://:8080/listrec。顯示錶中第一頁的記錄。在此表的頂部,還可以看到指向頁碼的連結。

如何為資料網格新增分頁支援
也可以為資料網格新增分頁支援。在以下示例中,分頁資料網格設計為顯示操作按鈕。為了啟用操作按鈕,資料網格物件使用以下程式碼構建 -
student_grid = DataGrid(fields = [('Name', 'name'),('City', 'city'),
   ('Address','address'), ('PINCODE', 'pincode'),
   ('Action', lambda obj:genshi.Markup('<a
      href = "%s">Edit</a>' % url('/edit',
      params = dict(name = obj.name)))) ])
此處,操作按鈕連結到資料網格中每行名稱引數。
將showgrid()函式重寫如下 -
@expose('hello.templates.grid')
@paginate("data", items_per_page = 3)

def showgrid(self):
   data = DBSession.query(student).all()
   return dict(page = 'grid', grid = student_grid, data = data)
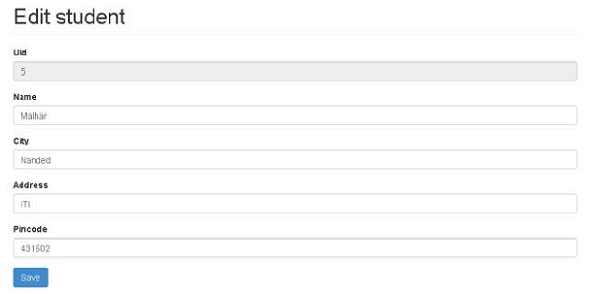
瀏覽器顯示分頁資料網格如下 -

透過單擊第三行中的“編輯”按鈕,它將重定向到以下 URLhttps://:8080/edit?name=Rajesh+Patil
TurboGears – 管理員訪問
TurboGears 提供了 tgext.admin 擴充套件,該擴充套件由 tgext.crud 和 sprox 提供支援。此 Sprox 是一個用於直接從資料庫模式建立 Web 小部件的包。這可用於自動建立簡單的管理頁面,並且是為新快速啟動的應用程式中的 /admin 頁面提供支援的工具包。
預設情況下,管理員將為專案模型 __init__.py 中匯入的所有模型提供自動生成的訪問許可權。
如何建立 TurboGears 管理員
預設的 TurboGears 管理員作為 AdminController 類的物件建立 -
from tgext.admin.controller import AdminController

class RootController(BaseController):
   admin = AdminController(model, DBSession, config_type = TGAdminConfig)
這將使用預設的 TurboGears 管理員配置為所有模型建立管理員。
透過管理器,在設定階段建立了一個使用者。現在,可以訪問https://:8080/admin處的 TurboGears 管理員。第一次訪問此頁面時,將要求進行身份驗證。您可以簡單地提供 setup-app 命令為我們建立的使用者帳戶的使用者名稱和密碼 -
Username: manager
Password: managepass
為了登入到快速啟動的專案,請將以下函式新增到 RootController 類(controllers/root.py)。
from hello.lib.base import BaseController
from tg import expose, flash, redirect, request,url, lurl
from tg import redirect, validate
from hello import model
from hello.model import DBSession
from tgext.admin.tgadminconfig import BootstrapTGAdminConfig as TGAdminConfig
from tgext.admin.controller import AdminController
from tg.exceptions import HTTPFound

class RootController(BaseController):
   admin = AdminController(model, DBSession, config_type =  TGAdminConfig)

   @expose('hello.templates.index')
   def index(self):
      return dict(page = 'index')

   @expose('hello.templates.login')
   def login(self, came_from = lurl('/'), failure = None,    login = ''):

      if failure is not None:
         if failure == 'user-not-found':
            flash(_('User not found'), 'error')
         elif failure == 'invalid-password':
            flash(_('Invalid Password'), 'error')

      login_counter = request.environ.get('repoze.who.logins', 0)

      if failure is None and login_counter > 0:
         flash(_('Wrong credentials'), 'warning')

      return dict(page = 'login', login_counter = str(login_counter),
         came_from = came_from, login = login)
   @expose()

   def post_login(self, came_from = lurl('/')):
      if not request.identity:

         login_counter = request.environ.get('repoze.who.logins', 0) + 1
            redirect('/login', params = dict(came_from = came_from,
            __logins = login_counter))

         userid = request.identity['repoze.who.userid']
         flash(('Welcome back, %s!') % userid)

         return HTTPFound(location = came_from)
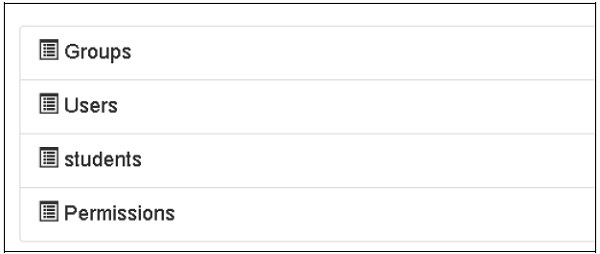
啟動伺服器並訪問https://:8080/login後,登入到“快速啟動”應用程式,然後輸入上面顯示的管理器憑據。瀏覽器將顯示如下所示的管理員頁面 -
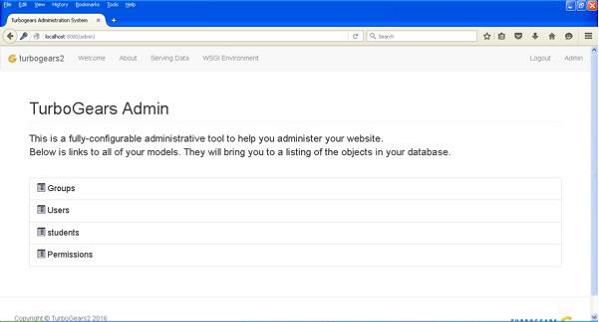
此頁面顯示在此應用程式中建立的所有模型。您可以單擊任何模型以檢視其中的條目列表 -
此資料網格頂部的“新建”按鈕允許新增記錄。同樣,此資料網格操作列中還提供了用於編輯和刪除記錄的操作按鈕。還顯示了一個搜尋框以有條件地選擇記錄。
TurboGears – 授權和身份驗證
TurboGears 應用程式由 gearbox 工具包的 quickstart 和 setup-app 選項建立,預設情況下啟用了授權和身份驗證支援。auth.py 中宣告的模型根據 bootstrap.py 中分配的值進行設定和初始化。
以下模型在 auth.py 中宣告 -
使用者模型
使用者模型包含 tg_user 表的設計。此表由 repose.who 包使用。此 repose.who 包是一個功能強大且可擴充套件的 WSGI 應用程式身份驗證庫。使用者模型的結構如下 -
class User(DeclarativeBase):

"""
   __tablename__ = 'tg_user'

   user_id = Column(Integer, autoincrement = True, primary_key=True)
   user_name = Column(Unicode(16), unique = True, nullable = False)
   email_address = Column(Unicode(255), unique = True,nullable=False)

   display_name = Column(Unicode(255))
   _password = Column('password', Unicode(128))
   created = Column(DateTime, default = datetime.now)
此組模型包含 tg_group 表的定義。其定義在 auth.py 中給出,如下所示 -
class Group(DeclarativeBase):
   __tablename__ = 'tg_group'

   group_id = Column(Integer, autoincrement = True,primary_key = True)
   group_name = Column(Unicode(16),unique = True,nullable = False)
   display_name = Column(Unicode(255))
   created = Column(DateTime, default = datetime.now)
還設定了另一個模型許可權,其中包含許可權定義。
class Permission(DeclarativeBase):
   __tablename__ = 'tg_permission'

   permission_id = Column(Integer,autoincrement = True,primary_key = True)
   permission_name = Column(Unicode(63), unique = True, nullable = False)
   description = Column(Unicode(255))
在設定模型時,以下資料新增到這些表中 -
u = model.User()
u.user_name = 'manager'
u.display_name = 'Example manager'
u.email_address = 'manager@somedomain.com'
u.password = 'managepass'

model.DBSession.add(u)
g = model.Group()
g.group_name = 'managers'
g.display_name = 'Managers Group'
g.users.append(u)

model.DBSession.add(g)
p = model.Permission()
p.permission_name = 'manage'
p.description = 'This permission gives an administrative right'
p.groups.append(g)

model.DBSession.add(p)
u1 = model.User()
u1.user_name = 'editor'
u1.display_name = 'Example editor'
u1.email_address = 'editor@somedomain.com'
u1.password = 'editpass'

model.DBSession.add(u1)
謂詞模型
tg 包中的謂詞模組包含謂詞檢查器的定義。謂詞是使用者能夠訪問請求的源必須滿足的條件。這樣的謂詞或條件可以由多個謂片語成 - 這些稱為複合謂詞。操作控制器或控制器可能只有一個謂詞,無論是單一的還是複合的。
如果使用者未登入或沒有適當的許可權,則此謂詞檢查器將丟擲 401(HTTP 未授權),repoze.who 中介軟體會捕獲此錯誤以顯示登入頁面,允許使用者登入,並在使用者完成操作後將其重定向回正確的頁面。
tg.predicates 模組中定義的不同條件或謂詞為 -
| 序號 | tg.predicates 模組和描述 |
|---|---|
| 1 | All 檢查是否滿足所有指定的謂詞 |
| 2 | Any 檢查是否滿足指定的謂詞中的至少一個 |
| 3 | is_user 檢查已認證使用者的使用者名稱是否為指定的使用者 |
| 4 | in_group 檢查使用者是否屬於特定組。 |
| 5 | in_all_groups 檢查使用者是否屬於所有指定的組。 |
| 6 | in_any_group 檢查使用者是否屬於指定的組中的至少一個。 |
| 7 | is_anonymous 檢查當前使用者是否為匿名使用者。 |
| 8 | has_permission 檢查當前使用者是否具有指定的許可權。 |
| 9 | has_all_permissions 檢查當前使用者是否已授予所有指定的許可權。 |
| 10 | has_any_permission 檢查使用者是否具有指定的許可權中的至少一個。 |
例如,如果您有一個謂詞,即授予屬於客戶組的使用者訪問許可權,則可以使用以下內建謂詞檢查器 -
from tg.predicates import in_group
p in_group(‘customers’)
以下謂詞檢查器將授予“root”使用者或任何具有“manage”許可權的使用者訪問許可權 -
from tg.predicates import Any, is_user, has_permission
p = Any(is_user('root'), has_permission('manage'),
   sg = 'Only administrators can remove blog posts')
TurboGears - 使用 MongoDB
TurboGears 也支援 MongoDB 文件資料庫。它使用 Ming,一個物件文件對映 API。Ming 的用法與 SQLAlchemy 非常相似。Ming 查詢語言使得將基於 SQLAlchemy 的 TurboGears 專案移植到 Ming 成為可能。
什麼是 PyMongo
PyMongo 是一個 Python 發行版,包含用於處理 MongoDB 的工具。Ming 擴充套件了 PyMongo,提供了以下功能:
- 宣告式模型
- 模式驗證和轉換
- 模式演變
- 純記憶體 MongoDB 實現
- 工作單元
- 標識對映
- 一對多、多對一和多對多關係
首先,您需要下載並安裝 MongoDB。最新的 MongoDB 發行版可以從 https://www.mongodb.org/downloads 下載
在 Windows 上,透過提供 -dbpath 選項啟動 MongoDB 伺服器:
C:\mongodb\bin>Mongod --dbpath d:\mongo
D:\mongo 資料夾被指定用於儲存 MongoDB 資料庫。伺服器開始監聽 https://:27017。現在,要啟動 MongoDB shell,請使用以下命令:
C:\mongodb\bin>Mongo
我們的 MongoDB 環境現在已準備就緒。
現在使用 -ming 選項建立一個 TurboGears 專案:
gearbox quickstart --ming Hello
此快速啟動專案將提供一個身份驗證和授權層,類似於 SQLAlchemy 版本中提供的層。此應用程式現在將嘗試連線到本地機器上埠 27017 上的伺服器。專案資料夾中的 development.ini 檔案包含以下設定:
ming.url = mongodb://:27017/
ming.db = hello
使用以下命令設定專案:
Python setup.py develop
專案資料夾包含 models 子資料夾,其中包含以下檔案:
__init__.py - 這是設定資料庫訪問的地方。您的集合應該匯入到此模組中。例如,我們將在此包中新增 student 集合。
session.py - 此檔案定義資料庫連線的會話。每次必須宣告MappedClass以指定會話來執行查詢時,都需要匯入此檔案。
auth.py - 如果您在快速入門中啟用了身份驗證和授權,則會建立此檔案。它定義了三個集合repoze.who,它進一步依賴於:User、Group 和 Permission。
定義您的集合
預設情況下,TurboGears 以宣告方式配置 Ming。這類似於 SQLAlchemy 的宣告式支援,需要每個模型都繼承自 MappedClass 類。
MappedClass 要求在內部提供一個 __mongometa__ 子類,該子類進一步提供有關儲存文件的集合名稱以及用於儲存文件的會話的詳細資訊。
MappedClass 還包含文件中欄位的定義。Ming 的 odm 模組包含不同型別欄位屬性的定義:
- FieldProperty
- ForeignIdProperty
- RelationProperty
ming.schema 模組定義了以下資料型別:
- ming.schema.Anything
- ming.schema.Array
- ming.schema.Binary
- ming.schema.Bool
- ming.schema.Float
- ming.schema.Int
- ming.schema.ObjectId
- ming.schema.Scalar
- ming.schema.String
要在此模型中新增 student 集合,請將以下程式碼另存為 hello/models 資料夾中的 student.py。
Hello\models\student.py
from ming import schema
from ming.odm import MappedClass
from ming.odm import FieldProperty, ForeignIdProperty
from hello.model import DBSession

Class student(MappedClass):
   class __mongometa__:
      session = DBSession
      name = 'student'

   _id = FieldProperty(schema.ObjectId)
   name = FieldProperty(schema.String(required = True))
   city = FieldProperty(schema.String(if_missing = ''))
   address = FieldProperty(schema.String(if_missing = ''))
   pincode = FieldProperty(schema.String(if_missing = ''))
最後,將此模型包含在 hello\models\__init__.py 中
# Import your model modules here.
from hello.model.auth import User, Group, Permission
from hello.model.student import student
要設定這些模型,請執行以下 gearbox 命令:
Gearbox setup-app
使用以下 gearbox 命令啟動伺服器:
Gearbox serve –reload –debug
開啟此應用程式的主頁 (https://:8080/) 並使用管理員憑據登入。此應用程式的管理員頁面將顯示設定的模型列表。(以管理員身份登入,密碼 managepass)
集合的建立也可以在 MongoDB Web 介面以及 MongoDB shell 中驗證。
ODMSession 用於使用以下函式執行多個數據庫操作:
- model.query.find()
- model.query.find_and_modify()
- model.remove()
- model.update()
- model.flush()
設計 ToscoWidget 表單
我們現在將設計一個 ToscoWidget 表單來輸入學生資料並將其新增到 student 模型的基礎表中。
以下是建立 studentform.py 的程式碼:
Hello\controllers\studentform.py
import tw2.core as twc
import tw2.forms as twf

class StudentForm(twf.Form):

   class child(twf.TableLayout):
      name = twf.TextField(size = 20)
      city = twf.TextField()
      address = twf.TextArea("",rows = 5, cols = 30)
      pincode = twf.NumberField()

   action = '/save_record'
   submit = twf.SubmitButton(value = 'Submit')
在應用程式的 Rootcontroller '/add' URL 中呼叫 add() 函式,該函式將在瀏覽器中開啟上面設計的表單。然後,其提交按鈕將呼叫 save_record() 函式。它檢索表單資料並將其儲存在 student 表中,並將應用程式重定向到 '/listrec' URL,該 URL 公開了 studentlist 模板。
此活動的 root.py 如下所示:
Hello/controllers/root.py
from hello.lib.base import BaseController
from tg import expose, flash, redirect, request,url, lurl
from tg import redirect, validate
from hello import model
from hello.model import DBSession
from hello.model.student import student

from hello.controllers.studentform import StudentForm

class RootController(BaseController):
   @expose()
   def index(self):
      return "<h1>Hello World</h1>"

   @expose ("hello.templates.studentlist")
   def listrec(self):
      entries = student.query.find()
      return dict(entries = entries)

   @expose('hello.templates.studentform')
   def add(self, *args, **kw):
      return dict(page = 'studentform', form = StudentForm)

   @expose()
   def save_record(self, **kw):
      newstudent = student(name = kw['name'],city = kw['city'],
         address = kw['address'], pincode = kw['pincode'])
      DBSession.flush()
      flash(message = "new entry added successfully")
      redirect("/listrec")
以下模板在 templates 資料夾中建立:
Hello\templates\studentform.html
<!DOCTYPE html>
<html xmlns = "http://www.w3.org/1999/xhtml"
   xmlns:py = "http://genshi.edgewall.org/" lang = "en">

   <head>
      <title>Student Registration Form</title>
   </head>


   <body>
      <div id = "getting_started">
         ${form.display(value = dict(title = 'Enter data'))}
      </div>
   </body>

</html>
Hello\templates\studentlist.html
<html xmlns = "http://www.w3.org/1999/xhtml"
   xmlns:py = "http://genshi.edgewall.org/">

   <head>
      <link rel = "stylesheet" type = "text/css" media = "screen"
         href = ${tg.url('/css/style.css')}" />
      <title>Welcome to TurboGears</title>
   </head>

   <body>
      <h1>Welcome to TurboGears</h1>

      <py:with vars = "flash = tg.flash_obj.render('flash', use_js = False)">
         <div py:if = "flash" py:replace = "Markup(flash)" />
      </py:with>

      <h2>Current Entries</h2>

      <table border = '1'>
         <thead>
            <tr>
               <th>Name</th>
               <th>City</th>
               <th>Address</th>
               <th>Pincode</th>
            </tr>
         </thead>

         <tbody>
            <py:for each = "entry in entries">
               <tr>
                  <td>${entry.name}</td>
                  <td>${entry.city}</td>
                  <td>${entry.address}</td>
                  <td>${entry.pincode}</td>
               </tr>
            </py:for>
         </tbody>
      </table>

   </body>

</html>
重新啟動伺服器並在瀏覽器中輸入 https://:8080/add:
每次新增資料並按下提交按鈕時,將顯示當前條目的列表。

TurboGears - 腳手架
Gearbox 工具包包含 scaffold 命令,該命令對於快速建立 TurboGears 應用程式的新元件非常有用。由 gearbox 的 quickstart 命令生成的應用程式在 model 資料夾(model.py.template)、templates 資料夾(template.html.template)和 controllers 資料夾(controller.py.template)中有一個骨架模板。這些“.template”檔案用作建立應用程式新腳手架的基礎。
例如,為了建立一個名為 mymodel 的新模型,只需執行以下命令:
gearbox scaffold model mymodel
此命令將在 model/mymodel.py 中生成定義了 newmodel 類的檔案。
# -*- coding: utf-8 -*-
"""Mymodel model module."""
from sqlalchemy import *
from sqlalchemy import Table, ForeignKey, Column
from sqlalchemy.types import Integer, Unicode, DateTime, LargeBinary
from sqlalchemy.orm import relationship, backref
from hello.model import DeclarativeBase, metadata, DBSession

class Mymodel(DeclarativeBase):
   __tablename__ = 'mymodels'

   uid = Column(Integer, primary_key = True)
   data = Column(Unicode(255), nullable = False)

   user_id = Column(Integer, ForeignKey('tg_user.user_id'), index = True)
   user = relationship('User', uselist = False,
      backref = backref('mymodels',cascade = 'all, delete-orphan'))
   __all__ = ['Mymodel']
使用者現在可以根據自己的需要修改表結構,然後將其匯入model/__init__.py以使模型在應用程式中可用。
為了建立一個模型、一個處理它的控制器類和一個索引頁面,所有這三個元件都可以透過以下命令同時建立。
gearbox scaffold model controller template mymodel
此命令將在 controllers\mymodel.py 中生成已正確定義 MymodelController 類的檔案。
# -*- coding: utf-8 -*-
"""Mymodel controller module"""

from tg import expose, redirect, validate, flash, url
# from tg.i18n import ugettext as _
# from tg import predicates

from hello.lib.base import BaseController
# from hello.model import DBSession

class MymodelController(BaseController):
   # Uncomment this line if your controller requires an authenticated user
   # allow_only = predicates.not_anonymous()

   @expose('hello.templates.mymodel')
   def index(self, **kw):
      return dict(page = 'mymodel-index')
要開始使用此控制器,請將其安裝到您的應用程式 RootController 中以定義 MymodelController 的例項。在 controllers\root.py 中新增以下行:
From hello.controller.mymodel import MymodelController

class RootController(BaseController): mymodel = MymodelController()
一個模板腳手架 templates\mymodel.html 也將在 templates 資料夾中建立。它將充當“/mymodel”URL 的索引頁面。
在 templates 資料夾中生成的mymodel.html 檔案如下所示:
<html xmlns = "http://www.w3.org/1999/xhtml"
   xmlns:py = "http://genshi.edgewall.org/"
   xmlns:xi = "http://www.w3.org/2001/XInclude">

   <xi:include href = "master.html" />

   <head>
      <title>Mymodel</title>
   </head>

   <body>
      <div class = "row">
         <div class = "col-md-12">
            <h2>Mymodel</h2>
            <p>Template page for Mymodel</p>
         </div>
      </div>
   </body>

</html>
TurboGears - 鉤子
在 TurboGears 中有三種方法可以在現有應用程式內插入行為。
鉤子 - 這是一種機制,透過該機制可以定義一個事件,並在事件發出時通知已註冊的偵聽器。
控制器包裝器 - 它位於 TurboGears 和控制器之間,因此可以像裝飾器一樣擴充套件控制器。因此,它可以附加到任何第三方控制器應用程式。
應用程式包裝器 - 它類似於任何 WSGI 中介軟體,但僅在 TurboGears 上下文中工作。
本章將討論如何在現有應用程式中使用鉤子。
鉤子
鉤子是在應用程式的配置檔案app_cfg.py中註冊的事件。然後,任何控制器都透過事件裝飾器掛接到這些事件。
TurboGears 中定義了以下鉤子:
| 序號 | 鉤子 & 描述 |
|---|---|
| 1 | Startup() 僅限於應用程式範圍,在應用程式啟動時呼叫。 |
| 2 | shutdown() 僅限於應用程式範圍,在應用程式退出時呼叫。 |
| 3 | configure_new_app 應用程式配置器建立了新的應用程式。 |
| 4 | before_config(app) 僅限於應用程式範圍,在建立應用程式後立即呼叫,但在設定選項和中介軟體之前呼叫。 |
| 5 | after_config(app) 僅限於應用程式範圍,在完成所有設定後呼叫。 |
| 6 | before_validate 在執行驗證之前呼叫。 |
| 7 | before_call 在驗證後呼叫,在呼叫實際的控制器方法之前呼叫。 |
| 8 | before_render 在呈現控制器模板之前呼叫,輸出是控制器返回值。 |
| 9 | after_render 在完成呈現控制器模板後呼叫。 |
註冊鉤子
為了註冊鉤子,請在app_cfg.py中建立函式,然後使用以下程式碼註冊它們:
tg.hooks.register(hookane, function, controller)
在以下程式碼中,on_startup、on_shutdown 和 before_render 鉤子在 app_cfg.py 中註冊。
def on_startup():
   print 'hello, startup world'

def on_shutdown():
   print 'hello, shutdown world'

def before_render(remainder, params, output):
   print 'system wide before render'

# ... (base_config init code)
tg.hooks.register('startup', on_startup)
tg.hooks.register('shutdown', on_shutdown)
tg.hooks.register('before_render', before_render)
before_render 鉤子與 Rootcontroller 中的控制器函式一起註冊。在 controllers\root.py 中新增以下程式碼。
from tg.decorators import before_render

class RootController(BaseController):
   @expose('hello.templates.index')
   @before_render(before_render_cb)

   def index(self, *args, **kw):
      return dict(page = 'index')
當應用程式啟動時,啟動訊息會顯示在控制檯中。
hello, startup world
Starting Standard HTTP server on http://127.0.0.1:8080
當在瀏覽器中輸入“/”URL 時,控制檯會顯示與 before_render 鉤子相對應的一條訊息。
system wide before render
Going to render {'page': 'index'}
TurboGears - 編寫擴充套件
TurboGears 擴充套件由tgext.* 包標識。Gearbox 工具包提供 tgext 命令來建立示例擴充套件。例如:
gearbox tgext -n myextension
此命令的其他可選引數為:
--author - 包作者的姓名。
--email - 包作者的電子郵件。
--licence - 用於包的許可證。預設為 MIT。
--description - 包的描述。
--keywords - 包關鍵字(預設:turbogears2.extension)。
這將建立一個 tgext.myextension 目錄,其中包含一個簡單的示例擴充套件。
執行目錄內的 setup.py:
Python setup.py install
tgext/myextension資料夾內的_init_.py檔案包含:
Plugme 函式 - 這是擴充套件的入口點。
SetupExtension 類 - 擴充套件初始化在此處進行。
On_startup 函式 - 類內部是一個在類內部的 __call__ 函式上註冊的鉤子。
tgext\myextension\__init__.py的簡要版本。
from tg import config
from tg import hooks
from tg.configuration import milestones

import logging
log = logging.getLogger('tgext.myextension')

def plugme(configurator, options = None):
   if options is None:
      options = {}
   log.info('Setting up tgext.myextension extension...')
   milestones.config_ready.register(SetupExtension(configurator))

   return dict(appid='tgext.myextension')

class SetupExtension(object):
   def __init__(self, configurator):
      self.configurator = configurator

   def __call__(self):
      log.info('>>> Public files path is %s' % config['paths']['static_files'])
      hooks.register('startup', self.on_startup)

   def echo_wrapper_factory(handler, config):
      def echo_wrapper(controller, environ, context):
         log.info('Serving: %s' % context.request.path)
         return handler(controller, environ, context)
      return echo_wrapper

   self.configurator.register_wrapper(echo_wrapper_factory)

   def on_startup(self):
      log.info('+ Application Running!')
安裝擴充套件後,透過在應用程式的app_cfg.py配置檔案中進行以下新增來啟用它。
from tgext.myextension import plugme

plugme(base_config)
如果我們使用 gearbox server 命令啟動伺服器,則可以透過以下方式在控制檯中檢視新註冊擴充套件的通知:
14:29:13,250 INFO [tgext.myextension] Setting up tgext.myextension extension...
14:29:13,453 INFO [tgext.myextension] >>> Public files path is c:\tghello\hello\hello\public
14:29:13,453 INFO [tgext.myextension] + Application Running!

Starting Standard HTTP server on http://127.0.0.1:8080
TurboGears - 可插拔應用程式
如果您的擴充套件需要公開模型和控制器,您可能需要檢視可插拔應用程式,這些應用程式旨在建立可重用的 Turbogears 應用程式,這些應用程式可以插入其他應用程式以擴充套件其功能。
使用以下 gearbox 命令建立可插拔應用程式:
gearbox quickstart-pluggable plugtest
這些可插拔應用程式可以定義自己的:
控制器 - 應用被清除時,將會自動掛載。
模型 - 在已掛載的應用內外都可用。
輔助函式 - 可以自動在應用模板的“H”物件中暴露。
載入程式 - 呼叫 setup-app 時將執行。
靜態檔案 - 可在其自己的私有路徑下訪問。
安裝此 plugtest 應用並透過在app_cfg.py中進行以下修改來掛載它。
from tgext.pluggable import plug
plug(base_config, plugtest)
TurboGears – RESTful 應用
REST 代表表述性狀態轉移。REST 是基於 Web 標準的架構,使用 HTTP 協議進行資料通訊。它圍繞資源展開,其中每個元件都是一個資源,並且可以使用 HTTP 標準方法透過通用介面訪問資源。REST 最初由Roy Fielding 於 2000 年提出。
什麼是 RestController
TurboGears 中的 RestController 提供了一種機制來訪問請求的方法,而不僅僅是 URL。標準的 HTTP 動詞包括:GET、POST、PUT 和 DELETE。RestController 支援這些方法,並且還添加了一些 URL 分發快捷方式,使使用者更輕鬆地以表單和列表的形式顯示資料。
為了解釋 RESTful 如何與 TurboGears 協同工作,我們將定義一個簡單的 Web 服務,該服務公開學生列表。
下面給出學生模型的程式碼:
model\student.py
# -* - coding: utf-8 -*-
from sqlalchemy import *

from sqlalchemy.orm import mapper, relation, relation, backref
from sqlalchemy import Table, ForeignKey, Column
from sqlalchemy.types import Integer, Unicode, DateTime
from hello.model import DeclarativeBase, metadata, DBSession
from datetime import datetime

class student(DeclarativeBase):
   __tablename__ = 'student'

   uid = Column(Integer, primary_key = True)
   name = Column(Unicode(20), nullable = False, default = '')
   city = Column(Unicode(20), nullable = False, default = '')
   address = Column(Unicode(100), nullable = False, default = '')
   pincode = Column(Unicode(10), nullable = False, default = '')
現在,基於 RestController 建立一個控制器,並提供一個檢視函式以 JSON 格式列出學生列表。
Controllers\student.py
from tg import RestController
from tg import expose
from hello import model
from hello.model import DBSession
from hello.model.student import student
from tg.decorators import with_trailing_slash

class StudentController(RestController):
   @expose('json')
   def get_all(self):
      students = DBSession.query(student).all()
      return dict(students=students)
透過在root.py中加入以下幾行,將此 StudentController 掛載到應用的 RootController 中:
from hello.controllers.student import StudentController

class RootController(BaseController):

   students = StudentController()
訪問https://:8080/students 將以 JSON 格式提供學生列表。
我們使用 post 方法來定義如何將學生儲存到資料庫中。每當使用 POST 請求訪問https://:8080/student URL 時,都會呼叫此方法:
@expose('json')
def post(self, name, city, address, pincode):
   newstudent = student(name = name, city = city, address = address, pincode = pincode)
   DBSession.add(newstudent)
   DBSession.flush()
   return dict(student = newstudent)
使用get_one()方法,我們可以將資料庫中的一項顯示給使用者:
@expose('json')
def get_one(self, movie_id):
   newstudent = DBSession.query(student).get(uid)
   return dict(movie = movie)
PUT 是使用 REST 更新現有記錄的方法:
@expose('json')
def put(self, name = name, city = city, address =  address, pincode = pincode, **kw):
   newstudent = DBSession.query(student).get(name)
   newstudent.name = name
   newstudent.city = city
   newstudent.address = address
   newstudent.pincode = pincode
   return dict(student = newstudent)
delete 的核心功能附加到 post_delete 方法中。在這裡,我們實際上從資料庫中刪除記錄,然後重定向回列表頁面:
@expose('json')
def post_delete(self, uid, **kw):
   newstudent = DBSession.query(student).get(uid)
   DBSession.delete(newstudent)
   return dict(movie = newstudent.uid)
TurboGears - 部署
要從開發環境切換到成熟的生產環境,需要將應用部署到真實的 Web 伺服器上。根據您的情況,有多種可用於部署 TurboGears Web 應用的選項。
帶有 mod_wsgi 的 Apache
mod_wsgi 是由 Graham Dumpleton 開發的 Apache 模組。它允許使用 Apache Web 伺服器提供 WSGI 程式。
首先,如果尚未安裝,請為您的平臺安裝 Apache 2.X。安裝 Apache 後,安裝 mod_wsgi。在伺服器上建立並激活 Python 虛擬環境,並在其中安裝 TurboGears。
在應用目錄中安裝您的應用,然後建立一個名為app.wsgi的指令碼。
如下配置 Apache 安裝:
<VirtualHost *:80>
   ServerName www.site1.com
   WSGIProcessGroup www.site1.com
   WSGIDaemonProcess www.site1.com user = <username>
      group = www-data threads = 4 python-path = <pythonpath>
   WSGIScriptAlias myapp/app.wsgi

   #Serve static files directly without TurboGears
   Alias /images
   Alias /css
   Alias /js
   CustomLog
   ErrorLog
</VirtualHost>
重啟 Apache
在瀏覽器中輸入http://www.site1.com/以訪問應用。
Circus 和 Chaussette 下的 TurboGears
Circus 是一個程序和套接字管理器。它可以用於監控和控制程序和套接字。當與 Chaussette WSGI 伺服器配對時,它可以成為部署應用和管理應用所需任何相關程序的強大工具。
TurboGears - GoogleAppEngine
從以下 URL 安裝適用於 Python 的 Google AppEngine SDK:https://cloud.google.coms
在您的系統上安裝 Google AppEngine。然後開啟 Google 開發者控制檯並使用您的 Google 帳戶登入:https://console.developers.google.com/start
建立一個名為mytgapp的新專案:

使用 Google AppEngine 啟動器,建立一個名為mytgapp的新應用。


將在指定的目錄中建立以下檔案:
- app.yaml
- favicon.ico
- index.yaml
- main.py
預設情況下,建立的應用依賴於 Webapp2 框架。要刪除此依賴項,請編輯 app.yaml 檔案並刪除以下部分:
libraries:
   - name: webapp2
   version: "2.5.2"
在名為 mytgapp 的目錄中建立一個臨時虛擬環境,並安裝 TurboGears。在其中建立一個 TurboGears 應用。現在,我們可以繼續編輯由 AppEngine 啟動以執行我們的應用的main.py檔案,並在其中實際編寫 TurboGears 應用。
在main.py中新增以下內容:
import os
import site
site.addsitedir(os.path.join(os.path.dirname(__file__), 'packages'))
from tg import expose, TGController, AppConfig

class RootController(TGController):
   @expose()
   def index(self):
      return "<h1>Hello World</h1>"

config = AppConfig(minimal = True, root_controller = RootController())
app = config.make_wsgi_app()
現在從 AppEngine 啟動器執行應用,然後單擊“瀏覽”按鈕以檢視應用在本地主機上是否正常工作。
我們已經在開發者控制檯中建立了一個名為 mytgapp 的專案。現在,單擊啟動器中的“部署”按鈕。部署過程完成後,訪問http://mytgapp.appspot.com/以線上檢視我們的應用。
