- SpecFlow 教程
- SpecFlow - 首頁
- SpecFlow - 簡介
- 測試驅動開發 (Test Driven Development)
- 行為驅動開發 (Behavior Driven Development)
- SpecFlow - Visual Studio 安裝
- Visual Studio 擴充套件安裝
- SpecFlow - 專案設定
- 其他專案依賴
- SpecFlow - 執行器啟用
- SpecFlow - HTML 報告
- SpecFlow - 繫結測試步驟
- SpecFlow - 建立第一個測試
- 配置 Selenium Webdriver
- SpecFlow - Gherkin
- SpecFlow - Gherkin 關鍵字
- SpecFlow - 功能檔案 (Feature File)
- SpecFlow - 步驟定義檔案 (Step Definition File)
- SpecFlow - Hooks
- SpecFlow - 背景圖示
- 使用 Examples 進行資料驅動測試
- 不使用 Examples 進行資料驅動測試
- 表格轉換為資料表
- 表格轉換為字典
- 使用 CreateInstance 的表格
- SpecFlow - 使用 CreateSet 的表格
- SpecFlow 有用資源
- SpecFlow - 快速指南
- SpecFlow - 有用資源
- SpecFlow - 討論
SpecFlow - 背景圖示
Background 關鍵字用於在功能檔案中的所有場景之前複製相同的步驟。我們可以透過將這些步驟組合在 Background 部分下,將其移至背景。
它有助於為場景新增上下文。它可以包含多個 Given 步驟。因此,它將在執行每個場景之前執行,但在任何 Before hooks之後執行。
Background 位於第一個 Example 或 Scenario 之前,縮排級別相同。簡而言之,它用於宣告所有測試的公共步驟。

在上面的示例中,有兩個場景,Background 步驟將在每個場景執行之前執行一次。
Background 規則
讓我們描述一些應用 Background 時的規則:
除非我們被迫將應用程式帶到需要執行復雜步驟的狀態(根據專案利益相關者的要求),否則應將其用於定義簡單的步驟。
它應該簡潔而現實。
所有場景也應該簡明扼要。
Background 示例
讓我們來看一個示例,其中我們使用了 Background 步驟,這些步驟將在功能檔案中的所有測試之前執行。例如,要為應用程式新增普通使用者和管理員使用者,我們需要在執行“普通使用者新增”場景之前執行以下步驟:
啟動應用程式 URL。
提交使用者名稱和密碼
步驟 1:建立功能檔案
關於如何建立功能檔案的詳細資訊在“功能檔案”章節中有詳細討論。
Feature: Member addition

   Background:
      Given launch URL
      Then enter name and password

   Scenario: Normal user addition
      Given user is on normal user addition screen
      When enters normal user details
      Then user should be added as normal user

   Scenario: Admin user addition
      Given user is on admin user addition screen
      When enters admin user details
      Then user should be added as admin user
步驟 2:建立步驟定義檔案
關於如何建立步驟定義檔案的詳細資訊在“步驟定義檔案”章節中有詳細討論。
using System;
using TechTalk.SpecFlow;
namespace SpecFlowProject1.Features{
   [Binding]
   public class MemberAdditionSteps{
      [Given(@"launch URL")]
      public void GivenLaunchURL(){
         Console.WriteLine("Url launched");
      }
      [Given(@"user is on normal user additon screeen")]
      public void GivenUserIsOnNormalUserAdditonScreeen(){
         Console.WriteLine("User is on normal user addition screen");
      }
      [Given(@"user is on admin user addition screen")]
      public void GivenUserIsOnAdminUserAdditionScreen(){
         Console.WriteLine("User is on admin user addition screen");
      }
      [When(@"enters normal user details")]
      public void WhenEntersNormalUserDetails(){
         Console.WriteLine("User enters normal user details");
      }
      [When(@"enters admin user details")]
      public void WhenEntersAdminUserDetails(){
         Console.WriteLine("User enters admin user details");
      }
      [Then(@"enter name and password")]
      public void ThenEnterNameAndPassword(){
         Console.WriteLine("User enters name and password");
      }
      [Then(@"user should be added as normal user")]
      public void ThenUserShouldBeAddedAsNormalUser(){
         Console.WriteLine("User should be added as normal user");
      }
      [Then(@"user should be added as admin user")]
      public void ThenUserShouldBeAddedAsAdminUser(){
         Console.WriteLine("User should be added as admin user");
      }
   }
}
步驟 3:執行和結果
選擇 SpecFlowProject(2),然後單擊 Run All Tests in View。

選擇 普通使用者新增場景,然後單擊 Open additional output for this result link。

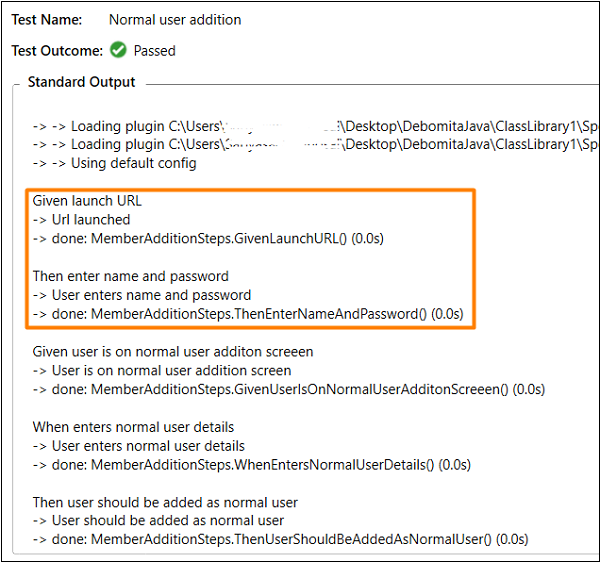
在上面的輸出中,Background 步驟 - Given Url launched 和 Then enter name and password 在實際的普通使用者場景之前執行。
選擇 管理員使用者新增 功能,然後單擊 Open additional output for this result 連結。

在上面的輸出中,Background 步驟 - Given Url launched 和 Then enter name and password 也在實際的管理員使用者場景之前執行。