- Python Pillow 教程
- Python Pillow - 首頁
- Python Pillow - 概述
- Python Pillow - 環境設定
- 基本影像操作
- Python Pillow - 影像處理
- Python Pillow - 調整影像大小
- Python Pillow - 翻轉和旋轉影像
- Python Pillow - 裁剪影像
- Python Pillow - 為影像新增邊框
- Python Pillow - 識別影像檔案
- Python Pillow - 合併影像
- Python Pillow - 剪下和貼上影像
- Python Pillow - 滾動影像
- Python Pillow - 在影像上寫入文字
- Python Pillow - ImageDraw 模組
- Python Pillow - 合併兩張影像
- Python Pillow - 建立縮圖
- Python Pillow - 建立水印
- Python Pillow - 影像序列
- Python Pillow 顏色轉換
- Python Pillow - 影像上的顏色
- Python Pillow - 使用顏色建立影像
- Python Pillow - 將顏色字串轉換為 RGB 顏色值
- Python Pillow - 將顏色字串轉換為灰度值
- Python Pillow - 透過更改畫素值來更改顏色
- 影像處理
- Python Pillow - 降噪
- Python Pillow - 更改影像模式
- Python Pillow - 影像合成
- Python Pillow - 使用 Alpha 通道
- Python Pillow - 應用透視變換
- 影像濾鏡
- Python Pillow - 為影像新增濾鏡
- Python Pillow - 卷積濾鏡
- Python Pillow - 模糊影像
- Python Pillow - 邊緣檢測
- Python Pillow - 浮雕影像
- Python Pillow - 增強邊緣
- Python Pillow - 銳化蒙版濾鏡
- 影像增強和校正
- Python Pillow - 增強對比度
- Python Pillow - 增強銳度
- Python Pillow - 增強色彩
- Python Pillow - 校正色彩平衡
- Python Pillow - 去噪
- 影像分析
- Python Pillow - 提取影像元資料
- Python Pillow - 識別顏色
- 高階主題
- Python Pillow - 建立動畫 GIF
- Python Pillow - 批次處理影像
- Python Pillow - 轉換影像檔案格式
- Python Pillow - 為影像新增填充
- Python Pillow - 顏色反轉
- Python Pillow 與 NumPy 結合使用
- Python Pillow 與 Tkinter BitmapImage 和 PhotoImage 物件結合使用
- Image 模組
- Python Pillow - 影像混合
- Python Pillow 有用資源
- Python Pillow - 快速指南
- Python Pillow - 函式參考
- Python Pillow - 有用資源
- Python Pillow - 討論
Python Pillow - ImageDraw 模組
在 Pillow 中繪製圖像涉及使用 Pillow 庫(Python Imaging Library)向現有影像新增各種視覺元素,例如線條、形狀、文字等等。這是影像處理中的一項常見任務,用於影像標註、建立視覺化效果、新增標籤或標題以突出感興趣的區域等。
我們可以使用 Pillow 中的 ImageDraw 模組建立一個繪圖物件,然後使用該物件的各種方法在影像上進行繪製。我們可以使用 line()、rectangle()、ellipse()、text() 等方法在影像上繪製各種元素。
在影像上繪製文字
為了在影像上繪製或寫入文字,我們可以使用 Pillow 庫中的 ImageDraw.Draw() 函式,此方法建立一個繪圖物件,允許我們對影像執行繪圖操作。
語法
以下是 Draw() 方法的語法和引數:
PIL.ImageDraw.Draw(image, mode=None)
其中,
image − 此引數表示我們要在其上執行繪圖操作的影像。它是 Pillow Image 物件的一個例項。
mode (可選) − 此引數指定繪圖將發生的模式。可用的模式包括:
- 1 − 1 位畫素(單色)
- L − 8 位畫素,黑白
- RGB − 3x8 位畫素,真彩色
- RGBA − 4x8 位畫素,帶透明度
- CMYK − 4x8 位畫素,CMYK 顏色空間
- HSV − 3x8 位畫素,HSV 顏色空間
以下兩個示例將使用的輸入影像。

示例
在這個例子中,我們使用 ImageDraw 模組的 Draw() 方法在影像上新增文字。
from PIL import Image, ImageDraw, ImageFont

#Open an image
image = Image.open("Images/faces.jpg")

#Create a drawing object
draw = ImageDraw.Draw(image)

#Define text attributes
text = "Welcome to Tutorialspoint"
font = ImageFont.truetype("arial.ttf", size=30)
text_color = (0, 0, 255)

#Blue
text_position = (50, 50)

#Add text to the image
draw.text(text_position, text, fill=text_color, font=font)

#Save or display the image with the added drawing elements
image.save("output Image/drawnimage.jpg")

#Open the output drawn image
opendraw = Image.open("output Image/drawnimage.jpg")
opendraw.show()
輸出

示例
這是另一個使用 Draw() 方法在影像中間新增文字的示例。
from PIL import Image, ImageDraw, ImageFont

#Open an image
image = Image.open("Images/faces.jpg")

#Create a drawing object
draw = ImageDraw.Draw(image)

#Define text attributes
text = "Welcome to Tutorialspoint"
font = ImageFont.truetype("arial.ttf", size=30)
text_color = (255, 0, 0)

#Add text to the image
draw.text(xy=(25, 160),
   text = text,
   font = font,
   fill= text_color)

#Save or display the image with the added drawing elements
image.save("output Image/drawnimage.jpg")

#Open the output drawn image
opendraw = Image.open("output Image/drawnimage.jpg")
opendraw.show()
輸出

在影像上繪製矩形
在 Pillow 庫 (PIL) 中,PIL.ImageDraw.Draw.rectangle() 方法用於使用指定的輪廓和填充顏色在影像上繪製矩形。此方法是 ImageDraw 模組的一部分,通常在使用 PIL.ImageDraw.Draw() 建立的 ImageDraw 物件上呼叫。
語法
以下是 PIL.ImageDraw.Draw.rectangle() 方法的語法和引數:
ImageDraw.Draw.rectangle(xy, outline=None, fill=None, width=0)
其中,
xy − 此引數指定矩形的座標,作為兩個點的元組。每個點表示為 (x1, y1) 和 (x2, y2),其中 (x1, y1) 是矩形的左上角,(x2, y2) 是矩形的右下角。
outline − 此引數是可選的,指定矩形輪廓的顏色。我們可以提供一個顏色字串(例如,“red” 或 "#FF0000")或表示 RGB 顏色的元組(例如,(255, 0, 0))。如果設定為 None,則不繪製輪廓。
fill − 此引數是可選的,指定填充矩形的顏色。與 outline 引數一樣,我們可以將填充顏色指定為字串或 RGB 元組。如果設定為 None,則矩形不會被填充。
width − 這是一個可選引數,用於指定矩形輪廓的寬度。預設值為 0,這意味著矩形將被填充而沒有輪廓。
以下兩個示例將使用的輸入影像。
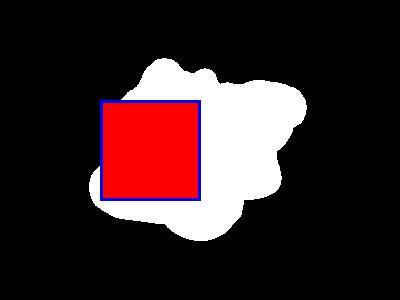
示例
在這個例子中,我們使用 PIL.ImageDraw.Draw.rectangle() 方法在給定的輸入影像上繪製一個矩形。
from PIL import Image, ImageDraw

#Open an image
image = Image.open("Images/bw.png")

#Create a drawing object
draw = ImageDraw.Draw(image)

#Define the coordinates for the rectangle
xy = [(100, 100), (200, 200)]

#Draw a filled red rectangle
draw.rectangle(xy, outline="blue", fill="red", width = 3)

#Save or display the modified image
image.save("output Image/output.jpg")
image.show()
輸出
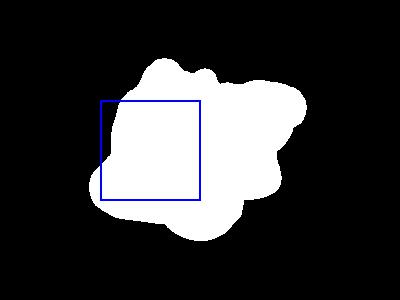
示例
這是另一個繪製矩形的示例,將 outline 引數指定為 Blue,fill 引數指定為 None。
from PIL import Image, ImageDraw

#Open an image
image = Image.open("Images/bw.png")

#Create a drawing object
draw = ImageDraw.Draw(image)

#Define the coordinates for the rectangle
xy = [(100, 100), (200, 200)]

#Draw a filled red rectangle
draw.rectangle(xy, outline= "Blue", fill= None, width = 2)

#Save or display the modified image
image.save("output Image/output.jpg")
image.show()
輸出
在影像上繪製線條
PIL.ImageDraw.Draw.line() 是 Python Imaging Library (PIL) 或 Pillow 庫提供的方法。Pillow 是 PIL 的一個更現代且積極維護的分支,用於在影像上繪製線條。此方法是 PIL/Pillow 中用於在影像上繪製形狀、文字和其他圖形的 ImageDraw 模組的一部分。
語法
以下是 PIL.ImageDraw.Draw.line() 方法的語法:
PIL.ImageDraw.Draw.line(xy, fill=None, width=0, joint=None)
其中,
xy − 指定線段端點的 (x, y) 座標序列。
fill − 此引數是可選的,指定線條的顏色。它可以是指定顏色名稱的字串、(R, G, B) 元組或整數值。如果沒有指定,線條將為黑色。
width − 此引數是可選的,指定線條的寬度(以畫素為單位)。預設值為 0,這意味著線條的寬度為 1 畫素。
joint − 此引數是可選的,可用於指定線條的連線樣式。它可以是以下值之一:
None (預設) − 線條具有常規連線。
curve − 線條具有圓形連線。
miter − 線條具有尖角連線。
以下兩個示例將使用的輸入影像。
示例
在這個例子中,我們使用 PIL.ImageDraw.Draw.line() 方法在輸入影像上繪製一條線。
from PIL import Image, ImageDraw, ImageFont

#Open an image
image = Image.open("Images/faces.jpg")

#Create a drawing object
draw = ImageDraw.Draw(image)

#Draw a line
line_coordinates = [(100, 200), (200, 200)]
draw.line(line_coordinates,width=10)

#Save or display the image with the added drawing elements
image.save("output Image/drawnimage.jpg")

#Open the output drawn image
opendraw = Image.open("output Image/drawnimage.jpg")
opendraw.show()
輸出

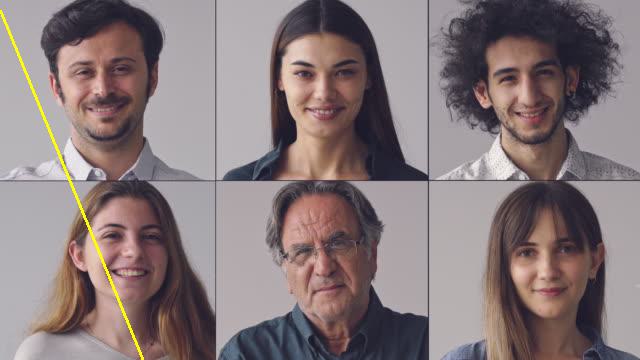
示例
這是另一個使用 PIL.ImageDraw.Draw.line() 方法的示例,將 joint 引數指定為 curve。
from PIL import Image, ImageDraw

#Open an image
image = Image.open("Images/faces.jpg")

#Create a drawing object
draw = ImageDraw.Draw(image)

#Define the endpoints and draw a red line
line_color = "Yellow"
#Red color
start_point = (0, 10)
end_point = (200, 500)
line_width = 3
draw.line([start_point, end_point], fill=line_color, width=line_width, joint = "curve")

#Save or display the modified image
image.save("output.jpg")
image.show()
輸出
在影像上繪製多邊形
PIL.ImageDraw.Draw.polygon() 是 Pillow 庫中 ImageDraw 物件提供的方法。它允許我們在影像上繪製多邊形。多邊形是一個具有多條邊的封閉形狀,因此我們可以指定頂點的座標來定義多邊形的形狀。
此方法是 ImageDraw.Draw 物件的一部分,用於建立並使用指定的顏色填充多邊形形狀。
語法
以下是 PIL.ImageDraw.Draw.polygon() 方法的語法:
PIL.ImageDraw.Draw.polygon(xy, fill=None, outline=None)
其中,
xy − 這是一個元組列表或座標的扁平列表,指定多邊形的頂點。每個元組或座標對代表多邊形的一個頂點。
fill − 此引數是可選的,指定多邊形內部的填充顏色。如果我們想要多邊形沒有填充,我們可以將其設定為 None。
outline − 此引數是可選的,指定多邊形輪廓或邊框的顏色。如果我們不想要輪廓,則可以將其設定為 None。
以下兩個示例將使用的輸入影像。
示例
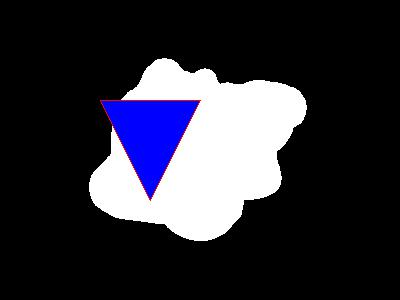
在這個例子中,我們使用 PIL.ImageDraw.Draw.polygon() 方法在影像上繪製一個多邊形,並指定引數 xy、fill 和 outline。
from PIL import Image, ImageDraw

#Open an image
image = Image.open("Images/bw.png")

#Create a drawing object
draw = ImageDraw.Draw(image)

#Define the vertices of the polygon
polygon_vertices = [(100, 100), (200, 100), (150, 200)]

#Draw a filled polygon with a blue interior and a red outline
draw.polygon(polygon_vertices, fill="blue", outline="red")

#Save or display the modified image
image.save("output Image/output.jpg")
image.show()
輸出
示例
這是一個另一個示例,其中我們將 PIL.ImageDraw.Draw.polygon() 方法的 fill 引數設定為 None 以避免填充多邊形。
from PIL import Image, ImageDraw

#Open an image
image = Image.open("Images/bw.png")

#Create a drawing object
draw = ImageDraw.Draw(image)

#Define the vertices of the polygon
polygon_vertices = [(100, 100), (200, 100), (150, 200),(100,150),(90,100)]

#Draw a filled polygon with a blue interior and a red outline
draw.polygon(polygon_vertices, fill= None, outline="red")

#Save or display the modified image
image.save("output Image/output.jpg")
image.show()
輸出

ImageDraw 模組方法
除了上述方法之外,此模組還提供許多其他特定方法,可用於特定條件。讓我們探索並瞭解每種方法的基本功能:
| 序號 | 方法及描述 |
|---|---|
| 1 |
在指定的邊界框內繪製一個弧形。 |
| 2 |
在邊界框內繪製一條弦(圓的一部分)。 |
| 3 |
在邊界框內繪製一個填充的扇形。 |
| 4 |
在影像上指定座標處繪製點(單個畫素)。 |
| 5 |
使用給定的邊界圓繪製一個正多邊形。 |
| 6 |
繪製一個圓角矩形。 |
| 7 |
在影像上的指定位置繪製多行文字。 |