- Python Pillow 教程
- Python Pillow - 首頁
- Python Pillow - 概述
- Python Pillow - 環境設定
- 基本影像操作
- Python Pillow - 處理影像
- Python Pillow - 調整影像大小
- Python Pillow - 翻轉和旋轉影像
- Python Pillow - 裁剪影像
- Python Pillow - 為影像新增邊框
- Python Pillow - 識別影像檔案
- Python Pillow - 合併影像
- Python Pillow - 裁切和貼上影像
- Python Pillow - 滾動影像
- Python Pillow - 在影像上寫入文字
- Python Pillow - ImageDraw 模組
- Python Pillow - 連線兩張影像
- Python Pillow - 建立縮圖
- Python Pillow - 建立水印
- Python Pillow - 影像序列
- Python Pillow 顏色轉換
- Python Pillow - 影像上的顏色
- Python Pillow - 使用顏色建立影像
- Python Pillow - 將顏色字串轉換為 RGB 顏色值
- Python Pillow - 將顏色字串轉換為灰度值
- Python Pillow - 透過更改畫素值來更改顏色
- 影像處理
- Python Pillow - 降噪
- Python Pillow - 更改影像模式
- Python Pillow - 影像合成
- Python Pillow - 使用 Alpha 通道
- Python Pillow - 應用透視變換
- 影像濾鏡
- Python Pillow - 為影像新增濾鏡
- Python Pillow - 卷積濾鏡
- Python Pillow - 模糊影像
- Python Pillow - 邊緣檢測
- Python Pillow - 浮雕影像
- Python Pillow - 增強邊緣
- Python Pillow - 銳化蒙版濾鏡
- 影像增強和校正
- Python Pillow - 增強對比度
- Python Pillow - 增強銳度
- Python Pillow - 增強顏色
- Python Pillow - 校正色彩平衡
- Python Pillow - 去噪
- 影像分析
- Python Pillow - 提取影像元資料
- Python Pillow - 識別顏色
- 高階主題
- Python Pillow - 建立動畫 GIF
- Python Pillow - 批次處理影像
- Python Pillow - 轉換影像檔案格式
- Python Pillow - 為影像新增填充
- Python Pillow - 顏色反轉
- Python Pillow - 使用 NumPy 進行機器學習
- Python Pillow 與 Tkinter BitmapImage 和 PhotoImage 物件
- Image 模組
- Python Pillow - 影像混合
- Python Pillow 有用資源
- Python Pillow - 快速指南
- Python Pillow - 函式參考
- Python Pillow - 有用資源
- Python Pillow - 討論
Python Pillow - 模糊影像
模糊影像是影像處理中的一個基本概念,用於降低影像的細節或銳度。模糊的主要目的是使影像看起來更平滑或不那麼銳利。模糊可以透過各種數學運算、卷積核或濾鏡來實現。
Python 的 Pillow 庫在 ImageFilter 模組中提供了幾個標準影像濾鏡,透過呼叫 image.filter() 方法對影像執行不同的模糊操作。在本教程中,我們將瞭解 ImageFilter 模組提供的不同影像模糊濾鏡。
將模糊濾鏡應用於影像
模糊影像可以透過使用 ImageFilter.BLUR 濾鏡來完成,它是 Pillow 庫當前版本中提供的內建濾鏡選項之一,用於在影像中建立模糊效果。
以下是應用影像模糊的步驟:
使用 Image.open() 函式載入輸入影像。
將 filter() 函式應用於載入的 Image 物件,並向函式提供 ImageFilter.BLUR 作為引數。該函式將返回模糊後的影像,作為 PIL.Image.Image 物件。
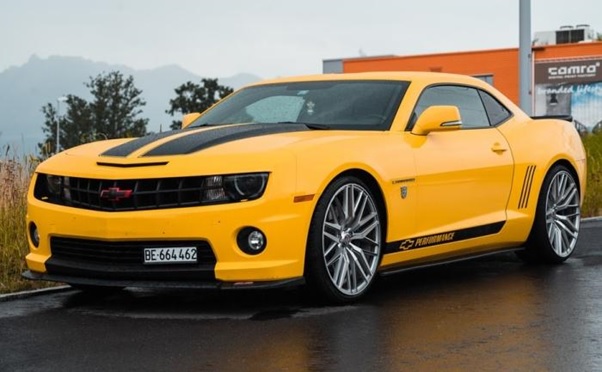
以下是本章所有示例中使用的輸入影像。
示例
以下是使用 Image.filter() 方法和 ImageFilter.BLUR 核心濾鏡的示例。
from PIL import Image, ImageFilter

# Open an existing image
original_image = Image.open('Images/car_2.jpg')

# Apply a blur filter to the image
blurred_image = original_image.filter(ImageFilter.BLUR)

# Display the original image
original_image.show()

# Display the blurred mage
blurred_image.show()
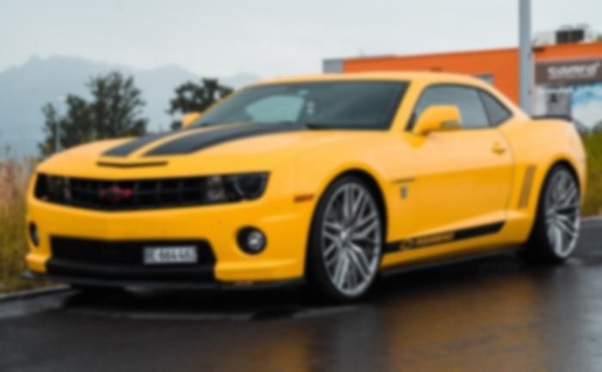
輸出影像

應用 BoxBlur 濾鏡
BoxBlur 濾鏡用於透過將每個畫素的值設定為擴充套件到每個方向指定畫素數的正方形框內畫素的平均值來模糊影像。為此,您可以使用 Pillow 的 ImageFilter 模組中的 BoxBlur() 類。
以下是 ImageFilter.BoxBlur() 類的語法:
class PIL.ImageFilter.BoxBlur(radius)
PIL.ImageFilter.BoxBlur() 類接受一個引數:
radius - 此引數指定用於在每個方向上模糊的正方形框的大小。可以將其提供為兩個數字的序列(用於 x 和 y 方向)或一個應用於兩個方向的數字。
如果 radius 設定為 1,則採用 3x3 正方形框內畫素值的平均值(每個方向 1 個畫素,總共 9 個畫素)。radius 值為 0 不會模糊影像,並返回相同的影像。
示例
以下是一個演示如何使用 BoxBlur() 類進行影像模糊的示例。
from PIL import Image, ImageFilter

# Open an existing image
original_image = Image.open('Images/car_2.jpg')

# Apply a Box Blur filter to the image
box_blurred_image = original_image.filter(ImageFilter.BoxBlur(radius=3))

# Display the Box Blurred image
box_blurred_image.show()
輸出影像

將高斯模糊應用於影像
高斯模糊濾鏡用於透過應用高斯模糊來模糊影像,高斯模糊是一種近似高斯分佈的特定模糊型別。這可以透過使用 Pillow 的 ImageFilter.GaussianBlur() 類來完成。
以下是 ImageFilter.GaussianBlur() 類的語法:
class PIL.ImageFilter.GaussianBlur(radius=2)
ImageFilter.GaussianBlur() 類接受一個引數:
radius - 此引數指定高斯核的標準差。標準差控制模糊的程度。您可以將其提供為兩個數字的序列(用於 x 和 y 方向)或一個應用於兩個方向的數字。
示例
以下是一個演示如何使用 GaussianBlur() 類進行影像模糊的示例。
from PIL import Image, ImageFilter

# Open an existing image
original_image = Image.open('Images/car_2.jpg')

# Apply a Gaussian Blur filter to the image
gaussian_blurred_image = original_image.filter(ImageFilter.GaussianBlur(radius=2))

# Display the Gaussian Blurred image
gaussian_blurred_image.show()
輸出影像