- Python Pillow 教程
- Python Pillow - 首頁
- Python Pillow - 概述
- Python Pillow - 環境搭建
- 基本影像操作
- Python Pillow - 影像處理
- Python Pillow - 調整影像大小
- Python Pillow - 翻轉和旋轉影像
- Python Pillow - 裁剪影像
- Python Pillow - 為影像新增邊框
- Python Pillow - 識別影像檔案
- Python Pillow - 合併影像
- Python Pillow - 影像剪下和貼上
- Python Pillow - 影像滾動
- Python Pillow - 在影像上寫入文字
- Python Pillow - ImageDraw 模組
- Python Pillow - 連線兩張影像
- Python Pillow - 建立縮圖
- Python Pillow - 建立水印
- Python Pillow - 影像序列
- Python Pillow 顏色轉換
- Python Pillow - 影像上的顏色
- Python Pillow - 使用顏色建立影像
- Python Pillow - 將顏色字串轉換為 RGB 顏色值
- Python Pillow - 將顏色字串轉換為灰度值
- Python Pillow - 透過更改畫素值來更改顏色
- 影像處理
- Python Pillow - 降噪
- Python Pillow - 更改影像模式
- Python Pillow - 影像合成
- Python Pillow - 使用 Alpha 通道
- Python Pillow - 應用透視變換
- 影像濾鏡
- Python Pillow - 為影像新增濾鏡
- Python Pillow - 卷積濾波器
- Python Pillow - 模糊影像
- Python Pillow - 邊緣檢測
- Python Pillow - 浮雕影像
- Python Pillow - 增強邊緣
- Python Pillow - 銳化蒙版濾鏡
- 影像增強和校正
- Python Pillow - 增強對比度
- Python Pillow - 增強銳度
- Python Pillow - 增強顏色
- Python Pillow - 校正色彩平衡
- Python Pillow - 去噪
- 影像分析
- Python Pillow - 提取影像元資料
- Python Pillow - 識別顏色
- 高階主題
- Python Pillow - 建立動畫 GIF
- Python Pillow - 批次處理影像
- Python Pillow - 轉換影像檔案格式
- Python Pillow - 為影像新增填充
- Python Pillow - 顏色反轉
- Python Pillow - 使用 Numpy 進行機器學習
- Python Pillow 與 Tkinter BitmapImage 和 PhotoImage 物件
- Image 模組
- Python Pillow - 影像混合
- Python Pillow 有用資源
- Python Pillow - 快速指南
- Python Pillow - 函式參考
- Python Pillow - 有用資源
- Python Pillow - 討論
Pillow - 裁剪影像
在 Pillow(Python 影像庫)中裁剪影像涉及選擇影像的特定區域或子區域,並從該區域建立新影像。此操作可用於去除影像中不需要的部分,專注於特定主題或將影像調整為特定尺寸。
Pillow 庫的 **Image** 模組提供了 **crop()** 方法來對影像執行裁剪操作。
使用 crop() 方法裁剪影像
可以透過使用 crop() 方法裁剪影像,該方法允許我們定義一個框,指定要保留的區域的左、上、右和下角的座標,然後它會建立一個僅包含原始影像該部分的新影像。
以下是 Pillow 庫中 **crop()** 方法的基本語法:
PIL.Image.crop(box)
其中,
**box** - 一個元組,以 (left, upper, right, lower) 的格式指定裁剪框的座標。這些座標表示我們要保留的矩形區域的左、上、右和下邊緣。
示例
在此示例中,我們透過傳遞我們要裁剪的影像區域的左、上、右和下角,使用 **crop()** 方法裁剪影像。
from PIL import Image

#Open an image
image = Image.open("Images/saved_image.jpg")

# Display the inaput image
image.show()

#Define the coordinates for the region to be cropped (left, upper, right, lower)
left = 100
upper = 50
right = 300
lower = 250

#Crop the image using the coordinates
cropped_image = image.crop((left, upper, right, lower))

#Display the cropped image as a new file
cropped_image.show()
輸出
以上程式碼將生成以下輸出:
輸入影像

輸出影像(裁剪後的影像)

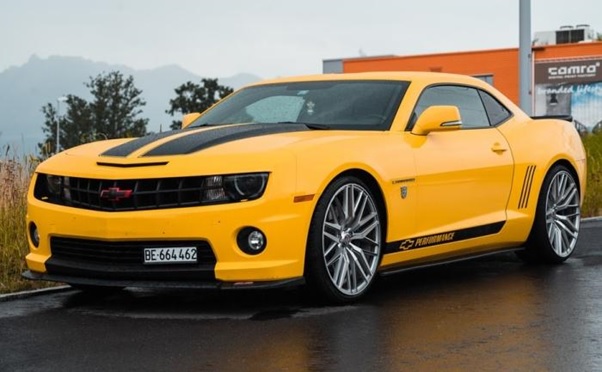
示例
這是一個使用 crop() 方法對輸入影像的指定部分執行裁剪操作的另一個示例。
from PIL import Image

#Open an image
image = Image.open("Images/yellow_car.jpg")

# Display the inaput image
image.show()

#Define the coordinates for the region to be cropped (left, upper, right, lower)
left = 100
upper = 100
right = 300
lower = 300

#Crop the image using the coordinates
cropped_image = image.crop((left, upper, right, lower))

#Display the cropped image
cropped_image.show()
輸出
執行上述程式碼後,您將獲得以下輸出:
輸入影像
輸出(裁剪後的影像)

廣告