- Python Pillow 教程
- Python Pillow——首頁
- Python Pillow——概述
- Python Pillow——環境搭建
- 基本影像操作
- Python Pillow——影像處理
- Python Pillow——影像縮放
- Python Pillow——影像翻轉和旋轉
- Python Pillow——影像裁剪
- Python Pillow——為影像新增邊框
- Python Pillow——識別影像檔案
- Python Pillow——影像合併
- Python Pillow——影像剪下和貼上
- Python Pillow——影像滾動
- Python Pillow——在影像上新增文字
- Python Pillow——ImageDraw 模組
- Python Pillow——連線兩張影像
- Python Pillow——建立縮圖
- Python Pillow——建立水印
- Python Pillow——影像序列
- Python Pillow 顏色轉換
- Python Pillow——影像顏色
- Python Pillow——建立彩色影像
- Python Pillow——將顏色字串轉換為 RGB 顏色值
- Python Pillow——將顏色字串轉換為灰度值
- Python Pillow——透過更改畫素值來更改顏色
- 影像處理
- Python Pillow——降噪
- Python Pillow——更改影像模式
- Python Pillow——影像合成
- Python Pillow——處理 Alpha 通道
- Python Pillow——應用透視變換
- 影像濾鏡
- Python Pillow——為影像新增濾鏡
- Python Pillow——卷積濾鏡
- Python Pillow——影像模糊
- Python Pillow——邊緣檢測
- Python Pillow——影像浮雕
- Python Pillow——增強邊緣
- Python Pillow——非銳化掩膜濾鏡
- 影像增強和校正
- Python Pillow——增強對比度
- Python Pillow——增強銳度
- Python Pillow——增強色彩
- Python Pillow——校正色彩平衡
- Python Pillow——去除噪點
- 影像分析
- Python Pillow——提取影像元資料
- Python Pillow——識別顏色
- 高階主題
- Python Pillow——建立動畫 GIF
- Python Pillow——批次處理影像
- Python Pillow——轉換影像檔案格式
- Python Pillow——為影像新增填充
- Python Pillow——顏色反轉
- Python Pillow 與 NumPy
- Python Pillow 與 Tkinter BitmapImage 和 PhotoImage 物件
- Image 模組
- Python Pillow——影像混合
- Python Pillow 有用資源
- Python Pillow——快速指南
- Python Pillow——函式參考
- Python Pillow——有用資源
- Python Pillow——討論
Python Pillow——影像處理
使用 Python Pillow 庫處理影像的基本操作包括開啟、寫入、顯示和儲存影像。Python Pillow 庫提供了廣泛的影像處理工具,為這些基本操作提供了簡單的方法和可定製的選項。
在本教程中,您將學習使用 Pillow 庫處理影像的幾個重要方面,包括讀取、顯示、寫入和儲存影像。
讀取影像
讀取影像指的是開啟和讀取影像檔案,並使其在 Python 程式中可用於操作和處理的過程。
在 Pillow 中,Image 模組提供open() 函式來載入給定的輸入影像。當我們呼叫Image.open() 時,它會讀取指定的影像檔案,解碼影像並建立一個代表該影像的 Pillow Image 物件。然後,此物件可用於各種影像處理任務。
使用 open() 函式讀取影像
Image.open() 函式能夠載入不同的影像格式,例如 JPEG、PNG、GIF、BMP、TIFF、ICO 等。
以下是此函式的語法和引數。
PIL.Image.open(fp, mode='r', formats = None)
其中,
fp——影像的檔名或路徑或 URL(字串格式)。
mode (可選)——mode 引數用於設定影像的開啟模式,應將其設定為r。
formats (可選)——要載入的格式列表或元組。這可以用作要載入的檔案格式的限制。
此函式返回影像作為輸出。在這裡,為了顯示影像,我們必須使用Image 模組的show() 函式。
示例
在這個例子中,我們透過字串格式指定影像路徑來載入影像,並將模式定義為r。
from PIL import Image
#Load an image
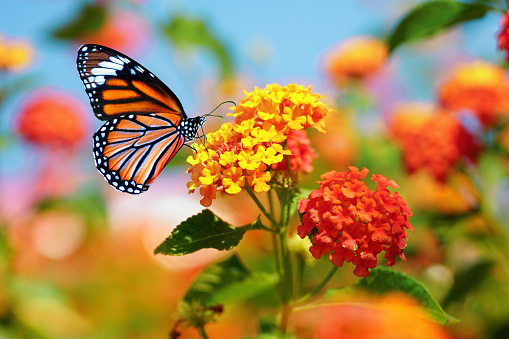
loaded_image = Image.open("Images/butterfly.jpg", mode = 'r')
loaded_image.show()
#Saving the image
img.save("Output_Images/reading.png")
待使用的影像

輸出
示例
在這個例子中,我們從影像 URL 載入影像。為此,我們必須使用urllib.request() 模組來讀取影像 URL。
我們使用urllib.request 模組的urlretrieve() 函式從 URL 下載影像,並將其儲存到本地檔案系統中,並指定檔名。
import urllib.request
from PIL import Image
url = "https://tutorialspoint.tw/images/logo.png"

#Download the image using urllib
urllib.request.urlretrieve(url, "image.png")

#Open the downloaded image in PIL
loading_image = Image.open("image.png", mode = 'r')

#Show the image
loading_image.show()
輸出
示例
在這個例子中,我們傳入影像名稱和formats = None 作為輸入引數。
from PIL import Image
#load the image
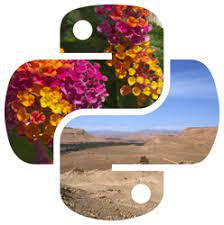
loading_image = Image.open("pillow.jpg", formats = None)
#Show the image
loading_image.show()
輸出

寫入影像
寫入影像無非是從頭建立新的影像檔案或修改現有影像(例如繪圖、畫素操作和合成)。然後可以使用其他 Pillow 函式和方法進一步處理生成的影像或將其儲存到磁碟。
使用 new() 方法寫入影像
您可以使用 Image 模組中的new() 方法建立一個具有指定模式和大小的空白影像。這是一種生成具有所需特徵的空白或未初始化影像的方法。
以下是Image.new() 的語法:
PIL.Image.new(mode, size, color)
其中,
mode——此引數指定影像的顏色模式,例如彩色影像的“RGB”或灰度影像的“L”。可用的模式取決於 Pillow 的版本和底層影像庫的功能(例如,“RGB”、“RGBA”、“L”、“CMYK”等)。
size——此引數是一個元組,指定影像的寬度和高度(以畫素為單位)。例如,要建立一個 300x200 畫素的影像,我們可以使用 '(300, 200)'。
color' (可選)——此引數指定影像的初始顏色。這是一個可選引數,可以是單個顏色值或多通道影像的元組。對於大多數模式,預設顏色為黑色。
示例
在這個例子中,我們使用 Pillow 庫中Image 模組的new() 方法建立一個黑色新影像。
from PIL import Image

#Create a new 300x200 pixel RGB image filled with white
img = Image.new('RGB', (300, 200), color='black')
img.show()
輸出

示例
在這個例子中,我們使用 Pillow 的Image 模組中的new() 方法建立一個寬度為 600,高度為 600,顏色為藍色的新影像。
from PIL import Image

#Create a new 300x200 pixel RGB image filled with white
img = Image.new('RGB', (500, 200), color='blue')
img.show()
輸出

顯示影像
顯示影像是在螢幕上渲染影像以便您可以檢視它。Pillow 提供 show() 方法,使用系統的預設影像檢視器來顯示影像。
使用 show() 方法顯示影像
Image 模組中的show() 方法不需要任何引數或自變數。這很簡單。
語法
以下是show() 函式的語法:
PIL.Image.show()
示例
在這個例子中,我們使用Image 模組的show() 函式顯示open() 函式的輸出。
from PIL import Image

#Open an image
image = Image.open("Images/hand writing.jpg")

#Display the image using the default image viewer
image.show()
輸出

在 Jupyter Notebook 環境中顯示影像
如果我們在 Jupyter Notebook 環境中工作,則可以使用 IPython 的display() 函式直接在 Notebook 中顯示影像。
以下是display() 函式的語法和引數:
IPython.display.display(image_name)
其中,
image_name——這是要顯示的影像的名稱。
示例
在這個例子中,我們使用IPython.display 模組的display() 函式顯示影像。
from PIL import Image
from IPython.display import display

#Load the image
loading_image = Image.open("Images/tutorialspoint.png")

#Show the image
display(loading_image)
輸出
在 GUI 應用程式中顯示
如果我們正在構建圖形使用者介面 (GUI) 應用程式,則可以使用像 Tkinter 這樣的 GUI 工具包(用於桌面應用程式)或像 Flask 或 Django 這樣的 Web 框架(用於 Web 應用程式)在使用者介面中顯示影像。
示例
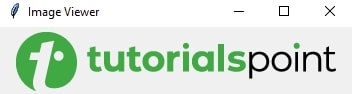
在這個例子中,我們使用 PIL 模組的 ImageTk 方法來顯示影像輸出。
import tkinter as tk
from PIL import Image, ImageTk

def display_image(image_path):
   root = tk.Tk()
   root.title("Image Viewer")

   image = Image.open(image_path)
   photo = ImageTk.PhotoImage(image)

   label = tk.Label(root, image=photo)
   label.image = photo
   label.pack()

   root.mainloop()

display_image("Images/tutorialspoint.png")
輸出
儲存影像
在 Pillow 中儲存影像是指將開啟的影像儲存到記憶體中,並使其在 Python 程式中可用於操作和處理。
Pillow 庫的Image 模組提供save() 方法,允許您將指定的影像物件儲存到記憶體或本地系統的指定位置。
使用 save() 函式儲存影像
save() 方法允許我們將開啟的影像儲存為不同的檔案格式,例如 JPG、PNG、PDF 等。此函式指定了儲存影像的各種選項,包括格式、質量和其他引數。
以下是此函式的語法和引數。
PIL.Image.save(file, format=None, **params)
其中,
file——將儲存影像到的檔案路徑或類檔案物件。
format(可選)——儲存影像的格式。如果未指定,Pillow 將嘗試從副檔名確定格式。
params(可選)——取決於我們儲存影像的格式的其他引數。
此函式將影像儲存到指定位置,並使用指定的檔名。
示例
在這個例子中,我們使用 Pillow 庫Image 模組的open() 函式開啟指定的影像。然後透過將路徑作為輸入引數傳遞給save() 函式,將開啟的影像儲存到指定位置。
from PIL import Image
loading_image = Image.open("pillow.jpg")

#Show the image
loading_image.show()

#Save the image
loading_image.save("Images/saved_image.jpg")
print("Image saved")
輸出
載入的影像:

儲存的影像:
示例
在此示例中,我們使用其他可選引數將影像儲存到指定位置。
from PIL import Image
#Load the image
loading_image = Image.open("Images/tutorialspoint.png")

#Show the image
loading_image.show()

#Save the image
loading_image.save("output Image/save_outputimg.png", format = "PNG", quality = 200)
print("Image saved")
輸出
載入的影像:

儲存的影像:

我們可以使用save() 方法以各種格式儲存影像,並根據我們的特定用例需要控制質量和其他特定於格式的選項。