- Python Pillow 教程
- Python Pillow - 首頁
- Python Pillow - 概述
- Python Pillow - 環境設定
- 基本影像操作
- Python Pillow - 影像處理
- Python Pillow - 調整影像大小
- Python Pillow - 翻轉和旋轉影像
- Python Pillow - 裁剪影像
- Python Pillow - 為影像新增邊框
- Python Pillow - 識別影像檔案
- Python Pillow - 合併影像
- Python Pillow - 剪下和貼上影像
- Python Pillow - 滾動影像
- Python Pillow - 在影像上寫入文字
- Python Pillow - ImageDraw 模組
- Python Pillow - 合併兩張影像
- Python Pillow - 建立縮圖
- Python Pillow - 建立水印
- Python Pillow - 影像序列
- Python Pillow 顏色轉換
- Python Pillow - 影像上的顏色
- Python Pillow - 建立彩色影像
- Python Pillow - 將顏色字串轉換為 RGB 顏色值
- Python Pillow - 將顏色字串轉換為灰度值
- Python Pillow - 透過更改畫素值來更改顏色
- 影像處理
- Python Pillow - 降噪
- Python Pillow - 更改影像模式
- Python Pillow - 影像合成
- Python Pillow - 使用 Alpha 通道
- Python Pillow - 應用透視變換
- 影像濾鏡
- Python Pillow - 為影像新增濾鏡
- Python Pillow - 卷積濾鏡
- Python Pillow - 模糊影像
- Python Pillow - 邊緣檢測
- Python Pillow - 浮雕影像
- Python Pillow - 增強邊緣
- Python Pillow - 銳化蒙版濾鏡
- 影像增強和校正
- Python Pillow - 增強對比度
- Python Pillow - 增強銳度
- Python Pillow - 增強顏色
- Python Pillow - 校正色彩平衡
- Python Pillow - 去噪
- 影像分析
- Python Pillow - 提取影像元資料
- Python Pillow - 識別顏色
- 高階主題
- Python Pillow - 建立動畫 GIF
- Python Pillow - 批次處理影像
- Python Pillow - 轉換影像檔案格式
- Python Pillow - 為影像新增填充
- Python Pillow - 顏色反轉
- Python Pillow 與 NumPy 結合使用
- Python Pillow 與 Tkinter 的 BitmapImage 和 PhotoImage 物件結合使用
- Image 模組
- Python Pillow - 影像混合
- Python Pillow 有用資源
- Python Pillow - 快速指南
- Python Pillow - 函式參考
- Python Pillow - 有用資源
- Python Pillow - 討論
Python Pillow - ImageDraw.chord() 函式
ImageDraw.chord() 方法用於繪製弦(圓的一部分),該弦位於由兩點定義的邊界框內(從起始角度繪製到結束角度)。它與 arc() 方法相同,但兩端點之間連線一條直線。圓的弦是連線圓周上兩點的直線段。
語法
以下是函式的語法:
ImageDraw.chord(xy, start, end, fill=None, outline=None, width=1)
引數
以下是此函式引數的詳細資訊:
xy - 定義弦的邊界框的兩點。可以將其指定為兩個元組的序列 [(x0, y0), (x1, y1)],也可以指定為扁平列表 [x0, y0, x1, y1]。無論哪種情況,都必須滿足條件 x1 >= x0 且 y1 >= y0。
start - 弦的起始角度,以度為單位。角度從 3 點鐘方向開始測量,順時針方向遞增。
end - 弦的結束角度,也以度為單位。
fill - 用於填充弦的顏色。
outline - 用於弦輪廓的顏色。
width - 弦輪廓的線寬,以畫素為單位。預設值為 1。
示例
示例 1
此示例在指定的邊界框內繪製弦,使用預設填充顏色、輪廓和寬度。
from PIL import Image, ImageDraw

# Create a blank image
image = Image.new("RGB", (700, 300), "black")
draw = ImageDraw.Draw(image)

# Draw a chord inside a bounding box [(100, 10), (350, 250)]
draw.chord([(100, 10), (350, 250)], start=45, end=180)

# Display the image
image.show()
print('Chord is drawn successfully...')
輸出
Chord is drawn successfully...
輸出影像

示例 2
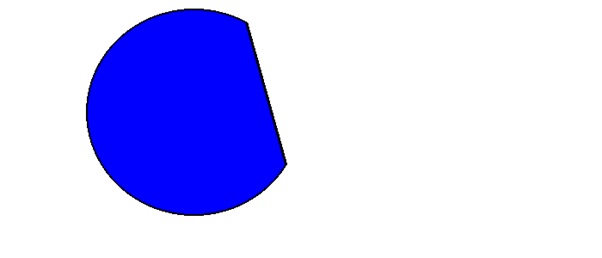
此示例在指定的邊界框內繪製弦,填充顏色為藍色,輪廓為黑色,輪廓線寬為 2 畫素。
from PIL import Image, ImageDraw

# Create a new image with a white background
image = Image.new("RGB", (700, 300), "white")
draw = ImageDraw.Draw(image)

# Draw a chord inside the bounding box
draw.chord([(100, 10), (350, 250)], start=30, end=300, fill="blue", outline="black", width=2)

# Display the images
image.show()
print('The Chord is drawn successfully...')
輸出
The Chord is drawn successfully...
輸出影像
示例 3
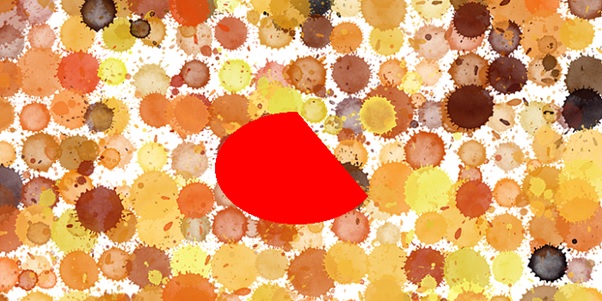
以下示例演示如何在現有影像上使用不同的引數繪製弦。
from PIL import Image, ImageDraw

# Open an Image
image = Image.open('Images/ColorDots.png')

# Create the draw object
draw = ImageDraw.Draw(image)

# Draw a red chord inside a bounding box
draw.chord([(250, 130), (440, 260)], start=30, end=270, fill="red", width=10)

# Display the image
image.show()
print('The chord is drawn successfully...')
輸出
The chord is drawn successfully...
輸出影像
python_pillow_function_reference.htm
廣告