- NumPy 教程
- NumPy - 首頁
- NumPy - 簡介
- NumPy - 環境配置
- NumPy 陣列
- NumPy - Ndarray 物件
- NumPy - 資料型別
- NumPy 建立和運算元組
- NumPy - 陣列建立函式
- NumPy - 陣列操作
- NumPy - 從現有資料建立陣列
- NumPy - 從數值範圍建立陣列
- NumPy - 遍歷陣列
- NumPy - 陣列重塑
- NumPy - 陣列連線
- NumPy - 陣列堆疊
- NumPy - 陣列分割
- NumPy - 陣列扁平化
- NumPy - 陣列轉置
- NumPy 索引和切片
- NumPy - 索引和切片
- NumPy - 高階索引
- NumPy 陣列屬性和操作
- NumPy - 陣列屬性
- NumPy - 陣列形狀
- NumPy - 陣列大小
- NumPy - 陣列步長
- NumPy - 陣列元素大小
- NumPy - 廣播
- NumPy - 算術運算
- NumPy - 陣列加法
- NumPy - 陣列減法
- NumPy - 陣列乘法
- NumPy - 陣列除法
- NumPy 高階陣列操作
- NumPy - 交換陣列軸
- NumPy - 位元組交換
- NumPy - 副本和檢視
- NumPy - 元素級陣列比較
- NumPy - 陣列過濾
- NumPy - 陣列拼接
- NumPy - 排序、搜尋和計數函式
- NumPy - 陣列搜尋
- NumPy - 陣列並集
- NumPy - 查詢唯一行
- NumPy - 建立日期時間陣列
- NumPy - 二元運算子
- NumPy - 字串函式
- NumPy - 數學函式
- NumPy - 統計函式
- NumPy - 矩陣庫
- NumPy - 線性代數
- NumPy - Matplotlib
- NumPy - 使用 Matplotlib 繪製直方圖
- NumPy - NumPy 的 I/O 操作
- NumPy 排序和高階操作
- NumPy - 陣列排序
- NumPy - 沿軸排序
- NumPy - 使用花式索引排序
- NumPy - 結構化陣列
- NumPy - 建立結構化陣列
- NumPy - 操作結構化陣列
- NumPy - 欄位訪問
- NumPy - 記錄陣列
- Numpy - 載入陣列
- Numpy - 儲存陣列
- NumPy - 向陣列追加值
- NumPy - 交換陣列列
- NumPy - 向陣列插入軸
- NumPy 處理缺失資料
- NumPy - 處理缺失資料
- NumPy - 識別缺失值
- NumPy - 刪除缺失資料
- NumPy - 填充缺失資料
- NumPy 效能最佳化
- NumPy - 使用陣列進行效能最佳化
- NumPy - 使用陣列進行向量化
- NumPy - 陣列的記憶體佈局
- Numpy 線性代數
- NumPy - 線性代數
- NumPy - 矩陣庫
- NumPy - 矩陣加法
- NumPy - 矩陣減法
- NumPy - 矩陣乘法
- NumPy - 元素級矩陣運算
- NumPy - 點積
- NumPy - 矩陣求逆
- NumPy - 行列式計算
- NumPy - 特徵值
- NumPy - 特徵向量
- NumPy - 奇異值分解
- NumPy - 求解線性方程組
- NumPy - 矩陣範數
- NumPy 元素級矩陣運算
- NumPy - 求和
- NumPy - 求平均值
- NumPy - 求中位數
- NumPy - 求最小值
- NumPy - 求最大值
- NumPy 集合運算
- NumPy - 唯一元素
- NumPy - 交集
- NumPy - 並集
- NumPy - 差集
- NumPy 有用資源
- NumPy 編譯器
- NumPy 快速指南
- NumPy - 有用資源
- NumPy - 討論
NumPy 快速指南
NumPy - 簡介
NumPy 是一個 Python 包。它代表“Numerical Python”。它是一個包含多維陣列物件和用於陣列處理的例程集合的庫。
Numeric,NumPy 的祖先,由 Jim Hugunin 開發。另一個名為 Numarray 的包也得到了開發,它具有一些額外的功能。2005 年,Travis Oliphant 透過將 Numarray 的功能整合到 Numeric 包中建立了 NumPy 包。許多貢獻者參與了這個開源專案。
使用 NumPy 進行的操作
使用 NumPy,開發人員可以執行以下操作:
陣列上的數學和邏輯運算。
傅立葉變換和形狀操作例程。
與線性代數相關的運算。NumPy 具有用於線性代數和隨機數生成的內建函式。
NumPy – MatLab 的替代品
NumPy 通常與 SciPy(科學 Python)和 Mat−plotlib(繪相簿)等包一起使用。這種組合被廣泛用作 MatLab 的替代品,MatLab 是一個流行的技術計算平臺。然而,Python 的 MatLab 替代方案現在被視為一種更現代和完整的程式語言。
它是開源的,這是 NumPy 的一個額外優勢。
NumPy - 環境配置
標準 Python 發行版不包含 NumPy 模組。一種輕量級的替代方法是使用流行的 Python 包安裝程式 pip 來安裝 NumPy。
pip install numpy
啟用 NumPy 的最佳方法是使用特定於您作業系統的可安裝二進位制包。這些二進位制檔案包含完整的 SciPy 堆疊(包括 NumPy、SciPy、matplotlib、IPython、SymPy 和 nose 包以及核心 Python)。
Windows
Anaconda(來自 https://www.continuum.io)是 SciPy 堆疊的免費 Python 發行版。它也適用於 Linux 和 Mac。
Canopy(https://www.enthought.com/products/canopy/)作為免費和商業發行版提供,包含適用於 Windows、Linux 和 Mac 的完整 SciPy 堆疊。
Python (x,y):這是一個免費的 Python 發行版,包含 SciPy 堆疊和適用於 Windows 作業系統的 Spyder IDE。(可從 https://www.python-xy.github.io/ 下載)
Linux
各個 Linux 發行版的包管理器用於安裝 SciPy 堆疊中的一個或多個包。
對於 Ubuntu
sudo apt-get install python-numpy
python-scipy python-matplotlibipythonipythonnotebook python-pandas
python-sympy python-nose
對於 Fedora
sudo yum install numpyscipy python-matplotlibipython
python-pandas sympy python-nose atlas-devel
從原始碼構建
必須安裝核心 Python(2.6.x、2.7.x 和 3.2.x 及更高版本),並啟用 distutils 和 zlib 模組。
必須提供 GNU gcc(4.2 及更高版本)C 編譯器。
要安裝 NumPy,請執行以下命令。
Python setup.py install
要測試 NumPy 模組是否已正確安裝,請嘗試從 Python 提示符匯入它。
import numpy
如果未安裝,將顯示以下錯誤訊息。
Traceback (most recent call last):
   File "<pyshell#0>", line 1, in <module>
      import numpy
ImportError: No module named 'numpy'
或者,可以使用以下語法匯入 NumPy 包:
import numpy as np
NumPy - Ndarray 物件
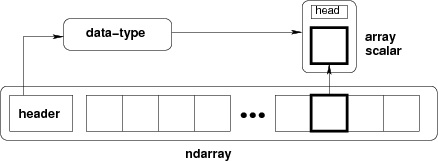
NumPy 中定義的最重要的物件是稱為 ndarray 的 N 維陣列型別。它描述了相同型別專案的集合。可以使用基於零的索引訪問集合中的專案。
ndarray 中的每個專案在記憶體中佔用相同大小的塊。ndarray 中的每個元素都是資料型別物件(稱為 dtype)的物件。
從 ndarray 物件(透過切片)提取的任何專案都由一個數組標量型別的 Python 物件表示。下圖顯示了 ndarray、資料型別物件(dtype)和陣列標量型別之間的關係:
可以通過後面教程中描述的不同陣列建立例程來構造 ndarray 類的例項。使用 NumPy 中的 array 函式建立基本 ndarray,如下所示:
numpy.array
它從任何公開陣列介面的物件或返回陣列的任何方法建立 ndarray。
numpy.array(object, dtype = None, copy = True, order = None, subok = False, ndmin = 0)
上述建構函式採用以下引數:
| 序號 | 引數和描述 |
|---|---|
| 1 | object 任何公開陣列介面方法並返回陣列的物件,或任何(巢狀)序列。 |
| 2 | dtype 所需的陣列資料型別,可選 |
| 3 | copy 可選。預設情況下(true),物件會被複制 |
| 4 | order C(行主序)或 F(列主序)或 A(任意)(預設) |
| 5 | subok 預設情況下,返回的陣列強制為基類陣列。如果為 true,則子類會傳遞 |
| 6 | ndmin 指定結果陣列的最小維度 |
請檢視以下示例以更好地理解。
示例 1
import numpy as np
a = np.array([1,2,3])
print a
輸出如下:
[1, 2, 3]
示例 2
# more than one dimensions
import numpy as np
a = np.array([[1, 2], [3, 4]])
print a
輸出如下:
[[1, 2]
 [3, 4]]
示例 3
# minimum dimensions
import numpy as np
a = np.array([1, 2, 3,4,5], ndmin = 2)
print a
輸出如下:
[[1, 2, 3, 4, 5]]
示例 4
# dtype parameter
import numpy as np
a = np.array([1, 2, 3], dtype = complex)
print a
輸出如下:
[ 1.+0.j, 2.+0.j, 3.+0.j]
ndarray 物件由計算機記憶體中連續的一維段組成,並結合索引方案,將每個專案對映到記憶體塊中的位置。記憶體塊以行主序(C 樣式)或列主序(FORTRAN 或 MatLab 樣式)儲存元素。
NumPy - 資料型別
NumPy 支援比 Python 多得多的數值型別。下表顯示了 NumPy 中定義的不同標量資料型別。
| 序號 | 資料型別和描述 |
|---|---|
| 1 | bool_ 布林值(True 或 False),儲存為位元組 |
| 2 | int_ 預設整數型別(與 C long 相同;通常為 int64 或 int32) |
| 3 | intc 與 C int 相同(通常為 int32 或 int64) |
| 4 | intp 用於索引的整數(與 C ssize_t 相同;通常為 int32 或 int64) |
| 5 | int8 位元組(-128 到 127) |
| 6 | int16 整數(-32768 到 32767) |
| 7 | int32 整數(-2147483648 到 2147483647) |
| 8 | int64 整數(-9223372036854775808 到 9223372036854775807) |
| 9 | uint8 無符號整數(0 到 255) |
| 10 | uint16 無符號整數(0 到 65535) |
| 11 | uint32 無符號整數(0 到 4294967295) |
| 12 | uint64 無符號整數(0 到 18446744073709551615) |
| 13 | float_ float64 的簡寫 |
| 14 | float16 半精度浮點數:符號位、5 位指數、10 位尾數 |
| 15 | float32 單精度浮點數:符號位、8 位指數、23 位尾數 |
| 16 | float64 雙精度浮點數:符號位、11 位指數、52 位尾數 |
| 17 | complex_ complex128 的簡寫 |
| 18 | complex64 複數,由兩個 32 位浮點數(實部和虛部)表示 |
| 19 | complex128 複數,由兩個 64 位浮點數(實部和虛部)表示 |
NumPy 數值型別是 dtype(資料型別)物件的例項,每個物件都具有獨特的特性。dtype 可用作 np.bool_、np.float32 等。
資料型別物件 (dtype)
資料型別物件描述了對應於陣列的固定記憶體塊的解釋,具體取決於以下方面:
資料型別(整數、浮點數或 Python 物件)
資料大小
位元組序(小端或大端)
對於結構化型別,包括欄位名稱、每個欄位的資料型別以及每個欄位佔據的記憶體塊部分。
如果資料型別是子陣列,則包括其形狀和資料型別
位元組序透過在資料型別前加“<”或“>”來確定。“<”表示編碼是小端序(最低有效位元組儲存在最小地址中)。“>”表示編碼是大端序(最高有效位元組儲存在最小地址中)。
使用以下語法構造 dtype 物件:
numpy.dtype(object, align, copy)
引數如下:
物件 - 轉換為資料型別物件
Align - 如果為 True,則向欄位新增填充,使其與 C 結構體類似
Copy - 建立 dtype 物件的新副本。如果為 False,則結果是對內建資料型別物件的引用
示例 1
# using array-scalar type
import numpy as np
dt = np.dtype(np.int32)
print dt
輸出如下:
int32
示例 2
#int8, int16, int32, int64 can be replaced by equivalent string 'i1', 'i2','i4', etc.
import numpy as np

dt = np.dtype('i4')
print dt
輸出如下:
int32
示例 3
# using endian notation
import numpy as np
dt = np.dtype('>i4')
print dt
輸出如下:
>i4
以下示例展示了結構化資料型別的用法。這裡需要宣告欄位名稱和對應的標量資料型別。
示例 4
# first create structured data type
import numpy as np
dt = np.dtype([('age',np.int8)])
print dt
輸出如下:
[('age', 'i1')]
示例 5
# now apply it to ndarray object
import numpy as np

dt = np.dtype([('age',np.int8)])
a = np.array([(10,),(20,),(30,)], dtype = dt)
print a
輸出如下:
[(10,) (20,) (30,)]
示例 6
# file name can be used to access content of age column
import numpy as np

dt = np.dtype([('age',np.int8)])
a = np.array([(10,),(20,),(30,)], dtype = dt)
print a['age']
輸出如下:
[10 20 30]
示例 7
以下示例定義了一個名為student的結構化資料型別,其中包含一個字串欄位'name'、一個整數字段'age'和一個浮點欄位'marks'。此 dtype 應用於 ndarray 物件。
import numpy as np
student = np.dtype([('name','S20'), ('age', 'i1'), ('marks', 'f4')])
print student
輸出如下:
[('name', 'S20'), ('age', 'i1'), ('marks', '<f4')])
示例 8
import numpy as np

student = np.dtype([('name','S20'), ('age', 'i1'), ('marks', 'f4')])
a = np.array([('abc', 21, 50),('xyz', 18, 75)], dtype = student)
print a
輸出如下:
[('abc', 21, 50.0), ('xyz', 18, 75.0)]
每個內建資料型別都有一個字元程式碼來唯一標識它。
'b' - 布林值
'i' - (有符號)整數
'u' - 無符號整數
'f' - 浮點數
'c' - 複數浮點數
'm' - 時間差
'M' - 日期時間
'O' - (Python)物件
'S', 'a' - (位元組)字串
'U' - Unicode
'V' - 原始資料(空值)
NumPy - 陣列屬性
在本節中,我們將討論 NumPy 的各種陣列屬性。
ndarray.shape
此陣列屬性返回一個包含陣列維度的元組。它還可以用於調整陣列大小。
示例 1
import numpy as np
a = np.array([[1,2,3],[4,5,6]])
print a.shape
輸出如下:
(2, 3)
示例 2
# this resizes the ndarray
import numpy as np

a = np.array([[1,2,3],[4,5,6]])
a.shape = (3,2)
print a
輸出如下:
[[1, 2]
 [3, 4]
 [5, 6]]
示例 3
NumPy 還提供了一個 reshape 函式來調整陣列大小。
import numpy as np
a = np.array([[1,2,3],[4,5,6]])
b = a.reshape(3,2)
print b
輸出如下:
[[1, 2]
 [3, 4]
 [5, 6]]
ndarray.ndim
此陣列屬性返回陣列的維度數。
示例 1
# an array of evenly spaced numbers
import numpy as np
a = np.arange(24)
print a
輸出如下:
[0 1 2 3 4 5 6 7 8 9 10 11 12 13 14 15 16 17 18 19 20 21 22 23]
示例 2
# this is one dimensional array
import numpy as np
a = np.arange(24)
a.ndim

# now reshape it
b = a.reshape(2,4,3)
print b
# b is having three dimensions
輸出如下:
[[[ 0,  1,  2]
  [ 3,  4,  5]
  [ 6,  7,  8]
  [ 9, 10, 11]]
  [[12, 13, 14]
   [15, 16, 17]
   [18, 19, 20]
   [21, 22, 23]]]
numpy.itemsize
此陣列屬性返回陣列中每個元素的位元組長度。
示例 1
# dtype of array is int8 (1 byte)
import numpy as np
x = np.array([1,2,3,4,5], dtype = np.int8)
print x.itemsize
輸出如下:
1
示例 2
# dtype of array is now float32 (4 bytes)
import numpy as np
x = np.array([1,2,3,4,5], dtype = np.float32)
print x.itemsize
輸出如下:
4
numpy.flags
ndarray 物件具有以下屬性。此函式返回其當前值。
| 序號 | 屬性 & 描述 |
|---|---|
| 1 | C_CONTIGUOUS (C) 資料位於單個、C 樣式連續段中 |
| 2 | F_CONTIGUOUS (F) 資料位於單個、Fortran 樣式連續段中 |
| 3 | OWNDATA (O) 陣列擁有其使用的記憶體或從另一個物件借用它 |
| 4 | WRITEABLE (W) 資料區域可以寫入。將其設定為 False 會鎖定資料,使其成為只讀 |
| 5 | ALIGNED (A) 資料和所有元素都針對硬體進行了適當的對齊 |
| 6 | UPDATEIFCOPY (U) 此陣列是其他某個陣列的副本。當此陣列被釋放時,基礎陣列將使用此陣列的內容進行更新 |
示例
以下示例顯示了標誌的當前值。
import numpy as np
x = np.array([1,2,3,4,5])
print x.flags
輸出如下:
C_CONTIGUOUS : True
F_CONTIGUOUS : True
OWNDATA : True
WRITEABLE : True
ALIGNED : True
UPDATEIFCOPY : False
NumPy - 陣列建立函式
可以透過以下任何陣列建立例程或使用低階 ndarray 建構函式來構造新的ndarray物件。
numpy.empty
它建立一個指定形狀和 dtype 的未初始化陣列。它使用以下建構函式:
numpy.empty(shape, dtype = float, order = 'C')
建構函式採用以下引數。
| 序號 | 引數和描述 |
|---|---|
| 1 | Shape 空陣列的形狀,以整數或整數元組表示 |
| 2 | Dtype 所需的輸出資料型別。可選 |
| 3 | Order 'C' 表示 C 樣式行主序陣列,'F' 表示 FORTRAN 樣式列主序陣列 |
示例
以下程式碼顯示了一個空陣列的示例。
import numpy as np
x = np.empty([3,2], dtype = int)
print x
輸出如下:
[[22649312    1701344351]
 [1818321759  1885959276]
 [16779776    156368896]]
注意 - 陣列中的元素顯示隨機值,因為它們未初始化。
numpy.zeros
返回一個指定大小的新陣列,填充為零。
numpy.zeros(shape, dtype = float, order = 'C')
建構函式採用以下引數。
| 序號 | 引數和描述 |
|---|---|
| 1 | Shape 空陣列的形狀,以整數或整數序列表示 |
| 2 | Dtype 所需的輸出資料型別。可選 |
| 3 | Order 'C' 表示 C 樣式行主序陣列,'F' 表示 FORTRAN 樣式列主序陣列 |
示例 1
# array of five zeros. Default dtype is float
import numpy as np
x = np.zeros(5)
print x
輸出如下:
[ 0. 0. 0. 0. 0.]
示例 2
import numpy as np
x = np.zeros((5,), dtype = np.int)
print x
現在,輸出將如下所示:
[0 0 0 0 0]
示例 3
# custom type
import numpy as np
x = np.zeros((2,2), dtype = [('x', 'i4'), ('y', 'i4')])
print x
它應該產生以下輸出:
[[(0,0)(0,0)]
 [(0,0)(0,0)]]
numpy.ones
返回一個指定大小和型別的陣列,填充為 1。
numpy.ones(shape, dtype = None, order = 'C')
建構函式採用以下引數。
| 序號 | 引數和描述 |
|---|---|
| 1 | Shape 空陣列的形狀,以整數或整數元組表示 |
| 2 | Dtype 所需的輸出資料型別。可選 |
| 3 | Order 'C' 表示 C 樣式行主序陣列,'F' 表示 FORTRAN 樣式列主序陣列 |
示例 1
# array of five ones. Default dtype is float
import numpy as np
x = np.ones(5)
print x
輸出如下:
[ 1. 1. 1. 1. 1.]
示例 2
import numpy as np
x = np.ones([2,2], dtype = int)
print x
現在,輸出將如下所示:
[[1  1]
 [1  1]]
NumPy - 從現有資料建立陣列
在本節中,我們將討論如何從現有資料建立陣列。
numpy.asarray
此函式類似於 numpy.array,除了它引數較少。此例程可用於將 Python 序列轉換為 ndarray。
numpy.asarray(a, dtype = None, order = None)
建構函式採用以下引數。
| 序號 | 引數和描述 |
|---|---|
| 1 | a 任何形式的輸入資料,例如列表、元組列表、元組、元組的元組或列表的元組 |
| 2 | dtype 預設情況下,輸入資料的資料型別應用於生成的 ndarray |
| 3 | order C(行主序)或 F(列主序)。C 為預設值 |
以下示例顯示瞭如何使用asarray函式。
示例 1
# convert list to ndarray
import numpy as np

x = [1,2,3]
a = np.asarray(x)
print a
其輸出將如下所示:
[1 2 3]
示例 2
# dtype is set
import numpy as np

x = [1,2,3]
a = np.asarray(x, dtype = float)
print a
現在,輸出將如下所示:
[ 1. 2. 3.]
示例 3
# ndarray from tuple
import numpy as np

x = (1,2,3)
a = np.asarray(x)
print a
其輸出將為:
[1 2 3]
示例 4
# ndarray from list of tuples
import numpy as np

x = [(1,2,3),(4,5)]
a = np.asarray(x)
print a
這裡,輸出將如下所示:
[(1, 2, 3) (4, 5)]
numpy.frombuffer
此函式將緩衝區解釋為一維陣列。任何公開緩衝區介面的物件都用作引數以返回ndarray。
numpy.frombuffer(buffer, dtype = float, count = -1, offset = 0)
建構函式採用以下引數。
| 序號 | 引數和描述 |
|---|---|
| 1 | buffer 任何公開緩衝區介面的物件 |
| 2 | dtype 返回的 ndarray 的資料型別。預設為浮點數 |
| 3 | count 要讀取的專案數,預設 -1 表示所有資料 |
| 4 | offset 開始讀取的位置。預設為 0 |
示例
以下示例演示了frombuffer函式的用法。
import numpy as np
s = 'Hello World'
a = np.frombuffer(s, dtype = 'S1')
print a
這是它的輸出:
['H' 'e' 'l' 'l' 'o' ' ' 'W' 'o' 'r' 'l' 'd']
numpy.fromiter
此函式從任何可迭代物件構建ndarray物件。此函式返回一個新的單維陣列。
numpy.fromiter(iterable, dtype, count = -1)
這裡,建構函式採用以下引數。
| 序號 | 引數和描述 |
|---|---|
| 1 | iterable 任何可迭代物件 |
| 2 | dtype 結果陣列的資料型別 |
| 3 | count 要從迭代器中讀取的專案數。預設為 -1,表示讀取所有資料 |
以下示例演示瞭如何使用內建range()函式返回列表物件。此列表的迭代器用於形成ndarray物件。
示例 1
# create list object using range function
import numpy as np
list = range(5)
print list
其輸出如下所示:
[0, 1, 2, 3, 4]
示例 2
# obtain iterator object from list
import numpy as np
list = range(5)
it = iter(list)

# use iterator to create ndarray
x = np.fromiter(it, dtype = float)
print x
現在,輸出將如下所示:
[0. 1. 2. 3. 4.]
NumPy - 從數值範圍建立陣列
在本節中,我們將瞭解如何從數值範圍建立陣列。
numpy.arange
此函式返回一個ndarray物件,其中包含給定範圍內的等間距值。函式格式如下:
numpy.arange(start, stop, step, dtype)
建構函式採用以下引數。
| 序號 | 引數和描述 |
|---|---|
| 1 | start 區間的起始值。如果省略,則預設為 0 |
| 2 | stop 區間的結束值(不包括此數字) |
| 3 | step 值之間的間距,預設為 1 |
| 4 | dtype 結果 ndarray 的資料型別。如果未給出,則使用輸入的資料型別 |
以下示例顯示瞭如何使用此函式。
示例 1
import numpy as np
x = np.arange(5)
print x
其輸出將如下所示:
[0 1 2 3 4]
示例 2
import numpy as np
# dtype set
x = np.arange(5, dtype = float)
print x
這裡,輸出將為:
[0. 1. 2. 3. 4.]
示例 3
# start and stop parameters set
import numpy as np
x = np.arange(10,20,2)
print x
其輸出如下所示:
[10 12 14 16 18]
numpy.linspace
此函式類似於arange()函式。在此函式中,指定了區間內等間距值的數目,而不是步長。此函式的用法如下:
numpy.linspace(start, stop, num, endpoint, retstep, dtype)
建構函式採用以下引數。
| 序號 | 引數和描述 |
|---|---|
| 1 | start 序列的起始值 |
| 2 | stop 序列的結束值,如果 endpoint 設定為 true,則包含在序列中 |
| 3 | num 要生成的等間距樣本數。預設為 50 |
| 4 | endpoint 預設為 True,因此 stop 值包含在序列中。如果為 False,則不包含 |
| 5 | retstep 如果為 True,則返回樣本和連續數字之間的步長 |
| 6 | dtype 輸出ndarray的資料型別 |
以下示例演示了linspace函式的用法。
示例 1
import numpy as np
x = np.linspace(10,20,5)
print x
其輸出將為:
[10. 12.5 15. 17.5 20.]
示例 2
# endpoint set to false
import numpy as np
x = np.linspace(10,20, 5, endpoint = False)
print x
輸出將為:
[10. 12. 14. 16. 18.]
示例 3
# find retstep value
import numpy as np

x = np.linspace(1,2,5, retstep = True)
print x
# retstep here is 0.25
現在,輸出將為:
(array([ 1. , 1.25, 1.5 , 1.75, 2. ]), 0.25)
numpy.logspace
此函式返回一個ndarray物件,其中包含對數刻度上等間距的數字。刻度的起始和結束端點是底數(通常為 10)的指數。
numpy.logspace(start, stop, num, endpoint, base, dtype)
以下引數確定logspace函式的輸出。
| 序號 | 引數和描述 |
|---|---|
| 1 | start 序列的起始點為 basestart |
| 2 | stop 序列的最終值為 basestop |
| 3 | num 範圍內的值的數量。預設為 50 |
| 4 | endpoint 如果為 True,則 stop 是範圍內的最後一個值 |
| 5 | base 對數空間的底數,預設為 10 |
| 6 | dtype 輸出陣列的資料型別。如果未給出,則取決於其他輸入引數 |
以下示例將幫助您理解logspace函式。
示例 1
import numpy as np
# default base is 10
a = np.logspace(1.0, 2.0, num = 10)
print a
其輸出將如下所示:
[ 10.           12.91549665     16.68100537      21.5443469  27.82559402
  35.93813664   46.41588834     59.94842503      77.42636827    100.    ]
示例 2
# set base of log space to 2
import numpy as np
a = np.logspace(1,10,num = 10, base = 2)
print a
現在,輸出將為:
[ 2. 4. 8. 16. 32. 64. 128. 256. 512. 1024.]
NumPy - 索引和切片
ndarray 物件的內容可以透過索引或切片來訪問和修改,就像 Python 的內建容器物件一樣。
如前所述,ndarray 物件中的專案遵循基於零的索引。有三種索引方法可用:欄位訪問、基本切片和高階索引。
基本切片是將 Python 的基本切片概念擴充套件到 n 維。Python 切片物件是透過向內建slice函式提供start、stop和step引數來構造的。此切片物件傳遞給陣列以提取陣列的一部分。
示例 1
import numpy as np
a = np.arange(10)
s = slice(2,7,2)
print a[s]
其輸出如下所示:
[2 4 6]
在上面的示例中,ndarray物件由arange()函式準備。然後定義一個切片物件,其 start、stop 和 step 值分別為 2、7 和 2。當此切片物件傳遞給 ndarray 時,它的一部分(從索引 2 開始到 7,步長為 2)被切片。
也可以透過直接向ndarray物件提供以冒號 : 分隔的切片引數 (start:stop:step) 來獲得相同的結果。
示例 2
import numpy as np
a = np.arange(10)
b = a[2:7:2]
print b
這裡,我們將獲得相同的輸出:
[2 4 6]
如果只輸入一個引數,則將返回與索引對應的單個專案。如果在前面插入一個 :,則將提取從該索引開始的所有專案。如果使用兩個引數(它們之間用 : 分隔),則將切片兩個索引之間的專案(不包括 stop 索引),預設步長為 1。
示例 3
# slice single item
import numpy as np

a = np.arange(10)
b = a[5]
print b
其輸出如下所示:
5
示例 4
# slice items starting from index
import numpy as np
a = np.arange(10)
print a[2:]
現在,輸出將為:
[2 3 4 5 6 7 8 9]
示例 5
# slice items between indexes
import numpy as np
a = np.arange(10)
print a[2:5]
這裡,輸出將為:
[2 3 4]
以上描述也適用於多維ndarray。
示例 6
import numpy as np
a = np.array([[1,2,3],[3,4,5],[4,5,6]])
print a

# slice items starting from index
print 'Now we will slice the array from the index a[1:]'
print a[1:]
輸出如下:
[[1 2 3]
 [3 4 5]
 [4 5 6]]

Now we will slice the array from the index a[1:]
[[3 4 5]
 [4 5 6]]
切片還可以包含省略號 (…) 以建立與陣列維度相同長度的選擇元組。如果在行位置使用省略號,它將返回一個包含行中專案的 ndarray。
示例 7
# array to begin with
import numpy as np
a = np.array([[1,2,3],[3,4,5],[4,5,6]])

print 'Our array is:'
print a
print '\n'

# this returns array of items in the second column
print 'The items in the second column are:'
print a[...,1]
print '\n'

# Now we will slice all items from the second row
print 'The items in the second row are:'
print a[1,...]
print '\n'

# Now we will slice all items from column 1 onwards
print 'The items column 1 onwards are:'
print a[...,1:]
此程式的輸出如下所示:
Our array is:
[[1 2 3]
 [3 4 5]
 [4 5 6]]

The items in the second column are:
[2 4 5]

The items in the second row are:
[3 4 5]

The items column 1 onwards are:
[[2 3]
 [4 5]
 [5 6]]
NumPy - 高階索引
可以從 ndarray 中進行選擇,該選擇是一個非元組序列、整數或布林資料型別的 ndarray 物件,或者是一個元組,其中至少有一個專案是序列物件。高階索引始終返回資料的副本。與此相反,切片僅顯示檢視。
高階索引有兩種型別:整數和布林。
整數索引
此機制有助於根據其 N 維索引選擇陣列中的任何任意專案。每個整數陣列表示該維度中的索引數。當索引包含與目標 ndarray 維度一樣多的整數陣列時,它變得很簡單。
在以下示例中,從 ndarray 物件的每一行的指定列中選擇一個元素。因此,行索引包含所有行號,列索引指定要選擇的元素。
示例 1
import numpy as np

x = np.array([[1, 2], [3, 4], [5, 6]])
y = x[[0,1,2], [0,1,0]]
print y
其輸出將如下所示:
[1 4 5]
選擇包括第一個陣列中的 (0,0)、(1,1) 和 (2,0) 處的元素。
在以下示例中,選擇了放置在 4X3 陣列角上的元素。選擇的行索引為 [0, 0] 和 [3,3],而列索引為 [0,2] 和 [0,2]。
示例 2
import numpy as np
x = np.array([[ 0,  1,  2],[ 3,  4,  5],[ 6,  7,  8],[ 9, 10, 11]])

print 'Our array is:'
print x
print '\n'

rows = np.array([[0,0],[3,3]])
cols = np.array([[0,2],[0,2]])
y = x[rows,cols]

print 'The corner elements of this array are:'
print y
此程式的輸出如下所示:
Our array is:
[[ 0  1  2]
 [ 3  4  5]
 [ 6  7  8]
 [ 9 10 11]]

The corner elements of this array are:
[[ 0  2]
 [ 9 11]]
結果選擇是一個包含角元素的 ndarray 物件。
高階索引和基本索引可以透過使用一個切片 (:) 或省略號 (…) 與索引陣列結合使用。以下示例對行使用切片,對列使用高階索引。當對兩者都使用切片時,結果相同。但高階索引會導致複製,並且可能具有不同的記憶體佈局。
示例 3
import numpy as np
x = np.array([[ 0,  1,  2],[ 3,  4,  5],[ 6,  7,  8],[ 9, 10, 11]])

print 'Our array is:'
print x
print '\n'

# slicing
z = x[1:4,1:3]

print 'After slicing, our array becomes:'
print z
print '\n'

# using advanced index for column
y = x[1:4,[1,2]]

print 'Slicing using advanced index for column:'
print y
此程式的輸出將如下所示:
Our array is:
[[ 0  1  2]
 [ 3  4  5]
 [ 6  7  8]
 [ 9 10 11]]

After slicing, our array becomes:
[[ 4  5]
 [ 7  8]
 [10 11]]

Slicing using advanced index for column:
[[ 4  5]
 [ 7  8]
 [10 11]]
布林陣列索引
當結果物件旨在成為布林運算(例如比較運算子)的結果時,使用這種型別的高階索引。
示例 1
在此示例中,大於 5 的專案作為布林索引的結果返回。
import numpy as np
x = np.array([[ 0,  1,  2],[ 3,  4,  5],[ 6,  7,  8],[ 9, 10, 11]])

print 'Our array is:'
print x
print '\n'

# Now we will print the items greater than 5
print 'The items greater than 5 are:'
print x[x > 5]
此程式的輸出將為:
Our array is:
[[ 0  1  2]
 [ 3  4  5]
 [ 6  7  8]
 [ 9 10 11]]

The items greater than 5 are:
[ 6  7  8  9 10 11]
示例 2
在此示例中,使用 ~(補碼運算子)省略 NaN(非數字)元素。
import numpy as np
a = np.array([np.nan, 1,2,np.nan,3,4,5])
print a[~np.isnan(a)]
其輸出將為:
[ 1. 2. 3. 4. 5.]
示例 3
以下示例演示瞭如何從陣列中過濾掉非複數元素。
import numpy as np
a = np.array([1, 2+6j, 5, 3.5+5j])
print a[np.iscomplex(a)]
這裡,輸出如下所示:
[2.0+6.j 3.5+5.j]
NumPy - 廣播
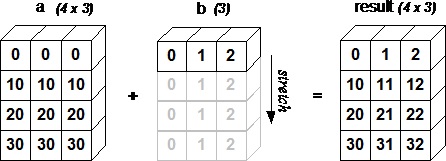
術語廣播(broadcasting)指的是 NumPy 在算術運算期間處理不同形狀陣列的能力。陣列上的算術運算通常在對應的元素上進行。如果兩個陣列的形狀完全相同,則這些運算可以順利執行。
示例 1
import numpy as np

a = np.array([1,2,3,4])
b = np.array([10,20,30,40])
c = a * b
print c
其輸出如下所示:
[10 40 90 160]
如果兩個陣列的維度不同,則無法進行元素到元素的運算。但是,由於廣播功能,NumPy 仍然可以對非相似形狀的陣列進行運算。較小的陣列將被廣播到較大陣列的大小,以便它們具有相容的形狀。
如果滿足以下規則,則可以進行廣播:
維度(ndim)小於另一個數組的陣列在其形狀前加上 '1'。
輸出形狀中每個維度的尺寸是該維度中輸入尺寸的最大值。
如果輸入在特定維度上的尺寸與輸出尺寸匹配或其值為 1,則可以使用該輸入進行計算。
如果輸入的某個維度尺寸為 1,則該維度中的第一個資料條目將用於沿該維度進行的所有計算。
如果上述規則產生有效結果,並且以下條件之一為真,則一組陣列被稱為可廣播(broadcastable):
陣列具有完全相同的形狀。
陣列具有相同的維度數,並且每個維度的長度要麼是公共長度,要麼是 1。
具有過少維度的陣列可以在其形狀前加上長度為 1 的維度,以便上述屬性為真。
以下程式顯示了一個廣播示例。
示例 2
import numpy as np
a = np.array([[0.0,0.0,0.0],[10.0,10.0,10.0],[20.0,20.0,20.0],[30.0,30.0,30.0]])
b = np.array([1.0,2.0,3.0])

print 'First array:'
print a
print '\n'

print 'Second array:'
print b
print '\n'

print 'First Array + Second Array'
print a + b
此程式的輸出將如下所示:
First array:
[[ 0. 0. 0.]
 [ 10. 10. 10.]
 [ 20. 20. 20.]
 [ 30. 30. 30.]]

Second array:
[ 1. 2. 3.]

First Array + Second Array
[[ 1. 2. 3.]
 [ 11. 12. 13.]
 [ 21. 22. 23.]
 [ 31. 32. 33.]]
下圖演示了陣列b如何被廣播以使其與a相容。
NumPy - 遍歷陣列
NumPy 包含一個迭代器物件numpy.nditer。它是一個高效的多維迭代器物件,可以使用它來迭代陣列。使用 Python 的標準迭代器介面訪問陣列的每個元素。
讓我們使用 arange() 函式建立一個 3X4 陣列,並使用nditer對其進行迭代。
示例 1
import numpy as np
a = np.arange(0,60,5)
a = a.reshape(3,4)

print 'Original array is:'
print a
print '\n'

print 'Modified array is:'
for x in np.nditer(a):
   print x,
此程式的輸出如下所示:
Original array is:
[[ 0 5 10 15]
 [20 25 30 35]
 [40 45 50 55]]

Modified array is:
0 5 10 15 20 25 30 35 40 45 50 55
示例 2
迭代順序的選擇是為了匹配陣列的記憶體佈局,而不考慮特定的排序。這可以透過迭代上述陣列的轉置來觀察。
import numpy as np
a = np.arange(0,60,5)
a = a.reshape(3,4)

print 'Original array is:'
print a
print '\n'

print 'Transpose of the original array is:'
b = a.T
print b
print '\n'

print 'Modified array is:'
for x in np.nditer(b):
   print x,
上述程式的輸出如下:
Original array is:
[[ 0 5 10 15]
 [20 25 30 35]
 [40 45 50 55]]

Transpose of the original array is:
[[ 0 20 40]
 [ 5 25 45]
 [10 30 50]
 [15 35 55]]

Modified array is:
0 5 10 15 20 25 30 35 40 45 50 55
迭代順序
如果使用 F 風格順序儲存相同的元素,則迭代器會選擇迭代陣列的更有效方式。
示例 1
import numpy as np
a = np.arange(0,60,5)
a = a.reshape(3,4)
print 'Original array is:'
print a
print '\n'

print 'Transpose of the original array is:'
b = a.T
print b
print '\n'

print 'Sorted in C-style order:'
c = b.copy(order='C')
print c
for x in np.nditer(c):
   print x,

print '\n'

print 'Sorted in F-style order:'
c = b.copy(order='F')
print c
for x in np.nditer(c):
   print x,
其輸出將如下所示:
Original array is:
[[ 0 5 10 15]
 [20 25 30 35]
 [40 45 50 55]]

Transpose of the original array is:
[[ 0 20 40]
 [ 5 25 45]
 [10 30 50]
 [15 35 55]]

Sorted in C-style order:
[[ 0 20 40]
 [ 5 25 45]
 [10 30 50]
 [15 35 55]]
0 20 40 5 25 45 10 30 50 15 35 55

Sorted in F-style order:
[[ 0 20 40]
 [ 5 25 45]
 [10 30 50]
 [15 35 55]]
0 5 10 15 20 25 30 35 40 45 50 55
示例 2
可以透過顯式提及來強制nditer物件使用特定的順序。
import numpy as np
a = np.arange(0,60,5)
a = a.reshape(3,4)

print 'Original array is:'
print a
print '\n'

print 'Sorted in C-style order:'
for x in np.nditer(a, order = 'C'):
   print x,
print '\n'

print 'Sorted in F-style order:'
for x in np.nditer(a, order = 'F'):
   print x,
其輸出將為:
Original array is:
[[ 0 5 10 15]
 [20 25 30 35]
 [40 45 50 55]]

Sorted in C-style order:
0 5 10 15 20 25 30 35 40 45 50 55

Sorted in F-style order:
0 20 40 5 25 45 10 30 50 15 35 55
修改陣列值
nditer物件還有一個可選引數,稱為op_flags。其預設值為只讀,但可以設定為讀寫或只寫模式。這將允許使用此迭代器修改陣列元素。
示例
import numpy as np
a = np.arange(0,60,5)
a = a.reshape(3,4)
print 'Original array is:'
print a
print '\n'

for x in np.nditer(a, op_flags = ['readwrite']):
   x[...] = 2*x
print 'Modified array is:'
print a
其輸出如下所示:
Original array is:
[[ 0 5 10 15]
 [20 25 30 35]
 [40 45 50 55]]

Modified array is:
[[ 0 10 20 30]
 [ 40 50 60 70]
 [ 80 90 100 110]]
外部迴圈
nditer 類建構函式有一個'flags'引數,它可以取以下值:
| 序號 | 引數和描述 |
|---|---|
| 1 | c_index 可以跟蹤 C 順序索引 |
| 2 | f_index 可以跟蹤 Fortran 順序索引 |
| 3 | multi-index 可以跟蹤每次迭代一個的索引型別 |
| 4 | external_loop 導致給定的值為具有多個值的 一維陣列,而不是零維陣列 |
示例
在下面的示例中,迭代器遍歷對應於每一列的一維陣列。
import numpy as np
a = np.arange(0,60,5)
a = a.reshape(3,4)

print 'Original array is:'
print a
print '\n'

print 'Modified array is:'
for x in np.nditer(a, flags = ['external_loop'], order = 'F'):
   print x,
輸出如下:
Original array is:
[[ 0 5 10 15]
 [20 25 30 35]
 [40 45 50 55]]

Modified array is:
[ 0 20 40] [ 5 25 45] [10 30 50] [15 35 55]
廣播迭代
如果兩個陣列是可廣播的,則組合的nditer物件能夠同時對它們進行迭代。假設陣列a的維度為 3X4,並且還有一個維度為 1X4 的陣列b,則使用以下型別的迭代器(陣列b被廣播到a的大小)。
示例
import numpy as np
a = np.arange(0,60,5)
a = a.reshape(3,4)

print 'First array is:'
print a
print '\n'

print 'Second array is:'
b = np.array([1, 2, 3, 4], dtype = int)
print b
print '\n'

print 'Modified array is:'
for x,y in np.nditer([a,b]):
   print "%d:%d" % (x,y),
其輸出將如下所示:
First array is:
[[ 0 5 10 15]
 [20 25 30 35]
 [40 45 50 55]]

Second array is:
[1 2 3 4]

Modified array is:
0:1 5:2 10:3 15:4 20:1 25:2 30:3 35:4 40:1 45:2 50:3 55:4
NumPy - 陣列操作
NumPy 包中提供了許多用於操作 ndarray 物件中元素的例程。它們可以分為以下型別:
更改形狀
| 序號 | 形狀和描述 |
|---|---|
| 1 | reshape
在不更改資料的情況下為陣列提供新的形狀 |
| 2 | flat
陣列上的 1-D 迭代器 |
| 3 | flatten
返回陣列摺疊成一維的副本 |
| 4 | ravel
返回一個連續的扁平陣列 |
轉置操作
| 序號 | 操作和描述 |
|---|---|
| 1 | transpose
置換陣列的維度 |
| 2 | ndarray.T
與 self.transpose() 相同 |
| 3 | rollaxis
向後滾動指定的軸 |
| 4 | swapaxes
交換陣列的兩個軸 |
更改維度
| 序號 | 維度和描述 |
|---|---|
| 1 | broadcast
生成模擬廣播的物件 |
| 2 | broadcast_to
將陣列廣播到新的形狀 |
| 3 | expand_dims
擴充套件陣列的形狀 |
| 4 | squeeze
從陣列的形狀中移除一維條目 |
連線陣列
| 序號 | 陣列和描述 |
|---|---|
| 1 | concatenate
沿著現有軸連線一系列陣列 |
| 2 | stack
沿著新軸連線一系列陣列 |
| 3 | hstack
水平(列方向)依次堆疊陣列 |
| 4 | vstack
垂直(行方向)依次堆疊陣列 |
分割陣列
新增/刪除元素
| 序號 | 元素和描述 |
|---|---|
| 1 | resize
返回具有指定形狀的新陣列 |
| 2 | append
將值追加到陣列的末尾 |
| 3 | insert
在給定軸上的給定索引之前插入值 |
| 4 | delete
返回一個新陣列,其中刪除了沿軸的子陣列 |
| 5 | unique
查詢陣列的唯一元素 |
NumPy - 二元運算子
以下是 NumPy 包中可用的按位運算函式。
| 序號 | 操作和描述 |
|---|---|
| 1 | bitwise_and
計算陣列元素的按位 AND 運算 |
| 2 | bitwise_or
計算陣列元素的按位 OR 運算 |
| 3 | invert
計算按位 NOT |
| 4 | left_shift
將二進位制表示的位向左移動 |
| 5 | right_shift
將二進位制表示的位向右移動 |
NumPy - 字串函式
以下函式用於對 dtype 為 numpy.string_ 或 numpy.unicode_ 的陣列執行向量化字串操作。它們基於 Python 內建庫中標準的字串函式。
| 序號 | 函式和描述 |
|---|---|
| 1 | add()
對於兩個 str 或 Unicode 陣列,返回元素級的字串連線 |
| 2 | multiply()
返回字串的多次連線,元素級 |
| 3 | center()
返回給定字串的副本,其中元素在指定長度的字串中居中 |
| 4 | capitalize()
返回字串的副本,其中只有第一個字元大寫 |
| 5 | title()
返回字串或 unicode 的元素級標題大小寫版本 |
| 6 | lower()
返回一個數組,其中元素轉換為小寫 |
| 7 | upper()
返回一個數組,其中元素轉換為大寫 |
| 8 | split()
使用分隔符分隔符返回字串中單詞的列表 |
| 9 | splitlines()
返回元素中行的列表,在行邊界處中斷 |
| 10 | strip()
返回一個副本,其中刪除了前導和尾隨字元 |
| 11 | join()
返回一個字串,它是序列中字串的連線 |
| 12 | replace()
返回字串的副本,其中所有出現的子字串都被新字串替換 |
| 13 | decode()
按元素級呼叫 str.decode |
| 14 | encode()
按元素級呼叫 str.encode |
這些函式在字元陣列類 (numpy.char) 中定義。舊的 Numarray 包包含 chararray 類。numpy.char 類中的上述函式對於執行向量化字串操作很有用。
NumPy - 數學函式
可以理解的是,NumPy 包含大量各種數學運算。NumPy 提供標準三角函式、算術運算函式、複數處理等。
三角函式
NumPy 具有標準三角函式,這些函式返回給定以弧度表示的角度的三角比。
示例
import numpy as np
a = np.array([0,30,45,60,90])

print 'Sine of different angles:'
# Convert to radians by multiplying with pi/180
print np.sin(a*np.pi/180)
print '\n'

print 'Cosine values for angles in array:'
print np.cos(a*np.pi/180)
print '\n'

print 'Tangent values for given angles:'
print np.tan(a*np.pi/180)
這是它的輸出:
Sine of different angles:
[ 0.          0.5         0.70710678  0.8660254   1.        ]

Cosine values for angles in array:
[  1.00000000e+00   8.66025404e-01   7.07106781e-01   5.00000000e-01
   6.12323400e-17]

Tangent values for given angles:
[  0.00000000e+00   5.77350269e-01   1.00000000e+00   1.73205081e+00
   1.63312394e+16]
arcsin、arcos 和arctan 函式返回給定角度的 sin、cos 和 tan 的三角反函式。可以透過numpy.degrees() 函式將弧度轉換為度數來驗證這些函式的結果。
示例
import numpy as np
a = np.array([0,30,45,60,90])

print 'Array containing sine values:'
sin = np.sin(a*np.pi/180)
print sin
print '\n'

print 'Compute sine inverse of angles. Returned values are in radians.'
inv = np.arcsin(sin)
print inv
print '\n'

print 'Check result by converting to degrees:'
print np.degrees(inv)
print '\n'

print 'arccos and arctan functions behave similarly:'
cos = np.cos(a*np.pi/180)
print cos
print '\n'

print 'Inverse of cos:'
inv = np.arccos(cos)
print inv
print '\n'

print 'In degrees:'
print np.degrees(inv)
print '\n'

print 'Tan function:'
tan = np.tan(a*np.pi/180)
print tan
print '\n'

print 'Inverse of tan:'
inv = np.arctan(tan)
print inv
print '\n'

print 'In degrees:'
print np.degrees(inv)
其輸出如下所示:
Array containing sine values:
[ 0.          0.5         0.70710678  0.8660254   1.        ]

Compute sine inverse of angles. Returned values are in radians.
[ 0.          0.52359878  0.78539816  1.04719755  1.57079633]

Check result by converting to degrees:
[  0.  30.  45.  60.  90.]

arccos and arctan functions behave similarly:
[  1.00000000e+00   8.66025404e-01   7.07106781e-01   5.00000000e-01
   6.12323400e-17]

Inverse of cos:
[ 0.          0.52359878  0.78539816  1.04719755  1.57079633]

In degrees:
[  0.  30.  45.  60.  90.]

Tan function:
[  0.00000000e+00   5.77350269e-01   1.00000000e+00   1.73205081e+00
   1.63312394e+16]

Inverse of tan:
[ 0.          0.52359878  0.78539816  1.04719755  1.57079633]

In degrees:
[  0.  30.  45.  60.  90.]
舍入函式
numpy.around()
這是一個返回舍入到所需精度的值的函式。該函式採用以下引數。
numpy.around(a,decimals)
其中,
| 序號 | 引數和描述 |
|---|---|
| 1 | a 輸入資料 |
| 2 | decimals 要舍入到的小數位數。預設為 0。如果為負數,則整數將舍入到小數點左側的位置 |
示例
import numpy as np
a = np.array([1.0,5.55, 123, 0.567, 25.532])

print 'Original array:'
print a
print '\n'

print 'After rounding:'
print np.around(a)
print np.around(a, decimals = 1)
print np.around(a, decimals = -1)
它產生以下輸出:
Original array:
[   1.       5.55   123.       0.567   25.532]

After rounding:
[   1.    6.   123.    1.   26. ]
[   1.    5.6  123.    0.6  25.5]
[   0.    10.  120.    0.   30. ]
numpy.floor()
此函式返回不大於輸入引數的最大整數。標量 x 的底數是最大的整數 i,使得 i <= x。請注意,在 Python 中,向下取整總是遠離 0 舍入。
示例
import numpy as np
a = np.array([-1.7, 1.5, -0.2, 0.6, 10])

print 'The given array:'
print a
print '\n'

print 'The modified array:'
print np.floor(a)
它產生以下輸出:
The given array:
[ -1.7   1.5  -0.2   0.6  10. ]

The modified array:
[ -2.   1.  -1.   0.  10.]
numpy.ceil()
ceil() 函式返回輸入值的向上取整,即標量 x 的向上取整是最小的整數 i,使得 i >= x。
示例
import numpy as np
a = np.array([-1.7, 1.5, -0.2, 0.6, 10])

print 'The given array:'
print a
print '\n'

print 'The modified array:'
print np.ceil(a)
它將產生以下輸出:
The given array:
[ -1.7   1.5  -0.2   0.6  10. ]

The modified array:
[ -1.   2.  -0.   1.  10.]
NumPy - 算術運算
用於執行算術運算(如 add()、subtract()、multiply() 和 divide())的輸入陣列必須具有相同的形狀,或者應符合陣列廣播規則。
示例
import numpy as np
a = np.arange(9, dtype = np.float_).reshape(3,3)

print 'First array:'
print a
print '\n'

print 'Second array:'
b = np.array([10,10,10])
print b
print '\n'

print 'Add the two arrays:'
print np.add(a,b)
print '\n'

print 'Subtract the two arrays:'
print np.subtract(a,b)
print '\n'

print 'Multiply the two arrays:'
print np.multiply(a,b)
print '\n'

print 'Divide the two arrays:'
print np.divide(a,b)
它將產生以下輸出:
First array:
[[ 0. 1. 2.]
 [ 3. 4. 5.]
 [ 6. 7. 8.]]

Second array:
[10 10 10]

Add the two arrays:
[[ 10. 11. 12.]
 [ 13. 14. 15.]
 [ 16. 17. 18.]]

Subtract the two arrays:
[[-10. -9. -8.]
 [ -7. -6. -5.]
 [ -4. -3. -2.]]

Multiply the two arrays:
[[ 0. 10. 20.]
 [ 30. 40. 50.]
 [ 60. 70. 80.]]

Divide the two arrays:
[[ 0. 0.1 0.2]
 [ 0.3 0.4 0.5]
 [ 0.6 0.7 0.8]]
現在讓我們討論 NumPy 中提供的一些其他重要的算術函式。
numpy.reciprocal()
此函式返回引數的倒數,元素級。對於絕對值大於 1 的元素,結果始終為 0,因為 Python 處理整數除法的方式。對於整數 0,會發出溢位警告。
示例
import numpy as np
a = np.array([0.25, 1.33, 1, 0, 100])

print 'Our array is:'
print a
print '\n'

print 'After applying reciprocal function:'
print np.reciprocal(a)
print '\n'

b = np.array([100], dtype = int)
print 'The second array is:'
print b
print '\n'

print 'After applying reciprocal function:'
print np.reciprocal(b)
它將產生以下輸出:
Our array is:
[   0.25    1.33    1.      0.    100.  ]

After applying reciprocal function:
main.py:9: RuntimeWarning: divide by zero encountered in reciprocal
  print np.reciprocal(a)
[ 4.         0.7518797  1.               inf  0.01     ]

The second array is:
[100]

After applying reciprocal function:
[0]
numpy.power()
此函式將第一個輸入陣列中的元素視為底數,並將其提升到第二個輸入陣列中對應元素的冪。
import numpy as np
a = np.array([10,100,1000])

print 'Our array is:'
print a
print '\n'

print 'Applying power function:'
print np.power(a,2)
print '\n'

print 'Second array:'
b = np.array([1,2,3])
print b
print '\n'

print 'Applying power function again:'
print np.power(a,b)
它將產生以下輸出:
Our array is:
[  10  100 1000]

Applying power function:
[    100   10000 1000000]

Second array:
[1 2 3]

Applying power function again:
[        10      10000 1000000000]
numpy.mod()
此函式返回輸入陣列中對應元素的除法餘數。函式numpy.remainder()也產生相同的結果。
import numpy as np
a = np.array([10,20,30])
b = np.array([3,5,7])

print 'First array:'
print a
print '\n'

print 'Second array:'
print b
print '\n'

print 'Applying mod() function:'
print np.mod(a,b)
print '\n'

print 'Applying remainder() function:'
print np.remainder(a,b)
它將產生以下輸出:
First array:
[10 20 30]

Second array:
[3 5 7]

Applying mod() function:
[1 0 2]

Applying remainder() function:
[1 0 2]
以下函式用於對具有複數的陣列執行運算。
numpy.real() - 返回複數型別引數的實部。
numpy.imag() − 返回複數資料型別引數的虛部。
numpy.conj() − 返回複共軛,它是透過改變虛部的符號獲得的。
numpy.angle() − 返回複數引數的角度。該函式具有degree引數。如果為真,則返回度數的角度,否則角度為弧度。
import numpy as np
a = np.array([-5.6j, 0.2j, 11. , 1+1j])

print 'Our array is:'
print a
print '\n'

print 'Applying real() function:'
print np.real(a)
print '\n'

print 'Applying imag() function:'
print np.imag(a)
print '\n'

print 'Applying conj() function:'
print np.conj(a)
print '\n'

print 'Applying angle() function:'
print np.angle(a)
print '\n'

print 'Applying angle() function again (result in degrees)'
print np.angle(a, deg = True)
它將產生以下輸出:
Our array is:
[ 0.-5.6j 0.+0.2j 11.+0.j 1.+1.j ]

Applying real() function:
[ 0. 0. 11. 1.]

Applying imag() function:
[-5.6 0.2 0. 1. ]

Applying conj() function:
[ 0.+5.6j 0.-0.2j 11.-0.j 1.-1.j ]

Applying angle() function:
[-1.57079633 1.57079633 0. 0.78539816]

Applying angle() function again (result in degrees)
[-90. 90. 0. 45.]
NumPy - 統計函式
NumPy 有很多有用的統計函式,用於從陣列中給定的元素中查詢最小值、最大值、百分位數標準差和方差等。這些函式解釋如下:
numpy.amin() 和 numpy.amax()
這些函式返回給定陣列中沿指定軸的元素的最小值和最大值。
示例
import numpy as np
a = np.array([[3,7,5],[8,4,3],[2,4,9]])

print 'Our array is:'
print a
print '\n'

print 'Applying amin() function:'
print np.amin(a,1)
print '\n'

print 'Applying amin() function again:'
print np.amin(a,0)
print '\n'

print 'Applying amax() function:'
print np.amax(a)
print '\n'

print 'Applying amax() function again:'
print np.amax(a, axis = 0)
它將產生以下輸出:
Our array is:
[[3 7 5]
[8 4 3]
[2 4 9]]

Applying amin() function:
[3 3 2]

Applying amin() function again:
[2 4 3]

Applying amax() function:
9

Applying amax() function again:
[8 7 9]
numpy.ptp()
numpy.ptp() 函式返回沿某個軸的值的範圍(最大值-最小值)。
import numpy as np
a = np.array([[3,7,5],[8,4,3],[2,4,9]])

print 'Our array is:'
print a
print '\n'

print 'Applying ptp() function:'
print np.ptp(a)
print '\n'

print 'Applying ptp() function along axis 1:'
print np.ptp(a, axis = 1)
print '\n'

print 'Applying ptp() function along axis 0:'
print np.ptp(a, axis = 0)
它將產生以下輸出:
Our array is:
[[3 7 5]
[8 4 3]
[2 4 9]]

Applying ptp() function:
7

Applying ptp() function along axis 1:
[4 5 7]

Applying ptp() function along axis 0:
[6 3 6]
numpy.percentile()
百分位數(或百分位數)是統計學中使用的一種度量,表示一組觀測值中低於給定百分比的觀測值的數值。numpy.percentile() 函式接受以下引數。
numpy.percentile(a, q, axis)
其中,
| 序號 | 引數 & 描述 |
|---|---|
| 1 | a 輸入陣列 |
| 2 | q 要計算的百分位數必須在 0-100 之間 |
| 3 | axis 要計算百分位數的軸 |
示例
import numpy as np
a = np.array([[30,40,70],[80,20,10],[50,90,60]])

print 'Our array is:'
print a
print '\n'

print 'Applying percentile() function:'
print np.percentile(a,50)
print '\n'

print 'Applying percentile() function along axis 1:'
print np.percentile(a,50, axis = 1)
print '\n'

print 'Applying percentile() function along axis 0:'
print np.percentile(a,50, axis = 0)
它將產生以下輸出:
Our array is:
[[30 40 70]
 [80 20 10]
 [50 90 60]]

Applying percentile() function:
50.0

Applying percentile() function along axis 1:
[ 40. 20. 60.]

Applying percentile() function along axis 0:
[ 50. 40. 60.]
numpy.median()
中位數定義為將資料樣本的上半部分與下半部分分隔的值。numpy.median() 函式的使用方法如下面的程式所示。
示例
import numpy as np
a = np.array([[30,65,70],[80,95,10],[50,90,60]])

print 'Our array is:'
print a
print '\n'

print 'Applying median() function:'
print np.median(a)
print '\n'

print 'Applying median() function along axis 0:'
print np.median(a, axis = 0)
print '\n'

print 'Applying median() function along axis 1:'
print np.median(a, axis = 1)
它將產生以下輸出:
Our array is:
[[30 65 70]
 [80 95 10]
 [50 90 60]]

Applying median() function:
65.0

Applying median() function along axis 0:
[ 50. 90. 60.]

Applying median() function along axis 1:
[ 65. 80. 60.]
numpy.mean()
算術平均值是沿某個軸的元素之和除以元素的數量。numpy.mean() 函式返回陣列中元素的算術平均值。如果指定了軸,則沿該軸計算。
示例
import numpy as np
a = np.array([[1,2,3],[3,4,5],[4,5,6]])

print 'Our array is:'
print a
print '\n'

print 'Applying mean() function:'
print np.mean(a)
print '\n'

print 'Applying mean() function along axis 0:'
print np.mean(a, axis = 0)
print '\n'

print 'Applying mean() function along axis 1:'
print np.mean(a, axis = 1)
它將產生以下輸出:
Our array is:
[[1 2 3]
 [3 4 5]
 [4 5 6]]

Applying mean() function:
3.66666666667

Applying mean() function along axis 0:
[ 2.66666667 3.66666667 4.66666667]

Applying mean() function along axis 1:
[ 2. 4. 5.]
numpy.average()
加權平均值是指每個分量乘以一個反映其重要性的因子而得到的平均值。numpy.average() 函式根據另一個數組中給定的相應權重計算陣列中元素的加權平均值。該函式可以具有 axis 引數。如果未指定軸,則陣列會被展平。
考慮一個數組 [1,2,3,4] 和相應的權重 [4,3,2,1],加權平均值的計算方法是將對應元素的乘積相加,然後將和除以權重之和。
加權平均值 = (1*4+2*3+3*2+4*1)/(4+3+2+1)
示例
import numpy as np
a = np.array([1,2,3,4])

print 'Our array is:'
print a
print '\n'

print 'Applying average() function:'
print np.average(a)
print '\n'

# this is same as mean when weight is not specified
wts = np.array([4,3,2,1])

print 'Applying average() function again:'
print np.average(a,weights = wts)
print '\n'

# Returns the sum of weights, if the returned parameter is set to True.
print 'Sum of weights'
print np.average([1,2,3, 4],weights = [4,3,2,1], returned = True)
它將產生以下輸出:
Our array is:
[1 2 3 4]

Applying average() function:
2.5

Applying average() function again:
2.0

Sum of weights
(2.0, 10.0)
在多維陣列中,可以指定計算的軸。
示例
import numpy as np
a = np.arange(6).reshape(3,2)

print 'Our array is:'
print a
print '\n'

print 'Modified array:'
wt = np.array([3,5])
print np.average(a, axis = 1, weights = wt)
print '\n'

print 'Modified array:'
print np.average(a, axis = 1, weights = wt, returned = True)
它將產生以下輸出:
Our array is:
[[0 1]
 [2 3]
 [4 5]]

Modified array:
[ 0.625 2.625 4.625]

Modified array:
(array([ 0.625, 2.625, 4.625]), array([ 8., 8., 8.]))
標準差
標準差是平均值的平方偏差的平均值的平方根。標準差的公式如下:
std = sqrt(mean(abs(x - x.mean())**2))
如果陣列為 [1, 2, 3, 4],則其平均值為 2.5。因此,平方偏差為 [2.25, 0.25, 0.25, 2.25],其平均值除以 4 的平方根,即 sqrt (5/4) 為 1.1180339887498949。
示例
import numpy as np
print np.std([1,2,3,4])
它將產生以下輸出:
1.1180339887498949
方差
方差是平方偏差的平均值,即 mean(abs(x - x.mean())**2)。換句話說,標準差是方差的平方根。
示例
import numpy as np
print np.var([1,2,3,4])
它將產生以下輸出:
1.25
NumPy - 排序、搜尋和計數函式
NumPy 中提供了各種與排序相關的函式。這些排序函式實現了不同的排序演算法,每個演算法都以執行速度、最壞情況效能、所需工作空間和演算法的穩定性為特徵。下表顯示了三種排序演算法的比較。
| kind | 速度 | 最壞情況 | 工作空間 | 穩定 |
|---|---|---|---|---|
| ‘quicksort’ | 1 | O(n^2) | 0 | 否 |
| ‘mergesort’ | 2 | O(n*log(n)) | ~n/2 | 是 |
| ‘heapsort’ | 3 | O(n*log(n)) | 0 | 否 |
numpy.sort()
sort() 函式返回輸入陣列的已排序副本。它具有以下引數:
numpy.sort(a, axis, kind, order)
其中,
| 序號 | 引數和描述 |
|---|---|
| 1 | a 要排序的陣列 |
| 2 | axis 要沿其排序陣列的軸。如果為 None,則陣列會被展平,在最後一個軸上排序 |
| 3 | kind 預設為 quicksort |
| 4 | order 如果陣列包含欄位,則要排序的欄位的順序 |
示例
import numpy as np
a = np.array([[3,7],[9,1]])

print 'Our array is:'
print a
print '\n'

print 'Applying sort() function:'
print np.sort(a)
print '\n'

print 'Sort along axis 0:'
print np.sort(a, axis = 0)
print '\n'

# Order parameter in sort function
dt = np.dtype([('name', 'S10'),('age', int)])
a = np.array([("raju",21),("anil",25),("ravi", 17), ("amar",27)], dtype = dt)

print 'Our array is:'
print a
print '\n'

print 'Order by name:'
print np.sort(a, order = 'name')
它將產生以下輸出:
Our array is:
[[3 7]
 [9 1]]

Applying sort() function:
[[3 7]
 [1 9]]

Sort along axis 0:
[[3 1]
 [9 7]]

Our array is:
[('raju', 21) ('anil', 25) ('ravi', 17) ('amar', 27)]

Order by name:
[('amar', 27) ('anil', 25) ('raju', 21) ('ravi', 17)]
numpy.argsort()
numpy.argsort() 函式對輸入陣列進行間接排序,沿給定的軸並使用指定的排序型別返回資料索引陣列。此索引陣列用於構造已排序的陣列。
示例
import numpy as np
x = np.array([3, 1, 2])

print 'Our array is:'
print x
print '\n'

print 'Applying argsort() to x:'
y = np.argsort(x)
print y
print '\n'

print 'Reconstruct original array in sorted order:'
print x[y]
print '\n'

print 'Reconstruct the original array using loop:'
for i in y:
   print x[i],
它將產生以下輸出:
Our array is:
[3 1 2]

Applying argsort() to x:
[1 2 0]

Reconstruct original array in sorted order:
[1 2 3]

Reconstruct the original array using loop:
1 2 3
numpy.lexsort()
函式使用一系列鍵執行間接排序。鍵可以看作電子表格中的列。該函式返回一個索引陣列,使用該陣列可以獲得已排序的資料。請注意,最後一個鍵恰好是排序的主鍵。
示例
import numpy as np

nm = ('raju','anil','ravi','amar')
dv = ('f.y.', 's.y.', 's.y.', 'f.y.')
ind = np.lexsort((dv,nm))

print 'Applying lexsort() function:'
print ind
print '\n'

print 'Use this index to get sorted data:'
print [nm[i] + ", " + dv[i] for i in ind]
它將產生以下輸出:
Applying lexsort() function:
[3 1 0 2]

Use this index to get sorted data:
['amar, f.y.', 'anil, s.y.', 'raju, f.y.', 'ravi, s.y.']
NumPy 模組有許多用於在陣列內搜尋的函式。提供了用於查詢最大值、最小值以及滿足給定條件的元素的函式。
numpy.argmax() 和 numpy.argmin()
這兩個函式分別返回沿給定軸的最大和最小元素的索引。
示例
import numpy as np
a = np.array([[30,40,70],[80,20,10],[50,90,60]])

print 'Our array is:'
print a
print '\n'

print 'Applying argmax() function:'
print np.argmax(a)
print '\n'

print 'Index of maximum number in flattened array'
print a.flatten()
print '\n'

print 'Array containing indices of maximum along axis 0:'
maxindex = np.argmax(a, axis = 0)
print maxindex
print '\n'

print 'Array containing indices of maximum along axis 1:'
maxindex = np.argmax(a, axis = 1)
print maxindex
print '\n'

print 'Applying argmin() function:'
minindex = np.argmin(a)
print minindex
print '\n'

print 'Flattened array:'
print a.flatten()[minindex]
print '\n'

print 'Flattened array along axis 0:'
minindex = np.argmin(a, axis = 0)
print minindex
print '\n'

print 'Flattened array along axis 1:'
minindex = np.argmin(a, axis = 1)
print minindex
它將產生以下輸出:
Our array is:
[[30 40 70]
 [80 20 10]
 [50 90 60]]

Applying argmax() function:
7

Index of maximum number in flattened array
[30 40 70 80 20 10 50 90 60]

Array containing indices of maximum along axis 0:
[1 2 0]

Array containing indices of maximum along axis 1:
[2 0 1]

Applying argmin() function:
5

Flattened array:
10

Flattened array along axis 0:
[0 1 1]

Flattened array along axis 1:
[0 2 0]
numpy.nonzero()
numpy.nonzero() 函式返回輸入陣列中非零元素的索引。
示例
import numpy as np
a = np.array([[30,40,0],[0,20,10],[50,0,60]])

print 'Our array is:'
print a
print '\n'

print 'Applying nonzero() function:'
print np.nonzero (a)
它將產生以下輸出:
Our array is:
[[30 40 0]
 [ 0 20 10]
 [50 0 60]]

Applying nonzero() function:
(array([0, 0, 1, 1, 2, 2]), array([0, 1, 1, 2, 0, 2]))
numpy.where()
where() 函式返回輸入陣列中滿足給定條件的元素的索引。
示例
import numpy as np
x = np.arange(9.).reshape(3, 3)

print 'Our array is:'
print x

print 'Indices of elements > 3'
y = np.where(x > 3)
print y

print 'Use these indices to get elements satisfying the condition'
print x[y]
它將產生以下輸出:
Our array is:
[[ 0. 1. 2.]
 [ 3. 4. 5.]
 [ 6. 7. 8.]]

Indices of elements > 3
(array([1, 1, 2, 2, 2]), array([1, 2, 0, 1, 2]))

Use these indices to get elements satisfying the condition
[ 4. 5. 6. 7. 8.]
numpy.extract()
extract() 函式返回滿足任何條件的元素。
import numpy as np
x = np.arange(9.).reshape(3, 3)

print 'Our array is:'
print x

# define a condition
condition = np.mod(x,2) == 0

print 'Element-wise value of condition'
print condition

print 'Extract elements using condition'
print np.extract(condition, x)
它將產生以下輸出:
Our array is:
[[ 0. 1. 2.]
 [ 3. 4. 5.]
 [ 6. 7. 8.]]

Element-wise value of condition
[[ True False True]
 [False True False]
 [ True False True]]

Extract elements using condition
[ 0. 2. 4. 6. 8.]
NumPy - 位元組交換
我們已經看到,儲存在計算機記憶體中的資料取決於 CPU 使用哪種架構。它可能是小端序(最低有效位元組儲存在最小地址中)或大端序(最高有效位元組儲存在最小地址中)。
numpy.ndarray.byteswap()
numpy.ndarray.byteswap() 函式在兩種表示形式之間切換:大端序和小端序。
import numpy as np
a = np.array([1, 256, 8755], dtype = np.int16)

print 'Our array is:'
print a

print 'Representation of data in memory in hexadecimal form:'
print map(hex,a)
# byteswap() function swaps in place by passing True parameter

print 'Applying byteswap() function:'
print a.byteswap(True)

print 'In hexadecimal form:'
print map(hex,a)
# We can see the bytes being swapped
它將產生以下輸出:
Our array is:
[1 256 8755]

Representation of data in memory in hexadecimal form:
['0x1', '0x100', '0x2233']

Applying byteswap() function:
[256 1 13090]

In hexadecimal form:
['0x100', '0x1', '0x3322']
NumPy - 副本和檢視
在執行函式時,其中一些函式返回輸入陣列的副本,而另一些函式返回檢視。當內容在物理上儲存在另一個位置時,稱為副本。另一方面,如果提供了相同記憶體內容的不同檢視,我們將其稱為檢視。
無副本
簡單的賦值不會建立陣列物件的副本。相反,它使用原始陣列的相同 id() 來訪問它。id() 返回 Python 物件的通用識別符號,類似於 C 中的指標。
此外,任何一個的更改都會反映在另一箇中。例如,一個的形狀更改也會更改另一個的形狀。
示例
import numpy as np
a = np.arange(6)

print 'Our array is:'
print a

print 'Applying id() function:'
print id(a)

print 'a is assigned to b:'
b = a
print b

print 'b has same id():'
print id(b)

print 'Change shape of b:'
b.shape = 3,2
print b

print 'Shape of a also gets changed:'
print a
它將產生以下輸出:
Our array is:
[0 1 2 3 4 5]

Applying id() function:
139747815479536

a is assigned to b:
[0 1 2 3 4 5]
b has same id():
139747815479536

Change shape of b:
[[0 1]
 [2 3]
 [4 5]]

Shape of a also gets changed:
[[0 1]
 [2 3]
 [4 5]]
檢視或淺複製
NumPy 具有ndarray.view() 方法,該方法是一個新的陣列物件,它檢視原始陣列的相同資料。與前面的情況不同,新陣列的維數更改不會更改原始陣列的維數。
示例
import numpy as np
# To begin with, a is 3X2 array
a = np.arange(6).reshape(3,2)

print 'Array a:'
print a

print 'Create view of a:'
b = a.view()
print b

print 'id() for both the arrays are different:'
print 'id() of a:'
print id(a)
print 'id() of b:'
print id(b)

# Change the shape of b. It does not change the shape of a
b.shape = 2,3

print 'Shape of b:'
print b

print 'Shape of a:'
print a
它將產生以下輸出:
Array a:
[[0 1]
 [2 3]
 [4 5]]

Create view of a:
[[0 1]
 [2 3]
 [4 5]]

id() for both the arrays are different:
id() of a:
140424307227264
id() of b:
140424151696288

Shape of b:
[[0 1 2]
 [3 4 5]]

Shape of a:
[[0 1]
 [2 3]
 [4 5]]
陣列的切片會建立一個檢視。
示例
import numpy as np
a = np.array([[10,10], [2,3], [4,5]])

print 'Our array is:'
print a

print 'Create a slice:'
s = a[:, :2]
print s
它將產生以下輸出:
Our array is:
[[10 10]
 [ 2 3]
 [ 4 5]]

Create a slice:
[[10 10]
 [ 2 3]
 [ 4 5]]
深複製
ndarray.copy() 函式建立一個深複製。它是陣列及其資料的完整副本,並且不與原始陣列共享。
示例
import numpy as np
a = np.array([[10,10], [2,3], [4,5]])

print 'Array a is:'
print a

print 'Create a deep copy of a:'
b = a.copy()
print 'Array b is:'
print b

#b does not share any memory of a
print 'Can we write b is a'
print b is a

print 'Change the contents of b:'
b[0,0] = 100

print 'Modified array b:'
print b

print 'a remains unchanged:'
print a
它將產生以下輸出:
Array a is:
[[10 10]
 [ 2 3]
 [ 4 5]]

Create a deep copy of a:
Array b is:
[[10 10]
 [ 2 3]
 [ 4 5]]
Can we write b is a
False

Change the contents of b:
Modified array b:
[[100 10]
 [ 2 3]
 [ 4 5]]

a remains unchanged:
[[10 10]
 [ 2 3]
 [ 4 5]]
NumPy - 矩陣庫
NumPy 包含一個矩陣庫numpy.matlib。此模組包含返回矩陣而不是 ndarray 物件的函式。
matlib.empty()
matlib.empty() 函式返回一個新的矩陣,但不初始化條目。該函式接受以下引數。
numpy.matlib.empty(shape, dtype, order)
其中,
| 序號 | 引數和描述 |
|---|---|
| 1 | shape int 或int 的元組,定義新矩陣的形狀 |
| 2 | Dtype 可選。輸出的資料型別 |
| 3 | order C 或 F |
示例
import numpy.matlib
import numpy as np

print np.matlib.empty((2,2))
# filled with random data
它將產生以下輸出:
[[ 2.12199579e-314,   4.24399158e-314]
 [ 4.24399158e-314,   2.12199579e-314]]
numpy.matlib.zeros()
此函式返回填充有零的矩陣。
import numpy.matlib
import numpy as np
print np.matlib.zeros((2,2))
它將產生以下輸出:
[[ 0.  0.]
 [ 0.  0.]]
numpy.matlib.ones()
此函式返回填充有 1 的矩陣。
import numpy.matlib
import numpy as np
print np.matlib.ones((2,2))
它將產生以下輸出:
[[ 1.  1.]
 [ 1.  1.]]
numpy.matlib.eye()
此函式返回一個矩陣,對角線元素為 1,其他位置為零。該函式接受以下引數。
numpy.matlib.eye(n, M,k, dtype)
其中,
| 序號 | 引數和描述 |
|---|---|
| 1 | n 結果矩陣中的行數 |
| 2 | M 列數,預設為 n |
| 3 | k 對角線的索引 |
| 4 | dtype 輸出的資料型別 |
示例
import numpy.matlib
import numpy as np
print np.matlib.eye(n = 3, M = 4, k = 0, dtype = float)
它將產生以下輸出:
[[ 1.  0.  0.  0.]
 [ 0.  1.  0.  0.]
 [ 0.  0.  1.  0.]]
numpy.matlib.identity()
numpy.matlib.identity() 函式返回給定大小的單位矩陣。單位矩陣是一個方陣,所有對角線元素都為 1。
import numpy.matlib
import numpy as np
print np.matlib.identity(5, dtype = float)
它將產生以下輸出:
[[ 1.  0.  0.  0.  0.]
 [ 0.  1.  0.  0.  0.]
 [ 0.  0.  1.  0.  0.]
 [ 0.  0.  0.  1.  0.]
 [ 0.  0.  0.  0.  1.]]
numpy.matlib.rand()
numpy.matlib.rand() 函式返回一個填充有隨機值的給定大小的矩陣。
示例
import numpy.matlib
import numpy as np
print np.matlib.rand(3,3)
它將產生以下輸出:
[[ 0.82674464  0.57206837  0.15497519]
 [ 0.33857374  0.35742401  0.90895076]
 [ 0.03968467  0.13962089  0.39665201]]
注意矩陣始終是二維的,而 ndarray 是 n 維陣列。這兩個物件是可相互轉換的。
示例
import numpy.matlib
import numpy as np

i = np.matrix('1,2;3,4')
print i
它將產生以下輸出:
[[1  2]
 [3  4]]
示例
import numpy.matlib
import numpy as np

j = np.asarray(i)
print j
它將產生以下輸出:
[[1  2]
 [3  4]]
示例
import numpy.matlib
import numpy as np

k = np.asmatrix (j)
print k
它將產生以下輸出:
[[1  2]
 [3  4]]
NumPy - 線性代數
NumPy 包含numpy.linalg模組,該模組提供了線性代數所需的所有功能。下表描述了此模組中的一些重要函式。
| 序號 | 函式和描述 |
|---|---|
| 1 | dot
兩個陣列的點積 |
| 2 | vdot
兩個向量的點積 |
| 3 | inner
兩個陣列的內積 |
| 4 | matmul
兩個陣列的矩陣乘積 |
| 5 | determinant
計算陣列的行列式 |
| 6 | solve
求解線性矩陣方程 |
| 7 | inv
查詢矩陣的乘法逆 |
NumPy - Matplotlib
Matplotlib 是 Python 的繪相簿。它與 NumPy 一起使用,提供了一個有效的開源替代 MatLab 的環境。它也可以與 PyQt 和 wxPython 等圖形工具包一起使用。
Matplotlib 模組最初由 John D. Hunter 編寫。從 2012 年開始,Michael Droettboom 是主要開發者。目前,Matplotlib 版本 1.5.1 是可用的穩定版本。該軟體包以二進位制發行版以及原始碼形式在www.matplotlib.org上提供。
按照慣例,透過新增以下語句將軟體包匯入 Python 指令碼中:
from matplotlib import pyplot as plt
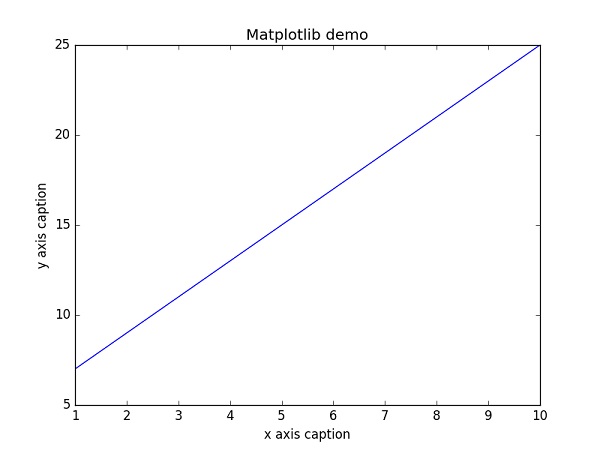
這裡pyplot()是 matplotlib 庫中最重要的函式,用於繪製二維資料。以下指令碼繪製方程y = 2x + 5
示例
import numpy as np
from matplotlib import pyplot as plt

x = np.arange(1,11)
y = 2 * x + 5
plt.title("Matplotlib demo")
plt.xlabel("x axis caption")
plt.ylabel("y axis caption")
plt.plot(x,y)
plt.show()
從np.arange() 函式建立 ndarray 物件 x 作為x 軸上的值。y 軸上的對應值儲存在另一個ndarray 物件 y中。這些值使用 matplotlib 包的 pyplot 子模組的plot()函式繪製。
圖形表示由show()函式顯示。
上述程式碼應產生以下輸出:
除了線性圖,還可以透過向plot()函式新增格式字串來離散顯示值。可以使用以下格式字元。
| 序號 | 字元 & 描述 |
|---|---|
| 1 | '-' 實線樣式 |
| 2 | '--' 虛線樣式 |
| 3 | '-.' 點劃線樣式 |
| 4 | ':' 點線樣式 |
| 5 | '.' 點標記 |
| 6 | ',' 畫素標記 |
| 7 | 'o' 圓形標記 |
| 8 | 'v' 下三角形標記 |
| 9 | '^' 上三角形標記 |
| 10 | '<' 左三角形標記 |
| 11 | '>' 右三角形標記 |
| 12 | '1' 向下三角形標記 |
| 13 | '2' 向上三角形標記 |
| 14 | '3' 向左三角形標記 |
| 15 | '4' 向右三角形標記 |
| 16 | 's' 正方形標記 |
| 17 | 'p' 五邊形標記 |
| 18 | '*' 星形標記 |
| 19 | 'h' 六邊形1標記 |
| 20 | 'H' 六邊形2標記 |
| 21 | '+' 加號標記 |
| 22 | 'x' X標記 |
| 23 | 'D' 菱形標記 |
| 24 | 'd' 細菱形標記 |
| 25 | '|' 垂直線標記 |
| 26 | '_' 水平線標記 |
以下還定義了顏色縮寫。
| 字元 | 顏色 |
|---|---|
| 'b' | 藍色 |
| 'g' | 綠色 |
| 'r' | 紅色 |
| 'c' | 青色 |
| 'm' | 洋紅色 |
| 'y' | 黃色 |
| 'k' | 黑色 |
| 'w' | 白色 |
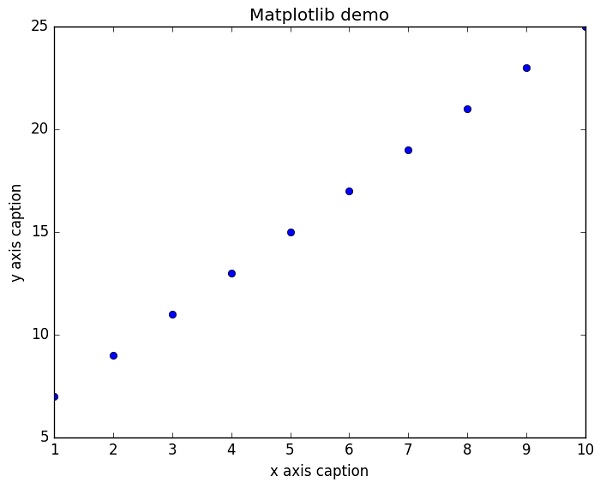
要顯示錶示點的圓圈,而不是上面示例中的線,請在 plot() 函式中使用“ob”作為格式字串。
示例
import numpy as np
from matplotlib import pyplot as plt

x = np.arange(1,11)
y = 2 * x + 5
plt.title("Matplotlib demo")
plt.xlabel("x axis caption")
plt.ylabel("y axis caption")
plt.plot(x,y,"ob")
plt.show()
上述程式碼應產生以下輸出:
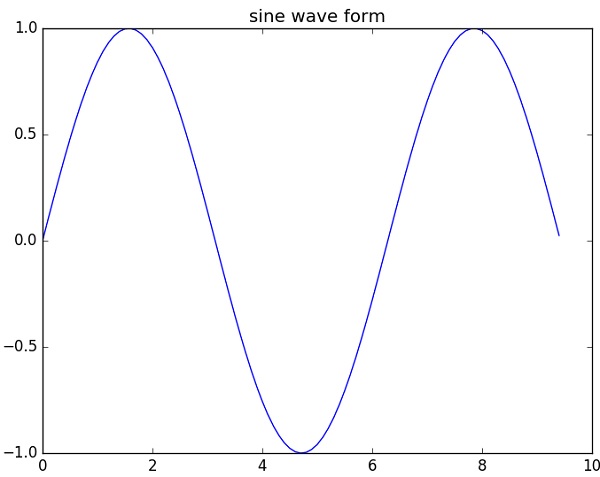
正弦波圖
以下指令碼使用 matplotlib 生成正弦波圖。
示例
import numpy as np
import matplotlib.pyplot as plt

# Compute the x and y coordinates for points on a sine curve
x = np.arange(0, 3 * np.pi, 0.1)
y = np.sin(x)
plt.title("sine wave form")

# Plot the points using matplotlib
plt.plot(x, y)
plt.show()
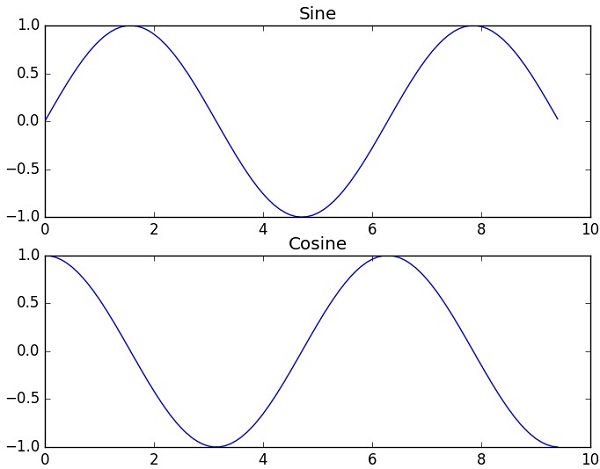
subplot()
subplot() 函式允許您在同一圖形中繪製不同的內容。在以下指令碼中,繪製了正弦和餘弦值。
示例
import numpy as np
import matplotlib.pyplot as plt

# Compute the x and y coordinates for points on sine and cosine curves
x = np.arange(0, 3 * np.pi, 0.1)
y_sin = np.sin(x)
y_cos = np.cos(x)

# Set up a subplot grid that has height 2 and width 1,
# and set the first such subplot as active.
plt.subplot(2, 1, 1)

# Make the first plot
plt.plot(x, y_sin)
plt.title('Sine')

# Set the second subplot as active, and make the second plot.
plt.subplot(2, 1, 2)
plt.plot(x, y_cos)
plt.title('Cosine')

# Show the figure.
plt.show()
上述程式碼應產生以下輸出:
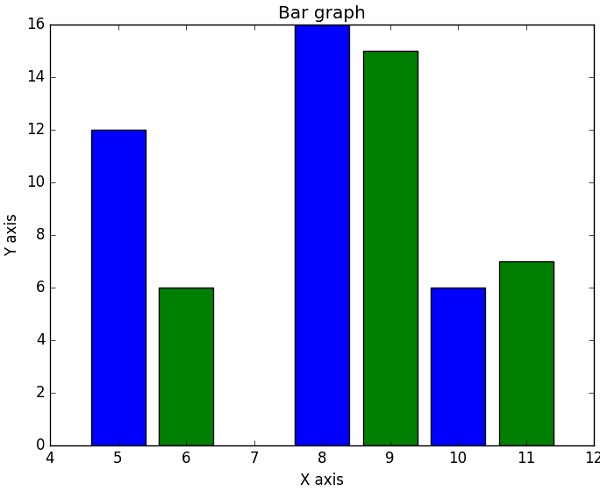
bar()
pyplot 子模組提供bar()函式來生成條形圖。以下示例生成兩組x和y陣列的條形圖。
示例
from matplotlib import pyplot as plt
x = [5,8,10]
y = [12,16,6]

x2 = [6,9,11]
y2 = [6,15,7]
plt.bar(x, y, align = 'center')
plt.bar(x2, y2, color = 'g', align = 'center')
plt.title('Bar graph')
plt.ylabel('Y axis')
plt.xlabel('X axis')

plt.show()
此程式碼應產生以下輸出:
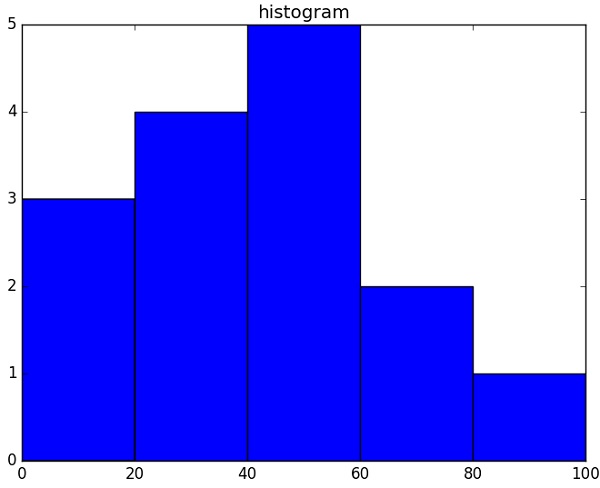
NumPy - 使用 Matplotlib 繪製直方圖
NumPy 有一個numpy.histogram()函式,它是資料頻率分佈的圖形表示。矩形具有對應於類間隔(稱為bin)的相等水平尺寸和對應於頻率的可變高度。
numpy.histogram()
numpy.histogram() 函式將輸入陣列和 bin 作為兩個引數。bin 陣列中的連續元素充當每個 bin 的邊界。
import numpy as np

a = np.array([22,87,5,43,56,73,55,54,11,20,51,5,79,31,27])
np.histogram(a,bins = [0,20,40,60,80,100])
hist,bins = np.histogram(a,bins = [0,20,40,60,80,100])
print hist
print bins
它將產生以下輸出:
[3 4 5 2 1]
[0 20 40 60 80 100]
plt()
Matplotlib 可以將直方圖的這種數字表示轉換為圖形。pyplot 子模組的plt() 函式將包含資料的陣列和 bin 陣列作為引數,並將其轉換為直方圖。
from matplotlib import pyplot as plt
import numpy as np

a = np.array([22,87,5,43,56,73,55,54,11,20,51,5,79,31,27])
plt.hist(a, bins = [0,20,40,60,80,100])
plt.title("histogram")
plt.show()
它應該產生以下輸出:
NumPy 的 I/O
ndarray 物件可以儲存到磁碟檔案並從磁碟檔案載入。可用的 IO 函式有:
load() 和save() 函式處理 /numPy 二進位制檔案(副檔名為npy)
loadtxt() 和savetxt() 函式處理普通文字檔案
NumPy 引入了一種用於 ndarray 物件的簡單檔案格式。此.npy檔案將資料、形狀、dtype 和重建 ndarray 所需的其他資訊儲存在磁碟檔案中,以便即使檔案位於具有不同體系結構的其他計算機上,也可以正確檢索陣列。
numpy.save()
numpy.save()檔案將輸入陣列儲存在副檔名為npy的磁碟檔案中。
import numpy as np
a = np.array([1,2,3,4,5])
np.save('outfile',a)
要從outfile.npy重建陣列,請使用load()函式。
import numpy as np
b = np.load('outfile.npy')
print b
它將產生以下輸出:
array([1, 2, 3, 4, 5])
save() 和 load() 函式接受一個額外的布林引數allow_pickles。Python 中的 pickle 用於在儲存到或讀取自磁碟檔案之前序列化和反序列化物件。
savetxt()
使用savetxt()和loadtxt()函式以簡單的文字檔案格式儲存和檢索陣列資料。
示例
import numpy as np

a = np.array([1,2,3,4,5])
np.savetxt('out.txt',a)
b = np.loadtxt('out.txt')
print b
它將產生以下輸出:
[ 1. 2. 3. 4. 5.]
savetxt() 和 loadtxt() 函式接受其他可選引數,例如標題、腳註和分隔符。