- Microsoft Azure 教程
- Microsoft Azure - 首頁
- 雲計算 - 概述
- Microsoft Azure - Windows
- Microsoft Azure - 元件
- Microsoft Azure - 計算模組
- Microsoft Azure - 結構控制器
- Microsoft Azure - 儲存
- Microsoft Azure - Blob
- Microsoft Azure - 佇列
- Microsoft Azure - 表格
- Microsoft Azure - CDN
- Microsoft Azure - 應用
- Microsoft Azure - 安全
- Microsoft Azure - 資料中心
- Microsoft Azure - 場景
- Microsoft Azure 高階
- Microsoft Azure - 管理門戶
- Azure - 建立虛擬網路
- Azure - 部署虛擬機器
- Azure - 端點配置
- Azure - 點對站點連線
- Azure - 站點到站點連線
- Microsoft Azure - Traffic Manager
- Microsoft Azure - PowerShell
- Azure - 監控虛擬機器
- Azure - 設定警報規則
- Azure - 應用部署
- Microsoft Azure - 備份和恢復
- Azure - 自助服務功能
- Azure - 多因素身份驗證
- Azure - Forefront Identity Manager
- Azure - 資料匯入和匯出作業
- Microsoft Azure - 網站
- Microsoft Azure - 可擴充套件性
- Microsoft Azure - 磁碟配置
- Microsoft Azure - 磁碟快取
- Microsoft Azure - 個性化訪問
- Azure - 個性化公司品牌
- Azure - 自助服務密碼重置
- Microsoft Azure - 自助服務組
- Microsoft Azure - 建立組
- Azure - 安全報告和警報
- Azure - 編排恢復
- Microsoft Azure - 健康監控
- Microsoft Azure - 升級
- Microsoft Azure 有用資源
- Microsoft Azure - 快速指南
- Microsoft Azure - 有用資源
- Microsoft Azure - 討論
Microsoft Azure - 表格
此處儲存表格並不意味著關係資料庫。Azure 儲存可以僅儲存一個表格,沒有任何外部索引鍵或任何其他型別的關係。這些表格具有高度可擴充套件性,非常適合處理大量資料。表格可以儲存和查詢大量資料。關係資料庫可以使用 SQL 資料服務儲存,這是一個單獨的服務。
服務的三個主要部分是:
- 表格
- 實體
- 屬性
例如,如果“圖書”是一個實體,其屬性將是 Id、標題、出版商、作者等。將為實體集合建立表格。可以有 252 個自定義屬性和 3 個系統屬性。實體將始終具有系統屬性,即 PartitionKey、RowKey 和 Timestamp。Timestamp 由系統生成,但在將資料插入表格時,您必須指定 PartitionKey 和 RowKey。下面的示例將使其更清晰。表名和屬性名區分大小寫,建立表時應始終考慮這一點。
如何使用 PowerShell 管理表格
步驟 1 - 下載並安裝 Windows PowerShell,如本教程前面所述。
步驟 2 - 右鍵單擊“Windows PowerShell”,選擇“固定到工作列”將其固定到計算機的工作列。
步驟 3 - 選擇“以管理員身份執行 ISE”。
建立表格
步驟 1 - 複製以下命令並將其貼上到螢幕上。將突出顯示的文字替換為您的帳戶。
步驟 2 - 登入您的帳戶。
$StorageAccountName = "mystorageaccount"
$StorageAccountKey = "mystoragekey"
$Ctx = New-AzureStorageContext $StorageAccountName - StorageAccountKey
$StorageAccountKey
步驟 3 - 建立一個新表格。
$tabName = "Mytablename"
New-AzureStorageTable –Name $tabName –Context $Ctx
下圖顯示了一個名為“book”的表格的建立過程。
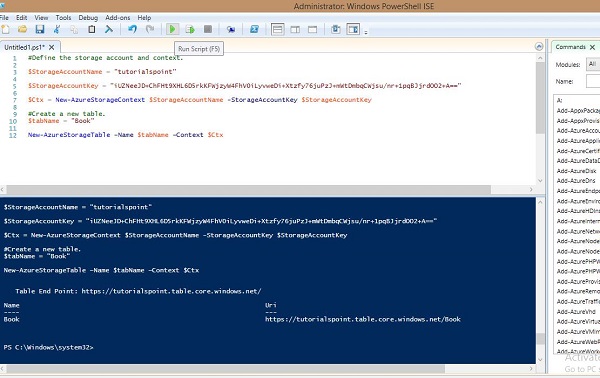
您可以看到它給出了以下端點作為結果。
https://tutorialspoint.table.core.windows.net/Book
同樣,您可以使用 PowerShell 中的預設命令檢索、刪除和插入表格中的資料。
檢索表格
$tabName = "Book"
Get-AzureStorageTable –Name $tabName –Context $Ctx
刪除表格
$tabName = "Book"
Remove-AzureStorageTable –Name $tabName –Context $Ctx
向表格中插入行
function Add-Entity() {
   [CmdletBinding()]

   param(
      $table,
      [String]$partitionKey,
      [String]$rowKey,
      [String]$title,
      [Int]$id,
      [String]$publisher,
      [String]$author
   )

   $entity = New-Object -TypeName Microsoft.WindowsAzure.Storage.Table.DynamicTableEntity
      -ArgumentList $partitionKey, $rowKey

   $entity.Properties.Add("Title", $title)
   $entity.Properties.Add("ID", $id)
   $entity.Properties.Add("Publisher", $publisher)
   $entity.Properties.Add("Author", $author)


   $result = $table.CloudTable.Execute(
      [Microsoft.WindowsAzure.Storage.Table.TableOperation]
      ::Insert($entity))
}

$StorageAccountName = "tutorialspoint"
$StorageAccountKey = Get-AzureStorageKey -StorageAccountName $StorageAccountName
$Ctx = New-AzureStorageContext $StorageAccountName - StorageAccountKey
   $StorageAccountKey.Primary

$TableName = "Book"

$table = Get-AzureStorageTable –Name $TableName -Context $Ctx -ErrorAction Ignore

#Add multiple entities to a table.
Add-Entity -Table $table -PartitionKey Partition1 -RowKey Row1 -Title .Net -Id 1
   -Publisher abc -Author abc
Add-Entity -Table $table -PartitionKey Partition2 -RowKey Row2 -Title JAVA -Id 2
   -Publisher abc -Author abc
Add-Entity -Table $table -PartitionKey Partition3 -RowKey Row3 -Title PHP -Id 3
   -Publisher xyz -Author xyz
Add-Entity -Table $table -PartitionKey Partition4 -RowKey Row4 -Title SQL -Id 4
   -Publisher xyz -Author xyz
檢索表格資料
$StorageAccountName = "tutorialspoint"
$StorageAccountKey = Get-AzureStorageKey - StorageAccountName $StorageAccountName
$Ctx = New-AzureStorageContext – StorageAccountName $StorageAccountName -
StorageAccountKey $StorageAccountKey.Primary;
$TableName = "Book"
#Get a reference to a table.
$table = Get-AzureStorageTable –Name $TableName -Context $Ctx
#Create a table query.
$query = New-Object Microsoft.WindowsAzure.Storage.Table.TableQuery
#Define columns to select.
$list = New-Object System.Collections.Generic.List[string]
$list.Add("RowKey")
$list.Add("ID")
$list.Add("Title")
$list.Add("Publisher")
$list.Add("Author")
#Set query details.
$query.FilterString = "ID gt 0"
$query.SelectColumns = $list
$query.TakeCount = 20
#Execute the query.
$entities = $table.CloudTable.ExecuteQuery($query)
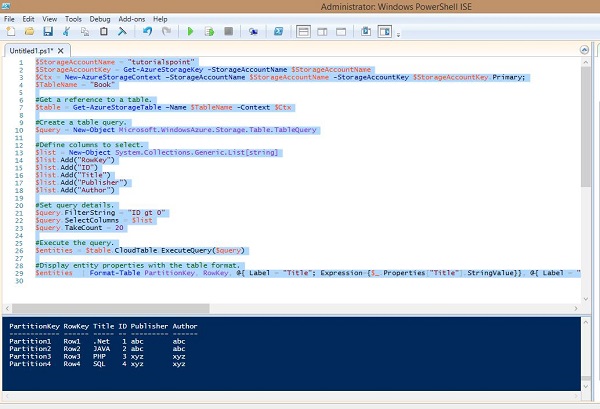
#Display entity properties with the table format.
$entities | Format-Table PartitionKey, RowKey, @{ Label = "Title";
Expression={$_.Properties["Title"].StringValue}}, @{ Label = "ID";
Expression={$_.Properties[“ID”].Int32Value}}, @{ Label = "Publisher";
Expression={$_.Properties[“Publisher”].StringValue}}, @{ Label = "Author";
Expression={$_.Properties[“Author”].StringValue}} -AutoSize
輸出將如下圖所示。
從表格中刪除行
$StorageAccountName = "tutorialspoint"

$StorageAccountKey = Get-AzureStorageKey - StorageAccountName $StorageAccountName
$Ctx = New-AzureStorageContext – StorageAccountName $StorageAccountName -
   StorageAccountKey $StorageAccountKey.Primary

#Retrieve the table.
$TableName = "Book"
$table = Get-AzureStorageTable -Name $TableName -Context $Ctx -ErrorAction
Ignore

#If the table exists, start deleting its entities.
if ($table -ne $null) {
   #Together the PartitionKey and RowKey uniquely identify every
   #entity within a table.

   $tableResult = $table.CloudTable.Execute(
      [Microsoft.WindowsAzure.Storage.Table.TableOperation]
      ::Retrieve(“Partition1”, "Row1"))

   $entity = $tableResult.Result;

   if ($entity -ne $null) {
      $table.CloudTable.Execute(
         [Microsoft.WindowsAzure.Storage.Table.TableOperation]
         ::Delete($entity))
   }
}
上述指令碼將刪除表格中的第一行,您可以看到我們在指令碼中指定了 Partition1 和 Row1。刪除行後,您可以透過執行檢索行的指令碼來檢查結果。在那裡您將看到第一行已被刪除。
執行這些命令時,請確保您已將 accountname 替換為您的帳戶名,將 accountkey 替換為您的帳戶金鑰。
如何使用 Azure 儲存資源管理器管理表格
步驟 1 - 登入您的 Azure 帳戶並轉到您的儲存帳戶。
步驟 2 - 點選下圖中紫色圓圈所示的“儲存資源管理器”連結。
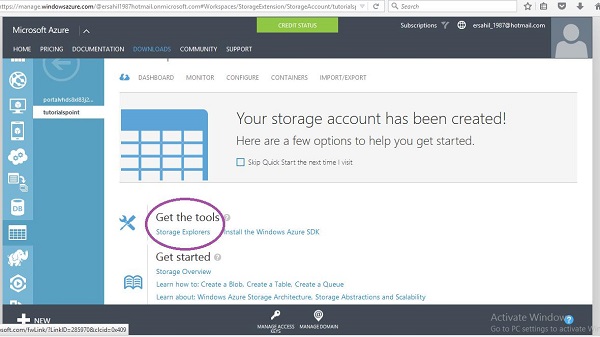
步驟 3 - 從列表中選擇“適用於 Windows 的 Azure 儲存資源管理器”。這是一個您可以下載並安裝到計算機上的免費工具。
步驟 4 - 在您的計算機上執行此程式,然後單擊頂部的“新增帳戶”按鈕。
步驟 5 - 輸入“儲存帳戶名稱”和“儲存帳戶金鑰”,然後單擊“測試訪問”。按鈕在下圖中用圓圈標出。

步驟 6 - 如果您的儲存中已經有表格,您將在左側面板的“表格”下看到它們。您可以透過單擊它們來檢視行。
建立表格
步驟 1 - 單擊“新建”並輸入表名,如下圖所示。

向表格中插入行
步驟 1 - 單擊“新建”。
步驟 2 - 輸入欄位名稱。
步驟 3 - 從下拉選單中選擇資料型別並輸入欄位值。

步驟 4 - 要檢視建立的行,請單擊左側面板中的表名。
Azure 儲存資源管理器是一個非常基本且易於使用的介面,用於管理表格。您可以使用此介面輕鬆建立、刪除、上傳和下載表格。與在 Windows PowerShell 中編寫冗長的指令碼相比,這使得開發人員的任務變得非常容易。