- Kibana 教程
- Kibana - 首頁
- Kibana - 概述
- Kibana - 環境設定
- Kibana - ELK Stack 簡介
- Kibana - 載入示例資料
- Kibana - 管理
- Kibana - 探索
- Kibana - 聚合和指標
- Kibana - 建立視覺化
- Kibana - 使用圖表
- Kibana - 使用圖形
- Kibana - 使用熱力圖
- 使用座標地圖
- Kibana - 使用區域地圖
- 使用儀表和目標
- Kibana - 使用畫布
- Kibana - 建立儀表板
- Kibana - Timelion
- Kibana - 開發工具
- Kibana - 監控
- 使用 Kibana 建立報表
- Kibana 有用資源
- Kibana - 快速指南
- Kibana - 有用資源
- Kibana - 討論
Kibana - 使用區域地圖
透過此視覺化,您可以看到在地理世界地圖上表示的資料。在本章中,讓我們詳細瞭解一下。
為區域地圖建立索引
我們將建立一個新的索引來使用區域地圖視覺化。我們將上傳的資料如下所示:
{"index":{"_id":1}}
{"country": "China", "population": "1313973713"}
{"index":{"_id":2}}
{"country": "India", "population": "1095351995"}
{"index":{"_id":3}}
{"country": "United States", "population": "298444215"}
{"index":{"_id":4}}
{"country": "Indonesia", "population": "245452739"}
{"index":{"_id":5}}
{"country": "Brazil", "population": "188078227"}
{"index":{"_id":6}}
{"country": "Pakistan", "population": "165803560"}
{"index":{"_id":7}}
{"country": "Bangladesh", "population": "147365352"}
{"index":{"_id":8}}
{"country": "Russia", "population": "142893540"}
{"index":{"_id":9}}
{"country": "Nigeria", "population": "131859731"}
{"index":{"_id":10}}
{"country": "Japan", "population": "127463611"}
請注意,我們將使用開發工具中的 _bulk 上傳來上傳資料。
現在,轉到 Kibana 開發工具並執行以下查詢:
PUT /allcountries
{
   "mappings": {
      "_doc": {
         "properties": {
            "country": {"type": "keyword"},
               "population": {"type": "integer"}
         }
      }
   }
}
POST /allcountries/_doc/_bulk?refresh
{"index":{"_id":1}}
{"country": "China", "population": "1313973713"}
{"index":{"_id":2}}
{"country": "India", "population": "1095351995"}
{"index":{"_id":3}}
{"country": "United States", "population": "298444215"}
{"index":{"_id":4}}
{"country": "Indonesia", "population": "245452739"}
{"index":{"_id":5}}
{"country": "Brazil", "population": "188078227"}
{"index":{"_id":6}}
{"country": "Pakistan", "population": "165803560"}
{"index":{"_id":7}}
{"country": "Bangladesh", "population": "147365352"}
{"index":{"_id":8}}
{"country": "Russia", "population": "142893540"}
{"index":{"_id":9}}
{"country": "Nigeria", "population": "131859731"}
{"index":{"_id":10}}
{"country": "Japan", "population": "127463611"}
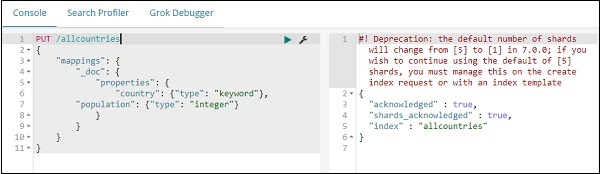
接下來,讓我們建立索引 allcountries。我們將國家欄位型別指定為 **關鍵字**:
PUT /allcountries
{
   "mappings": {
      "_doc": {
         "properties": {
            "country": {"type": "keyword"},
            "population": {"type": "integer"}
         }
      }
   }
}
**注意** - 要使用區域地圖,我們需要將用於聚合的欄位型別指定為關鍵字。
完成後,使用 _bulk 命令上傳資料。
我們現在將建立索引模式。轉到 Kibana 管理選項卡並選擇建立索引模式。
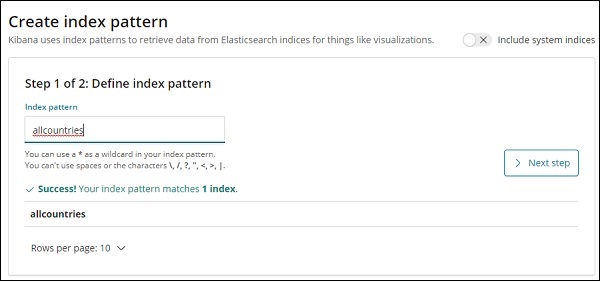
以下是 allcountries 索引中顯示的欄位。

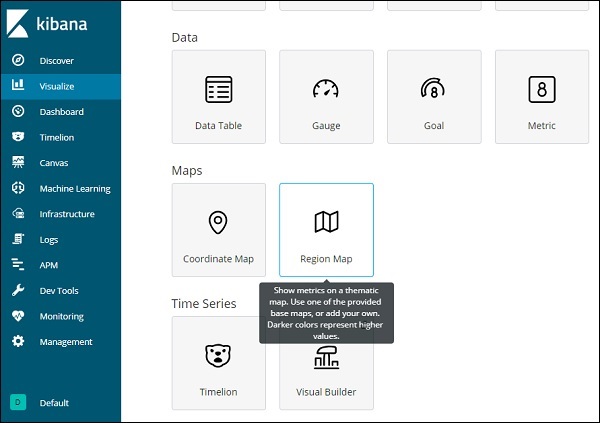
區域地圖入門
我們現在將使用區域地圖建立視覺化。轉到視覺化並選擇區域地圖。
完成後,選擇索引為 *allcountries* 並繼續。
選擇聚合指標和桶指標,如下所示:
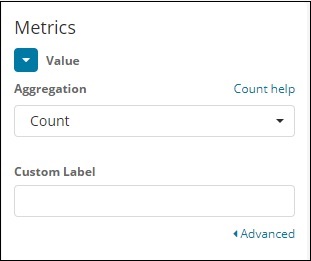

在這裡,我們選擇了國家欄位,因為我想在世界地圖上顯示它。
區域地圖的向量地圖和連線欄位
對於區域地圖,我們還需要選擇選項卡,如下所示:

選項卡具有在世界地圖上繪製資料所需的圖層設定配置。
向量地圖具有以下選項:
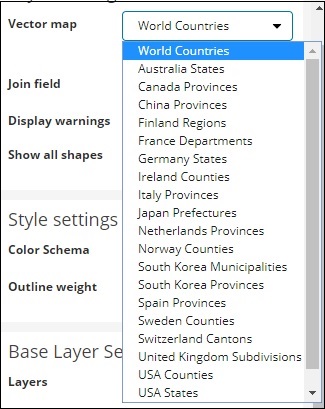
在這裡,我們將選擇世界各國,因為我擁有國家資料。
連線欄位具有以下詳細資訊:
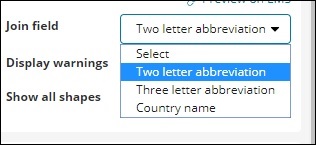
在我們的索引中,我們有國家名稱,因此我們將選擇國家名稱。
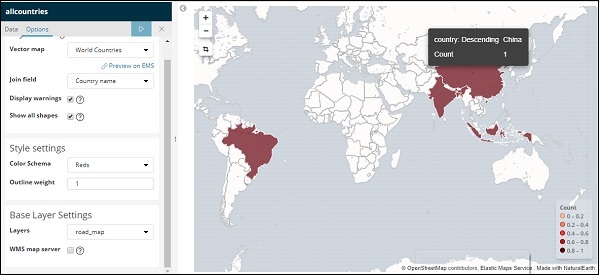
在樣式設定中,您可以選擇要為國家/地區顯示的顏色:
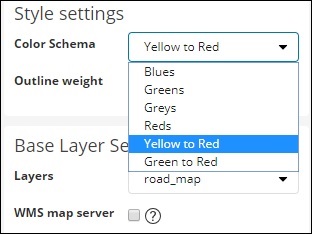
我們將選擇紅色。我們將不會更改其餘的詳細資訊。
現在,單擊分析按鈕以檢視繪製在世界地圖上的國家/地區的詳細資訊,如下所示:
在 Kibana 中自託管向量地圖和連線欄位
您還可以為向量地圖和連線欄位新增您自己的 Kibana 設定。為此,請從 kibana 配置資料夾轉到 kibana.yml 並新增以下詳細資訊:
regionmap:
   includeElasticMapsService: false
   layers:
      - name: "Countries Data"
      url: "https:///kibana/worldcountries.geojson"
      attribution: "INRAP"
      fields:
         - name: "Country"
         description: "country names"
選項卡中的向量地圖將填充以上資料,而不是預設資料。請注意,給定的 URL 必須啟用 CORS,以便 Kibana 可以下載它。使用的 json 檔案應以座標連續的方式。例如:
https://vector.maps.elastic.co/blob/5659313586569216?elastic_tile_service_tos=agree當區域地圖向量地圖詳細資訊為自託管時,選項卡如下所示:
