- Aurelia 教程
- Aurelia - 首頁
- Aurelia - 概述
- Aurelia - 環境搭建
- Aurelia - 第一個應用程式
- Aurelia - 元件
- Aurelia - 元件生命週期
- Aurelia - 自定義元素
- Aurelia - 依賴注入
- Aurelia - 配置
- Aurelia - 外掛
- Aurelia - 資料繫結
- Aurelia - 繫結行為
- Aurelia - 轉換器
- Aurelia - 事件
- Aurelia - 事件聚合器
- Aurelia - 表單
- Aurelia - HTTP
- Aurelia - Refs
- Aurelia - 路由
- Aurelia - 歷史記錄
- Aurelia - 動畫
- Aurelia - 對話方塊
- Aurelia - 國際化
- Aurelia - 工具
- Aurelia - 打包
- Aurelia - 除錯
- Aurelia - 社群
- Aurelia - 最佳實踐
- Aurelia 有用資源
- Aurelia - 快速指南
- Aurelia - 有用資源
- Aurelia - 討論
Aurelia - 國際化
Aurelia 提供了 **i18n** 外掛。在本節中,您將學習如何使用此外掛本地化您的應用程式。
步驟 1 - 安裝外掛
開啟 **命令提示符** 視窗並執行以下程式碼以安裝 **i18n** 外掛。
C:\Users\username\Desktop\aureliaApp>jspm install aurelia-i18n
我們還需要安裝後端外掛。
C:\Users\username\Desktop\aureliaApp>jspm install npm:i18next-xhr-backend
步驟 2 - 建立資料夾和檔案
在專案根資料夾中,我們需要建立一個 **locale** 目錄。
C:\Users\username\Desktop\aureliaApp>mkdir locale
在此資料夾中,您需要為所需的任何語言新增新資料夾。我們將建立 **en**,並在其中新增 **translation.js** 檔案。
C:\Users\username\Desktop\aureliaApp\locale>mkdir en
C:\Users\username\Desktop\aureliaApp\locale\en>touch translation.json
步驟 3 - 使用外掛
您需要使用手動引導才能使用此外掛。有關更多資訊,請檢視配置章節。我們需要將 **i18n** 外掛新增到 **main.js** 檔案中。
main.js
import {I18N} from 'aurelia-i18n';
import XHR from 'i18next-xhr-backend';

export function configure(aurelia) {
   aurelia.use
   .standardConfiguration()
   .developmentLogging()

   .plugin('aurelia-i18n', (instance) => {
      // register backend plugin
      instance.i18next.use(XHR);

      // adapt options to your needs (see http://i18next.com/docs/options/)
      instance.setup({
         backend: {
            loadPath: '/locales/{{lng}}/{{ns}}.json',
         },

         lng : 'de',
         attributes : ['t','i18n'],
         fallbackLng : 'en',
         debug : false
      });
   });

   aurelia.start().then(a => a.setRoot());
}
步驟 4 - 翻譯 JSON 檔案
這是您可以設定翻譯值的檔案。我們將使用官方文件中的示例。**de-DE** 資料夾實際上應該用於翻譯成德語,但是為了便於理解,我們將使用英語短語。
translation.json
{
   "score": "Score: {{score}}",
   "lives": "{{count}} life remaining",
   "lives_plural": "{{count}} lives remaining",
   "lives_indefinite": "a life remaining",
   "lives_plural_indefinite": "some lives remaining",
   "friend": "A friend",
   "friend_male": "A boyfriend",
   "friend_female": "A girlfriend"
}
步驟 5 - 設定語言環境
我們只需要匯入 **i18n** 外掛並將其設定為使用 **de-DE** 資料夾中的 JSON 程式碼。
app.js
import {I18N} from 'aurelia-i18n';

export class App {
   static inject = [I18N];

   constructor(i18n) {
      this.i18n = i18n;
      this.i18n
      .setLocale('de-DE')

      .then( () => {
         console.log('Locale is ready!');
      });
   }
}
步驟 6 - 檢視
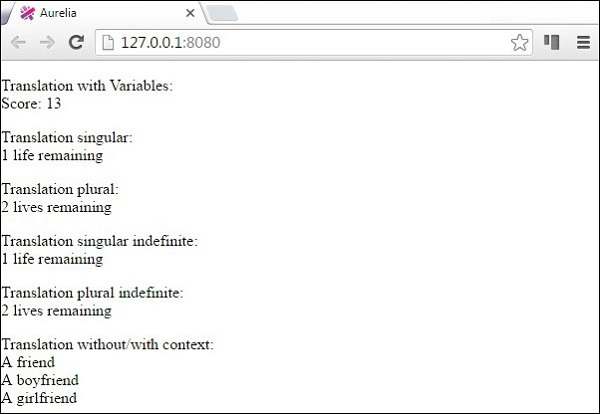
有幾種方法可以翻譯資料。我們將使用名為 **t** 的自定義 ValueConverter。您可以在以下示例中看到各種格式化資料的方法。將其與 **translation.json** 檔案進行比較,您會注意到用於格式化的模式。
<template>
   <p>
      Translation with Variables: <br />
      ${ 'score' | t: {'score': 13}}
   </p>

   <p>
      Translation singular: <br />
      ${ 'lives' | t: { 'count': 1 } }
   </p>

   <p>
      Translation plural: <br />
      ${ 'lives' | t: { 'count': 2 } }
   </p>

   <p>
      Translation singular indefinite: <br />
      ${ 'lives' | t: { 'count': 1, indefinite_article: true  } }
   </p>

   <p>
      Translation plural indefinite: <br />
      ${ 'lives' | t: { 'count': 2, indefinite_article: true } }
   </p>

   <p>
      Translation without/with context: <br />
      ${ 'friend' | t } <br />
      ${ 'friend' | t: { context: 'male' } } <br />
      ${ 'friend' | t: { context: 'female' } }
   </p>

</template>
當我們執行應用程式時,我們將獲得以下輸出。
廣告