- Aurelia 教程
- Aurelia - 首頁
- Aurelia - 概述
- Aurelia - 環境設定
- Aurelia - 第一個應用程式
- Aurelia - 元件
- Aurelia - 元件生命週期
- Aurelia - 自定義元素
- Aurelia - 依賴注入
- Aurelia - 配置
- Aurelia - 外掛
- Aurelia - 資料繫結
- Aurelia - 繫結行為
- Aurelia - 轉換器
- Aurelia - 事件
- Aurelia - 事件聚合器
- Aurelia - 表單
- Aurelia - HTTP
- Aurelia - 引用
- Aurelia - 路由
- Aurelia - 歷史
- Aurelia - 動畫
- Aurelia - 對話方塊
- Aurelia - 本地化
- Aurelia - 工具
- Aurelia - 捆綁
- Aurelia - 除錯
- Aurelia - 社群
- Aurelia - 最佳實踐
- Aurelia 實用資源
- Aurelia - 快速指南
- Aurelia - 實用資源
- Aurelia - 討論
Aurelia - HTTP
在本章中,您將瞭解如何在 Aurelia 框架中使用 HTTP 請求。
第 1 步 - 建立檢視
讓我們建立四個按鈕,用於向我們的 API 傳送請求。
app.html
<template>
   <button click.delegate = "getData()">GET</button>
   <button click.delegate = "postData()">POST</button>
   <button click.delegate = "updateData()">PUT</button>
   <button click.delegate = "deleteData()">DEL</button>
</template>
第 2 步 - 建立視模型
為了向伺服器傳送請求,Aurelia 推薦使用 **fetch** 客戶端。我們為需要的每個請求(GET、POST、PUT 和 DELETE)建立函式。
import 'fetch';
import {HttpClient, json} from 'aurelia-fetch-client';

let httpClient = new HttpClient();

export class App {
   getData() {
      httpClient.fetch('http://jsonplaceholder.typicode.com/posts/1')
      .then(response => response.json())
      .then(data => {
         console.log(data);
      });
   }
   myPostData = {
      id: 101
   }
	postData(myPostData) {
      httpClient.fetch('http://jsonplaceholder.typicode.com/posts', {
         method: "POST",
         body: JSON.stringify(myPostData)
      })

      .then(response => response.json())
      .then(data => {
         console.log(data);
      });
   }
   myUpdateData = {
      id: 1
   }
	updateData(myUpdateData) {
      httpClient.fetch('http://jsonplaceholder.typicode.com/posts/1', {
         method: "PUT",
         body: JSON.stringify(myUpdateData)
      })

      .then(response => response.json())
      .then(data => {
         console.log(data);
      });
   }
   deleteData() {
      httpClient.fetch('http://jsonplaceholder.typicode.com/posts/1', {
         method: "DELETE"
      })
      .then(response => response.json())
      .then(data => {
         console.log(data);
      });
   }
}
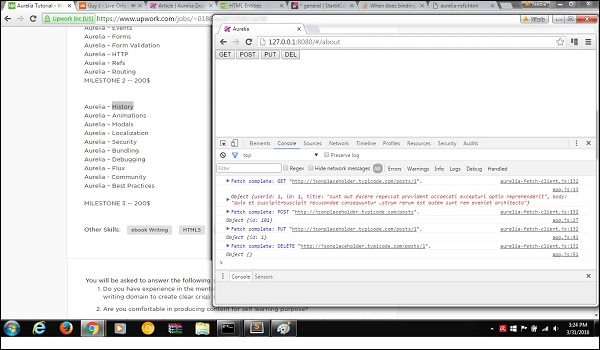
我們可以執行該應用程式,分別單擊 **GET**、**POST**、**PUT** 和 **DEL** 按鈕。我們可以在控制檯中看到每個請求都已成功,並且結果已記錄。
廣告