- Aurelia 教程
- Aurelia - 首頁
- Aurelia - 概述
- Aurelia - 環境搭建
- Aurelia - 第一個應用程式
- Aurelia - 元件
- Aurelia - 元件生命週期
- Aurelia - 自定義元素
- Aurelia - 依賴注入
- Aurelia - 配置
- Aurelia - 外掛
- Aurelia - 資料繫結
- Aurelia - 繫結行為
- Aurelia - 轉換器
- Aurelia - 事件
- Aurelia - 事件聚合器
- Aurelia - 表單
- Aurelia - HTTP
- Aurelia - Refs
- Aurelia - 路由
- Aurelia - 歷史記錄
- Aurelia - 動畫
- Aurelia - 對話方塊
- Aurelia - 本地化
- Aurelia - 工具
- Aurelia - 打包
- Aurelia - 除錯
- Aurelia - 社群
- Aurelia - 最佳實踐
- Aurelia 有用資源
- Aurelia - 快速指南
- Aurelia - 有用資源
- Aurelia - 討論
Aurelia - 表單
本章將學習如何在 Aurelia 框架中使用表單。
文字輸入
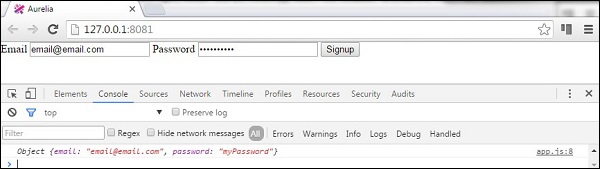
首先,我們將學習如何提交一個輸入表單。檢視將有兩個用於使用者名稱和密碼的輸入表單。我們將使用value.bind進行資料繫結。
app.html
<template>
   <form role = "form" submit.delegate = "signup()">

      <label for = "email">Email</label>
      <input type = "text" value.bind = "email" placeholder = "Email">

      <label for = "password">Password</label>
      <input type = "password" value.bind = "password" placeholder = "Password">

      <button type = "submit">Signup</button>
   </form>
</template>
signup 函式將從輸入中獲取使用者名稱和密碼值,並將其記錄在開發者控制檯中。
export class App {
   email = '';
   password = '';

   signup() {
      var myUser = { email: this.email, password: this.password }
      console.log(myUser);
   };
}
複選框
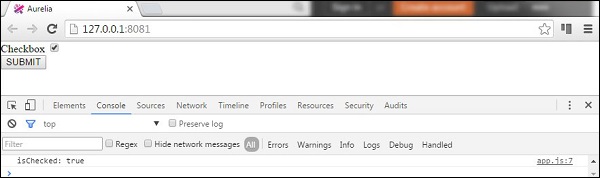
以下示例將演示如何使用 Aurelia 框架提交複選框。我們將建立一個複選框並將checked值繫結到我們的檢視模型。
app.html
<template>
   <form role = "form" submit.delegate = "submit()">

      <label for = "checkbox">Checkbox</label>
      <input type = "checkbox" id = "checkbox" checked.bind = "isChecked"><br/>
      <button type = "submit">SUBMIT</button>

   </form>
</template>
表單提交將只在控制檯中記錄checked值。
app.js
export class App  {
   constructor() {
      this.isChecked = false;
   }
   submit() {
      console.log("isChecked: " + this.isChecked);
   }
}
單選按鈕
以下示例將演示如何提交單選按鈕。語法repeat.for = "option of options"將遍歷物件陣列,併為每個物件建立一個單選按鈕。這是在 Aurelia 框架中動態建立元素的一種簡潔方法。其餘部分與之前的示例相同。我們正在繫結model和checked值。
app.html
<template>
   <form role = "form" submit.delegate = "submit()">

      <label repeat.for = "option of options">
         <input type = "radio" name = "myOptions"
            model.bind = "option" checked.bind = "$parent.selectedOption"/>
            ${option.text}
      </label>
      <br/>

      <button type = "submit">SUBMIT</button>
   </form>
</template>
在我們的檢視模型中,我們將建立一個物件陣列this.options,並指定選中第一個單選按鈕。同樣,提交按鈕將只在控制檯中記錄哪個單選按鈕被選中。
app.js
export class PeriodPanel {
   options = [];
   selectedOption = {};

   constructor() {
      this.options = [
         {id:1, text:'First'},
         {id:2, text:'Second'},
         {id:3, text:'Third'}
      ];
      this.selectedOption = this.options[0];
   }
   submit() {
      console.log('checked: ' + this.selectedOption.id);
   }
}
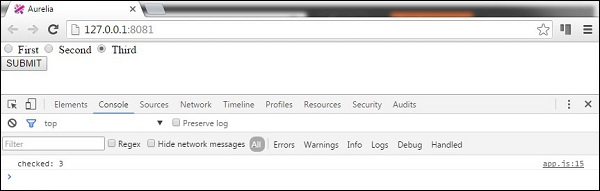
如果我們選中第三個單選按鈕並提交表單,控制檯將顯示它。
廣告