- Angular 6 教程
- Angular 6 - 首頁
- Angular 6 - 概述
- Angular 6 - 環境設定
- Angular 6 - 專案設定
- Angular 6 - 元件
- Angular 6 - 模組
- Angular 6 - 資料繫結
- Angular 6 - 事件繫結
- Angular 6 - 模板
- Angular 6 - 指令
- Angular 6 - 管道
- Angular 6 - 路由
- Angular 6 - 服務
- Angular 6 - Http 服務
- Angular 6 - Http 客戶端
- Angular 6 - 表單
- Angular 6 - 動畫
- Angular 6 - 材質設計
- Angular 6 - CLI
- Angular 6 有用資源
- Angular 6 - 快速指南
- Angular 6 - 有用資源
- Angular 6 - 討論
Angular 6 - 路由
路由基本上意味著在頁面之間導航。您已經看到許多網站上的連結可以將您定向到新頁面。這可以透過路由來實現。這裡我們所指的頁面將以元件的形式存在。我們已經瞭解瞭如何建立元件。現在讓我們建立一個元件,並看看如何使用路由。
在主父元件app.module.ts中,我們現在必須包含路由模組,如下所示:
import { BrowserModule } from '@angular/platform-browser';
import { NgModule } from '@angular/core';
import { RouterModule} from '@angular/router';
import { AppComponent } from './app.component';
import { NewCmpComponent } from './new-cmp/new-cmp.component';
import { ChangeTextDirective } from './change-text.directive';
import { SqrtPipe } from './app.sqrt';
@NgModule({
   declarations: [
      SqrtPipe,
      AppComponent,
      NewCmpComponent,
      ChangeTextDirective
   ],
   imports: [
      BrowserModule,
      RouterModule.forRoot([
         {
            path: 'new-cmp',
            component: NewCmpComponent
         }
      ])
   ],
   providers: [],
   bootstrap: [AppComponent]
})
export class AppModule { }
import { RouterModule} from '@angular/router'
這裡,RouterModule 從 angular/router 中匯入。該模組包含在 imports 中,如下所示:
RouterModule.forRoot([
   {
      path: 'new-cmp',
      component: NewCmpComponent
   }
])
RouterModule 指的是forRoot,它接收一個數組作為輸入,該陣列又包含路徑和元件的物件。路徑是路由器的名稱,元件是類的名稱,即建立的元件。
現在讓我們看看建立的元件檔案:
New-cmp.component.ts
import { Component, OnInit } from '@angular/core';
@Component({
   selector: 'app-new-cmp',
   templateUrl: './new-cmp.component.html',
   styleUrls: ['./new-cmp.component.css']
})
export class NewCmpComponent implements OnInit {
   newcomponent = "Entered in new component created";
   constructor() {}
   ngOnInit() { }
}
突出顯示的類在主模組的 imports 中被提及。
New-cmp.component.html
<p>
   {{newcomponent}}
</p>

<p>
   new-cmp works!
</p>
現在,我們需要在需要時或從主模組單擊時顯示 html 檔案中的上述內容。為此,我們需要在app.component.html中新增路由詳細資訊。
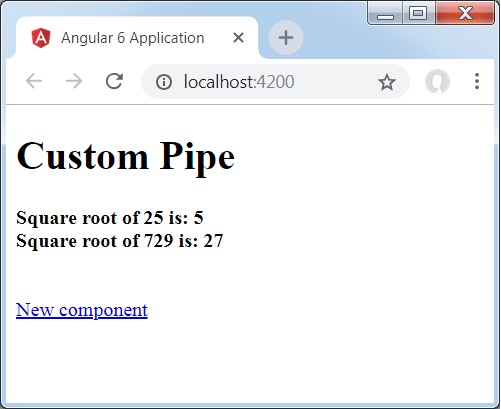
<h1>Custom Pipe</h1>
<b>Square root of 25 is: {{25 | sqrt}}</b><br/>
<b>Square root of 729 is: {{729 | sqrt}}</b>
<br />
<br />
<br />
<a routerLink = "new-cmp">New component</a>
<br />
<br/>
<router-outlet></router-outlet>
在上面的程式碼中,我們建立了錨鏈接標籤,並將 routerLink 設定為"new-cmp"。這在app.module.ts中作為路徑被引用。
當用戶點選新元件時,頁面應該顯示內容。為此,我們需要以下標籤 - <router-outlet> </router-outlet>。
上述標籤確保當用戶點選新元件時,new-cmp.component.html中的內容將顯示在頁面上。
現在讓我們看看輸出如何在瀏覽器中顯示。
當用戶點選新元件時,您將在瀏覽器中看到以下內容。

url 包含https://:4200/new-cmp。這裡,new-cmp 附加到原始 url,這是app.module.ts中給出的路徑和app.component.html中的 router-link。
當用戶點選新元件時,頁面不會重新整理,並且內容在沒有任何重新載入的情況下顯示給使用者。只有在點選時,網站程式碼的特定部分才會重新載入。當頁面上有大量內容並且需要根據使用者互動載入時,此功能很有幫助。該功能還提供了良好的使用者體驗,因為頁面不會重新載入。