- Angular 6 教程
- Angular 6 - 首頁
- Angular 6 - 概述
- Angular 6 - 環境設定
- Angular 6 - 專案設定
- Angular 6 - 元件
- Angular 6 - 模組
- Angular 6 - 資料繫結
- Angular 6 - 事件繫結
- Angular 6 - 模板
- Angular 6 - 指令
- Angular 6 - 管道
- Angular 6 - 路由
- Angular 6 - 服務
- Angular 6 - Http 服務
- Angular 6 - Http 客戶端
- Angular 6 - 表單
- Angular 6 - 動畫
- Angular 6 - 材料
- Angular 6 - CLI
- Angular 6 有用資源
- Angular 6 - 快速指南
- Angular 6 - 有用資源
- Angular 6 - 討論
Angular 6 - 材料
材料為您的專案提供了許多內建模組。自動完成、日期選擇器、滑塊、選單、網格和工具欄等功能可用於 Angular 6 中的材料。
要使用材料,我們需要匯入包。Angular 2 也擁有所有上述功能,但它們作為 @angular/core 模組的一部分提供。Angular 6 推出了一個單獨的模組@angular/materials.。這有助於使用者匯入所需的材料。
要開始使用材料,您需要安裝兩個包 - 材料和 cdk。材料元件依賴於動畫模組以實現高階功能,因此您需要為此使用動畫包,即 @angular/animations。該包已在上一章中更新。
npm install --save @angular/material @angular/cdk
現在讓我們看看 package.json。@angular/material 和 @angular/cdk 已安裝。
{
  "name": "angular6-app",
  "version": "0.0.0",
  "scripts": {
      "ng": "ng",
      "start": "ng serve",
      "build": "ng build",
      "test": "ng test",
      "lint": "ng lint",
      "e2e": "ng e2e"
   },
   "private": true, "dependencies": {
      "@angular/animations": "^6.1.0",
      "@angular/cdk": "^6.4.7",
      "@angular/common": "^6.1.0",
      "@angular/compiler": "^6.1.0",
      "@angular/core": "^6.1.0",
      "@angular/forms": "^6.1.0",
      "@angular/http": "^6.1.0",
      "@angular/material": "^6.4.7",
      "@angular/platform-browser": "^6.1.0",
      "@angular/platform-browser-dynamic": "^6.1.0",
      "@angular/router": "^6.1.0",
      "core-js": "^2.5.4",
      "rxjs": "^6.0.0",
      "zone.js": "~0.8.26"
   },
   "devDependencies": {
      "@angular-devkit/build-angular": "~0.7.0",
      "@angular/cli": "~6.1.3",
      "@angular/compiler-cli": "^6.1.0",
      "@angular/language-service": "^6.1.0",
      "@types/jasmine": "~2.8.6",
      "@types/jasminewd2": "~2.0.3",
      "@types/node": "~8.9.4",
      "codelyzer": "~4.2.1",
      "jasmine-core": "~2.99.1",
      "jasmine-spec-reporter": "~4.2.1",
      "karma": "~1.7.1",
      "karma-chrome-launcher": "~2.2.0",
      "karma-coverage-istanbul-reporter": "~2.0.0",
      "karma-jasmine": "~1.1.1",
      "karma-jasmine-html-reporter": "^0.2.2",
      "protractor": "~5.3.0",
      "ts-node": "~5.0.1",
      "tslint": "~5.9.1",
      "typescript": "~2.7.2"
   }
}
我們突出顯示了安裝以使用材料的包。
我們現在將在父模組app.module.ts中匯入模組,如下所示。
import { BrowserModule } from '@angular/platform-browser';
import { NgModule } from '@angular/core';
import { BrowserAnimationsModule } from '@angular/platform-browser/animations';
import { MatButtonModule, MatMenuModule, MatSidenavModule } from '@angular/material';
import { FormsModule } from '@angular/forms';
import { AppComponent } from './app.component';
@NgModule({
   declarations: [
      AppComponent
   ],
   imports: [
      BrowserModule,
      BrowserAnimationsModule,
      MatButtonModule,
      MatMenuModule,
      FormsModule,
      MatSidenavModule
   ],
   providers: [],
   bootstrap: [AppComponent]
})
export class AppModule { }
在上面的檔案中,我們從 @angular/materials 匯入了以下模組。
import { MatButtonModule, MatMenuModule, MatSidenavModule } from '@angular/material';
並在下面的 imports 陣列中使用它:
imports: [
   BrowserModule,
   BrowserAnimationsModule,
   MatButtonModule,
   MatMenuModule,
   FormsModule,
   MatSidenavModule
]
app.component.ts 如下所示:
import { Component } from '@angular/core';
@Component({
   selector: 'app-root',
   templateUrl: './app.component.html',
   styleUrls: ['./app.component.css']
})
export class AppComponent {
   myData: Array<any>;
   constructor() {}
}
現在讓我們在styles.css中新增材料 CSS 支援。
@import "~@angular/material/prebuilt-themes/indigo-pink.css";
現在讓我們在app.component.html中新增材料。
<button mat-button [matMenuTriggerFor] = "menu">Menu</button>
<mat-menu #menu = "matMenu">
   <button mat-menu-item>
      File
   </button>
   <button mat-menu-item>
      Save As
   </button>
</mat-menu>
<mat-sidenav-container class = "example-container">
   <mat-sidenav #sidenav class = "example-sidenav">
      Angular 6
   </mat-sidenav>
   <div class = "example-sidenav-content">
      <button type = "button" mat-button  (click) = "sidenav.open()">
         Open sidenav
      </button>
   </div>
</mat-sidenav-container>
在上面的檔案中,我們添加了選單和側邊欄。
選單
要新增選單,使用<mat-menu></mat-menu>。檔案和另存為項新增到mat-menu下的按鈕下。添加了一個主按鈕選單。它的引用透過使用[matMenuTriggerFor]="menu"傳遞給<mat-menu>,並使用#在<mat-menu>中使用選單。
側邊欄
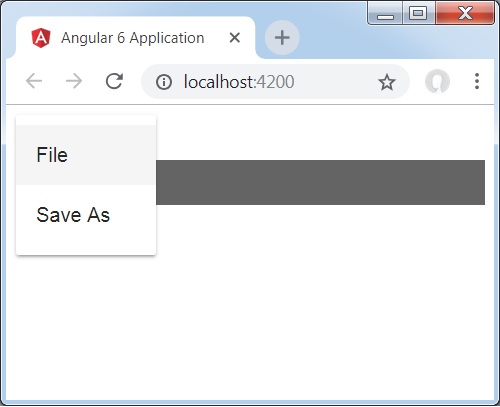
要新增側邊欄,我們需要<mat-sidenav-container></mat-sidenav-container>。<mat-sidenav></mat-sidenav>作為容器的子元素新增。添加了另一個 div,它透過使用(click)="sidenav.open()"觸發側邊欄。以下是選單和側邊欄在瀏覽器中的顯示:
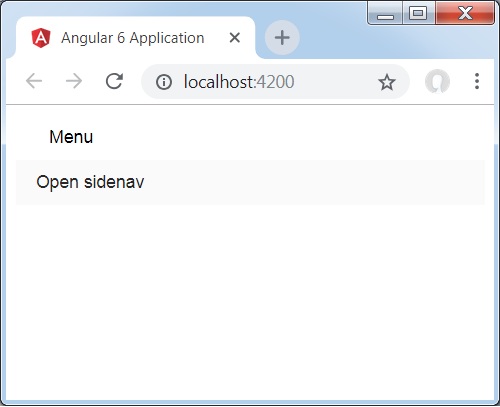
點選opensidenav後,它會顯示如下所示的側邊欄:
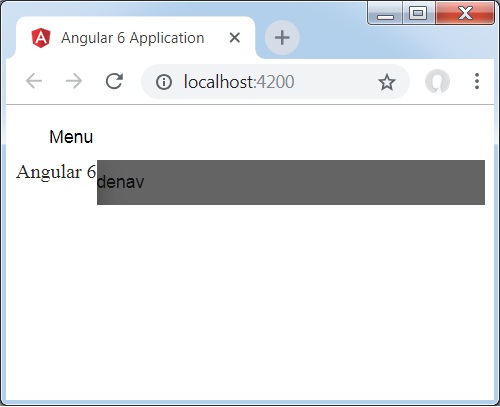
點選選單後,您將獲得兩個專案檔案和另存為,如下所示:
現在讓我們使用材料新增日期選擇器。要新增日期選擇器,我們需要匯入顯示日期選擇器所需的模組。
在app.module.ts中,我們匯入了以下模組,如下所示,用於日期選擇器。
import { BrowserModule } from '@angular/platform-browser';
import { NgModule } from '@angular/core';
import { BrowserAnimationsModule } from '@angular/platform-browser/animations';
import { MatDatepickerModule, MatInputModule, MatNativeDateModule } from '@angular/material';
import { FormsModule } from '@angular/forms';
import { AppComponent } from './app.component';
@NgModule({
   declarations: [
      AppComponent
   ],
   imports: [
      BrowserModule,
      BrowserAnimationsModule,
      FormsModule,
      MatDatepickerModule,
      MatInputModule,
      MatNativeDateModule
   ],
   providers: [],
   bootstrap: [AppComponent]
})
export class AppModule { }
這裡,我們匯入了MatDatepickerModule、MatInputModule和MatNativeDateModule等模組。
現在,app.component.ts如下所示:
import { Component } from '@angular/core';
@Component({
   selector: 'app-root',
   templateUrl: './app.component.html',
   styleUrls: ['./app.component.css']
})
export class AppComponent {
   myData: Array<any>;
   constructor() {}
}
app.component.html如下所示:
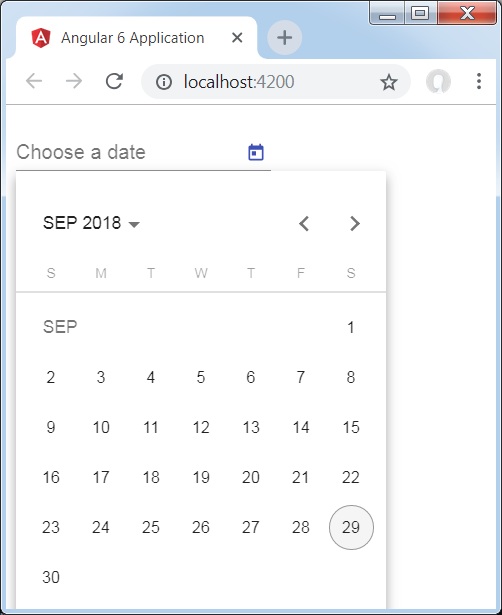
<mat-form-field>
   <input matInput [matDatepicker] = "picker" placeholder = "Choose a date">
   <mat-datepicker-toggle matSuffix [for] = "picker"></mat-datepicker-toggle>
   <mat-datepicker #picker></mat-datepicker>
</mat-form-field>
這就是日期選擇器在瀏覽器中顯示的方式。