
 資料結構
資料結構 網路
網路 RDBMS
RDBMS 作業系統
作業系統 Java
Java iOS
iOS HTML
HTML CSS
CSS Android
 Python
 C 程式設計
 C++
C++ C#
C# MongoDB
 MySQL
MySQL Javascript
 PHP
PHP在 Snack 中使用影像
有時,任務是從移動裝置中選擇影像,然後在應用程式中顯示這些影像。為此,可以使用 expo-image-picker 中的 ImagePicker。在本文中,展示了 React Native 和 Javascript 程式碼,其中包含兩個不同的示例,第一個示例使用 React Native 元件“Image”來選擇影像、調整大小並顯示它。在另一個示例中,展示了從計算機或移動裝置選擇影像的方法,然後將其渲染到裝置螢幕上。
示例 1:使用 React Native 調整影像大小並顯示影像。
演算法
步驟 1 − 從 'react-native' 中匯入 View 和 Image。
步驟 2 − 建立 App.js 並編寫程式碼,以在將本地影像上傳到專案的 asset 資料夾後使用它。
步驟 3 − 透過點選影像名稱來檢查影像大小。在顯示原始大小影像時,在 style 部分指定相同的寬度和高度。
步驟 4 − 為了在所有方向上等比例增加影像大小,請將影像大小乘以相同的值。
步驟 5 − 為了在所有方向上等比例減小影像大小,請將影像大小除以相同的值。
步驟 6 − 向寬度和高度新增相同的值也可以使影像大小在所有方向上等比例變化。
專案中使用的重要檔案是
App.js
Asset 資料夾包含影像“bluestar.jpg”。當點選影像的檔名時,會顯示影像的原始大小。例如,它顯示為 136*112 (bluestar.jpg)。
App.js:這是此專案的 Javascript 主檔案。
示例
import React from 'react';
import {View , Image} from 'react-native';

//displaying and controlling the size of the image

export default class App extends React.Component {
   render() {
      return (
         <View>
            <Image source = {require('./assets/bluestar.jpg')}
            style = {{ width: 112, height: 136}}/>
            <Image source = {require('./assets/bluestar.jpg')}
            style = {{ width: 112*2, height: 136*2}}/>
            <Image source = {require('./assets/bluestar.jpg')}
            style = {{ width: 112/2, height: 136/2}}/>
            <Image source = {require('./assets/bluestar.jpg')}
            style = {{ width: 112+50, height: 136+50}}/>

         </View>
      );
   }
}
檢視結果 - 示例 1
結果可以線上檢視。當用戶輸入程式碼時,Web 檢視會預設被選中,結果會立即顯示。

圖:在 Snack 的 Web 檢視中調整影像大小並顯示。
示例 2:使用 ImagePicker 從裝置中選擇影像,然後顯示它。
演算法
步驟 1 − 從 'react-native' 中匯入 Image、View、StyleSheet 和 Button。從 'expo-image-picker' 中匯入 ImagePicker。
步驟 2 − 建立 App.js 並編寫使用 MediaLibrary.requestPermissionsAsync() 和 ImagePicker.launchImageLibraryAsync() 函式的程式碼。
步驟 3 − 建立一個按鈕,點選它可以從計算機/移動裝置中選擇影像。
步驟 4 − 定義影像樣式,然後顯示影像。
專案中使用的重要檔案是
App.js
App.js:這是此專案的 Javascript 主檔案。
示例
import * as React from 'react';
import { Image, View, StyleSheet, Button } from 'react-native';
import * as ImagePicker from 'expo-image-picker';

export default class SelectImageAndShow extends React.Component {
   state = {
      theimage: null
   }

   getPermissionAsync = async () => {
      const { status } = await MediaLibrary.requestPermissionsAsync();
   }

   picktheImage = async () => {
      let resultimg = await ImagePicker.launchImageLibraryAsync({
         mediaTypes: ImagePicker.MediaTypeOptions.All,
         allowsEditing: true,
         aspect: [4, 3],
         quality: 1
      });

       if (!resultimg.cancelled) {
         this.setState({ theimage: resultimg.uri });
      }
   }

   render() {
      const { theimage } = this.state;
      return (
         <View style={styles.thespace}>

            <View style={{width:"90%", justifyContent:"center", margin:20 }}>
            <Button title="Select the image from your device" color="#A42585"width="50%"onPress={this.picktheImage}/>
            </View>

            {theimage && <Image style={{ justifyContent:"center", width: 300, height: 300, margin:20}} source={{ uri: theimage }}/>}

         </View>
      );
   }
}

const styles = StyleSheet.create({
   thespace: {
      flex: 1,
      justifyContent: 'center',
      backgroundColor: '#000',
   },
});
檢視結果 - 示例 2
結果可以線上檢視。當用戶輸入程式碼時,Web 檢視會預設被選中,結果會立即顯示。當用戶點選按鈕時,會開啟從計算機中選擇圖片的資料夾。當用戶選擇影像時,它會顯示在螢幕上。如果使用者在移動裝置上使用該應用程式,ImagePicker 會提供從移動裝置中選擇圖片的選項。兩種情況下的結果都顯示在此處。
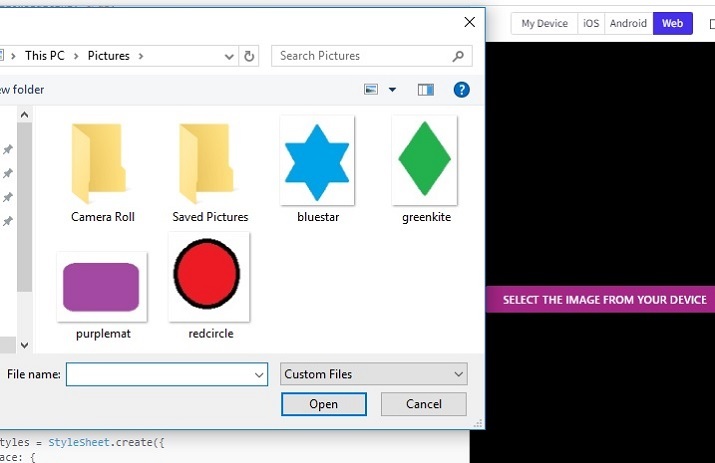
圖:顯示使用 Web 檢視從計算機中選擇圖片的選項。
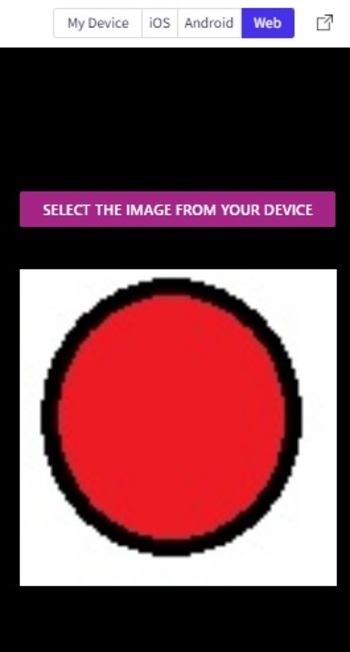
圖:顯示使用 Web 檢視從計算機中選擇圖片後的影像。
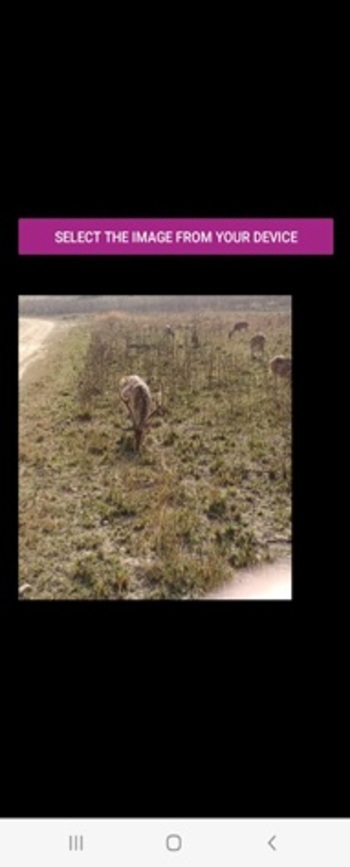
圖:顯示從移動裝置中選擇圖片後,在個人移動裝置上的影像。
本文透過兩個不同的示例,介紹了在 Expo Snack 中顯示影像的方法。首先,介紹了將影像本地儲存在專案中的方法,然後介紹了獲取影像並顯示它的過程。示例 2 還指定了從計算機和移動裝置中選擇影像,然後在螢幕上顯示它的方法。此外,還顯示了線上 Web 檢視和個人移動裝置上的輸出。

673 次瀏覽
