
 資料結構
資料結構 網路
網路 關係資料庫管理系統 (RDBMS)
 作業系統
作業系統 Java
Java iOS
iOS HTML
HTML CSS
CSS Android
 Python
 C語言程式設計
 C++
C++ C#
C# MongoDB
 MySQL
MySQL Javascript
 PHP
PHP在Snack中使用標籤頁
標籤頁用於在應用程式中實現多頁檢視。標籤頁通常位於螢幕頂部或底部。一些庫允許在移動應用程式中建立標籤頁。也可以使用簡單的元件(如按鈕)來建立標籤頁。本文展示了 React Native 和 Javascript 程式碼,其中包含兩個不同的示例:第一個示例使用按鈕建立標籤頁;第二個示例使用 `'@react-navigation/material-top-tabs'` 中的 `createMaterialTopTabNavigator` 建立標籤頁,然後將其渲染到裝置螢幕上。
演算法 1
步驟 1 − 從 'react-native' 中匯入 Text、View、StyleSheet 和 Button。
步驟 2 − 編寫單獨的函式以顯示不同頁面內容。
步驟 3 − 建立 App.js 並編寫程式碼。建立四個按鈕並將它們放置為頂部標籤。
步驟 4 − 為指定的標籤建立頁面內容,並透過按鈕點選顯示它。
步驟 5 − 建立一個新的樣式並將其命名為 selectedOne。選擇給定標籤時設定此樣式。這將使指定的標籤在該行中看起來與其他未選擇的標籤不同。
步驟 6 − 檢查結果。
示例 1:在 Snack 中使用按鈕建立標籤頁。
專案中使用的重要檔案是
App.js
App.js:這是該專案的 Javascript 主檔案。
示例
import{Component}from'react';
import{Text,View,StyleSheet,Button}from'react-native';

exportdefaultclassAppextendsComponent{
   constructor(props){
      super(props);
      this.state={
         LessonSelected:'One',
         btnClr:"#6690ad",
      };
   }
   render(){
      return(
         <Viewstyle={styles.mainSpace}>
            <Viewstyle={styles.Lessonbuttons}>

               <Viewstyle={this.state.LessonSelected==='One'?styles.selectedOne:null}>
                  <Button
                  onPress={()=>{
                     this.setState({LessonSelected:'One'});
                  }}
                  title="Lesson1"
                  color={this.state.btnClr}
                  borderColor='#000'
                  />
               </View>
               <Viewstyle={this.state.LessonSelected==='Two'?styles.selectedOne:null}>
                  <Button
                  onPress={()=>{
                     this.setState({LessonSelected:'Two'});
                  }}
                  title="Lesson2"
                  color={this.state.btnClr}
                  />
               </View>
               <Viewstyle={this.state.LessonSelected==='Three'?styles.selectedOne:null}>
                  <Button
                  onPress={()=>{
                     this.setState({LessonSelected:'Three'});
                  }}
                  title="Lesson3"
                  color={this.state.btnClr}
                  />

               </View>
               <Viewstyle={this.state.LessonSelected==='Four'?styles.selectedOne:null}>
                  <Button
                  onPress={()=>{
                     this.setState({LessonSelected:'Four'});
                  }}
                  title="Lesson4"
                  color={this.state.btnClr}
                  />
               </View>
            </View>

            {this.state.LessonSelected==='One'?this.showLesson1()
               :this.state.LessonSelected==='Two'?this.showLesson2()
               :this.state.LessonSelected==='Three'?this.showLesson3()
               :this.state.LessonSelected==='Four'?this.showLesson4()
               :this.showLesson1()
            }
         </View>
      );
   }
   showLesson1=()=>(
      <Viewstyle={[styles.Lessoncontents,styles.Lessons]}>
         <Textstyle={styles.LessonHeader}>Lesson1</Text>
         <Textstyle={styles.LessonContent}>Contents</Text>
      </View>
   );

   showLesson2=()=>(
      <Viewstyle={[styles.Lessoncontents,styles.Lessons]}>
         <Textstyle={styles.LessonHeader}>Lesson2</Text>
         <Textstyle={styles.LessonContent}>Contents</Text>
      </View>
   );

   showLesson3=()=>(
      <Viewstyle={[styles.Lessoncontents,styles.Lessons]}>
         <Textstyle={styles.LessonHeader}>Lesson3</Text>
         <Textstyle={styles.LessonContent}>Contents</Text>
      </View>
   );

   showLesson4=()=>(
      <Viewstyle={[styles.Lessoncontents,styles.Lessons]}>
         <Textstyle={styles.LessonHeader}>Lesson4</Text>
         <Textstyle={styles.LessonContent}>Contents</Text>
      </View>
   );
}

conststyles=StyleSheet.create({
   mainSpace:{
      flex:1,
      marginTop:50,
   },
   Lessonbuttons:{
      width:'100%',
      flexDirection:'row',
      justifyContent:'space-between',
   },
   Lessoncontents:{
      flex:1,
      width:'100%',
      padding:10,
      marginTop:10,
      borderWidth:1,
      borderColor:'black',
   },
   LessonHeader:{
      color:'black',
      fontSize:28,
      textAlign:'center',
   },
   selectedOne:{
      borderBottomWidth:10,
      borderBottomColor:'#ffc181',
   },
});
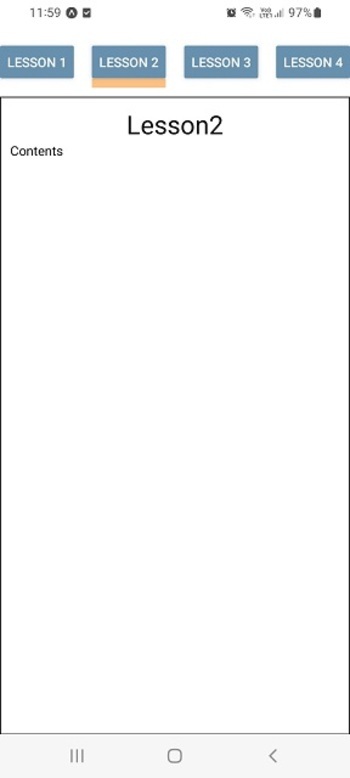
輸出
雖然結果可以線上檢視,但此處顯示的是在個人移動裝置上的結果。
演算法 2
步驟 1 − 從 'react-native' 中匯入 Text、View、StyleSheet。
步驟 2 − 從 '@react-navigation/native' 匯入 NavigationContainer,然後從 '@react-navigation/material-top-tabs' 匯入 createMaterialTopTabNavigator。
步驟 3 − 編寫單獨的函式以顯示不同頁面內容。
步驟 4 − 建立 App.js 並編寫程式碼。使用 createMaterialTopTabNavigator() 建立 LessonTab。
步驟 5 − 建立 NavigationContainer 標籤,並在其中建立 LessonTab.Navigator。從不同的 LessonTab.Screen 呼叫頁面內容函式。
步驟 6 − 檢查結果。
示例 2:使用 `'@react-navigation/material-top-tabs'` 中的 `createMaterialTopTabNavigator` 建立標籤頁。
專案中使用的重要檔案是
App.js
App.js:這是該專案的 Javascript 主檔案。
示例
import {Component} from 'react';
import { Text, View, StyleSheet } from 'react-native';
import { NavigationContainer } from '@react-navigation/native';
import { createMaterialTopTabNavigator } from '@react-navigation/material-top-tabs';

const LessonTab = createMaterialTopTabNavigator();

export default class TopTabs extends Component {
   constructor(props) {
      super(props);
      this.state = {
         LessonSelected: 'One',
         btnClr: "#6690ad",
      };
   }
   render(){
      return (
         <View style={styles.mainSpace}>
            <NavigationContainer>
               <LessonTab.Navigator
               tabBarOptions={{
               activeTintColor: '#e3486a',
               inactiveTintColor: '#7448e3',
               }}
               >
                  <LessonTab.Screen name="Lesson 1" component={this.showLesson1} />
                  <LessonTab.Screen name="Lesson 2" component={this.showLesson2} />
                  <LessonTab.Screen name="Lesson 3" component={this.showLesson3} />
                  <LessonTab.Screen name="Lesson 4" component={this.showLesson4} />
               </LessonTab.Navigator>
            </NavigationContainer>
         </View>
      );
   }
   showLesson1 = () => (
      <View style={[styles.Lessoncontents, styles.Lessons]}>
         <Text style={styles.LessonHeader}>Lesson1</Text>
         <Text style={styles.LessonContent}>Contents</Text>
      </View>
   );
   showLesson2 = () => (
      <View style={[styles.Lessoncontents, styles.Lessons]}>
         <Text style={styles.LessonHeader}>Lesson2</Text>
         <Text style={styles.LessonContent}>Contents</Text>
      </View>
   );

   showLesson3 = () => (
      <View style={[styles.Lessoncontents, styles.Lessons]}>
         <Text style={styles.LessonHeader}>Lesson3</Text>
         <Text style={styles.LessonContent}>Contents</Text>
      </View>
   );

   showLesson4 = () => (
      <View style={[styles.Lessoncontents, styles.Lessons]}>
         <Text style={styles.LessonHeader}>Lesson 4 </Text>
         <Text style={styles.LessonContent}>Contents</Text>
      </View>
   );
}

const styles = StyleSheet.create({
   mainSpace: {
      flex: 1,
      marginTop: 50,
   },
   Lessoncontents: {
      flex: 1,
      width: '100%',
      padding: 10,
      marginTop: 10,
      borderWidth: 1,
      borderColor: 'black',
   },
   LessonHeader: {
      color: 'black',
      fontSize: 28,
      textAlign: 'center',
   },
});
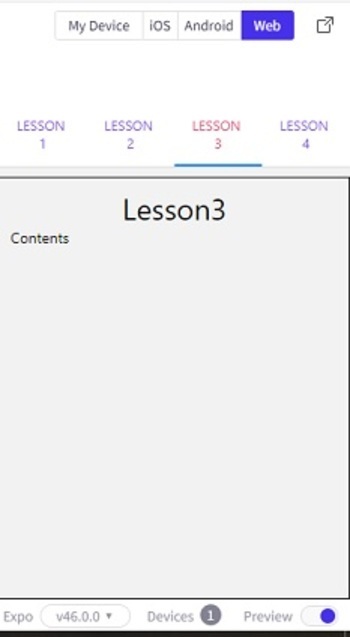
輸出
結果可以線上檢視。當用戶輸入程式碼時,Web 檢視將預設選中,結果會立即顯示。
本文使用兩個不同的示例介紹了在 Expo Snack 上建立頂部標籤頁的方法。首先介紹了使用簡單按鈕建立標籤頁的方法,然後以使用 `'@react-navigation/material-top-tabs'` 中的 `createMaterialTopTabNavigator` 建立頂部標籤頁為例,並展示了這些方法線上 Web 檢視和個人移動裝置上的輸出。

212 次瀏覽
