
 資料結構
資料結構 網路
網路 關係資料庫管理系統 (RDBMS)
 作業系統
作業系統 Java
Java iOS
iOS HTML
HTML CSS
CSS Android
 Python
 C語言程式設計
 C++
C++ C#
C# MongoDB
 MySQL
MySQL Javascript
 PHP
PHP在Snack中使用列表
有時,任務是將多個專案儲存和顯示為列表。對於這個React Native元件,可以使用FlatList。FlatList也可以設定為可選擇或可點選的。在這篇文章中,將展示React Native和Javascript程式碼,其中包含兩個不同的示例,第一個示例將列表的專案儲存為具有唯一ID的可識別的鍵值對陣列,然後獲取和渲染。
演算法
演算法-1
步驟1 − 從'react-native'匯入FlatList、Text和View。
步驟2 − 建立App.js並編寫儲存列表的程式碼。列表以陣列的形式存在,但儲存為鍵值對。每個專案都有一個唯一的ID。
步驟3 − 建立一個箭頭函式“showlist”來設定狀態,使其包含所有列表項。
步驟4 − 獲取狀態變數列表並逐一渲染所有專案。
步驟5 − 使用所需的樣式,View和Text用於在螢幕上顯示專案。
示例1:在FlatList中顯示所有專案。
專案中使用的重要檔案是
App.js
App.js:這是此專案的Javascript主檔案。
示例
import React from 'react';
import {FlatList,Text, View} from 'react-native';

export default class FetchExample extends React.Component {
   constructor(props){
      super(props);
      this.state ={
         list:[
            {
               "id": 1,
               "name": "Sector 15 A",
               "city": "Faridabad",
               "lat": 28.395403,
               "lng": 77.315292,
            },
            {
               "id": 2,
               "name": "Borivali",
               "city": "Mumbai",
               "lat": 19.228825,
               "lng": 72.854118,
            },
            {
               "id": 3,
               "name": "Kolutolla",
               "city": "Kolkata",
               "lat": 22.578005,
               "lng": 88.358536,
            },
            {
               "id": 4,
               "name": "Benz Circle",
               "city": "Vijayawada",
               "lat": 16.499725,
               "lng": 80.656067,
            },
         ],
         keyid:0,
      }
   }
   showitem= ()=>{
      for(var i=0;i<this.state.list.length;i++){
         this.setState({keyid:this.state.keyid+1})
      }
   }
   render(){
      return(
         <View style={{flex: 1, paddingTop:5, backgroundColor: 'forestgreen'}}>
            <Text style={{padding:60,fontSize: 18,       fontWeight: 'bold'}}>Latitude and Longitude</Text>
            <View style={{flexDirection:'row', justifyContent: 'space-between',
            alignItems:'center', padding:10, backgroundColor: 'brown', margin: 10}}>
               <Text style={{fontSize: 18, fontWeight: 'bold'}}>Place</Text>
               <Text style={{fontSize: 18, fontWeight: 'bold'}}>City</Text>
               <Text style={{fontSize: 18, fontWeight: 'bold'}}>Latitude</Text>
               <Text style={{fontSize: 18, fontWeight: 'bold'}}>Longitude</Text>
            </View>
            <FlatList
            data={this.state.list}
            renderItem={({item}) => (
               <View style={{flexDirection:'row', justifyContent: 'space-between',
               alignItems:'center', padding:10, backgroundColor: 'lawngreen', margin: 10}}>
                  <Text>{item.name}</Text>
                  <Text>{item.city}</Text>
                  <Text>{item.lat}</Text>
                  <Text>{item.lng}</Text>
               </View>
            )}
            keyExtractor={(item, index) => index}
            />
         </View>
      );
   }
}
檢視結果
結果可以線上檢視。當用戶輸入程式碼時,Web檢視將預設選中,結果會立即顯示。
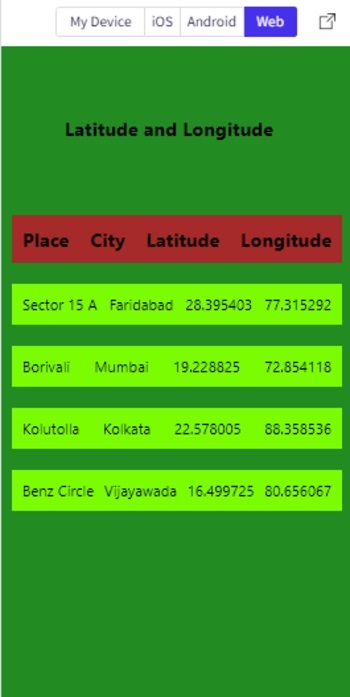
在Snack的Web檢視中顯示FlatList專案
演算法-2
步驟1 − 從'react-native'匯入FlatList、TouchableOpacity、Alert、Text和View。
步驟2 − 建立App.js並編寫儲存列表的程式碼。列表以陣列的形式存在,但儲存為鍵值對。每個專案都有一個唯一的ID。
步驟3 − 建立一個箭頭函式“showlist”來設定狀態,使其包含所有列表項。
步驟4 − 獲取狀態變數列表並逐一渲染所有專案。
步驟5 − 要使FlatList專案可點選,請使用具有所需樣式的TouchableOpacity。
步驟6 − 函式onPress()指定單擊列表項時要執行的操作。例如,此處將JSON物件轉換為文字後,在警報中顯示緯度和經度值作為結果。
示例2:使FlatList中的專案可點選以顯示與所選專案相關的結果。
專案中使用的重要檔案是
App.js
App.js:這是此專案的Javascript主檔案。
示例
import React from 'react';
import {Alert, FlatList,Text, View,TouchableOpacity} from 'react-native';

export default class FetchExample extends React.Component {
   constructor(props){
      super(props);
      this.state ={
         list:[
            {
               "id": 1,
               "name": "Sector 15 A",
               "city": "Faridabad",
               "lat": 28.395403,
               "lng": 77.315292,
            },
            {
               "id": 2,
               "name": "Borivali",
               "city": "Mumbai",
               "lat": 19.228825,
               "lng": 72.854118,
            },
            {
               "id": 3,
               "name": "Kolutolla",
               "city": "Kolkata",
               "lat": 22.578005,
               "lng": 88.358536,
            },
            {
               "id": 4,
               "name": "Benz Circle",
               "city": "Vijayawada",
               "lat": 16.499725,
               "lng": 80.656067,
            },
         ],
         keyid:0,

      }
   }
   showitem= ()=>{
      for(var i=0;i<this.state.list.length;i++){
         this.setState({keyid:this.state.keyid+1})
      }
   }
   render(){
      return (
            <View style={{flex: 1, paddingTop:5, backgroundColor: 'forestgreen'}}>
            <Text style={{padding:60,fontSize: 18, fontWeight: 'bold'}}>Latitude and Longitude</Text>
            <View style={{flexDirection:'row', justifyContent: 'space-between',
            alignItems:'center', padding:10, backgroundColor: 'brown', margin: 10}}>
            <Text style={{fontSize: 18, fontWeight: 'bold'}}>Place</Text>
            <Text style={{fontSize: 18, fontWeight: 'bold'}}>City</Text>
            <Text style={{fontSize: 18, fontWeight: 'bold'}}>Latitude</Text>
            <Text style={{fontSize: 18, fontWeight: 'bold'}}>Longitude</Text>
         </View>

         <FlatList
         data={this.state.list}
         renderItem={
         ({item ,index}) => (
            <View style={{flex: 1, flexDirection:'row', justifyContent: 'space-between', alignItems:'center', padding:10, backgroundColor: 'lawngreen', margin: 10}}>
               <TouchableOpacity
                  key={index.toString()}
                  onPress={() =>{
                     let str= JSON.stringify(item.name);
                     let str1 = JSON.stringify(item.lat);
                     let str2 = JSON.stringify(item.lng);
                     Alert.alert(str +" --" + "latitude: " +str1+ "" + "
longitude: " +str2);
                     //alert(str +" --" + "latitude: " +str1+ "" + "
longitude: " +str2);
                  }
               }
               >
               <Text>{item.name}</Text>
               <Text>{item.city}</Text>
               </TouchableOpacity>
            </View>
         )
         }
         keyExtractor={(item, index) => index}
         />
         </View>
      );
   }
}
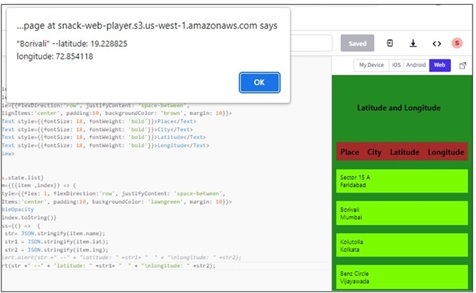
檢視結果
結果可以線上檢視。當用戶輸入程式碼時,Web檢視將預設選中,結果會立即顯示。Alert.alert()函式可能不會在Web檢視中顯示結果。因此,要檢視結果,可以使用簡單的alert()。程式碼示例中顯示了這兩個語句。其中一個可以保留為註釋。
在個人手機上選擇專案時,顯示簡單警報的可點選FlatList專案
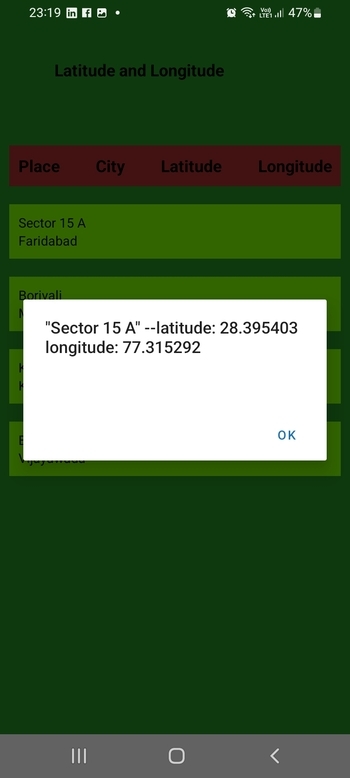
在個人手機上顯示警報的可點選FlatList專案
本文透過兩個不同的示例,介紹了在Expo Snack上顯示FlatList的方法。首先介紹了儲存列表項的方法,然後介紹了獲取列表項並將其顯示為FlatList的過程。示例2中還指定了單擊FlatList專案並執行操作的方法。此外,還顯示了線上Web檢視和個人移動裝置上的輸出。

167 次瀏覽
