
 資料結構
資料結構 網路
網路 關係資料庫管理系統 (RDBMS)
 作業系統
作業系統 Java
Java iOS
iOS HTML
HTML CSS
CSS Android
 Python
 C語言程式設計
 C++
C++ C#
C# MongoDB
 MySQL
MySQL Javascript
 PHP
PHP使用Python讀取影像?
使用OpenCV進行影像處理
OpenCV(開源計算機視覺)是一個開源程式設計庫,主要用於機器學習和計算機視覺。它提供用於處理計算機視覺應用程式的通用基礎架構,並加快機器學習在商業產品中的使用。
它包含超過2500個針對計算機視覺和機器學習的最佳化演算法,這些演算法既經典又屬於最新技術。如此眾多的演算法使其能夠用於多種用途,包括人臉檢測和識別、物體識別、對影片中人物行為進行分類、跟蹤攝像機運動、將影像拼接在一起以生成整個場景的高解析度影像等等。
在本教程中,我將嘗試解釋如何使用OpenCV庫和Python來讀取和顯示影像。這使用cv2和NumPy模組實現。
您可以從Python包索引(PyPI)下載NumPy模組。
$ pip install numpy
讀取影像
我們使用cv2.imread()函式來讀取影像。影像應該放在當前工作目錄中,否則我們需要提供絕對路徑。
import numpy as np
import cv2
# Load an color image in grayscale
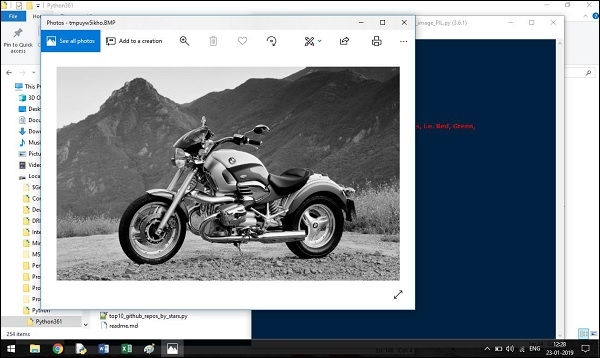
img = cv2.imread('Top-bike-wallpaper.jpg',0)顯示影像
要在視窗中顯示影像,請使用cv2.imshow()函式。
#Display the image
cv2.imshow('image',img)
#key binding function
cv2.waitKey(0)
#Destroyed all window we created earlier.
cv2.destroyAllWindows()
執行以上程式碼後,視窗截圖如下所示,

寫入影像
使用函式**cv2.imwrite()**儲存影像。
第一個引數是檔名,第二個引數是要儲存的影像。
cv2.imwrite('messigray.png',img)總結:
import numpy as np
import cv2

#Read the Image
# Load an color image in grayscale
img = cv2.imread('Top-bike-wallpaper.jpg',0)

#Display the image
cv2.imshow('image',img)

#key binding function
k = cv2.waitKey(0)

# wait for ESC key to exit
if k == 27:
   cv2.destroyAllWindows()
# wait for 's' key to save and exit
elif k == ord('s'):
   cv2.imwrite('myBike.jpg',img)
   cv2.destroyAllWindows()
按“s”儲存影像,或按“ESC”鍵直接退出而不儲存。
使用Python影像庫(PIL)
Python影像庫(PIL)是Python中的影像處理庫。使用pip安裝PIL庫:
$ pip install Pillow
from PIL import Image, ImageFilter
#Read image
im = Image.open( 'myBike.png' )

#Display image
im.show()

#Applying a filter to the image
im_sharp = im.filter( ImageFilter.SHARPEN )

#Saving the filtered image to a new file
im_sharp.save( 'another_Bike.jpg', 'JPEG' )
輸出
影像儲存在我的預設位置,即當前工作目錄,並且視窗截圖將顯示我們的影像。

更新於:2019年7月30日
8K+ 次瀏覽

廣告