- Struts 2 教程
- Struts2 - 首頁
- Struts2 - 基本 MVC 架構
- Struts2 - 概述
- Struts2 - 環境搭建
- Struts2 - 架構
- Struts2 - 示例
- Struts2 - 配置
- Struts2 - Action
- Struts2 - 攔截器
- Struts2 - 結果型別
- Struts2 - 值棧/OGNL
- Struts2 - 檔案上傳
- Struts2 - 資料庫訪問
- Struts2 - 傳送郵件
- Struts2 - 驗證
- Struts2 - 國際化
- Struts2 - 型別轉換
- Struts2 - 主題/模板
- Struts2 - 異常處理
- Struts2 - 註解
- Struts 2 標籤
- Struts2 - 控制標籤
- Struts2 - 資料標籤
- Struts2 - 表單標籤
- Struts2 - Ajax 標籤
- Struts 2 整合
- Struts2 - Spring
- Struts2 - Tiles
- Struts2 - Hibernate
- Struts 2 有用資源
- Struts2 - 問答
- Struts2 - 快速指南
- Struts2 - 有用資源
- Struts2 - 討論
Struts 2 和 Hibernate 整合
Hibernate 是一個高效能的物件/關係持久化和查詢服務,它在開源 GNU Lesser General Public License (LGPL) 許可下發布,可以免費下載。在本章中,我們將學習如何實現 Struts 2 與 Hibernate 的整合。如果您不熟悉 Hibernate,可以檢視我們的 Hibernate 教程。
資料庫設定
在本教程中,我將使用名為 "struts2_tutorial" 的 MySQL 資料庫。我使用使用者名稱 "root" 和無密碼連線到我機器上的此資料庫。首先,您需要執行以下指令碼。此指令碼建立一個名為 student 的新表,並在該表中建立一些記錄 -
CREATE TABLE IF NOT EXISTS `student` (
   `id` int(11) NOT NULL AUTO_INCREMENT,
   `first_name` varchar(40) NOT NULL,
   `last_name` varchar(40) NOT NULL,
   `marks` int(11) NOT NULL,
   PRIMARY KEY (`id`)
);

--
-- Dumping data for table `student`
--

INSERT INTO `student` (`id`, `first_name`, `last_name`, `marks`)
   VALUES(1, 'George', 'Kane', 20);
INSERT INTO `student` (`id`, `first_name`, `last_name`, `marks`)
   VALUES(2, 'Melissa', 'Michael', 91);
INSERT INTO `student` (`id`, `first_name`, `last_name`, `marks`)
   VALUES(3, 'Jessica', 'Drake', 21);
Hibernate 配置
接下來,讓我們建立 hibernate.cfg.xml 檔案,它是 Hibernate 的配置檔案。
<?xml version = '1.0' encoding = 'utf-8'?>
<!DOCTYPE hibernate-configuration PUBLIC
   "-//Hibernate/Hibernate Configuration DTD//EN"
   "http://hibernate.sourceforge.net/hibernate-configuration-3.0.dtd">

<hibernate-configuration>
   <session-factory>
      <property name = "hibernate.connection.driver_class">c
         om.mysql.jdbc.Driver
      </property>

      <property name = "hibernate.connection.url">
         jdbc:mysql://tutorialspoint.tw/struts_tutorial
      </property>

      <property name = "hibernate.connection.username">root</property>

      <property name = "hibernate.connection.password"></property>

      <property name = "hibernate.connection.pool_size">10</property>

      <property name = "show_sql">true</property>

      <property name = "dialect">
         org.hibernate.dialect.MySQLDialect
      </property>

      <property name = "hibernate.hbm2ddl.auto">update</property>

      <mapping class = "com.tutorialspoint.hibernate.Student" />
   </session-factory>
</hibernate-configuration>
讓我們看一下 Hibernate 配置檔案。首先,我們宣告我們正在使用 MySQL 驅動程式。然後我們宣告用於連線到資料庫的 jdbc url。然後我們宣告連線的使用者名稱、密碼和池大小。我們還透過將 "show_sql" 設定為 true 來指示我們希望在日誌檔案中看到 SQL。請閱讀 Hibernate 教程以瞭解這些屬性的含義。
最後,我們將對映類設定為 com.tutorialspoint.hibernate.Student,我們將在本章中建立它。
環境搭建
接下來,此專案需要大量 jar 包。附件是所需 JAR 檔案完整列表的螢幕截圖 -
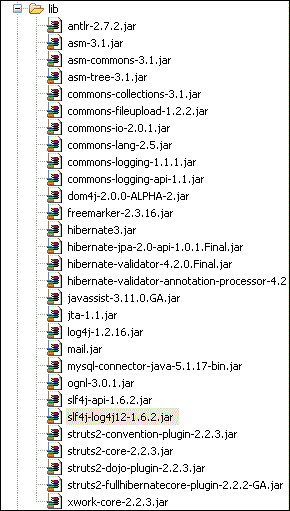
大多數 JAR 檔案可以作為 Struts 發行版的一部分獲得。如果您安裝了 GlassFish、WebSphere 或 JBoss 等應用伺服器,則可以從應用伺服器的 lib 資料夾中獲取大部分剩餘的 jar 檔案。如果沒有,您可以單獨下載這些檔案 -
Hibernate jar 檔案 - Hibernate.org
Struts Hibernate 外掛 - Struts Hibernate 外掛
JTA 檔案 - JTA 檔案
Dom4j 檔案 - Dom4j
log4j 檔案 - log4j
其餘檔案應該可以從您的 Struts2 發行版中獲得。
Hibernate 類
現在讓我們建立 Hibernate 整合所需的 Java 類。以下是 Student.java 的內容 -
package com.tutorialspoint.hibernate;

import javax.persistence.Column;
import javax.persistence.Entity;
import javax.persistence.GeneratedValue;
import javax.persistence.Id;
import javax.persistence.Table;

@Entity
@Table(name = "student")
public class Student {

   @Id
   @GeneratedValue
   private int id;
   @Column(name = "last_name")
   private String lastName;
   @Column(name = "first_name")
   private String firstName;
   private int marks;

   public int getId() {
    return id;
   }

   public void setId(int id) {
    this.id = id;
   }

   public String getLastName() {
      return lastName;
   }

   public void setLastName(String lastName) {
      this.lastName = lastName;
   }

   public String getFirstName() {
      return firstName;
   }

   public void setFirstName(String firstName) {
      this.firstName = firstName;
   }

   public int getMarks() {
      return marks;
   }

   public void setMarks(int marks) {
      this.marks = marks;
   }
}
這是一個 POJO 類,根據 Hibernate 規範表示 student 表。它具有屬性 id、firstName 和 lastName,它們對應於 student 表的列名。接下來,讓我們建立 StudentDAO.java 檔案,如下所示 -
package com.tutorialspoint.hibernate;

import java.util.ArrayList;
import java.util.List;

import org.hibernate.Session;
import org.hibernate.Transaction;

import com.googlecode.s2hibernate.struts2.plugin.\
   annotations.SessionTarget;
import com.googlecode.s2hibernate.struts2.plugin.\
   annotations.TransactionTarget;

public class StudentDAO {

   @SessionTarget
   Session session;

   @TransactionTarget
   Transaction transaction;

   @SuppressWarnings("unchecked")
   public List<Student> getStudents() {
      List<Student> students = new ArrayList<Student>();

      try {
         students = session.createQuery("from Student").list();
      } catch(Exception e) {
         e.printStackTrace();
      }
      return students;
   }

   public void addStudent(Student student) {
      session.save(student);
   }
}
StudentDAO 類是 Student 類的資料庫訪問層。它具有列出所有學生和儲存新學生記錄的方法。
Action 類
以下 AddStudentAction.java 檔案定義了我們的 Action 類。這裡有兩個 Action 方法 - execute() 和 listStudents()。execute() 方法用於新增新的學生記錄。我們使用 dao 的 save() 方法來實現這一點。
另一個方法 listStudents() 用於列出學生。我們使用 dao 的 list 方法獲取所有學生列表。
package com.tutorialspoint.struts2;

import java.util.ArrayList;
import java.util.List;

import com.opensymphony.xwork2.ActionSupport;
import com.opensymphony.xwork2.ModelDriven;
import com.tutorialspoint.hibernate.Student;
import com.tutorialspoint.hibernate.StudentDAO;

public class AddStudentAction extends ActionSupport implements ModelDriven<Student> {

   Student student  = new Student();
   List<Student> students = new ArrayList<Student>();
   StudentDAO dao = new StudentDAO();
   @Override

  public Student getModel() {
      return student;
   }

   public String execute() {
      dao.addStudent(student);
      return "success";
   }

   public String listStudents() {
      students = dao.getStudents();
      return "success";
   }

   public Student getStudent() {
      return student;
   }

   public void setStudent(Student student) {
      this.student = student;
   }

   public List<Student> getStudents() {
      return students;
   }

   public void setStudents(List<Student> students) {
      this.students = students;
   }

}
您會注意到我們正在實現 ModelDriven 介面。當您的 Action 類處理具體的模型類(例如 Student)而不是單個屬性(例如 firstName、lastName)時,可以使用此介面。ModelAware 介面要求您實現一個方法來返回模型。在我們的例子中,我們返回 "student" 物件。
建立檢視檔案
現在讓我們建立包含以下內容的 student.jsp 檢視檔案 -
<%@ page contentType = "text/html; charset = UTF-8"%>
<%@ taglib prefix = "s" uri = "/struts-tags"%>

<html>
   <head>
      <title>Hello World</title>
      <s:head />
   </head>

   <body>
      <s:form action = "addStudent">
         <s:textfield name = "firstName" label = "First Name"/>
         <s:textfield name = "lastName" label = "Last Name"/>
         <s:textfield name = "marks" label = "Marks"/>
         <s:submit/>
         <hr/>

         <table>
            <tr>
               <td>First Name</td>
               <td>Last Name</td>
               <td>Marks</td>
            </tr>

            <s:iterator value = "students">
               <tr>
                  <td><s:property value = "firstName"/></td>
                  <td><s:property value = "lastName"/></td>
                  <td><s:property value = "marks"/></td>
                 </tr>
            </s:iterator>
         </table>
      </s:form>
   </body>
</html>
student.jsp 非常簡單。在頂部部分,我們有一個提交到 "addStudent.action" 的表單。它接收 firstName、lastName 和 marks。因為 addStudent action 與 ModelAware "AddSudentAction" 繫結,所以會自動建立一個 student bean,其 firstName、lastName 和 marks 值會自動填充。
在底部部分,我們遍歷學生列表(參見 AddStudentAction.java)。我們迭代列表並在表格中顯示名字、姓氏和分數的值。
Struts 配置
讓我們使用 struts.xml 將所有內容組合在一起 -
<?xml version = "1.0" Encoding = "UTF-8"?>
<!DOCTYPE struts PUBLIC
   "-//Apache Software Foundation//DTD Struts Configuration 2.0//EN"
   "http://struts.apache.org/dtds/struts-2.0.dtd">

<struts>
   <constant name = "struts.devMode" value = "true" />
   <package name = "myhibernate" extends = "hibernate-default">

      <action name = "addStudent" method = "execute"
         class = "com.tutorialspoint.struts2.AddStudentAction">
         <result name = "success" type = "redirect">
            listStudents
         </result>
      </action>

      <action name = "listStudents" method = "listStudents"
         class = "com.tutorialspoint.struts2.AddStudentAction">
         <result name = "success">/students.jsp</result>
      </action>

   </package>
</struts>
這裡需要注意的重要一點是,我們的包 "myhibernate" 擴充套件了名為 "hibernate-default" 的 Struts2 預設包。然後我們宣告兩個 action - addStudent 和 listStudents。addStudent 在 AddStudentAction 類上呼叫 execute(),然後在成功後,它呼叫 listStudents action 方法。
listStudent action 方法在 AddStudentAction 類上呼叫 listStudents() 並使用 student.jsp 作為檢視。
現在,右鍵單擊專案名稱並單擊 匯出 > WAR 檔案 以建立 WAR 檔案。然後將此 WAR 部署到 Tomcat 的 webapps 目錄中。最後,啟動 Tomcat 伺服器並嘗試訪問 URL https://:8080/HelloWorldStruts2/student.jsp。這將生成以下螢幕 -
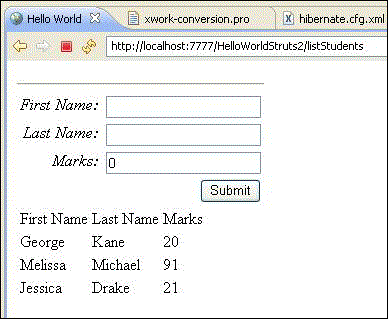
在頂部部分,我們得到一個表單,用於輸入新學生記錄的值,底部部分列出資料庫中的學生。繼續新增新的學生記錄並按提交。每次單擊提交時,螢幕都會重新整理並顯示更新的列表。