- Struts 2 教程
- Struts2 - 首頁
- Struts2 - 基本 MVC 架構
- Struts2 - 概述
- Struts2 - 環境設定
- Struts2 - 架構
- Struts2 - 示例
- Struts2 - 配置
- Struts2 - Action
- Struts2 - 攔截器
- Struts2 - 結果型別
- Struts2 - 值棧/OGNL
- Struts2 - 檔案上傳
- Struts2 - 資料庫訪問
- Struts2 - 傳送郵件
- Struts2 - 驗證
- Struts2 - 國際化
- Struts2 - 型別轉換
- Struts2 - 主題/模板
- Struts2 - 異常處理
- Struts2 - 註解
- Struts 2 標籤
- Struts2 - 控制標籤
- Struts2 - 資料標籤
- Struts2 - 表單標籤
- Struts2 - Ajax 標籤
- Struts 2 整合
- Struts2 - Spring
- Struts2 - Tiles
- Struts2 - Hibernate
- Struts 2 有用資源
- Struts2 - 問答
- Struts2 - 快速指南
- Struts2 - 有用資源
- Struts2 - 討論
Struts 2 - 註解
如前所述,Struts 提供兩種配置形式。傳統方式是使用struts.xml檔案進行所有配置。到目前為止,我們在教程中已經看到了很多這樣的例子。配置 Struts 的另一種方式是使用 Java 5 註解功能。使用 Struts 註解,我們可以實現零配置。
要在您的專案中開始使用註解,請確保您已將以下 jar 檔案包含在您的WebContent/WEB-INF/lib資料夾中:
- struts2-convention-plugin-x.y.z.jar
- asm-x.y.jar
- antlr-x.y.z.jar
- commons-fileupload-x.y.z.jar
- commons-io-x.y.z.jar
- commons-lang-x.y.jar
- commons-logging-x.y.z.jar
- commons-logging-api-x.y.jar
- freemarker-x.y.z.jar
- javassist-.xy.z.GA
- ognl-x.y.z.jar
- struts2-core-x.y.z.jar
- xwork-core.x.y.z.jar
現在,讓我們看看如何擺脫struts.xml檔案中可用的配置,並用註解替換它。
為了解釋 Struts2 中註解的概念,我們將不得不重新考慮我們在Struts2 驗證章節中解釋的驗證示例。
在這裡,我們將以一個員工為例,其姓名和年齡將透過一個簡單的頁面捕獲,我們將進行兩次驗證,以確保使用者始終輸入姓名,並且年齡應在 28 到 65 之間。
讓我們從示例的主要 JSP 頁面開始。
建立主頁面
讓我們編寫主頁面 JSP 檔案index.jsp,用於收集上面提到的與員工相關的資訊。
<%@ page language = "java" contentType = "text/html; charset = ISO-8859-1"
   pageEncoding = "ISO-8859-1"%>
<%@ taglib prefix = "s" uri = "/struts-tags"%>
<!DOCTYPE html PUBLIC "-//W3C//DTD HTML 4.01 Transitional//EN"
   "http://www.w3.org/TR/html4/loose.dtd">

<html>
   <head>
      <title>Employee Form</title>
   </head>

   <body>

      <s:form action = "empinfo" method = "post">
         <s:textfield name = "name" label = "Name" size = "20" />
         <s:textfield name = "age" label = "Age" size = "20" />
         <s:submit name = "submit" label = "Submit" align="center" />
      </s:form>

   </body>
</html>
index.jsp 使用了 Struts 標籤,我們還沒有介紹,但我們將在與標籤相關的章節中學習它們。但現在,假設 s:textfield 標籤列印一個輸入欄位,而 s:submit 列印一個提交按鈕。我們為每個標籤使用了 label 屬性,該屬性為每個標籤建立標籤。
建立檢視
我們將使用 JSP 檔案success.jsp,該檔案將在定義的 action 返回SUCCESS時呼叫。
<%@ page language = "java" contentType = "text/html; charset = ISO-8859-1"
	pageEncoding = "ISO-8859-1"%>
<%@ taglib prefix = "s" uri = "/struts-tags"%>
<!DOCTYPE html PUBLIC "-//W3C//DTD HTML 4.01 Transitional//EN"
   "http://www.w3.org/TR/html4/loose.dtd">

<html>
   <head>
      <title>Success</title>
   </head>

   <body>
      Employee Information is captured successfully.
   </body>
</html>
建立 Action
這是使用註解的地方。讓我們使用註解重新定義 action 類Employee,然後新增一個名為validate()的方法,如下所示,在Employee.java檔案中。請確保您的 action 類擴充套件了ActionSupport類,否則您的 validate 方法將不會執行。
package com.tutorialspoint.struts2;

import com.opensymphony.xwork2.ActionSupport;
import org.apache.struts2.convention.annotation.Action;
import org.apache.struts2.convention.annotation.Result;
import org.apache.struts2.convention.annotation.Results;
import com.opensymphony.xwork2.validator.annotations.*;

@Results({
   @Result(name = "success", Location = "/success.jsp"),
   @Result(name = "input", Location = "/index.jsp")
})
public class Employee extends ActionSupport {
   private String name;
   private int age;

   @Action(value = "/empinfo")

   public String execute() {
      return SUCCESS;
   }

   @RequiredFieldValidator( message = "The name is required" )

   public String getName() {
      return name;
   }

   public void setName(String name) {
      this.name = name;
   }

   @IntRangeFieldValidator(message = "Age must be in between 28 and 65", min = "29", max = "65")

   public int getAge() {
      return age;
   }

   public void setAge(int age) {
      this.age = age;
   }
}
在這個例子中,我們使用了一些註解。讓我逐一介紹它們:
首先,我們包含了Results註解。Results 註解是結果的集合。
在 results 註解下,我們有兩個 result 註解。result 註解具有與 execute 方法的結果相對應的name。它們還包含一個位置,指示應提供與 execute() 返回值相對應的哪個檢視。
下一個註解是Action註解。它用於裝飾 execute() 方法。Action 方法還接收一個值,該值是呼叫 action 的 URL。
最後,我使用了兩個validation註解。我在name欄位上配置了 required field validator,在age欄位上配置了 integer range validator。我還為驗證指定了自定義訊息。
配置檔案
我們確實不需要struts.xml配置檔案,所以讓我們刪除此檔案,並檢查web.xml檔案的內容:
<?xml version = "1.0" Encoding = "UTF-8"?>
<web-app xmlns:xsi = "http://www.w3.org/2001/XMLSchema-instance"
   xmlns = "http://java.sun.com/xml/ns/javaee"
   xmlns:web = "http://java.sun.com/xml/ns/javaee/web-app_2_5.xsd"
   xsi:schemaLocation = "http://java.sun.com/xml/ns/javaee
   http://java.sun.com/xml/ns/javaee/web-app_3_0.xsd"
   id = "WebApp_ID" version = "3.0">

   <display-name>Struts 2</display-name>

   <welcome-file-list>
      <welcome-file>index.jsp</welcome-file>
   </welcome-file-list>

   <filter>
      <filter-name>struts2</filter-name>

      <filter-class>
         org.apache.struts2.dispatcher.FilterDispatcher
      </filter-class>

      <init-param>
         <param-name>struts.devMode</param-name>
         <param-value>true</param-value>
      </init-param>
   </filter>

   <filter-mapping>
      <filter-name>struts2</filter-name>
      <url-pattern>/*</url-pattern>
   </filter-mapping>
</web-app>
現在,右鍵單擊專案名稱,然後單擊匯出 > WAR 檔案以建立 WAR 檔案。然後將此 WAR 部署到 Tomcat 的 webapps 目錄中。最後,啟動 Tomcat 伺服器,並嘗試訪問 URLhttps://:8080/HelloWorldStruts2/index.jsp。這將生成以下螢幕:

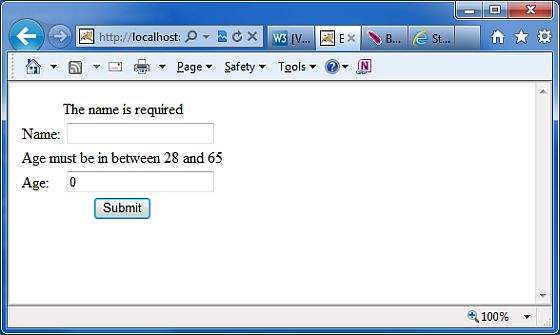
現在不要輸入任何必需的資訊,只需單擊提交按鈕。您將看到以下結果:
輸入所需資訊,但輸入錯誤的 From 欄位,例如將 name 設為“test”,將 age 設為 30,最後單擊提交按鈕。您將看到以下結果:

Struts 2 註解型別
Struts 2 應用程式可以使用 Java 5 註解作為 XML 和 Java 屬性配置的替代方案。您可以檢視與不同類別相關的最重要註解的列表: