- OpenCV 教程
- OpenCV - 首頁
- OpenCV - 概述
- OpenCV - 環境配置
- OpenCV - 影像儲存
- OpenCV - 讀取影像
- OpenCV - 寫入影像
- OpenCV - 圖形使用者介面 (GUI)
- 繪圖函式
- OpenCV - 繪製圓形
- OpenCV - 繪製直線
- OpenCV - 繪製矩形
- OpenCV - 繪製橢圓
- OpenCV - 繪製折線
- OpenCV - 繪製凸多邊形
- OpenCV - 繪製帶箭頭的直線
- OpenCV - 新增文字
- 濾波
- OpenCV - 雙邊濾波
- OpenCV - 方框濾波
- OpenCV - 平方盒濾波
- OpenCV - Filter2D
- OpenCV - 膨脹
- OpenCV - 腐蝕
- OpenCV - 形態學操作
- OpenCV - 影像金字塔
- Sobel 運算元
- OpenCV - Sobel 運算元
- OpenCV - Scharr 運算元
- 影像變換操作
- OpenCV - 拉普拉斯變換
- OpenCV - 距離變換
- 攝像頭和人臉檢測
- OpenCV - 使用攝像頭
- OpenCV - 圖片中的人臉檢測
- 使用攝像頭進行人臉檢測
- OpenCV 有用資源
- OpenCV 快速指南
- OpenCV - 有用資源
- OpenCV - 討論
OpenCV 快速指南
OpenCV - 概述
OpenCV是一個跨平臺庫,我們可以用它來開發即時的計算機視覺應用程式。它主要關注影像處理、影片捕獲和分析,包括人臉檢測和物體檢測等功能。
讓我們從定義“計算機視覺”這個術語開始本章節。
計算機視覺
計算機視覺可以定義為一門學科,它解釋如何根據場景中存在的結構屬性,從其二維影像重建、解釋和理解三維場景。它處理使用計算機軟體和硬體模擬和複製人類視覺。
計算機視覺與以下領域有很大的重疊:
影像處理 - 它專注於影像操作。
模式識別 - 它解釋各種分類模式的技術。
攝影測量學 - 它關注從影像中獲取精確測量。
計算機視覺與影像處理
影像處理處理影像到影像的轉換。影像處理的輸入和輸出都是影像。
計算機視覺是從影像中構建對物理物件的明確、有意義的描述。計算機視覺的輸出是對三維場景中結構的描述或解釋。
計算機視覺的應用
這裡列出了一些計算機視覺大量使用的主要領域。
機器人應用
定位 - 自動確定機器人位置
導航
避障
裝配(銷孔、焊接、噴漆)
操作(例如 PUMA 機器人機械手)
人機互動 (HRI) - 智慧機器人與人互動和服務人
醫學應用
- 分類和檢測(例如病灶或細胞分類和腫瘤檢測)
- 二維/三維分割
- 三維人體器官重建(MRI 或超聲波)
- 視覺引導機器人手術
工業自動化應用
- 工業檢測(缺陷檢測)
- 裝配
- 條形碼和包裝標籤閱讀
- 物體分揀
- 文件理解(例如 OCR)
安全應用
生物識別技術(虹膜、指紋、人臉識別)
監控 - 檢測某些可疑活動或行為
交通應用
- 自動駕駛車輛
- 安全,例如駕駛員警覺性監控
OpenCV 庫的功能
使用 OpenCV 庫,您可以:
讀取和寫入影像
捕獲和儲存影片
處理影像(濾波、變換)
執行特徵檢測
檢測影片或影像中特定物件,例如人臉、眼睛、汽車。
分析影片,即估計影片中的運動,減去背景,並跟蹤影片中的物件。
OpenCV 最初是用 C++ 開發的。除此之外,還提供了 Python 和 Java 繫結。OpenCV 執行在各種作業系統上,例如 Windows、Linux、OSx、FreeBSD、Net BSD、Open BSD 等。
本教程使用 Java 繫結解釋 OpenCV 的概念和示例。
OpenCV 庫模組
以下是 OpenCV 庫的主要庫模組。
核心功能
此模組涵蓋用於構建 OpenCV 應用程式的基本資料結構,例如 Scalar、Point、Range 等。除此之外,它還包括用於儲存影像的多維陣列Mat。在 OpenCV 的 Java 庫中,此模組作為名為org.opencv.core的包包含。
影像處理
此模組涵蓋各種影像處理操作,例如影像濾波、幾何影像變換、顏色空間轉換、直方圖等。在 OpenCV 的 Java 庫中,此模組作為名為org.opencv.imgproc的包包含。
影片
此模組涵蓋影片分析概念,例如運動估計、背景減法和物件跟蹤。在 OpenCV 的 Java 庫中,此模組作為名為org.opencv.video的包包含。
影片 I/O
此模組解釋使用 OpenCV 庫進行影片捕獲和影片編解碼。在 OpenCV 的 Java 庫中,此模組作為名為org.opencv.videoio的包包含。
calib3d
此模組包括關於基本多檢視幾何演算法、單目和立體相機標定、物體姿態估計、立體對應和三維重建元素的演算法。在 OpenCV 的 Java 庫中,此模組作為名為org.opencv.calib3d的包包含。
features2d
此模組包括特徵檢測和描述的概念。在 OpenCV 的 Java 庫中,此模組作為名為org.opencv.features2d的包包含。
Objdetect
此模組包括檢測物件和預定義類的例項,例如人臉、眼睛、杯子、人、汽車等。在 OpenCV 的 Java 庫中,此模組作為名為org.opencv.objdetect的包包含。
Highgui
這是一個易於使用的介面,具有簡單的 UI 功能。在 OpenCV 的 Java 庫中,此模組的功能包含在兩個不同的包中,即org.opencv.imgcodecs和org.opencv.videoio。
OpenCV 簡史
OpenCV 最初是英特爾的一個研究專案,旨在輔助 CPU 密集型應用。它於 1999 年正式啟動。
- 2006 年,其第一個主要版本 OpenCV 1.0 釋出。
- 2009 年 10 月,第二個主要版本 OpenCV 2 釋出。
- 2012 年 8 月,OpenCV 被非營利組織 OpenCV.org 接管。
OpenCV - 環境配置
在本節中,您將學習如何在您的系統中安裝 OpenCV 並設定其環境。
安裝 OpenCV
首先,您需要將 OpenCV 下載到您的系統。請按照以下步驟操作。
步驟 1 - 點選以下連結開啟OpenCV的主頁:https://opencv.tw/ 點選後,您將看到如下所示的主頁。
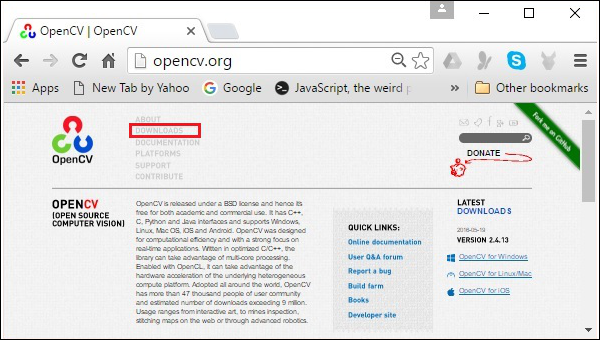
步驟 2 - 現在,點選上面截圖中突出顯示的下載連結。點選後,您將被定向到 OpenCV 的下載頁面。

步驟 3 - 點選上面截圖中突出顯示的連結後,將下載一個名為opencv-3.1.0.exe的檔案。解壓此檔案,在您的系統中生成一個名為opencv的資料夾,如下面的截圖所示。

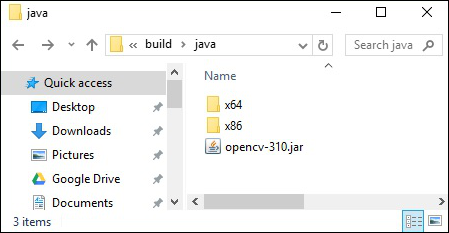
步驟 4 - 開啟資料夾OpenCV → build → java。在這裡,您將找到名為opencv-310.jar的 OpenCV jar 檔案。將此檔案儲存到單獨的資料夾中以便日後使用。
Eclipse 安裝
下載所需的 JAR 檔案後,您必須將這些 JAR 檔案嵌入到您的 Eclipse 環境中。您可以透過為這些 JAR 檔案設定構建路徑並使用pom.xml來實現。
設定構建路徑
以下是如何在 Eclipse 中設定 OpenCV 的步驟:
步驟 1 - 確保您已經在系統中安裝了 Eclipse。如果沒有,請下載並在您的系統中安裝 Eclipse。
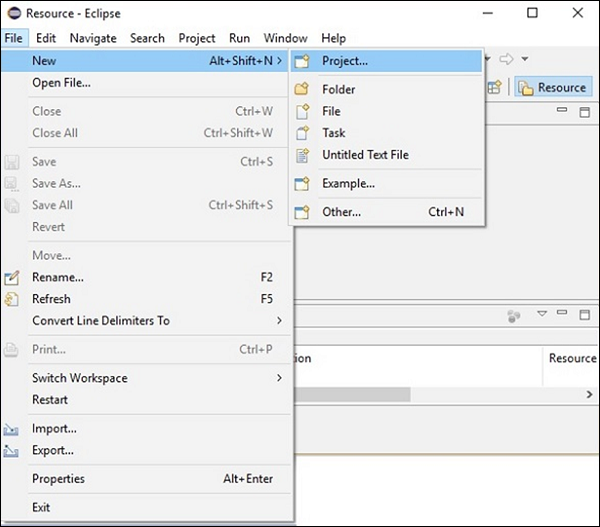
步驟 2 - 開啟 Eclipse,點選檔案,新建,並開啟一個新專案,如下面的截圖所示。
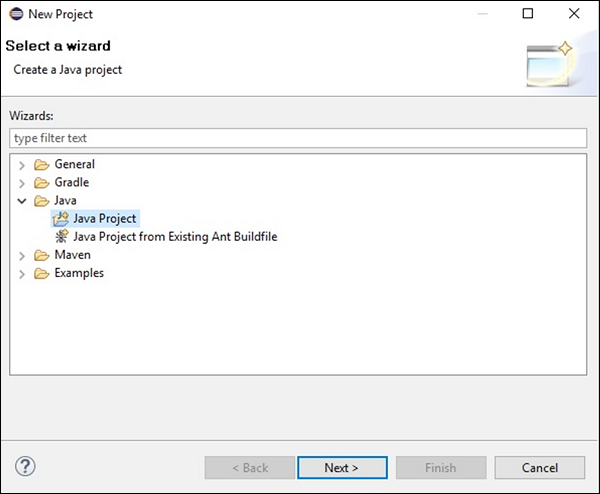
步驟 3 - 選擇專案後,您將獲得新建專案嚮導。在此嚮導中,選擇 Java 專案,然後點選下一步按鈕繼續,如下面的截圖所示。
步驟 4 - 繼續前進,您將被定向到新建 Java 專案嚮導。建立一個新專案並點選下一步,如下面的截圖所示。

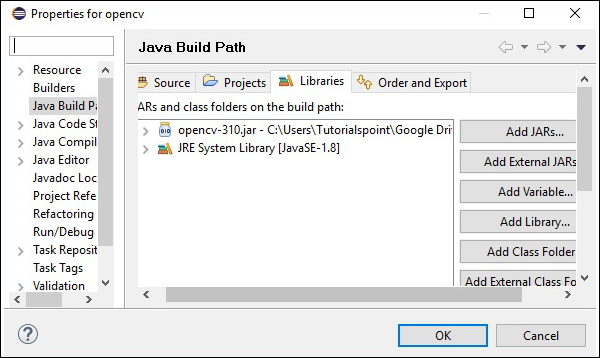
步驟 5 - 建立新專案後,右鍵單擊它。選擇構建路徑並點選配置構建路徑…,如下面的截圖所示。
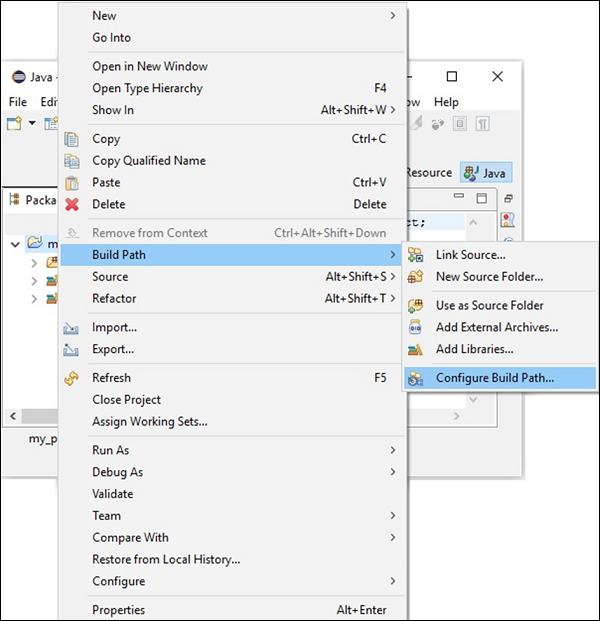
步驟 6 - 點選構建路徑選項後,您將被定向到Java 構建路徑向導。點選新增外部 JARs按鈕,如下面的截圖所示。
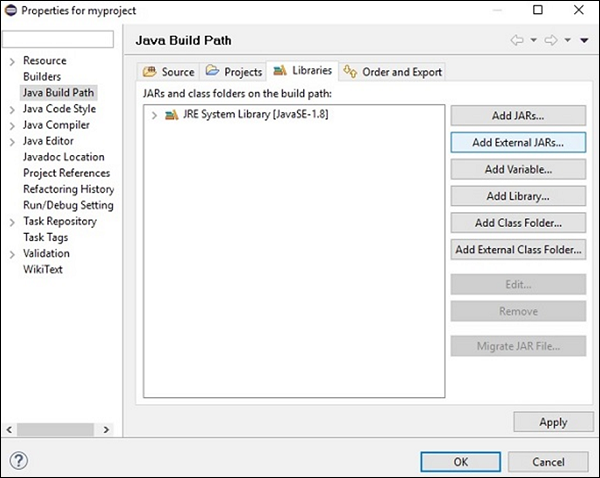
步驟 7 - 選擇您儲存檔案opencv-310.jar的路徑。
步驟 8 - 點選上面截圖中的開啟按鈕,這些檔案將新增到您的庫中。
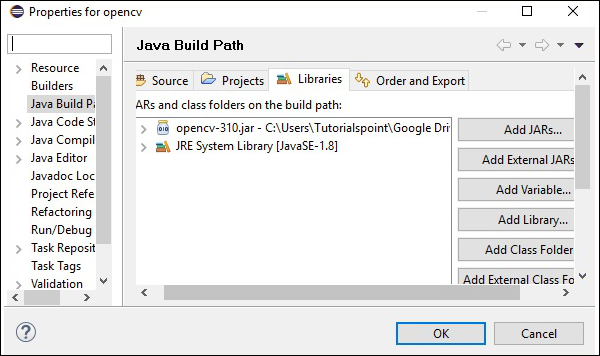
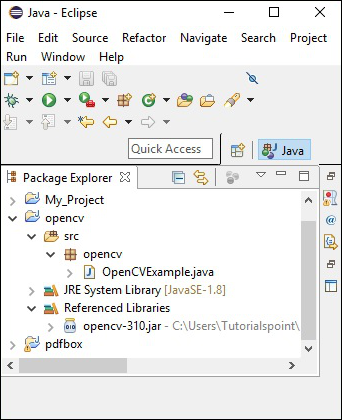
步驟 9 - 點選確定,您將成功地將所需的 JAR 檔案新增到當前專案中,您可以透過展開“引用庫”來驗證這些已新增的庫。
設定原生庫的路徑
除了 JAR 檔案外,您還需要為 OpenCV 的原生庫(DLL 檔案)設定路徑。
DLL 檔案的位置 - 開啟OpenCV的安裝資料夾,然後轉到子資料夾build → java。在這裡,您將找到包含 OpenCV dll 檔案的兩個資料夾x64(64 位)和x86(32 位)。

開啟適合您作業系統的相應資料夾,然後您可以看到dll檔案,如下面的截圖所示。

現在,請按照以下步驟設定此檔案的路徑:
步驟 1 - 再次開啟 JavaBuildPath 視窗。在這裡,您可以看到已新增的 JAR 檔案和JRE 系統庫。
步驟 2 - 展開後,您將獲得系統庫和原生庫位置,如下面的截圖中突出顯示的那樣。
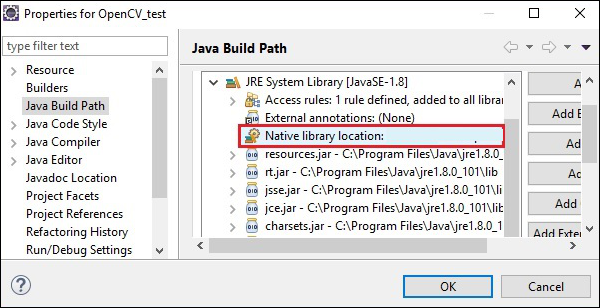
步驟 3 − 雙擊原生庫位置。在這裡,您可以看到如下所示的原生庫資料夾配置視窗。
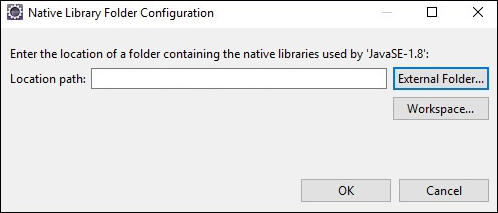
在此處,單擊外部資料夾…按鈕,然後選擇系統中dll檔案的位置。
OpenCV - 影像儲存
為了捕獲影像,我們使用相機和掃描器等裝置。這些裝置記錄影像的數值(例如:畫素值)。OpenCV 是一個處理數字影像的庫,因此我們需要儲存這些影像以便進行處理。
OpenCV 庫的Mat類用於儲存影像的值。它表示一個 n 維陣列,用於儲存灰度或彩色影像、體素體積、向量場、點雲、張量、直方圖等影像資料。
此類包含兩個資料部分:頭部和指標
頭部 − 包含諸如大小、儲存方法和矩陣地址(大小恆定)等資訊。
指標 − 儲存影像的畫素值(持續變化)。
Mat 類
OpenCV Java 庫在org.opencv.core包中提供具有相同名稱(Mat)的此類。
建構函式
OpenCV Java 庫的 Mat 類具有各種建構函式,可以使用這些建構函式來構造 Mat 物件。
| 序號 | 建構函式和描述 |
|---|---|
| 1 |
Mat() 在大多數情況下,這是沒有引數的預設建構函式。我們使用此建構函式來建立一個空矩陣,並將其傳遞給其他 OpenCV 方法。 |
| 2 |
Mat(int rows, int cols, int type) 此建構函式接受三個整型引數,分別表示二維陣列中的行數和列數以及陣列的型別(用於儲存資料)。 |
| 3 |
Mat(int rows, int cols, int type, Scalar s) 除了前一個建構函式的引數外,此建構函式還額外接受 Scalar 類的一個物件作為引數。 |
| 4 |
Mat(Size size, int type) 此建構函式接受兩個引數,一個表示矩陣大小的物件和一個表示用於儲存資料的陣列型別的整數。 |
| 5 |
Mat(Size size, int type, Scalar s) 除了前一個建構函式的引數外,此建構函式還額外接受 Scalar 類的一個物件作為引數。 |
| 6 | Mat(long addr) |
| 7 |
Mat(Mat m, Range rowRange) 此建構函式接受另一個矩陣的物件和 Range 類的一個物件,該物件表示要用於建立新矩陣的行範圍。 |
| 8 |
Mat(Mat m, Range rowRange, Range colRange) 除了前一個建構函式的引數外,此建構函式還額外接受 Range 類的一個物件,表示列範圍。 |
| 9 |
Mat(Mat m, Rect roi) 此建構函式接受兩個物件,一個表示另一個矩陣,另一個表示感興區 (Region Of Interest)。 |
注意 −
陣列型別。使用 CV_8UC1、…、CV_64FC4 建立 1-4 通道矩陣,或使用 CV_8UC(n)、…、CV_64FC(n) 建立多通道(最多 CV_CN_MAX 通道)矩陣。
矩陣的型別由org.opencv.core包中CvType類的各個欄位表示。
方法和描述
以下是 Mat 類提供的一些方法。
| 序號 | 方法和描述 |
|---|---|
| 1 |
Mat col(int x) 此方法接受一個整數引數,表示列的索引,並檢索並返回該列。 |
| 2 |
Mat row(int y) 此方法接受一個整數引數,表示行的索引,並檢索並返回該行。 |
| 3 |
int cols() 此方法返回矩陣中的列數。 |
| 4 |
int rows() 此方法返回矩陣中的行數。 |
| 5 |
Mat setTo(Mat value) 此方法接受Mat型別的物件,並將陣列元素設定為指定的值。 |
| 6 |
Mat setTo(Scalar s) 此方法接受Scalar型別的物件,並將陣列元素設定為指定的值。 |
建立和顯示矩陣
在本節中,我們將討論我們的第一個 OpenCV 示例。我們將看到如何建立和顯示一個簡單的 OpenCV 矩陣。
以下是使用 OpenCV 建立和顯示矩陣的步驟。
步驟 1:載入 OpenCV 原生庫
使用 OpenCV 庫編寫 Java 程式碼時,第一步需要使用loadLibrary()載入 OpenCV 的原生庫。如下所示載入 OpenCV 原生庫。
//Loading the core library
System.loadLibrary(Core.NATIVE_LIBRARY_NAME);
步驟 2:例項化 Mat 類
使用本章前面提到的任何函式例項化 Mat 類。
//Creating a matrix
Mat matrix = new Mat(5, 5, CvType.CV_8UC1, new Scalar(0));
步驟 3:使用方法填充矩陣
您可以透過向row()/col()方法傳遞索引值來檢索矩陣的特定行/列。
並且,您可以使用setTo()方法的任何變體為其設定值。
//Retrieving the row with index 0
Mat row0 = matrix.row(0);

//setting values of all elements in the row with index 0
row0.setTo(new Scalar(1));

//Retrieving the row with index 3
Mat col3 = matrix.col(3);

//setting values of all elements in the row with index 3
col3.setTo(new Scalar(3));
示例
您可以使用以下程式程式碼使用 OpenCV 庫在 Java 中建立和顯示一個簡單的矩陣。
import org.opencv.core.Core;
import org.opencv.core.Mat;
import org.opencv.core.CvType;
import org.opencv.core.Scalar;

class DisplayingMatrix {
   public static void main(String[] args) {
      //Loading the core library
      System.loadLibrary(Core.NATIVE_LIBRARY_NAME);

      //Creating a matrix
      Mat matrix = new Mat(5, 5, CvType.CV_8UC1, new Scalar(0));

      //Retrieving the row with index 0
      Mat row0 = matrix.row(0);

      //setting values of all elements in the row with index 0
      row0.setTo(new Scalar(1));

      //Retrieving the row with index 3
      Mat col3 = matrix.col(3);

      //setting values of all elements in the row with index 3
      col3.setTo(new Scalar(3));

      //Printing the matrix
      System.out.println("OpenCV Mat data:\n" + matrix.dump());
   }
}
執行上述程式後,您將獲得以下輸出 −
OpenCV Mat data:
[  1,   1,   1,   3,   1;
   0,   0,   0,   3,   0;
   0,   0,   0,   3,   0;
   0,   0,   0,   3,   0;
   0,   0,   0,   3,   0]
使用 JavaSE API 載入影像
java.awt.image.BufferedImage包的BufferedImage類用於儲存影像,import javax.imageio包的ImageIO類提供讀取和寫入影像的方法。
示例
您可以使用以下程式程式碼使用 JavaSE 庫載入和儲存影像。
import java.awt.image.BufferedImage;
import java.io.File;
import java.io.IOException;
import javax.imageio.ImageIO;

public class LoadingImage_JSE_library {
   public static void main( String[] args ) throws IOException {
      //Input File
      File input = new File("C:/EXAMPLES/OpenCV/sample.jpg");

      //Reading the image
      BufferedImage image = ImageIO.read(input);

      //Saving the image with a different name
      File ouptut = new File("C:/OpenCV/sample.jpg");
      ImageIO.write(image, "jpg", ouptut);

      System.out.println("image Saved");
   }
}
執行上述程式後,您將獲得以下輸出 −
image Saved
如果您開啟指定的路徑,您可以觀察到儲存的影像如下所示 −

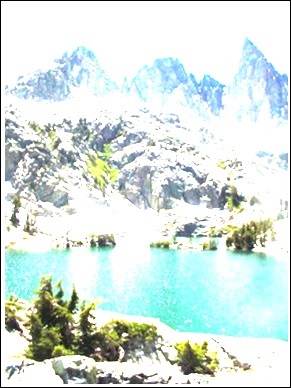
OpenCV - 讀取影像
org.opencv.imgcodecs包的Imgcodecs類提供讀取和寫入影像的方法。使用 OpenCV,您可以讀取影像並將其儲存在矩陣中(如果需要,可以在矩陣上執行轉換)。之後,您可以將處理後的矩陣寫入檔案。
Imgcodecs類的read()方法用於使用 OpenCV 讀取影像。以下是此方法的語法。
imread(filename)
它接受一個引數(filename),一個表示要讀取的檔案路徑的 String 型別變數。
以下是使用 OpenCV 庫在 Java 中讀取影像的步驟。
步驟 1:載入 OpenCV 原生庫
使用load()方法載入 OpenCV 原生庫,如下所示。
//Loading the core library
System.loadLibrary(Core.NATIVE_LIBRARY_NAME);
步驟 2:例項化 Imgcodecs 類
例項化Imgcodecs類。
//Instantiating the Imgcodecs class
Imgcodecs imageCodecs = new Imgcodecs();
步驟 3:讀取影像
使用imread()方法讀取影像。此方法接受一個表示影像路徑的字串引數,並返回作為Mat物件的讀取影像。
//Reading the Image from the file
Mat matrix = imageCodecs.imread(Path of the image);
示例
以下程式程式碼顯示瞭如何使用 OpenCV 庫讀取影像。
import org.opencv.core.Core;
import org.opencv.core.Mat;
import org.opencv.imgcodecs.Imgcodecs;

public class ReadingImages {
   public static void main(String args[]) {
      //Loading the OpenCV core library
      System.loadLibrary( Core.NATIVE_LIBRARY_NAME );

      //Instantiating the Imagecodecs class
      Imgcodecs imageCodecs = new Imgcodecs();

      //Reading the Image from the file
      String file ="C:/EXAMPLES/OpenCV/sample.jpg";
      Mat matrix = imageCodecs.imread(file);

      System.out.println("Image Loaded");
   }
}
執行上述程式後,OpenCV 將載入指定的影像並顯示以下輸出 −
Image Loaded
OpenCV - 寫入影像
Imgcodecs類的write()方法用於使用 OpenCV 寫入影像。要寫入影像,請重複前面示例中的前三個步驟。
要寫入影像,您需要呼叫Imgcodecs類的imwrite()方法。
以下是此方法的語法。
imwrite(filename, mat)
此方法接受以下引數 −
filename − 一個表示要儲存檔案路徑的String變數。
mat − 一個表示要寫入影像的Mat物件。
示例
以下程式是使用 OpenCV 庫使用 Java 程式寫入影像的示例。
import org.opencv.core.Core;
import org.opencv.core.Mat;
import org.opencv.imgcodecs.Imgcodecs;

public class WritingImages {
   public static void main(String args[]) {
      //Loading the OpenCV core library
      System.loadLibrary(Core.NATIVE_LIBRARY_NAME);

      //Instantiating the imagecodecs class
      Imgcodecs imageCodecs = new Imgcodecs();

      //Reading the Image from the file and storing it in to a Matrix object
      String file ="C:/EXAMPLES/OpenCV/sample.jpg";
      Mat matrix = imageCodecs.imread(file);

      System.out.println("Image Loaded ..........");
      String file2 = "C:/EXAMPLES/OpenCV/sample_resaved.jpg";

      //Writing the image
      imageCodecs.imwrite(file2, matrix);
      System.out.println("Image Saved ............");
   }
}
執行上述程式後,您將獲得以下輸出 −
Image Loaded ..........
Image Saved ...........
如果您開啟指定的路徑,您可以觀察到儲存的影像如下所示 −

OpenCV - 圖形使用者介面 (GUI)
在前面的章節中,我們已經討論瞭如何使用 OpenCV Java 庫讀取和儲存影像。除此之外,我們還可以使用 AWT/Swings 和 JavaFX 等 GUI 庫在單獨的視窗中顯示載入的影像。
將 Mat 轉換為 Buffered Image
要讀取影像,我們使用imread()方法。此方法以矩陣的形式返回讀取的影像。但是,要將此影像與 GUI 庫(AWT/Swings 和 JavaFX)一起使用,應將其轉換為java.awt.image.BufferedImage包的BufferedImage類的物件。
以下是將 OpenCV 的Mat物件轉換為BufferedImage物件的步驟。
步驟 1:將 Mat 編碼為 MatOfByte
首先,您需要將矩陣轉換為位元組矩陣。您可以使用Imgcodecs類的imencode()方法來完成此操作。以下是此方法的語法。
imencode(ext, image, matOfByte);
此方法接受以下引數 −
Ext − 一個指定影像格式(.jpg、.png 等)的 String 引數。
image − 影像的 Mat 物件。
matOfByte − MatOfByte 類的一個空物件。
使用此方法編碼影像,如下所示。
//Reading the image
Mat image = Imgcodecs.imread(file);

//instantiating an empty MatOfByte class
MatOfByte matOfByte = new MatOfByte();

//Converting the Mat object to MatOfByte
Imgcodecs.imencode(".jpg", image, matOfByte);
步驟 2:將 MatOfByte 物件轉換為位元組陣列
使用toArray()方法將MatOfByte物件轉換為位元組陣列。
byte[] byteArray = matOfByte.toArray();
步驟 3:準備 InputStream 物件
透過將上一步中建立的位元組陣列傳遞給ByteArrayInputStream類的建構函式來準備 InputStream 物件。
//Preparing the InputStream object
InputStream in = new ByteArrayInputStream(byteArray);
步驟 4:準備 InputStream 物件
將上一步中建立的 Input Stream 物件傳遞給ImageIO類的read()方法。這將返回一個 BufferedImage 物件。
//Preparing the BufferedImage
BufferedImage bufImage = ImageIO.read(in);
使用 AWT/Swings 顯示影像
要使用 AWT/Swings 框架顯示影像,首先使用imread()方法讀取影像,並按照上述步驟將其轉換為BufferedImage。
然後,例項化JFrame類並將建立的緩衝影像新增到 JFrame 的 ContentPane 中,如下所示 −
//Instantiate JFrame
JFrame frame = new JFrame();

//Set Content to the JFrame
frame.getContentPane().add(new JLabel(new ImageIcon(bufImage)));
frame.pack();
frame.setVisible(true);
示例
以下程式程式碼顯示瞭如何使用 OpenCV 庫讀取影像並透過 Swing 視窗顯示影像。
import java.awt.image.BufferedImage;

import java.io.ByteArrayInputStream;
import java.io.InputStream;

import javax.imageio.ImageIO;
import javax.swing.ImageIcon;
import javax.swing.JFrame;
import javax.swing.JLabel;

import org.opencv.core.Core;
import org.opencv.core.Mat;
import org.opencv.core.MatOfByte;
import org.opencv.imgcodecs.Imgcodecs;

public class DisplayingImagesUsingSwings {
   public static void main(String args[]) throws Exception {
      //Loading the OpenCV core library
      System.loadLibrary( Core.NATIVE_LIBRARY_NAME );

      //Reading the Image from the file and storing it in to a Matrix object
      String file = "C:/EXAMPLES/OpenCV/sample.jpg";
      Mat image = Imgcodecs.imread(file);

      //Encoding the image
      MatOfByte matOfByte = new MatOfByte();
      Imgcodecs.imencode(".jpg", image, matOfByte);

      //Storing the encoded Mat in a byte array
      byte[] byteArray = matOfByte.toArray();

      //Preparing the Buffered Image
      InputStream in = new ByteArrayInputStream(byteArray);
      BufferedImage bufImage = ImageIO.read(in);

      //Instantiate JFrame
      JFrame frame = new JFrame();

      //Set Content to the JFrame
      frame.getContentPane().add(new JLabel(new ImageIcon(bufImage)));
      frame.pack();
      frame.setVisible(true);

      System.out.println("Image Loaded");
   }
}
執行上述程式後,您將獲得以下輸出 −
Image Loaded
除此之外,您還可以看到一個顯示載入影像的視窗,如下所示 −

使用 JavaFX 顯示影像
要使用 JavaFX 顯示影像,首先使用imread()方法讀取影像,並將其轉換為BufferedImage。然後,將 BufferedImage 轉換為 WritableImage,如下所示。
WritableImage writableImage = SwingFXUtils.toFXImage(bufImage, null);
將此WritableImage物件傳遞給ImageView類的建構函式。
ImageView imageView = new ImageView(writableImage);
示例
以下程式程式碼顯示瞭如何使用 OpenCV 庫讀取影像並透過 JavaFX 視窗顯示影像。
import java.awt.image.BufferedImage;

import java.io.ByteArrayInputStream;
import java.io.IOException;
import java.io.InputStream;

import javafx.application.Application;
import javafx.embed.swing.SwingFXUtils;
import javafx.scene.Group;
import javafx.scene.Scene;
import javafx.scene.image.ImageView;
import javafx.scene.image.WritableImage;
import javafx.stage.Stage;

import javax.imageio.ImageIO;

import org.opencv.core.Core;
import org.opencv.core.Mat;
import org.opencv.core.MatOfByte;
import org.opencv.imgcodecs.Imgcodecs;

public class DisplayingImagesJavaFX extends Application {
   @Override
   public void start(Stage stage) throws IOException {
      WritableImage writableImage = loadImage();

      //Setting the image view
      ImageView imageView = new ImageView(writableImage);

      //Setting the position of the image
      imageView.setX(50);
      imageView.setY(25);

      //setting the fit height and width of the image view
      imageView.setFitHeight(400);
      imageView.setFitWidth(500);

      //Setting the preserve ratio of the image view
      imageView.setPreserveRatio(true);

      //Creating a Group object
      Group root = new Group(imageView);

      //Creating a scene object
      Scene scene = new Scene(root, 600, 400);

      //Setting title to the Stage
      stage.setTitle("Loading an image");

      //Adding scene to the stage
      stage.setScene(scene);

      //Displaying the contents of the stage
      stage.show();
   }
   public WritableImage loadImage() throws IOException {
      //Loading the OpenCV core library
      System.loadLibrary( Core.NATIVE_LIBRARY_NAME );

      //Reading the Image from the file and storing it in to a Matrix object
      String file ="C:/EXAMPLES/OpenCV/sample.jpg";
      Mat image = Imgcodecs.imread(file);

      //Encoding the image
      MatOfByte matOfByte = new MatOfByte();
      Imgcodecs.imencode(".jpg", image, matOfByte);

      //Storing the encoded Mat in a byte array
      byte[] byteArray = matOfByte.toArray();

      //Displaying the image
      InputStream in = new ByteArrayInputStream(byteArray);
      BufferedImage bufImage = ImageIO.read(in);

      System.out.println("Image Loaded");
      WritableImage writableImage = SwingFXUtils.toFXImage(bufImage, null);
      return writableImage;
   }
   public static void main(String args[]) {
      launch(args);
   }
}
執行上述程式後,您將獲得以下輸出 −
Image Loaded
除此之外,您還可以看到一個顯示載入影像的視窗,如下所示 −
OpenCV - IMREAD_XXX 引數
OpenCV 支援各種型別的影像,例如彩色、二值、灰度等。使用imread()方法和Imgcodecs類的預定義欄位,您可以將給定影像讀取為另一種型別。
imread() 方法的標誌引數 (IMREAD_XXX)
在前面的章節中,我們看到了Imgcodecs類的imread()方法的語法。它接受一個表示要讀取的影像位置的字串引數。
imread(filename)
imread()方法還有另一種語法。
imread(filename, int flags)
此語法接受兩個引數 −
filename − 它接受一個引數(filename),一個表示要讀取的檔案路徑的 String 型別變數。
flags − 一個整數值,表示預定義的標誌值。對於每個值,這都會將給定影像讀取為特定型別(灰度顏色等)。
以下是列出Imgproc類中作為此引數值的各個欄位的表格。
| 序號 | 欄位和描述 |
|---|---|
| 1 |
IMREAD_COLOR 如果標誌設定為此值,則載入的影像將被轉換為3通道BGR(藍綠紅)彩色影像。 |
| 2 |
IMREAD_GRAYSCALE 如果標誌設定為此值,則載入的影像將被轉換為單通道灰度影像。 |
| 3 |
IMREAD_LOAD_GDAL 如果標誌設定為此值,則可以使用gdal驅動程式載入影像。 |
| 4 |
IMREAD_ANYCOLOR 如果標誌設定為此值,則影像將以任何可能的顏色格式讀取。 |
| 5 |
IMREAD_REDUCED_COLOR_2 IMREAD_REDUCED_COLOR_4 IMREAD_REDUCED_COLOR_8 如果標誌設定為此值,則影像將作為三通道BGR讀取,並且影像大小將根據所使用的欄位減少到原始影像大小的½、¼或⅛。 |
| 6 |
IMREAD_REDUCED_GRAYSCALE_2 IMREAD_REDUCED_GRAYSCALE_4 IMREAD_REDUCED_GRAYSCALE_8 如果標誌設定為此值,則影像將作為單通道灰度影像讀取,並且影像大小將根據所使用的欄位減少到原始影像大小的½、¼或⅛。 |
| 7 |
IMREAD_UNCHANGED 如果標誌設定為此值,則載入的影像將原樣返回。 |
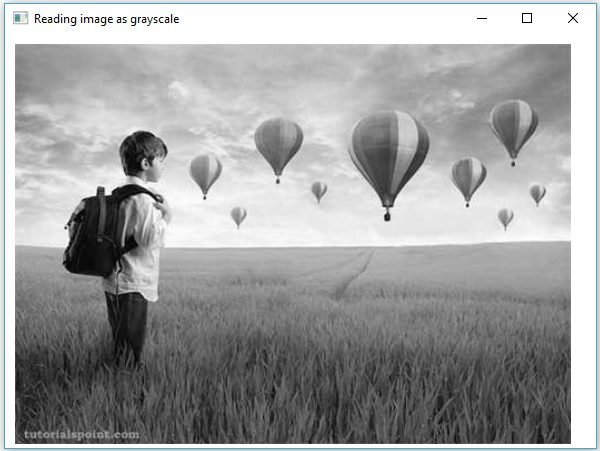
OpenCV - 將影像讀取為灰度
以下程式演示如何將彩色影像讀取為灰度影像,並使用JavaFX視窗顯示它。在這裡,我們透過傳遞標誌IMREAD_GRAYSCALE以及包含彩色影像路徑的字串來讀取影像。
import java.awt.image.BufferedImage;

import org.opencv.core.Core;
import org.opencv.core.Mat;
import org.opencv.imgcodecs.Imgcodecs;

import javafx.application.Application;
import javafx.embed.swing.SwingFXUtils;
import javafx.scene.Group;
import javafx.scene.Scene;
import javafx.scene.image.ImageView;
import javafx.scene.image.WritableImage;
import javafx.stage.Stage;

public class ReadingAsGrayscale extends Application {
   @Override
   public void start(Stage stage) throws Exception {
      WritableImage writableImage = loadAndConvert();

      // Setting the image view
      ImageView imageView = new ImageView(writableImage);

      // Setting the position of the image
      imageView.setX(10);
      imageView.setY(10);

      // setting the fit height and width of the image view
      imageView.setFitHeight(400);
      imageView.setFitWidth(600);

      // Setting the preserve ratio of the image view
      imageView.setPreserveRatio(true);

      // Creating a Group object
      Group root = new Group(imageView);

      // Creating a scene object
      Scene scene = new Scene(root, 600, 400);

      // Setting title to the Stage
      stage.setTitle("Reading image as grayscale");

      // Adding scene to the stage
      stage.setScene(scene);

      // Displaying the contents of the stage
      stage.show();
   }
   public WritableImage loadAndConvert() throws Exception {
      // Loading the OpenCV core library
      System.loadLibrary( Core.NATIVE_LIBRARY_NAME );

      // Instantiating the imagecodecs class
      Imgcodecs imageCodecs = new Imgcodecs();

      String input = "C:/EXAMPLES/OpenCV/sample.jpg";

      // Reading the image
      Mat src = imageCodecs.imread(input, Imgcodecs.IMREAD_GRAYSCALE);

      byte[] data1 = new byte[src.rows() * src.cols() * (int)(src.elemSize())];
      src.get(0, 0, data1);

      // Creating the buffered image
      BufferedImage bufImage = new BufferedImage(src.cols(),src.rows(),
         BufferedImage.TYPE_BYTE_GRAY);

      // Setting the data elements to the image
      bufImage.getRaster().setDataElements(0, 0, src.cols(), src.rows(), data1);

      // Creating a WritableImage
      WritableImage writableImage = SwingFXUtils.toFXImage(bufImage, null);
      System.out.println("Image Read");
      return writableImage;
   }
   public static void main(String args[]) throws Exception {
      launch(args);
   }
}
輸入影像
假設以上程式中指定的輸入影像是sample.jpg。

輸出影像
執行程式後,您將獲得以下輸出。
OpenCV - 讀取BGR影像
以下程式演示如何將彩色影像讀取為BGR型別影像,並使用JavaFX視窗顯示它。在這裡,我們透過將標誌IMREAD_COLOR以及包含彩色影像路徑的字串傳遞給方法imread()來讀取影像。
import java.awt.image.BufferedImage;

import org.opencv.core.Core;
import org.opencv.core.Mat;
import org.opencv.imgcodecs.Imgcodecs;

import javafx.application.Application;
import javafx.embed.swing.SwingFXUtils;
import javafx.scene.Group;
import javafx.scene.Scene;
import javafx.scene.image.ImageView;
import javafx.scene.image.WritableImage;
import javafx.stage.Stage;

public class ReadingAsColored extends Application {
   @Override
   public void start(Stage stage) throws Exception {
      WritableImage writableImage = loadAndConvert();

      // Setting the image view
      ImageView imageView = new ImageView(writableImage);

      // Setting the position of the image
      imageView.setX(10);
      imageView.setY(10);

      // setting the fit height and width of the image view
      imageView.setFitHeight(400);
      imageView.setFitWidth(600);

      // Setting the preserve ratio of the image view
      imageView.setPreserveRatio(true);

      // Creating a Group object
      Group root = new Group(imageView);

      // Creating a scene object
      Scene scene = new Scene(root, 600, 400);

      // Setting title to the Stage
      stage.setTitle("Reading as colored image");

      // Adding scene to the stage
      stage.setScene(scene);

      // Displaying the contents of the stage
      stage.show();
   }
   public WritableImage loadAndConvert() throws Exception {
      // Loading the OpenCV core library
      System.loadLibrary( Core.NATIVE_LIBRARY_NAME );

      String input = "C:/EXAMPLES/OpenCV/sample.jpg";

      Mat dst = new Mat();

      // Reading the image
      Mat src = Imgcodecs.imread(input, Imgcodecs.IMREAD_COLOR);

      byte[] data1 = new byte[src.rows() * src.cols() * (int)(src.elemSize())];
      src.get(0, 0, data1);

      // Creating the buffered image
      BufferedImage bufImage = new BufferedImage(src.cols(),src.rows(),
         BufferedImage.TYPE_3BYTE_BGR);

      // Setting the data elements to the image
      bufImage.getRaster().setDataElements(0, 0, src.cols(), src.rows(), data1);

      // Creating a WritableImage
      WritableImage writableImage = SwingFXUtils.toFXImage(bufImage, null);

      System.out.println("Image read");
      return writableImage;
   }
   public static void main(String args[]) throws Exception {
      launch(args);
   }
}
輸入影像
假設以上程式中指定的輸入影像是sample.jpg。
輸出影像
執行程式後,您將獲得以下輸出。

OpenCV - 彩色影像轉換為灰度
在前面的章節中,我們討論瞭如何將輸入影像讀取為不同的型別(二進位制、灰度、BGR等)。在本節中,我們將學習如何將一種型別的影像轉換為另一種型別。
包org.opencv.imgproc中的名為Imgproc的類提供將影像從一種顏色轉換為另一種顏色方法。
將彩色影像轉換為灰度
名為cvtColor()的方法用於將彩色影像轉換為灰度影像。以下是此方法的語法。
cvtColor(Mat src, Mat dst, int code)
此方法接受以下引數 −
src − 代表源的矩陣。
dst − 代表目標的矩陣。
code − 代表轉換型別的整數程式碼,例如,RGB到灰度。
您可以透過將程式碼Imgproc.COLOR_RGB2GRAY以及源矩陣和目標矩陣作為引數傳遞給cvtColor()方法來將彩色影像轉換為灰度影像。
示例
以下程式演示如何將彩色影像讀取為灰度影像,並使用JavaFX視窗顯示它。
import java.awt.image.BufferedImage;

import org.opencv.core.Core;
import org.opencv.core.Mat;
import org.opencv.imgcodecs.Imgcodecs;
import org.opencv.imgproc.Imgproc;

import javafx.application.Application;
import javafx.embed.swing.SwingFXUtils;
import javafx.scene.Group;
import javafx.scene.Scene;
import javafx.scene.image.ImageView;
import javafx.scene.image.WritableImage;

import javafx.stage.Stage;

public class ColorToGrayscale extends Application {
   @Override
   public void start(Stage stage) throws Exception {
      WritableImage writableImage = loadAndConvert();

      // Setting the image view
      ImageView imageView = new ImageView(writableImage);

      // Setting the position of the image
      imageView.setX(10);
      imageView.setY(10);

      // setting the fit height and width of the image view
      imageView.setFitHeight(400);
      imageView.setFitWidth(600);

      // Setting the preserve ratio of the image view
      imageView.setPreserveRatio(true);

      // Creating a Group object
      Group root = new Group(imageView);

      // Creating a scene object
      Scene scene = new Scene(root, 600, 400);

      // Setting title to the Stage
      stage.setTitle("Colored to grayscale image");

      // Adding scene to the stage
      stage.setScene(scene);

      // Displaying the contents of the stage
      stage.show();
   }
   public WritableImage loadAndConvert() throws Exception {
      //Loading the OpenCV core library
      System.loadLibrary( Core.NATIVE_LIBRARY_NAME );

      String input = "C:/EXAMPLES/OpenCV/sample.jpg";

      //Reading the image
      Mat src = Imgcodecs.imread(input);

      //Creating the empty destination matrix
      Mat dst = new Mat();

      //Converting the image to gray sacle and saving it in the dst matrix
      Imgproc.cvtColor(src, dst, Imgproc.COLOR_RGB2GRAY);

      //Extracting data from the transformed image (dst)
      byte[] data1 = new byte[dst.rows() * dst.cols() * (int)(dst.elemSize())];
      dst.get(0, 0, data1);

      //Creating Buffered image using the data
      BufferedImage bufImage = new BufferedImage(dst.cols(),dst.rows(),
         BufferedImage.TYPE_BYTE_GRAY);

      //Setting the data elements to the image
      bufImage.getRaster().setDataElements(0, 0, dst.cols(), dst.rows(), data1);

      //Creating a WritableImage
      WritableImage writableImage = SwingFXUtils.toFXImage(bufImage, null);
      System.out.println("Converted to Grayscale");
      return writableImage;
   }
   public static void main(String args[]) throws Exception {
      launch(args);
   }
}
輸入影像
假設以上程式中指定的輸入影像是sample.jpg。
輸出影像
執行程式後,您將獲得以下輸出。

OpenCV - 彩色影像轉換為二值影像
名為threshold()的方法用於將灰度影像轉換為二值影像。以下是此方法的語法。
threshold(Mat src, Mat dst, double thresh, double maxval, int type)
此方法接受以下引數 −
mat − 代表輸入影像的Mat物件。
dst − 代表輸出影像的Mat物件。
thresh − 代表閾值的整數。
maxval − 代表與THRESH_BINARY和THRESH_BINARY_INV閾值型別一起使用的最大值的整數。
type − 代表轉換型別的整數程式碼,例如,RGB到灰度。
您可以透過將程式碼Imgproc.THRESH_BINARY以及值傳遞給其餘引數來將灰度影像轉換為二值影像。
示例
以下程式演示如何將彩色影像讀取為二值影像,並使用JavaFX視窗顯示它。
import java.awt.image.BufferedImage;

import org.opencv.core.Core;
import org.opencv.core.Mat;
import org.opencv.imgcodecs.Imgcodecs;
import org.opencv.imgproc.Imgproc;

import javafx.application.Application;
import javafx.embed.swing.SwingFXUtils;
import javafx.scene.Group;
import javafx.scene.Scene;
import javafx.scene.image.ImageView;
import javafx.scene.image.WritableImage;
import javafx.stage.Stage;

public class ColorToBinary extends Application {
   @Override
   public void start(Stage stage) throws Exception {
      WritableImage writableImage = loadAndConvert();

      // Setting the image view
      ImageView imageView = new ImageView(writableImage);

      // Setting the position of the image
      imageView.setX(10);
      imageView.setY(10);

      // setting the fit height and width of the image view
      imageView.setFitHeight(400);
      imageView.setFitWidth(600);

      // Setting the preserve ratio of the image view
      imageView.setPreserveRatio(true);

      // Creating a Group object
      Group root = new Group(imageView);

      // Creating a scene object
      Scene scene = new Scene(root, 600, 400);

      // Setting title to the Stage
      stage.setTitle("Loading an image");

      // Adding scene to the stage
      stage.setScene(scene);

      // Displaying the contents of the stage
      stage.show();
   }
   public WritableImage loadAndConvert() throws Exception {
      // Loading the OpenCV core library
      System.loadLibrary( Core.NATIVE_LIBRARY_NAME );

      // Instantiating the Imgcodecs class
      Imgcodecs imageCodecs = new Imgcodecs();

      // File input = new File("C:/EXAMPLES/OpenCV/sample.jpg");
      String input = "C:/EXAMPLES/OpenCV/sample.jpg";

      // Reading the image
      Mat src = imageCodecs.imread(input);

      // Creating the destination matrix
      Mat dst = new Mat();

      // Converting to binary image...
      Imgproc.threshold(src, dst, 200, 500, Imgproc.THRESH_BINARY);

      // Extracting data from the transformed image (dst)
      byte[] data1 = new byte[dst.rows() * dst.cols() * (int)(dst.elemSize())];
      dst.get(0, 0, data1);

      // Creating Buffered image using the data
      BufferedImage bufImage = new BufferedImage(dst.cols(),dst.rows(),
         BufferedImage.TYPE_BYTE_GRAY);

      // Setting the data elements to the image
      bufImage.getRaster().setDataElements(0, 0, dst.cols(), dst.rows(), data1);

      // Creating a Writable image
      WritableImage writableImage = SwingFXUtils.toFXImage(bufImage, null);

      System.out.println("Converted to binary");
      return writableImage;
   }
   public static void main(String args[]) throws Exception {
      launch(args);
   }
}
輸入影像
假設以上程式中指定的輸入影像是sample.jpg。
輸出影像
執行程式後,您將獲得以下輸出。

OpenCV - 灰度影像轉換為二值影像
您可以使用上一章中提到的相同方法將灰度影像轉換為二值影像。只需將灰度影像的路徑作為輸入傳遞給此程式。
示例
以下程式演示如何將灰度影像讀取為二值影像,並使用JavaFX視窗顯示它。
import java.awt.image.BufferedImage;

import org.opencv.core.Core;
import org.opencv.core.Mat;
import org.opencv.imgcodecs.Imgcodecs;
import org.opencv.imgproc.Imgproc;

import javafx.application.Application;
import javafx.embed.swing.SwingFXUtils;
import javafx.scene.Group;
import javafx.scene.Scene;
import javafx.scene.image.ImageView;
import javafx.scene.image.WritableImage;
import javafx.stage.Stage;

public class GrayScaleToBinary extends Application {
   @Override
   public void start(Stage stage) throws Exception {
      WritableImage writableImage = loadAndConvert();

      // Setting the image view
      ImageView imageView = new ImageView(writableImage);

      // Setting the position of the image
      imageView.setX(10);
      imageView.setY(10);

      // Setting the fit height and width of the image view
      imageView.setFitHeight(400);
      imageView.setFitWidth(600);

      // Setting the preserve ratio of the image view
      imageView.setPreserveRatio(true);

      // Creating a Group object
      Group root = new Group(imageView);

      // Creating a scene object
      Scene scene = new Scene(root, 600, 400);

      // Setting title to the Stage
      stage.setTitle("Grayscale to binary image");

      // Adding scene to the stage
      stage.setScene(scene);

      // Displaying the contents of the stage
      stage.show();
   }
   public WritableImage loadAndConvert() throws Exception {
      // Loading the OpenCV core library
      System.loadLibrary( Core.NATIVE_LIBRARY_NAME );

      // Instantiating the imagecodecs class
      Imgcodecs imageCodecs = new Imgcodecs();

      String input = "E:/OpenCV/chap7/grayscale.jpg";

      // Reading the image
      Mat src = imageCodecs.imread(input);

      // Creating the destination matrix
      Mat dst = new Mat();

      // Converting to binary image...
      Imgproc.threshold(src, dst, 200, 500, Imgproc.THRESH_BINARY);

      // Extracting data from the transformed image (dst)
      byte[] data1 = new byte[dst.rows() * dst.cols() * (int)(dst.elemSize())];
      dst.get(0, 0, data1);

      // Creating Buffered image using the data
      BufferedImage bufImage = new BufferedImage(dst.cols(),dst.rows(),
         BufferedImage.TYPE_BYTE_BINARY);

      // Setting the data elements to the image
      bufImage.getRaster().setDataElements(0, 0, dst.cols(), dst.rows(), data1);

      // Creating a Writable image
      WritableImage writableImage = SwingFXUtils.toFXImage(bufImage, null);

      System.out.println("Converted to binary");
      return writableImage;
   }
   public static void main(String args[]) throws Exception {
      launch(args);
   }
}
輸入影像
假設以上程式中指定的輸入影像是sample.jpg。
輸出影像
執行程式後,您將獲得以下輸出。

OpenCV - 繪製圓形
您可以使用org.opencv.imgproc包的相應方法在影像上繪製各種形狀,如圓形、矩形、線條、橢圓、折線、凸多邊形和折線。
您可以使用imgproc類的circle()方法在影像上繪製圓形。以下是此方法的語法:
circle(img, center, radius, color, thickness)
此方法接受以下引數 −
mat − 代表要繪製圓形的影像的Mat物件。
point − 代表圓心Point物件。
radius − 代表圓形的半徑的整數型別變數。
scalar − 代表圓形顏色的Scalar物件。(BGR)
thickness − 代表圓形粗細的整數;預設情況下,粗細值為1。
示例
以下程式演示如何在影像上繪製圓形並使用JavaFX視窗顯示它。
import java.awt.image.BufferedImage;

import java.io.ByteArrayInputStream;
import java.io.InputStream;
import javax.imageio.ImageIO;

import javafx.application.Application;
import javafx.embed.swing.SwingFXUtils;
import javafx.scene.Group;
import javafx.scene.Scene;
import javafx.scene.image.ImageView;
import javafx.scene.image.WritableImage;
import javafx.stage.Stage;

import org.opencv.core.Core;
import org.opencv.core.Mat;
import org.opencv.core.MatOfByte;
import org.opencv.core.Point;
import org.opencv.core.Scalar;
import org.opencv.imgcodecs.Imgcodecs;
import org.opencv.imgproc.Imgproc;

public class DrawingCircle extends Application {
   Mat matrix = null;

   @Override
   public void start(Stage stage) throws Exception {
      // Capturing the snapshot from the camera
      DrawingCircle obj = new DrawingCircle();
      WritableImage writableImage = obj.LoadImage();

      // Setting the image view
      ImageView imageView = new ImageView(writableImage);

      // setting the fit height and width of the image view
      imageView.setFitHeight(600);
      imageView.setFitWidth(600);

      // Setting the preserve ratio of the image view
      imageView.setPreserveRatio(true);

      // Creating a Group object
      Group root = new Group(imageView);

      // Creating a scene object
      Scene scene = new Scene(root, 600, 400);

      // Setting title to the Stage
      stage.setTitle("Drawing Circle on the image");

      // Adding scene to the stage
      stage.setScene(scene);

      // Displaying the contents of the stage
      stage.show();
   }
   public WritableImage LoadImage() throws Exception {
      // Loading the OpenCV core library
      System.loadLibrary( Core.NATIVE_LIBRARY_NAME );

      // Reading the Image from the file and storing it in to a Matrix object
      String file ="E:/OpenCV/chap8/input.jpg";
      Mat matrix = Imgcodecs.imread(file);

      //Drawing a Circle
      Imgproc.circle (
         matrix,                 //Matrix obj of the image
         new Point(230, 160),    //Center of the circle
         100,                    //Radius
         new Scalar(0, 0, 255),  //Scalar object for color
         10                      //Thickness of the circle
      );

      // Encoding the image
      MatOfByte matOfByte = new MatOfByte();
      Imgcodecs.imencode(".jpg", matrix, matOfByte);

      // Storing the encoded Mat in a byte array
      byte[] byteArray = matOfByte.toArray();

      // Displaying the image
      InputStream in = new ByteArrayInputStream(byteArray);
      BufferedImage bufImage = ImageIO.read(in);
      this.matrix = matrix;

      // Creating the Writable Image
      WritableImage writableImage = SwingFXUtils.toFXImage(bufImage, null);

      return writableImage;
   }
   public static void main(String args[]) {
      launch(args);
   }
}
執行上述程式後,您將獲得以下輸出 −

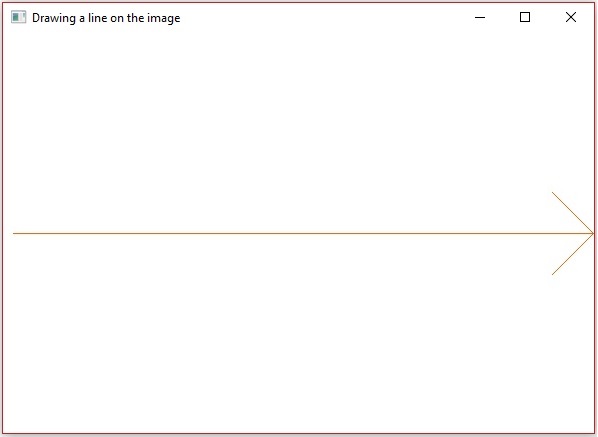
OpenCV - 繪製直線
您可以使用imgproc類的line()方法在影像上繪製線條。以下是此方法的語法。
line(img, pt1, pt2, color, thickness)
此方法接受以下引數 −
mat − 代表要繪製線條的影像的Mat物件。
pt1和pt2 − 兩個Point物件,代表要繪製線條的兩個點。
scalar − 代表圓形顏色的Scalar物件。(BGR)
thickness − 代表線條粗細的整數;預設情況下,粗細值為1。
示例
以下程式演示如何在影像上繪製線條並使用JavaFX視窗顯示它。
import java.awt.image.BufferedImage;

import java.io.ByteArrayInputStream;
import java.io.InputStream;
import javax.imageio.ImageIO;

import javafx.application.Application;
import javafx.embed.swing.SwingFXUtils;
import javafx.scene.Group;
import javafx.scene.Scene;
import javafx.scene.image.ImageView;
import javafx.scene.image.WritableImage;
import javafx.stage.Stage;

import org.opencv.core.Core;
import org.opencv.core.Mat;
import org.opencv.core.MatOfByte;
import org.opencv.core.Point;
import org.opencv.core.Scalar;
import org.opencv.imgcodecs.Imgcodecs;
import org.opencv.imgproc.Imgproc;

public class DrawingLine extends Application {
   Mat matrix = null;

   @Override
   public void start(Stage stage) throws Exception {

      // Capturing the snapshot from the camera
      DrawingLine obj = new DrawingLine();
      WritableImage writableImage = obj.LoadImage();

      // Setting the image view
      ImageView imageView = new ImageView(writableImage);

      // setting the fit height and width of the image view
      imageView.setFitHeight(600);
      imageView.setFitWidth(600);

      // Setting the preserve ratio of the image view
      imageView.setPreserveRatio(true);

      // Creating a Group object
      Group root = new Group(imageView);

      // Creating a scene object
      Scene scene = new Scene(root, 600, 400);

      // Setting title to the Stage
      stage.setTitle("Drawing a line on the image");

      // Adding scene to the stage
      stage.setScene(scene);

      // Displaying the contents of the stage
      stage.show();
   }
   public WritableImage LoadImage() throws Exception {
      // Loading the OpenCV core library
      System.loadLibrary( Core.NATIVE_LIBRARY_NAME );

      // Reading the Image from the file and storing it in to a Matrix object
      String file ="E:/OpenCV/chap8/input.jpg";
      Mat matrix = Imgcodecs.imread(file);

      // Drawing a line
      Imgproc.line (
         matrix,                    //Matrix obj of the image
         new Point(10, 200),        //p1
         new Point(300, 200),       //p2
         new Scalar(0, 0, 255),     //Scalar object for color
         5                          //Thickness of the line
      );
      // Encoding the image
      MatOfByte matOfByte = new MatOfByte();
      Imgcodecs.imencode(".jpg", matrix, matOfByte);

      // Storing the encoded Mat in a byte array
      byte[] byteArray = matOfByte.toArray();

      // Displaying the image
      InputStream in = new ByteArrayInputStream(byteArray);
      BufferedImage bufImage = ImageIO.read(in);

      this.matrix = matrix;

      // Creating the Writable Image
      WritableImage writableImage = SwingFXUtils.toFXImage(bufImage, null);
      return writableImage;
   }
   public static void main(String args[]) {
      launch(args);
   }
}
執行上述程式後,您將獲得以下輸出 −

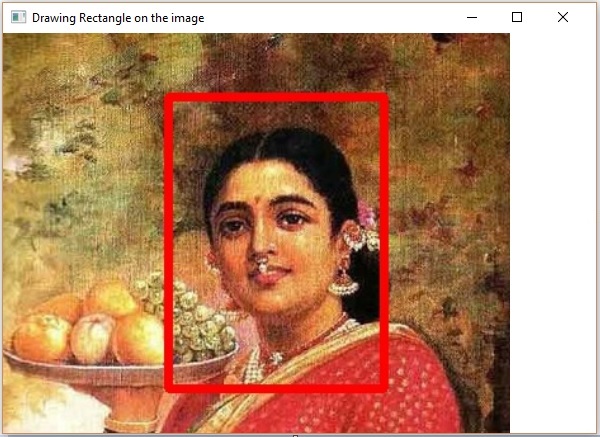
OpenCV - 繪製矩形
您可以使用imgproc類的rectangle()方法在影像上繪製矩形。以下是此方法的語法:
rectangle(img, pt1, pt2, color, thickness)
此方法接受以下引數 −
mat − 代表要繪製矩形的影像的Mat物件。
pt1和pt2 − 兩個Point物件,代表要繪製矩形的頂點。
scalar − 代表矩形顏色的Scalar物件。(BGR)
thickness − 代表矩形粗細的整數;預設情況下,粗細值為1。
示例
以下示例演示如何在影像上繪製矩形並使用JavaFX視窗顯示它。
import java.awt.image.BufferedImage;

import java.io.ByteArrayInputStream;
import java.io.InputStream;
import javax.imageio.ImageIO;

import javafx.application.Application;
import javafx.embed.swing.SwingFXUtils;
import javafx.scene.Group;
import javafx.scene.Scene;
import javafx.scene.image.ImageView;
import javafx.scene.image.WritableImage;
import javafx.stage.Stage;

import org.opencv.core.Core;
import org.opencv.core.Mat;
import org.opencv.core.MatOfByte;
import org.opencv.core.Point;
import org.opencv.core.Scalar;
import org.opencv.imgcodecs.Imgcodecs;
import org.opencv.imgproc.Imgproc;

public class DrawingRectangle extends Application {
   Mat matrix = null;

   @Override
   public void start(Stage stage) throws Exception {
      // Capturing the snapshot from the camera
      DrawingRectangle obj = new DrawingRectangle();
      WritableImage writableImage = obj.LoadImage();

      // Setting the image view
      ImageView imageView = new ImageView(writableImage);

      // setting the fit height and width of the image view
      imageView.setFitHeight(600);
      imageView.setFitWidth(600);

      // Setting the preserve ratio of the image view
      imageView.setPreserveRatio(true);

      // Creating a Group object
      Group root = new Group(imageView);

      // Creating a scene object
      Scene scene = new Scene(root, 600, 400);

      // Setting title to the Stage
      stage.setTitle("Drawing Rectangle on the image");

      // Adding scene to the stage
      stage.setScene(scene);

      // Displaying the contents of the stage
      stage.show();
   }
   public WritableImage LoadImage() throws Exception {
      // Loading the OpenCV core library
      System.loadLibrary( Core.NATIVE_LIBRARY_NAME );

      // Reading the Image from the file and storing it in to a Matrix object
      String file ="E:/OpenCV/chap8/input.jpg";
      Mat matrix = Imgcodecs.imread(file);

      // Drawing a Rectangle
      Imgproc.rectangle (
         matrix,                    //Matrix obj of the image
         new Point(130, 50),        //p1
         new Point(300, 280),       //p2
         new Scalar(0, 0, 255),     //Scalar object for color
         5                          //Thickness of the line
      );

      // Encoding the image
      MatOfByte matOfByte = new MatOfByte();
      Imgcodecs.imencode(".jpg", matrix, matOfByte);

      // Storing the encoded Mat in a byte array
      byte[] byteArray = matOfByte.toArray();

      // Displaying the image
      InputStream in = new ByteArrayInputStream(byteArray);
      BufferedImage bufImage = ImageIO.read(in);

      this.matrix = matrix;

      // Creating the Writable Image
      WritableImage writableImage = SwingFXUtils.toFXImage(bufImage, null);
      return writableImage;
   }
   public static void main(String args[]) {
      launch(args);
   }
}
執行上述程式後,您將獲得以下輸出 −
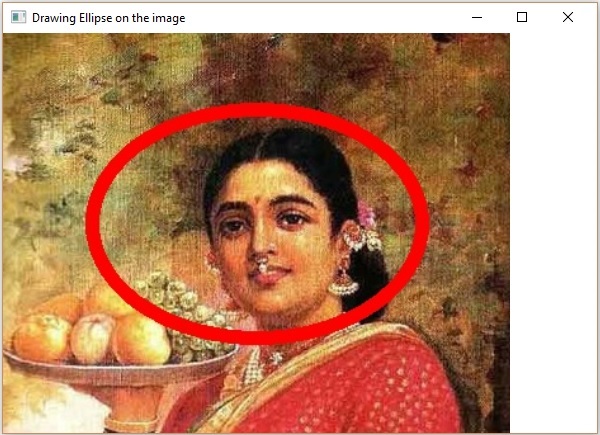
OpenCV - 繪製橢圓
您可以使用imgproc類的rectangle()方法在影像上繪製橢圓。以下是此方法的語法:
ellipse(img, box, color, thickness)
此方法接受以下引數 −
mat − 代表要繪製矩形的影像的Mat物件。
box − RotatedRect 物件(橢圓繪製在此矩形內切)
scalar − 代表矩形顏色的Scalar物件。(BGR)
thickness − 代表矩形粗細的整數;預設情況下,粗細值為1。
RotatedRect類的建構函式接受Point類物件、Size類物件和double型別變數,如下所示。
RotatedRect(Point c, Size s, double a)
示例
以下程式演示如何在影像上繪製橢圓並使用JavaFX視窗顯示它。
import java.awt.image.BufferedImage;

import java.io.ByteArrayInputStream;
import java.io.InputStream;
import javax.imageio.ImageIO;

import javafx.application.Application;
import javafx.embed.swing.SwingFXUtils;
import javafx.scene.Group;
import javafx.scene.Scene;
import javafx.scene.image.ImageView;
import javafx.scene.image.WritableImage;
import javafx.stage.Stage;

import org.opencv.core.Core;
import org.opencv.core.Mat;
import org.opencv.core.MatOfByte;
import org.opencv.core.Point;
import org.opencv.core.RotatedRect;
import org.opencv.core.Scalar;
import org.opencv.core.Size;
import org.opencv.imgcodecs.Imgcodecs;
import org.opencv.imgproc.Imgproc;

public class DrawingEllipse extends Application {
   Mat matrix = null;

   @Override
   public void start(Stage stage) throws Exception {
      // Capturing the snapshot from the camera
      DrawingEllipse obj = new DrawingEllipse();
      WritableImage writableImage = obj.LoadImage();

      // Setting the image view
      ImageView imageView = new ImageView(writableImage);

      // setting the fit height and width of the image view
      imageView.setFitHeight(600);
      imageView.setFitWidth(600);

      // Setting the preserve ratio of the image view
      imageView.setPreserveRatio(true);

      // Creating a Group object
      Group root = new Group(imageView);

      // Creating a scene object
      Scene scene = new Scene(root, 600, 400);

      // Setting title to the Stage
      stage.setTitle("Drawing Ellipse on the image");

      // Adding scene to the stage
      stage.setScene(scene);

      // Displaying the contents of the stage
      stage.show();
   }
   public WritableImage LoadImage() throws Exception {
      // Loading the OpenCV core library
      System.loadLibrary( Core.NATIVE_LIBRARY_NAME );

      // Reading the Image from the file and storing it in to a Matrix object
      String file ="E:/OpenCV/chap8/input.jpg";
      Mat matrix = Imgcodecs.imread(file);

      // Drawing an Ellipse
      Imgproc.ellipse (
         matrix,                          //Matrix obj of the image
         new RotatedRect (                // RotatedRect(Point c, Size s, double a)
            new Point(200, 150),
            new Size(260, 180), 180
         ),
         new Scalar(0, 0, 255),           //Scalar object for color
         10                               //Thickness of the line
      );

      // Encoding the image
      MatOfByte matOfByte = new MatOfByte();
      Imgcodecs.imencode(".jpg", matrix, matOfByte);

      // Storing the encoded Mat in a byte array
      byte[] byteArray = matOfByte.toArray();

      // Displaying the image
      InputStream in = new ByteArrayInputStream(byteArray);
      BufferedImage bufImage = ImageIO.read(in);

      this.matrix = matrix;

      // Creating the Writable Image
      WritableImage writableImage = SwingFXUtils.toFXImage(bufImage, null);

      return writableImage;
   }
   public static void main(String args[]) {
      launch(args);
   }
}
執行上述程式後,您將獲得以下輸出 −
OpenCV - 繪製折線
您可以使用imgproc類的polylines()方法在影像上繪製折線。以下是此方法的語法。
polylines(img, pts, isClosed, color, thickness)
此方法接受以下引數 −
mat − 代表要繪製折線的影像的Mat物件。
pts − 包含MatOfPoint型別物件的List物件。
isClosed − 指定折線是否閉合的布林型別引數。
scalar − 代表折線顏色的Scalar物件。(BGR)
thickness − 代表折線粗細的整數;預設情況下,粗細值為1。
MatOfPoint類的建構函式接受Point類物件。
MatOfPoint(Point... a)
示例
以下程式演示如何在影像上繪製折線並使用JavaFX視窗顯示它。
import java.awt.image.BufferedImage;

import java.io.ByteArrayInputStream;
import java.io.InputStream;

import java.util.ArrayList;
import java.util.List;
import javax.imageio.ImageIO;

import javafx.application.Application;
import javafx.embed.swing.SwingFXUtils;
import javafx.scene.Group;
import javafx.scene.Scene;
import javafx.scene.image.ImageView;
import javafx.scene.image.WritableImage;
import javafx.stage.Stage;

import org.opencv.core.Core;
import org.opencv.core.Mat;
import org.opencv.core.MatOfByte;
import org.opencv.core.MatOfPoint;
import org.opencv.core.Point;
import org.opencv.core.Scalar;
import org.opencv.imgcodecs.Imgcodecs;
import org.opencv.imgproc.Imgproc;

public class DrawingPolyLines extends Application {
   Mat matrix = null;

   @Override
   public void start(Stage stage) throws Exception {
      // Capturing the snapshot from the camera
      DrawingPolyLines obj = new DrawingPolyLines();
      WritableImage writableImage = obj.LoadImage();

      // Setting the image view
      ImageView imageView = new ImageView(writableImage);

      // setting the fit height and width of the image view
      imageView.setFitHeight(600);
      imageView.setFitWidth(600);

      // Setting the preserve ratio of the image view
      imageView.setPreserveRatio(true);

      // Creating a Group object
      Group root = new Group(imageView);

      // Creating a scene object
      Scene scene = new Scene(root, 600, 400);

      // Setting title to the Stage
      stage.setTitle("Drawing Polylines on the image");

      // Adding scene to the stage
      stage.setScene(scene);

      // Displaying the contents of the stage
      stage.show();
   }
   public WritableImage LoadImage() throws Exception {
      // Loading the OpenCV core library
      System.loadLibrary( Core.NATIVE_LIBRARY_NAME );

      // Reading the Image from the file and storing it in to a Matrix object
      String file ="E:/OpenCV/chap8/input.jpg";
      Mat matrix = Imgcodecs.imread(file);

      List<MatOfPoint> list = new ArrayList();
      list.add(
         new MatOfPoint (
            new Point(75, 100), new Point(350, 100),
            new Point(75, 150), new Point(350, 150),
            new Point(75, 200), new Point(350, 200),
            new Point(75, 250), new Point(350, 250)
         )
      );
      // Drawing polylines
      Imgproc.polylines (
         matrix,                    // Matrix obj of the image
         list,                      // java.util.List<MatOfPoint> pts
         false,                     // isClosed
         new Scalar(0, 0, 255),     // Scalar object for color
         2                          // Thickness of the line
      );
      // Encoding the image
      MatOfByte matOfByte = new MatOfByte();
      Imgcodecs.imencode(".jpg", matrix, matOfByte);

      // Storing the encoded Mat in a byte array
      byte[] byteArray = matOfByte.toArray();

      // Displaying the image
      InputStream in = new ByteArrayInputStream(byteArray);
      BufferedImage bufImage = ImageIO.read(in);

      this.matrix = matrix;

      // Creating the Writable Image
      WritableImage writableImage = SwingFXUtils.toFXImage(bufImage, null);
      return writableImage;
   }
   public static void main(String args[]) {
      launch(args);
   }
}
執行上述程式後,您將獲得以下輸出 −

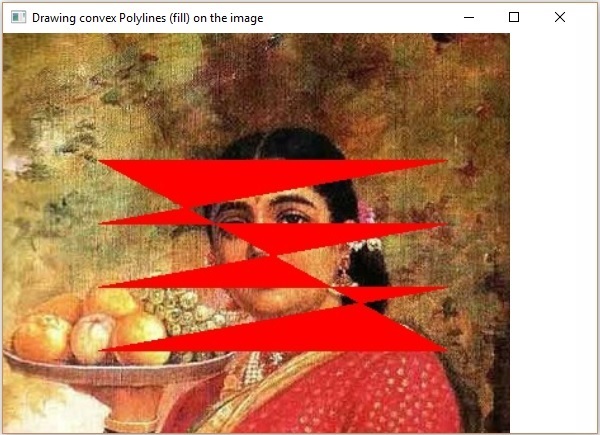
OpenCV - 繪製凸多邊形
您可以使用imgproc類的fillconvexPoly()方法在影像上繪製凸多邊形。以下是此方法的語法。
fillConvexPoly(Mat img, MatOfPoint points, Scalar color)
此方法接受以下引數 −
mat − 代表要繪製凸多邊形的影像的Mat物件。
points − 代表要繪製凸多邊形的點的MatOfPoint物件。
scalar − 代表凸多邊形顏色的Scalar物件。(BGR)
MatOfPoint類的建構函式接受Point類物件。
MatOfPoint(Point... a)
示例
以下程式演示如何在影像上繪製凸多邊形並使用JavaFX視窗顯示它。
import java.awt.image.BufferedImage;

import java.io.ByteArrayInputStream;
import java.io.InputStream;
import javax.imageio.ImageIO;

import javafx.application.Application;
import javafx.embed.swing.SwingFXUtils;
import javafx.scene.Group;
import javafx.scene.Scene;
import javafx.scene.image.ImageView;
import javafx.scene.image.WritableImage;
import javafx.stage.Stage;

import org.opencv.core.Core;
import org.opencv.core.Mat;
import org.opencv.core.MatOfByte;
import org.opencv.core.MatOfPoint;
import org.opencv.core.Point;
import org.opencv.core.Scalar;
import org.opencv.imgcodecs.Imgcodecs;
import org.opencv.imgproc.Imgproc;

public class FillConvexPoly extends Application {
   Mat matrix = null;

   @Override
   public void start(Stage stage) throws Exception {
      // Capturing the snapshot from the camera
      FillConvexPoly obj = new FillConvexPoly();
      WritableImage writableImage = obj.LoadImage();

      // Setting the image view
      ImageView imageView = new ImageView(writableImage);

      // setting the fit height and width of the image view
      imageView.setFitHeight(600);
      imageView.setFitWidth(600);

      //Setting the preserve ratio of the image view
      imageView.setPreserveRatio(true);

      // Creating a Group object
      Group root = new Group(imageView);

      // Creating a scene object
      Scene scene = new Scene(root, 600, 400);

      // Setting title to the Stage
      stage.setTitle("Drawing convex Polylines (fill) on the image");

      // Adding scene to the stage
      stage.setScene(scene);

      // Displaying the contents of the stage
      stage.show();
   }
   public WritableImage LoadImage() throws Exception {
      // Loading the OpenCV core library
      System.loadLibrary( Core.NATIVE_LIBRARY_NAME );

      // Reading the Image from the file and storing it in to a Matrix object
      String file ="E:/OpenCV/chap8/input.jpg";
      Mat matrix = Imgcodecs.imread(file);

      MatOfPoint matOfPoint = new MatOfPoint (
         new Point(75, 100), new Point(350, 100),
         new Point(75, 150), new Point(350, 150),
         new Point(75, 200), new Point(350, 200),
         new Point(75, 250), new Point(350, 250)
      );
      // Drawing polylines
      Imgproc.fillConvexPoly (
         matrix,                       // Matrix obj of the image
         matOfPoint,                   // java.util.List<MatOfPoint> pts
         new Scalar(0, 0, 255)         // Scalar object for color
      );
      // Encoding the image
      MatOfByte matOfByte = new MatOfByte();
      Imgcodecs.imencode(".jpg", matrix, matOfByte);

      // Storing the encoded Mat in a byte array
      byte[] byteArray = matOfByte.toArray();

      // Displaying the image
      InputStream in = new ByteArrayInputStream(byteArray);
      BufferedImage bufImage = ImageIO.read(in);
      this.matrix = matrix;

      // Creating the Writable Image
      WritableImage writableImage = SwingFXUtils.toFXImage(bufImage, null);
      return writableImage;
   }
   public static void main(String args[]) {
      launch(args);
   }
}
執行上述程式後,您將獲得以下輸出 −
OpenCV - 繪製帶箭頭的直線
您可以使用imgproc類的arrowedLine()方法在影像上繪製帶箭頭的線條。以下是此方法的語法:
arrowedLine(Mat img, Point pt1, Point pt2, Scalar color)
此方法接受以下引數 −
mat − 代表要繪製帶箭頭線條的影像的Mat物件。
pt1和pt2 − 兩個Point物件,代表要繪製帶箭頭線條的兩個點。
scalar − 代表帶箭頭線條顏色的Scalar物件。(BGR)
示例
以下程式演示如何在影像上繪製帶箭頭線條並使用JavaFX視窗顯示它。
import java.awt.image.BufferedImage;

import java.io.ByteArrayInputStream;
import java.io.InputStream;
import javax.imageio.ImageIO;

import javafx.application.Application;
import javafx.embed.swing.SwingFXUtils;
import javafx.scene.Group;
import javafx.scene.Scene;
import javafx.scene.image.ImageView;
import javafx.scene.image.WritableImage;
import javafx.stage.Stage;

import org.opencv.core.Core;
import org.opencv.core.Mat;
import org.opencv.core.MatOfByte;
import org.opencv.core.Point;
import org.opencv.core.Scalar;
import org.opencv.imgcodecs.Imgcodecs;
import org.opencv.imgproc.Imgproc;

public class DrawingArrowedLine extends Application {
   Mat matrix = null;

   @Override
   public void start(Stage stage) throws Exception {
      // Capturing the snapshot from the camera
      DrawingArrowedLine obj = new DrawingArrowedLine();
      WritableImage writableImage = obj.LoadImage();

      // Setting the image view
      ImageView imageView = new ImageView(writableImage);

      // setting the fit height and width of the image view
      imageView.setFitHeight(600);
      imageView.setFitWidth(600);

      // Setting the preserve ratio of the image view
      imageView.setPreserveRatio(true);

      // Creating a Group object
      Group root = new Group(imageView);

      // Creating a scene object
      Scene scene = new Scene(root, 600, 400);

      // Setting title to the Stage
      stage.setTitle("Drawing a line on the image");

      // Adding scene to the stage
      stage.setScene(scene);

      // Displaying the contents of the stage
      stage.show();
   }
   public WritableImage LoadImage() throws Exception {
      // Loading the OpenCV core library
      System.loadLibrary( Core.NATIVE_LIBRARY_NAME );

      // Reading the Image from the file and storing it in to a Matrix object
      String file ="C:/EXAMPLES/OpenCV/Aish.jpg";
      Mat matrix = Imgcodecs.imread(file);

      //Drawing a line
      Imgproc.arrowedLine(
         matrix,                       // Matrix obj of the image
         new Point(10, 200),           // p1
         new Point(590, 200),          // p2
         new Scalar(0, 100, 255)       // Scalar object for color
      );

      // arrowedLine(Mat img, Point pt1, Point pt2, Scalar color)
      // Encoding the image
      MatOfByte matOfByte = new MatOfByte();
      Imgcodecs.imencode(".jpg", matrix, matOfByte);

      // Storing the encoded Mat in a byte array
      byte[] byteArray = matOfByte.toArray();

      // Displaying the image
      InputStream in = new ByteArrayInputStream(byteArray);
      BufferedImage bufImage = ImageIO.read(in);
      this.matrix = matrix;

      // Creating the Writable Image
      WritableImage writableImage = SwingFXUtils.toFXImage(bufImage, null);

      return writableImage;
   }
   public static void main(String args[]) {
      launch(args);
   }
}
執行上述程式後,您將獲得以下輸出 −
OpenCV - 新增文字
您可以使用imgproc類的arrowedLine()方法向影像新增文字。以下是此方法的語法。
putText(img, text, org, fontFace, fontScale, Scalar color, int thickness)
此方法接受以下引數 −
mat − 代表要新增文字的影像的Mat物件。
text − 代表要新增文字的字串變數。
org − 代表影像中文字字串左下角的Point物件。
fontFace − 代表字型型別的整數型別變數。
fontScale − 代表乘以字型特定基準大小的比例因子的double型別變數。
scalar − 代表要新增文字顏色的Scalar物件。(BGR)
thickness − 代表線條粗細的整數;預設情況下,粗細值為1。
示例
以下程式演示如何向影像新增文字並使用JavaFX視窗顯示它。
import java.awt.image.BufferedImage;

import java.io.ByteArrayInputStream;
import java.io.InputStream;
import javax.imageio.ImageIO;

import javafx.application.Application;
import javafx.embed.swing.SwingFXUtils;
import javafx.scene.Group;
import javafx.scene.Scene;
import javafx.scene.image.ImageView;
import javafx.scene.image.WritableImage;
import javafx.stage.Stage;

import org.opencv.core.Core;
import org.opencv.core.Mat;
import org.opencv.core.MatOfByte;
import org.opencv.core.Point;
import org.opencv.core.Scalar;
import org.opencv.imgcodecs.Imgcodecs;
import org.opencv.imgproc.Imgproc;

public class AddingTextToImage extends Application {
   Mat matrix = null;

   @Override
   public void start(Stage stage) throws Exception {
      // Capturing the snapshot from the camera
      AddingTextToImage obj = new AddingTextToImage();
      WritableImage writableImage = obj.LoadImage();

      // Setting the image view
      ImageView imageView = new ImageView(writableImage);

      // setting the fit height and width of the image view
      imageView.setFitHeight(600);
      imageView.setFitWidth(600);

      // Setting the preserve ratio of the image view
      imageView.setPreserveRatio(true);

      // Creating a Group object
      Group root = new Group(imageView);

      // Creating a scene object
      Scene scene = new Scene(root, 600, 400);

      // Setting title to the Stage
      stage.setTitle("Adding text to an image");

      // Adding scene to the stage
      stage.setScene(scene);

      // Displaying the contents of the stage
      stage.show();
   }
   public WritableImage LoadImage() throws Exception {
      // Loading the OpenCV core library
      System.loadLibrary( Core.NATIVE_LIBRARY_NAME );

      // Reading the Image from the file and storing it in to a Matrix object
      String file ="E:/OpenCV/chap8/input.jpg";
      Mat matrix = Imgcodecs.imread(file);

      // Adding Text
      Imgproc.putText (
         matrix,                          // Matrix obj of the image
         "Ravivarma's Painting",          // Text to be added
         new Point(10, 50),               // point
         Core.FONT_HERSHEY_SIMPLEX ,      // front face
         1,                               // front scale
         new Scalar(0, 0, 0),             // Scalar object for color
         4                                // Thickness
      );

      // Encoding the image
      MatOfByte matOfByte = new MatOfByte();
      Imgcodecs.imencode(".jpg", matrix, matOfByte);

      // Storing the encoded Mat in a byte array
      byte[] byteArray = matOfByte.toArray();

      // Displaying the image
      InputStream in = new ByteArrayInputStream(byteArray);
      BufferedImage bufImage = ImageIO.read(in);
      this.matrix = matrix;

      //Creating the Writable Image
      WritableImage writableImage = SwingFXUtils.toFXImage(bufImage, null);
      return writableImage;
   }
   public static void main(String args[]) {
      launch(args);
   }
}
執行上述程式後,您將獲得以下輸出 −

OpenCV - 均值模糊
模糊(平滑)是常用的影像處理操作,用於減少影像噪點。此過程會去除影像中的高頻內容(如邊緣),使其平滑。
一般情況下,模糊化是透過卷積(影像的每個元素與其區域性鄰域元素相加,並由卷積核加權)影像透過低通濾波器卷積核來實現的。
模糊(平均)
在此操作過程中,影像與箱式濾波器(歸一化)進行卷積。在這個過程中,影像的中心元素被卷積核區域內所有畫素的平均值所替換。
您可以使用imgproc類的blur()方法對影像執行此操作。以下是此方法的語法:
blur(src, dst, ksize, anchor, borderType)
此方法接受以下引數 −
src − 一個Mat物件,代表此操作的源(輸入影像)。
dst − 一個Mat物件,代表此操作的目標(輸出影像)。
ksize − 一個Size物件,代表卷積核的大小。
anchor − 一個整數型別的變數,代表錨點。
borderType − 一個整數型別的變數,代表用於輸出的邊界型別。
示例
下面的程式演示瞭如何在影像上執行平均(模糊)操作。
import org.opencv.core.Core;
import org.opencv.core.Mat;
import org.opencv.core.Point;
import org.opencv.core.Size;
import org.opencv.imgcodecs.Imgcodecs;
import org.opencv.imgproc.Imgproc;

public class BlurTest {
   public static void main(String args[]) {
      // Loading the OpenCV core library
      System.loadLibrary( Core.NATIVE_LIBRARY_NAME );

      // Reading the Image from the file and storing it in to a Matrix object
      String file ="C:/EXAMPLES/OpenCV/sample.jpg";
      Mat src = Imgcodecs.imread(file);

      // Creating an empty matrix to store the result
      Mat dst = new Mat();

      // Creating the Size and Point objects
      Size size = new Size(45, 45);
      Point point = new Point(20, 30);

      // Applying Blur effect on the Image
      Imgproc.blur(src, dst, size, point, Core.BORDER_DEFAULT);

      // blur(Mat src, Mat dst, Size ksize, Point anchor, int borderType)
      // Writing the image
      Imgcodecs.imwrite("E:/OpenCV/chap9/blur.jpg", dst);
      System.out.println("Image processed");
   }
}
假設以上程式中指定的輸入影像是sample.jpg。
輸出
執行程式後,您將獲得以下輸出:
Image Processed
如果您開啟指定的路徑,您可以觀察到如下所示的輸出影像:

OpenCV - 高斯模糊
在高斯模糊操作中,影像與高斯濾波器而不是箱式濾波器進行卷積。高斯濾波器是一種低通濾波器,它去除高頻分量。
您可以使用imgproc類的GaussianBlur()方法對影像執行此操作。以下是此方法的語法:
GaussianBlur(src, dst, ksize, sigmaX)
此方法接受以下引數 −
src − 一個Mat物件,代表此操作的源(輸入影像)。
dst − 一個Mat物件,代表此操作的目標(輸出影像)。
ksize − 一個Size物件,代表卷積核的大小。
sigmaX − 一個雙精度型別的變數,代表 X 方向上的高斯核標準差。
示例
下面的程式演示瞭如何在影像上執行高斯模糊操作。
import org.opencv.core.Core;
import org.opencv.core.Mat;
import org.opencv.core.Size;
import org.opencv.imgcodecs.Imgcodecs;
import org.opencv.imgproc.Imgproc;

public class GaussianTest {
   public static void main(String args[]) {
      // Loading the OpenCV core library
      System.loadLibrary(Core.NATIVE_LIBRARY_NAME);

      // Reading the Image from the file and storing it in to a Matrix object
      String file ="C:/EXAMPLES/OpenCV/sample.jpg";
      Mat src = Imgcodecs.imread(file);

      // Creating an empty matrix to store the result
      Mat dst = new Mat();

      // Applying GaussianBlur on the Image
      Imgproc.GaussianBlur(src, dst, new Size(45, 45), 0);

      // Writing the image
      Imgcodecs.imwrite("E:/OpenCV/chap9/Gaussian.jpg", dst);
      System.out.println("Image Processed");
   }
}
假設以上程式中指定的輸入影像是sample.jpg。
輸出
執行程式後,您將獲得以下輸出:
Image Processed
如果您開啟指定的路徑,您可以觀察到如下所示的輸出影像:

OpenCV - 中值模糊
中值模糊操作類似於其他平均方法。在這裡,影像的中心元素被卷積核區域內所有畫素的中值所替換。此操作在去除噪聲的同時處理邊緣。
您可以使用imgproc類的medianBlur()方法對影像執行此操作。以下是此方法的語法:
medianBlur(src, dst, ksize)
此方法接受以下引數 −
src − 一個Mat物件,代表此操作的源(輸入影像)。
dst − 一個Mat物件,代表此操作的目標(輸出影像)。
ksize − 一個Size物件,代表卷積核的大小。
示例
下面的程式演示瞭如何在影像上執行中值模糊操作。
import org.opencv.core.Core;
import org.opencv.core.Mat;
import org.opencv.imgcodecs.Imgcodecs;
import org.opencv.imgproc.Imgproc;

public class MedianBlurTest {
   public static void main(String args[]) {
      // Loading the OpenCV core library
      System.loadLibrary( Core.NATIVE_LIBRARY_NAME );

      // Reading the Image from the file and storing it in to a Matrix object
      String file ="C:/EXAMPLES/OpenCV/sample.jpg";
      Mat src = Imgcodecs.imread(file);

      // Creating an empty matrix to store the result
      Mat dst = new Mat();

      // Applying MedianBlur on the Image
      Imgproc.medianBlur(src, dst, 15);

      // Writing the image
      Imgcodecs.imwrite("E:/OpenCV/chap9/median.jpg", dst);

      System.out.println("Image Processed");
   }
}
假設以上程式中指定的輸入影像是sample.jpg。
輸出
執行程式後,您將獲得以下輸出:
Image Processed
如果您開啟指定的路徑,您可以觀察到如下所示的輸出影像:

OpenCV - 雙邊濾波
影像濾波允許您對影像應用各種效果。在本章和接下來的三章中,我們將討論各種濾波操作,例如雙邊濾波器、箱式濾波器、SQR 箱式濾波器和 Filter2D。
雙邊濾波器
雙邊濾波器操作將雙邊影像應用於濾波器。您可以使用imgproc類的medianBlur()方法對影像執行此操作。以下是此方法的語法。
bilateralFilter(src, dst, d, sigmaColor, sigmaSpace, borderType)
此方法接受以下引數 −
src − 一個Mat物件,代表此操作的源(輸入影像)。
dst − 一個Mat物件,代表此操作的目標(輸出影像)。
d − 一個整數型別的變數,代表畫素鄰域的直徑。
sigmaColor − 一個整數型別的變數,代表顏色空間中的濾波器 sigma。
sigmaSpace − 一個整數型別的變數,代表座標空間中的濾波器 sigma。
borderType − 一個整數物件,代表使用的邊界型別。
示例
下面的程式演示瞭如何在影像上執行雙邊濾波器操作。
import org.opencv.core.Core;
import org.opencv.core.Mat;
import org.opencv.imgcodecs.Imgcodecs;
import org.opencv.imgproc.Imgproc;

public class BilateralFilter {
   public static void main(String args[]) {
      // Loading the OpenCV core library
      System.loadLibrary( Core.NATIVE_LIBRARY_NAME );

      // Reading the Image from the file and storing it in to a Matrix object
      String file ="E:/OpenCV/chap11/filter_input.jpg";
      Mat src = Imgcodecs.imread(file);

      // Creating an empty matrix to store the result
      Mat dst = new Mat();

      // Applying Bilateral filter on the Image
      Imgproc.bilateralFilter(src, dst, 15, 80, 80, Core.BORDER_DEFAULT);

      // Writing the image
      Imgcodecs.imwrite("E:/OpenCV/chap11/bilateralfilter.jpg", dst);

      System.out.println("Image Processed");
   }
}
假設上面程式中指定的輸入影像是filter_input.jpg。
輸出
執行程式後,您將獲得以下輸出:
Image Processed
如果您開啟指定的路徑,您可以觀察到如下所示的輸出影像:
OpenCV - 方框濾波
箱式濾波器操作類似於平均模糊操作;它將雙邊影像應用於濾波器。在這裡,您可以選擇是否應該對箱子進行歸一化。
您可以使用imgproc類的boxFilter()方法對影像執行此操作。以下是此方法的語法:
boxFilter(src, dst, ddepth, ksize, anchor, normalize, borderType)
此方法接受以下引數 −
src − 一個Mat物件,代表此操作的源(輸入影像)。
dst − 一個Mat物件,代表此操作的目標(輸出影像)。
ddepth − 一個整數型別的變數,代表輸出影像的深度。
ksize − 一個Size物件,代表模糊核的大小。
anchor − 一個整數型別的變數,代表錨點。
Normalize − 一個布林型別的變數,指定是否應該對核進行歸一化。
borderType − 一個整數物件,代表使用的邊界型別。
示例
下面的程式演示瞭如何在影像上執行箱式濾波器操作。
import org.opencv.core.Core;
import org.opencv.core.Mat;
import org.opencv.core.Point;
import org.opencv.core.Size;
import org.opencv.imgcodecs.Imgcodecs;
import org.opencv.imgproc.Imgproc;

public class BoxFilterTest {
   public static void main( String[] args ) {
      // Loading the OpenCV core library
      System.loadLibrary( Core.NATIVE_LIBRARY_NAME );

      // Reading the Image from the file and storing it in to a Matrix object
      String file = "E:/OpenCV/chap11/filter_input.jpg";
      Mat src = Imgcodecs.imread(file);

      // Creating an empty matrix to store the result
      Mat dst = new Mat();

      // Creating the objects for Size and Point
      Size size = new Size(45, 45);
      Point point = Point(-1, -1);

      // Applying Box Filter effect on the Image
      Imgproc.boxFilter(src, dst, 50, size, point, true, Core.BORDER_DEFAULT);

      // Writing the image
      Imgcodecs.imwrite("E:/OpenCV/chap11/boxfilterjpg", dst);

      System.out.println("Image Processed");
   }
}
假設上面程式中指定的輸入影像是filter_input.jpg。
輸出
執行程式後,您將獲得以下輸出:
Image Processed
如果您開啟指定的路徑,您可以觀察到如下所示的輸出影像:
OpenCV - 平方盒濾波
您可以使用imgproc類的boxFilter()方法對影像執行 SQR 箱式濾波器操作。以下是此方法的語法:
sqrBoxFilter(src, dst, ddepth, ksize)
此方法接受以下引數 −
src − 一個Mat物件,代表此操作的源(輸入影像)。
dst − 一個Mat物件,代表此操作的目標(輸出影像)。
ddepth − 一個整數型別的變數,代表輸出影像的深度。
ksize − 一個Size物件,代表模糊核的大小。
示例
下面的程式演示瞭如何在給定影像上執行 Sqrbox 濾波器操作。
import org.opencv.core.Core;
import org.opencv.core.Mat;
import org.opencv.core.Size;
import org.opencv.imgcodecs.Imgcodecs;
import org.opencv.imgproc.Imgproc;

public class SqrBoxFilterTest {
   public static void main( String[] args ) {
      // Loading the OpenCV core library
      System.loadLibrary( Core.NATIVE_LIBRARY_NAME );

      // Reading the Image from the file and storing it in to a Matrix object
      String file ="E:/OpenCV/chap11/filter_input.jpg";
      Mat src = Imgcodecs.imread(file);

      // Creating an empty matrix to store the result
      Mat dst = new Mat();

      // Applying Box Filter effect on the Image
      Imgproc.sqrBoxFilter(src, dst, -1, new Size(1, 1));

      // Writing the image
      Imgcodecs.imwrite("E:/OpenCV/chap11/sqrboxfilter.jpg", dst);

      System.out.println("Image Processed");
   }
}
假設上面程式中指定的輸入影像是filter_input.jpg。
輸出
執行程式後,您將獲得以下輸出:
Image Processed
如果您開啟指定的路徑,您可以觀察到如下所示的輸出影像:

OpenCV - Filter2D
Filter2D 操作將影像與核進行卷積。您可以使用imgproc類的Filter2D()方法對影像執行此操作。以下是此方法的語法:
filter2D(src, dst, ddepth, kernel)
此方法接受以下引數 −
src − 一個Mat物件,代表此操作的源(輸入影像)。
dst − 一個Mat物件,代表此操作的目標(輸出影像)。
ddepth − 一個整數型別的變數,代表輸出影像的深度。
kernel − 一個Mat物件,代表卷積核。
示例
下面的程式演示瞭如何在影像上執行 Filter2D 操作。
import org.opencv.core.Core;
import org.opencv.core.CvType;
import org.opencv.core.Mat;
import org.opencv.imgcodecs.Imgcodecs;
import org.opencv.imgproc.Imgproc;

public class Filter2D {
   public static void main( String[] args ) {
      //Loading the OpenCV core library
      System.loadLibrary( Core.NATIVE_LIBRARY_NAME );

      //Reading the Image from the file and storing it in to a Matrix object
      String file ="E:/OpenCV/chap11/filter_input.jpg";
      Mat src = Imgcodecs.imread(file);

      //Creating an empty matrix to store the result
      Mat dst = new Mat();

      // Creating kernel matrix
      Mat kernel = Mat.ones(2,2, CvType.CV_32F);

      for(int i = 0; i<kernel.rows(); i++) {
         for(int j = 0; j<kernel.cols(); j++) {
            double[] m = kernel.get(i, j);

            for(int k = 1; k<m.length; k++) {
               m[k] = m[k]/(2 * 2);
            }
            kernel.put(i,j, m);
         }
      }
      Imgproc.filter2D(src, dst, -1, kernel);
      Imgcodecs.imwrite("E:/OpenCV/chap11/filter2d.jpg", dst);
      System.out.println("Image Processed");
   }
}
假設上面程式中指定的輸入影像是filter_input.jpg。
輸出
執行程式後,您將獲得以下輸出:
Image Processed
如果您開啟指定的路徑,您可以觀察到如下所示的輸出影像:
OpenCV - 膨脹
腐蝕和膨脹是兩種形態學操作。顧名思義,形態學操作是一組根據影像形狀處理影像的操作。
基於給定的輸入影像,開發了一個“結構元素”。這可以透過兩種程式中的任何一種來完成。這些旨在去除噪聲並消除缺陷,使影像清晰。
膨脹
此過程遵循與某種特定形狀(例如正方形或圓形)的核進行卷積。此核具有一個錨點,表示其中心。
此核與圖片重疊以計算最大畫素值。計算後,圖片將被中心處的錨點替換。透過此過程,明亮區域的面積會增大,因此影像大小會增大。
例如,白色陰影或明亮陰影中物件的尺寸會增加,而黑色陰影或黑暗陰影中物件的尺寸會減小。
您可以使用imgproc類的dilate()方法對影像執行膨脹操作。以下是此方法的語法。
dilate(src, dst, kernel)
此方法接受以下引數 −
src − 一個Mat物件,代表此操作的源(輸入影像)。
dst − 一個Mat物件,代表此操作的目標(輸出影像)。
kernel − 一個Mat物件,代表卷積核。
示例
您可以使用getStructuringElement()方法準備核矩陣。此方法接受一個代表morph_rect型別的整數和一個Size型別的物件。
Imgproc.getStructuringElement(int shape, Size ksize);
下面的程式演示瞭如何在給定影像上執行膨脹操作。
import org.opencv.core.Core;
import org.opencv.core.Mat;
import org.opencv.core.Size;
import org.opencv.imgcodecs.Imgcodecs;
import org.opencv.imgproc.Imgproc;

public class DilateTest {
   public static void main( String[] args ) {
      // Loading the OpenCV core library
      System.loadLibrary( Core.NATIVE_LIBRARY_NAME );

      // Reading the Image from the file and storing it in to a Matrix object
      String file ="C:/EXAMPLES/OpenCV/sample.jpg";
      Mat src = Imgcodecs.imread(file);

      // Creating an empty matrix to store the result
      Mat dst = new Mat();

      // Preparing the kernel matrix object
      Mat kernel = Imgproc.getStructuringElement(Imgproc.MORPH_RECT,
         new  Size((2*2) + 1, (2*2)+1));

      // Applying dilate on the Image
      Imgproc.dilate(src, dst, kernel);

      // Writing the image
      Imgcodecs.imwrite("E:/OpenCV/chap10/Dilation.jpg", dst);

      System.out.println("Image Processed");
   }
}
輸入
假設以上程式中指定的輸入影像是sample.jpg。
輸出
執行程式後,您將獲得以下輸出:
Image Processed
如果您開啟指定的路徑,您可以觀察到如下所示的輸出影像:

OpenCV - 腐蝕
腐蝕與膨脹的過程非常相似。但是這裡計算的畫素值是最小值,而不是膨脹中的最大值。影像在錨點下用該最小畫素值替換。
透過此過程,黑暗區域的面積會增大,而明亮區域會減小。例如,黑暗陰影或黑色陰影中物件的尺寸會增加,而在白色陰影或明亮陰影中則會減小。
示例
您可以使用imgproc類的erode()方法對影像執行此操作。以下是此方法的語法:
erode(src, dst, kernel)
此方法接受以下引數 −
src − 一個Mat物件,代表此操作的源(輸入影像)。
dst − 一個Mat物件,代表此操作的目標(輸出影像)。
kernel − 一個Mat物件,代表卷積核。
您可以使用getStructuringElement()方法準備核矩陣。此方法接受一個代表morph_rect型別的整數和一個Size型別的物件。
Imgproc.getStructuringElement(int shape, Size ksize);
下面的程式演示瞭如何在給定影像上執行腐蝕操作。
import org.opencv.core.Core;
import org.opencv.core.Mat;
import org.opencv.core.Size;
import org.opencv.imgcodecs.Imgcodecs;
import org.opencv.imgproc.Imgproc;

public class ErodeTest {
   public static void main( String[] args ) {
      // Loading the OpenCV core library
      System.loadLibrary( Core.NATIVE_LIBRARY_NAME );

      // Reading the Image from the file and storing it in to a Matrix object
      String file ="C:/EXAMPLES/OpenCV/sample.jpg";
      Mat src = Imgcodecs.imread(file);

      // Creating an empty matrix to store the result
      Mat dst = new Mat();

      // Preparing the kernel matrix object
      Mat kernel = Imgproc.getStructuringElement(Imgproc.MORPH_RECT,
         new  Size((2*2) + 1, (2*2)+1));

      // Applying erode on the Image
      Imgproc.erode(src, dst, kernel);

      // Writing the image
      Imgcodecs.imwrite("E:/OpenCV/chap10/Erosion.jpg", dst);

      System.out.println("Image processed");
   }
}
假設以上程式中指定的輸入影像是sample.jpg。
輸出
執行程式後,您將獲得以下輸出:
Image Loaded
如果您開啟指定的路徑,您可以觀察到如下所示的輸出影像:

OpenCV - 形態學操作
在前面的章節中,我們討論了腐蝕和膨脹的過程。除了這兩個之外,OpenCV 還有更多形態學變換。Imgproc類的morphologyEx()方法用於對給定影像執行這些操作。
以下是此方法的語法:
morphologyEx(src, dst, op, kernel)
此方法接受以下引數 −
src − 一個Mat類物件,代表源(輸入)影像。
dst − 一個Mat類物件,代表目標(輸出)影像。
op − 一個整數,代表形態學操作的型別。
kernel − 一個核矩陣。
示例
下面的程式演示瞭如何使用 OpenCV 庫在影像上應用“頂帽”形態學操作。
import org.opencv.core.Core;
import org.opencv.core.CvType;
import org.opencv.core.Mat;
import org.opencv.imgcodecs.Imgcodecs;
import org.opencv.imgproc.Imgproc;

public class MorphologyExTest {
   public static void main(String args[]) {
      // Loading the OpenCV core library
      System.loadLibrary( Core.NATIVE_LIBRARY_NAME );

      // Reading the Image from the file and storing it in to a Matrix object
      String file ="E:/OpenCV/chap12/morph_input.jpg";
      Mat src = Imgcodecs.imread(file);

      // Creating an empty matrix to store the result
      Mat dst = new Mat();

      // Creating kernel matrix
      Mat kernel = Mat.ones(5,5, CvType.CV_32F);

      // Applying Blur effect on the Image
      Imgproc.morphologyEx(src, dst, Imgproc.MORPH_TOPHAT, kernel);

      // Writing the image
      Imgcodecs.imwrite("E:/OpenCV/chap12/morph_tophat.jpg", dst);

      System.out.println("Image Processed");
   }
}
假設上面程式中指定的輸入影像是morph_input.jpg。

輸出
執行程式後,您將獲得以下輸出:
Image Processed
如果您開啟指定的路徑,您可以觀察到如下所示的輸出影像:

更多操作
除了前面示例中演示的TOPHAT形態學操作之外,OpenCV 還提供各種其他型別的形態學操作。所有這些型別都由Imgproc類的預定義靜態欄位(固定值)表示。
您可以透過將其各自的預定義值傳遞給morphologyEx()方法的op引數來選擇所需的形態學型別。
// Applying Blur effect on the Image
Imgproc.morphologyEx(src, dst, Imgproc.MORPH_TOPHAT, kernel);
以下是代表形態學操作型別及其各自輸出的值。
| 操作和描述 | 輸出 |
|---|---|
| MORPH_BLACKHAT |  |
| MORPH_CLOSE |  |
| MORPH_CROSS |  |
| MORPH_DILATE |  |
| MORPH_ELLIPSE |  |
| MORPH_ERODE | 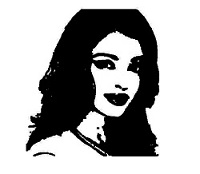 |
| MORPH_GRADIENT |  |
| MORPH_OPEN | 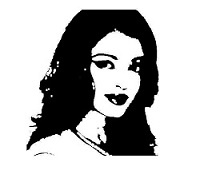 |
| MORPH_RECT |  |
| MORPH_TOPHAT |  |
OpenCV - 影像金字塔
金字塔是對影像的操作,其中:
輸入影像最初使用特定的平滑濾波器(例如:高斯、拉普拉斯)進行平滑,然後對平滑後的影像進行二次取樣。
此過程重複多次。
在金字塔操作期間,影像的平滑度增加,解析度(大小)減小。
金字塔向上
在金字塔向上操作中,影像最初被上取樣,然後被模糊。您可以使用imgproc類的pyrUP()方法對影像執行金字塔向上操作。以下是此方法的語法:
pyrUp(src, dst, dstsize, borderType)
此方法接受以下引數 −
src − 一個Mat類物件,代表源(輸入)影像。
mat − 一個Mat類物件,代表目標(輸出)影像。
size − 一個Size類物件,代表影像要增大或減小到的尺寸。
borderType − 一個整數型別的變數,代表要使用的邊界型別。
示例
下面的程式演示瞭如何在影像上執行金字塔向上操作。
import org.opencv.core.Core;
import org.opencv.core.Mat;
import org.opencv.core.Size;
import org.opencv.imgcodecs.Imgcodecs;
import org.opencv.imgproc.Imgproc;

public class PyramidUp {
   public static void main( String[] args ) {
      // Loading the OpenCV core library
      System.loadLibrary( Core.NATIVE_LIBRARY_NAME );

      // Reading the Image from the file and storing it in to a Matrix object
      String file ="E:/OpenCV/chap13/pyramid_input.jpg";
      Mat src = Imgcodecs.imread(file);

      // Creating an empty matrix to store the result
      Mat dst = new Mat();

      // Applying pyrUp on the Image
      Imgproc.pyrUp(src, dst, new Size(src.cols()*2,  src.rows()*2), Core.BORDER_DEFAULT);

      // Writing the image
      Imgcodecs.imwrite("E:/OpenCV/chap13/pyrUp_output.jpg", dst);

      System.out.println("Image Processed");
   }
}
假設上面程式中指定的輸入影像是pyramid_input.jpg。

輸出
執行程式後,您將獲得以下輸出:
Image Processed
如果您開啟指定的路徑,您可以觀察到如下所示的輸出影像:

金字塔向下
在金字塔向下操作中,影像最初被模糊,然後被下采樣。您可以使用imgproc類的pyrDown()方法對影像執行金字塔向下操作。以下是此方法的語法:
pyrDown(src, dst, dstsize, borderType)
此方法接受以下引數 −
src − 一個Mat類物件,代表源(輸入)影像。
mat − 一個Mat類物件,代表目標(輸出)影像。
size − 一個Size類物件,代表影像要增大或減小到的尺寸。
borderType − 一個整數型別的變數,代表要使用的邊界型別。
示例
下面的程式演示瞭如何在影像上執行金字塔向下操作。
import org.opencv.core.Core;
import org.opencv.core.Mat;
import org.opencv.core.Size;
import org.opencv.imgcodecs.Imgcodecs;
import org.opencv.imgproc.Imgproc;

public class PyramidDown {
   public static void main( String[] args ) {
      // Loading the OpenCV core library
      System.loadLibrary( Core.NATIVE_LIBRARY_NAME );

      // Reading the Image from the file and storing it in to a Matrix object
      String file ="E:/OpenCV/chap13/pyramid_input.jpg";
      Mat src = Imgcodecs.imread(file);

      // Creating an empty matrix to store the result
      Mat dst = new Mat();

      // Applying pyrDown on the Image
      Imgproc.pyrDown(src, dst, new Size(src.cols()/2,  src.rows()/2),
         Core.BORDER_DEFAULT);

      // Writing the image
      Imgcodecs.imwrite("E:/OpenCV/chap13/pyrDown_output.jpg", dst);

      System.out.println("Image Processed");
   }
}
假設上面程式中指定的輸入影像是pyramid_input.jpg。
輸出
執行程式後,您將獲得以下輸出:
Image Processed
如果您開啟指定的路徑,您可以觀察到如下所示的輸出影像:

均值漂移濾波
在均值漂移金字塔操作中,首先對影像進行均值漂移分割。
您可以使用imgproc類的pyrDown()方法對影像執行金字塔均值漂移濾波操作。以下是此方法的語法。
pyrMeanShiftFiltering(src, dst, sp, sr)
此方法接受以下引數 −
src − 一個Mat類物件,代表源(輸入)影像。
mat − 一個Mat類物件,代表目標(輸出)影像。
sp − 一個雙精度型別的變數,代表空間視窗半徑。
sr − 一個雙精度型別的變數,代表顏色視窗半徑。
示例
下面的程式演示瞭如何在給定影像上執行均值漂移濾波操作。
import org.opencv.core.Core;
import org.opencv.core.Mat;
import org.opencv.imgcodecs.Imgcodecs;
import org.opencv.imgproc.Imgproc;

public class PyramidMeanShift {
   public static void main( String[] args ) {
      // Loading the OpenCV core library
      System.loadLibrary( Core.NATIVE_LIBRARY_NAME );

      // Reading the Image from the file and storing it in to a Matrix object
      String file ="E:/OpenCV/chap13/pyramid_input.jpg";
      Mat src = Imgcodecs.imread(file);

      // Creating an empty matrix to store the result
      Mat dst = new Mat();

      // Applying meanShifting on the Image
      Imgproc.pyrMeanShiftFiltering(src, dst, 200, 300);

      // Writing the image
      Imgcodecs.imwrite("E:/OpenCV/chap13/meanShift_output.jpg", dst);

      System.out.println("Image Processed");
   }
}
假設上面程式中指定的輸入影像是pyramid_input.jpg。
輸出
執行程式後,您將獲得以下輸出:
Image Processed
如果您開啟指定的路徑,您可以觀察到如下所示的輸出影像:

OpenCV - 簡單閾值化
閾值化是一種影像分割方法,一般用於建立二值影像。閾值化分為兩種型別,即簡單閾值化和自適應閾值化。
簡單閾值化
在簡單閾值化操作中,畫素值大於指定閾值的值將被賦予一個標準值。
您可以使用Imgproc 類的threshold()方法對影像執行簡單的閾值操作,以下是此方法的語法。
threshold(src, dst, thresh, maxval, type)
此方法接受以下引數 −
src − 一個Mat類物件,代表源(輸入)影像。
dst − 一個Mat類物件,代表目標(輸出)影像。
thresh − 一個雙精度型別的變數,代表閾值。
maxval − 一個雙精度型別的變數,代表如果畫素值大於閾值則要賦予的值。
type − 一個整數型別的變數,代表要使用的閾值型別。
示例
以下程式演示如何在OpenCV中對影像執行簡單的閾值操作。
import org.opencv.core.Core;
import org.opencv.core.Mat;
import org.opencv.imgcodecs.Imgcodecs;
import org.opencv.imgproc.Imgproc;

public class Thresh {
   public static void main(String args[]) {
      // Loading the OpenCV core library
      System.loadLibrary( Core.NATIVE_LIBRARY_NAME );

      // Reading the Image from the file and storing it in to a Matrix object
      String file ="E:/OpenCV/chap14/thresh_input.jpg";
      Mat src = Imgcodecs.imread(file);

      // Creating an empty matrix to store the result
      Mat dst = new Mat();
      Imgproc.threshold(src, dst, 50, 255, Imgproc.THRESH_BINARY);

      // Writing the image
      Imgcodecs.imwrite("E:/OpenCV/chap14/thresh_trunc.jpg", dst);

      System.out.println("Image Processed");
   }
}
假設以上程式中指定的輸入影像為thresh_input.jpg。

輸出
執行程式後,您將獲得以下輸出:
Image Processed
如果您開啟指定的路徑,您可以觀察到如下所示的輸出影像:

其他型別的簡單閾值化
除了前面示例中演示的THRESH_BINARY操作外,OpenCV還提供各種其他型別的閾值操作。所有這些型別都由Imgproc類的預定義靜態欄位(固定值)表示。
您可以透過將相應的預定義值傳遞給threshold()方法名為type的引數來選擇所需的閾值操作型別。
Imgproc.threshold(src, dst, 50, 255, Imgproc.THRESH_BINARY);
以下是表示各種閾值操作型別及其各自輸出的值。
| 操作和描述 | 輸出 |
|---|---|
| THRESH_BINARY |  |
| THRESH_BINARY_INV |  |
| THRESH_TRUNC |  |
| THRESH_TOZERO |  |
| THRESH_TOZERO_INV |  |
OpenCV - 自適應閾值化
在簡單閾值化中,閾值是全域性的,即對影像中的所有畫素都相同。自適應閾值化是一種為較小區域計算閾值的方法,因此不同區域將具有不同的閾值。
在OpenCV中,您可以使用Imgproc類的adaptiveThreshold()方法對影像執行自適應閾值操作。以下是此方法的語法。
adaptiveThreshold(src, dst, maxValue, adaptiveMethod, thresholdType, blockSize, C)
此方法接受以下引數 −
src − 一個Mat類物件,代表源(輸入)影像。
dst − 一個Mat類物件,代表目標(輸出)影像。
maxValue − 一個雙精度型變數,表示如果畫素值大於閾值則要賦予的值。
adaptiveMethod − 一個整型變數,表示要使用的自適應方法。這將是以下兩個值之一:
ADAPTIVE_THRESH_MEAN_C − 閾值是鄰域區域的平均值。
ADAPTIVE_THRESH_GAUSSIAN_C − 閾值是鄰域值的加權和,權重為高斯視窗。
thresholdType − 一個整型變數,表示要使用的閾值型別。
blockSize − 一個整型變數,表示用於計算閾值大小的畫素鄰域。
C − 一個雙精度型變數,表示兩種方法中使用的常數(從平均值或加權平均值中減去)。
示例
以下程式演示如何在OpenCV中對影像執行自適應閾值操作。這裡我們選擇型別為binary的自適應閾值和ADAPTIVE_THRESH_MEAN_C作為閾值方法。
import org.opencv.core.Core;
import org.opencv.core.Mat;
import org.opencv.imgcodecs.Imgcodecs;
import org.opencv.imgproc.Imgproc;

public class AdaptiveThresh {
   public static void main(String args[]) throws Exception {
      // Loading the OpenCV core library
      System.loadLibrary( Core.NATIVE_LIBRARY_NAME );

      // Reading the Image from the file and storing it in to a Matrix object
      String file ="E:/OpenCV/chap14/thresh_input.jpg";

      // Reading the image
      Mat src = Imgcodecs.imread(file,0);

      // Creating an empty matrix to store the result
      Mat dst = new Mat();

      Imgproc.adaptiveThreshold(src, dst, 125, Imgproc.ADAPTIVE_THRESH_MEAN_C,
         Imgproc.THRESH_BINARY, 11, 12);

      // Writing the image
      Imgcodecs.imwrite("E:/OpenCV/chap14/Adaptivemean_thresh_binary.jpg", dst);

      System.out.println("Image Processed");
   }
}
假設以上程式中指定的輸入影像為thresh_input.jpg。
輸出
執行程式後,您將獲得以下輸出:
Image Processed
如果您開啟指定的路徑,您可以觀察到如下所示的輸出影像:

其他型別的自適應閾值化
除了前面示例中演示的ADAPTIVE_THRESH_MEAN_C作為自適應方法和THRESH_BINARY作為閾值型別外,我們還可以選擇這兩種值的更多組合。
Imgproc.adaptiveThreshold(src, dst, 125, Imgproc.ADAPTIVE_THRESH_MEAN_C,
   Imgproc.THRESH_BINARY, 11, 12);
以下是表示引數adaptiveMethod和thresholdType的各種組合值及其各自輸出的值。
| adaptiveMethod / thresholdType | ADAPTIVE_THRESH_MEAN_C | ADAPTIVE_THRESH_GAUSSIAN_C |
|---|---|---|
| THRESH_BINARY |  |
 |
| THRESH_BINARY_INV |  |
 |
OpenCV - 新增邊界
本章將教你如何向影像新增邊界。
copyMakeBorder() 方法
您可以使用名為Core的類的copyMakeBorder()方法向影像新增各種邊界,該類屬於org.opencv.core包。以下是此方法的語法。
copyMakeBorder(src, dst, top, bottom, left, right, borderType)
此方法接受以下引數 −
src − 一個Mat類物件,代表源(輸入)影像。
dst − 一個Mat類物件,代表目標(輸出)影像。
top − 一個整型變數,表示影像頂部邊界的長度。
bottom − 一個整型變數,表示影像底部邊界的長度。
left − 一個整型變數,表示影像左側邊界的長度。
right − 一個整型變數,表示影像右側邊界的長度。
borderType − 一個整型變數,表示要使用的邊界型別。
示例
以下程式是一個示例,演示如何向給定影像新增邊界。
import org.opencv.core.Core;
import org.opencv.core.Mat;
import org.opencv.imgcodecs.Imgcodecs;

public class AddingBorder {
   public static void main( String[] args ) {
      // Loading the OpenCV core library
      System.loadLibrary( Core.NATIVE_LIBRARY_NAME );

      // Reading the Image from the file and storing it in to a Matrix object
      String file ="E:/OpenCV/chap15/input.jpg";
      Mat src = Imgcodecs.imread(file);

      // Creating an empty matrix to store the result
      Mat dst = new Mat();

      Core.copyMakeBorder(src, dst, 20, 20, 20, 20, Core.BORDER_CONSTANT);
      Imgcodecs.imwrite("E:/OpenCV/chap15/border_constant.jpg", dst);

      System.out.println("Image Processed");
   }
}
假設以上程式中指定的輸入影像為thresh_input.jpg。
輸出
執行程式後,您將獲得以下輸出:
Image Processed
如果您開啟指定的路徑,您可以觀察到如下所示的輸出影像:

其他型別的邊界
除了前面示例中演示的邊界型別BORDER_CONSTANT外,OpenCV還提供各種其他型別的邊界。所有這些型別都由Core類的預定義靜態欄位(固定值)表示。
您可以透過將相應的預定義值傳遞給copyMakeBorder()方法名為borderType的引數來選擇所需的邊界型別。
Core.copyMakeBorder(src, dst, 20, 20, 20, 20, Core.BORDER_CONSTANT);
以下是表示各種邊界操作型別及其各自輸出的值。
| 操作和描述 | 輸出 |
|---|---|
| BORDER_CONSTANT |  |
| BORDER_ISOLATED |  |
| BORDER_DEFAULT |  |
| BORDER_REFLECT |  |
| BORDER_REFLECT_101 |  |
| BORDER_REFLECT101 |  |
| BORDER_REPLICATE |  |
| BORDER_WRAP |  |
OpenCV - Sobel 運算元
使用Sobel運算元,您可以檢測影像在水平和垂直方向上的邊緣。您可以使用sobel()方法對影像應用Sobel運算元。以下是此方法的語法:
Sobel(src, dst, ddepth, dx, dy)
此方法接受以下引數 −
src − 一個Mat類物件,代表源(輸入)影像。
dst − 一個Mat類物件,代表目標(輸出)影像。
ddepth − 一個整型變數,表示影像的深度(-1)
dx − 一個整型變數,表示x導數。(0或1)
dy − 一個整型變數,表示y導數。(0或1)
示例
以下程式演示如何在給定影像上執行Sobel操作。
import org.opencv.core.Core;
import org.opencv.core.Mat;

import org.opencv.imgcodecs.Imgcodecs;
import org.opencv.imgproc.Imgproc;

public class SobelTest {
   public static void main(String args[]) {
      // Loading the OpenCV core library
      System.loadLibrary(Core.NATIVE_LIBRARY_NAME);

      // Reading the Image from the file and storing it in to a Matrix object
      String file ="E:/OpenCV/chap16/sobel_input.jpg";
      Mat src = Imgcodecs.imread(file);

      // Creating an empty matrix to store the result
      Mat dst = new Mat();

      // Applying sobel on the Image
      Imgproc.Sobel(src, dst, -1, 1, 1);

      // Writing the image
      Imgcodecs.imwrite("E:/OpenCV/chap16/sobel_output.jpg", dst);

      System.out.println("Image processed");
   }
}
假設以上程式中指定的輸入影像為sobel_input.jpg。
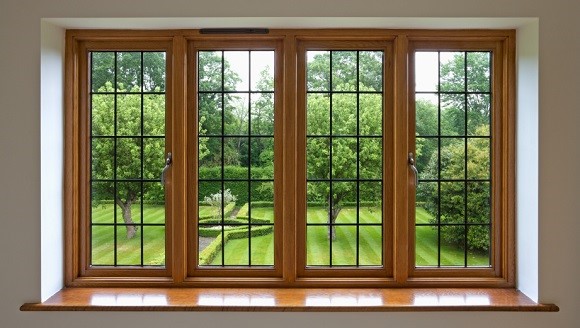
輸出
執行程式後,您將獲得以下輸出:
Image Processed
如果您開啟指定的路徑,您可以觀察到如下所示的輸出影像:
Sobel 變體
將不同的值傳遞給最後兩個引數(dx 和 dy)(在 0 和 1 之間),您將獲得不同的輸出:
// Applying sobel on the Image
Imgproc.Sobel(src, dst, -1, 1, 1);
下表列出了Sobel()方法的變數dx和dy的各種值及其各自的輸出。
| X導數 | Y導數 | 輸出 |
|---|---|---|
| 0 | 1 |  |
| 1 | 0 |  |
| 1 | 1 |  |
OpenCV - Scharr 運算元
Scharr也用於檢測影像在水平和垂直方向上的二階導數。您可以使用scharr()方法對影像執行Scharr操作。以下是此方法的語法:
Scharr(src, dst, ddepth, dx, dy)
此方法接受以下引數 −
src − 一個Mat類物件,代表源(輸入)影像。
dst − 一個Mat類物件,代表目標(輸出)影像。
ddepth − 一個整型變數,表示影像的深度(-1)
dx − 一個整型變數,表示x導數。(0或1)
dy − 一個整型變數,表示y導數。(0或1)
示例
以下程式演示如何將Scharr應用於給定影像。
import org.opencv.core.Core;
import org.opencv.core.Mat;

import org.opencv.imgcodecs.Imgcodecs;
import org.opencv.imgproc.Imgproc;

public class ScharrTest {

   public static void main( String[] args ) {

      // Loading the OpenCV core library
      System.loadLibrary( Core.NATIVE_LIBRARY_NAME );

      // Reading the Image from the file and storing it in to a Matrix object
      String file ="E:/OpenCV/chap16/sobel_input.jpg";
      Mat src = Imgcodecs.imread(file);

      // Creating an empty matrix to store the result
      Mat dst = new Mat();

      // Applying Box Filter effect on the Image
      Imgproc.Scharr(src, dst, Imgproc.CV_SCHARR, 0, 1);

      // Writing the image
      Imgcodecs.imwrite("E:/OpenCV/chap16/scharr_output.jpg", dst);

      System.out.println("Image processed");
   }
}
假設以上程式中指定的輸入影像為scharr_input.jpg。
輸出
執行後,您將獲得以下輸出:
Image Processed
如果您開啟指定的路徑,您可以觀察到輸出影像如下:
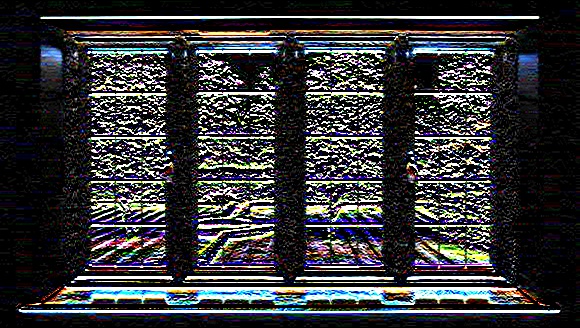
更多 Scharr 導數
將不同的值傳遞給最後兩個引數 (dx 和 dy) (在 0 和 1 之間),您將獲得不同的輸出:
// Applying scharr on the Image
Imgproc.Scharr(src, dst, -1, 1, 1);
下表列出了scharr()方法的變數dx和dy的各種值及其各自的輸出。
| X導數 | Y導數 | 輸出 |
|---|---|---|
| 0 | 1 | 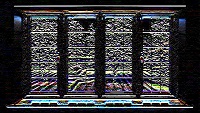 |
| 1 | 0 |  |
OpenCV - 拉普拉斯變換
拉普拉斯運算元也是一個導數運算元,用於查詢影像中的邊緣。它是一個二階導數掩碼。在這個掩碼中,我們有兩個進一步的分類,一個是正拉普拉斯運算元,另一個是負拉普拉斯運算元。
與其他運算元不同,拉普拉斯運算元不會在任何特定方向上提取邊緣,而是按以下分類提取邊緣。
- 內邊緣
- 外邊緣
您可以使用imgproc類的Laplacian()方法對影像執行拉普拉斯變換操作,以下是此方法的語法。
Laplacian(src, dst, ddepth)
此方法接受以下引數 −
src − 一個Mat物件,代表此操作的源(輸入影像)。
dst − 一個Mat物件,代表此操作的目標(輸出影像)。
ddepth − 一個整型變數,表示目標影像的深度。
示例
以下程式演示如何在給定影像上執行拉普拉斯變換操作。
import org.opencv.core.Core;
import org.opencv.core.Mat;
import org.opencv.imgcodecs.Imgcodecs;
import org.opencv.imgproc.Imgproc;

public class LaplacianTest {
   public static void main(String args[]) {
      // Loading the OpenCV core library
      System.loadLibrary(Core.NATIVE_LIBRARY_NAME);

      //Reading the Image from the file and storing it in to a Matrix object
      String file ="E:/OpenCV/chap18/laplacian_input.jpg";
      Mat src = Imgcodecs.imread(file);

      // Creating an empty matrix to store the result
      Mat dst = new Mat();

      // Applying GaussianBlur on the Image
      Imgproc.Laplacian(src, dst, 10);

      // Writing the image
      Imgcodecs.imwrite("E:/OpenCV/chap18/laplacian.jpg", dst);

      System.out.println("Image Processed");
   }
}
假設以上程式中指定的輸入影像為laplacian_input.jpg。

輸出
執行程式後,您將獲得以下輸出:
Image Processed
如果您開啟指定的路徑,您可以觀察到如下所示的輸出影像:

OpenCV - 距離變換
距離變換運算元通常以二值影像作為輸入。在此操作中,前景區域內點的灰度強度會更改為它們到最近的0值(邊界)的距離。
您可以使用distanceTransform()方法在OpenCV中應用距離變換。以下是此方法的語法。
distanceTransform(src, dst, distanceType, maskSize)
此方法接受以下引數 −
src − 一個Mat類物件,代表源(輸入)影像。
dst − 一個Mat類物件,代表目標(輸出)影像。
distanceType − 一個整型變數,表示要應用的距離變換型別。
maskSize − 一個整型變數,表示要使用的掩碼大小。
示例
以下程式演示如何在給定影像上執行距離變換操作。
import org.opencv.core.Core;
import org.opencv.core.Mat;
import org.opencv.imgcodecs.Imgcodecs;
import org.opencv.imgproc.Imgproc;

public class DistanceTransform {
   public static void main(String args[]) {
      // Loading the OpenCV core library
      System.loadLibrary( Core.NATIVE_LIBRARY_NAME );

      // Reading the Image from the file and storing it in to a Matrix object
      String file ="E:/OpenCV/chap19/input.jpg";
      Mat src = Imgcodecs.imread(file,0);

      // Creating an empty matrix to store the results
      Mat dst = new Mat();
      Mat binary = new Mat();

      // Converting the grayscale image to binary image
      Imgproc.threshold(src, binary, 100, 255, Imgproc.THRESH_BINARY);

      // Applying distance transform
      Imgproc.distanceTransform(mat, dst, Imgproc.DIST_C, 3);

      // Writing the image
      Imgcodecs.imwrite("E:/OpenCV/chap19/distnceTransform.jpg", dst);

      System.out.println("Image Processed");
   }
}
假設以上程式中指定的輸入影像為input.jpg。
輸出
執行程式後,您將獲得以下輸出:
Image Processed
如果您開啟指定的路徑,您可以觀察到如下所示的輸出影像:

距離變換操作型別
除了前面示例中演示的距離操作型別DIST_C外,OpenCV還提供各種其他型別的距離變換操作。所有這些型別都由Imgproc類的預定義靜態欄位(固定值)表示。
您可以透過將相應的預定義值傳遞給distanceTransform()方法名為distanceType的引數來選擇所需的距離變換操作型別。
// Applying distance transform
Imgproc.distanceTransform(mat, dst, Imgproc.DIST_C, 3);
以下是表示各種distanceTransform操作型別及其各自輸出的值。
| 操作和描述 | 輸出 |
|---|---|
| DIST_C |  |
| DIST_L1 |  |
| DIST_L2 |  |
| DIST_LABEL_PIXEL | |
| DIST_MASK_3 |  |
OpenCV - 使用攝像頭
在本章中,我們將學習如何使用OpenCV使用系統攝像頭捕獲幀。org.opencv.videoio包的VideoCapture類包含使用攝像頭捕獲影片的類和方法。讓我們一步一步地學習如何捕獲幀:
步驟 1:載入 OpenCV 原生庫
使用 OpenCV 庫編寫 Java 程式碼時,第一步需要使用loadLibrary()載入 OpenCV 的原生庫。如下所示載入 OpenCV 原生庫。
// Loading the core library
System.loadLibrary(Core.NATIVE_LIBRARY_NAME);
步驟2:例項化影片捕獲類
使用本教程前面提到的任何函式例項化Mat類。
// Instantiating the VideoCapture class (camera:: 0)
VideoCapture capture = new VideoCapture(0);
步驟3:讀取幀
您可以使用VideoCapture類的read()方法讀取來自攝像頭的幀。此方法接受Mat類的物件來儲存讀取的幀。
// Reading the next video frame from the camera
Mat matrix = new Mat();
capture.read(matrix);
示例
以下程式演示如何使用攝像頭捕獲幀並使用JavaFX視窗顯示它。它還儲存捕獲的幀。
import java.awt.image.BufferedImage;
import java.awt.image.DataBufferByte;
import java.awt.image.WritableRaster;

import java.io.FileNotFoundException;
import java.io.IOException;

import javafx.application.Application;
import javafx.embed.swing.SwingFXUtils;
import javafx.scene.Group;
import javafx.scene.Scene;
import javafx.scene.image.ImageView;
import javafx.scene.image.WritableImage;
import javafx.stage.Stage;

import org.opencv.core.Core;
import org.opencv.core.Mat;
import org.opencv.imgcodecs.Imgcodecs;
import org.opencv.videoio.VideoCapture;

public class CameraSnapshotJavaFX extends Application {
   Mat matrix = null;

   @Override
   public void start(Stage stage) throws FileNotFoundException, IOException {
      // Capturing the snapshot from the camera
      CameraSnapshotJavaFX obj = new CameraSnapshotJavaFX();
      WritableImage writableImage = obj.capureSnapShot();

      // Saving the image
      obj.saveImage();

      // Setting the image view
      ImageView imageView = new ImageView(writableImage);

      // setting the fit height and width of the image view
      imageView.setFitHeight(400);
      imageView.setFitWidth(600);

      // Setting the preserve ratio of the image view
      imageView.setPreserveRatio(true);

      // Creating a Group object
      Group root = new Group(imageView);

      // Creating a scene object
      Scene scene = new Scene(root, 600, 400);

      // Setting title to the Stage
      stage.setTitle("Capturing an image");

      // Adding scene to the stage
      stage.setScene(scene);

      // Displaying the contents of the stage
      stage.show();
   }
   public WritableImage capureSnapShot() {
      WritableImage WritableImage = null;

      // Loading the OpenCV core library
      System.loadLibrary( Core.NATIVE_LIBRARY_NAME );

      // Instantiating the VideoCapture class (camera:: 0)
      VideoCapture capture = new VideoCapture(0);

      // Reading the next video frame from the camera
      Mat matrix = new Mat();
      capture.read(matrix);

      // If camera is opened
      if( capture.isOpened()) {
         // If there is next video frame
         if (capture.read(matrix)) {
            // Creating BuffredImage from the matrix
            BufferedImage image = new BufferedImage(matrix.width(),
               matrix.height(), BufferedImage.TYPE_3BYTE_BGR);

            WritableRaster raster = image.getRaster();
            DataBufferByte dataBuffer = (DataBufferByte) raster.getDataBuffer();
            byte[] data = dataBuffer.getData();
            matrix.get(0, 0, data);
            this.matrix = matrix;

            // Creating the Writable Image
            WritableImage = SwingFXUtils.toFXImage(image, null);
         }
      }
      return WritableImage;
   }
   public void saveImage() {
      // Saving the Image
      String file = "E:/OpenCV/chap22/sanpshot.jpg";

      // Instantiating the imgcodecs class
      Imgcodecs imageCodecs = new Imgcodecs();

      // Saving it again
      imageCodecs.imwrite(file, matrix);
   }
   public static void main(String args[]) {
      launch(args);
   }
}
輸出
執行程式後,您將獲得以下輸出。
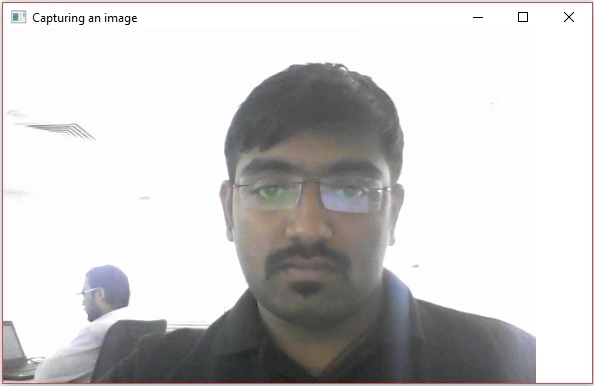
如果您開啟指定的路徑,您可以看到儲存為jpg檔案的相同幀。
OpenCV - 圖片中的人臉檢測
org.opencv.videoio包的VideoCapture類包含使用系統攝像頭捕獲影片的類和方法。讓我們一步一步地學習如何做到這一點。
步驟 1:載入 OpenCV 原生庫
使用 OpenCV 庫編寫 Java 程式碼時,第一步需要使用loadLibrary()載入 OpenCV 的原生庫。如下所示載入 OpenCV 原生庫。
// Loading the core library
System.loadLibrary(Core.NATIVE_LIBRARY_NAME);
步驟2:例項化CascadeClassifier類
org.opencv.objdetect包的CascadeClassifier類用於載入分類器檔案。透過傳遞xml檔案lbpcascade_frontalface.xml來例項化此類,如下所示。
// Instantiating the CascadeClassifier
String xmlFile = "E:/OpenCV/facedetect/lbpcascade_frontalface.xml";
CascadeClassifier classifier = new CascadeClassifier(xmlFile);
步驟3:檢測人臉
您可以使用名為CascadeClassifier類的detectMultiScale()方法檢測影像中的人臉。此方法接受持有輸入影像的Mat類物件和MatOfRect類物件來儲存檢測到的人臉。
// Detecting the face in the snap
MatOfRect faceDetections = new MatOfRect();
classifier.detectMultiScale(src, faceDetections);
示例
以下程式演示如何在影像中檢測人臉。
import org.opencv.core.Core;
import org.opencv.core.Mat;
import org.opencv.core.MatOfRect;
import org.opencv.core.Point;
import org.opencv.core.Rect;
import org.opencv.core.Scalar;

import org.opencv.imgcodecs.Imgcodecs;
import org.opencv.imgproc.Imgproc;
import org.opencv.objdetect.CascadeClassifier;

public class FaceDetectionImage {
   public static void main (String[] args) {
      // Loading the OpenCV core library
      System.loadLibrary( Core.NATIVE_LIBRARY_NAME );

      // Reading the Image from the file and storing it in to a Matrix object
      String file ="E:/OpenCV/chap23/facedetection_input.jpg";
      Mat src = Imgcodecs.imread(file);

      // Instantiating the CascadeClassifier
      String xmlFile = "E:/OpenCV/facedetect/lbpcascade_frontalface.xml";
      CascadeClassifier classifier = new CascadeClassifier(xmlFile);

      // Detecting the face in the snap
      MatOfRect faceDetections = new MatOfRect();
      classifier.detectMultiScale(src, faceDetections);
      System.out.println(String.format("Detected %s faces",
         faceDetections.toArray().length));

      // Drawing boxes
      for (Rect rect : faceDetections.toArray()) {
         Imgproc.rectangle(
            src,                                               // where to draw the box
            new Point(rect.x, rect.y),                            // bottom left
            new Point(rect.x + rect.width, rect.y + rect.height), // top right
            new Scalar(0, 0, 255),
            3                                                     // RGB colour
         );
      }

      // Writing the image
      Imgcodecs.imwrite("E:/OpenCV/chap23/facedetect_output1.jpg", src);

      System.out.println("Image Processed");
   }
}
假設以上程式中指定的輸入影像為facedetection_input.jpg。
輸出
執行程式後,您將獲得以下輸出:
Detected 3 faces
Image Processed
如果您開啟指定的路徑,您可以觀察到如下所示的輸出影像:

OpenCV - 使用攝像頭進行人臉檢測
以下程式演示如何使用系統攝像頭檢測人臉並使用JavaFX視窗顯示它。
示例
import java.awt.image.BufferedImage;
import java.awt.image.DataBufferByte;
import java.awt.image.WritableRaster;

import java.io.FileNotFoundException;
import java.io.IOException;

import javafx.application.Application;
import javafx.embed.swing.SwingFXUtils;
import javafx.scene.Group;
import javafx.scene.Scene;
import javafx.scene.image.ImageView;
import javafx.scene.image.WritableImage;
import javafx.stage.Stage;

import org.opencv.core.Core;
import org.opencv.core.Mat;
import org.opencv.core.MatOfRect;
import org.opencv.core.Point;
import org.opencv.core.Rect;
import org.opencv.core.Scalar;
import org.opencv.imgcodecs.Imgcodecs;
import org.opencv.imgproc.Imgproc;
import org.opencv.objdetect.CascadeClassifier;
import org.opencv.videoio.VideoCapture;

public class faceDetectionJavaFXX extends Application {
   Mat matrix = null;

   @Override
   public void start(Stage stage) throws FileNotFoundException, IOException {
      // Capturing the snapshot from the camera
      faceDetectionJavaFXX obj = new faceDetectionJavaFXX();
      WritableImage writableImage = obj.capureFrame();

      // Saving the image
      obj.saveImage();

      // Setting the image view
      ImageView imageView = new ImageView(writableImage);

      // setting the fit height and width of the image view
      imageView.setFitHeight(400);
      imageView.setFitWidth(600);

      // Setting the preserve ratio of the image view
      imageView.setPreserveRatio(true);

      // Creating a Group object
      Group root = new Group(imageView);

      // Creating a scene object
      Scene scene = new Scene(root, 600, 400);

      // Setting title to the Stage
      stage.setTitle("Capturing an image");

      // Adding scene to the stage
      stage.setScene(scene);

      // Displaying the contents of the stage
      stage.show();
   }
   public WritableImage capureFrame() {
      WritableImage writableImage = null;

      // Loading the OpenCV core library
      System.loadLibrary( Core.NATIVE_LIBRARY_NAME );

      // Instantiating the VideoCapture class (camera:: 0)
      VideoCapture capture = new VideoCapture(0);

      // Reading the next video frame from the camera
      Mat matrix = new Mat();
      capture.read(matrix);

      // If camera is opened
      if(!capture.isOpened()) {
         System.out.println("camera not detected");
      } else
         System.out.println("Camera detected ");

      // If there is next video frame
      if (capture.read(matrix)) {
         /////// Detecting the face in the snap /////
         String file = "E:/OpenCV/facedetect/lbpcascade_frontalface.xml";
         CascadeClassifier classifier = new CascadeClassifier(file);

         MatOfRect faceDetections = new MatOfRect();
         classifier.detectMultiScale(matrix, faceDetections);
         System.out.println(String.format("Detected %s faces",
            faceDetections.toArray().length));

         // Drawing boxes
         for (Rect rect : faceDetections.toArray()) {
            Imgproc.rectangle(
               matrix,                                   //where to draw the box
               new Point(rect.x, rect.y),                            //bottom left
               new Point(rect.x + rect.width, rect.y + rect.height), //top right
               new Scalar(0, 0, 255)                                 //RGB colour
            );
         }
         // Creating BuffredImage from the matrix
         BufferedImage image = new BufferedImage(matrix.width(), matrix.height(),
            BufferedImage.TYPE_3BYTE_BGR);

         WritableRaster raster = image.getRaster();
         DataBufferByte dataBuffer = (DataBufferByte) raster.getDataBuffer();
         byte[] data = dataBuffer.getData();
         matrix.get(0, 0, data);

         this.matrix = matrix;

         // Creating the Writable Image
         writableImage = SwingFXUtils.toFXImage(image, null);
      }
      return writableImage;
   }
   public void saveImage() {
      // Saving the Image
      String file = "E:/OpenCV/chap23/facedetected.jpg";

      // Instantiating the imagecodecs class
      Imgcodecs imageCodecs = new Imgcodecs();

      // Saving it again
      imageCodecs.imwrite(file, matrix);
   }
   public static void main(String args[]) {
      launch(args);
   }
}
輸出
執行程式後,您將獲得以下輸出。
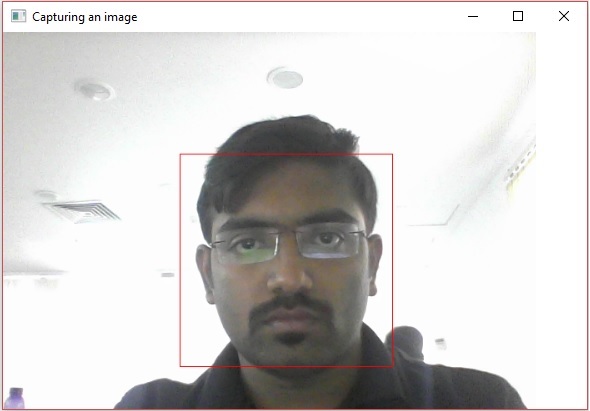
如果您開啟指定的路徑,您可以看到儲存為jpg影像的相同快照。
OpenCV - 仿射變換(平移)
您可以使用imgproc類的warpAffine()方法對影像執行仿射變換。以下是此方法的語法:
Imgproc.warpAffine(src, dst, tranformMatrix, size);
此方法接受以下引數 −
src − 一個Mat物件,代表此操作的源(輸入影像)。
dst − 一個Mat物件,代表此操作的目標(輸出影像)。
tranformMatrix − 一個Mat物件,表示變換矩陣。
size − 一個整型變數,表示輸出影像的大小。
示例
以下程式演示如何在給定影像上應用仿射操作。
import org.opencv.core.Core;
import org.opencv.core.Mat;
import org.opencv.core.MatOfPoint2f;
import org.opencv.core.Point;
import org.opencv.core.Size;
import org.opencv.imgcodecs.Imgcodecs;
import org.opencv.imgproc.Imgproc;

public class AffineTranslation {
   public static void main(String args[]) {
      // Loading the OpenCV core library
      System.loadLibrary( Core.NATIVE_LIBRARY_NAME );

      // Reading the Image from the file and storing it in to a Matrix object
      String file ="E:/OpenCV/chap24/transform_input.jpg";
      Mat src = Imgcodecs.imread(file);

      //Creating an empty matrix to store the result
      Mat dst = new Mat();

      Point p1 = new Point( 0,0 );
      Point p2 = new Point( src.cols() - 1, 0 );
      Point p3 = new Point( 0, src.rows() - 1 );
      Point p4 = new Point( src.cols()*0.0, src.rows()*0.33 );
      Point p5 = new Point( src.cols()*0.85, src.rows()*0.25 );
      Point p6 = new Point( src.cols()*0.15, src.rows()*0.7 );

      MatOfPoint2f ma1 = new MatOfPoint2f(p1,p2,p3);
      MatOfPoint2f ma2 = new MatOfPoint2f(p4,p5,p6);

      // Creating the transformation matrix
      Mat tranformMatrix = Imgproc.getAffineTransform(ma1,ma2);

      // Creating object of the class Size
      Size size = new Size(src.cols(), src.cols());

      // Applying Wrap Affine
      Imgproc.warpAffine(src, dst, tranformMatrix, size);

      // Writing the image
      Imgcodecs.imwrite("E:/OpenCV/chap24/Affinetranslate.jpg", dst);

      System.out.println("Image Processed");
   }
}
假設以上程式中指定的輸入影像為transform_input.jpg。

輸出
執行後,您將獲得以下輸出:
Image Processed
如果您開啟指定的路徑,您可以觀察到如下所示的輸出影像:

OpenCV - 旋轉
可以使用imgproc類的warpAffine()方法對影像進行旋轉操作。以下是此方法的語法:
Imgproc.warpAffine(src, dst, rotationMatrix, size);
此方法接受以下引數 −
src − 一個Mat物件,代表此操作的源(輸入影像)。
dst − 一個Mat物件,代表此操作的目標(輸出影像)。
rotationMatrix − 表示旋轉矩陣的Mat物件。
size − 一個整型變數,表示輸出影像的大小。
示例
下面的程式演示瞭如何旋轉影像。
import org.opencv.core.Core;
import org.opencv.core.Mat;
import org.opencv.core.Point;
import org.opencv.core.Size;

import org.opencv.imgcodecs.Imgcodecs;
import org.opencv.imgproc.Imgproc;

public class Rotation {
   public static void main(String args[]) {
      // Loading the OpenCV core library
      System.loadLibrary( Core.NATIVE_LIBRARY_NAME );

      // Reading the Image from the file and storing it in to a Matrix object
      String file ="E:/OpenCV/chap24/transform_input.jpg";
      Mat src = Imgcodecs.imread(file);

      // Creating an empty matrix to store the result
      Mat dst = new Mat();

      // Creating a Point object
      Point point = new Point(300, 200)

      // Creating the transformation matrix M
      Mat rotationMatrix = Imgproc.getRotationMatrix2D(point, 30, 1);

      // Creating the object of the class Size
      Size size = new Size(src.cols(), src.cols());

      // Rotating the given image
      Imgproc.warpAffine(src, dst, rotationMatrix, size);

      // Writing the image
      Imgcodecs.imwrite("E:/OpenCV/chap24/rotate_output.jpg", dst);

      System.out.println("Image Processed");
   }
}
假設以上程式中指定的輸入影像為transform_input.jpg。
輸出
執行程式後,您將獲得以下輸出:
Image Processed
如果您開啟指定的路徑,您可以觀察到如下所示的輸出影像:

OpenCV - 縮放
可以使用imgproc類的resize()方法對影像進行縮放。以下是此方法的語法。
resize(Mat src, Mat dst, Size dsize, double fx, double fy, int interpolation)
此方法接受以下引數 −
src − 一個Mat物件,代表此操作的源(輸入影像)。
dst − 一個Mat物件,代表此操作的目標(輸出影像)。
dsize − 表示輸出影像大小的Size物件。
fx − 一個double型別的變數,表示水平方向的縮放因子。
fy − 一個double型別的變數,表示垂直方向的縮放因子。
Interpolation − 一個整型變數,表示插值方法。
示例
下面的程式演示瞭如何將縮放變換應用於影像。
import org.opencv.core.Core;
import org.opencv.core.Mat;
import org.opencv.core.Size;

import org.opencv.imgcodecs.Imgcodecs;
import org.opencv.imgproc.Imgproc;

public class Scaling {
   public static void main(String args[]) {
      // Loading the OpenCV core library
      System.loadLibrary( Core.NATIVE_LIBRARY_NAME );

      // Reading the Image from the file and storing it in to a Matrix object
      String file ="E:/OpenCV/chap24/transform_input.jpg";
      Mat src = Imgcodecs.imread(file);

      // Creating an empty matrix to store the result
      Mat dst = new Mat();

      // Creating the Size object
      Size size = new Size(src.rows()*2, src.rows()*2);

      // Scaling the Image
      Imgproc.resize(src, dst, size, 0, 0, Imgproc.INTER_AREA);

      // Writing the image
      Imgcodecs.imwrite("E:/OpenCV/chap24/scale_output.jpg", dst);

      System.out.println("Image Processed");
   }
}
假設上面程式中指定的輸入影像為transform_input.jpg(大小:寬度300畫素,高度300畫素)。
輸出
執行程式後,您將獲得以下輸出:
Image Processed
如果開啟指定的路徑,您可以看到輸出影像如下所示(大小:寬度600畫素,高度600畫素):

OpenCV - 顏色對映
在OpenCV中,您可以使用Imgproc類的applyColorMap()方法將不同的顏色對映應用於影像。以下是此方法的語法:
applyColorMap(Mat src, Mat dst, int colormap)
它接受三個引數:
src − 一個Mat類物件,代表源(輸入)影像。
dst − 一個Mat類物件,代表目標(輸出)影像。
colormap − 一個整型變數,表示要應用的顏色對映型別。
示例
下面的程式演示瞭如何將顏色對映應用於影像。
import org.opencv.core.Core;
import org.opencv.core.Mat;

import org.opencv.imgcodecs.Imgcodecs;
import org.opencv.imgproc.Imgproc;

public class ColorMapTest {
   public static void main(String args[]) {
      // Loading the OpenCV core library
      System.loadLibrary(Core.NATIVE_LIBRARY_NAME);

      // Reading the Image from the file and storing it in to a Matrix object
      String file ="E:/OpenCV/chap25/color_input.jpg";
      Mat src = Imgcodecs.imread(file);

      // Creating an empty matrix to store the result
      Mat dst = new Mat();

      // Applying color map to an image
      Imgproc.applyColorMap(src, dst, Imgproc.COLORMAP_HOT);

      // Writing the image
      Imgcodecs.imwrite("E:/OpenCV/chap25/colormap_hot.jpg", dst);
      System.out.println("Image processed");
   }
}
假設上面程式中指定的輸入影像為color_input.jpg。
輸出
執行上述程式後,您將獲得以下輸出 −
Image Processed
如果您開啟指定的路徑,您可以觀察到如下所示的輸出影像:

更多操作
除了前面示例中演示的COLORMAP_HOT之外,OpenCV還提供了各種其他型別的顏色對映。所有這些型別都由Imgproc類的預定義靜態欄位(固定值)表示。
您可以透過將相應的預定義值傳遞給applyColorMap()方法的colormap引數來選擇所需的顏色對映型別。
Imgproc.applyColorMap(src, dst, Imgproc.COLORMAP_HOT);
以下是表示各種顏色對映型別及其相應輸出的值。
| 操作和描述 | 輸出 |
|---|---|
| COLORMAP_AUTUMN |  |
| COLORMAP_BONE |  |
| COLORMAP_COOL |  |
| COLORMAP_HOT |  |
| COLORMAP_HSV |  |
| COLORMAP_JET |  |
| COLORMAP_OCEAN |  |
| COLORMAP_PARULA |  |
| COLORMAP_PINK |  |
| COLORMAP_RAINBOW |  |
| COLORMAP_SPRING |  |
| COLORMAP_SUMMER |  |
| COLORMAP_WINTER |  |
OpenCV - Canny 邊緣檢測
Canny邊緣檢測用於檢測影像中的邊緣。它接受灰度影像作為輸入,並使用多階段演算法。
您可以使用imgproc類的Canny()方法對影像執行此操作,以下是此方法的語法。
Canny(image, edges, threshold1, threshold2)
此方法接受以下引數 −
image − 表示此操作的源(輸入影像)的Mat物件。
edges − 表示此操作的目標(邊緣)的Mat物件。
threshold1 − 一個double型別的變數,表示滯後過程的第一個閾值。
threshold2 − 一個double型別的變數,表示滯後過程的第二個閾值。
示例
下面的程式是一個示例,演示瞭如何在給定影像上執行Canny邊緣檢測操作。
import org.opencv.core.Core;
import org.opencv.core.Mat;

import org.opencv.imgcodecs.Imgcodecs;
import org.opencv.imgproc.Imgproc;

public class CannyEdgeDetection {
   public static void main(String args[]) throws Exception {
      // Loading the OpenCV core library
      System.loadLibrary(Core.NATIVE_LIBRARY_NAME);

      // Reading the Image from the file and storing it in to a Matrix object
      String file = "E:/OpenCV/chap17/canny_input.jpg";

      // Reading the image
      Mat src = Imgcodecs.imread(file);

      // Creating an empty matrix to store the result
      Mat gray = new Mat();

      // Converting the image from color to Gray
      Imgproc.cvtColor(src, gray, Imgproc.COLOR_BGR2GRAY);
      Mat edges = new Mat();

      // Detecting the edges
      Imgproc.Canny(gray, edges, 60, 60*3);

      // Writing the image
      Imgcodecs.imwrite("E:/OpenCV/chap17/canny_output.jpg", edges);
      System.out.println("Image Loaded");
   }
}
假設上面程式中指定的輸入影像為canny_input.jpg。

輸出
執行上述程式後,您將獲得以下輸出 −
Image Processed
如果您開啟指定的路徑,您可以觀察到如下所示的輸出影像:
OpenCV - Hough 線變換
您可以透過使用Imgproc類的HoughLines()方法應用霍夫變換技術來檢測給定影像的形狀。以下是此方法的語法。
HoughLines(image, lines, rho, theta, threshold)
此方法接受以下引數 −
image − 表示源(輸入)影像的Mat類物件。
lines − 一個儲存儲存線的引數 (r, Φ) 的向量的Mat類物件。
rho − 一個double型別的變數,表示引數r的解析度(以畫素為單位)。
theta − 一個double型別的變數,表示引數Φ的解析度(以弧度為單位)。
threshold − 一個整型變數,表示檢測一條線的最小交叉點數量。
示例
下面的程式演示瞭如何在給定影像中檢測霍夫線。
import org.opencv.core.Core;
import org.opencv.core.Mat;
import org.opencv.core.Point;
import org.opencv.core.Scalar;

import org.opencv.imgcodecs.Imgcodecs;
import org.opencv.imgproc.Imgproc;

public class HoughlinesTest {
   public static void main(String args[]) throws Exception {
      // Loading the OpenCV core library
      System.loadLibrary( Core.NATIVE_LIBRARY_NAME );

      // Reading the Image from the file and storing it in to a Matrix object
      String file = "E:/OpenCV/chap21/hough_input.jpg";

      // Reading the image
      Mat src = Imgcodecs.imread(file,0);

      // Detecting edges of it
      Mat canny = new Mat();
      Imgproc.Canny(src, canny, 50, 200, 3, false);

      // Changing the color of the canny
      Mat cannyColor = new Mat();
      Imgproc.cvtColor(canny, cannyColor, Imgproc.COLOR_GRAY2BGR);

      // Detecting the hough lines from (canny)
      Mat lines = new Mat();
      Imgproc.HoughLines(canny, lines, 1, Math.PI/180, 100);

      System.out.println(lines.rows());
      System.out.println(lines.cols());

      // Drawing lines on the image
      double[] data;
      double rho, theta;
      Point pt1 = new Point();
      Point pt2 = new Point();
      double a, b;
      double x0, y0;

      for (int i = 0; i < lines.cols(); i++) {
         data = lines.get(0, i);
         rho = data[0];
         theta = data[1];

         a = Math.cos(theta);
         b = Math.sin(theta);
         x0 = a*rho;
         y0 = b*rho;

         pt1.x = Math.round(x0 + 1000*(-b));
         pt1.y = Math.round(y0 + 1000*(a));
         pt2.x = Math.round(x0 - 1000*(-b));
         pt2.y = Math.round(y0 - 1000 *(a));
         Imgproc.line(cannyColor, pt1, pt2, new Scalar(0, 0, 255), 6);
      }
      // Writing the image
      Imgcodecs.imwrite("E:/OpenCV/chap21/hough_output.jpg", cannyColor);

      System.out.println("Image Processed");
   }
}
假設上面程式中指定的輸入影像為hough_input.jpg。
輸出
執行程式後,您將獲得以下輸出:
143
1
Image Processed
如果您開啟指定的路徑,您可以觀察到如下所示的輸出影像:

OpenCV - 直方圖均衡化
影像的直方圖顯示了畫素強度值的頻率。在影像直方圖中,X軸顯示灰度強度,Y軸顯示這些強度的頻率。
直方圖均衡化提高了影像的對比度,以擴充套件強度範圍。您可以使用Imgproc類的equalizeHist()方法均衡給定影像的直方圖。以下是此方法的語法。
equalizeHist(src, dst)
此方法接受以下引數 −
src − 一個Mat類物件,代表源(輸入)影像。
dst − 表示輸出的Mat類物件。(均衡直方圖後獲得的影像)
示例
下面的程式演示瞭如何均衡給定影像的直方圖。
import java.util.ArrayList;
import java.util.List;

import org.opencv.core.Core;
import org.opencv.core.Mat;
import org.opencv.core.Size;
import org.opencv.imgcodecs.Imgcodecs;
import org.opencv.imgproc.Imgproc;

public class HistoTest {
   public static void main (String[] args) {
      // Loading the OpenCV core library
      System.loadLibrary( Core.NATIVE_LIBRARY_NAME );

      // Reading the Image from the file and storing it in to a Matrix object
      String file ="E:/OpenCV/chap20/histo_input.jpg";

      // Load the image
      Mat img = Imgcodecs.imread(file);

      // Creating an empty matrix
      Mat equ = new Mat();
      img.copyTo(equ);

      // Applying blur
      Imgproc.blur(equ, equ, new Size(3, 3));

      // Applying color
      Imgproc.cvtColor(equ, equ, Imgproc.COLOR_BGR2YCrCb);
      List<Mat> channels = new ArrayList<Mat>();

      // Splitting the channels
      Core.split(equ, channels);

      // Equalizing the histogram of the image
      Imgproc.equalizeHist(channels.get(0), channels.get(0));
      Core.merge(channels, equ);
      Imgproc.cvtColor(equ, equ, Imgproc.COLOR_YCrCb2BGR);

      Mat gray = new Mat();
      Imgproc.cvtColor(equ, gray, Imgproc.COLOR_BGR2GRAY);
      Mat grayOrig = new Mat();
      Imgproc.cvtColor(img, grayOrig, Imgproc.COLOR_BGR2GRAY);

      Imgcodecs.imwrite("E:/OpenCV/chap20/histo_output.jpg", equ);
      System.out.println("Image Processed");
   }
}
假設上面程式中指定的輸入影像為histo_input.jpg。

輸出
執行程式後,您將獲得以下輸出:
Image Processed
如果您開啟指定的路徑,您可以觀察到如下所示的輸出影像: