- MVVM 教程
- MVVM - 首頁
- MVVM – 簡介
- MVVM - 優勢
- MVVM - 職責
- MVVM - 第一個應用程式
- MVVM - 連線檢視
- MVVM - 連線檢視模型
- MVVM - WPF 資料繫結
- MVVM - WPF 資料模板
- MVVM - 檢視模型通訊
- MVVM - 層次結構與導航
- MVVM - 驗證
- MVVM - 依賴注入
- MVVM - 事件
- MVVM - 單元測試
- MVVM - 框架
- MVVM - 面試問題
- MVVM 有用資源
- MVVM - 快速指南
- MVVM - 有用資源
- MVVM - 討論
MVVM – 檢視/檢視模型通訊
本章將學習如何在 MVVM 應用程式中新增互動性以及如何幹淨地呼叫邏輯。您還將看到所有這些都是透過保持鬆散耦合和良好的結構來完成的,而這正是 MVVM 模式的核心。為了理解所有這些,首先讓我們瞭解命令。
透過命令進行檢視/檢視模型通訊
命令模式已被充分記錄,並且幾十年來經常使用設計模式。在這個模式中,有兩個主要參與者,呼叫者和接收者。
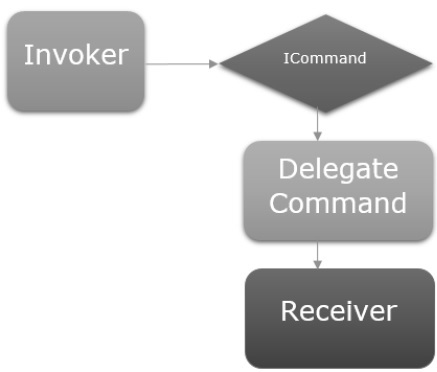
呼叫者
呼叫者是一段可以執行某些命令式邏輯的程式碼。
通常,它是在 UI 框架上下文中使用者互動的 UI 元素。
它也可能只是應用程式其他地方的另一段邏輯程式碼。
接收者
接收者是在呼叫者觸發時要執行的邏輯。
在 MVVM 的上下文中,接收者通常是您需要呼叫的檢視模型中的方法。
在這兩者之間,您有一個阻斷層,這意味著呼叫者和接收者不必顯式地瞭解彼此。這通常表示為公開給呼叫者的介面抽象,並且該介面的具體實現能夠呼叫接收者。
讓我們來看一個簡單的例子,您將在其中學習命令以及如何使用它們在檢視和檢視模型之間進行通訊。在本章中,我們將繼續使用上一章中的相同示例。
在 StudentView.xaml 檔案中,我們有一個 ListBox,它連線了來自檢視模型的學生資料。現在讓我們新增一個按鈕來從 ListBox 中刪除學生。
重要的是,在按鈕上使用命令非常容易,因為它們具有一個命令屬性可以連線到 ICommand。
因此,我們可以在檢視模型上公開一個具有 ICommand 的屬性,並從按鈕的命令屬性繫結到它,如下面的程式碼所示。
<Button Content = "Delete"
   Command = "{Binding DeleteCommand}"
   HorizontalAlignment = "Left"
   VerticalAlignment = "Top"
   Width = "75" />
讓我們在您的專案中新增一個新類,它將實現 ICommand 介面。以下是 ICommand 介面的實現。
using System;
using System.Windows.Input;

namespace MVVMDemo {

   public class MyICommand : ICommand {
      Action _TargetExecuteMethod;
      Func<bool> _TargetCanExecuteMethod;

      public MyICommand(Action executeMethod) {
         _TargetExecuteMethod = executeMethod;
      }

      public MyICommand(Action executeMethod, Func<bool> canExecuteMethod){
         _TargetExecuteMethod = executeMethod;
         _TargetCanExecuteMethod = canExecuteMethod;
      }

      public void RaiseCanExecuteChanged() {
         CanExecuteChanged(this, EventArgs.Empty);
      }

      bool ICommand.CanExecute(object parameter) {

         if (_TargetCanExecuteMethod != null) {
            return _TargetCanExecuteMethod();
         }

         if (_TargetExecuteMethod != null) {
            return true;
         }

         return false;
      }

      // Beware - should use weak references if command instance lifetime
         is longer than lifetime of UI objects that get hooked up to command

      // Prism commands solve this in their implementation
      public event EventHandler CanExecuteChanged = delegate { };

      void ICommand.Execute(object parameter) {
         if (_TargetExecuteMethod != null) {
            _TargetExecuteMethod();
         }
      }
   }
}
如您所見,這是 ICommand 的一個簡單的委託實現,我們有兩個委託,一個用於 executeMethod,一個用於 canExecuteMethod,可以在構造時傳入。
在上述實現中,有兩個過載的建構函式,一個僅用於 executeMethod,一個用於 executeMethod 和 canExecuteMethod。
讓我們在 StudentView Model 類中新增一個 MyICommand 型別的屬性。現在我們需要在 StudentViewModel 中構造一個例項。我們將使用 MyICommand 的過載建構函式,該建構函式需要兩個引數。
public MyICommand DeleteCommand { get; set;}

public StudentViewModel() {
   LoadStudents();
   DeleteCommand = new MyICommand(OnDelete, CanDelete);
}
現在新增 OnDelete 和 CanDelete 方法的實現。
private void OnDelete() {
   Students.Remove(SelectedStudent);
}

private bool CanDelete() {
   return SelectedStudent != null;
}
我們還需要新增一個新的 SelectedStudent,以便使用者可以從 ListBox 中刪除選定的專案。
private Student _selectedStudent;

public Student SelectedStudent {
   get {
      return _selectedStudent;
   }

   set {
      _selectedStudent = value;
      DeleteCommand.RaiseCanExecuteChanged();
   }
}
以下是檢視模型類的完整實現。
using MVVMDemo.Model;

using System.Collections.ObjectModel;
using System.Windows.Input;
using System;

namespace MVVMDemo.ViewModel {

   public class StudentViewModel {

      public MyICommand DeleteCommand { get; set;}

      public StudentViewModel() {
         LoadStudents();
         DeleteCommand = new MyICommand(OnDelete, CanDelete);
      }

      public ObservableCollection<Student> Students {
         get;
         set;
      }

      public void LoadStudents() {
         ObservableCollection<Student> students = new ObservableCollection<Student>();

         students.Add(new Student { FirstName = "Mark", LastName = "Allain" });
         students.Add(new Student { FirstName = "Allen", LastName = "Brown" });
         students.Add(new Student { FirstName = "Linda", LastName = "Hamerski" });

         Students = students;
      }

      private Student _selectedStudent;

      public Student SelectedStudent {
         get {
            return _selectedStudent;
         }

         set {
            _selectedStudent = value;
            DeleteCommand.RaiseCanExecuteChanged();
         }
      }

      private void OnDelete() {
         Students.Remove(SelectedStudent);
      }

      private bool CanDelete() {
         return SelectedStudent != null;
      }
   }
}
在 StudentView.xaml 中,我們需要在 ListBox 中新增 SelectedItem 屬性,該屬性將繫結到 SelectStudent 屬性。
<ListBox ItemsSource = "{Binding Students}" SelectedItem = "{Binding SelectedStudent}"/>
以下是完整的 xaml 檔案。
<UserControl x:Class = "MVVMDemo.Views.StudentView"
   xmlns = "http://schemas.microsoft.com/winfx/2006/xaml/presentation"
   xmlns:x = "http://schemas.microsoft.com/winfx/2006/xaml"
   xmlns:mc = "http://schemas.openxmlformats.org/markup-compatibility/2006"
   xmlns:d = "http://schemas.microsoft.com/expression/blend/2008"
   xmlns:local = "clr-namespace:MVVMDemo.Views"
   xmlns:viewModel = "clr-namespace:MVVMDemo.ViewModel"
   xmlns:data = "clr-namespace:MVVMDemo.Model"
   xmlns:vml = "clr-namespace:MVVMDemo.VML"
   vml:ViewModelLocator.AutoHookedUpViewModel = "True"
   mc:Ignorable = "d"
   d:DesignHeight = "300" d:DesignWidth = "300">

   <UserControl.Resources>
      <DataTemplate DataType = "{x:Type data:Student}">

         <StackPanel Orientation = "Horizontal">

            <TextBox Text = "{Binding Path = FirstName, Mode = TwoWay}"
               Width = "100" Margin = "3 5 3 5"/>

            <TextBox Text = "{Binding Path = LastName, Mode = TwoWay}"
               Width = "100" Margin = "0 5 3 5"/>

            <TextBlock Text = "{Binding Path = FullName, Mode = OneWay}"
               Margin = "0 5 3 5"/>

         </StackPanel>

      </DataTemplate>
   </UserControl.Resources>

   <Grid>
      <StackPanel Orientation = "Horizontal">
         <ListBox ItemsSource = "{Binding Students}"
            SelectedItem = "{Binding SelectedStudent}"/>

         <Button Content = "Delete"
            Command = "{Binding DeleteCommand}"
            HorizontalAlignment = "Left"
            VerticalAlignment = "Top"
            Width = "75" />
      </StackPanel>
   </Grid>

</UserControl>
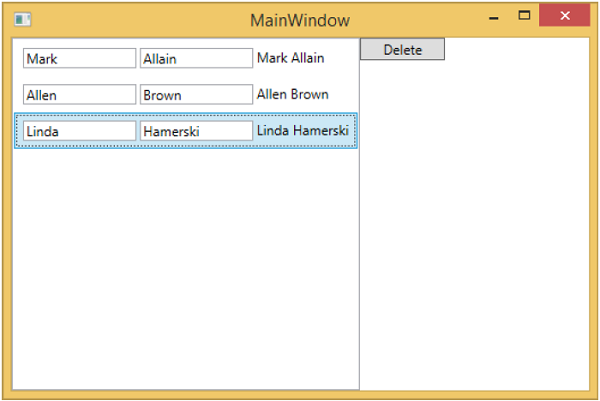
編譯並執行上述程式碼後,您將看到以下視窗。

您可以看到刪除按鈕處於停用狀態。當您選擇任何專案時,它將被啟用。
當您選擇任何專案並按下刪除鍵時。您將看到選定的專案列表被刪除,並且刪除按鈕再次被停用。
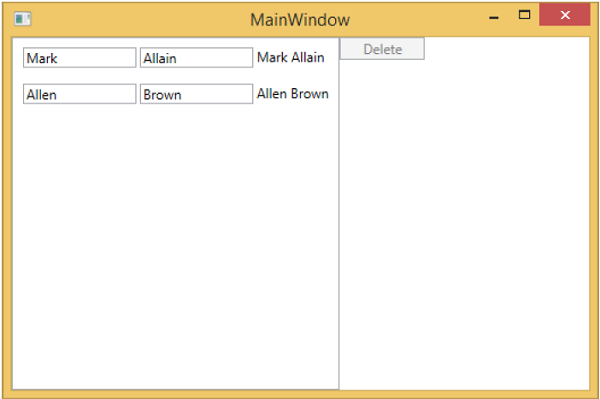
我們建議您逐步執行上述示例以更好地理解。