- MVVM 教程
- MVVM - 首頁
- MVVM – 簡介
- MVVM - 優勢
- MVVM - 職責
- MVVM - 第一個應用程式
- MVVM - 連線檢視
- MVVM - 連線 ViewModel
- MVVM - WPF 資料繫結
- MVVM - WPF 資料模板
- MVVM - ViewModel 通訊
- MVVM – 層次結構與導航
- MVVM - 驗證
- MVVM - 依賴注入
- MVVM - 事件
- MVVM - 單元測試
- MVVM - 框架
- MVVM - 面試問題
- MVVM 有用資源
- MVVM - 快速指南
- MVVM - 有用資源
- MVVM - 討論
MVVM – 層次結構與導航
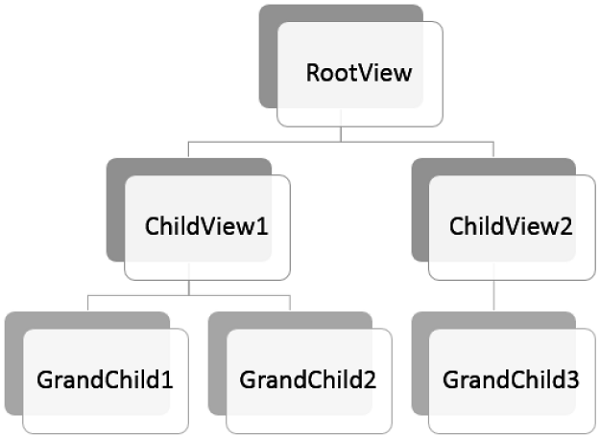
構建 MVVM 應用程式時,通常會將複雜的資訊螢幕分解成一組父檢視和子檢視,其中子檢視包含在面板或容器控制元件中的父檢視內,並形成自身使用的層次結構。
分解複雜的檢視後,並不意味著您分離到其自身 XAML 檔案中的每個子內容部分都需要成為 MVVM 檢視。
內容塊僅提供渲染內容到螢幕的結構,並且不支援使用者對該內容的任何輸入或操作。
它可能不需要單獨的 ViewModel,而可能只是一個基於父 ViewModel 公開屬性進行渲染的 XAML 塊。
最後,如果您具有檢視和 ViewModel 的層次結構,則父 ViewModel 可以成為通訊中心,以便每個子 ViewModel 儘可能地與其他子 ViewModel 及其父級分離。
讓我們來看一個定義不同檢視之間簡單層次結構的示例。建立一個新的 WPF 應用程式專案 MVVMHierarchiesDemo

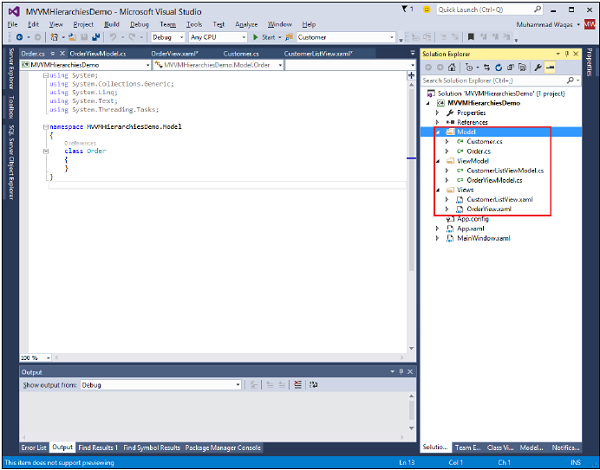
步驟 1 − 將三個資料夾(Model、ViewModel 和 Views)新增到您的專案中。

步驟 2 − 在 Model 資料夾中新增 Customer 和 Order 類,在 Views 資料夾中新增 CustomerListView 和 OrderView,在 ViewModel 資料夾中新增 CustomerListViewModel 和 OrderViewModel,如下面的影像所示。
步驟 3 − 在 CustomerListView 和 OrderView 中新增文字塊。以下是 CustomerListView.xaml 檔案。
<UserControl x:Class="MVVMHierarchiesDemo.Views.CustomerListView"
   xmlns = "http://schemas.microsoft.com/winfx/2006/xaml/presentation"
   xmlns:x = "http://schemas.microsoft.com/winfx/2006/xaml"
   xmlns:mc = "http://schemas.openxmlformats.org/markup-compatibility/2006"
   xmlns:d = "http://schemas.microsoft.com/expression/blend/2008"
   xmlns:local = "clr-namespace:MVVMHierarchiesDemo.Views"
   mc:Ignorable = "d"
   d:DesignHeight = "300" d:DesignWidth = "300">

   <Grid>
      <TextBlock Text = "Customer List View"/>
   </Grid>

</UserControl>
以下是 OrderView.xaml 檔案。
<UserControl x:Class = "MVVMHierarchiesDemo.Views.OrderView"
   xmlns = "http://schemas.microsoft.com/winfx/2006/xaml/presentation"
   xmlns:x ="http://schemas.microsoft.com/winfx/2006/xaml"
   xmlns:mc ="http://schemas.openxmlformats.org/markup-compatibility/2006"
   xmlns:d ="http://schemas.microsoft.com/expression/blend/2008"
   xmlns:local = "clr-namespace:MVVMHierarchiesDemo.Views" mc:Ignorable = "d"
   d:DesignHeight = "300" d:DesignWidth = "300">

   <Grid>
      <TextBlock Text = "Order View"/>
   </Grid>

</UserControl>
現在我們需要一些東西來託管這些檢視,在我們的 MainWindow 中這是一個好地方,因為它是一個簡單的應用程式。我們需要一個容器控制元件,我們可以放置我們的檢視並在導航方式中切換它們。為此,我們需要在我們的 MainWindow.xaml 檔案中新增 ContentControl,我們將使用它的 content 屬性並將其繫結到 ViewModel 引用。
現在在資源字典中為每個檢視定義資料模板。以下是 MainWindow.xaml 檔案。請注意每個資料模板如何將資料型別(ViewModel 型別)對映到相應的 View。
<Window x:Class = "MVVMHierarchiesDemo.MainWindow"
   xmlns = "http://schemas.microsoft.com/winfx/2006/xaml/presentation"
   xmlns:x = "http://schemas.microsoft.com/winfx/2006/xaml"
   xmlns:d = "http://schemas.microsoft.com/expression/blend/2008"
   xmlns:mc = "http://schemas.openxmlformats.org/markup-compatibility/2006"
   xmlns:local = "clr-namespace:MVVMHierarchiesDemo"
   xmlns:views = "clr-namespace:MVVMHierarchiesDemo.Views"
   xmlns:viewModels = "clr-namespace:MVVMHierarchiesDemo.ViewModel"
   mc:Ignorable = "d"
   Title = "MainWindow" Height = "350" Width = "525">

   <Window.DataContext>
      <local:MainWindowViewModel/>
   </Window.DataContext>

   <Window.Resources>
      <DataTemplate DataType = "{x:Type viewModels:CustomerListViewModel}">
         <views:CustomerListView/>
      </DataTemplate>

      <DataTemplate DataType = "{x:Type viewModels:OrderViewModel}">
         <views:OrderView/>
      </DataTemplate>
   </Window.Resources>

   <Grid>
      <ContentControl Content = "{Binding CurrentView}"/>
   </Grid>

</Window>
每當當前檢視模型設定為 CustomerListViewModel 的例項時,它將呈現一個 CustomerListView,其中 ViewModel 已連線。它是一個訂單 ViewModel,它將呈現 OrderView 等等。
我們現在需要一個 ViewModel,它具有 CurrentViewModel 屬性以及一些邏輯和命令,以便能夠切換屬性內部的 ViewModel 的當前引用。
讓我們為此 MainWindow 建立一個名為 MainWindowViewModel 的 ViewModel。我們可以從 XAML 建立 ViewModel 的例項並使用它來設定視窗的 DataContext 屬性。為此,我們需要建立一個基類來封裝我們 ViewModel 的 INotifyPropertyChanged 實現。
此類的主要思想是封裝 INotifyPropertyChanged 實現並向派生類提供幫助器方法,以便它們可以輕鬆觸發適當的通知。以下是 BindableBase 類的實現。
using System;
using System.Collections.Generic;
using System.ComponentModel;
using System.Linq;
using System.Runtime.CompilerServices;
using System.Text;
using System.Threading.Tasks;

namespace MVVMHierarchiesDemo {

   class BindableBase : INotifyPropertyChanged {

      protected virtual void SetProperty<T>(ref T member, T val,
         [CallerMemberName] string propertyName = null) {
            if (object.Equals(member, val)) return;

            member = val;
            PropertyChanged(this, new PropertyChangedEventArgs(propertyName));
      }

      protected virtual void OnPropertyChanged(string propertyName) {
         PropertyChanged(this, new PropertyChangedEventArgs(propertyName));
      }

      public event PropertyChangedEventHandler PropertyChanged = delegate { };
   }
}
現在是時候使用我們的 CurrentViewModel 屬性開始進行一些檢視切換了。我們只需要某種方式來驅動此屬性的設定。我們將使其成為終端使用者可以命令轉到客戶列表或訂單檢視。首先在您的專案中新增一個新類,該類將實現 ICommand 介面。以下是 ICommand 介面的實現。
using System;
using System.Windows.Input;

namespace MVVMHierarchiesDemo {

   public class MyICommand<T> : ICommand {

      Action<T> _TargetExecuteMethod;
      Func<T, bool> _TargetCanExecuteMethod;

      public MyICommand(Action<T> executeMethod) {
         _TargetExecuteMethod = executeMethod;
      }

      public MyICommand(Action<T> executeMethod, Func<T, bool> canExecuteMethod) {
         _TargetExecuteMethod = executeMethod;
         _TargetCanExecuteMethod = canExecuteMethod;
      }

      public void RaiseCanExecuteChanged() {
         CanExecuteChanged(this, EventArgs.Empty);
      }

      #region ICommand Members

      bool ICommand.CanExecute(object parameter) {

         if (_TargetCanExecuteMethod != null) {
            T tparm = (T)parameter;
            return _TargetCanExecuteMethod(tparm);
         }

         if (_TargetExecuteMethod != null) {
            return true;
         }

         return false;
      }

      // Beware - should use weak references if command instance lifetime is
         longer than lifetime of UI objects that get hooked up to command

      // Prism commands solve this in their implementation

      public event EventHandler CanExecuteChanged = delegate { };

      void ICommand.Execute(object parameter) {
         if (_TargetExecuteMethod != null) {
            _TargetExecuteMethod((T)parameter);
         }
      }

      #endregion
   }
}
現在我們需要為這些 ViewModel 設定一些頂級導航,並且切換的邏輯應該屬於 MainWindowViewModel 內部。為此,我們將使用一個名為 on navigate 的方法,該方法接受一個字串目標並返回 CurrentViewModel 屬性。
private void OnNav(string destination) {

   switch (destination) {
      case "orders":
         CurrentViewModel = orderViewModelModel;
      break;
      case "customers":
      default:
         CurrentViewModel = custListViewModel;
      break;
   }
}
為了導航這些不同的檢視,我們需要在我們的 MainWindow.xaml 檔案中新增兩個按鈕。以下是完整的 XAML 檔案實現。
<Window x:Class = "MVVMHierarchiesDemo.MainWindow"
   xmlns = "http://schemas.microsoft.com/winfx/2006/xaml/presentation"
   xmlns:x = "http://schemas.microsoft.com/winfx/2006/xaml"
   xmlns:d = "http://schemas.microsoft.com/expression/blend/2008"
   xmlns:mc = "http://schemas.openxmlformats.org/markup-compatibility/2006"
   xmlns:local = "clr-namespace:MVVMHierarchiesDemo"
   xmlns:views = "clr-namespace:MVVMHierarchiesDemo.Views"
   xmlns:viewModels = "clr-namespace:MVVMHierarchiesDemo.ViewModel"
   mc:Ignorable = "d"
   Title = "MainWindow" Height = "350" Width = "525">

   <Window.DataContext>
      <local:MainWindowViewModel/>
   </Window.DataContext>

   <Window.Resources>
      <DataTemplate DataType = "{x:Type viewModels:CustomerListViewModel}">
         <views:CustomerListView/>
      </DataTemplate>

      <DataTemplate DataType = "{x:Type viewModels:OrderViewModel}">
         <views:OrderView/>
      </DataTemplate>
   </Window.Resources>

   <Grid>
      <Grid.RowDefinitions>
         <RowDefinition Height = "Auto" />
         <RowDefinition Height = "*" />
      </Grid.RowDefinitions>

      <Grid x:Name = "NavBar">
         <Grid.ColumnDefinitions>
            <ColumnDefinition Width = "*" />
            <ColumnDefinition Width = "*" />
            <ColumnDefinition Width = "*" />
         </Grid.ColumnDefinitions>

         <Button Content = "Customers"
            Command = "{Binding NavCommand}"
            CommandParameter = "customers"
            Grid.Column = "0" />

         <Button Content = "Order"
            Command = "{Binding NavCommand}"
            CommandParameter = "orders"
            Grid.Column = "2" />
      </Grid>

      <Grid x:Name = "MainContent" Grid.Row = "1">
         <ContentControl Content = "{Binding CurrentViewModel}" />
      </Grid>

   </Grid>

</Window>
以下是完整的 MainWindowViewModel 實現。
using MVVMHierarchiesDemo.ViewModel;
using MVVMHierarchiesDemo.Views;

using System;
using System.Collections.Generic;
using System.Linq;
using System.Text;
using System.Threading.Tasks;

namespace MVVMHierarchiesDemo {

   class MainWindowViewModel : BindableBase {

      public MainWindowViewModel() {
         NavCommand = new MyICommand<string>(OnNav);
      }

      private CustomerListViewModel custListViewModel = new CustomerListViewModel();

      private OrderViewModel orderViewModelModel = new OrderViewModel();

      private BindableBase _CurrentViewModel;

      public BindableBase CurrentViewModel {
         get {return _CurrentViewModel;}
         set {SetProperty(ref _CurrentViewModel, value);}
      }

      public MyICommand<string> NavCommand { get; private set; }

      private void OnNav(string destination) {

         switch (destination) {
            case "orders":
               CurrentViewModel = orderViewModelModel;
               break;
            case "customers":
            default:
               CurrentViewModel = custListViewModel;
               break;
         }
      }
   }
}
從 BindableBase 類派生所有 ViewModel。當上述程式碼編譯並執行時,您將看到以下輸出。
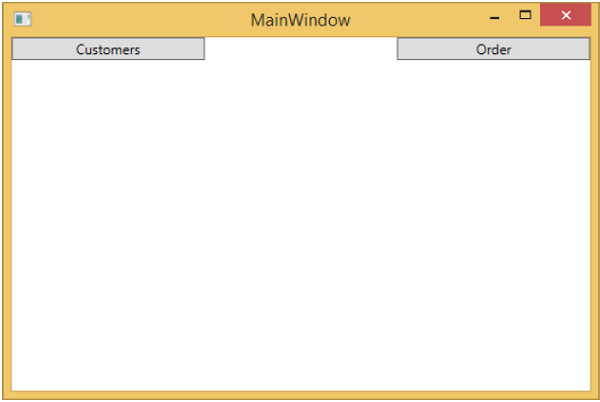
如您所見,我們只在 MainWindow 上添加了兩個按鈕和一個 CurrentViewModel。如果單擊任何按鈕,它將導航到該特定檢視。讓我們單擊“客戶”按鈕,您將看到 CustomerListView 顯示出來。
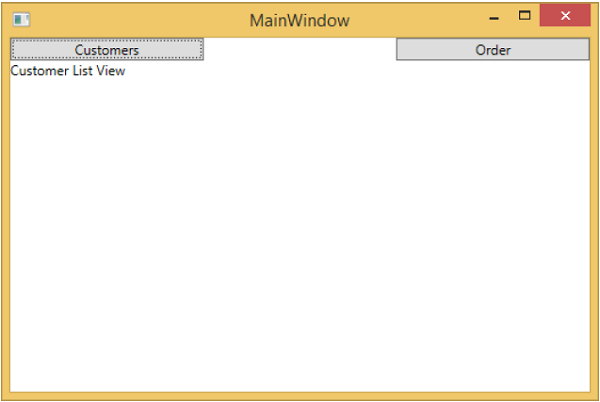
我們建議您逐步執行上述示例以更好地理解。