- MVVM 教程
- MVVM - 首頁
- MVVM – 簡介
- MVVM - 優點
- MVVM - 職責
- MVVM - 第一個應用
- MVVM - 關聯檢視
- MVVM - 關聯ViewModel
- MVVM - WPF 資料繫結
- MVVM - WPF 資料模板
- MVVM - ViewModel 通訊
- MVVM - 層次結構與導航
- MVVM - 驗證
- MVVM - 依賴注入
- MVVM - 事件
- MVVM - 單元測試
- MVVM - 框架
- MVVM - 面試問題
- MVVM 有用資源
- MVVM 快速指南
- MVVM - 有用資源
- MVVM - 討論
MVVM 快速指南
MVVM – 簡介
組織程式碼井然有序且可能最可重用的方法是使用“MVVM”模式。模型、檢視、ViewModel(MVVM 模式)旨在指導您如何組織和構建程式碼,以編寫可維護、可測試和可擴充套件的應用程式。
模型 - 它只儲存資料,與任何業務邏輯無關。
ViewModel - 它充當模型和檢視之間的連結/連線,並使事物看起來更漂亮。
檢視 - 它只儲存格式化資料,並基本上將所有內容委託給模型。

分離的表示層
為了避免將應用程式邏輯放在程式碼隱藏或 XAML 中所導致的問題,最好使用一種稱為分離表示層的技術。我們試圖避免這種情況,在這種情況下,我們將擁有 XAML 和程式碼隱藏,其中包含與使用者介面物件直接互動所需的最少內容。使用者介面類還包含用於複雜互動行為、應用程式邏輯和其他所有內容的程式碼,如下面的左側圖所示。

使用分離的表示層,使用者介面類會簡單得多。它當然有 XAML,但程式碼隱藏儘可能少。
應用程式邏輯屬於一個單獨的類,通常稱為模型。
然而,這並不是全部。如果您止步於此,您很可能會重複一個非常常見的錯誤,這將導致您走上資料繫結瘋狂的道路。
許多開發人員嘗試使用資料繫結將 XAML 中的元素直接連線到模型中的屬性。
有時這可以,但通常不行。問題在於模型完全關注應用程式的功能,而不是使用者如何與應用程式互動。
呈現資料的方式通常與資料在內部的結構方式有所不同。
此外,大多數使用者介面都具有一些不屬於應用程式模型的狀態。
例如,如果您的使用者介面使用拖放,則某些內容需要跟蹤諸如當前拖動項的位置、其外觀在移過可能的放置目標時應如何變化以及這些放置目標在拖動該項時如何變化等方面。
這種狀態可能會變得非常複雜,需要進行徹底的測試。
在實踐中,您通常希望在使用者介面和模型之間放置另一個類。這有兩個重要作用。
首先,它將您的應用程式模型適配到特定的使用者介面檢視。
其次,它是任何重要的互動邏輯所在之處,我的意思是讓您的使用者介面按您想要的方式執行所需的程式碼。
MVVM – 優點
MVVM 模式最終是 MVC 模式的現代結構,因此主要目標仍然相同,即在領域邏輯和表示層之間提供清晰的分離。以下是 MVVM 模式的優缺點。
主要好處是允許在檢視和模型之間實現真正的分離,超越實現分離以及從擁有這種分離所獲得的效率。在實際意義上,這意味著當您的模型需要更改時,它可以輕鬆更改,而無需更改檢視,反之亦然。
應用 MVVM 會產生三個重要的關鍵要素,如下所示。
可維護性
不同型別程式碼的清晰分離應該使您更容易進入一個或多個更細粒度和更集中的部分進行更改,而無需擔心。
這意味著您可以保持敏捷並快速釋出新版本。
可測試性
使用 MVVM,每個程式碼部分都更細粒度,如果實現正確,您的外部和內部依賴項將與您想要測試的核心邏輯部分的程式碼分離。
這使得針對核心邏輯編寫單元測試容易得多。
確保在編寫時正確執行,即使在維護時發生更改也能保持執行。
可擴充套件性
由於清晰的分離邊界和更細粒度的程式碼部分,它有時與可維護性重疊。
您更有可能使這些部分中的任何部分更可重用。
它還具有替換或新增執行類似操作的新程式碼部分到架構中正確位置的能力。
MVVM 模式的明顯目的是抽象檢視,從而減少程式碼隱藏中的業務邏輯量。但是,以下是一些其他的優點:
- ViewModel 比程式碼隱藏或事件驅動的程式碼更容易進行單元測試。
- 您可以無需笨拙的 UI 自動化和互動即可對其進行測試。
- 表示層和邏輯是鬆散耦合的。
缺點
- 有些人認為對於簡單的 UI,MVVM 可能過於複雜。
- 同樣,在更大的情況下,設計 ViewModel 可能很困難。
- 當我們有複雜的資料繫結時,除錯會比較困難。
MVVM – 職責
MVVM 模式由三個部分組成:模型、檢視和 ViewModel。大多數開發人員一開始對模型、檢視和 ViewModel 應該包含什麼或不應該包含什麼以及每個部分的職責是什麼感到有些困惑。
在本章中,我們將學習 MVVM 模式每個部分的職責,以便您可以清楚地理解哪種程式碼放在哪裡。MVVM 實際上是客戶端的分層架構,如下圖所示。
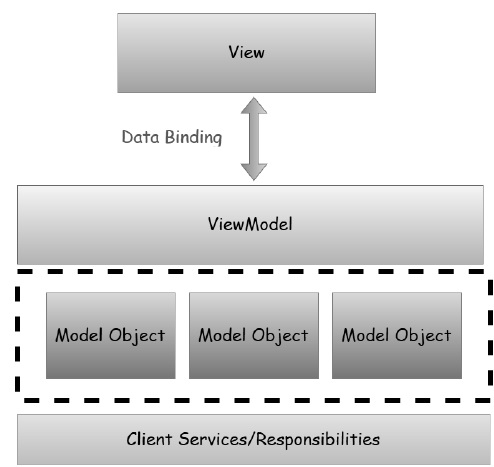
表示層由檢視組成。
邏輯層是檢視模型。
表示層是模型物件的組合。
產生和持久化它們的客戶端服務,在兩層應用程式中直接訪問,或者在然後到您的應用程式的服務呼叫中訪問。
客戶端服務並非 MVVM 模式的正式組成部分,但它經常與 MVVM 一起使用以實現進一步的分離並避免重複程式碼。
模型職責
通常,模型是最容易理解的。它是支援應用程式中檢視的客戶端資料模型。
它由具有屬性和一些變數的物件組成,用於在記憶體中儲存資料。
其中一些屬性可能引用其他模型物件並建立物件圖,該物件圖作為一個整體是模型物件。
模型物件應該引發屬性更改通知,在 WPF 中這意味著資料繫結。
最後一個職責是驗證,這是可選的,但是您可以透過使用 WPF 資料繫結驗證功能(透過諸如 INotifyDataErrorInfo/IDataErrorInfo 之類的介面)將驗證資訊嵌入到模型物件中。
檢視職責
檢視的主要目的和職責是定義使用者在螢幕上看到的內容的結構。該結構可以包含靜態部分和動態部分。
靜態部分是定義檢視由其組成的控制元件和控制元件佈局的 XAML 層次結構。
動態部分就像定義為檢視一部分的動畫或狀態更改。
MVVM 的主要目標是檢視中不應該有程式碼隱藏。
檢視中不可能沒有程式碼隱藏。在檢視中,您至少需要建構函式和對初始化元件的呼叫。
我們的想法是,事件處理、操作和資料操作邏輯程式碼不應放在檢視中的程式碼隱藏中。
還有一些其他型別的程式碼必須放在程式碼隱藏中,任何需要引用 UI 元素的程式碼本質上都是檢視程式碼。
ViewModel 職責
ViewModel 是 MVVM 應用程式的重點。ViewModel 的主要職責是向檢視提供資料,以便檢視可以將該資料放在螢幕上。
它還允許使用者與資料互動並更改資料。
ViewModel 的另一個關鍵職責是封裝檢視的互動邏輯,但這並不意味著應用程式的所有邏輯都應該進入 ViewModel。
它應該能夠處理適當的呼叫順序,以便根據使用者或檢視上的任何更改做出正確的事情。
ViewModel 還應該管理任何導航邏輯,例如確定何時導航到不同的檢視。
MVVM – 第一個應用程式
在本章中,我們將學習如何將 MVVM 模式用於簡單的輸入螢幕和您可能已經習慣使用的 WPF 應用程式。
讓我們來看一個簡單的示例,我們將在這個示例中使用 MVVM 方法。
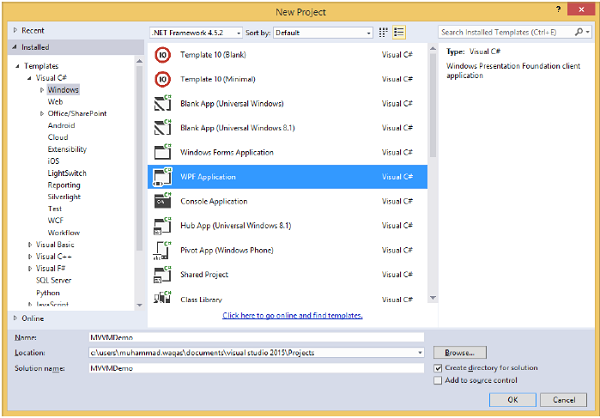
步驟 1 - 建立一個新的 WPF 應用程式專案 MVVMDemo。
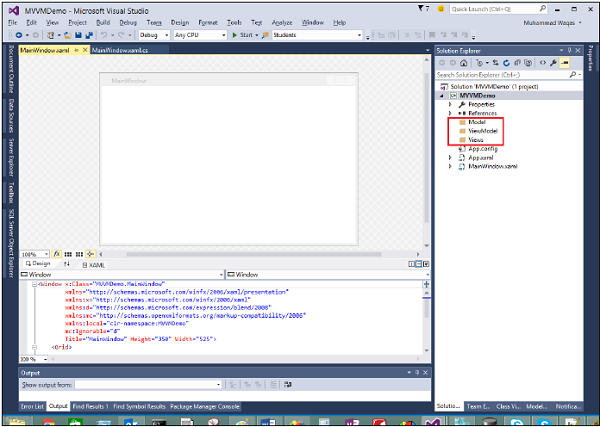
步驟 2 - 將三個資料夾(Model、ViewModel 和 Views)新增到您的專案中。
步驟 3 - 在 Model 資料夾中新增一個 StudentModel 類,並將以下程式碼貼上到該類中。
using System.ComponentModel;

namespace MVVMDemo.Model {

   public class StudentModel {}

   public class Student : INotifyPropertyChanged {
      private string firstName;
      private string lastName;

      public string FirstName {
         get {
            return firstName;
         }

         set {
            if (firstName != value) {
               firstName = value;
               RaisePropertyChanged("FirstName");
               RaisePropertyChanged("FullName");
            }
         }
      }

      public string LastName {
         get {return lastName; }

         set {
            if (lastName != value) {
               lastName = value;
               RaisePropertyChanged("LastName");
               RaisePropertyChanged("FullName");
            }
         }
      }

      public string FullName {
         get {
            return firstName + " " + lastName;
         }
      }

      public event PropertyChangedEventHandler PropertyChanged;

      private void RaisePropertyChanged(string property) {
         if (PropertyChanged != null) {
            PropertyChanged(this, new PropertyChangedEventArgs(property));
         }
      }
   }
}
步驟 4 - 在 ViewModel 資料夾中新增另一個 StudentViewModel 類,並貼上以下程式碼。
using MVVMDemo.Model;
using System.Collections.ObjectModel;

namespace MVVMDemo.ViewModel {

   public class StudentViewModel {

      public ObservableCollection<Student> Students {
         get;
         set;
      }

      public void LoadStudents() {
         ObservableCollection<Student> students = new ObservableCollection<Student>();

         students.Add(new Student { FirstName = "Mark", LastName = "Allain" });
         students.Add(new Student { FirstName = "Allen", LastName = "Brown" });
         students.Add(new Student { FirstName = "Linda", LastName = "Hamerski" });

         Students = students;
      }
   }
}
步驟 5 - 透過右鍵單擊 Views 資料夾並選擇新增 > 新建項…來新增新的使用者控制元件 (WPF)。
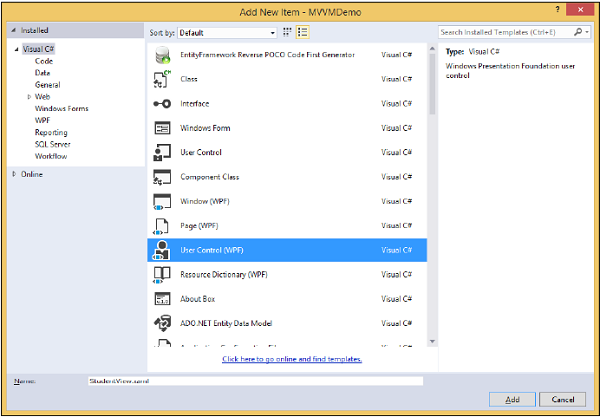
步驟 6 - 單擊新增按鈕。現在您將看到 XAML 檔案。將以下程式碼新增到包含不同 UI 元素的 StudentView.xaml 檔案中。
<UserControl x:Class = "MVVMDemo.Views.StudentView"
   xmlns = "http://schemas.microsoft.com/winfx/2006/xaml/presentation"
   xmlns:x = "http://schemas.microsoft.com/winfx/2006/xaml"
   xmlns:mc = "http://schemas.openxmlformats.org/markup-compatibility/2006"
   xmlns:d = "http://schemas.microsoft.com/expression/blend/2008"
   xmlns:local = "clr-namespace:MVVMDemo.Views"
   mc:Ignorable = "d"
   d:DesignHeight = "300" d:DesignWidth = "300">

   <Grid>
      <StackPanel HorizontalAlignment = "Left">

         <ItemsControl ItemsSource = "{Binding Path = Students}">

            <ItemsControl.ItemTemplate>
               <DataTemplate>
                  <StackPanel Orientation = "Horizontal">
                     <TextBox Text = "{Binding Path = FirstName, Mode = TwoWay}"
                        Width = "100" Margin = "3 5 3 5"/>

                     <TextBox Text = "{Binding Path = LastName, Mode = TwoWay}"
                        Width = "100" Margin = "0 5 3 5"/>

                     <TextBlock Text = "{Binding Path = FullName, Mode = OneWay}"
                        Margin = "0 5 3 5"/>

                  </StackPanel>
               </DataTemplate>
            </ItemsControl.ItemTemplate>

         </ItemsControl>

      </StackPanel>
   </Grid>

</UserControl>
步驟 7 - 現在使用以下程式碼將 StudentView 新增到您的 MainPage.xaml 檔案中。
<Window x:Class = "MVVMDemo.MainWindow"
   xmlns = "http://schemas.microsoft.com/winfx/2006/xaml/presentation"
   xmlns:x = "http://schemas.microsoft.com/winfx/2006/xaml"
   xmlns:d = "http://schemas.microsoft.com/expression/blend/2008"
   xmlns:mc = "http://schemas.openxmlformats.org/markup-compatibility/2006"
   xmlns:local = "clr-namespace:MVVMDemo"
   xmlns:views = "clr-namespace:MVVMDemo.Views"
   mc:Ignorable = "d"
   Title = "MainWindow" Height = "350" Width = "525">

   <Grid>
      <views:StudentView x:Name = "StudentViewControl" Loaded = "StudentViewControl_Loaded"/>
   </Grid>

</Window>
步驟 8 - 這是 MainPage.xaml.cs 檔案中 Loaded 事件的實現,它將從 ViewModel 更新檢視。
using System.Windows;

namespace MVVMDemo {

   /// <summary>
      /// Interaction logic for MainWindow.xaml
   /// </summary>

   public partial class MainWindow : Window {

      public MainWindow() {
         InitializeComponent();
      }

      private void StudentViewControl_Loaded(object sender, RoutedEventArgs e) {
         MVVMDemo.ViewModel.StudentViewModel studentViewModelObject =
            new MVVMDemo.ViewModel.StudentViewModel();
         studentViewModelObject.LoadStudents();

         StudentViewControl.DataContext = studentViewModelObject;
      }
   }
}
步驟 9 − 當以上程式碼編譯並執行後,您將在主視窗上看到以下輸出。
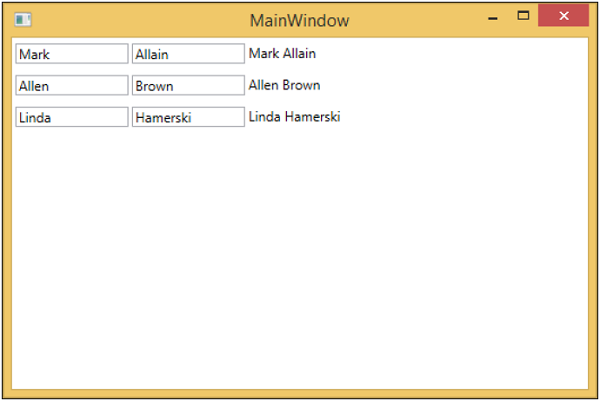
我們建議您逐步執行以上示例,以便更好地理解。
MVVM – 繫結檢視
本章將介紹將檢視繫結到 ViewModel 的不同方法。首先,讓我們看一下檢視優先構造,我們可以在 XAML 中宣告它。正如我們在上一章中看到的示例,我們已經從主視窗綁定了一個檢視。現在我們將看到其他繫結檢視的方法。
本章也將使用相同的示例。以下是相同的 Model 類實現。
using System.ComponentModel;

namespace MVVMDemo.Model {

   public class StudentModel {}

   public class Student : INotifyPropertyChanged {
      private string firstName;
      private string lastName;

      public string FirstName {
         get { return firstName; }

         set {
            if (firstName != value) {
               firstName = value;
               RaisePropertyChanged("FirstName");
               RaisePropertyChanged("FullName");
            }
         }
      }

      public string LastName {
         get { return lastName; }

         set {
            if (lastName != value) {
               lastName = value;
               RaisePropertyChanged("LastName");
               RaisePropertyChanged("FullName");
            }
         }
      }

      public string FullName {
         get {
            return firstName + " " + lastName;
         }
      }

      public event PropertyChangedEventHandler PropertyChanged;

      private void RaisePropertyChanged(string property) {
         if (PropertyChanged != null) {
            PropertyChanged(this, new PropertyChangedEventArgs(property));
         }
      }
   }
}
這是 ViewModel 類的實現。這次 LoadStudents 方法在預設建構函式中呼叫。
using MVVMDemo.Model;
using System.Collections.ObjectModel;

namespace MVVMDemo.ViewModel{

   public class StudentViewModel {

      public StudentViewModel() {
         LoadStudents();
      }

      public ObservableCollection<Student> Students {
         get;
         set;
      }

      public void LoadStudents() {
         ObservableCollection<Student> students = new ObservableCollection<Student>();

         students.Add(new Student { FirstName = "Mark", LastName = "Allain" });
         students.Add(new Student { FirstName = "Allen", LastName = "Brown" });
         students.Add(new Student { FirstName = "Linda", LastName = "Hamerski" });

         Students = students;
      }
   }
}
無論檢視是視窗、使用者控制元件還是頁面,解析器通常從上到下、從左到右工作。它在遇到每個元素時都會呼叫其預設建構函式。構造檢視有兩種方法。您可以使用任何一種。
- 在 XAML 中進行檢視優先構造
- 在程式碼隱藏中進行檢視優先構造
在 XAML 中進行檢視優先構造
一種方法是簡單地將您的 ViewModel 新增為 DataContext 屬性設定程式中的巢狀元素,如下面的程式碼所示。
<UserControl.DataContext>
   <viewModel:StudentViewModel/>
</UserControl.DataContext>
這是完整的 View XAML 檔案。
<UserControl x:Class="MVVMDemo.Views.StudentView"
   xmlns = "http://schemas.microsoft.com/winfx/2006/xaml/presentation"
   xmlns:x = "http://schemas.microsoft.com/winfx/2006/xaml"
   xmlns:mc = "http://schemas.openxmlformats.org/markup-compatibility/2006"
   xmlns:d = "http://schemas.microsoft.com/expression/blend/2008"
   xmlns:local = "clr-namespace:MVVMDemo.Views"
   xmlns:viewModel = "clr-namespace:MVVMDemo.ViewModel"
   mc:Ignorable = "d"
   d:DesignHeight = "300" d:DesignWidth = "300">

   <UserControl.DataContext>
      <viewModel:StudentViewModel/>
   </UserControl.DataContext>

   <Grid>
      <StackPanel HorizontalAlignment = "Left">
         <ItemsControl ItemsSource = "{Binding Path = Students}">

            <ItemsControl.ItemTemplate>
               <DataTemplate>

                  <StackPanel Orientation = "Horizontal">
                     <TextBox Text = "{Binding Path = FirstName, Mode = TwoWay}"
                        Width = "100" Margin = "3 5 3 5"/>

                      <TextBox Text = "{Binding Path = LastName, Mode = TwoWay}"
                        Width = "100" Margin = "0 5 3 5"/>

                     <TextBlock Text = "{Binding Path = FullName, Mode = OneWay}"
                        Margin = "0 5 3 5"/>

                  </StackPanel>

               </DataTemplate>
            </ItemsControl.ItemTemplate>

         </ItemsControl>
      </StackPanel>
   </Grid>

</UserControl>
在程式碼隱藏中進行檢視優先構造
另一種方法是,您可以透過在檢視的程式碼隱藏中自行構造檢視模型來實現檢視優先構造,方法是在那裡使用例項設定 DataContext 屬性。
通常,DataContext 屬性是在檢視的建構函式方法中設定的,但您也可以將其構造推遲到檢視的 Load 事件觸發時。
using System.Windows.Controls;

namespace MVVMDemo.Views {

   /// <summary>
      /// Interaction logic for StudentView.xaml
   /// </summary>

   public partial class StudentView : UserControl {
      public StudentView() {
         InitializeComponent();
         this.DataContext = new MVVMDemo.ViewModel.StudentViewModel();
      }
   }
}
在程式碼隱藏中而不是在 XAML 中構造檢視模型的一個原因是,檢視模型建構函式需要引數,但 XAML 解析只能在預設建構函式中定義時構造元素。
現在在這種情況下,View 的 XAML 檔案將如下面的程式碼所示。
<UserControl x:Class = "MVVMDemo.Views.StudentView"
   xmlns = "http://schemas.microsoft.com/winfx/2006/xaml/presentation"
   xmlns:x = "http://schemas.microsoft.com/winfx/2006/xaml"
   xmlns:mc = "http://schemas.openxmlformats.org/markup-compatibility/2006"
   xmlns:d = "http://schemas.microsoft.com/expression/blend/2008"
   xmlns:local = "clr-namespace:MVVMDemo.Views"
   mc:Ignorable = "d"
   d:DesignHeight = "300"
   d:DesignWidth = "300">

   <Grid>
      <StackPanel HorizontalAlignment = "Left">
         <ItemsControl ItemsSource = "{Binding Path = Students}">

            <ItemsControl.ItemTemplate>
               <DataTemplate>

                  <StackPanel Orientation = "Horizontal"<
                     <TextBox Text = "{Binding Path = FirstName, Mode = TwoWay}"
                        Width = "100" Margin = "3 5 3 5"/>

                     <TextBox Text = "{Binding Path = LastName, Mode = TwoWay}"
                        Width = "100" Margin = "0 5 3 5"/>

                     <TextBlock Text = "{Binding Path = FullName, Mode = OneWay}"
                        Margin = "0 5 3 5"/>

                  </StackPanel>

               </DataTemplate>
            </ItemsControl.ItemTemplate>

         </ItemsControl>
      </StackPanel>
   </Grid>

</UserControl>
您可以像在 MainWindow.XAML 檔案中顯示的那樣在 MainWindow 中宣告此 View。
<Window x:Class = "MVVMDemo.MainWindow"
   xmlns = "http://schemas.microsoft.com/winfx/2006/xaml/presentation"
   xmlns:x = "http://schemas.microsoft.com/winfx/2006/xaml"
   xmlns:d = "http://schemas.microsoft.com/expression/blend/2008"
   xmlns:mc = "http://schemas.openxmlformats.org/markup-compatibility/2006"
   xmlns:local = "clr-namespace:MVVMDemo"
   xmlns:views = "clr-namespace:MVVMDemo.Views"
   mc:Ignorable = "d"
   Title = "MainWindow" Height = "350" Width = "525">

   <Grid>
      <views:StudentView x:Name = "StudentViewControl"/>
   </Grid>

</Window>
當以上程式碼編譯並執行後,您將在主視窗上看到以下輸出。

我們建議您逐步執行以上示例,以便更好地理解。
MVVM – 繫結 ViewModel
本章將介紹如何繫結 ViewModel。這是上一章的延續,我們在上一章中討論了檢視優先構造。現在,第一種構造的下一個形式是一種元模式,稱為ViewModelLocator。它是一種偽模式,構建在 MVVM 模式之上。
在 MVVM 中,每個檢視都需要繫結到其 ViewModel。
ViewModelLocator 是一種簡單的方法,可以集中程式碼並進一步解耦檢視。
這意味著它不必明確知道 ViewModel 型別以及如何構造它。
使用 ViewModelLocator 有許多不同的方法,但這裡我們使用與 PRISM 框架的一部分最相似的方法。
ViewModelLocator 提供了一種標準的、一致的、宣告式的和鬆散耦合的方法來進行檢視優先構造,它自動化了將 ViewModel 繫結到檢視的過程。下圖顯示了 ViewModelLocator 的高階過程。

步驟 1 − 確定正在構造哪個檢視型別。
步驟 2 − 識別該特定檢視型別的 ViewModel。
步驟 3 − 構造該 ViewModel。
步驟 4 − 將檢視的 DataContext 設定為 ViewModel。
為了理解基本概念,讓我們看一下 ViewModelLocator 的簡單示例,繼續使用上一章的相同示例。如果您檢視 StudentView.xaml 檔案,您會看到我們已經靜態地綁定了 ViewModel。
現在,如以下程式所示,註釋這些 XAML 程式碼並從程式碼隱藏中刪除程式碼。
<UserControl x:Class = "MVVMDemo.Views.StudentView"
   xmlns = "http://schemas.microsoft.com/winfx/2006/xaml/presentation"
   xmlns:x = "http://schemas.microsoft.com/winfx/2006/xaml"
   xmlns:mc = "http://schemas.openxmlformats.org/markup-compatibility/2006"
   xmlns:d = "http://schemas.microsoft.com/expression/blend/2008"
   xmlns:local = "clr-namespace:MVVMDemo.Views"
   xmlns:viewModel = "clr-namespace:MVVMDemo.ViewModel"
   mc:Ignorable = "d" d:DesignHeight = "300" d:DesignWidth = "300">

   <!--<UserControl.DataContext>
      <viewModel:StudentViewModel/>
   </UserControl.DataContext>-->

   <Grid>
      <StackPanel HorizontalAlignment = "Left">
         <ItemsControl ItemsSource = "{Binding Path = Students}">
            <ItemsControl.ItemTemplate>
               <DataTemplate>

                  <StackPanel Orientation = "Horizontal">
                     <TextBox Text = "{Binding Path = FirstName, Mode = TwoWay}"
                        Width = "100" Margin = "3 5 3 5"/>

                     <TextBox Text = "{Binding Path = LastName, Mode = TwoWay}"
                        Width = "100" Margin = "0 5 3 5"/>

                     <TextBlock Text = "{Binding Path = FullName, Mode = OneWay}"
                        Margin = "0 5 3 5"/>

                  </StackPanel>

               </DataTemplate>
            </ItemsControl.ItemTemplate>
         </ItemsControl>
      </StackPanel>
   </Grid>

</UserControl>
現在讓我們建立一個新的資料夾 VML 並新增一個新的公共類 ViewModelLocator,它將包含一個附加屬性(依賴屬性)AutoHookedUpViewModel,如下面的程式碼所示。
public static bool GetAutoHookedUpViewModel(DependencyObject obj) {
   return (bool)obj.GetValue(AutoHookedUpViewModelProperty);
}

public static void SetAutoHookedUpViewModel(DependencyObject obj, bool value) {
   obj.SetValue(AutoHookedUpViewModelProperty, value);
}

// Using a DependencyProperty as the backing store for AutoHookedUpViewModel.
//This enables animation, styling, binding, etc...

public static readonly DependencyProperty AutoHookedUpViewModelProperty =
   DependencyProperty.RegisterAttached("AutoHookedUpViewModel",
   typeof(bool), typeof(ViewModelLocator), new PropertyMetadata(false,
   AutoHookedUpViewModelChanged));
現在您可以看到一個基本的附加屬性定義。要向屬性新增行為,我們需要為此屬性新增一個更改事件處理程式,其中包含自動繫結檢視 ViewModel 的過程。執行此操作的程式碼如下所示:
private static void AutoHookedUpViewModelChanged(DependencyObject d,
   DependencyPropertyChangedEventArgs e) {
   if (DesignerProperties.GetIsInDesignMode(d)) return;
   var viewType = d.GetType();
   string str = viewType.FullName;
   str = str.Replace(".Views.", ".ViewModel.");

   var viewTypeName = str;
   var viewModelTypeName = viewTypeName + "Model";
   var viewModelType = Type.GetType(viewModelTypeName);
   var viewModel = Activator.CreateInstance(viewModelType);
   ((FrameworkElement)d).DataContext = viewModel;
}
以下是 ViewModelLocator 類的完整實現。
using System;
using System.ComponentModel;
using System.Windows;

namespace MVVMDemo.VML {

   public static class ViewModelLocator {

      public static bool GetAutoHookedUpViewModel(DependencyObject obj) {
         return (bool)obj.GetValue(AutoHookedUpViewModelProperty);
      }

      public static void SetAutoHookedUpViewModel(DependencyObject obj, bool value) {
         obj.SetValue(AutoHookedUpViewModelProperty, value);
      }

      // Using a DependencyProperty as the backing store for AutoHookedUpViewModel.

      //This enables animation, styling, binding, etc...
      public static readonly DependencyProperty AutoHookedUpViewModelProperty =
         DependencyProperty.RegisterAttached("AutoHookedUpViewModel",
         typeof(bool), typeof(ViewModelLocator), new
         PropertyMetadata(false, AutoHookedUpViewModelChanged));

      private static void AutoHookedUpViewModelChanged(DependencyObject d,
         DependencyPropertyChangedEventArgs e) {
         if (DesignerProperties.GetIsInDesignMode(d)) return;
         var viewType = d.GetType();

         string str = viewType.FullName;
         str = str.Replace(".Views.", ".ViewModel.");

         var viewTypeName = str;
         var viewModelTypeName = viewTypeName + "Model";
         var viewModelType = Type.GetType(viewModelTypeName);
         var viewModel = Activator.CreateInstance(viewModelType);

        ((FrameworkElement)d).DataContext = viewModel;
      }
   }
}
首先要做的是新增一個名稱空間,以便我們可以在專案的根目錄中訪問該 ViewModelLocator 型別。然後在作為檢視型別的根元素上,新增 AutoHookedUpViewModel 屬性並將其設定為 true。
xmlns:vml = "clr-namespace:MVVMDemo.VML"
vml:ViewModelLocator.AutoHookedUpViewModel = "True"
以下是 StudentView.xaml 檔案的完整實現。
<UserControl x:Class = "MVVMDemo.Views.StudentView"
   xmlns = "http://schemas.microsoft.com/winfx/2006/xaml/presentation"
   xmlns:x = "http://schemas.microsoft.com/winfx/2006/xaml"
   xmlns:mc = "http://schemas.openxmlformats.org/markup-compatibility/2006"
   xmlns:d = "http://schemas.microsoft.com/expression/blend/2008"
   xmlns:local = "clr-namespace:MVVMDemo.Views"
   xmlns:viewModel = "clr-namespace:MVVMDemo.ViewModel"
   xmlns:vml = "clr-namespace:MVVMDemo.VML"
   vml:ViewModelLocator.AutoHookedUpViewModel = "True"
   mc:Ignorable = "d" d:DesignHeight = "300" d:DesignWidth = "300">

   <!--<UserControl.DataContext>
      <viewModel:StudentViewModel/>
   </UserControl.DataContext>-->

   <Grid>
      <StackPanel HorizontalAlignment = "Left">
         <ItemsControl ItemsSource = "{Binding Path = Students}">
            <ItemsControl.ItemTemplate>
               <DataTemplate>

                  <StackPanel Orientation = "Horizontal">
                     <TextBox Text = "{Binding Path = FirstName, Mode = TwoWay}"
                        Width = "100" Margin = "3 5 3 5"/>

                     <TextBox Text = "{Binding Path = LastName, Mode = TwoWay}"
                        Width = "100" Margin = "0 5 3 5"/>

                     <TextBlock Text = "{Binding Path = FullName, Mode = OneWay}"
                        Margin = "0 5 3 5"/>

                  </StackPanel>

               </DataTemplate>
            </ItemsControl.ItemTemplate>
         </ItemsControl>
      </StackPanel>
   </Grid>

</UserControl>
當以上程式碼編譯並執行後,您將看到 ViewModelLocator 正在為該特定檢視繫結 ViewModel。

需要注意的關鍵一點是,檢視不再以某種方式與其 ViewModel 的型別或其構造方式耦合。所有這些都已移動到 ViewModelLocator 內部的中心位置。
MVVM – WPF 資料繫結
本章將學習資料繫結如何支援 MVVM 模式。資料繫結是使 MVVM 與其他 UI 分離模式(如 MVC 和 MVP)不同的關鍵特性。
對於資料繫結,您需要構建一個檢視或一組 UI 元素,然後您需要一些繫結將指向的其他物件。
檢視中的 UI 元素繫結到 ViewModel 公開的屬性。
檢視和 ViewModel 的構造順序取決於具體情況,正如我們已經介紹的檢視優先構造一樣。
檢視和 ViewModel 被構造,並且檢視的 DataContext 被設定為 ViewModel。
繫結可以是單向或雙向資料繫結,以便在檢視和 ViewModel 之間來回傳遞資料。
讓我們在同一個示例中看一下資料繫結。以下是 StudentView 的 XAML 程式碼。
<UserControl x:Class = "MVVMDemo.Views.StudentView"
   xmlns = "http://schemas.microsoft.com/winfx/2006/xaml/presentation"
   xmlns:x = "http://schemas.microsoft.com/winfx/2006/xaml"
   xmlns:mc = "http://schemas.openxmlformats.org/markup-compatibility/2006"
   xmlns:d = "http://schemas.microsoft.com/expression/blend/2008"
   xmlns:local = "clr-namespace:MVVMDemo.Views"
   xmlns:viewModel = "clr-namespace:MVVMDemo.ViewModel"
   xmlns:vml = "clr-namespace:MVVMDemo.VML"
   vml:ViewModelLocator.AutoHookedUpViewModel = "True"
   mc:Ignorable = "d" d:DesignHeight = "300" d:DesignWidth = "300">

   <!--<UserControl.DataContext>
      <viewModel:StudentViewModel/>
   </UserControl.DataContext>-->

   <Grid>
      <StackPanel HorizontalAlignment = "Left">
         <ItemsControl ItemsSource = "{Binding Path = Students}">
            <ItemsControl.ItemTemplate>
               <DataTemplate>

                  <StackPanel Orientation = "Horizontal">
                     <TextBox Text = "{Binding Path = FirstName, Mode = TwoWay}"
                        Width = "100" Margin = "3 5 3 5"/>

                     <TextBox Text = "{Binding Path = LastName, Mode = TwoWay}"
                        Width = "100" Margin = "0 5 3 5"/>

                     <TextBlock Text = "{Binding Path = FullName, Mode = OneWay}"
                        Margin = "0 5 3 5"/>

                  </StackPanel>

               </DataTemplate>
            </ItemsControl.ItemTemplate>
         </ItemsControl>
      </StackPanel>
   </Grid>

</UserControl>
如果您檢視上面的 XAML 程式碼,您會看到 ItemsControl 繫結到 ViewModel 公開的 Students 集合。
您還可以看到 Student 模型的屬性也有其自己的各個繫結,這些繫結繫結到文字框和文字塊。
ItemsControl 的 ItemSource 能夠繫結到 Students 屬性,因為檢視的整體 DataContext 設定為 ViewModel。
這裡的屬性的各個繫結也是 DataContext 繫結,但由於 ItemSource 的工作方式,它們並沒有繫結到 ViewModel 本身。
當專案源繫結到其集合時,它會在渲染時為每個專案渲染一個容器,並將該容器的 DataContext 設定為該專案。因此,每一行中每個文字框和文字塊的整體 DataContext 將是集合中的單個 Student。您還可以看到,這些文字框的繫結是雙向資料繫結,而文字塊是單向資料繫結,因為您無法編輯文字塊。
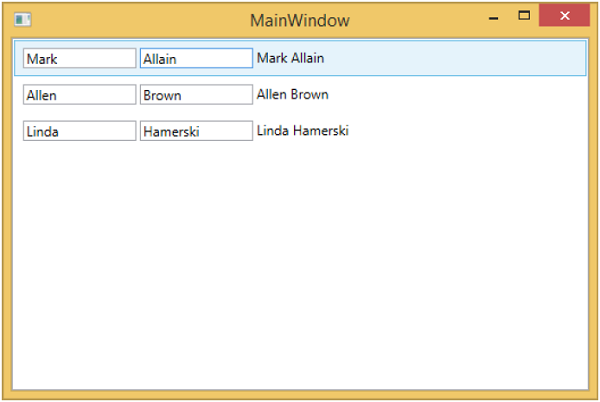
再次執行此應用程式時,您將看到以下輸出。

現在讓我們將第一行第二個文字框中的文字從 Allain 更改為 Upston,然後按 Tab 鍵失去焦點。您將看到文字塊文字也已更新。

這是因為文字框的繫結設定為雙向繫結,它也會更新模型,並且從模型中再次更新文字塊。
MVVM – WPF 資料模板
模板描述了控制元件的整體外觀和視覺外觀。對於每個控制元件,都與其關聯一個預設模板,該模板賦予該控制元件外觀。在 WPF 應用程式中,當您想要自定義控制元件的視覺行為和視覺外觀時,可以輕鬆建立您自己的模板。邏輯和模板之間的連線可以透過資料繫結來實現。
在 MVVM 中,還有另一種主要形式,稱為 ViewModel 優先構造。
ViewModel 優先構造方法利用了 WPF 中隱式資料模板的功能。
隱式資料模板可以根據資料繫結渲染的資料物件的型別,從當前資源字典中自動選擇適合的元素模板。首先,您需要有一些繫結到資料物件的元素。
讓我們再次看一下我們的簡單示例,在這個示例中,您將瞭解如何利用資料模板(特別是隱式資料模板)進行 ViewModel 優先構造。以下是我們的 StudentViewModel 類的實現。
using MVVMDemo.Model;
using System.Collections.ObjectModel;

namespace MVVMDemo.ViewModel {

   public class StudentViewModel {

      public StudentViewModel() {
         LoadStudents();
      }

      public ObservableCollection<Student> Students {
         get;
         set;
      }

      public void LoadStudents() {
         ObservableCollection<Student> students = new ObservableCollection<Student>();

         students.Add(new Student { FirstName = "Mark", LastName = "Allain" });
         students.Add(new Student { FirstName = "Allen", LastName = "Brown" });
         students.Add(new Student { FirstName = "Linda", LastName = "Hamerski" });

         Students = students;
      }
   }
}
您可以看到上面的 ViewModel 沒有更改。我們將繼續使用上一章中的相同示例。此 ViewModel 類只公開 Students 集合屬性並在構造時填充它。讓我們轉到 StudentView.xaml 檔案,刪除現有實現並在 Resources 部分定義資料模板。
<UserControl.Resources>
   <DataTemplate x:Key = "studentsTemplate">

      <StackPanel Orientation = "Horizontal">
         <TextBox Text = "{Binding Path = FirstName, Mode = TwoWay}"
            Width = "100" Margin = "3 5 3 5"/>

         <TextBox Text = "{Binding Path = LastName, Mode = TwoWay}"
            Width = "100" Margin = "0 5 3 5"/>

         <TextBlock Text = "{Binding Path = FullName, Mode = OneWay}"
            Margin = "0 5 3 5"/>
      </StackPanel>

   </DataTemplate>
</UserControl.Resources>
現在新增一個列表框並將該列表框資料繫結到 Students 屬性,如下面的程式碼所示。
<ListBox ItemsSource = "{Binding Students}" ItemTemplate = "{StaticResource studentsTemplate}"/>
在 Resources 部分,DataTemplate 的鍵為 studentsTemplate,然後要實際使用該模板,我們需要使用 ListBox 的 ItemTemplate 屬性。因此,現在您可以看到我們指示列表框使用該特定模板來渲染這些 Students。以下是 StudentView.xaml 檔案的完整實現。
<UserControl x:Class = "MVVMDemo.Views.StudentView"
   xmlns = "http://schemas.microsoft.com/winfx/2006/xaml/presentation"
   xmlns:x = "http://schemas.microsoft.com/winfx/2006/xaml"
   xmlns:mc = "http://schemas.openxmlformats.org/markup-compatibility/2006"
   xmlns:d = "http://schemas.microsoft.com/expression/blend/2008"
   xmlns:local = "clr-namespace:MVVMDemo.Views"
   xmlns:viewModel = "clr-namespace:MVVMDemo.ViewModel"
   xmlns:vml = "clr-namespace:MVVMDemo.VML"
   vml:ViewModelLocator.AutoHookedUpViewModel = "True"
   mc:Ignorable = "d" d:DesignHeight = "300" d:DesignWidth = "300">

   <UserControl.Resources>
      <DataTemplate x:Key = "studentsTemplate">

         <StackPanel Orientation = "Horizontal">
            <TextBox Text = "{Binding Path = FirstName, Mode = TwoWay}"
               Width = "100" Margin = "3 5 3 5"/>

            <TextBox Text = "{Binding Path = LastName, Mode = TwoWay}"
               Width = "100" Margin = "0 5 3 5"/>

            <TextBlock Text = "{Binding Path = FullName, Mode = OneWay}"
               Margin = "0 5 3 5"/>

         </StackPanel>

      </DataTemplate>
   </UserControl.Resources>

   <Grid>
      <ListBox
         ItemsSource = "{Binding Students}"
         ItemTemplate = "{StaticResource studentsTemplate}"/>
   </Grid>

</UserControl>
當以上程式碼編譯並執行後,您將看到以下視窗,其中包含一個 ListBox。每個 ListBoxItem 包含在文字塊和文字框中顯示的 Student 類物件資料。
為了使其成為隱式模板,我們需要從列表框中刪除 ItemTemplate 屬性,並在模板定義中新增 DataType 屬性,如下面的程式碼所示。
<UserControl.Resources>
   <DataTemplate DataType = "{x:Type data:Student}">

      <StackPanel Orientation = "Horizontal">
         <TextBox Text = "{Binding Path = FirstName, Mode = TwoWay}"
            Width = "100" Margin = "3 5 3 5"/>

         <TextBox Text = "{Binding Path = LastName, Mode = TwoWay}"
            Width = "100" Margin = "0 5 3 5"/>

         <TextBlock Text = "{Binding Path = FullName, Mode = OneWay}"
            Margin = "0 5 3 5"/>

      </StackPanel>

   </DataTemplate>
</UserControl.Resources>

<Grid>
   <ListBox ItemsSource = "{Binding Students}"/>
</Grid>
在 DataTemplate 中,x:Type 標記擴充套件非常重要,它就像 XAML 中的型別運算子。因此,基本上我們需要指向 MVVMDemo.Model 名稱空間中的 Student 資料型別。以下是更新後的完整 XAML 檔案。
<UserControl x:Class="MVVMDemo.Views.StudentView"
   xmlns = "http://schemas.microsoft.com/winfx/2006/xaml/presentation"
   xmlns:x = "http://schemas.microsoft.com/winfx/2006/xaml"
   xmlns:mc = "http://schemas.openxmlformats.org/markup-compatibility/2006"
   xmlns:d = "http://schemas.microsoft.com/expression/blend/2008"
   xmlns:local = "clr-namespace:MVVMDemo.Views"
   xmlns:viewModel = "clr-namespace:MVVMDemo.ViewModel"
   xmlns:data = "clr-namespace:MVVMDemo.Model"
   xmlns:vml = "clr-namespace:MVVMDemo.VML"
   vml:ViewModelLocator.AutoHookedUpViewModel = "True"
   mc:Ignorable = "d" d:DesignHeight = "300" d:DesignWidth = "300">

   <UserControl.Resources>
      <DataTemplate DataType = "{x:Type data:Student}">

         <StackPanel Orientation = "Horizontal">
            <TextBox Text = "{Binding Path = FirstName, Mode = TwoWay}"
               Width = "100" Margin = "3 5 3 5"/>

            <TextBox Text = "{Binding Path = LastName, Mode = TwoWay}"
               Width = "100" Margin = "0 5 3 5"/>

            <TextBlock Text = "{Binding Path = FullName, Mode = OneWay}"
               Margin = "0 5 3 5"/>

         </StackPanel>

      </DataTemplate>
   </UserControl.Resources>

   <Grid>
      <ListBox ItemsSource = "{Binding Students}"/>
   </Grid>

</UserControl>
再次執行此應用程式時,您仍然會看到使用資料模板渲染的相同 Students 資料,因為它會透過定位相應的資料模板來自動對映正在渲染的物件的型別。
我們建議您逐步執行上述示例,以便更好地理解。
MVVM – 檢視/檢視模型通訊
在本章中,我們將學習如何向 MVVM 應用程式新增互動性以及如何幹淨地呼叫邏輯。您還將看到所有這些都是透過保持鬆散耦合和良好的結構來完成的,這是 MVVM 模式的核心。要理解這一切,首先讓我們瞭解命令。
透過命令進行檢視/檢視模型通訊
命令模式已被充分記錄,並且幾十年來一直頻繁地使用設計模式。在此模式中,有兩個主要參與者,呼叫者和接收者。
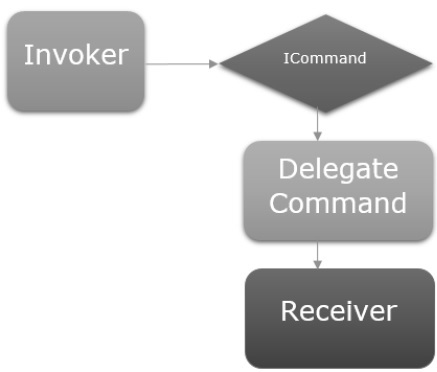
呼叫者
呼叫者是一段可以執行某些命令式邏輯的程式碼。
通常,它是在 UI 框架上下文中使用者互動的 UI 元素。
它可能只是應用程式其他地方的另一塊邏輯程式碼。
接收者
接收者是在呼叫者觸發時要執行的邏輯。
在 MVVM 的上下文中,接收者通常是需要呼叫的檢視模型中的方法。
在這兩者之間,您有一個阻塞層,這意味著呼叫者和接收者不必顯式地瞭解彼此。這通常表示為公開給呼叫者的介面抽象,並且該介面的具體實現能夠呼叫接收者。
讓我們來看一個簡單的示例,您將在其中學習命令以及如何使用它們在檢視和檢視模型之間進行通訊。在本章中,我們將繼續使用上一章中的相同示例。
在 StudentView.xaml 檔案中,我們有一個 ListBox,它連線來自檢視模型的學生資料。現在讓我們新增一個按鈕,用於從 ListBox 中刪除學生。
重要的是,在按鈕上使用命令非常容易,因為它們具有一個命令屬性來連線到 ICommand。
因此,我們可以在檢視模型上公開一個具有 ICommand 的屬性,並從按鈕的命令屬性繫結到它,如下面的程式碼所示。
<Button Content = "Delete"
   Command = "{Binding DeleteCommand}"
   HorizontalAlignment = "Left"
   VerticalAlignment = "Top"
   Width = "75" />
讓我們在您的專案中新增一個新類,它將實現 ICommand 介面。以下是 ICommand 介面的實現。
using System;
using System.Windows.Input;

namespace MVVMDemo {

   public class MyICommand : ICommand {
      Action _TargetExecuteMethod;
      Func<bool> _TargetCanExecuteMethod;

      public MyICommand(Action executeMethod) {
         _TargetExecuteMethod = executeMethod;
      }

      public MyICommand(Action executeMethod, Func<bool> canExecuteMethod){
         _TargetExecuteMethod = executeMethod;
         _TargetCanExecuteMethod = canExecuteMethod;
      }

      public void RaiseCanExecuteChanged() {
         CanExecuteChanged(this, EventArgs.Empty);
      }

      bool ICommand.CanExecute(object parameter) {

         if (_TargetCanExecuteMethod != null) {
            return _TargetCanExecuteMethod();
         }

         if (_TargetExecuteMethod != null) {
            return true;
         }

         return false;
      }

      // Beware - should use weak references if command instance lifetime
         is longer than lifetime of UI objects that get hooked up to command

      // Prism commands solve this in their implementation
      public event EventHandler CanExecuteChanged = delegate { };

      void ICommand.Execute(object parameter) {
         if (_TargetExecuteMethod != null) {
            _TargetExecuteMethod();
         }
      }
   }
}
如您所見,這是 ICommand 的一個簡單的委託實現,我們有兩個委託,一個用於 executeMethod,一個用於 canExecuteMethod,可以在構造時傳入。
在上面的實現中,有兩個過載的建構函式,一個只用於 executeMethod,另一個用於 executeMethod 和 canExecuteMethod。
讓我們在 StudentView Model 類中新增 MyICommand 型別的屬性。現在我們需要在 StudentViewModel 中構造一個例項。我們將使用 MyICommand 的過載建構函式,它需要兩個引數。
public MyICommand DeleteCommand { get; set;}

public StudentViewModel() {
   LoadStudents();
   DeleteCommand = new MyICommand(OnDelete, CanDelete);
}
現在新增 OnDelete 和 CanDelete 方法的實現。
private void OnDelete() {
   Students.Remove(SelectedStudent);
}

private bool CanDelete() {
   return SelectedStudent != null;
}
我們還需要新增一個新的 SelectedStudent,以便使用者可以從 ListBox 中刪除選定的專案。
private Student _selectedStudent;

public Student SelectedStudent {
   get {
      return _selectedStudent;
   }

   set {
      _selectedStudent = value;
      DeleteCommand.RaiseCanExecuteChanged();
   }
}
以下是檢視模型類的完整實現。
using MVVMDemo.Model;

using System.Collections.ObjectModel;
using System.Windows.Input;
using System;

namespace MVVMDemo.ViewModel {

   public class StudentViewModel {

      public MyICommand DeleteCommand { get; set;}

      public StudentViewModel() {
         LoadStudents();
         DeleteCommand = new MyICommand(OnDelete, CanDelete);
      }

      public ObservableCollection<Student> Students {
         get;
         set;
      }

      public void LoadStudents() {
         ObservableCollection<Student> students = new ObservableCollection<Student>();

         students.Add(new Student { FirstName = "Mark", LastName = "Allain" });
         students.Add(new Student { FirstName = "Allen", LastName = "Brown" });
         students.Add(new Student { FirstName = "Linda", LastName = "Hamerski" });

         Students = students;
      }

      private Student _selectedStudent;

      public Student SelectedStudent {
         get {
            return _selectedStudent;
         }

         set {
            _selectedStudent = value;
            DeleteCommand.RaiseCanExecuteChanged();
         }
      }

      private void OnDelete() {
         Students.Remove(SelectedStudent);
      }

      private bool CanDelete() {
         return SelectedStudent != null;
      }
   }
}
在 StudentView.xaml 中,我們需要在 ListBox 中新增 SelectedItem 屬性,該屬性將繫結到 SelectStudent 屬性。
<ListBox ItemsSource = "{Binding Students}" SelectedItem = "{Binding SelectedStudent}"/>
以下是完整的 xaml 檔案。
<UserControl x:Class = "MVVMDemo.Views.StudentView"
   xmlns = "http://schemas.microsoft.com/winfx/2006/xaml/presentation"
   xmlns:x = "http://schemas.microsoft.com/winfx/2006/xaml"
   xmlns:mc = "http://schemas.openxmlformats.org/markup-compatibility/2006"
   xmlns:d = "http://schemas.microsoft.com/expression/blend/2008"
   xmlns:local = "clr-namespace:MVVMDemo.Views"
   xmlns:viewModel = "clr-namespace:MVVMDemo.ViewModel"
   xmlns:data = "clr-namespace:MVVMDemo.Model"
   xmlns:vml = "clr-namespace:MVVMDemo.VML"
   vml:ViewModelLocator.AutoHookedUpViewModel = "True"
   mc:Ignorable = "d"
   d:DesignHeight = "300" d:DesignWidth = "300">

   <UserControl.Resources>
      <DataTemplate DataType = "{x:Type data:Student}">

         <StackPanel Orientation = "Horizontal">

            <TextBox Text = "{Binding Path = FirstName, Mode = TwoWay}"
               Width = "100" Margin = "3 5 3 5"/>

            <TextBox Text = "{Binding Path = LastName, Mode = TwoWay}"
               Width = "100" Margin = "0 5 3 5"/>

            <TextBlock Text = "{Binding Path = FullName, Mode = OneWay}"
               Margin = "0 5 3 5"/>

         </StackPanel>

      </DataTemplate>
   </UserControl.Resources>

   <Grid>
      <StackPanel Orientation = "Horizontal">
         <ListBox ItemsSource = "{Binding Students}"
            SelectedItem = "{Binding SelectedStudent}"/>

         <Button Content = "Delete"
            Command = "{Binding DeleteCommand}"
            HorizontalAlignment = "Left"
            VerticalAlignment = "Top"
            Width = "75" />
      </StackPanel>
   </Grid>

</UserControl>
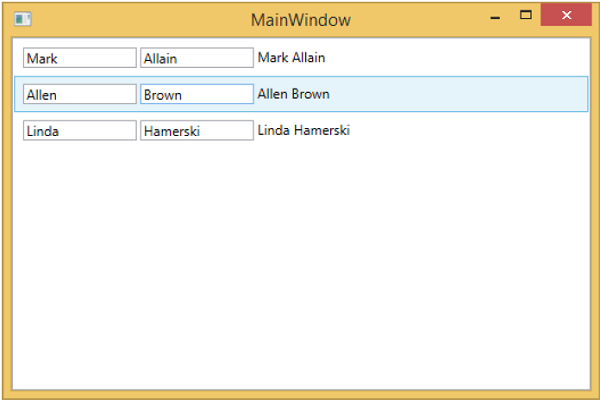
編譯並執行上述程式碼後,您將看到以下視窗。

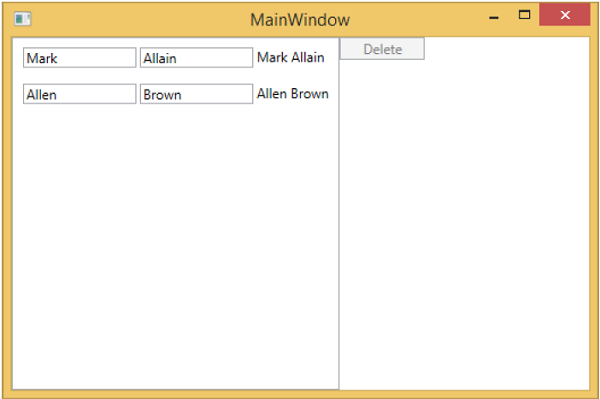
您可以看到刪除按鈕處於停用狀態。當您選擇任何專案時,它將被啟用。
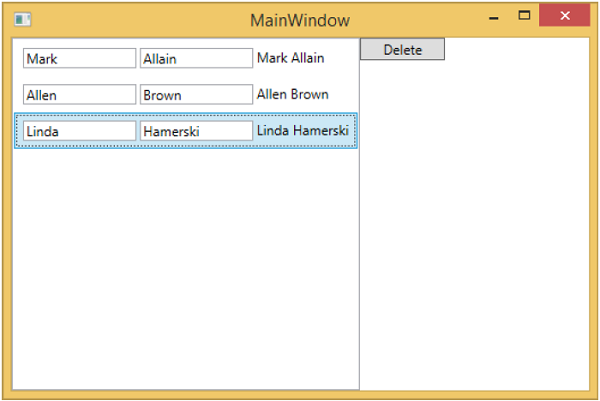
當您選擇任何專案並按刪除鍵時。您將看到選定的專案列表已被刪除,並且刪除按鈕再次被停用。
我們建議您逐步執行以上示例,以便更好地理解。
MVVM – 層次結構和導航
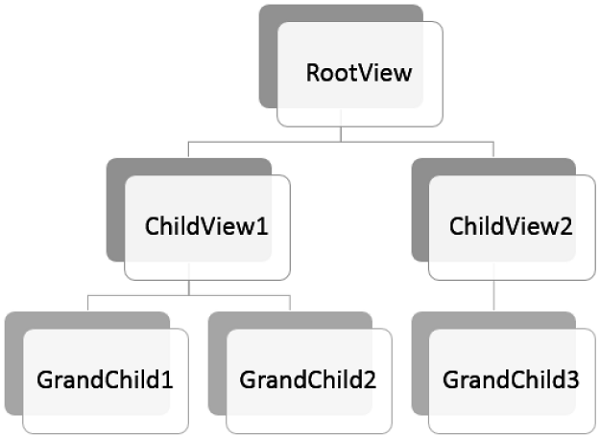
在構建 MVVM 應用程式時,您通常會將複雜的資訊螢幕分解成一組父檢視和子檢視,其中子檢視包含在面板或容器控制元件中的父檢視中,並形成自身使用的層次結構。
分解複雜的檢視後,並不意味著您將其分解成自己的 XAML 檔案的每個子內容塊都需要成為 MVVM 檢視。
內容塊只是提供結構來將某些內容呈現到螢幕上,並且不支援使用者對該內容進行任何輸入或操作。
它可能不需要單獨的檢視模型,而只是一個基於父檢視模型公開的屬性進行渲染的 XAML 塊。
最後,如果您有一個檢視和檢視模型的層次結構,則父檢視模型可以成為通訊中心,以便每個子檢視模型儘可能地與其他子檢視模型及其父級分離。
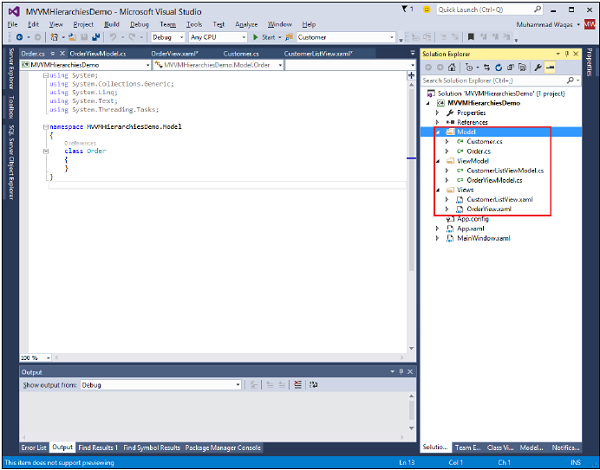
讓我們來看一個示例,我們將在其中定義不同檢視之間的簡單層次結構。建立一個新的 WPF 應用程式專案 **MVVMHierarchiesDemo**

**步驟 1** - 將三個資料夾(Model、ViewModel 和 Views)新增到您的專案中。

**步驟 2** - 在 Model 資料夾中新增 Customer 和 Order 類,在 Views 資料夾中新增 CustomerListView 和 OrderView,在 ViewModel 資料夾中新增 CustomerListViewModel 和 OrderViewModel,如下圖所示。
**步驟 3** - 在 CustomerListView 和 OrderView 中新增文字塊。這是 CustomerListView.xaml 檔案。
<UserControl x:Class="MVVMHierarchiesDemo.Views.CustomerListView"
   xmlns = "http://schemas.microsoft.com/winfx/2006/xaml/presentation"
   xmlns:x = "http://schemas.microsoft.com/winfx/2006/xaml"
   xmlns:mc = "http://schemas.openxmlformats.org/markup-compatibility/2006"
   xmlns:d = "http://schemas.microsoft.com/expression/blend/2008"
   xmlns:local = "clr-namespace:MVVMHierarchiesDemo.Views"
   mc:Ignorable = "d"
   d:DesignHeight = "300" d:DesignWidth = "300">

   <Grid>
      <TextBlock Text = "Customer List View"/>
   </Grid>

</UserControl>
以下是 OrderView.xaml 檔案。
<UserControl x:Class = "MVVMHierarchiesDemo.Views.OrderView"
   xmlns = "http://schemas.microsoft.com/winfx/2006/xaml/presentation"
   xmlns:x ="http://schemas.microsoft.com/winfx/2006/xaml"
   xmlns:mc ="http://schemas.openxmlformats.org/markup-compatibility/2006"
   xmlns:d ="http://schemas.microsoft.com/expression/blend/2008"
   xmlns:local = "clr-namespace:MVVMHierarchiesDemo.Views" mc:Ignorable = "d"
   d:DesignHeight = "300" d:DesignWidth = "300">

   <Grid>
      <TextBlock Text = "Order View"/>
   </Grid>

</UserControl>
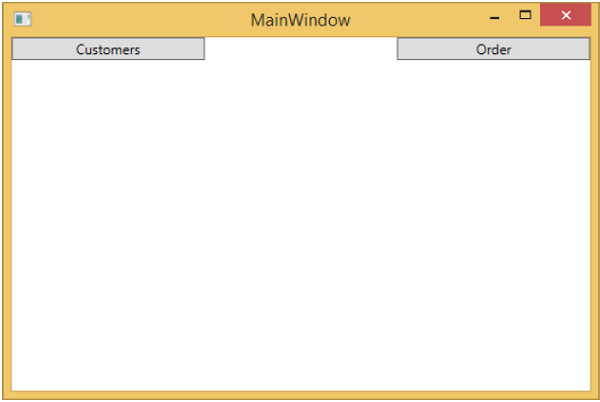
現在我們需要一些東西來託管這些檢視,而我們的 MainWindow 是一個好地方,因為它是一個簡單的應用程式。我們需要一個容器控制元件,我們可以將我們的檢視放置在其中並以導航方式切換它們。為此,我們需要在 MainWindow.xaml 檔案中新增 ContentControl,我們將使用其內容屬性並將其繫結到檢視模型引用。
現在在資源字典中為每個檢視定義資料模板。以下是 MainWindow.xaml 檔案。請注意每個資料模板如何將資料型別(ViewModel 型別)對映到相應的檢視。
<Window x:Class = "MVVMHierarchiesDemo.MainWindow"
   xmlns = "http://schemas.microsoft.com/winfx/2006/xaml/presentation"
   xmlns:x = "http://schemas.microsoft.com/winfx/2006/xaml"
   xmlns:d = "http://schemas.microsoft.com/expression/blend/2008"
   xmlns:mc = "http://schemas.openxmlformats.org/markup-compatibility/2006"
   xmlns:local = "clr-namespace:MVVMHierarchiesDemo"
   xmlns:views = "clr-namespace:MVVMHierarchiesDemo.Views"
   xmlns:viewModels = "clr-namespace:MVVMHierarchiesDemo.ViewModel"
   mc:Ignorable = "d"
   Title = "MainWindow" Height = "350" Width = "525">

   <Window.DataContext>
      <local:MainWindowViewModel/>
   </Window.DataContext>

   <Window.Resources>
      <DataTemplate DataType = "{x:Type viewModels:CustomerListViewModel}">
         <views:CustomerListView/>
      </DataTemplate>

      <DataTemplate DataType = "{x:Type viewModels:OrderViewModel}">
         <views:OrderView/>
      </DataTemplate>
   </Window.Resources>

   <Grid>
      <ContentControl Content = "{Binding CurrentView}"/>
   </Grid>

</Window>
每當當前檢視模型設定為 CustomerListViewModel 的例項時,它都會呈現一個 CustomerListView,並連線 ViewModel。它是一個 Order ViewModel,它將呈現 OrderView,依此類推。
現在我們需要一個具有 CurrentViewModel 屬性以及一些邏輯和命令的檢視模型,以便能夠切換屬性內 ViewModel 的當前引用。
讓我們為此 MainWindow 建立一個名為 MainWindowViewModel 的檢視模型。我們可以直接從 XAML 建立檢視模型的例項,並使用它來設定視窗的 DataContext 屬性。為此,我們需要建立一個基類來封裝 INotifyPropertyChanged 的實現以用於我們的檢視模型。
此類的主要思想是封裝 INotifyPropertyChanged 的實現,併為派生類提供輔助方法,以便它們可以輕鬆觸發適當的通知。以下是 BindableBase 類的實現。
using System;
using System.Collections.Generic;
using System.ComponentModel;
using System.Linq;
using System.Runtime.CompilerServices;
using System.Text;
using System.Threading.Tasks;

namespace MVVMHierarchiesDemo {

   class BindableBase : INotifyPropertyChanged {

      protected virtual void SetProperty<T>(ref T member, T val,
         [CallerMemberName] string propertyName = null) {
            if (object.Equals(member, val)) return;

            member = val;
            PropertyChanged(this, new PropertyChangedEventArgs(propertyName));
      }

      protected virtual void OnPropertyChanged(string propertyName) {
         PropertyChanged(this, new PropertyChangedEventArgs(propertyName));
      }

      public event PropertyChangedEventHandler PropertyChanged = delegate { };
   }
}
現在是時候使用我們的 CurrentViewModel 屬性開始進行一些檢視切換了。我們只需要某種方式來驅動此屬性的設定。我們將使其成為終端使用者可以命令轉到客戶列表或訂單檢視的方式。首先在您的專案中新增一個新類,該類將實現 ICommand 介面。以下是 ICommand 介面的實現。
using System;
using System.Windows.Input;

namespace MVVMHierarchiesDemo {

   public class MyICommand<T> : ICommand {

      Action<T> _TargetExecuteMethod;
      Func<T, bool> _TargetCanExecuteMethod;

      public MyICommand(Action<T> executeMethod) {
         _TargetExecuteMethod = executeMethod;
      }

      public MyICommand(Action<T> executeMethod, Func<T, bool> canExecuteMethod) {
         _TargetExecuteMethod = executeMethod;
         _TargetCanExecuteMethod = canExecuteMethod;
      }

      public void RaiseCanExecuteChanged() {
         CanExecuteChanged(this, EventArgs.Empty);
      }

      #region ICommand Members

      bool ICommand.CanExecute(object parameter) {

         if (_TargetCanExecuteMethod != null) {
            T tparm = (T)parameter;
            return _TargetCanExecuteMethod(tparm);
         }

         if (_TargetExecuteMethod != null) {
            return true;
         }

         return false;
      }

      // Beware - should use weak references if command instance lifetime is
         longer than lifetime of UI objects that get hooked up to command

      // Prism commands solve this in their implementation

      public event EventHandler CanExecuteChanged = delegate { };

      void ICommand.Execute(object parameter) {
         if (_TargetExecuteMethod != null) {
            _TargetExecuteMethod((T)parameter);
         }
      }

      #endregion
   }
}
現在我們需要為這兩個 ViewModel 設定一些頂級導航,並且切換的邏輯應該在 MainWindowViewModel 內部。為此,我們將使用一個名為 onNavigate 的方法,該方法接受字串目標並返回 CurrentViewModel 屬性。
private void OnNav(string destination) {

   switch (destination) {
      case "orders":
         CurrentViewModel = orderViewModelModel;
      break;
      case "customers":
      default:
         CurrentViewModel = custListViewModel;
      break;
   }
}
為了導航這些不同的檢視,我們需要在 MainWindow.xaml 檔案中新增兩個按鈕。以下是完整的 XAML 檔案實現。
<Window x:Class = "MVVMHierarchiesDemo.MainWindow"
   xmlns = "http://schemas.microsoft.com/winfx/2006/xaml/presentation"
   xmlns:x = "http://schemas.microsoft.com/winfx/2006/xaml"
   xmlns:d = "http://schemas.microsoft.com/expression/blend/2008"
   xmlns:mc = "http://schemas.openxmlformats.org/markup-compatibility/2006"
   xmlns:local = "clr-namespace:MVVMHierarchiesDemo"
   xmlns:views = "clr-namespace:MVVMHierarchiesDemo.Views"
   xmlns:viewModels = "clr-namespace:MVVMHierarchiesDemo.ViewModel"
   mc:Ignorable = "d"
   Title = "MainWindow" Height = "350" Width = "525">

   <Window.DataContext>
      <local:MainWindowViewModel/>
   </Window.DataContext>

   <Window.Resources>
      <DataTemplate DataType = "{x:Type viewModels:CustomerListViewModel}">
         <views:CustomerListView/>
      </DataTemplate>

      <DataTemplate DataType = "{x:Type viewModels:OrderViewModel}">
         <views:OrderView/>
      </DataTemplate>
   </Window.Resources>

   <Grid>
      <Grid.RowDefinitions>
         <RowDefinition Height = "Auto" />
         <RowDefinition Height = "*" />
      </Grid.RowDefinitions>

      <Grid x:Name = "NavBar">
         <Grid.ColumnDefinitions>
            <ColumnDefinition Width = "*" />
            <ColumnDefinition Width = "*" />
            <ColumnDefinition Width = "*" />
         </Grid.ColumnDefinitions>

         <Button Content = "Customers"
            Command = "{Binding NavCommand}"
            CommandParameter = "customers"
            Grid.Column = "0" />

         <Button Content = "Order"
            Command = "{Binding NavCommand}"
            CommandParameter = "orders"
            Grid.Column = "2" />
      </Grid>

      <Grid x:Name = "MainContent" Grid.Row = "1">
         <ContentControl Content = "{Binding CurrentViewModel}" />
      </Grid>

   </Grid>

</Window>
以下是完整的 MainWindowViewModel 實現。
using MVVMHierarchiesDemo.ViewModel;
using MVVMHierarchiesDemo.Views;

using System;
using System.Collections.Generic;
using System.Linq;
using System.Text;
using System.Threading.Tasks;

namespace MVVMHierarchiesDemo {

   class MainWindowViewModel : BindableBase {

      public MainWindowViewModel() {
         NavCommand = new MyICommand<string>(OnNav);
      }

      private CustomerListViewModel custListViewModel = new CustomerListViewModel();

      private OrderViewModel orderViewModelModel = new OrderViewModel();

      private BindableBase _CurrentViewModel;

      public BindableBase CurrentViewModel {
         get {return _CurrentViewModel;}
         set {SetProperty(ref _CurrentViewModel, value);}
      }

      public MyICommand<string> NavCommand { get; private set; }

      private void OnNav(string destination) {

         switch (destination) {
            case "orders":
               CurrentViewModel = orderViewModelModel;
               break;
            case "customers":
            default:
               CurrentViewModel = custListViewModel;
               break;
         }
      }
   }
}
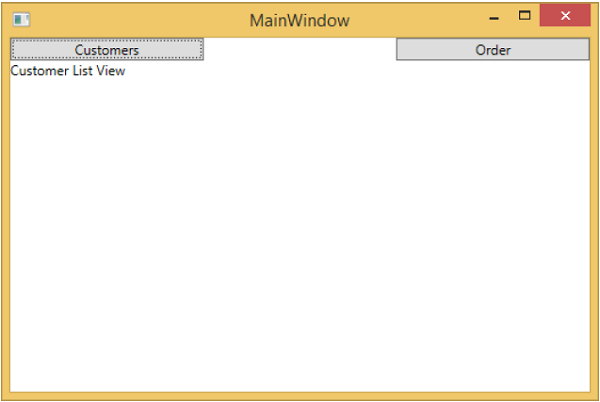
從 BindableBase 類派生所有檢視模型。編譯並執行上述程式碼後,您將看到以下輸出。
如您所見,我們在 MainWindow 上只添加了兩個按鈕和一個 CurrentViewModel。如果您單擊任何按鈕,它將導航到該特定檢視。讓我們單擊“客戶”按鈕,您將看到顯示 CustomerListView。
我們建議您逐步執行以上示例,以便更好地理解。
MVVM – 驗證
在本章中,我們將學習有關驗證的內容。我們還將研究一種使用 WPF 繫結已經支援的內容以乾淨的方式進行驗證的方法,但將其與 MVVM 元件關聯起來。
MVVM 中的驗證
當您的應用程式開始接受來自終端使用者的輸入資料時,您需要考慮驗證該輸入。
確保它符合您的總體要求。
WPF 在繫結系統中具有一些出色的構建和功能,用於驗證輸入,並且在執行 MVVM 時您仍然可以利用所有這些功能。
請記住,支援您的驗證並定義哪些規則存在於哪些屬性應該成為模型或檢視模型的一部分的邏輯,而不是檢視本身。
您仍然可以使用 WPF 資料繫結支援的所有表達驗證的方式,包括:
- 在設定屬性時引發異常。
- 實現 IDataErrorInfo 介面。
- 實現 INotifyDataErrorInfo。
- 使用 WPF 驗證規則。
通常,建議使用 INotifyDataErrorInfo,它是在 WPF .NET 4.5 中引入的,它支援查詢與屬性關聯的錯誤的物件,並且它還修復了所有其他選項的一些不足之處。具體來說,它允許非同步驗證。它允許屬性與其關聯多個錯誤。
新增驗證
讓我們來看一個示例,我們將在其中向我們的輸入檢視新增驗證支援,在大型應用程式中,您可能需要在應用程式中的許多地方使用它。有時在檢視上,有時在檢視模型上,有時在這些輔助物件上,它們是模型物件的包裝器。
將驗證支援放在您可以從中繼承不同場景的公共基類中是一個好習慣。
基類將支援 INotifyDataErrorInfo,以便在屬性更改時觸發該驗證。
建立並新增一個名為 ValidatableBindableBase 的新類。由於我們已經有一個用於屬性更改處理的基類,讓我們從中派生基類,並實現 INotifyDataErrorInfo 介面。
以下是 ValidatableBindableBase 類的實現。
using System;
using System.Collections.Generic;
using System.ComponentModel;

//using System.ComponentModel.DataAnnotations;
using System.Linq;
using System.Runtime.CompilerServices;
using System.Text;
using System.Threading.Tasks;
using System.Windows.Controls;

namespace MVVMHierarchiesDemo {

   public class ValidatableBindableBase : BindableBase, INotifyDataErrorInfo {
      private Dictionary<string, List<string>> _errors = new Dictionary<string, List<string>>();

      public event EventHandler<DataErrorsChangedEventArgs>
         ErrorsChanged = delegate { };

      public System.Collections.IEnumerable GetErrors(string propertyName) {

         if (_errors.ContainsKey(propertyName))
            return _errors[propertyName];
         else
            return null;
      }

      public bool HasErrors {
         get { return _errors.Count > 0; }
      }

      protected override void SetProperty<T>(ref T member, T val,
         [CallerMemberName] string propertyName = null) {

         base.SetProperty<T>(ref member, val, propertyName);
         ValidateProperty(propertyName, val);
      }

      private void ValidateProperty<T>(string propertyName, T value) {
         var results = new List<ValidationResult>();

         //ValidationContext context = new ValidationContext(this);
         //context.MemberName = propertyName;
         //Validator.TryValidateProperty(value, context, results);

         if (results.Any()) {
            //_errors[propertyName] = results.Select(c => c.ErrorMessage).ToList();
         } else {
            _errors.Remove(propertyName);
         }

         ErrorsChanged(this, new DataErrorsChangedEventArgs(propertyName));
      }
   }
}
現在在各自的資料夾中新增 AddEditCustomerView 和 AddEditCustomerViewModel。以下是 AddEditCustomerView.xaml 的程式碼。
<UserControl x:Class = "MVVMHierarchiesDemo.Views.AddEditCustomerView"
   xmlns = "http://schemas.microsoft.com/winfx/2006/xaml/presentation"
   xmlns:x = "http://schemas.microsoft.com/winfx/2006/xaml"
   xmlns:mc = "http://schemas.openxmlformats.org/markup-compatibility/2006"
   xmlns:d = "http://schemas.microsoft.com/expression/blend/2008"
   xmlns:local = "clr-namespace:MVVMHierarchiesDemo.Views"
   mc:Ignorable = "d"
   d:DesignHeight = "300" d:DesignWidth = "300">

   <Grid>
      <Grid.RowDefinitions>
         <RowDefinition Height = "Auto" />
         <RowDefinition Height = "Auto" />
      </Grid.RowDefinitions>

      <Grid x:Name = "grid1"
         HorizontalAlignment = "Left"
         DataContext = "{Binding Customer}"
         Margin = "10,10,0,0"
         VerticalAlignment = "Top">

         <Grid.ColumnDefinitions>
            <ColumnDefinition Width = "Auto" />
            <ColumnDefinition Width = "Auto" />
         </Grid.ColumnDefinitions>

         <Grid.RowDefinitions>
            <RowDefinition Height = "Auto" />
            <RowDefinition Height = "Auto" />
            <RowDefinition Height = "Auto" />
            <RowDefinition Height = "Auto" />
         </Grid.RowDefinitions>

         <Label Content = "First Name:"
            Grid.Column = "0"
            HorizontalAlignment = "Left"
            Margin = "3"
            Grid.Row = "0"
            VerticalAlignment = "Center" />

         <TextBox x:Name = "firstNameTextBox"
            Grid.Column = "1"
            HorizontalAlignment = "Left"
            Height = "23"
            Margin = "3"
            Grid.Row = "0"
            Text = "{Binding FirstName, ValidatesOnNotifyDataErrors = True}"
            VerticalAlignment = "Center"
            Width = "120" />

         <Label Content = "Last Name:"
            Grid.Column = "0"
            HorizontalAlignment = "Left"
            Margin = "3"
            Grid.Row = "1"
            VerticalAlignment = "Center" />

         <TextBox x:Name = "lastNameTextBox"
            Grid.Column = "1"
            HorizontalAlignment = "Left"
            Height = "23"
            Margin = "3"
            Grid.Row = "1"
            Text = "{Binding LastName, ValidatesOnNotifyDataErrors = True}"
            VerticalAlignment = "Center"
            Width = "120" />

         <Label Content = "Email:"
            Grid.Column = "0"
            HorizontalAlignment = "Left"
            Margin = "3"
            Grid.Row = "2"
            VerticalAlignment = "Center" />

         <TextBox x:Name = "emailTextBox"
            Grid.Column = "1"
            HorizontalAlignment = "Left"
            Height = "23"
            Margin = "3"
            Grid.Row = "2"
            Text = "{Binding Email, ValidatesOnNotifyDataErrors = True}"
            VerticalAlignment = "Center"
            Width = "120" />

         <Label Content = "Phone:"
            Grid.Column = "0"
            HorizontalAlignment = "Left"
            Margin = "3"
            Grid.Row = "3"
            VerticalAlignment = "Center" />

         <TextBox x:Name = "phoneTextBox"
            Grid.Column = "1"
            HorizontalAlignment = "Left"
            Height = "23"
            Margin = "3"
            Grid.Row = "3"
            Text = "{Binding Phone, ValidatesOnNotifyDataErrors = True}"
            VerticalAlignment = "Center"
            Width = "120" />

      </Grid>

      <Grid Grid.Row = "1">
         <Button Content = "Save"
            Command = "{Binding SaveCommand}"
            HorizontalAlignment = "Left"
            Margin = "25,5,0,0"
            VerticalAlignment = "Top"
            Width = "75" />

         <Button Content = "Add"
            Command = "{Binding SaveCommand}"
            HorizontalAlignment = "Left"
            Margin = "25,5,0,0"
            VerticalAlignment = "Top"
            Width = "75" />

         <Button Content = "Cancel"
            Command = "{Binding CancelCommand}"
            HorizontalAlignment = "Left"
            Margin = "150,5,0,0"
            VerticalAlignment = "Top"
            Width = "75" />
      </Grid>

   </Grid>

</UserControl>
以下是 AddEditCustomerViewModel 的實現。
using MVVMHierarchiesDemo.Model;

using System;
using System.Collections.Generic;
using System.Linq;
using System.Text;
using System.Threading.Tasks;

namespace MVVMHierarchiesDemo.ViewModel {

   class AddEditCustomerViewModel : BindableBase {

      public AddEditCustomerViewModel() {
         CancelCommand = new MyIcommand(OnCancel);
         SaveCommand = new MyIcommand(OnSave, CanSave);
      }

      private bool _EditMode;

      public bool EditMode {
         get { return _EditMode; }
         set { SetProperty(ref _EditMode, value);}
      }

      private SimpleEditableCustomer _Customer;

      public SimpleEditableCustomer Customer {
         get { return _Customer; }
         set { SetProperty(ref _Customer, value);}
      }

      private Customer _editingCustomer = null;

      public void SetCustomer(Customer cust) {
         _editingCustomer = cust;

         if (Customer != null) Customer.ErrorsChanged -= RaiseCanExecuteChanged;
         Customer = new SimpleEditableCustomer();
         Customer.ErrorsChanged += RaiseCanExecuteChanged;
         CopyCustomer(cust, Customer);
      }

      private void RaiseCanExecuteChanged(object sender, EventArgs e) {
         SaveCommand.RaiseCanExecuteChanged();
      }

      public MyIcommand CancelCommand { get; private set; }
      public MyIcommand SaveCommand { get; private set; }

      public event Action Done = delegate { };

      private void OnCancel() {
         Done();
      }

      private async void OnSave() {
         Done();
      }

      private bool CanSave() {
         return !Customer.HasErrors;
      }
   }
}
以下是 SimpleEditableCustomer 類的實現。
using System;
using System.Collections.Generic;
using System.Linq;
using System.Text;
using System.Threading.Tasks;

namespace MVVMHierarchiesDemo.Model {

   public class SimpleEditableCustomer : ValidatableBindableBase {
      private Guid _id;

      public Guid Id {
         get { return _id; }
         set { SetProperty(ref _id, value); }
      }

      private string _firstName;
      [Required]

      public string FirstName {
         get { return _firstName; }
         set { SetProperty(ref _firstName, value); }
      }

      private string _lastName;
      [Required]

      public string LastName {
         get { return _lastName; }
         set { SetProperty(ref _lastName, value); }
      }

      private string _email;
      [EmailAddress]

      public string Email {
         get { return _email; }
         set { SetProperty(ref _email, value); }
      }

      private string _phone;
      [Phone]

      public string Phone {
         get { return _phone; }
         set { SetProperty(ref _phone, value); }
      }
   }
}
編譯並執行上述程式碼後,您將看到以下視窗。

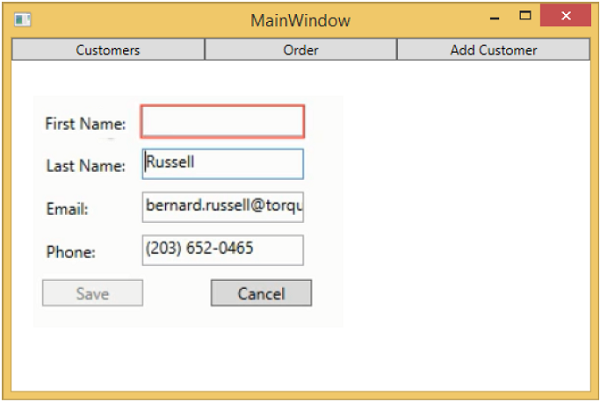
當您按下“新增客戶”按鈕時,您將看到以下檢視。當用戶不填寫任何欄位時,它將被突出顯示,並且儲存按鈕將被停用。

MVVM – 依賴注入
在本章中,我們將簡要討論依賴注入。我們已經介紹了資料繫結使檢視和檢視模型彼此解耦,這允許它們在不知道通訊另一端究竟發生了什麼的情況下進行通訊。
現在我們需要類似的東西來將我們的檢視模型與客戶端服務解耦。
在面向物件程式設計的早期,開發人員面臨著在應用程式中建立和檢索類例項的問題。已經為這個問題提出了各種解決方案。
過去幾年,依賴注入和控制反轉 (IoC) 在開發者中越來越受歡迎,並取代了一些較舊的解決方案,例如單例模式。
依賴注入/IoC容器
IoC 和依賴注入是兩種密切相關的設計模式,容器基本上是一塊基礎設施程式碼,可以同時實現這兩種模式。
IoC 模式是關於委託物件的構造責任,而依賴注入模式是關於向已構造的物件提供依賴項。
它們都可以被視為構造的兩個階段方法。當您使用容器時,容器承擔以下幾個責任:
- 根據請求構造物件。
- 容器將確定該物件依賴於什麼。
- 構造這些依賴項。
- 將它們注入到正在構造的物件中。
- 遞迴地執行此過程。
讓我們看看如何使用依賴注入來打破 ViewModel 和客戶端服務之間的耦合。我們將使用與之相關的依賴注入來連線 AddEditCustomerViewModel 表單的儲存處理。
首先,我們需要在專案的 Services 資料夾中建立一個新的介面。如果您的專案中沒有 Services 資料夾,請先建立一個,然後在 Services 資料夾中新增以下介面。
using MVVMHierarchiesDemo.Model;

using System;
using System.Collections.Generic;
using System.Linq;
using System.Text;
using System.Threading.Tasks;

namespace MVVMHierarchiesDemo.Services {

   public interface ICustomersRepository {
      Task<List<Customer>> GetCustomersAsync();
      Task<Customer> GetCustomerAsync(Guid id);
      Task<Customer> AddCustomerAsync(Customer customer);
      Task<Customer> UpdateCustomerAsync(Customer customer);
      Task DeleteCustomerAsync(Guid customerId);
   }
}
以下是 ICustomersRepository 的實現。
using MVVMHierarchiesDemo.Model;

using System;
using System.Collections.Generic;
using System.Linq; using System.Text;
using System.Threading.Tasks;

namespace MVVMHierarchiesDemo.Services {

   public class CustomersRepository : ICustomersRepository {
      ZzaDbContext _context = new ZzaDbContext();

      public Task<List<Customer>> GetCustomersAsync() {
         return _context.Customers.ToListAsync();
      }

      public Task<Customer> GetCustomerAsync(Guid id) {
         return _context.Customers.FirstOrDefaultAsync(c => c.Id == id);
      }

      public async Task<Customer> AddCustomerAsync(Customer customer){
         _context.Customers.Add(customer);
         await _context.SaveChangesAsync();
         return customer;
      }

      public async Task<Customer> UpdateCustomerAsync(Customer customer) {

         if (!_context.Customers.Local.Any(c => c.Id == customer.Id)) {
            _context.Customers.Attach(customer);
         }

         _context.Entry(customer).State = EntityState.Modified;
         await _context.SaveChangesAsync();
         return customer;

      }

      public async Task DeleteCustomerAsync(Guid customerId) {
         var customer = _context.Customers.FirstOrDefault(c => c.Id == customerId);

         if (customer != null) {
            _context.Customers.Remove(customer);
         }

         await _context.SaveChangesAsync();
      }
   }
}
簡單的儲存處理方法是在 AddEditCustomerViewModel 中新增 ICustomersRepository 的一個新例項,並重載 AddEditCustomerViewModel 和 CustomerListViewModel 建構函式。
private ICustomersRepository _repo;

public AddEditCustomerViewModel(ICustomersRepository repo) {
   _repo = repo;
   CancelCommand = new MyIcommand(OnCancel);
   SaveCommand = new MyIcommand(OnSave, CanSave);
}
按如下程式碼所示更新 OnSave 方法。
private async void OnSave() {
   UpdateCustomer(Customer, _editingCustomer);

   if (EditMode)
      await _repo.UpdateCustomerAsync(_editingCustomer);
   else
      await _repo.AddCustomerAsync(_editingCustomer);
   Done();
}

private void UpdateCustomer(SimpleEditableCustomer source, Customer target) {
   target.FirstName = source.FirstName;
   target.LastName = source.LastName;
   target.Phone = source.Phone;
   target.Email = source.Email;
}
以下是完整的 AddEditCustomerViewModel。
using MVVMHierarchiesDemo.Model;
using MVVMHierarchiesDemo.Services;

using System;
using System.Collections.Generic;
using System.Linq;
using System.Text;
using System.Threading.Tasks;

namespace MVVMHierarchiesDemo.ViewModel {

   class AddEditCustomerViewModel : BindableBase {
      private ICustomersRepository _repo;

      public AddEditCustomerViewModel(ICustomersRepository repo) {
         _repo = repo;
         CancelCommand = new MyIcommand(OnCancel);
         SaveCommand = new MyIcommand(OnSave, CanSave);
      }

      private bool _EditMode;

      public bool EditMode {
         get { return _EditMode; }
         set { SetProperty(ref _EditMode, value); }
      }

      private SimpleEditableCustomer _Customer;

      public SimpleEditableCustomer Customer {
         get { return _Customer; }
         set { SetProperty(ref _Customer, value); }
      }

      private Customer _editingCustomer = null;

      public void SetCustomer(Customer cust) {
         _editingCustomer = cust;

         if (Customer != null) Customer.ErrorsChanged -= RaiseCanExecuteChanged;
         Customer = new SimpleEditableCustomer();
         Customer.ErrorsChanged += RaiseCanExecuteChanged;
         CopyCustomer(cust, Customer);
      }

      private void RaiseCanExecuteChanged(object sender, EventArgs e) {
         SaveCommand.RaiseCanExecuteChanged();
      }

      public MyIcommand CancelCommand { get; private set; }
      public MyIcommand SaveCommand { get; private set; }

      public event Action Done = delegate { };

      private void OnCancel() {
         Done();
      }

      private async void OnSave() {
         UpdateCustomer(Customer, _editingCustomer);

         if (EditMode)
            await _repo.UpdateCustomerAsync(_editingCustomer);
         else
            await _repo.AddCustomerAsync(_editingCustomer);
         Done();
      }

      private void UpdateCustomer(SimpleEditableCustomer source, Customer target) {
         target.FirstName = source.FirstName;
         target.LastName = source.LastName;
         target.Phone = source.Phone;
         target.Email = source.Email;
      }

      private bool CanSave() {
         return !Customer.HasErrors;
      }

      private void CopyCustomer(Customer source, SimpleEditableCustomer target) {
         target.Id = source.Id;

         if (EditMode) {
            target.FirstName = source.FirstName;
            target.LastName = source.LastName;
            target.Phone = source.Phone;
            target.Email = source.Email;
         }
      }
   }
}
編譯並執行上述程式碼後,您將看到相同的輸出,但是現在 ViewModel 的耦合度更低了。

當您按下“新增客戶”按鈕時,您將看到以下檢視。如果使用者留下任何欄位為空,則該欄位將突出顯示,並且儲存按鈕將被停用。
MVVM – 事件
事件是一種程式設計結構,它對狀態變化做出反應,通知已註冊接收通知的任何端點。主要來說,事件用於透過滑鼠和鍵盤告知使用者輸入,但其用途並不限於此。每當檢測到狀態更改時,例如當物件已載入或初始化時,都可以觸發事件以提醒任何感興趣的第三方。
在使用 MVVM(模型-檢視-檢視模型)設計模式的 WPF 應用程式中,檢視模型是負責處理應用程式的表示邏輯和狀態的元件。
檢視的程式碼隱藏檔案不應包含任何處理從任何使用者介面 (UI) 元素(例如按鈕或組合框)引發的事件的程式碼,也不應包含任何特定於域的邏輯。
理想情況下,檢視的程式碼隱藏只包含呼叫 InitializeComponent 方法的建構函式,以及可能還有一些其他程式碼來控制或互動難以或效率低下地在 XAML 中表達的檢視層,例如複雜的動畫。
讓我們來看一個應用程式中按鈕單擊事件的簡單示例。以下是 MainWindow.xaml 檔案的 XAML 程式碼,您將在其中看到兩個按鈕。
<Window x:Class = "MVVMHierarchiesDemo.MainWindow"
   xmlns = "http://schemas.microsoft.com/winfx/2006/xaml/presentation"
   xmlns:x = "http://schemas.microsoft.com/winfx/2006/xaml"
   xmlns:d = "http://schemas.microsoft.com/expression/blend/2008"
   xmlns:mc = "http://schemas.openxmlformats.org/markup-compatibility/2006"
   xmlns:local = "clr-namespace:MVVMHierarchiesDemo"
   xmlns:views = "clr-namespace:MVVMHierarchiesDemo.Views"
   xmlns:viewModels = "clr-namespace:MVVMHierarchiesDemo.ViewModel"
   mc:Ignorable = "d"
   Title = "MainWindow" Height = "350" Width = "525">

   <Window.DataContext>
      <local:MainWindowViewModel/>
   </Window.DataContext>

   <Window.Resources>
      <DataTemplate DataType = "{x:Type viewModels:CustomerListViewModel}">
         <views:CustomerListView/>
      </DataTemplate>

      <DataTemplate DataType = "{x:Type viewModels:OrderViewModel}">
         <views:OrderView/>
      </DataTemplate>
   </Window.Resources>

   <Grid>
      <Grid.RowDefinitions>
         <RowDefinition Height = "Auto" />
         <RowDefinition Height = "*" />
      </Grid.RowDefinitions>

      <Grid x:Name = "NavBar">
         <Grid.ColumnDefinitions>
            <ColumnDefinition Width = "*" />
            <ColumnDefinition Width = "*" />
            <ColumnDefinition Width = "*" />
         </Grid.ColumnDefinitions>

         <Button Content = "Customers"
            Command = "{Binding NavCommand}"
            CommandParameter = "customers"
            Grid.Column = "0" />

         <Button Content = "Order"
            Command = "{Binding NavCommand}"
            CommandParameter = "orders"
            Grid.Column = "2" />
      </Grid>

      <Grid x:Name = "MainContent" Grid.Row = "1">
         <ContentControl Content = "{Binding CurrentViewModel}" />
      </Grid>

   </Grid>

</Window>
您可以看到,上述 XAML 檔案中未使用按鈕 Click 屬性,而是使用了 Command 和 CommandParameter 屬性來在按下按鈕時載入不同的檢視。現在您需要在 MainWindowViewModel.cs 檔案中定義命令的實現,而不是在檢視檔案中。以下是完整的 MainWindowViewModel 實現。
using MVVMHierarchiesDemo.ViewModel;
using MVVMHierarchiesDemo.Views;

using System;
using System.Collections.Generic;
using System.Linq;
using System.Text;
using System.Threading.Tasks;

namespace MVVMHierarchiesDemo {

   class MainWindowViewModel : BindableBase {

      public MainWindowViewModel() {
         NavCommand = new MyICommand<string>(OnNav);
      }

      private CustomerListViewModel custListViewModel = new CustomerListViewModel();
      private OrderViewModel orderViewModelModel = new OrderViewModel();

      private BindableBase _CurrentViewModel;

      public BindableBase CurrentViewModel {
         get { return _CurrentViewModel; }
         set { SetProperty(ref _CurrentViewModel, value); }
      }

      public MyICommand<string> NavCommand { get; private set; }

      private void OnNav(string destination) {

         switch (destination) {
            case "orders":
               CurrentViewModel = orderViewModelModel;
               break;
            case "customers":
               default:
               CurrentViewModel = custListViewModel;
               break;
         }
      }
   }
}
從 BindableBase 類派生所有檢視模型。編譯並執行上述程式碼後,您將看到以下輸出。
如您所見,我們只在 MainWindow 上添加了兩個按鈕和一個 CurrentViewModel。現在,如果您單擊任何按鈕,它將導航到該特定檢視。讓我們單擊“客戶”按鈕,您將看到顯示 CustomerListView。

我們建議您逐步執行上述示例,以便更好地理解。
MVVM – 單元測試
單元測試背後的理念是獲取離散的程式碼塊(單元),並編寫測試方法以預期的方式使用程式碼,然後測試它們是否獲得預期結果。
作為程式碼本身,單元測試與專案的其餘部分一樣進行編譯。
它們也由測試執行軟體執行,該軟體可以快速執行每個測試,有效地給出贊成或反對的意見,以指示測試是否分別透過或失敗。
讓我們來看一個前面建立的示例。以下是學生模型的實現。
using System.ComponentModel;

namespace MVVMDemo.Model {

   public class StudentModel {}

   public class Student : INotifyPropertyChanged {
      private string firstName;
      private string lastName;

      public string FirstName {
         get { return firstName; }

         set {
            if (firstName != value) {
               firstName = value;
               RaisePropertyChanged("FirstName");
               RaisePropertyChanged("FullName");
            }
         }
      }

      public string LastName {
         get { return lastName; }

         set {
            if (lastName != value) {
               lastName = value;
               RaisePropertyChanged("LastName");
               RaisePropertyChanged("FullName");
            }
         }
      }

      public string FullName {
         get {
            return firstName + " " + lastName;
         }
      }

      public event PropertyChangedEventHandler PropertyChanged;

      private void RaisePropertyChanged(string property) {
         if (PropertyChanged != null) {
            PropertyChanged(this, new PropertyChangedEventArgs(property));
         }
      }
   }
}
以下是 StudentView 的實現。
<UserControl x:Class="MVVMDemo.Views.StudentView"
   xmlns = "http://schemas.microsoft.com/winfx/2006/xaml/presentation"
   xmlns:x = "http://schemas.microsoft.com/winfx/2006/xaml"
   xmlns:mc = "http://schemas.openxmlformats.org/markup-compatibility/2006"
   xmlns:d = "http://schemas.microsoft.com/expression/blend/2008"
   xmlns:local = "clr-namespace:MVVMDemo.Views"
   xmlns:viewModel = "clr-namespace:MVVMDemo.ViewModel"
   xmlns:data = "clr-namespace:MVVMDemo.Model"
   xmlns:vml = "clr-namespace:MVVMDemo.VML"
   vml:ViewModelLocator.AutoHookedUpViewModel = "True"
   mc:Ignorable = "d"
   d:DesignHeight = "300" d:DesignWidth = "300">

   <UserControl.Resources>
      <DataTemplate DataType = "{x:Type data:Student}">

         <StackPanel Orientation = "Horizontal">
            <TextBox Text = "{Binding Path = FirstName, Mode = TwoWay}"
               Width = "100" Margin = "3 5 3 5"/>

            <TextBox Text = "{Binding Path = LastName, Mode = TwoWay}"
               Width = "100" Margin = "0 5 3 5"/>

            <TextBlock Text = "{Binding Path = FullName, Mode = OneWay}"
               Margin = "0 5 3 5"/>
         </StackPanel>

      </DataTemplate>
   </UserControl.Resources>

   <Grid>
      <StackPanel Orientation = "Horizontal">
         <ListBox ItemsSource = "{Binding Students}"
            SelectedItem = "{Binding SelectedStudent}"/>

         <Button Content = "Delete"
            Command = "{Binding DeleteCommand}"
            HorizontalAlignment = "Left"
            VerticalAlignment = "Top"
            Width = "75" />
      </StackPanel>
   </Grid>

</UserControl>
以下是 StudentViewModel 的實現。
using MVVMDemo.Model;

using System.Collections.ObjectModel;
using System.Windows.Input;
using System;

namespace MVVMDemo.ViewModel {

   public class StudentViewModel {

      public MyICommand DeleteCommand { get; set;}

      public StudentViewModel() {
         LoadStudents();
         DeleteCommand = new MyICommand(OnDelete, CanDelete);
      }

      public ObservableCollection<Student> Students {
         get;
         set;
      }

      public void LoadStudents() {
         ObservableCollection<Student> students = new ObservableCollection<Student>();

         students.Add(new Student { FirstName = "Mark", LastName = "Allain" });
         students.Add(new Student { FirstName = "Allen", LastName = "Brown" });
         students.Add(new Student { FirstName = "Linda", LastName = "Hamerski" });

         Students = students;
      }

      private Student _selectedStudent;

      public Student SelectedStudent {
         get {
            return _selectedStudent;
         }

         set {
            _selectedStudent = value;
            DeleteCommand.RaiseCanExecuteChanged();
         }
      }

      private void OnDelete() {
         Students.Remove(SelectedStudent);
      }

      private bool CanDelete() {
         return SelectedStudent != null;
      }

      public int GetStudentCount() {
         return Students.Count;
      }
   }
}
以下是 MainWindow.xaml 檔案。
<Window x:Class = "MVVMDemo.MainWindow"
   xmlns = "http://schemas.microsoft.com/winfx/2006/xaml/presentation"
   xmlns:x = "http://schemas.microsoft.com/winfx/2006/xaml"
   xmlns:d = "http://schemas.microsoft.com/expression/blend/2008"
   xmlns:mc = "http://schemas.openxmlformats.org/markup-compatibility/2006"
   xmlns:local = "clr-namespace:MVVMDemo"
   xmlns:views = "clr-namespace:MVVMDemo.Views"
   mc:Ignorable = "d"
   Title = "MainWindow" Height = "350" Width = "525">

   <Grid>
      <views:StudentView x:Name = "StudentViewControl"/>
   </Grid>

</Window>
以下是 MyICommand 的實現,它實現了 ICommand 介面。
using System;
using System.Windows.Input;

namespace MVVMDemo {

   public class MyICommand : ICommand {
      Action _TargetExecuteMethod;
      Func<bool> _TargetCanExecuteMethod;

      public MyICommand(Action executeMethod) {
         _TargetExecuteMethod = executeMethod;
      }

      public MyICommand(Action executeMethod, Func<bool> canExecuteMethod) {
         _TargetExecuteMethod = executeMethod;
         _TargetCanExecuteMethod = canExecuteMethod;
      }

      public void RaiseCanExecuteChanged() {
         CanExecuteChanged(this, EventArgs.Empty);
      }

      bool ICommand.CanExecute(object parameter) {

         if (_TargetCanExecuteMethod != null) {
            return _TargetCanExecuteMethod();
         }

         if (_TargetExecuteMethod != null) {
            return true;
         }

         return false;
      }

      // Beware - should use weak references if command instance lifetime
         is longer than lifetime of UI objects that get hooked up to command

      // Prism commands solve this in their implementation

      public event EventHandler CanExecuteChanged = delegate { };

      void ICommand.Execute(object parameter) {
         if (_TargetExecuteMethod != null) {
            _TargetExecuteMethod();
         }
      }
   }
}
當以上程式碼編譯並執行後,您將在主視窗上看到以下輸出。

要為上述示例編寫單元測試,讓我們向解決方案新增一個新的測試專案。

透過右鍵單擊“引用”來新增對專案的引用。

選擇現有專案並單擊“確定”。
現在讓我們新增一個簡單的測試,它將檢查學生數量,如下面的程式碼所示。
using System;

using Microsoft.VisualStudio.TestTools.UnitTesting;
using MVVMDemo.ViewModel;

namespace MVVMTest {
   [TestClass]

   public class UnitTest1 {
      [TestMethod]

      public void TestMethod1() {
         StudentViewModel sViewModel = new StudentViewModel();
         int count = sViewModel.GetStudentCount();
         Assert.IsTrue(count == 3);
      }
   }
}
要執行此測試,請選擇“測試”→“執行”→“所有測試”選單選項。

您可以在測試資源管理器中看到測試已透過,因為在 StudentViewModel 中添加了三個學生。將計數條件從 3 更改為 4,如下面的程式碼所示。
using System;

using Microsoft.VisualStudio.TestTools.UnitTesting;
using MVVMDemo.ViewModel;

namespace MVVMTest {
   [TestClass]

   public class UnitTest1 {
      [TestMethod] public void TestMethod1() {
         StudentViewModel sViewModel = new StudentViewModel();
         int count = sViewModel.GetStudentCount();
         Assert.IsTrue(count == 4);
      }
   }
}
再次執行測試計劃時,您將看到測試失敗,因為學生數量不等於 4。

我們建議您逐步執行上述示例,以便更好地理解。
MVVM – 框架
在本章中,我們將討論可用的 MVVM 工具包或框架。您也可以使用這些框架,這樣您就不必編寫大量重複的程式碼來自己實現 MVVM 模式。以下是一些最流行的框架:
- Prism
- MVVM Light
- Caliburn Micro

Prism
Prism 提供示例和文件形式的指導,幫助您輕鬆設計和構建豐富、靈活且易於維護的 Windows Presentation Foundation (WPF) 桌面應用程式。使用 Microsoft Silverlight 瀏覽器外掛和 Windows 應用程式構建的富網際網路應用程式 (RIA)。
Prism 使用體現重要架構設計原則(例如關注點分離和鬆散耦合)的設計模式。
Prism 幫助您使用鬆散耦合的元件設計和構建應用程式,這些元件可以獨立發展,但可以輕鬆且無縫地整合到整個應用程式中。
這些型別的應用程式被稱為組合應用程式。
Prism 具有許多開箱即用的功能。以下是 Prism 的一些重要功能。
MVVM 模式
Prism 支援 MVVM 模式。它有一個 Bindablebase 類,類似於前面章節中實現的類。
它有一個靈活的 ViewModelLocator,它具有約定,但允許您覆蓋這些約定並以鬆散耦合的方式宣告性地連線您的檢視和 ViewModel。
模組化
這是能夠將程式碼分解成完全鬆散耦合的類庫部件,並在執行時將它們組合成一個對終端使用者而言具有凝聚力的整體,而程式碼仍然完全解耦。
UI 組合/區域
這是能夠將檢視插入容器的能力,而無需進行插入的檢視擁有對 UI 容器本身的顯式引用。
導航
Prism 具有構建在區域之上的導航功能,例如向前和向後導航以及允許您的檢視模型直接參與導航過程的導航堆疊。
命令
Prism 具有命令,因此它們具有一個委託命令,與我們在前面章節中使用的 MyICommand 非常相似,只是它具有一些額外的魯棒性來保護您免受記憶體洩漏。
釋出/訂閱事件
Prism 還支援釋出/訂閱事件。這些是鬆散耦合的事件,其中釋出者和訂閱者可以具有不同的生命週期,並且不必具有彼此的顯式引用即可透過事件進行通訊。
MVVM Light
MVVM Light 由 Laurent Bugnion 製作,可以幫助您將檢視與模型分離,從而建立更清晰、更易於維護和擴充套件的應用程式。
它還可以建立可測試的應用程式,並允許您擁有更精簡的使用者介面層(更難以自動測試)。
此工具包特別強調開啟和編輯使用者介面到 Blend 中,包括建立設計時資料,使 Blend 使用者在使用資料控制元件時能夠“看到一些東西”。
Caliburn Micro
這是另一個小型開源框架,可幫助您實現 MVVM 模式,並開箱即用地支援許多功能。
Caliburn Micro 是一個小型但功能強大的框架,專為跨所有 XAML 平臺構建應用程式而設計。
憑藉對 MVVM 和其他成熟的 UI 模式的強大支援,Caliburn Micro 將使您能夠快速構建解決方案,而無需犧牲程式碼質量或可測試性。