- MFC 教程
- MFC - 首頁
- MFC - 概述
- MFC - 環境設定
- MFC - VC++ 專案
- MFC - 入門
- MFC - Windows 基礎
- MFC - 對話方塊
- MFC - Windows 資源
- MFC - 屬性表
- MFC - 窗口布局
- MFC - 控制元件管理
- MFC - Windows 控制元件
- MFC - 訊息和事件
- MFC - ActiveX 控制元件
- MFC - 檔案系統
- MFC - 標準 I/O
- MFC - 文件/檢視
- MFC - 字串
- MFC - CArray
- MFC - 連結串列
- MFC - 資料庫類
- MFC - 序列化
- MFC - 多執行緒
- MFC - Internet 程式設計
- MFC - GDI
- MFC - 庫
- MFC 有用資源
- MFC - 快速指南
- MFC - 有用資源
- MFC - 討論
MFC - 多執行緒
Microsoft Foundation Class (MFC) 庫為多執行緒應用程式提供支援。執行緒是程序中的執行路徑。當您啟動記事本時,作業系統會建立一個程序並開始執行該程序的主執行緒。當此執行緒終止時,程序也會終止。
如果需要,您可以在應用程式中建立其他執行緒。MFC 應用程式中的所有執行緒都由 CWinThread 物件表示。在大多數情況下,您甚至不必顯式建立這些物件;而是呼叫框架輔助函式 AfxBeginThread,它會為您建立 CWinThread 物件。
讓我們透過建立一個新的基於 MFC 對話方塊的應用程式來了解一個簡單的示例。
步驟 1 - 將靜態控制元件的標題和 ID 分別更改為單擊“啟動執行緒”按鈕和IDC_STATIC_TEXT。
步驟 2 - 拖動兩個按鈕併為這些按鈕新增單擊事件處理程式。

步驟 3 - 為靜態文字控制元件新增控制元件變數。
步驟 4 - 現在在 CMFCMultithreadingDlg.cpp 檔案的開頭新增以下三個全域性變數。
int currValue;
int maxValue;
BOOL stopNow;
步驟 5 - 在 CMFCMultithreadingDlg 類中新增 WM_TIMER 訊息。
以下是 OnTimer() 的實現
void CMFCMultithreadingDlg::OnTimer(UINT_PTR nIDEvent) {
   // TODO: Add your message handler code here and/or call default
   CString sStatusMsg;
   sStatusMsg.Format(L"Running: %d", currValue);
   m_ctrlStatus.SetWindowText(sStatusMsg);

   CDialogEx::OnTimer(nIDEvent);
}
步驟 6 - 現在新增一個示例函式,用於在 CMFCMultithreadingDlg 類中的 AfxBeginThread 中使用。
UINT MyThreadProc(LPVOID Param) {
   while (!stopNow && (currValue < maxValue)) {
      currValue++;
      Sleep(50);     // would do some work here
   }

   return TRUE;
}
步驟 7 - 以下是“啟動執行緒”按鈕的事件處理程式的實現,它將啟動執行緒。
void CMFCMultithreadingDlg::OnBnClickedButtonStart() {
   // TODO: Add your control notification handler code here
   currValue = 0;
   maxValue = 5000;
   stopNow = 0;
   m_ctrlStatus.SetWindowText(L"Starting...");
   SetTimer(1234, 333, 0); // 3 times per second

   AfxBeginThread(MyThreadProc, 0); // <<== START THE THREAD
}
步驟 8 - 以下是“停止執行緒”按鈕的事件處理程式的實現,它將停止執行緒。
void CMFCMultithreadingDlg::OnBnClickedButtonStop() {

   // TODO: Add your control notification handler code here
   stopNow = TRUE;
   KillTimer(1234);
   m_ctrlStatus.SetWindowText(L"Stopped");
}
步驟 9 - 以下是完整原始檔。
// MFCMultithreadingDlg.cpp : implementation file
//

#include "stdafx.h"
#include "MFCMultithreading.h"
#include "MFCMultithreadingDlg.h"
#include "afxdialogex.h"

#ifdef _DEBUG
#define new DEBUG_NEW
#endif

// CMFCMultithreadingDlg dialog

int currValue;
int maxValue;
BOOL stopNow;

CMFCMultithreadingDlg::CMFCMultithreadingDlg(CWnd* pParent /* = NULL*/)
   : CDialogEx(IDD_MFCMULTITHREADING_DIALOG, pParent) {
   m_hIcon = AfxGetApp() -> LoadIcon(IDR_MAINFRAME);
}
void CMFCMultithreadingDlg::DoDataExchange(CDataExchange* pDX) {
   CDialogEx::DoDataExchange(pDX);
   DDX_Control(pDX, IDC_STATIC_TEXT, m_ctrlStatus);
}

BEGIN_MESSAGE_MAP(CMFCMultithreadingDlg, CDialogEx)
   ON_WM_PAINT()
   ON_WM_QUERYDRAGICON()
   ON_BN_CLICKED(IDC_BUTTON_START,
      &CMFCMultithreadingDlg::OnBnClickedButtonStart)
   ON_WM_TIMER()
   ON_BN_CLICKED(IDC_BUTTON_STOP,
      &CMFCMultithreadingDlg::OnBnClickedButtonStop)
END_MESSAGE_MAP()

// CMFCMultithreadingDlg message handlers

BOOL CMFCMultithreadingDlg::OnInitDialog() {
   CDialogEx::OnInitDialog();

   // Set the icon for this dialog. The framework does this automatically
   // when the application's main window is not a dialog
   SetIcon(m_hIcon, TRUE);        // Set big icon
   SetIcon(m_hIcon, FALSE);       // Set small icon

   // TODO: Add extra initialization here

   return TRUE; // return TRUE unless you set the focus to a control
}

// If you add a minimize button to your dialog, you will need the code below
// to draw the icon. For MFC applications using the document/view model,
// this is automatically done for you by the framework.

void CMFCMultithreadingDlg::OnPaint() {
   if (IsIconic()) {
      CPaintDC dc(this); // device context for painting
      SendMessage(WM_ICONERASEBKGND,
         reinterpret_cast<WPARAM>(dc.GetSafeHdc()), 0);

      // Center icon in client rectangle
      int cxIcon = GetSystemMetrics(SM_CXICON);
      int cyIcon = GetSystemMetrics(SM_CYICON);
      CRect rect;
      GetClientRect(&rect);
      int x = (rect.Width() - cxIcon + 1) / 2;
      int y = (rect.Height() - cyIcon + 1) / 2;

      // Draw the icon
      dc.DrawIcon(x, y, m_hIcon);
   }else {
      CDialogEx::OnPaint();
   }
}
// The system calls this function to obtain the cursor to display while the user drags
// the minimized window.
HCURSOR CMFCMultithreadingDlg::OnQueryDragIcon() {
   return static_cast<HCURSOR>(m_hIcon);
}

UINT /*CThreadDlg::*/MyThreadProc(LPVOID Param) //Sample function for using in
AfxBeginThread {
   while (!stopNow && (currValue < maxValue)) {
      currValue++;
      Sleep(50); // would do some work here
   }
   return TRUE;
}
void CMFCMultithreadingDlg::OnBnClickedButtonStart() {
   // TODO: Add your control notification handler code here
   currValue = 0;
   maxValue = 5000;
   stopNow = 0;
   m_ctrlStatus.SetWindowText(L"Starting...");
   SetTimer(1234, 333, 0); // 3 times per second

   AfxBeginThread(MyThreadProc, 0); // <<== START THE THREAD
}

void CMFCMultithreadingDlg::OnTimer(UINT_PTR nIDEvent) {
   // TODO: Add your message handler code here and/or call default
   CString sStatusMsg;
   sStatusMsg.Format(L"Running: %d", currValue);
   m_ctrlStatus.SetWindowText(sStatusMsg);

   CDialogEx::OnTimer(nIDEvent);
}

void CMFCMultithreadingDlg::OnBnClickedButtonStop() {
   // TODO: Add your control notification handler code here
   stopNow = TRUE;
   KillTimer(1234);
   m_ctrlStatus.SetWindowText(L"Stopped");
}
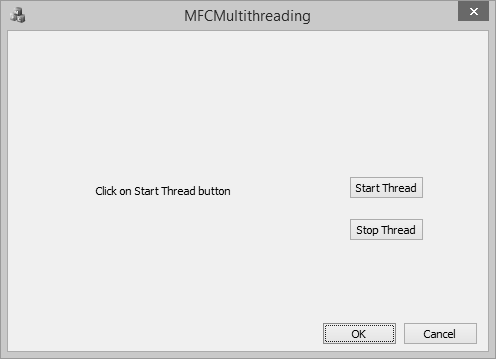
步驟 10 - 編譯並執行上述程式碼後,您將看到以下輸出。
步驟 11 - 現在單擊“啟動執行緒”按鈕。
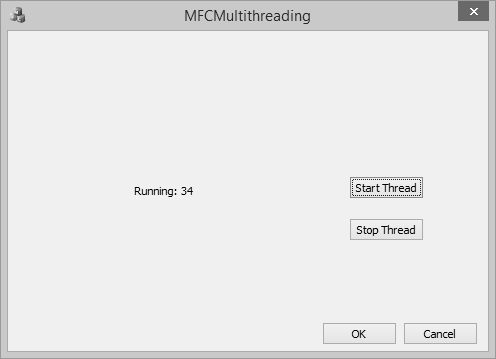
步驟 12 - 單擊“停止執行緒”按鈕。它將停止執行緒。

廣告