- JOGL 圖形形狀
- JOGL - 繪製基礎知識
- JOGL - 使用 GL_Lines 繪製
- JOGL - 預定義形狀
- JOGL 效果和轉換
- JOGL - 轉換
- JOGL - 填充顏色
- JOGL - 縮放
- JOGL - 旋轉
- JOGL - 光照
- JOGL 3D 圖形
- JOGL - 3D 基礎知識
- JOGL - 3D 三角形
- JOGL - 3D 立方體
- JOGL - 附錄
- JOGL 實用資源
- JOGL - 快速指南
- JOGL - 實用資源
- JOGL - 討論
JOGL - 3D 基礎知識
在前幾章中,我們已經瞭解瞭如何建立 2D 物件、對其應用效果以及如何轉換物件。本章將教您如何繪製具有第 3 維度的線和一些形狀。
讓我們繪製一條帶有 z 軸的簡單線,看看 2D 線和 3D 線的區別。首先,繪製一條簡單的線,然後在視窗中向內繪製第二條 3 個單位的線。
讓我們逐步瀏覽該程式,以繪製一條 3D 線 −
import javax.media.opengl.GL2;
import javax.media.opengl.GLAutoDrawable;
import javax.media.opengl.GLCapabilities;
import javax.media.opengl.GLEventListener;
import javax.media.opengl.GLProfile;
import javax.media.opengl.awt.GLCanvas;
import javax.media.opengl.glu.GLU;

import javax.swing.JFrame;

public class Line3d implements GLEventListener {
   private GLU glu = new GLU();

   @Override

   public void display( GLAutoDrawable drawable ) {
      final GL2 gl = drawable.getGL().getGL2();
      gl.glTranslatef( 0f, 0f, -2.5f );
      gl.glBegin( GL2.GL_LINES );
      gl.glVertex3f( -0.75f,0f,0 );
      gl.glVertex3f( 0f,-0.75f, 0 );
      gl.glEnd();

      //3d line
      gl.glBegin( GL2.GL_LINES );
      gl.glVertex3f( -0.75f,0f,3f );// 3 units into the window
      gl.glVertex3f( 0f,-0.75f,3f );
      gl.glEnd();
   }

   @Override
   public void dispose( GLAutoDrawable arg0 ) {
      //method body
   }

   @Override
   public void init( GLAutoDrawable arg0 ) {
      // method body
   }

   @Override
   public void reshape( GLAutoDrawable drawable, int x, int y, int width, int height ) {

      GL2 gl = drawable.getGL().getGL2();

      if( height <= 0 )
         height = 1;

      final float h = ( float ) width / ( float ) height;
      gl.glViewport( 0, 0, width, height );
      gl.glMatrixMode( GL2.GL_PROJECTION );
      gl.glLoadIdentity();

      glu.gluPerspective( 45.0f, h, 1.0, 20.0 );
      gl.glMatrixMode( GL2.GL_MODELVIEW );
      gl.glLoadIdentity();
   }

   public static void main( String[] args ) {

      //getting the capabilities object of GL2 profile
      final GLProfile profile = GLProfile.get( GLProfile.GL2 );
      GLCapabilities capabilities = new GLCapabilities(profile);

      // The canvas
      final GLCanvas glcanvas = new GLCanvas( capabilities );
      Line3d line3d = new Line3d();
      glcanvas.addGLEventListener( line3d );
      glcanvas.setSize( 400, 400 );

      //creating frame
      final JFrame frame = new JFrame (" 3d line");

      //adding canvas to it
      frame.getContentPane().add( glcanvas );
      frame.setSize(frame.getContentPane().getPreferredSize() );
      frame.setVisible( true );
   }//end of main

}//end of class
當您編譯並執行上述程式時,將生成以下輸出 −

透過向 glVertex3f() 方法的 z 象限提供非零值,可以繪製 3D 形狀,這將生成上述檢視。現在,連線剩餘的線將形成一條 3D 邊。
現在,讓我們以相同的方式開發具有第 3 維度的邊。
import javax.media.opengl.GL2;
import javax.media.opengl.GLAutoDrawable;
import javax.media.opengl.GLCapabilities;
import javax.media.opengl.GLEventListener;
import javax.media.opengl.GLProfile;
import javax.media.opengl.awt.GLCanvas;
import javax.media.opengl.glu.GLU;

import javax.swing.JFrame;

public class Edge1 implements GLEventListener {
   private GLU glu = new GLU();

   @Override
   public void display(GLAutoDrawable drawable) {

      // TODO Auto-generated method stub
      final GL2 gl = drawable.getGL().getGL2();
      gl.glTranslatef(0f, 0f, -2.5f);
      gl.glBegin(GL2.GL_LINES);
      gl.glVertex3f(-0.75f,0f,0);
      gl.glVertex3f(0f,-0.75f, 0);
      gl.glEnd();

      //3d line
      gl.glBegin(GL2.GL_LINES);

      //3 units in to the window
      gl.glVertex3f(-0.75f,0f,3f);
      gl.glVertex3f(0f,-0.75f,3f);
      gl.glEnd();

      //top
      gl.glBegin(GL2.GL_LINES);
      gl.glVertex3f(-0.75f,0f,0);
      gl.glVertex3f(-0.75f,0f,3f);
      gl.glEnd();

      //bottom
      gl.glBegin(GL2.GL_LINES);
      gl.glVertex3f(0f,-0.75f, 0);
      gl.glVertex3f(0f,-0.75f,3f);
      gl.glEnd();
   }

   @Override
   public void dispose(GLAutoDrawable arg0) {
      //method body
   }

   @Override
   public void init(GLAutoDrawable arg0) {
      // method body
   }

   @Override
   public void reshape(GLAutoDrawable drawable, int x, int y, int width, int height) {

      // TODO Auto-generated method stubfinal
      GL2 gl = drawable.getGL().getGL2();
      if(height <= 0)
         height = 1;

      final float h = (float) width / (float) height;
      gl.glViewport(0, 0, width, height);
      gl.glMatrixMode(GL2.GL_PROJECTION);
      gl.glLoadIdentity();

      glu.gluPerspective(45.0f, h, 1.0, 20.0);
      gl.glMatrixMode(GL2.GL_MODELVIEW);
      gl.glLoadIdentity();

   }

   public static void main(String[] args) {

      //getting the capabilities object of GL2 profile
      final GLProfile profile = GLProfile.get(GLProfile.GL2);
      GLCapabilities capabilities = new GLCapabilities(profile);

      // The canvas
      final GLCanvas glcanvas = new GLCanvas(capabilities);
      Edge1 b = new Edge1();
      glcanvas.addGLEventListener(b);
      glcanvas.setSize(400, 400);

      //creating frame
      final JFrame frame = new JFrame (" 3d edge");

      //adding canvas to it
      frame.getContentPane().add(glcanvas);
      frame.setSize(frame.getContentPane().getPreferredSize());
      frame.setVisible(true);
   }//end of main

}//end of class
當您編譯並執行上述程式時,將生成以下輸出 −

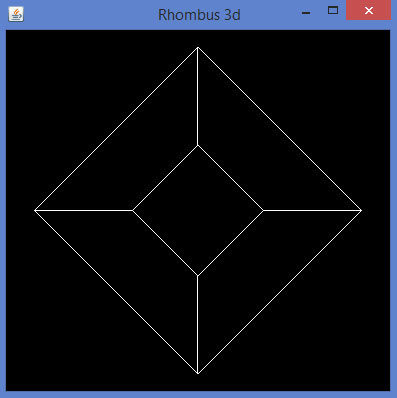
同樣地,透過向任何 2D 四邊形的相應邊開發 3D 邊,然後連線相鄰的頂點,就可以得到一個 3D 四邊形。
下面給出了使用 JOGL 繪製菱形的程式。
import javax.media.opengl.GL2;
import javax.media.opengl.GLAutoDrawable;
import javax.media.opengl.GLCapabilities;
import javax.media.opengl.GLEventListener;
import javax.media.opengl.GLProfile;
import javax.media.opengl.awt.GLCanvas;
import javax.media.opengl.glu.GLU;

import javax.swing.JFrame;

public class Rhombus implements GLEventListener {
   private GLU glu = new GLU();

   @Override
   public void display(GLAutoDrawable drawable) {

      final GL2 gl = drawable.getGL().getGL2();
      gl.glTranslatef(0f, 0f, -2.5f);

      //drawing edge1.....
      gl.glBegin(GL2.GL_LINES);
      gl.glVertex3f(-0.75f,0f,0);
      gl.glVertex3f(0f,-0.75f, 0);
      gl.glEnd();

      gl.glBegin(GL2.GL_LINES);
      gl.glVertex3f(-0.75f,0f,3f); // 3 units into the window
      gl.glVertex3f(0f,-0.75f,3f);
      gl.glEnd();

      //top
      gl.glBegin(GL2.GL_LINES);
      gl.glVertex3f(-0.75f,0f,0);
      gl.glVertex3f(-0.75f,0f,3f);
      gl.glEnd();

      // bottom
      gl.glBegin(GL2.GL_LINES);
      gl.glVertex3f(0f,-0.75f, 0);
      gl.glVertex3f(0f,-0.75f,3f);
      gl.glEnd();

      // edge 2....
      gl.glBegin(GL2.GL_LINES);
      gl.glVertex3f(0f,-0.75f, 0);
      gl.glVertex3f(0.75f,0f, 0);
      gl.glEnd();

      gl.glBegin(GL2.GL_LINES);
      gl.glVertex3f(0f,-0.75f, 3f);
      gl.glVertex3f(0.75f,0f, 3f);
      gl.glEnd();

      gl.glBegin(GL2.GL_LINES);
      gl.glVertex3f(0f,-0.75f, 0);
      gl.glVertex3f(0f,-0.75f, 3f);
      gl.glEnd();

      gl.glBegin(GL2.GL_LINES);
      gl.glVertex3f(0.75f,0f, 0);
      gl.glVertex3f(0.75f,0f, 3f);
      gl.glEnd();

      //Edge 3.............
      gl.glBegin(GL2.GL_LINES);
      gl.glVertex3f( 0.0f,0.75f,0);
      gl.glVertex3f(-0.75f,0f,0);
      gl.glEnd();

      gl.glBegin(GL2.GL_LINES);
      gl.glVertex3f( 0.0f,0.75f,3f);
      gl.glVertex3f(-0.75f,0f,3f);
      gl.glEnd();

      gl.glBegin(GL2.GL_LINES);
      gl.glVertex3f( 0.0f,0.75f,0);
      gl.glVertex3f( 0.0f,0.75f,3f);
      gl.glEnd();

      gl.glBegin(GL2.GL_LINES);
      gl.glVertex3f(-0.75f,0f,0);
      gl.glVertex3f(-0.75f,0f,3f);
      gl.glEnd();

      //final edge
      gl.glBegin(GL2.GL_LINES);
      gl.glVertex3f(0.75f,0f, 0);
      gl.glVertex3f( 0.0f,0.75f,0);
      gl.glEnd();

      gl.glBegin(GL2.GL_LINES);
      gl.glVertex3f(0.75f,0f,3f);
      gl.glVertex3f( 0.0f,0.75f,3f);
      gl.glEnd();

      gl.glBegin(GL2.GL_LINES);
      gl.glVertex3f(0.75f,0f, 0);
      gl.glVertex3f(0.75f,0f,3f);
      gl.glEnd();

      gl.glBegin(GL2.GL_LINES);
      gl.glVertex3f( 0.0f,0.75f,0);
      gl.glVertex3f( 0.0f,0.75f,3f);
      gl.glEnd();
   }

   @Override
   public void dispose(GLAutoDrawable arg0) {
      //method body
   }

   @Override
   public void init(GLAutoDrawable arg0) {
      // method body
   }

   @Override
   public void reshape(GLAutoDrawable drawable, int x, int y, int width, int height) {

      // TODO Auto-generated method stub final
      GL2 gl = drawable.getGL().getGL2();
      if(height lt;= 0)
         height = 1;

      final float h = (float) width / (float) height;
      gl.glViewport(3, 6, width, height);
      gl.glMatrixMode(GL2.GL_PROJECTION);
      gl.glLoadIdentity();

      glu.gluPerspective(45.0f, h, 1.0, 20.0);
      gl.glMatrixMode(GL2.GL_MODELVIEW);
      gl.glLoadIdentity();
   }

   public static void main(String[] args) {

      //getting the capabilities object of GL2 profile
      final GLProfile profile = GLProfile.get(GLProfile.GL2);
      GLCapabilities capabilities = new GLCapabilities(profile);

      // The canvas
      final GLCanvas glcanvas = new GLCanvas(capabilities);
      Rhombus b = new Rhombus();
      glcanvas.addGLEventListener(b);
      glcanvas.setSize(400, 400);

      //creating frame
      final JFrame frame = new JFrame (" Rhombus 3d");

      //adding canvas to it
      frame.getContentPane().add(glcanvas);
      frame.setSize(frame.getContentPane().getPreferredSize());
      frame.setVisible(true);
   }//end of main

}//end of classimport javax.media.opengl.GL2;
當您編譯並執行上述程式時,將生成以下輸出。它顯示了使用 3D 線繪製的菱形。
glBegin() 方法的預定義引數可用於繪製 3D 形狀。
廣告