- Flutter 教程
- Flutter - 首頁
- Flutter - 簡介
- Flutter - 安裝
- 在 Android Studio 中建立簡單應用程式
- Flutter - 架構應用程式
- Dart 程式設計入門
- Flutter - Widget 入門
- Flutter - 佈局入門
- Flutter - 手勢入門
- Flutter - 狀態管理
- Flutter - 動畫
- Flutter - 編寫 Android 特定程式碼
- Flutter - 編寫 iOS 特定程式碼
- Flutter - 包入門
- Flutter - 訪問 REST API
- Flutter - 資料庫概念
- Flutter - 國際化
- Flutter - 測試
- Flutter - 部署
- Flutter - 開發工具
- Flutter - 編寫高階應用程式
- Flutter - 總結
- Flutter 有用資源
- Flutter - 快速指南
- Flutter - 有用資源
- Flutter - 討論
Flutter - 快速指南
Flutter - 簡介
通常,開發移動應用程式是一項複雜且具有挑戰性的任務。有很多框架可用於開發移動應用程式。Android 提供了一個基於 Java 語言的原生框架,而 iOS 提供了一個基於 Objective-C/Swift 語言的原生框架。
但是,要開發支援這兩個作業系統的應用程式,我們需要使用兩種不同的框架用兩種不同的語言進行編碼。為了幫助克服這種複雜性,存在支援這兩個作業系統的移動框架。這些框架從簡單的基於 HTML 的混合移動應用程式框架(使用 HTML 作為使用者介面和 JavaScript 作為應用程式邏輯)到複雜的特定語言框架(承擔將程式碼轉換為原生程式碼的繁重工作)不等。無論其簡單性或複雜性如何,這些框架總是有很多缺點,其中一個主要缺點是其效能緩慢。
在這種情況下,Flutter——一個基於 Dart 語言的簡單且高效能的框架,透過直接在作業系統的畫布上渲染 UI 而不是透過原生框架來提供高效能。
Flutter 還提供了許多現成的 Widget(UI)來建立現代應用程式。這些 Widget 已針對移動環境進行了最佳化,使用 Widget 設計應用程式就像設計 HTML 一樣簡單。
具體來說,Flutter 應用程式本身就是一個 Widget。Flutter Widget 也支援動畫和手勢。應用程式邏輯基於響應式程式設計。Widget 可以選擇具有狀態。透過更改 Widget 的狀態,Flutter 將自動(響應式程式設計)比較 Widget 的狀態(舊的和新的),並僅使用必要的更改渲染 Widget,而不是重新渲染整個 Widget。
我們將在接下來的章節中討論完整的架構。
Flutter 的特性
Flutter 框架為開發人員提供了以下特性:
現代且響應式的框架。
使用 Dart 程式語言,非常容易學習。
快速開發。
美觀流暢的使用者介面。
龐大的 Widget 目錄。
在多個平臺上執行相同的 UI。
高效能應用程式。
Flutter 的優勢
Flutter 配備了美觀且可自定義的 Widget,可實現高效能和出色的移動應用程式。它滿足所有自定義需求和要求。除此之外,Flutter 還提供了許多其他優勢,如下所述:
Dart 擁有大量的軟體包儲存庫,可讓您擴充套件應用程式的功能。
開發人員只需要為兩個應用程式(Android 和 iOS 平臺)編寫一個程式碼庫。Flutter 未來也可能擴充套件到其他平臺。
Flutter 需要較少的測試。由於其單一程式碼庫,如果我們為這兩個平臺編寫一次自動化測試就足夠了。
Flutter 的簡單性使其成為快速開發的理想選擇。其自定義能力和可擴充套件性使其更加強大。
使用 Flutter,開發人員可以完全控制 Widget 及其佈局。
Flutter 提供了很棒的開發者工具,以及令人驚歎的熱過載功能。
Flutter 的缺點
儘管 Flutter 擁有眾多優點,但它也存在以下缺點:
由於它是用 Dart 語言編寫的,因此開發人員需要學習新的語言(儘管它很容易學習)。
現代框架儘可能地將邏輯和 UI 分開,但在 Flutter 中,使用者介面和邏輯是混合在一起的。我們可以透過智慧編碼和使用高階模組來分離使用者介面和邏輯來克服這一點。
Flutter 只是另一個用於建立移動應用程式的框架。在使用者數量龐大的細分市場中,開發人員難以選擇合適的開發工具。
Flutter - 安裝
本章將詳細指導您在本地計算機上安裝 Flutter。
在 Windows 上安裝
在本節中,讓我們看看如何在 Windows 系統中安裝Flutter SDK及其要求。
步驟 1 - 訪問 URL,https://flutter.club.tw/docs/get-started/install/windows 並下載最新的 Flutter SDK。截至 2019 年 4 月,版本為 1.2.1,檔案為 flutter_windows_v1.2.1-stable.zip。
步驟 2 - 將 zip 壓縮檔案解壓縮到一個資料夾中,例如 C:\flutter\
步驟 3 - 更新系統路徑以包含 flutter bin 目錄。
步驟 4 - Flutter 提供了一個工具 flutter doctor,用於檢查是否滿足 Flutter 開發的所有要求。
flutter doctor
步驟 5 - 執行上述命令將分析系統並顯示其報告,如下所示:
Doctor summary (to see all details, run flutter doctor -v):
[√] Flutter (Channel stable, v1.2.1, on Microsoft Windows [Version
10.0.17134.706], locale en-US)
[√] Android toolchain - develop for Android devices (Android SDK version
28.0.3)
[√] Android Studio (version 3.2)
[√] VS Code, 64-bit edition (version 1.29.1)
[!] Connected device
! No devices available
! Doctor found issues in 1 category.
該報告表明所有開發工具都可用,但裝置未連線。我們可以透過 USB 連線 Android 裝置或啟動 Android 模擬器來解決此問題。
步驟 6 - 安裝最新的 Android SDK(如果 flutter doctor 報告需要)。
步驟 7 - 安裝最新的 Android Studio(如果 flutter doctor 報告需要)。
步驟 8 - 啟動 Android 模擬器或將真實的 Android 裝置連線到系統。
步驟 9 - 為 Android Studio 安裝 Flutter 和 Dart 外掛。它提供了啟動模板以建立新的 Flutter 應用程式,以及在 Android Studio 本身中執行和除錯 Flutter 應用程式的選項等。
開啟 Android Studio。
單擊檔案 → 設定 → 外掛。
選擇 Flutter 外掛並單擊安裝。
當提示安裝 Dart 外掛時,單擊是。
重新啟動 Android Studio。
在 macOS 上安裝
要在 macOS 上安裝 Flutter,您需要執行以下步驟:
步驟 1 - 訪問 URL,https://flutter.club.tw/docs/get-started/install/macos 並下載最新的 Flutter SDK。截至 2019 年 4 月,版本為 1.2.1,檔案為 flutter_macos_v1.2.1-stable.zip。
步驟 2 - 將 zip 壓縮檔案解壓縮到一個資料夾中,例如 /path/to/flutter
步驟 3 - 更新系統路徑以包含 flutter bin 目錄(在 ~/.bashrc 檔案中)。
> export PATH = "$PATH:/path/to/flutter/bin"
步驟 4 - 使用以下命令在當前會話中啟用更新的路徑,然後對其進行驗證。
source ~/.bashrc
source $HOME/.bash_profile
echo $PATH
Flutter 提供了一個工具 flutter doctor,用於檢查是否滿足 Flutter 開發的所有要求。它類似於 Windows 版本。
步驟 5 - 安裝最新的 XCode(如果 flutter doctor 報告需要)。
步驟 6 - 安裝最新的 Android SDK(如果 flutter doctor 報告需要)。
步驟 7 - 安裝最新的 Android Studio(如果 flutter doctor 報告需要)。
步驟 8 - 啟動 Android 模擬器或將真實的 Android 裝置連線到系統以開發 Android 應用程式。
步驟 9 - 開啟 iOS 模擬器或將真實的 iPhone 裝置連線到系統以開發 iOS 應用程式。
步驟 10 - 為 Android Studio 安裝 Flutter 和 Dart 外掛。它提供了啟動模板以建立新的 Flutter 應用程式,以及在 Android Studio 本身中執行和除錯 Flutter 應用程式的選項等。
開啟 Android Studio
單擊首選項 → 外掛
選擇 Flutter 外掛並單擊安裝
當提示安裝 Dart 外掛時,單擊是。
重新啟動 Android Studio。
在 Android Studio 中建立簡單應用程式
在本章中,讓我們建立一個簡單的Flutter應用程式,以瞭解在 Android Studio 中建立 Flutter 應用程式的基本知識。
步驟 1 - 開啟 Android Studio
步驟 2 - 建立 Flutter 專案。為此,請單擊檔案 → 新建 → 新建 Flutter 專案
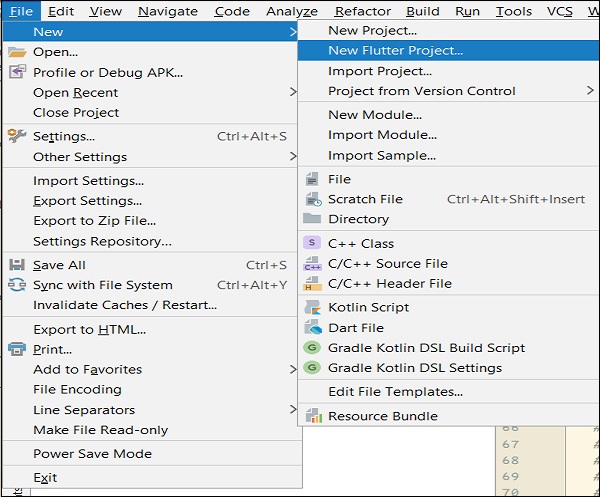
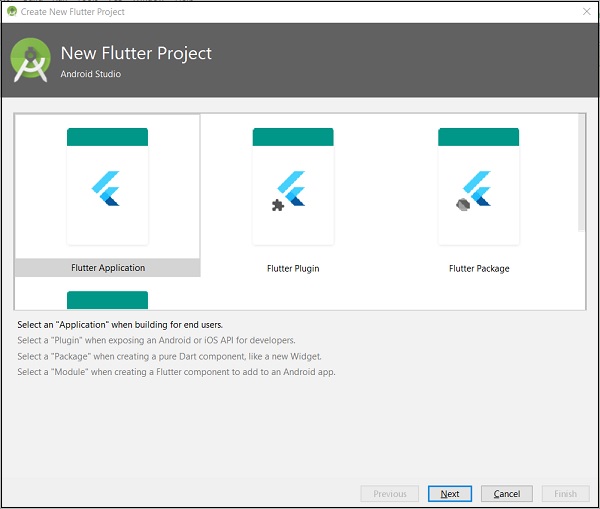
步驟 3 - 選擇 Flutter 應用程式。為此,請選擇Flutter 應用程式並單擊下一步。
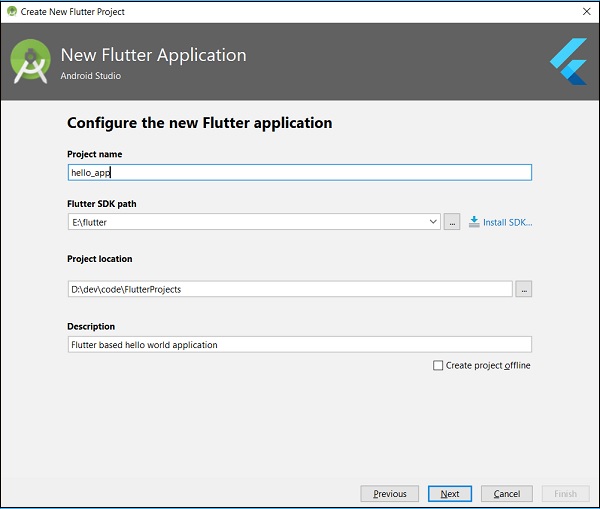
步驟 4 - 按如下所示配置應用程式,然後單擊下一步。
專案名稱:hello_app
Flutter SDK 路徑:<path_to_flutter_sdk>
專案位置:<path_to_project_folder>
描述:基於 Flutter 的 Hello World 應用程式
步驟 5 - 配置專案。
將公司域名設定為flutterapp.tutorialspoint.com,然後單擊完成。
步驟 6 - 輸入公司域名。
Android Studio 建立了一個功能最少的完全可用的 Flutter 應用程式。讓我們檢查一下應用程式的結構,然後更改程式碼以執行我們的任務。
應用程式的結構及其用途如下:
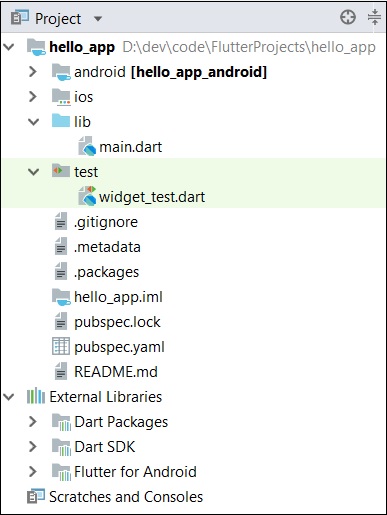
此處解釋了應用程式結構的各個元件:
android - 自動生成的原始碼以建立 Android 應用程式
ios - 自動生成的原始碼以建立 iOS 應用程式
lib - 包含使用 Flutter 框架編寫的 Dart 程式碼的主要資料夾
lib/main.dart - Flutter 應用程式的入口點
test - 包含用於測試 Flutter 應用程式的 Dart 程式碼的資料夾
test/widget_test.dart - 示例程式碼
.gitignore - Git 版本控制檔案
.metadata - 由 Flutter 工具自動生成
.packages - 自動生成以跟蹤 Flutter 包
.iml - Android Studio 使用的專案檔案
pubspec.yaml - 由Pub(Flutter 包管理器)使用
pubspec.lock - 由 Flutter 包管理器Pub自動生成
README.md - 用 Markdown 格式編寫的專案描述檔案
步驟 7 - 將lib/main.dart 檔案中的 Dart 程式碼替換為以下程式碼:
import 'package:flutter/material.dart';

void main() => runApp(MyApp());

class MyApp extends StatelessWidget {
   // This widget is the root of your application.
   @override
   Widget build(BuildContext context) {
      return MaterialApp(
         title: 'Hello World Demo Application',
         theme: ThemeData(
            primarySwatch: Colors.blue,
         ),
         home: MyHomePage(title: 'Home page'),
      );
   }
}
class MyHomePage extends StatelessWidget {
   MyHomePage({Key key, this.title}) : super(key: key);
   final String title;

   @override
   Widget build(BuildContext context) {
      return Scaffold(
         appBar: AppBar(
            title: Text(this.title),
         ),
         body: Center(
            child:
            Text(
               'Hello World',
            )
         ),
      );
   }
}
讓我們逐行了解 Dart 程式碼。
第 1 行 - 匯入 Flutter 包material。material 是一個 Flutter 包,用於根據 Android 指定的材料設計指南建立使用者介面。
第 3 行 - 這是 Flutter 應用程式的入口點。呼叫runApp函式並向其傳遞MyApp類的物件。runApp函式的目的是將給定的 Widget 附加到螢幕上。
第 5-17 行 - Widget 用於在 Flutter 框架中建立 UI。StatelessWidget是一個 Widget,它不維護 Widget 的任何狀態。MyApp擴充套件了StatelessWidget並覆蓋了其build 方法。build方法的目的是建立應用程式 UI 的一部分。這裡,build方法使用MaterialApp,一個 Widget 來建立應用程式的根級 UI。它具有三個屬性 - title、theme和home。
title是應用程式的標題
theme是 Widget 的主題。在這裡,我們使用ThemeData類及其屬性primarySwatch將藍色設定為應用程式的整體顏色。
home 是應用程式的內部 UI,我們設定了另一個 Widget,MyHomePage
第 19 - 38 行 − MyHomePage 與 MyApp 相同,除了它返回 Scaffold 元件。Scaffold 是一個頂級元件,與 MaterialApp 元件並列使用,用於建立符合 Material Design 的 UI。它有兩個重要的屬性,appBar 用於顯示應用程式的標題,body 用於顯示應用程式的實際內容。AppBar 是另一個用於渲染應用程式標題的元件,我們已在 appBar 屬性中使用它。在 body 屬性中,我們使用了 Center 元件,它將它的子元件居中。Text 是最終的也是最內部的元件,用於顯示文字,它顯示在螢幕的中央。
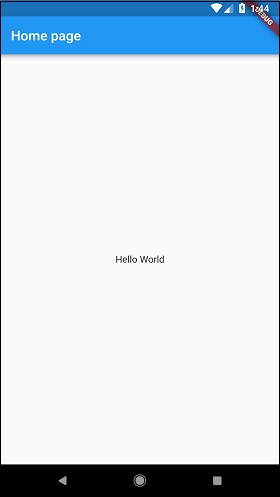
步驟 8 − 現在,使用 執行 → 執行 main.dart 執行應用程式。
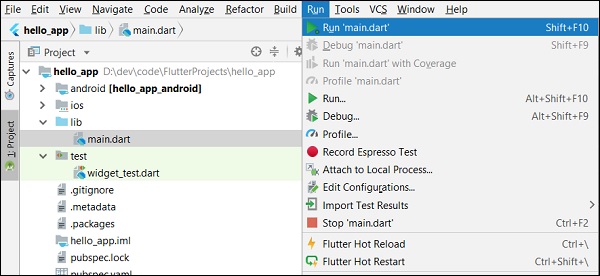
步驟 9 − 最後,應用程式的輸出如下所示 −
Flutter - 架構應用程式
在本章中,讓我們討論 Flutter 框架的架構。
元件
Flutter 框架的核心概念是 在 Flutter 中,一切皆為元件。元件基本上是用於建立應用程式使用者介面的使用者介面元件。
在 Flutter 中,應用程式本身就是一個元件。應用程式是頂級元件,其 UI 使用一個或多個子元件(元件)構建,這些子元件又使用其子元件構建。這種 組合性 特性幫助我們建立任何複雜度的使用者介面。
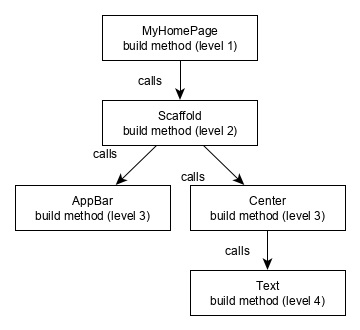
例如,Hello World 應用程式(在上一章中建立)的元件層次結構如下所示 −
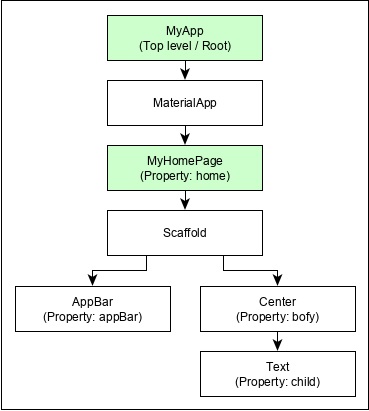
這裡以下幾點值得注意 −
MyApp 是使用者建立的元件,它使用 Flutter 原生元件 MaterialApp 構建。
MaterialApp 有一個 home 屬性來指定主頁的使用者介面,它又是一個使用者建立的元件 MyHomePage。
MyHomePage 使用另一個 Flutter 原生元件 Scaffold 構建
Scaffold 具有兩個屬性 – body 和 appBar
body 用於指定其主要使用者介面,appBar 用於指定其標題使用者介面
標題 UI 使用 Flutter 原生元件 AppBar 構建,主體 UI 使用 Center 元件構建。
Center 元件有一個屬性 Child,它引用實際內容,並且它使用 Text 元件構建
手勢
Flutter 元件透過一個特殊的元件 GestureDetector 支援互動。GestureDetector 是一個不可見的元件,能夠捕獲使用者互動,例如其子元件的點選、拖動等。Flutter 的許多原生元件都透過使用 GestureDetector 支援互動。我們還可以透過將 GestureDetector 元件與現有元件組合來將互動功能整合到現有元件中。我們將在後續章節中單獨學習手勢。
狀態的概念
Flutter 元件透過提供一個特殊的元件 StatefulWidget 來支援 狀態維護。元件需要從 StatefulWidget 元件派生才能支援狀態維護,所有其他元件都應該從 StatefulWidget 派生。Flutter 元件在原生中是 反應式 的。這類似於 reactjs,並且 StatefulWidget 只要其內部狀態發生變化就會自動重新渲染。重新渲染透過查詢舊元件 UI 和新元件 UI 之間的差異並僅渲染必要的更改來進行最佳化
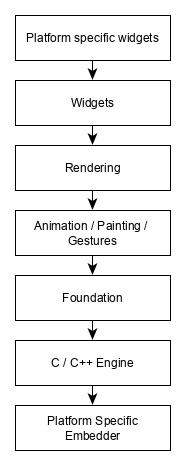
層
Flutter 框架最重要的概念是,該框架根據複雜性被分為多個類別,並以複雜度遞減的順序清晰地排列在多層中。一層使用其緊鄰下一層構建。最頂層是特定於 Android 和 iOS 的元件。下一層包含所有 Flutter 原生元件。下一層是 渲染層,它是一個低階渲染器元件,渲染 Flutter 應用中的所有內容。層級一直延伸到核心平臺特定程式碼
Flutter 中層的概覽如下所示 −
以下幾點總結了 Flutter 的架構 −
在 Flutter 中,一切皆為元件,一個複雜的元件是由已存在的元件組合而成的。
必要時可以使用 GestureDetector 元件整合互動功能。
必要時可以使用 StatefulWidget 元件維護元件的狀態。
Flutter 提供分層設計,以便可以根據任務的複雜性對任何層進行程式設計。
我們將在後續章節中詳細討論所有這些概念。
Flutter - Dart 程式設計入門
Dart 是一種開源通用程式語言。它最初由 Google 開發。Dart 是一種面向物件的語言,具有 C 風格的語法。它支援諸如介面、類等程式設計概念,與其他程式語言不同,Dart 不支援陣列。Dart 集合可用於複製資料結構,如陣列、泛型和可選型別。
以下程式碼顯示了一個簡單的 Dart 程式 −
void main() {
   print("Dart language is easy to learn");
}
變數和資料型別
變數 是命名的儲存位置,資料型別 只是指與變數和函式關聯的資料的型別和大小。
Dart 使用 var 關鍵字宣告變數。var 的語法定義如下:
var name = 'Dart';
final 和 const 關鍵字用於宣告常量。它們定義如下 −
void main() {
   final a = 12;
   const pi = 3.14;
   print(a);
   print(pi);
}
Dart 語言支援以下資料型別 −
數字 − 用於表示數字字面量 - 整數和雙精度浮點數。
字串 − 表示一系列字元。字串值用單引號或雙引號指定。
布林值 − Dart 使用 bool 關鍵字表示布林值 - true 和 false。
列表和對映 − 用於表示物件的集合。一個簡單的列表可以定義如下 −。
void main() {
   var list = [1,2,3,4,5];
   print(list);
}
上面顯示的列表生成 [1,2,3,4,5] 列表。
對映可以定義如下 −
void main() {
   var mapping = {'id': 1,'name':'Dart'};
   print(mapping);
}
動態 − 如果未定義變數型別,則其預設型別為動態。以下示例說明了動態型別變數 −
void main() {
   dynamic name = "Dart";
   print(name);
}
決策和迴圈
決策塊在執行指令之前評估條件。Dart 支援 If、If..else 和 switch 語句。
迴圈用於重複執行程式碼塊,直到滿足特定條件。Dart 支援 for、for..in、while 和 do..while 迴圈。
讓我們瞭解一個關於控制語句和迴圈用法的簡單示例 −
void main() {
   for( var i = 1 ; i <= 10; i++ ) {
      if(i%2==0) {
         print(i);
      }
   }
}
以上程式碼列印從 1 到 10 的偶數。
函式
函式是一組語句,它們一起執行特定的任務。讓我們看看這裡顯示的 Dart 中的一個簡單函式 −
void main() {
   add(3,4);
}
void add(int a,int b) {
   int c;
   c = a+b;
   print(c);
}
以上函式將兩個值相加,並生成 7 作為輸出。
面向物件程式設計
Dart 是一種面向物件的語言。它支援面向物件的程式設計特性,如類、介面等。
類是建立物件的藍圖。類定義包括以下內容 −
- 欄位
- Getter 和 Setter
- 建構函式
- 函式
現在,讓我們使用以上定義建立一個簡單的類 −
class Employee {
   String name;

   //getter method
   String get emp_name {
      return name;
   }
   //setter method
   void set emp_name(String name) {
      this.name = name;
   }
   //function definition
   void result() {
      print(name);
   }
}
void main() {
   //object creation
   Employee emp = new Employee();
   emp.name = "employee1";
   emp.result(); //function call
}
Flutter - Widget 入門
正如我們在上一章中學到的,元件在 Flutter 框架中無處不在。我們已經在前面的章節中學習瞭如何在前面的章節中建立新的元件。
在本章中,讓我們瞭解建立元件背後的實際概念以及 Flutter 框架中提供的不同型別的元件。
讓我們檢查 Hello World 應用程式的 MyHomePage 元件。為此目的的程式碼如下所示 −
class MyHomePage extends StatelessWidget {
   MyHomePage({Key key, this.title}) : super(key: key);

   final String title;
   @override
   Widget build(BuildContext context) {
      return Scaffold(
         appBar: AppBar(title: Text(this.title), ),
         body: Center(child: Text( 'Hello World',)),
      );
   }
}
在這裡,我們透過擴充套件 StatelessWidget 建立了一個新的元件。
請注意,StatelessWidget 只需要在派生類中實現一個單一方法 build。build 方法獲取構建元件所需的上下文環境,透過 BuildContext 引數,並返回它構建的元件。
在程式碼中,我們使用了 title 作為建構函式引數之一,還使用了 Key 作為另一個引數。title 用於顯示標題,Key 用於在構建環境中識別元件。
在這裡,build 方法呼叫 Scaffold 的 build 方法,後者又呼叫 AppBar 和 Center 的 build 方法來構建其使用者介面。
最後,Center 的 build 方法呼叫 Text 的 build 方法。
為了更好地理解,下面給出了相同的視覺化表示 −
元件構建視覺化
在 Flutter 中,元件可以根據其功能分為多個類別,如下所示 −
- 平臺特定元件
- 佈局元件
- 狀態維護元件
- 平臺無關/基本元件
現在讓我們詳細討論每個元件。
平臺特定元件
Flutter 具有特定於特定平臺(Android 或 iOS)的元件。
Android 特定元件是根據 Android 作業系統的 Material Design 指南 設計的。Android 特定元件稱為 Material 元件。
iOS 特定元件是根據 Apple 的 Human Interface Guidelines 設計的,它們被稱為 Cupertino 元件。
一些最常用的 Material 元件如下 −
- Scaffold
- AppBar
- BottomNavigationBar
- TabBar
- TabBarView
- ListTile
- RaisedButton
- FloatingActionButton
- FlatButton
- IconButton
- DropdownButton
- PopupMenuButton
- ButtonBar
- TextField
- Checkbox
- Radio
- Switch
- Slider
- 日期和時間選擇器
- SimpleDialog
- AlertDialog
一些最常用的 Cupertino 元件如下 −
- CupertinoButton
- CupertinoPicker
- CupertinoDatePicker
- CupertinoTimerPicker
- CupertinoNavigationBar
- CupertinoTabBar
- CupertinoTabScaffold
- CupertinoTabView
- CupertinoTextField
- CupertinoDialog
- CupertinoDialogAction
- CupertinoFullscreenDialogTransition
- CupertinoPageScaffold
- CupertinoPageTransition
- CupertinoActionSheet
- CupertinoActivityIndicator
- CupertinoAlertDialog
- CupertinoPopupSurface
- CupertinoSlider
佈局元件
在 Flutter 中,可以透過組合一個或多個元件來建立元件。為了將多個元件組合成一個元件,Flutter 提供了大量具有佈局功能的元件。例如,可以使用 Center 元件將子元件居中。
一些流行的佈局元件如下 −
容器(Container) - 一個使用BoxDecoration部件裝飾的矩形框,包含背景、邊框和陰影。
居中(Center) - 將其子部件居中。
行(Row) - 將其子部件水平排列。
列(Column) - 將其子部件垂直排列。
堆疊(Stack) - 將一個部件疊加在另一個部件之上。
我們將在後續的佈局部件簡介章節中詳細介紹佈局部件。
狀態維護元件
在Flutter中,所有部件都派生自StatelessWidget或StatefulWidget。
派生自StatelessWidget的部件不包含任何狀態資訊,但它可能包含派生自StatefulWidget的部件。應用程式的動態特性來自於部件的互動行為以及互動過程中狀態的變化。例如,點選一個計數器按鈕將使計數器的內部狀態增加/減少1,並且Flutter部件的響應特性將使用新的狀態資訊自動重新渲染部件。
我們將在後續的狀態管理章節中詳細學習StatefulWidget部件的概念。
平臺無關/基本元件
Flutter提供了大量的基本部件,可以以平臺無關的方式建立簡單和複雜的使用者介面。讓我們在本節中瞭解一些基本部件。
文字(Text)
Text部件用於顯示一段字串。可以使用style屬性和TextStyle類設定字串的樣式。此目的的示例程式碼如下:
Text('Hello World!', style: TextStyle(fontWeight: FontWeight.bold))
Text部件有一個特殊的建構函式Text.rich,它接受型別為TextSpan的子部件來指定具有不同樣式的字串。TextSpan部件本質上是遞迴的,它接受TextSpan作為其子部件。此目的的示例程式碼如下:
Text.rich(
   TextSpan(
      children: <TextSpan>[
         TextSpan(text: "Hello ", style:
         TextStyle(fontStyle: FontStyle.italic)),
         TextSpan(text: "World", style:
         TextStyle(fontWeight: FontWeight.bold)),
      ],
   ),
)
Text部件最重要的屬性如下:
maxLines,int - 顯示的最大行數
overflow,TextOverFlow - 使用TextOverFlow類指定如何處理視覺溢位
style,TextStyle - 使用TextStyle類指定字串的樣式
textAlign,TextAlign - 使用TextAlign類指定文字的對齊方式,例如右對齊、左對齊、兩端對齊等。
textDirection,TextDirection - 文字流的方向,從左到右或從右到左。
影像(Image)
Image部件用於在應用程式中顯示影像。Image部件提供了不同的建構函式來從多個來源載入影像,如下所示:
Image - 使用ImageProvider的通用影像載入器
Image.asset - 從Flutter專案的資源載入影像
Image.file - 從系統資料夾載入影像
Image.memory - 從記憶體載入影像
Image.Network - 從網路載入影像
在Flutter中載入和顯示影像最簡單的選項是將影像作為應用程式的資源,並在需要時將其載入到部件中。
在專案資料夾中建立一個名為assets的資料夾,並將所需的影像放置其中。
在pubspec.yaml中指定資源,如下所示:
flutter:
   assets:
      - assets/smiley.png
現在,在應用程式中載入並顯示影像。
Image.asset('assets/smiley.png')
下面顯示了Hello World應用程式的MyHomePage部件的完整原始碼和結果。
class MyHomePage extends StatelessWidget {
   MyHomePage({Key key, this.title}) : super(key: key);
   final String title;

   @override
   Widget build(BuildContext context) {
      return Scaffold(
         appBar: AppBar( title: Text(this.title), ),
         body: Center( child: Image.asset("assets/smiley.png")),
      );
   }
}
載入的影像如下所示:

Image部件最重要的屬性如下:
image,ImageProvider - 要載入的實際影像
width,double - 影像的寬度
height,double - 影像的高度
alignment,AlignmentGeometry - 如何在其邊界內對齊影像
圖示(Icon)
Icon部件用於顯示IconData類中描述的字型中的字形。載入簡單電子郵件圖示的程式碼如下:
Icon(Icons.email)
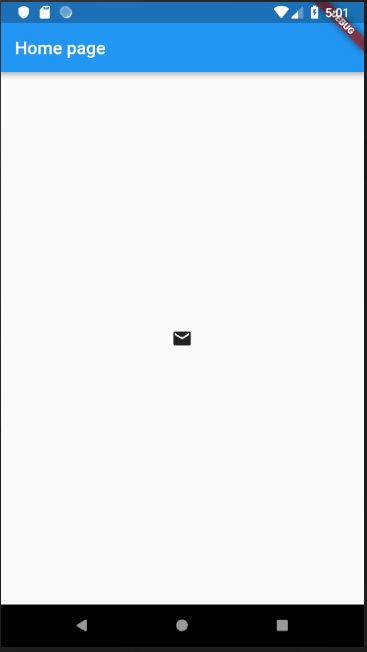
在Hello World應用程式中應用它的完整原始碼如下:
class MyHomePage extends StatelessWidget {
   MyHomePage({Key key, this.title}) : super(key: key);
   final String title;

   @override
   Widget build(BuildContext context) {
      return Scaffold(
         appBar: AppBar(title: Text(this.title),),
         body: Center( child: Icon(Icons.email)),
      );
   }
}
載入的圖示如下所示:
Flutter - 佈局入門
由於Flutter的核心概念是一切皆為部件,因此Flutter將使用者介面佈局功能整合到部件本身。Flutter提供了很多專門設計的部件,例如Container、Center、Align等,僅僅用於佈局使用者介面。透過組合其他部件構建的部件通常使用佈局部件。讓我們在本節中學習Flutter佈局的概念。
佈局部件的型別
根據其子部件,佈局部件可以分為兩類:
- 支援單個子部件的部件
- 支援多個子部件的部件
讓我們在接下來的部分中學習這兩種部件及其功能。
單子部件
在此類別中,部件只有一個部件作為其子部件,並且每個部件都具有特殊的佈局功能。
例如,Center部件只是將其子部件相對於其父部件居中,而Container部件提供了完全的靈活性,可以使用不同的選項(如填充、裝飾等)將其子部件放置在其內部的任何給定位置。
單子部件是建立具有單個功能的高質量部件(如按鈕、標籤等)的絕佳選擇。
使用Container部件建立簡單按鈕的程式碼如下:
class MyButton extends StatelessWidget {
   MyButton({Key key}) : super(key: key);

   @override
   Widget build(BuildContext context) {
      return Container(
         decoration: const BoxDecoration(
            border: Border(
               top: BorderSide(width: 1.0, color: Color(0xFFFFFFFFFF)),
               left: BorderSide(width: 1.0, color: Color(0xFFFFFFFFFF)),
               right: BorderSide(width: 1.0, color: Color(0xFFFF000000)),
               bottom: BorderSide(width: 1.0, color: Color(0xFFFF000000)),
            ),
         ),
         child: Container(
            padding: const
            EdgeInsets.symmetric(horizontal: 20.0, vertical: 2.0),
            decoration: const BoxDecoration(
               border: Border(
                  top: BorderSide(width: 1.0, color: Color(0xFFFFDFDFDF)),
                  left: BorderSide(width: 1.0, color: Color(0xFFFFDFDFDF)),
                  right: BorderSide(width: 1.0, color: Color(0xFFFF7F7F7F)),
                  bottom: BorderSide(width: 1.0, color: Color(0xFFFF7F7F7F)),
               ),
               color: Colors.grey,
            ),
            child: const Text(
               'OK',textAlign: TextAlign.center, style: TextStyle(color: Colors.black)
            ),
         ),
      );
   }
}
這裡,我們使用了兩個部件 - 一個Container部件和一個Text部件。部件的結果是一個自定義按鈕,如下所示:

讓我們檢查一下Flutter提供的一些最重要的單子佈局部件:
Padding - 用於透過給定的填充來排列其子部件。這裡,填充可以透過EdgeInsets類提供。
Align - 使用alignment屬性的值在其內部對齊其子部件。alignment屬性的值可以透過FractionalOffset類提供。FractionalOffset類以距左上角的距離來指定偏移量。
一些可能的偏移量值如下:
FractionalOffset(1.0, 0.0) 表示右上角。
FractionalOffset(0.0, 1.0) 表示左下角。
關於偏移量的示例程式碼如下:
Center(
   child: Container(
      height: 100.0,
      width: 100.0,
      color: Colors.yellow, child: Align(
         alignment: FractionalOffset(0.2, 0.6),
         child: Container( height: 40.0, width:
            40.0, color: Colors.red,
         ),
      ),
   ),
)
FittedBox - 它縮放子部件,然後根據指定的適配方式對其進行定位。
AspectRatio - 它嘗試將子部件的大小調整為指定的縱橫比。
ConstrainedBox
Baseline
FractionalSizedBox
IntrinsicHeight
IntrinsicWidth
LimitedBox
OffStage
OverflowBox
SizedBox
SizedOverflowBox
Transform
CustomSingleChildLayout
我們的Hello World應用程式使用基於Material的佈局部件來設計主頁。讓我們修改我們的Hello World應用程式,使用如下指定的基本佈局部件來構建主頁:
Container - 通用、單子、基於框的容器部件,具有對齊、填充、邊框和邊距以及豐富的樣式功能。
Center - 簡單、單子容器部件,將子部件居中。
下面是MyHomePage和MyApp部件的修改後的程式碼:
class MyApp extends StatelessWidget {
   @override
   Widget build(BuildContext context) {
      return MyHomePage(title: "Hello World demo app");
   }
}
class MyHomePage extends StatelessWidget {
   MyHomePage({Key key, this.title}) : super(key: key);
   final String title;
   @override
   Widget build(BuildContext context) {
      return Container(
         decoration: BoxDecoration(color: Colors.white,),
         padding: EdgeInsets.all(25), child: Center(
            child:Text(
               'Hello World', style: TextStyle(
                  color: Colors.black, letterSpacing: 0.5, fontSize: 20,
               ),
               textDirection: TextDirection.ltr,
            ),
         )
      );
   }
}
這裡,
Container部件是頂級或根部件。Container使用decoration和padding屬性配置其內容佈局。
BoxDecoration具有許多屬性,如顏色、邊框等,用於裝飾Container部件,這裡使用color設定容器的顏色。
Container部件的padding透過使用EdgeInsets類設定,該類提供了指定填充值的選項。
Center是Container部件的子部件。同樣,Text是Center部件的子部件。Text用於顯示訊息,Center用於相對於父部件Container居中顯示文字訊息。
上面給出的程式碼的最終結果是一個佈局示例,如下所示:
多子部件
在此類別中,給定部件將有多個子部件,並且每個部件的佈局都是唯一的。
例如,Row部件允許將其子部件水平排列,而Column部件允許將其子部件垂直排列。透過組合Row和Column,可以構建任何複雜程度的部件。
讓我們在本節中學習一些常用的部件。
Row - 允許將其子部件水平排列。
Column - 允許將其子部件垂直排列。
ListView - 允許將其子部件作為列表排列。
GridView - 允許將其子部件作為畫廊排列。
Expanded - 用於使Row和Column部件的子部件佔用最大可能的區域。
Table - 基於表格的部件。
Flow - 基於流的部件。
Stack - 基於堆疊的部件。
高階佈局應用程式
在本節中,讓我們學習如何使用單子佈局部件和多子佈局部件建立具有自定義設計的複雜產品列表使用者介面。
為此,請按照以下順序操作:
在Android Studio中建立一個新的Flutter應用程式product_layout_app。
將main.dart程式碼替換為以下程式碼:
import 'package:flutter/material.dart';
void main() => runApp(MyApp());

class MyApp extends StatelessWidget {
   // This widget is the root of your application.
   @override
   Widget build(BuildContext context) {
      return MaterialApp(
         title: 'Flutter Demo', theme: ThemeData(
         primarySwatch: Colors.blue,),
         home: MyHomePage(title: 'Product layout demo home page'),
      );
   }
}
class MyHomePage extends StatelessWidget {
   MyHomePage({Key key, this.title}) : super(key: key);
   final String title;

   @override
   Widget build(BuildContext context) {
      return Scaffold(
         appBar: AppBar(title: Text(this.title),),
         body: Center(child: Text( 'Hello World', )),
      );
   }
}
這裡,
我們透過擴充套件StatelessWidget而不是預設的StatefulWidget建立了MyHomePage部件,然後刪除了相關的程式碼。
現在,根據指定的如下所示的設計建立一個新的部件ProductBox:
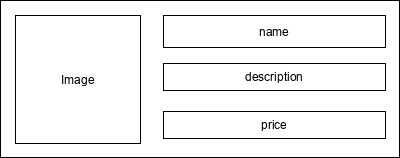
ProductBox的程式碼如下所示。
class ProductBox extends StatelessWidget {
   ProductBox({Key key, this.name, this.description, this.price, this.image})
      : super(key: key);
   final String name;
   final String description;
   final int price;
   final String image;

   Widget build(BuildContext context) {
      return Container(
         padding: EdgeInsets.all(2), height: 120,  child: Card(
            child: Row(
               mainAxisAlignment: MainAxisAlignment.spaceEvenly, children: <Widget>[
                  Image.asset("assets/appimages/" +image), Expanded(
                     child: Container(
                        padding: EdgeInsets.all(5), child: Column(
                           mainAxisAlignment: MainAxisAlignment.spaceEvenly,
                              children: <Widget>[

                              Text(this.name, style: TextStyle(fontWeight:
                                 FontWeight.bold)), Text(this.description),
                              Text("Price: " + this.price.toString()),
                           ],
                        )
                     )
                  )
               ]
            )
         )
      );
   }
}
請注意程式碼中的以下內容:
ProductBox使用了四個引數,如下所示:
name - 產品名稱
description - 產品描述
price - 產品價格
image - 產品圖片
ProductBox使用了七個內建部件,如下所示:
- Container
- Expanded
- Row
- Column
- Card
- 文字(Text)
- 影像(Image)
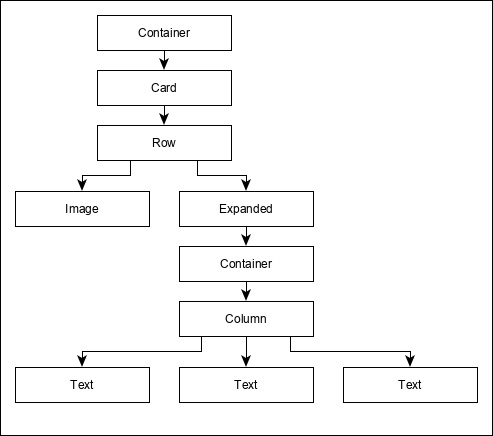
ProductBox使用上述部件進行設計。部件的排列或層次結構在下面所示的圖中指定:
現在,將一些虛擬圖片(見下文)放置到應用程式的assets資料夾中,並在pubspec.yaml檔案中配置assets資料夾,如下所示:
assets:
   - assets/appimages/floppy.png
   - assets/appimages/iphone.png
   - assets/appimages/laptop.png
   - assets/appimages/pendrive.png
   - assets/appimages/pixel.png
   - assets/appimages/tablet.png

iPhone.png
Pixel.png

Laptop.png
Tablet.png

Pendrive.png

Floppy.png
最後,在MyHomePage部件中使用ProductBox部件,如下所示:
class MyHomePage extends StatelessWidget {
   MyHomePage({Key key, this.title}) : super(key: key);
   final String title;

   @override
   Widget build(BuildContext context) {
      return Scaffold(
         appBar: AppBar(title:Text("Product Listing")),
         body: ListView(
            shrinkWrap: true, padding: const EdgeInsets.fromLTRB(2.0, 10.0, 2.0, 10.0),
            children: <Widget> [
               ProductBox(
                  name: "iPhone",
                  description: "iPhone is the stylist phone ever",
                  price: 1000,
                  image: "iphone.png"
               ),
               ProductBox(
                  name: "Pixel",
                  description: "Pixel is the most featureful phone ever",
                  price: 800,
                  image: "pixel.png"
               ),
               ProductBox(
                  name: "Laptop",
                  description: "Laptop is most productive development tool",
                  price: 2000,
                  image: "laptop.png"
               ),
               ProductBox(
                  name: "Tablet",
                  description: "Tablet is the most useful device ever for meeting",
                  price: 1500,
                  image: "tablet.png"
               ),
               ProductBox(
                  name: "Pendrive",
                  description: "Pendrive is useful storage medium",
                  price: 100,
                  image: "pendrive.png"
               ),
               ProductBox(
                  name: "Floppy Drive",
                  description: "Floppy drive is useful rescue storage medium",
                  price: 20,
                  image: "floppy.png"
               ),
            ],
         )
      );
   }
}
這裡,我們使用ProductBox作為ListView部件的子部件。
產品佈局應用程式(product_layout_app)的完整程式碼(main.dart)如下:
import 'package:flutter/material.dart';
void main() => runApp(MyApp());

class MyApp extends StatelessWidget {
   // This widget is the root of your application.
   @override
   Widget build(BuildContext context) {
      return MaterialApp(
         title: 'Flutter Demo', theme: ThemeData(
            primarySwatch: Colors.blue,
         ),
         home: MyHomePage(title: 'Product layout demo home page'),
      );
   }
}
class MyHomePage extends StatelessWidget {
   MyHomePage({Key key, this.title}) : super(key: key);
   final String title;

   @override
   Widget build(BuildContext context) {
      return Scaffold(
         appBar: AppBar(title: Text("Product Listing")),
         body: ListView(
            shrinkWrap: true,
            padding: const EdgeInsets.fromLTRB(2.0, 10.0, 2.0, 10.0),
            children: <Widget>[
               ProductBox(
                  name: "iPhone",
                  description: "iPhone is the stylist phone ever",
                  price: 1000,
                  image: "iphone.png"
               ),
               ProductBox(
                  name: "Pixel",
                  description: "Pixel is the most featureful phone ever",
                  price: 800,
                  image: "pixel.png"
               ),
               ProductBox(
                  name: "Laptop",
                  description: "Laptop is most productive development tool",
                  price: 2000,
                  image: "laptop.png"
               ),
               ProductBox(
                  name: "Tablet",
                  description: "Tablet is the most useful device ever for meeting",
                  price: 1500,
                  image: "tablet.png"
               ),
               ProductBox(
                  name: "Pendrive",
                  description: "Pendrive is useful storage medium",
                  price: 100,
                  image: "pendrive.png"
               ),
               ProductBox(
                  name: "Floppy Drive",
                  description: "Floppy drive is useful rescue storage medium",
                  price: 20,
                  image: "floppy.png"
               ),
            ],
         )
      );
   }
}
class ProductBox extends StatelessWidget {
   ProductBox({Key key, this.name, this.description, this.price, this.image}) :
      super(key: key);
   final String name;
   final String description;
   final int price;
   final String image;

   Widget build(BuildContext context) {
      return Container(
         padding: EdgeInsets.all(2),
         height: 120,
         child: Card(
            child: Row(
               mainAxisAlignment: MainAxisAlignment.spaceEvenly,
               children: <Widget>[
                  Image.asset("assets/appimages/" + image),
                  Expanded(
                     child: Container(
                        padding: EdgeInsets.all(5),
                        child: Column(
                           mainAxisAlignment: MainAxisAlignment.spaceEvenly,
                           children: <Widget>[
                              Text(
                                 this.name, style: TextStyle(
                                    fontWeight: FontWeight.bold
                                 )
                              ),
                              Text(this.description), Text(
                                 "Price: " + this.price.toString()
                              ),
                           ],
                        )
                     )
                  )
               ]
            )
         )
      );
   }
}
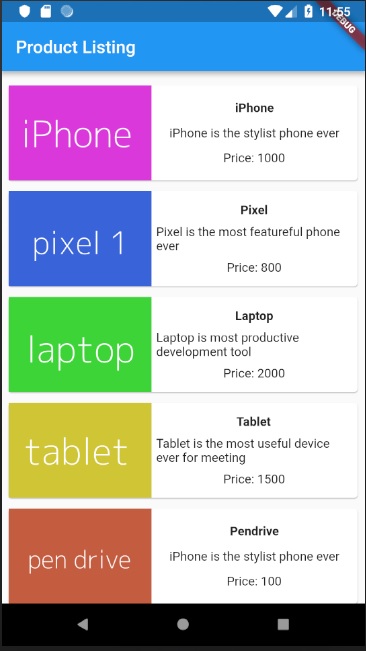
應用程式的最終輸出如下所示:
Flutter - 手勢入門
手勢主要是使用者與移動(或任何基於觸控的裝置)應用程式互動的方式。手勢通常定義為使用者為了啟用移動裝置的特定控制元件而進行的任何物理動作/移動。手勢可以像輕觸移動裝置螢幕一樣簡單,也可以像在遊戲應用程式中使用的更復雜的動作。
這裡提到了一些廣泛使用的手勢:
輕觸(Tap) - 用指尖短暫觸控裝置表面,然後鬆開指尖。
雙擊(Double Tap) - 在短時間內連續點選兩次。
拖動(Drag) - 用指尖觸控裝置表面,然後以穩定的方式移動指尖,最後鬆開指尖。
輕掃(Flick) - 類似於拖動,但以更快的速度進行。
捏合(Pinch) - 使用兩隻手指捏合裝置表面。
散開/縮放(Spread/Zoom) - 捏合的反向操作。
平移 - 用指尖觸碰裝置表面,並在任何方向移動,而不鬆開指尖。
Flutter 透過其獨有的 Widget,GestureDetector,為所有型別的手勢提供了極好的支援。GestureDetector 是一個非視覺 Widget,主要用於檢測使用者的手勢。要識別針對某個 Widget 的手勢,可以將該 Widget 放置在 GestureDetector Widget 內部。GestureDetector 將捕獲手勢並根據手勢分派多個事件。
下面列出了一些手勢及其對應的事件:
- 點選
- onTapDown
- onTapUp
- onTap
- onTapCancel
- 雙擊
- onDoubleTap
- 長按
- onLongPress
- 垂直拖動
- onVerticalDragStart
- onVerticalDragUpdate
- onVerticalDragEnd
- 水平拖動
- onHorizontalDragStart
- onHorizontalDragUpdate
- onHorizontalDragEnd
- 平移
- onPanStart
- onPanUpdate
- onPanEnd
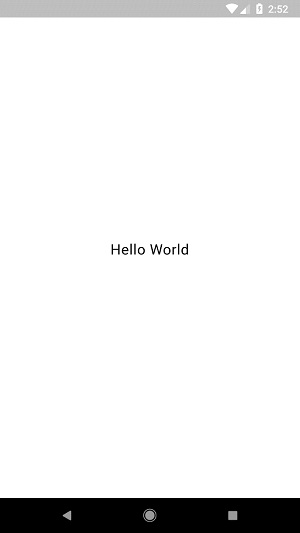
現在,讓我們修改 hello world 應用以包含手勢檢測功能,並嘗試理解這個概念。
將MyHomePage Widget 的主體內容更改為如下所示:
body: Center(
   child: GestureDetector(
      onTap: () {
         _showDialog(context);
      },
      child: Text( 'Hello World', )
   )
),
請注意,在這裡,我們在 Widget 層次結構中將GestureDetector Widget 放置在 Text Widget 上方,捕獲了 onTap 事件,然後最終顯示了一個對話方塊視窗。
實現 *_showDialog* 函式,以便在使用者點選hello world 訊息時顯示對話方塊。它使用通用的showDialog 和AlertDialog Widget 建立一個新的對話方塊 Widget。程式碼如下所示:
// user defined function void _showDialog(BuildContext context) {
   // flutter defined function
   showDialog(
      context: context, builder: (BuildContext context) {
         // return object of type Dialog
         return AlertDialog(
            title: new Text("Message"),
            content: new Text("Hello World"),
            actions: <Widget>[
               new FlatButton(
                  child: new Text("Close"),
                  onPressed: () {
                     Navigator.of(context).pop();
                  },
               ),
            ],
         );
      },
   );
}
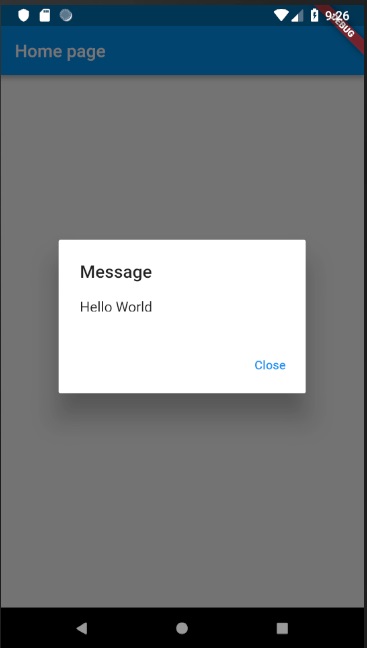
應用程式將使用熱過載功能在裝置中重新載入。現在,只需點選訊息“Hello World”,它將顯示如下所示的對話方塊:
現在,透過點選對話方塊中的關閉選項關閉對話方塊。
完整程式碼(main.dart)如下:
import 'package:flutter/material.dart';
void main() => runApp(MyApp());

class MyApp extends StatelessWidget {
   // This widget is the root of your application.
   @override
   Widget build(BuildContext context) {
      return MaterialApp(
         title: 'Hello World Demo Application',
         theme: ThemeData( primarySwatch: Colors.blue,),
         home: MyHomePage(title: 'Home page'),
      );
   }
}
class MyHomePage extends StatelessWidget {
   MyHomePage({Key key, this.title}) : super(key: key);
   final String title;

   // user defined function
   void _showDialog(BuildContext context) {
      // flutter defined function showDialog(
         context: context, builder: (BuildContext context) {
            // return object of type Dialog return AlertDialog(
               title: new Text("Message"),
               content: new Text("Hello World"),
               actions: <Widget>[
                  new FlatButton(
                     child: new Text("Close"),
                     onPressed: () {
                        Navigator.of(context).pop();
                     },
                  ),
               ],
            );
         },
      );
   }
   @override
   Widget build(BuildContext context) {
      return Scaffold(
         appBar: AppBar(title: Text(this.title),),
         body: Center(
            child: GestureDetector(
               onTap: () {
                  _showDialog(context);
               },
            child: Text( 'Hello World', )
            )
         ),
      );
   }
}
最後,Flutter 還透過Listener Widget 提供了一種低階的手勢檢測機制。它將檢測所有使用者互動,然後分派以下事件:
- PointerDownEvent
- PointerMoveEvent
- PointerUpEvent
- PointerCancelEvent
Flutter 還提供了一小組 Widget 來執行特定以及高階手勢。這些 Widget 列出如下:
Dismissible - 支援輕掃手勢來關閉 Widget。
Draggable - 支援拖動手勢來移動 Widget。
LongPressDraggable - 支援拖動手勢來移動 Widget,當其父 Widget 也可拖動時。
DragTarget - 接受任何Draggable Widget
IgnorePointer - 從手勢檢測過程中隱藏 Widget 及其子元素。
AbsorbPointer - 停止手勢檢測過程本身,因此任何重疊的 Widget 也無法參與手勢檢測過程,因此不會引發任何事件。
Scrollable - 支援滾動 Widget 內可用的內容。
Flutter - 狀態管理
在應用程式中管理狀態是應用程式生命週期中最重要和必要的流程之一。
讓我們考慮一個簡單的購物車應用程式。
使用者將使用其憑據登入應用程式。
使用者登入後,應用程式應在所有螢幕中保留已登入的使用者詳細資訊。
同樣,當用戶選擇產品並將其儲存到購物車中時,購物車資訊應在頁面之間保留,直到使用者結賬。
使用者及其購物車資訊在任何例項中都稱為該例項下應用程式的狀態。
狀態管理可以根據特定狀態在應用程式中持續的時間分為兩類。
短暫的 - 持續幾秒鐘,例如動畫的當前狀態或單個頁面,例如產品的當前評分。Flutter 透過 StatefulWidget 支援它。
應用程式狀態 - 持續整個應用程式,例如已登入的使用者詳細資訊、購物車資訊等。Flutter 透過 scoped_model 支援它。
導航和路由
在任何應用程式中,從一個頁面/螢幕導航到另一個頁面/螢幕定義了應用程式的工作流程。處理應用程式導航的方式稱為路由。Flutter 提供了一個基本的路由類 - MaterialPageRoute 和兩個方法 - Navigator.push 和 Navigator.pop,來定義應用程式的工作流程。
MaterialPageRoute
MaterialPageRoute 是一個 Widget,用於透過用特定於平臺的動畫替換整個螢幕來呈現其 UI。
MaterialPageRoute(builder: (context) => Widget())
在這裡,builder 將接受一個函式來構建其內容,方法是提供應用程式的當前上下文。
Navigation.push
Navigation.push 用於使用 MaterialPageRoute Widget 導航到新螢幕。
Navigator.push( context, MaterialPageRoute(builder: (context) => Widget()), );
Navigation.pop
Navigation.pop 用於導航到上一個螢幕。
Navigator.pop(context);
讓我們建立一個新的應用程式來更好地理解導航概念。
在 Android Studio 中建立一個新的 Flutter 應用程式,product_nav_app
將 assets 資料夾從 product_nav_app 複製到 product_state_app,並在 pubspec.yaml 檔案中新增 assets。
flutter:
   assets:
   - assets/appimages/floppy.png
   - assets/appimages/iphone.png
   - assets/appimages/laptop.png
   - assets/appimages/pendrive.png
   - assets/appimages/pixel.png
   - assets/appimages/tablet.png
將預設啟動程式碼(main.dart)替換為我們的啟動程式碼。
import 'package:flutter/material.dart';
void main() => runApp(MyApp());

class MyApp extends StatelessWidget {
   // This widget is the root of your application.
   @override
   Widget build(BuildContext context) {
      return MaterialApp(
         title: 'Flutter Demo',
         theme: ThemeData(
            primarySwatch: Colors.blue,
         ),
         home: MyHomePage(
            title: 'Product state demo home page'
         ),
      );
   }
}
class MyHomePage extends StatelessWidget {
   MyHomePage({Key key, this.title}) : super(key: key);
   final String title;
   @override
   Widget build(BuildContext context) {
      return Scaffold(
         appBar: AppBar(
            title: Text(this.title),
         ),
         body: Center(
            child: Text('Hello World',)
         ),
      );
   }
}
讓我們建立一個 Product 類來組織產品資訊。
class Product {
   final String name;
   final String description;
   final int price;
   final String image;
   Product(this.name, this.description, this.price, this.image);
}
讓我們在 Product 類中編寫一個 getProducts 方法來生成我們的虛擬產品記錄。
static List<Product> getProducts() {
   List<Product> items = <Product>[];

   items.add(
      Product(
         "Pixel",
         "Pixel is the most feature-full phone ever", 800,
         "pixel.png"
      )
   );
   items.add(
      Product(
         "Laptop",
         "Laptop is most productive development tool",
         2000, "
         laptop.png"
      )
   );
   items.add(
      Product(
         "Tablet",
         "Tablet is the most useful device ever for meeting",
         1500,
         "tablet.png"
      )
   );
   items.add(
      Product(
         "Pendrive",
         "Pendrive is useful storage medium",
         100,
         "pendrive.png"
      )
   );
   items.add(
      Product(
         "Floppy Drive",
         "Floppy drive is useful rescue storage medium",
         20,
         "floppy.png"
      )
   );
   return items;
}
import product.dart in main.dart
import 'Product.dart';
讓我們包含我們的新 Widget,RatingBox。
class RatingBox extends StatefulWidget {
   @override
   _RatingBoxState createState() =>_RatingBoxState();
}
class _RatingBoxState extends State<RatingBox> {
   int _rating = 0;
   void _setRatingAsOne() {
      setState(() {
         _rating = 1;
      });
   }
   void _setRatingAsTwo() {
      setState(() {
         _rating = 2;
      });
   }
   void _setRatingAsThree() {
      setState(() {
         _rating = 3;
      });
   }
   Widget build(BuildContext context) {
      double _size = 20;
      print(_rating);
      return Row(
         mainAxisAlignment: MainAxisAlignment.end,
         crossAxisAlignment: CrossAxisAlignment.end,
         mainAxisSize: MainAxisSize.max,
         children: <Widget>[
            Container(
               padding: EdgeInsets.all(0),
               child: IconButton(
                  icon: (
                     _rating >= 1?
                     Icon(
                        Icons.star,
                        size: _size,
                     )
                     : Icon(
                        Icons.star_border,
                        size: _size,
                     )
                  ),
                  color: Colors.red[500],
                  onPressed: _setRatingAsOne,
                  iconSize: _size,
               ),
            ),
            Container(
               padding: EdgeInsets.all(0),
               child: IconButton(
                  icon: (
                     _rating >= 2?
                     Icon(
                        Icons.star,
                        size: _size,
                     )
                     : Icon(
                        Icons.star_border,
                        size: _size,
                     )
                  ),
                  color: Colors.red[500],
                  onPressed: _setRatingAsTwo,
                  iconSize: _size,
               ),
            ),
            Container(
               padding: EdgeInsets.all(0),
               child: IconButton(
                  icon: (
                     _rating >= 3 ?
                     Icon(
                        Icons.star,
                        size: _size,
                     )
                     : Icon(
                        Icons.star_border,
                        size: _size,
                     )
                  ),
                  color: Colors.red[500],
                  onPressed: _setRatingAsThree,
                  iconSize: _size,
               ),
            ),
         ],
      );
   }
}
讓我們修改我們的 ProductBox Widget 以與我們的新 Product 類一起使用。
class ProductBox extends StatelessWidget {
   ProductBox({Key key, this.item}) : super(key: key);
   final Product item;

   Widget build(BuildContext context) {
      return Container(
         padding: EdgeInsets.all(2),
         height: 140,
         child: Card(
            child: Row(
               mainAxisAlignment: MainAxisAlignment.spaceEvenly,
               children: <Widget>[
                  Image.asset("assets/appimages/" + this.item.image),
                  Expanded(
                     child: Container(
                        padding: EdgeInsets.all(5),
                        child: Column(
                           mainAxisAlignment: MainAxisAlignment.spaceEvenly,
                           children: <Widget>[
                              Text(this.item.name,
                              style: TextStyle(fontWeight: FontWeight.bold)),
                              Text(this.item.description),
                              Text("Price: " + this.item.price.toString()),
                              RatingBox(),
                           ],
                        )
                     )
                  )
               ]
            ),
         )
      );
   }
}
讓我們重寫我們的 MyHomePage Widget 以與 Product 模型一起使用,並使用 ListView 列出所有產品。
class MyHomePage extends StatelessWidget {
   MyHomePage({Key key, this.title}) : super(key: key);
   final String title;
   final items = Product.getProducts();

   @override
   Widget build(BuildContext context) {
      return Scaffold( appBar: AppBar(title: Text("Product Navigation")),
      body: ListView.builder(
         itemCount: items.length,
         itemBuilder: (context, index) {
            return GestureDetector(
               child: ProductBox(item: items[index]),
               onTap: () {
                  Navigator.push(
                     context, MaterialPageRoute(
                        builder: (context) => ProductPage(item: items[index]),
                     ),
                  );
               },
            );
         },
      ));
   }
}
在這裡,我們使用了 MaterialPageRoute 導航到產品詳細資訊頁面。
現在,讓我們新增 ProductPage 來顯示產品詳細資訊。
class ProductPage extends StatelessWidget {
   ProductPage({Key key, this.item}) : super(key: key);
   final Product item;

   @override
   Widget build(BuildContext context) {
      return Scaffold(
         appBar: AppBar(
            title: Text(this.item.name),
         ),
         body: Center(
            child: Container(
               padding: EdgeInsets.all(0),
               child: Column(
                  mainAxisAlignment: MainAxisAlignment.start,
                  crossAxisAlignment: CrossAxisAlignment.start,
                  children: <Widget>[
                     Image.asset("assets/appimages/" + this.item.image),
                     Expanded(
                        child: Container(
                           padding: EdgeInsets.all(5),
                           child: Column(
                              mainAxisAlignment: MainAxisAlignment.spaceEvenly,
                              children: <Widget>[
                                 Text(
                                    this.item.name, style: TextStyle(
                                       fontWeight: FontWeight.bold
                                    )
                                 ),
                                 Text(this.item.description),
                                 Text("Price: " + this.item.price.toString()),
                                 RatingBox(),
                              ],
                           )
                        )
                     )
                  ]
               ),
            ),
         ),
      );
   }
}
應用程式的完整程式碼如下:
import 'package:flutter/material.dart';
void main() => runApp(MyApp());

class Product {
   final String name;
   final String description;
   final int price;
   final String image;
   Product(this.name, this.description, this.price, this.image);

   static List<Product> getProducts() {
      List<Product> items = <Product>[];
      items.add(
         Product(
            "Pixel",
            "Pixel is the most featureful phone ever",
            800,
            "pixel.png"
         )
      );
      items.add(
         Product(
            "Laptop",
            "Laptop is most productive development tool",
            2000,
            "laptop.png"
         )
      );
      items.add(
         Product(
            "Tablet",
            "Tablet is the most useful device ever for meeting",
            1500,
            "tablet.png"
         )
      );
      items.add(
         Product(
            "Pendrive",
            "iPhone is the stylist phone ever",
            100,
            "pendrive.png"
         )
      );
      items.add(
         Product(
            "Floppy Drive",
            "iPhone is the stylist phone ever",
            20,
            "floppy.png"
         )
      );
      items.add(
         Product(
            "iPhone",
            "iPhone is the stylist phone ever",
            1000,
            "iphone.png"
         )
      );
      return items;
   }
}
class MyApp extends StatelessWidget {
   // This widget is the root of your application.
   @override
   Widget build(BuildContext context) {
      return MaterialApp(
         title: 'Flutter Demo',
         theme: ThemeData(
            primarySwatch: Colors.blue,
         ),
         home: MyHomePage(title: 'Product Navigation demo home page'),
      );
   }
}
class MyHomePage extends StatelessWidget {
   MyHomePage({Key key, this.title}) : super(key: key);
   final String title;
   final items = Product.getProducts();

   @override
   Widget build(BuildContext context) {
      return Scaffold(
         appBar: AppBar(title: Text("Product Navigation")),
         body: ListView.builder(
            itemCount: items.length,
            itemBuilder: (context, index) {
               return GestureDetector(
                  child: ProductBox(item: items[index]),
                  onTap: () {
                     Navigator.push(
                        context,
                        MaterialPageRoute(
                           builder: (context) => ProductPage(item: items[index]),
                        ),
                     );
                  },
               );
            },
         )
      );
   }
}
class ProductPage extends StatelessWidget {
   ProductPage({Key key, this.item}) : super(key: key);
   final Product item;

   @override
   Widget build(BuildContext context) {
      return Scaffold(
         appBar: AppBar(
            title: Text(this.item.name),
         ),
         body: Center(
            child: Container(
               padding: EdgeInsets.all(0),
               child: Column(
                  mainAxisAlignment: MainAxisAlignment.start,
                  crossAxisAlignment: CrossAxisAlignment.start,
                  children: <Widget>[
                     Image.asset("assets/appimages/" + this.item.image),
                     Expanded(
                        child: Container(
                           padding: EdgeInsets.all(5),
                           child: Column(
                              mainAxisAlignment: MainAxisAlignment.spaceEvenly,
                              children: <Widget>[
                                 Text(this.item.name, style: TextStyle(fontWeight: FontWeight.bold)),
                                 Text(this.item.description),
                                 Text("Price: " + this.item.price.toString()),
                                 RatingBox(),
                              ],
                           )
                        )
                     )
                  ]
               ),
            ),
         ),
      );
   }
}
class RatingBox extends StatefulWidget {
   @override
   _RatingBoxState createState() => _RatingBoxState();
}
class _RatingBoxState extends State<RatingBox> {
   int _rating = 0;
   void _setRatingAsOne() {
      setState(() {
         _rating = 1;
      });
   }
   void _setRatingAsTwo() {
      setState(() {
         _rating = 2;
      });
   }
   void _setRatingAsThree() {
      setState(() {
         _rating = 3;
      });
   }
   Widget build(BuildContext context) {
      double _size = 20;
      print(_rating);
      return Row(
         mainAxisAlignment: MainAxisAlignment.end,
         crossAxisAlignment: CrossAxisAlignment.end,
         mainAxisSize: MainAxisSize.max,
         children: <Widget>[
            Container(
               padding: EdgeInsets.all(0),
               child: IconButton(
                  icon: (
                     _rating >= 1 ? Icon(
                        Icons.star,
                        size: _size,
                     )
                     : Icon(
                        Icons.star_border,
                        size: _size,
                     )
                  ),
                  color: Colors.red[500],
                  onPressed: _setRatingAsOne,
                  iconSize: _size,
               ),
            ),
            Container(
               padding: EdgeInsets.all(0),
               child: IconButton(
                  icon: (
                     _rating >= 2 ?
                     Icon(
                        Icons.star,
                        size: _size,
                     )
                     : Icon(
                        Icons.star_border,
                        size: _size,
                     )
                  ),
                  color: Colors.red[500],
                  onPressed: _setRatingAsTwo,
                  iconSize: _size,
               ),
            ),
            Container(
               padding: EdgeInsets.all(0),
               child: IconButton(
                  icon: (
                     _rating >= 3 ?
                     Icon(
                        Icons.star,
                        size: _size,
                     )
                     : Icon(
                        Icons.star_border,
                        size: _size,
                     )
                  ),
                  color: Colors.red[500],
                  onPressed: _setRatingAsThree,
                  iconSize: _size,
               ),
            ),
         ],
      );
   }
}
class ProductBox extends StatelessWidget {
   ProductBox({Key key, this.item}) : super(key: key);
   final Product item;

   Widget build(BuildContext context) {
      return Container(
         padding: EdgeInsets.all(2),
         height: 140,
         child: Card(
            child: Row(
               mainAxisAlignment: MainAxisAlignment.spaceEvenly,
               children: <Widget>[
                  Image.asset("assets/appimages/" + this.item.image),
                  Expanded(
                     child: Container(
                        padding: EdgeInsets.all(5),
                        child: Column(
                           mainAxisAlignment: MainAxisAlignment.spaceEvenly,
                           children: <Widget>[
                              Text(this.item.name, style: TextStyle(fontWeight: FontWeight.bold)), Text(this.item.description),
                              Text("Price: " + this.item.price.toString()),
                              RatingBox(),
                           ],
                        )
                     )
                  )
               ]
            ),
         )
      );
   }
}
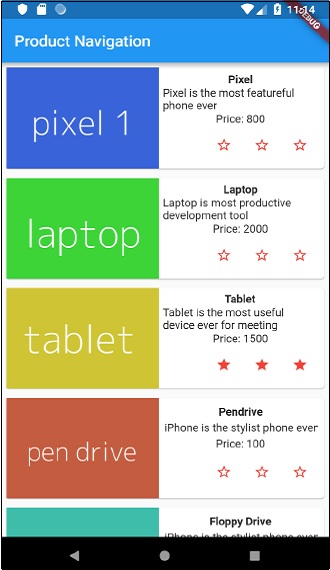
執行應用程式並點選任意一個產品專案。它將顯示相關的詳細資訊頁面。我們可以透過點選後退按鈕移動到主頁。應用程式的產品列表頁面和產品詳細資訊頁面如下所示:
Flutter - 動畫
動畫是任何移動應用程式中一個複雜的流程。儘管其複雜性,動畫將使用者體驗提升到一個新的水平,並提供豐富的使用者互動。由於其豐富性,動畫成為現代移動應用程式不可或缺的一部分。Flutter 框架認識到動畫的重要性,並提供了一個簡單直觀的框架來開發所有型別的動畫。
簡介
動畫是在特定持續時間內按特定順序顯示一系列影像/圖片的過程,以產生運動的錯覺。動畫最重要的方面如下:
動畫有兩個不同的值:起始值和結束值。動畫從起始值開始,經過一系列中間值,最後以結束值結束。例如,要使 Widget 淡出,初始值將是完全不透明,最終值將是零不透明。
中間值可以是線性的或非線性的(曲線)的,並且可以進行配置。瞭解動畫按其配置方式工作。每個配置都會為動畫提供不同的感覺。例如,使 Widget 淡出將是線性的,而球的彈跳將是非線性的。
動畫過程的持續時間會影響動畫的速度(緩慢或快速)。
控制動畫過程的能力,例如啟動動畫、停止動畫、重複動畫特定次數、反轉動畫過程等。
在 Flutter 中,動畫系統不會執行任何真實的動畫。相反,它僅提供每幀渲染影像所需的 value。
基於動畫的類
Flutter 動畫系統基於 Animation 物件。核心動畫類及其用法如下:
Animation
在特定持續時間內生成兩個數字之間的插值 value。最常見的 Animation 類如下:
Animation<double> - 在兩個十進位制數字之間插值 value
Animation<Color> - 在兩種顏色之間插值顏色
Animation<Size> - 在兩種尺寸之間插值尺寸
AnimationController - 用於控制動畫本身的特殊 Animation 物件。每當應用程式準備好新幀時,它都會生成新的 value。它支援基於線性的動畫,並且 value 從 0.0 開始到 1.0 結束
controller = AnimationController(duration: const Duration(seconds: 2), vsync: this);
在這裡,controller 控制動畫,duration 選項控制動畫過程的持續時間。vsync 是一個用於最佳化動畫中使用的資源的特殊選項。
CurvedAnimation
類似於 AnimationController,但支援非線性動畫。CurvedAnimation 可以與 Animation 物件一起使用,如下所示:
controller = AnimationController(duration: const Duration(seconds: 2), vsync: this);
animation = CurvedAnimation(parent: controller, curve: Curves.easeIn)
Tween<T>
派生自 Animatable<T>,用於生成除 0 和 1 之外的任何兩個數字之間的數字。它可以透過使用 animate 方法並將實際的 Animation 物件傳遞給它來與 Animation 物件一起使用。
AnimationController controller = AnimationController(
   duration: const Duration(milliseconds: 1000),
vsync: this); Animation<int> customTween = IntTween(
   begin: 0, end: 255).animate(controller);
Tween 也可以與 CurvedAnimation 一起使用,如下所示:
AnimationController controller = AnimationController(
   duration: const Duration(milliseconds: 500), vsync: this);
final Animation curve = CurvedAnimation(parent: controller, curve: Curves.easeOut);
Animation<int> customTween = IntTween(begin: 0, end: 255).animate(curve);
在這裡,controller 是實際的動畫控制器。curve 提供非線性的型別,customTween 提供從 0 到 255 的自定義範圍。
Flutter 動畫的工作流程
動畫的工作流程如下:
在 StatefulWidget 的 initState 中定義並啟動動畫控制器。
AnimationController(duration: const Duration(seconds: 2), vsync: this);
animation = Tween<double>(begin: 0, end: 300).animate(controller);
controller.forward();
新增基於動畫的監聽器,addListener 來更改 Widget 的狀態。
animation = Tween<double>(begin: 0, end: 300).animate(controller) ..addListener(() {
   setState(() {
      // The state that has changed here is the animation object’s value.
   });
});
內建 Widget,AnimatedWidget 和 AnimatedBuilder 可以用來跳過此過程。這兩個 Widget 都接受 Animation 物件並獲取動畫所需的當前 value。
在 Widget 的構建過程中獲取動畫 value,然後將其應用於寬度、高度或任何相關屬性,而不是原始 value。
child: Container(
   height: animation.value,
   width: animation.value,
   child: <Widget>,
)
工作應用程式
讓我們編寫一個簡單的基於動畫的應用程式,以瞭解 Flutter 框架中動畫的概念。
在 Android Studio 中建立一個新的Flutter 應用程式,product_animation_app。
將 assets 資料夾從 product_nav_app 複製到 product_animation_app,並在 pubspec.yaml 檔案中新增 assets。
flutter:
   assets:
   - assets/appimages/floppy.png
   - assets/appimages/iphone.png
   - assets/appimages/laptop.png
   - assets/appimages/pendrive.png
   - assets/appimages/pixel.png
   - assets/appimages/tablet.png
刪除預設啟動程式碼(main.dart)。
新增匯入和基本 main 函式。
import 'package:flutter/material.dart';
void main() => runApp(MyApp());
建立從 StatefulWidgtet 派生的 MyApp Widget。
class MyApp extends StatefulWidget {
   _MyAppState createState() => _MyAppState();
}
建立 _MyAppState Widget 並實現 initState 和 dispose,以及預設的 build 方法。
class _MyAppState extends State<MyApp> with SingleTickerProviderStateMixin {
   Animation<double> animation;
   AnimationController controller;
   @override void initState() {
      super.initState();
      controller = AnimationController(
         duration: const Duration(seconds: 10), vsync: this
      );
      animation = Tween<double>(begin: 0.0, end: 1.0).animate(controller);
      controller.forward();
   }
   // This widget is the root of your application.
   @override
   Widget build(BuildContext context) {
      controller.forward();
      return MaterialApp(
         title: 'Flutter Demo',
         theme: ThemeData(primarySwatch: Colors.blue,),
         home: MyHomePage(title: 'Product layout demo home page', animation: animation,)
      );
   }
   @override
   void dispose() {
      controller.dispose();
      super.dispose();
   }
}
這裡,
在 initState 方法中,我們建立了一個動畫控制器物件(controller),一個動畫物件(animation)並使用 controller.forward 啟動了動畫。
在 dispose 方法中,我們處置了動畫控制器物件(controller)。
在 build 方法中,透過建構函式將動畫傳送到 MyHomePage Widget。現在,MyHomePage Widget 可以使用動畫物件來為其內容設定動畫。
現在,新增 ProductBox Widget
class ProductBox extends StatelessWidget {
   ProductBox({Key key, this.name, this.description, this.price, this.image})
      : super(key: key);
   final String name;
   final String description;
   final int price;
   final String image;

   Widget build(BuildContext context) {
      return Container(
         padding: EdgeInsets.all(2),
         height: 140,
         child: Card(
            child: Row(
               mainAxisAlignment: MainAxisAlignment.spaceEvenly,
               children: <Widget>[
                  Image.asset("assets/appimages/" + image),
                  Expanded(
                     child: Container(
                        padding: EdgeInsets.all(5),
                        child: Column(
                           mainAxisAlignment: MainAxisAlignment.spaceEvenly,
                           children: <Widget>[
                              Text(this.name, style:
                                 TextStyle(fontWeight: FontWeight.bold)),
                              Text(this.description),
                                 Text("Price: " + this.price.toString()),
                           ],
                        )
                     )
                  )
               ]
            )
         )
      );
   }
}
建立一個新的 Widget,MyAnimatedWidget,使用不透明度執行簡單的淡入淡出動畫。
class MyAnimatedWidget extends StatelessWidget {
   MyAnimatedWidget({this.child, this.animation});

   final Widget child;
   final Animation<double> animation;

   Widget build(BuildContext context) => Center(
   child: AnimatedBuilder(
      animation: animation,
      builder: (context, child) => Container(
         child: Opacity(opacity: animation.value, child: child),
      ),
      child: child),
   );
}
在這裡,我們使用了 AniatedBuilder 來執行我們的動畫。AnimatedBuilder 是一個 Widget,它在執行動畫的同時構建其內容。它接受一個 animation 物件來獲取當前動畫 value。我們使用了動畫 value,animation.value 來設定子 Widget 的不透明度。實際上,Widget 將使用不透明度概念為子 Widget 設定動畫。
最後,建立 MyHomePage Widget 並使用動畫物件為其任何內容設定動畫。
class MyHomePage extends StatelessWidget {
   MyHomePage({Key key, this.title, this.animation}) : super(key: key);

   final String title;
   final Animation<double>
   animation;

   @override
   Widget build(BuildContext context) {
      return Scaffold(
         appBar: AppBar(title: Text("Product Listing")),body: ListView(
            shrinkWrap: true,
            padding: const EdgeInsets.fromLTRB(2.0, 10.0, 2.0, 10.0),
            children: <Widget>[
               FadeTransition(
                  child: ProductBox(
                     name: "iPhone",
                     description: "iPhone is the stylist phone ever",
                     price: 1000,
                     image: "iphone.png"
                  ), opacity: animation
               ),
               MyAnimatedWidget(child: ProductBox(
                  name: "Pixel",
                  description: "Pixel is the most featureful phone ever",
                  price: 800,
                  image: "pixel.png"
               ), animation: animation),
               ProductBox(
                  name: "Laptop",
                  description: "Laptop is most productive development tool",
                  price: 2000,
                  image: "laptop.png"
               ),
               ProductBox(
                  name: "Tablet",
                  description: "Tablet is the most useful device ever for meeting",
                  price: 1500,
                  image: "tablet.png"
               ),
               ProductBox(
                  name: "Pendrive",
                  description: "Pendrive is useful storage medium",
                  price: 100,
                  image: "pendrive.png"
               ),
               ProductBox(
                  name: "Floppy Drive",
                  description: "Floppy drive is useful rescue storage medium",
                  price: 20,
                  image: "floppy.png"
               ),
            ],
         )
      );
   }
}
在這裡,我們使用了 FadeAnimation 和 MyAnimationWidget 為列表中的前兩個專案設定動畫。FadeAnimation 是一個內建動畫類,我們使用它來使用不透明度概念為其子元素設定動畫。
完整程式碼如下:
import 'package:flutter/material.dart';
void main() => runApp(MyApp());

class MyApp extends StatefulWidget {
   _MyAppState createState() => _MyAppState();
}
class _MyAppState extends State<MyApp> with SingleTickerProviderStateMixin {
   Animation<double> animation;
   AnimationController controller;

   @override
   void initState() {
      super.initState();
      controller = AnimationController(
         duration: const Duration(seconds: 10), vsync: this);
      animation = Tween<double>(begin: 0.0, end: 1.0).animate(controller);
      controller.forward();
   }
   // This widget is the root of your application.
   @override
   Widget build(BuildContext context) {
      controller.forward();
      return MaterialApp(
         title: 'Flutter Demo', theme: ThemeData(primarySwatch: Colors.blue,),
         home: MyHomePage(title: 'Product layout demo home page', animation: animation,)
      );
   }
   @override
   void dispose() {
      controller.dispose();
      super.dispose();
   }
}
class MyHomePage extends StatelessWidget {
   MyHomePage({Key key, this.title, this.animation}): super(key: key);
   final String title;
   final Animation<double> animation;

   @override
   Widget build(BuildContext context) {
      return Scaffold(
         appBar: AppBar(title: Text("Product Listing")),
         body: ListView(
            shrinkWrap: true,
            padding: const EdgeInsets.fromLTRB(2.0, 10.0, 2.0, 10.0),
            children: <Widget>[
               FadeTransition(
                  child: ProductBox(
                     name: "iPhone",
                     description: "iPhone is the stylist phone ever",
                     price: 1000,
                     image: "iphone.png"
                  ),
                  opacity: animation
               ),
               MyAnimatedWidget(
                  child: ProductBox(
                     name: "Pixel",
                     description: "Pixel is the most featureful phone ever",
                     price: 800,
                     image: "pixel.png"
                  ),
                  animation: animation
               ),
               ProductBox(
                  name: "Laptop",
                  description: "Laptop is most productive development tool",
                  price: 2000,
                  image: "laptop.png"
               ),
               ProductBox(
                  name: "Tablet",
                  description: "Tablet is the most useful device ever for meeting",
                  price: 1500,
                  image: "tablet.png"
               ),
               ProductBox(
                  name: "Pendrive",
                  description: "Pendrive is useful storage medium",
                  price: 100,
                  image: "pendrive.png"
               ),
               ProductBox(
                  name: "Floppy Drive",
                  description: "Floppy drive is useful rescue storage medium",
                  price: 20,
                  image: "floppy.png"
               ),
            ],
         )
      );
   }
}
class ProductBox extends StatelessWidget {
   ProductBox({Key key, this.name, this.description, this.price, this.image}) :
      super(key: key);
   final String name;
   final String description;
   final int price;
   final String image;
   Widget build(BuildContext context) {
      return Container(
         padding: EdgeInsets.all(2),
         height: 140,
         child: Card(
            child: Row(
               mainAxisAlignment: MainAxisAlignment.spaceEvenly,
               children: <Widget>[
                  Image.asset("assets/appimages/" + image),
                  Expanded(
                     child: Container(
                        padding: EdgeInsets.all(5),
                        child: Column(
                           mainAxisAlignment: MainAxisAlignment.spaceEvenly,
                           children: <Widget>[
                              Text(
                                 this.name, style: TextStyle(
                                    fontWeight: FontWeight.bold
                                 )
                              ),
                              Text(this.description), Text(
                                 "Price: " + this.price.toString()
                              ),
                           ],
                        )
                     )
                  )
               ]
            )
         )
      );
   }
}
class MyAnimatedWidget extends StatelessWidget {
   MyAnimatedWidget({this.child, this.animation});
   final Widget child;
   final Animation<double> animation;

   Widget build(BuildContext context) => Center(
      child: AnimatedBuilder(
         animation: animation,
         builder: (context, child) => Container(
            child: Opacity(opacity: animation.value, child: child),
         ),
         child: child
      ),
   );
}
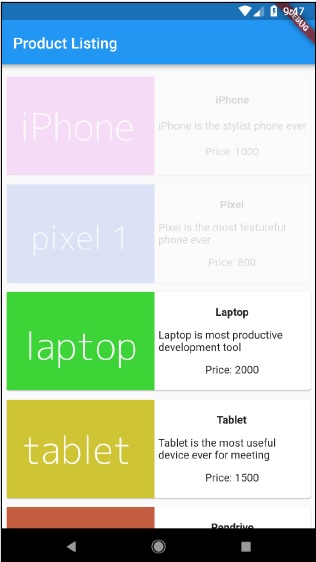
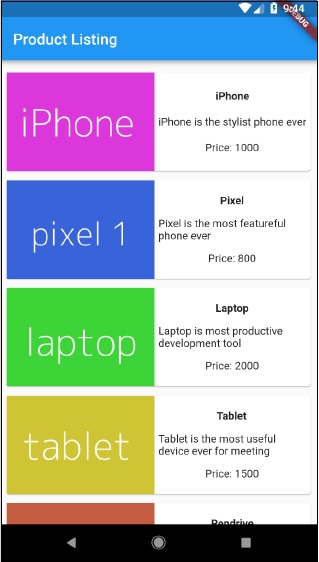
編譯並執行應用程式以檢視結果。應用程式的初始版本和最終版本如下所示:
Flutter - 編寫 Android 特定程式碼
Flutter 提供了一個通用框架來訪問平臺特定的功能。這使開發人員能夠使用平臺特定的程式碼擴充套件Flutter框架的功能。可以透過該框架輕鬆訪問平臺特定的功能,例如相機、電池電量、瀏覽器等。
訪問平臺特定程式碼的總體思路是透過簡單的訊息傳遞協議。Flutter 程式碼(客戶端)和平臺程式碼(主機)繫結到一個通用的訊息通道。客戶端透過訊息通道向主機發送訊息。主機監聽訊息通道,接收訊息並執行必要的功能,最後透過訊息通道將結果返回給客戶端。
平臺特定程式碼架構如下圖所示:
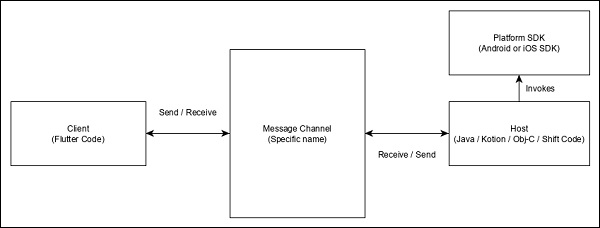
訊息傳遞協議使用標準訊息編解碼器(StandardMessageCodec 類),該編解碼器支援 JSON 類值的二進位制序列化,例如數字、字串、布林值等。序列化和反序列化在客戶端和主機之間透明地工作。
讓我們編寫一個簡單的應用程式,使用Android SDK開啟瀏覽器,並瞭解如何
在 Android Studio 中建立一個新的 Flutter 應用程式,flutter_browser_app
將 main.dart 程式碼替換為以下程式碼:
import 'package:flutter/material.dart';
void main() => runApp(MyApp());
class MyApp extends StatelessWidget {
   @override
   Widget build(BuildContext context) {
      return MaterialApp(
         title: 'Flutter Demo',
         theme: ThemeData(
            primarySwatch: Colors.blue,
         ),
         home: MyHomePage(title: 'Flutter Demo Home Page'),
      );
   }
}
class MyHomePage extends StatelessWidget {
   MyHomePage({Key key, this.title}) : super(key: key);
   final String title;

   @override
   Widget build(BuildContext context) {
      return Scaffold(
         appBar: AppBar(
            title: Text(this.title),
         ),
         body: Center(
            child: RaisedButton(
               child: Text('Open Browser'),
               onPressed: null,
            ),
         ),
      );
   }
}
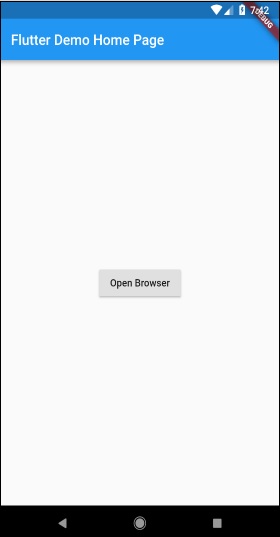
在這裡,我們建立了一個新的按鈕來開啟瀏覽器,並將它的 onPressed 方法設定為 null。
現在,匯入以下包:
import 'dart:async';
import 'package:flutter/services.dart';
在這裡,services.dart 包含呼叫平臺特定程式碼的功能。
在 MyHomePage 小部件中建立一個新的訊息通道。
static const platform = const
MethodChannel('flutterapp.tutorialspoint.com/browser');
編寫一個方法 _openBrowser 來透過訊息通道呼叫平臺特定方法 openBrowser 方法。
Future<void> _openBrowser() async {
   try {
      final int result = await platform.invokeMethod(
         'openBrowser', <String, String>{
            'url': "https://flutter.club.tw"
         }
      );
   }
   on PlatformException catch (e) {
      // Unable to open the browser
      print(e);
   }
}
在這裡,我們使用 platform.invokeMethod 呼叫 openBrowser(將在後續步驟中解釋)。openBrowser 有一個引數 url,用於開啟特定的 URL。
將 RaisedButton 的 onPressed 屬性的值從 null 更改為 _openBrowser。
onPressed: _openBrowser,
開啟 MainActivity.java(在 android 資料夾內)並匯入所需的庫:
import android.app.Activity;
import android.content.Intent;
import android.net.Uri;
import android.os.Bundle;

import io.flutter.app.FlutterActivity;
import io.flutter.plugin.common.MethodCall;
import io.flutter.plugin.common.MethodChannel;
import io.flutter.plugin.common.MethodChannel.MethodCallHandler;
import io.flutter.plugin.common.MethodChannel.Result;
import io.flutter.plugins.GeneratedPluginRegistrant;
編寫一個方法 openBrowser 來開啟瀏覽器
private void openBrowser(MethodCall call, Result result, String url) {
   Activity activity = this;
   if (activity == null) {
      result.error("ACTIVITY_NOT_AVAILABLE",
      "Browser cannot be opened without foreground
      activity", null);
      return;
   }
   Intent intent = new Intent(Intent.ACTION_VIEW);
   intent.setData(Uri.parse(url));

   activity.startActivity(intent);
   result.success((Object) true);
}
現在,在 MainActivity 類中設定通道名稱:
private static final String CHANNEL = "flutterapp.tutorialspoint.com/browser";
編寫 Android 特定的程式碼,在 onCreate 方法中設定訊息處理:
new MethodChannel(getFlutterView(), CHANNEL).setMethodCallHandler(
   new MethodCallHandler() {
   @Override
   public void onMethodCall(MethodCall call, Result result) {
      String url = call.argument("url");
      if (call.method.equals("openBrowser")) {
         openBrowser(call, result, url);
      } else {
         result.notImplemented();
      }
   }
});
在這裡,我們使用 MethodChannel 類建立了一個訊息通道,並使用 MethodCallHandler 類來處理訊息。onMethodCall 是實際負責透過檢查訊息來呼叫正確的平臺特定程式碼的方法。onMethodCall 方法從訊息中提取 url,然後僅當方法呼叫為 openBrowser 時才呼叫 openBrowser。否則,它返回 notImplemented 方法。
應用程式的完整原始碼如下:
main.dart
MainActivity.java
package com.tutorialspoint.flutterapp.flutter_browser_app;

import android.app.Activity;
import android.content.Intent;
import android.net.Uri;
import android.os.Bundle;
import io.flutter.app.FlutterActivity;
import io.flutter.plugin.common.MethodCall;
import io.flutter.plugin.common.MethodChannel.Result;
import io.flutter.plugins.GeneratedPluginRegistrant;

public class MainActivity extends FlutterActivity {
   private static final String CHANNEL = "flutterapp.tutorialspoint.com/browser";
   @Override
   protected void onCreate(Bundle savedInstanceState) {
      super.onCreate(savedInstanceState);
      GeneratedPluginRegistrant.registerWith(this);
      new MethodChannel(getFlutterView(), CHANNEL).setMethodCallHandler(
         new MethodCallHandler() {
            @Override
            public void onMethodCall(MethodCall call, Result result) {
               String url = call.argument("url");
               if (call.method.equals("openBrowser")) {
                  openBrowser(call, result, url);
               } else {
                  result.notImplemented();
               }
            }
         }
      );
   }
   private void openBrowser(MethodCall call, Result result, String url) {
      Activity activity = this; if (activity == null) {
         result.error(
            "ACTIVITY_NOT_AVAILABLE", "Browser cannot be opened without foreground activity", null
         );
         return;
      }
      Intent intent = new Intent(Intent.ACTION_VIEW);
      intent.setData(Uri.parse(url));
      activity.startActivity(intent);
      result.success((Object) true);
   }
}
main.dart
import 'package:flutter/material.dart';
import 'dart:async';
import 'package:flutter/services.dart';

void main() => runApp(MyApp());
class MyApp extends StatelessWidget {
   @override
   Widget build(BuildContext context) {
      return MaterialApp(
         title: 'Flutter Demo',
         theme: ThemeData(
            primarySwatch: Colors.blue,
         ),
         home: MyHomePage(
            title: 'Flutter Demo Home Page'
         ),
      );
   }
}
class MyHomePage extends StatelessWidget {
   MyHomePage({Key key, this.title}) : super(key: key);
   final String title;
   static const platform = const MethodChannel('flutterapp.tutorialspoint.com/browser');
   Future<void> _openBrowser() async {
      try {
         final int result = await platform.invokeMethod('openBrowser', <String, String>{
            'url': "https://flutter.club.tw"
         });
      }
      on PlatformException catch (e) {
         // Unable to open the browser print(e);
      }
   }
   @override
   Widget build(BuildContext context) {
      return Scaffold(
         appBar: AppBar(
            title: Text(this.title),
         ),
         body: Center(
            child: RaisedButton(
               child: Text('Open Browser'),
               onPressed: _openBrowser,
            ),
         ),
      );
   }
}
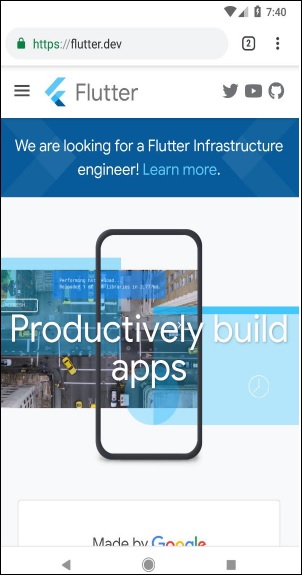
執行應用程式並點選“開啟瀏覽器”按鈕,您會看到瀏覽器已啟動。瀏覽器應用程式 - 首頁如下圖所示:
Flutter - 編寫 iOS 特定程式碼
訪問 iOS 特定程式碼與 Android 平臺類似,只是它使用 iOS 特定的語言 - Objective-C 或 Swift 以及 iOS SDK。否則,概念與 Android 平臺相同。
讓我們為 iOS 平臺編寫與上一章相同的應用程式。
讓我們在 Android Studio(macOS)中建立一個新的應用程式,flutter_browser_ios_app
按照上一章中的步驟 2-6 操作。
啟動 Xcode 並點選檔案 → 開啟
選擇 Flutter 專案 ios 目錄下的 Xcode 專案。
開啟Runner → Runner 路徑下的 AppDelegate.m。它包含以下程式碼:
#include "AppDelegate.h"
#include "GeneratedPluginRegistrant.h"
@implementation AppDelegate

- (BOOL)application:(UIApplication *)application
   didFinishLaunchingWithOptions:(NSDictionary *)launchOptions {
      // [GeneratedPluginRegistrant registerWithRegistry:self];
      // Override point for customization after application launch.
      return [super application:application didFinishLaunchingWithOptions:launchOptions];
   }
@end
我們添加了一個方法 openBrowser,用於使用指定的 url 開啟瀏覽器。它接受單個引數 url。
- (void)openBrowser:(NSString *)urlString {
   NSURL *url = [NSURL URLWithString:urlString];
   UIApplication *application = [UIApplication sharedApplication];
   [application openURL:url];
}
在 didFinishLaunchingWithOptions 方法中,找到控制器並將其設定為 controller 變數。
FlutterViewController* controller = (FlutterViewController*)self.window.rootViewController;
在 didFinishLaunchingWithOptions 方法中,將瀏覽器通道設定為 flutterapp.tutorialspoint.com/browse:
FlutterMethodChannel* browserChannel = [
   FlutterMethodChannel methodChannelWithName:
   @"flutterapp.tutorialspoint.com/browser" binaryMessenger:controller];
建立一個變數 weakSelf 並設定當前類:
__weak typeof(self) weakSelf = self;
現在,實現 setMethodCallHandler。透過匹配 call.method 呼叫 openBrowser。透過呼叫 call.arguments 獲取 url,並在呼叫 openBrowser 時傳遞它。
[browserChannel setMethodCallHandler:^(FlutterMethodCall* call, FlutterResult result) {
   if ([@"openBrowser" isEqualToString:call.method]) {
      NSString *url = call.arguments[@"url"];
      [weakSelf openBrowser:url];
   } else { result(FlutterMethodNotImplemented); }
}];
完整程式碼如下:
#include "AppDelegate.h"
#include "GeneratedPluginRegistrant.h"
@implementation AppDelegate

- (BOOL)application:(UIApplication *)application
   didFinishLaunchingWithOptions:(NSDictionary *)launchOptions {

   // custom code starts
   FlutterViewController* controller = (FlutterViewController*)self.window.rootViewController;
   FlutterMethodChannel* browserChannel = [
      FlutterMethodChannel methodChannelWithName:
      @"flutterapp.tutorialspoint.com /browser" binaryMessenger:controller];

   __weak typeof(self) weakSelf = self;
   [browserChannel setMethodCallHandler:^(
      FlutterMethodCall* call, FlutterResult result) {

      if ([@"openBrowser" isEqualToString:call.method]) {
         NSString *url = call.arguments[@"url"];
         [weakSelf openBrowser:url];
      } else { result(FlutterMethodNotImplemented); }
   }];
   // custom code ends
   [GeneratedPluginRegistrant registerWithRegistry:self];

   // Override point for customization after application launch.
   return [super application:application didFinishLaunchingWithOptions:launchOptions];
}
- (void)openBrowser:(NSString *)urlString {
   NSURL *url = [NSURL URLWithString:urlString];
   UIApplication *application = [UIApplication sharedApplication];
   [application openURL:url];
}
@end
開啟專案設定。
轉到功能並啟用後臺模式。
新增*後臺獲取和遠端通知**。
現在,執行應用程式。它的工作原理與 Android 版本類似,但將開啟 Safari 瀏覽器而不是 Chrome 瀏覽器。
Flutter - 包入門
Dart 組織和共享一組功能的方式是透過包。Dart 包僅僅是可共享的庫或模組。通常,Dart 包與 Dart 應用程式相同,只是 Dart 包沒有應用程式入口點 main。
包的通用結構(考慮一個演示包 my_demo_package)如下所示:
lib/src/* - 私有 Dart 程式碼檔案。
lib/my_demo_package.dart - 主 Dart 程式碼檔案。它可以像這樣匯入到應用程式中:
import 'package:my_demo_package/my_demo_package.dart'
如果需要,其他私有程式碼檔案可以匯出到主程式碼檔案(my_demo_package.dart)中,如下所示:
export src/my_private_code.dart
lib/* - 任意數量的 Dart 程式碼檔案,以任何自定義資料夾結構排列。程式碼可以這樣訪問:
import 'package:my_demo_package/custom_folder/custom_file.dart'
pubspec.yaml - 專案規範,與應用程式相同。
包中的所有 Dart 程式碼檔案都只是 Dart 類,並且 Dart 程式碼沒有特殊要求才能將其包含在包中。
包的型別
由於 Dart 包基本上是相似功能的小集合,因此可以根據其功能進行分類。
Dart 包
通用 Dart 程式碼,可在 Web 和移動環境中使用。例如,english_words 就是這樣一個包,它包含大約 5000 個單詞,並具有諸如名詞(列出英語中的名詞)、音節(指定單詞中的音節數)等基本實用程式函式。
Flutter 包
通用 Dart 程式碼,依賴於 Flutter 框架,只能在移動環境中使用。例如,fluro 是 Flutter 的自定義路由器。它依賴於 Flutter 框架。
Flutter 外掛
通用 Dart 程式碼,依賴於 Flutter 框架以及底層平臺程式碼(Android SDK 或 iOS SDK)。例如,camera 是一個與裝置相機互動的外掛。它依賴於 Flutter 框架以及底層框架來訪問相機。
使用 Dart 包
Dart 包託管併發布到活動伺服器 https://pub.dartlang.org。此外,Flutter 提供了一個簡單的工具 pub 來管理應用程式中的 Dart 包。使用包所需的步驟如下:
將包名稱和所需的版本包含在 pubspec.yaml 中,如下所示:
dependencies: english_words: ^3.1.5
可以透過檢查線上伺服器找到最新的版本號。
使用以下命令將包安裝到應用程式中:
flutter packages get
在 Android Studio 中開發時,Android Studio 會檢測 pubspec.yaml 中的任何更改,並向開發人員顯示 Android Studio 包警報,如下所示:

可以使用選單選項在 Android Studio 中安裝或更新 Dart 包。
使用以下命令匯入必要的檔案並開始工作:
import 'package:english_words/english_words.dart';
使用包中提供的任何方法:
nouns.take(50).forEach(print);
在這裡,我們使用 nouns 函式獲取並列印前 50 個單詞。
開發 Flutter 外掛包
開發 Flutter 外掛類似於開發 Dart 應用程式或 Dart 包。唯一的例外是外掛將使用系統 API(Android 或 iOS)來獲取所需的平臺特定功能。
正如我們已經在前面的章節中學習瞭如何訪問平臺程式碼,讓我們開發一個簡單的外掛 my_browser 來理解外掛開發過程。my_browser 外掛的功能是允許應用程式在平臺特定的瀏覽器中開啟給定的網站。
啟動 Android Studio。
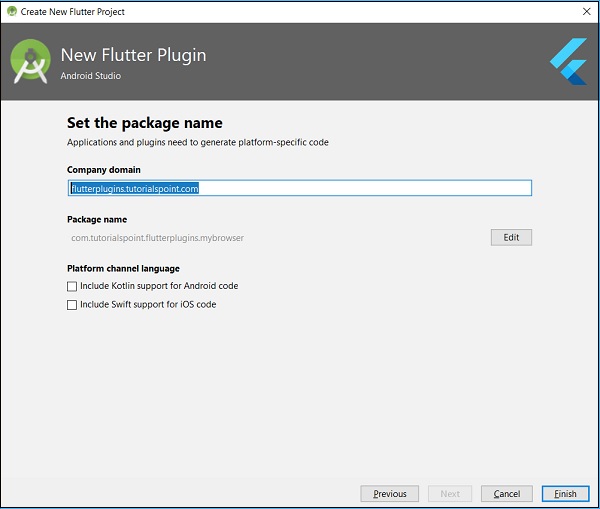
點選檔案 → 新建 Flutter 專案並選擇 Flutter 外掛選項。
您會看到一個 Flutter 外掛選擇視窗,如下所示:
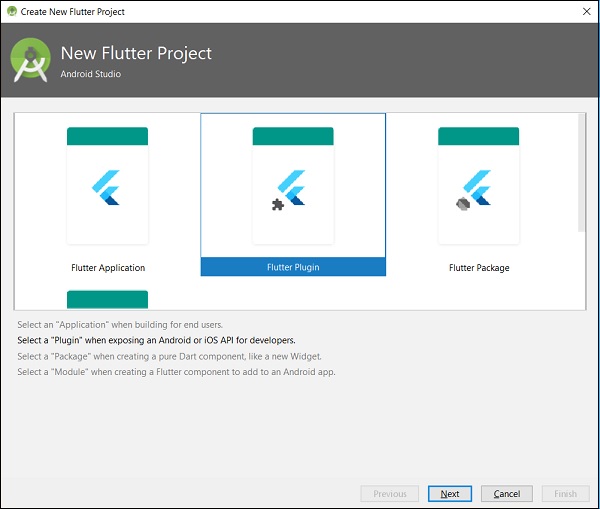
輸入 my_browser 作為專案名稱,然後點選下一步。
在視窗中輸入外掛名稱和其他詳細資訊,如下所示:
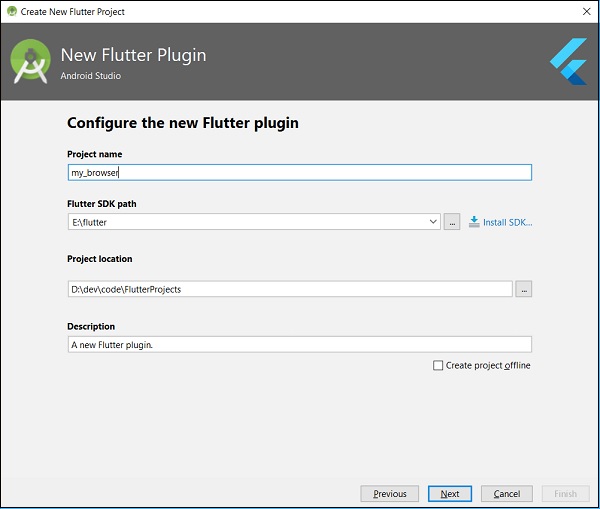
在下面顯示的視窗中輸入公司域名 flutterplugins.tutorialspoint.com,然後點選完成。它將生成一個啟動程式碼來開發我們的新外掛。
開啟 my_browser.dart 檔案並編寫一個方法 openBrowser 來呼叫平臺特定的 openBrowser 方法。
Future<void> openBrowser(String urlString) async {
   try {
      final int result = await _channel.invokeMethod(
         'openBrowser', <String, String>{ 'url': urlString }
      );
   }
   on PlatformException catch (e) {
      // Unable to open the browser print(e);
   }
}
開啟 MyBrowserPlugin.java 檔案並匯入以下類:
import android.app.Activity;
import android.content.Intent;
import android.net.Uri;
import android.os.Bundle;
在這裡,我們必須匯入從 Android 開啟瀏覽器所需的庫。
在 MyBrowserPlugin 類中新增新的私有變數 mRegistrar,型別為 Registrar。
private final Registrar mRegistrar;
在這裡,Registrar 用於獲取呼叫程式碼的上下文資訊。
新增一個建構函式,在 MyBrowserPlugin 類中設定 Registrar。
private MyBrowserPlugin(Registrar registrar) {
   this.mRegistrar = registrar;
}
更改 registerWith 以在 MyBrowserPlugin 類中包含我們的新建構函式。
public static void registerWith(Registrar registrar) {
   final MethodChannel channel = new MethodChannel(registrar.messenger(), "my_browser");
   MyBrowserPlugin instance = new MyBrowserPlugin(registrar);
   channel.setMethodCallHandler(instance);
}
更改 onMethodCall 以在 MyBrowserPlugin 類中包含 openBrowser 方法。
@Override
public void onMethodCall(MethodCall call, Result result) {
   String url = call.argument("url");
   if (call.method.equals("getPlatformVersion")) {
      result.success("Android " + android.os.Build.VERSION.RELEASE);
   }
   else if (call.method.equals("openBrowser")) {
      openBrowser(call, result, url);
   } else {
      result.notImplemented();
   }
}
編寫平臺特定的 openBrowser 方法以在 MyBrowserPlugin 類中訪問瀏覽器。
private void openBrowser(MethodCall call, Result result, String url) {
   Activity activity = mRegistrar.activity();
   if (activity == null) {
      result.error("ACTIVITY_NOT_AVAILABLE",
      "Browser cannot be opened without foreground activity", null);
      return;
   }
   Intent intent = new Intent(Intent.ACTION_VIEW);
   intent.setData(Uri.parse(url));
   activity.startActivity(intent);
   result.success((Object) true);
}
my_browser 外掛的完整原始碼如下:
my_browser.dart
import 'dart:async';
import 'package:flutter/services.dart';

class MyBrowser {
   static const MethodChannel _channel = const MethodChannel('my_browser');
   static Future<String> get platformVersion async {
      final String version = await _channel.invokeMethod('getPlatformVersion'); return version;
   }
   Future<void> openBrowser(String urlString) async {
      try {
         final int result = await _channel.invokeMethod(
            'openBrowser', <String, String>{'url': urlString});
      }
      on PlatformException catch (e) {
         // Unable to open the browser print(e);
      }
   }
}
MyBrowserPlugin.java
package com.tutorialspoint.flutterplugins.my_browser;

import io.flutter.plugin.common.MethodCall;
import io.flutter.plugin.common.MethodChannel;
import io.flutter.plugin.common.MethodChannel.MethodCallHandler;
import io.flutter.plugin.common.MethodChannel.Result;
import io.flutter.plugin.common.PluginRegistry.Registrar;
import android.app.Activity;
import android.content.Intent;
import android.net.Uri;
import android.os.Bundle;

/** MyBrowserPlugin */
public class MyBrowserPlugin implements MethodCallHandler {
   private final Registrar mRegistrar;
   private MyBrowserPlugin(Registrar registrar) {
      this.mRegistrar = registrar;
   }
   /** Plugin registration. */
   public static void registerWith(Registrar registrar) {
      final MethodChannel channel = new MethodChannel(
         registrar.messenger(), "my_browser");
      MyBrowserPlugin instance = new MyBrowserPlugin(registrar);
      channel.setMethodCallHandler(instance);
   }
   @Override
   public void onMethodCall(MethodCall call, Result result) {
      String url = call.argument("url");
      if (call.method.equals("getPlatformVersion")) {
         result.success("Android " + android.os.Build.VERSION.RELEASE);
      }
      else if (call.method.equals("openBrowser")) {
         openBrowser(call, result, url);
      } else {
         result.notImplemented();
      }
   }
   private void openBrowser(MethodCall call, Result result, String url) {
      Activity activity = mRegistrar.activity();
      if (activity == null) {
         result.error("ACTIVITY_NOT_AVAILABLE",
            "Browser cannot be opened without foreground activity", null);
         return;
      }
      Intent intent = new Intent(Intent.ACTION_VIEW);
      intent.setData(Uri.parse(url));
      activity.startActivity(intent);
      result.success((Object) true);
   }
}
建立一個新專案 my_browser_plugin_test 來測試我們新建立的外掛。
開啟 pubspec.yaml 並將 my_browser 設定為外掛依賴項。
dependencies:
   flutter:
      sdk: flutter
   my_browser:
      path: ../my_browser
Android Studio 將提示 pubspec.yaml 已更新,如下面的 Android Studio 包警報所示:

點選獲取依賴項選項。Android Studio 將從 Internet 獲取包併為應用程式正確配置它。
開啟 main.dart 幷包含 my_browser 外掛,如下所示:
import 'package:my_browser/my_browser.dart';
從 my_browser 外掛呼叫 openBrowser 函式,如下所示:
onPressed: () => MyBrowser().openBrowser("https://flutter.club.tw"),
main.dart 的完整程式碼如下:
import 'package:flutter/material.dart';
import 'package:my_browser/my_browser.dart';

void main() => runApp(MyApp());

class MyApp extends StatelessWidget {
   @override
   Widget build(BuildContext context) {
      return MaterialApp(
         title: 'Flutter Demo',
         theme: ThemeData(
            primarySwatch: Colors.blue,
         ),
         home: MyHomePage(
            title: 'Flutter Demo Home Page'
         ),
      );,
   }
}
class MyHomePage extends StatelessWidget {
   MyHomePage({Key key, this.title}) : super(key: key);
   final String title;
   @override
   Widget build(BuildContext context) {
      return Scaffold(
         appBar: AppBar(
            title: Text(this.title),
         ),
         body: Center(
            child: RaisedButton(
               child: Text('Open Browser'),
               onPressed: () => MyBrowser().openBrowser("https://flutter.club.tw"),
            ),
         ),
      );
   }
}
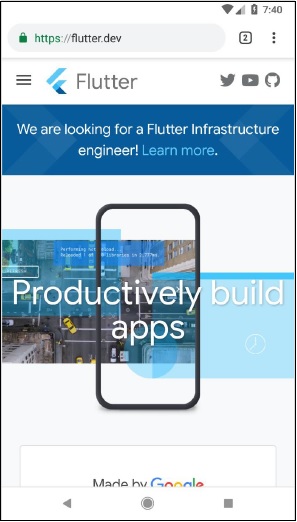
執行應用程式並點選“開啟瀏覽器”按鈕,您會看到瀏覽器已啟動。您會看到瀏覽器應用程式 - 首頁,如下圖所示:

您會看到瀏覽器應用程式 - 瀏覽器螢幕,如下圖所示:
Flutter - 訪問 REST API
Flutter 提供 http 包來使用 HTTP 資源。http 是一個基於 Future 的庫,並使用 await 和 async 功能。它提供了許多高階方法,並簡化了基於 REST 的移動應用程式的開發。
基本概念
http 包提供了一個高階類和 http 來執行 Web 請求。
http 類提供執行所有型別 HTTP 請求的功能。
http 方法接受一個 url,以及透過 Dart Map 的其他資訊(釋出資料、其他標頭等)。它請求伺服器並以非同步/等待模式收集響應。例如,以下程式碼從指定的 url 讀取資料並在控制檯中列印它。
print(await http.read('https://flutter.club.tw/'));
一些核心方法如下:
read - 透過 GET 方法請求指定的 url 並將響應作為 Future<String> 返回
get - 透過 GET 方法請求指定的 url 並將響應作為 Future<Response> 返回。Response 是一個包含響應資訊的類。
post - 透過 POST 方法請求指定的 url,釋出提供的資料,並將響應作為 Future<Response> 返回
put - 透過 PUT 方法請求指定的 url 並將響應作為 Future <Response> 返回
head - 透過 HEAD 方法請求指定的 url 並將響應作為 Future<Response> 返回
delete - 透過 DELETE 方法請求指定的 url 並將響應作為 Future<Response> 返回
http 還提供了一個更標準的 HTTP 客戶端類 client。client 支援持久連線。當要向特定伺服器發出大量請求時,它將很有用。它需要使用 close 方法正確關閉。否則,它類似於 http 類。示例程式碼如下:
var client = new http.Client();
try {
   print(await client.get('https://flutter.club.tw/'));
}
finally {
   client.close();
}
訪問產品服務 API
讓我們建立一個簡單的應用程式,從 Web 伺服器獲取產品資料,然後使用ListView顯示產品。
在 Android Studio 中建立一個新的Flutter應用程式,product_rest_app。
將預設的啟動程式碼(main.dart)替換為我們的product_nav_app程式碼。
將 assets 資料夾從product_nav_app複製到product_rest_app,並在 pubspec.yaml 檔案中新增 assets。
flutter:
   assets:
      - assets/appimages/floppy.png
      - assets/appimages/iphone.png
      - assets/appimages/laptop.png
      - assets/appimages/pendrive.png
      - assets/appimages/pixel.png
      - assets/appimages/tablet.png
在 pubspec.yaml 檔案中配置 http 包,如下所示:
dependencies:
   http: ^0.12.0+2
這裡,我們將使用 http 包的最新版本。Android Studio 會發送一個包警報,提示 pubspec.yaml 已更新。

點選獲取依賴項選項。Android Studio 將從 Internet 獲取包併為應用程式正確配置它。
在 main.dart 檔案中匯入 http 包 -
import 'dart:async';
import 'dart:convert';
import 'package:http/http.dart' as http;
建立一個新的 JSON 檔案 products.json,其中包含如下所示的產品資訊 -
[
   {
      "name": "iPhone",
      "description": "iPhone is the stylist phone ever",
      "price": 1000,
      "image": "iphone.png"
   },
   {
      "name": "Pixel",
      "description": "Pixel is the most feature phone ever",
      "price": 800,
      "image": "pixel.png"
   },
   {
      "name": "Laptop",
      "description": "Laptop is most productive development tool",
      "price": 2000,
      "image": "laptop.png"
   },
   {
      "name": "Tablet",
      "description": "Tablet is the most useful device ever for meeting",
      "price": 1500,
      "image": "tablet.png"
   },
   {
      "name": "Pendrive",
      "description": "Pendrive is useful storage medium",
      "price": 100,
      "image": "pendrive.png"
   },
   {
      "name": "Floppy Drive",
      "description": "Floppy drive is useful rescue storage medium",
      "price": 20,
      "image": "floppy.png"
   }
]
建立一個新資料夾 JSONWebServer,並將 JSON 檔案 products.json 放入其中。
執行任何以 JSONWebServer 作為根目錄的 Web 伺服器,並獲取其 Web 路徑。例如,http://192.168.184.1:8000/products.json。我們可以使用任何 Web 伺服器,如 Apache、Nginx 等。
最簡單的方法是安裝基於 Node 的 http-server 應用程式。請按照以下步驟安裝和執行 http-server 應用程式
安裝 Nodejs 應用程式 (nodejs.org)
轉到 JSONWebServer 資料夾。
cd /path/to/JSONWebServer
使用 npm 安裝 http-server 包。
npm install -g http-server
現在,執行伺服器。
http-server . -p 8000

Starting up http-server, serving .
Available on:
   http://192.168.99.1:8000
   http://127.0.0.1:8000
   Hit CTRL-C to stop the server
在 lib 資料夾中建立一個新檔案 Product.dart,並將 Product 類移動到其中。
在 Product 類中編寫一個工廠建構函式 Product.fromMap,用於將對映資料 Map 轉換為 Product 物件。通常,JSON 檔案將被轉換為 Dart Map 物件,然後轉換為相關的物件(Product)。
factory Product.fromJson(Map<String, dynamic> data) {
   return Product(
      data['name'],
      data['description'],
      data['price'],
      data['image'],
   );
}
Product.dart 的完整程式碼如下 -
class Product {
   final String name;
   final String description;
   final int price;
   final String image;

   Product(this.name, this.description, this.price, this.image);
   factory Product.fromMap(Map<String, dynamic> json) {
      return Product(
         json['name'],
         json['description'],
         json['price'],
         json['image'],
      );
   }
}
在主類中編寫兩個方法 - parseProducts 和 fetchProducts - 從 Web 伺服器獲取並載入產品資訊到 List<Product> 物件中。
List<Product> parseProducts(String responseBody) {
   final parsed = json.decode(responseBody).cast<Map<String, dynamic>>();
   return parsed.map<Product>((json) =>Product.fromJson(json)).toList();
}
Future<List<Product>> fetchProducts() async {
   final response = await http.get('http://192.168.1.2:8000/products.json');
   if (response.statusCode == 200) {
      return parseProducts(response.body);
   } else {
      throw Exception('Unable to fetch products from the REST API');
   }
}
請注意以下幾點 -
Future 用於延遲載入產品資訊。延遲載入是一個推遲程式碼執行直到必要時的概念。
http.get 用於從網際網路獲取資料。
json.decode 用於將 JSON 資料解碼為 Dart Map 物件。JSON 資料解碼後,將使用 Product 類的 fromMap 方法將其轉換為 List<Product>。
在 MyApp 類中,新增新的成員變數 products,型別為 Future<Product>,並在建構函式中包含它。
class MyApp extends StatelessWidget {
   final Future<List<Product>> products;
   MyApp({Key key, this.products}) : super(key: key);
   ...
在 MyHomePage 類中,新增新的成員變數 products,型別為 Future<Product>,並在建構函式中包含它。此外,移除 items 變數及其相關方法,getProducts 方法呼叫。將 products 變數放在建構函式中。這將允許僅在應用程式首次啟動時從網際網路獲取產品。
class MyHomePage extends StatelessWidget {
   final String title;
   final Future<ListList<Product>> products;
   MyHomePage({Key key, this.title, this.products}) : super(key: key);
   ...
更改 MyApp 元件的 build 方法中的 home 選項(MyHomePage)以適應上述更改 -
home: MyHomePage(title: 'Product Navigation demo home page', products: products),
更改 main 函式以包含 Future<Product> 引數 -
void main() => runApp(MyApp(fetchProduct()));
建立一個新的元件 ProductBoxList,用於在主頁上構建產品列表。
class ProductBoxList extends StatelessWidget {
   final List<Product> items;
   ProductBoxList({Key key, this.items});

   @override
   Widget build(BuildContext context) {
      return ListView.builder(
         itemCount: items.length,
         itemBuilder: (context, index) {
            return GestureDetector(
               child: ProductBox(item: items[index]),
               onTap: () {
                  Navigator.push(
                     context, MaterialPageRoute(
                        builder: (context) =gt; ProductPage(item: items[index]),
                     ),
                  );
               },
            );
         },
      );
   }
}
請注意,我們使用了與導航應用程式中相同的方法來列出產品,只是將其設計為一個單獨的元件,並傳遞型別為 List<Product> 的 products(物件)。
最後,修改 MyHomePage 元件的 build 方法,使用 Future 選項而不是普通方法呼叫來獲取產品資訊。
Widget build(BuildContext context) {
   return Scaffold(
      appBar: AppBar(title: Text("Product Navigation")),
      body: Center(
         child: FutureBuilder<List<Product>>(
            future: products, builder: (context, snapshot) {
               if (snapshot.hasError) print(snapshot.error);
               return snapshot.hasData ? ProductBoxList(items: snapshot.data)

               // return the ListView widget :
               Center(child: CircularProgressIndicator());
            },
         ),
      )
   );
}
這裡要注意,我們使用了 FutureBuilder 元件來渲染元件。FutureBuilder 將嘗試從其 future 屬性(型別為 Future<List<Product>>)獲取資料。如果 future 屬性返回資料,它將使用 ProductBoxList 渲染元件,否則會丟擲錯誤。
main.dart 的完整程式碼如下:
import 'package:flutter/material.dart';
import 'dart:async';
import 'dart:convert';
import 'package:http/http.dart' as http;
import 'Product.dart';

void main() => runApp(MyApp(products: fetchProducts()));

List<Product> parseProducts(String responseBody) {
   final parsed = json.decode(responseBody).cast<Map<String, dynamic>>();
   return parsed.map<Product>((json) => Product.fromMap(json)).toList();
}
Future<List<Product>> fetchProducts() async {
   final response = await http.get('http://192.168.1.2:8000/products.json');
   if (response.statusCode == 200) {
      return parseProducts(response.body);
   } else {
      throw Exception('Unable to fetch products from the REST API');
   }
}
class MyApp extends StatelessWidget {
   final Future<List<Product>> products;
   MyApp({Key key, this.products}) : super(key: key);

   // This widget is the root of your application.
   @override
   Widget build(BuildContext context) {
      return MaterialApp(
         title: 'Flutter Demo',
         theme: ThemeData(
            primarySwatch: Colors.blue,
         ),
         home: MyHomePage(title: 'Product Navigation demo home page', products: products),
      );
   }
}
class MyHomePage extends StatelessWidget {
   final String title;
   final Future<List<Product>> products;
   MyHomePage({Key key, this.title, this.products}) : super(key: key);

   // final items = Product.getProducts();
   @override
   Widget build(BuildContext context) {
      return Scaffold(
         appBar: AppBar(title: Text("Product Navigation")),
         body: Center(
            child: FutureBuilder<List<Product>>(
               future: products, builder: (context, snapshot) {
                  if (snapshot.hasError) print(snapshot.error);
                  return snapshot.hasData ? ProductBoxList(items: snapshot.data)

                  // return the ListView widget :
                  Center(child: CircularProgressIndicator());
               },
            ),
         )
      );
   }
}
class ProductBoxList extends StatelessWidget {
   final List<Product> items;
   ProductBoxList({Key key, this.items});

   @override
   Widget build(BuildContext context) {
      return ListView.builder(
         itemCount: items.length,
         itemBuilder: (context, index) {
            return GestureDetector(
               child: ProductBox(item: items[index]),
               onTap: () {
                  Navigator.push(
                     context, MaterialPageRoute(
                        builder: (context) => ProductPage(item: items[index]),
                     ),
                  );
               },
            );
         },
      );
   }
}
class ProductPage extends StatelessWidget {
   ProductPage({Key key, this.item}) : super(key: key);
   final Product item;
   @override
   Widget build(BuildContext context) {
      return Scaffold(
         appBar: AppBar(title: Text(this.item.name),),
         body: Center(
            child: Container(
               padding: EdgeInsets.all(0),
               child: Column(
                  mainAxisAlignment: MainAxisAlignment.start,
                  crossAxisAlignment: CrossAxisAlignment.start,
                  children: <Widget>[
                     Image.asset("assets/appimages/" + this.item.image),
                     Expanded(
                        child: Container(
                           padding: EdgeInsets.all(5),
                           child: Column(
                              mainAxisAlignment: MainAxisAlignment.spaceEvenly,
                              children: <Widget>[
                                 Text(this.item.name, style:
                                    TextStyle(fontWeight: FontWeight.bold)),
                                 Text(this.item.description),
                                 Text("Price: " + this.item.price.toString()),
                                 RatingBox(),
                              ],
                           )
                        )
                     )
                  ]
               ),
            ),
         ),
      );
   }
}
class RatingBox extends StatefulWidget {
   @override
   _RatingBoxState createState() =>_RatingBoxState();
}
class _RatingBoxState extends State<RatingBox> {
   int _rating = 0;
   void _setRatingAsOne() {
      setState(() {
         _rating = 1;
      });
   }
   void _setRatingAsTwo() {
      setState(() {
         _rating = 2;
      });
   }
   void _setRatingAsThree() {
      setState(() {
         _rating = 3;
      });
   }
   Widget build(BuildContext context) {
      double _size = 20;
      print(_rating);
      return Row(
         mainAxisAlignment: MainAxisAlignment.end,
         crossAxisAlignment: CrossAxisAlignment.end,
         mainAxisSize: MainAxisSize.max,

         children: <Widget>[
            Container(
               padding: EdgeInsets.all(0),
               child: IconButton(
                  icon: (
                     _rating >= 1
                     ? Icon(Icons.star, ize: _size,)
                     : Icon(Icons.star_border, size: _size,)
                  ),
                  color: Colors.red[500], onPressed: _setRatingAsOne, iconSize: _size,
               ),
            ),
            Container(
               padding: EdgeInsets.all(0),
               child: IconButton(
                  icon: (
                     _rating >= 2
                     ? Icon(Icons.star, size: _size,)
                     : Icon(Icons.star_border, size: _size, )
                  ),
                  color: Colors.red[500],
                  onPressed: _setRatingAsTwo,
                  iconSize: _size,
               ),
            ),
            Container(
               padding: EdgeInsets.all(0),
               child: IconButton(
                  icon: (
                     _rating >= 3 ?
                     Icon(Icons.star, size: _size,)
                     : Icon(Icons.star_border, size: _size,)
                  ),
                  color: Colors.red[500],
                  onPressed: _setRatingAsThree,
                  iconSize: _size,
               ),
            ),
         ],
      );
   }
}
class ProductBox extends StatelessWidget {
   ProductBox({Key key, this.item}) : super(key: key);
   final Product item;

   Widget build(BuildContext context) {
      return Container(
         padding: EdgeInsets.all(2), height: 140,
         child: Card(
            child: Row(
               mainAxisAlignment: MainAxisAlignment.spaceEvenly,
               children: <Widget>[
                  Image.asset("assets/appimages/" + this.item.image),
                  Expanded(
                     child: Container(
                        padding: EdgeInsets.all(5),
                        child: Column(
                           mainAxisAlignment: MainAxisAlignment.spaceEvenly,
                           children: <Widget>[
                              Text(this.item.name, style:TextStyle(fontWeight: FontWeight.bold)),
                              Text(this.item.description),
                              Text("Price: " + this.item.price.toString()),
                              RatingBox(),
                           ],
                        )
                     )
                  )
               ]
            ),
         )
      );
   }
}
最後執行應用程式以檢視結果。它與我們的 Navigation 示例相同,只是資料來自網際網路,而不是在編寫應用程式時輸入的本地靜態資料。
Flutter - 資料庫概念
Flutter 提供了許多與資料庫互動的高階包。最重要的包包括 -
sqflite - 用於訪問和操作 SQLite 資料庫,以及
firebase_database - 用於訪問和操作來自 Google 的雲託管 NoSQL 資料庫。
在本章中,讓我們詳細討論每個包。
SQLite
SQLite 資料庫是事實上的標準 SQL 基嵌入式資料庫引擎。它是一個小巧且經過時間考驗的資料庫引擎。sqflite 包提供了許多功能,可以有效地使用 SQLite 資料庫。它提供了標準的方法來操作 SQLite 資料庫引擎。sqflite 包提供的核心功能如下 -
建立/開啟(openDatabase 方法)一個 SQLite 資料庫。
對 SQLite 資料庫執行 SQL 語句(execute 方法)。
高階查詢方法(query 方法),以減少查詢和獲取 SQLite 資料庫資訊所需的程式碼。
讓我們建立一個產品應用程式,使用 sqflite 包從標準的 SQLite 資料庫引擎中儲存和獲取產品資訊,並瞭解 SQLite 資料庫和 sqflite 包背後的概念。
在 Android Studio 中建立一個新的 Flutter 應用程式 product_sqlite_app。
將預設的啟動程式碼(main.dart)替換為我們的 product_rest_app 程式碼。
將 product_nav_app 中的 assets 資料夾複製到 product_rest_app 中,並在 *pubspec.yaml` 檔案中新增 assets。
flutter:
   assets:
      - assets/appimages/floppy.png
      - assets/appimages/iphone.png
      - assets/appimages/laptop.png
      - assets/appimages/pendrive.png
      - assets/appimages/pixel.png
      - assets/appimages/tablet.png
在 pubspec.yaml 檔案中配置 sqflite 包,如下所示 -
dependencies: sqflite: any
使用 sqflite 的最新版本號代替 any
在 pubspec.yaml 檔案中配置 path_provider 包,如下所示 -
dependencies: path_provider: any
這裡,path_provider 包用於獲取系統的臨時資料夾路徑和應用程式的路徑。使用 sqflite 的最新版本號代替 any。
Android Studio 會提示 pubspec.yaml 已更新。

點選獲取依賴項選項。Android Studio 將從 Internet 獲取包併為應用程式正確配置它。
在資料庫中,我們需要主鍵 id 作為附加欄位,以及產品屬性,如名稱、價格等。因此,在 Product 類中新增 id 屬性。此外,新增一個新方法 toMap,用於將產品物件轉換為 Map 物件。fromMap 和 toMap 用於序列化和反序列化 Product 物件,它用於資料庫操作方法。
class Product {
   final int id;
   final String name;
   final String description;
   final int price;
   final String image;
   static final columns = ["id", "name", "description", "price", "image"];
   Product(this.id, this.name, this.description, this.price, this.image);
   factory Product.fromMap(Map<String, dynamic> data) {
      return Product(
         data['id'],
         data['name'],
         data['description'],
         data['price'],
         data['image'],
      );
   }
   Map<String, dynamic> toMap() => {
      "id": id,
      "name": name,
      "description": description,
      "price": price,
      "image": image
   };
}
在 lib 資料夾中建立一個新檔案 Database.dart,用於編寫 SQLite 相關的功能。
在 Database.dart 中匯入必要的匯入語句。
import 'dart:async';
import 'dart:io';
import 'package:path/path.dart';
import 'package:path_provider/path_provider.dart';
import 'package:sqflite/sqflite.dart';
import 'Product.dart';
請注意以下幾點 -
async 用於編寫非同步方法。
io 用於訪問檔案和目錄。
path 用於訪問與檔案路徑相關的 Dart 核心實用程式函式。
path_provider 用於獲取臨時路徑和應用程式路徑。
sqflite 用於操作 SQLite 資料庫。
建立一個新類 SQLiteDbProvider
宣告一個基於單例的靜態 SQLiteDbProvider 物件,如下所示 -
class SQLiteDbProvider {
   SQLiteDbProvider._();
   static final SQLiteDbProvider db = SQLiteDbProvider._();
   static Database _database;
}
SQLiteDBProvoider 物件及其方法可以透過靜態變數 db 訪問。
SQLiteDBProvoider.db.<emthod>
建立一個獲取資料庫(Future 選項)的方法,型別為 Future<Database>。在建立資料庫時建立產品表並載入初始資料。
Future<Database> get database async {
   if (_database != null)
   return _database;
   _database = await initDB();
   return _database;
}
initDB() async {
   Directory documentsDirectory = await getApplicationDocumentsDirectory();
   String path = join(documentsDirectory.path, "ProductDB.db");
   return await openDatabase(
      path,
      version: 1,
      onOpen: (db) {},
      onCreate: (Database db, int version) async {
         await db.execute(
            "CREATE TABLE Product ("
            "id INTEGER PRIMARY KEY,"
            "name TEXT,"
            "description TEXT,"
            "price INTEGER,"
            "image TEXT" ")"
         );
         await db.execute(
            "INSERT INTO Product ('id', 'name', 'description', 'price', 'image')
            values (?, ?, ?, ?, ?)",
            [1, "iPhone", "iPhone is the stylist phone ever", 1000, "iphone.png"]
         );
         await db.execute(
            "INSERT INTO Product ('id', 'name', 'description', 'price', 'image')
            values (?, ?, ?, ?, ?)",
            [2, "Pixel", "Pixel is the most feature phone ever", 800, "pixel.png"]
         );
         await db.execute(
            "INSERT INTO Product ('id', 'name', 'description', 'price', 'image')
            values (?, ?, ?, ?, ?)",
            [3, "Laptop", "Laptop is most productive development tool", 2000, "laptop.png"]\
         );
         await db.execute(
            "INSERT INTO Product ('id', 'name', 'description', 'price', 'image')
            values (?, ?, ?, ?, ?)",
            [4, "Tablet", "Laptop is most productive development tool", 1500, "tablet.png"]
         );
         await db.execute(
            "INSERT INTO Product
            ('id', 'name', 'description', 'price', 'image')
            values (?, ?, ?, ?, ?)",
            [5, "Pendrive", "Pendrive is useful storage medium", 100, "pendrive.png"]
         );
         await db.execute(
            "INSERT INTO Product
            ('id', 'name', 'description', 'price', 'image')
            values (?, ?, ?, ?, ?)",
            [6, "Floppy Drive", "Floppy drive is useful rescue storage medium", 20, "floppy.png"]
         );
      }
   );
}
這裡,我們使用了以下方法 -
getApplicationDocumentsDirectory - 返回應用程式目錄路徑
join - 用於建立特定於系統的路徑。我們使用它來建立資料庫路徑。
openDatabase - 用於開啟 SQLite 資料庫
onOpen - 用於在開啟資料庫時編寫程式碼
onCreate - 用於在首次建立資料庫時編寫程式碼
db.execute - 用於執行 SQL 查詢。它接受一個查詢。如果查詢有佔位符(?),則它接受第二個引數中的值列表。
編寫一個方法來獲取資料庫中的所有產品 -
Future<List<Product>> getAllProducts() async {
   final db = await database;
   List<Map>
   results = await db.query("Product", columns: Product.columns, orderBy: "id ASC");

   List<Product> products = new List();
   results.forEach((result) {
      Product product = Product.fromMap(result);
      products.add(product);
   });
   return products;
}
這裡,我們做了以下操作 -
使用 query 方法獲取所有產品資訊。query 提供了一種快捷方式來查詢表資訊,而無需編寫整個查詢。query 方法將根據我們的輸入(如列、orderBy 等)自己生成正確的查詢。
使用 Product 的 fromMap 方法,透過迴圈結果物件獲取產品詳細資訊,結果物件包含表中的所有行。
編寫一個方法來獲取特定於 id 的產品
Future<Product> getProductById(int id) async {
   final db = await database;
   var result = await db.query("Product", where: "id = ", whereArgs: [id]);
   return result.isNotEmpty ? Product.fromMap(result.first) : Null;
}
這裡,我們使用了 where 和 whereArgs 來應用過濾器。
建立三個方法 - insert、update 和 delete 方法,用於插入、更新和刪除資料庫中的產品。
insert(Product product) async {
   final db = await database;
   var maxIdResult = await db.rawQuery(
      "SELECT MAX(id)+1 as last_inserted_id FROM Product");

   var id = maxIdResult.first["last_inserted_id"];
   var result = await db.rawInsert(
      "INSERT Into Product (id, name, description, price, image)"
      " VALUES (?, ?, ?, ?, ?)",
      [id, product.name, product.description, product.price, product.image]
   );
   return result;
}
update(Product product) async {
   final db = await database;
   var result = await db.update("Product", product.toMap(),
   where: "id = ?", whereArgs: [product.id]); return result;
}
delete(int id) async {
   final db = await database;
   db.delete("Product", where: "id = ?", whereArgs: [id]);
}
Database.dart 的最終程式碼如下 -
import 'dart:async';
import 'dart:io';
import 'package:path/path.dart';
import 'package:path_provider/path_provider.dart';
import 'package:sqflite/sqflite.dart';
import 'Product.dart';

class SQLiteDbProvider {
   SQLiteDbProvider._();
   static final SQLiteDbProvider db = SQLiteDbProvider._();
   static Database _database;

   Future<Database> get database async {
      if (_database != null)
      return _database;
      _database = await initDB();
      return _database;
   }
   initDB() async {
      Directory documentsDirectory = await
      getApplicationDocumentsDirectory();
      String path = join(documentsDirectory.path, "ProductDB.db");
      return await openDatabase(
         path, version: 1,
         onOpen: (db) {},
         onCreate: (Database db, int version) async {
            await db.execute(
               "CREATE TABLE Product ("
               "id INTEGER PRIMARY KEY,"
               "name TEXT,"
               "description TEXT,"
               "price INTEGER,"
               "image TEXT"")"
            );
            await db.execute(
               "INSERT INTO Product ('id', 'name', 'description', 'price', 'image')
               values (?, ?, ?, ?, ?)",
               [1, "iPhone", "iPhone is the stylist phone ever", 1000, "iphone.png"]
            );
            await db.execute(
               "INSERT INTO Product ('id', 'name', 'description', 'price', 'image')
               values (?, ?, ?, ?, ?)",
               [2, "Pixel", "Pixel is the most feature phone ever", 800, "pixel.png"]
            );
            await db.execute(
               "INSERT INTO Product ('id', 'name', 'description', 'price', 'image')
               values (?, ?, ?, ?, ?)",
               [3, "Laptop", "Laptop is most productive development tool", 2000, "laptop.png"]
            );
            await db.execute(
               "INSERT INTO Product ('id', 'name', 'description', 'price', 'image')
               values (?, ?, ?, ?, ?)",
               [4, "Tablet", "Laptop is most productive development tool", 1500, "tablet.png"]
            );
            await db.execute(
               "INSERT INTO Product ('id', 'name', 'description', 'price', 'image')
               values (?, ?, ?, ?, ?)",
               [5, "Pendrive", "Pendrive is useful storage medium", 100, "pendrive.png"]
            );
            await db.execute(
               "INSERT INTO Product ('id', 'name', 'description', 'price', 'image')
               values (?, ?, ?, ?, ?)",
               [6, "Floppy Drive", "Floppy drive is useful rescue storage medium", 20, "floppy.png"]
            );
         }
      );
   }
   Future<List<Product>> getAllProducts() async {
      final db = await database;
      List<Map> results = await db.query(
         "Product", columns: Product.columns, orderBy: "id ASC"
      );
      List<Product> products = new List();
      results.forEach((result) {
         Product product = Product.fromMap(result);
         products.add(product);
      });
      return products;
   }
   Future<Product> getProductById(int id) async {
      final db = await database;
      var result = await db.query("Product", where: "id = ", whereArgs: [id]);
      return result.isNotEmpty ? Product.fromMap(result.first) : Null;
   }
   insert(Product product) async {
      final db = await database;
      var maxIdResult = await db.rawQuery("SELECT MAX(id)+1 as last_inserted_id FROM Product");
      var id = maxIdResult.first["last_inserted_id"];
      var result = await db.rawInsert(
         "INSERT Into Product (id, name, description, price, image)"
         " VALUES (?, ?, ?, ?, ?)",
         [id, product.name, product.description, product.price, product.image]
      );
      return result;
   }
   update(Product product) async {
      final db = await database;
      var result = await db.update(
         "Product", product.toMap(), where: "id = ?", whereArgs: [product.id]
      );
      return result;
   }
   delete(int id) async {
      final db = await database;
      db.delete("Product", where: "id = ?", whereArgs: [id]);
   }
}
更改 main 方法以獲取產品資訊。
void main() {
   runApp(MyApp(products: SQLiteDbProvider.db.getAllProducts()));
}
這裡,我們使用了 getAllProducts 方法從資料庫中獲取所有產品。
執行應用程式並檢視結果。它將類似於前面的示例 Accessing Product service API,只是產品資訊儲存在本地 SQLite 資料庫中並從中獲取。
雲 Firestore
Firebase 是一個 BaaS 應用開發平臺。它提供了許多功能來加速移動應用程式開發,例如身份驗證服務、雲端儲存等。Firebase 的主要功能之一是 Cloud Firestore,一個基於雲的即時 NoSQL 資料庫。
Flutter 提供了一個特殊的包 cloud_firestore 來使用 Cloud Firestore。讓我們在 Cloud Firestore 中建立一個線上產品商店,並建立一個應用程式來訪問該產品商店。
在 Android Studio 中建立一個新的 Flutter 應用程式 product_firebase_app。
將預設的啟動程式碼(main.dart)替換為我們的 product_rest_app 程式碼。
將 product_rest_app 中的 Product.dart 檔案複製到 lib 資料夾中。
class Product {
   final String name;
   final String description;
   final int price;
   final String image;

   Product(this.name, this.description, this.price, this.image);
   factory Product.fromMap(Map<String, dynamic> json) {
      return Product(
         json['name'],
         json['description'],
         json['price'],
         json['image'],
      );
   }
}
將 product_rest_app 中的 assets 資料夾複製到 product_firebase_app 中,並在 pubspec.yaml 檔案中新增 assets。
flutter:
   assets:
   - assets/appimages/floppy.png
   - assets/appimages/iphone.png
   - assets/appimages/laptop.png
   - assets/appimages/pendrive.png
   - assets/appimages/pixel.png
   - assets/appimages/tablet.png
在 pubspec.yaml 檔案中配置 cloud_firestore 包,如下所示 -
dependencies: cloud_firestore: ^0.9.13+1
這裡,使用 cloud_firestore 包的最新版本。
Android Studio 會提示 pubspec.yaml 已更新,如下所示 -

點選獲取依賴項選項。Android Studio 將從 Internet 獲取包併為應用程式正確配置它。
按照以下步驟在 Firebase 中建立一個專案 -
透過在 https://firebase.google.com/pricing/. 選擇免費計劃來建立一個 Firebase 帳戶。
建立 Firebase 帳戶後,它將重定向到專案概覽頁面。它列出了所有基於 Firebase 的專案,並提供了一個建立新專案的選項。
點選新增專案,它將開啟一個專案建立頁面。
輸入 products app db 作為專案名稱,然後點選建立專案選項。
轉到 *Firebase 控制檯。
點選專案概覽。它將開啟專案概覽頁面。
點選 Android 圖示。它將開啟特定於 Android 開發的專案設定。
輸入 Android 包名稱 com.tutorialspoint.flutterapp.product_firebase_app。
點選註冊應用程式。它將生成一個專案配置檔案 google_service.json。
下載 google_service.json,然後將其移動到專案的 android/app 目錄中。此檔案是我們的應用程式和 Firebase 之間的連線。
開啟 android/app/build.gradle 幷包含以下程式碼 -
apply plugin: 'com.google.gms.google-services'
開啟 android/build.gradle 幷包含以下配置 -
buildscript {
   repositories {
      // ...
   }
   dependencies {
      // ...
      classpath 'com.google.gms:google-services:3.2.1' // new
   }
}
開啟 android/app/build.gradle 幷包含以下程式碼。
這裡,外掛和類路徑用於讀取 google_service.json 檔案。
android {
   defaultConfig {
      ...
      multiDexEnabled true
   }
   ...
}
dependencies {
   ...
   compile 'com.android.support: multidex:1.0.3'
}
按照 Firebase 控制檯中的其餘步驟操作,或跳過。
使用以下步驟在新建立的專案中建立產品儲存 -
轉到 Firebase 控制檯。
開啟新建立的專案。
單擊左側選單中的“資料庫”選項。
單擊“建立資料庫”選項。
單擊“以測試模式啟動”,然後單擊“啟用”。
單擊“新增集合”。輸入“product”作為集合名稱,然後單擊“下一步”。
輸入此處影像中所示的示例產品資訊 -
此依賴項使 Android 應用程式能夠使用多 dex 功能。
使用新增文件選項新增其他產品資訊。
開啟 main.dart 檔案並匯入 Cloud Firestore 外掛檔案,並刪除 http 包。
import 'package:cloud_firestore/cloud_firestore.dart';
刪除 parseProducts 並更新 fetchProducts 以從 Cloud Firestore 而不是 Product 服務 API 中獲取產品。
Stream<QuerySnapshot> fetchProducts() {
   return Firestore.instance.collection('product').snapshots(); }
在這裡,Firestore.instance.collection 方法用於訪問雲端儲存中可用的 product 集合。Firestore.instance.collection 提供了許多選項來過濾集合以獲取必要的文件。但是,我們沒有應用任何過濾器來獲取所有產品資訊。
Cloud Firestore 透過 Dart Stream 概念提供集合,因此將 MyApp 和 MyHomePage 小部件中的 products 型別從 Future<list<Product>> 修改為 Stream<QuerySnapshot>。
更改 MyHomePage 小部件的 build 方法以使用 StreamBuilder 而不是 FutureBuilder。
@override
Widget build(BuildContext context) {
   return Scaffold(
      appBar: AppBar(title: Text("Product Navigation")),
      body: Center(
         child: StreamBuilder<QuerySnapshot>(
            stream: products, builder: (context, snapshot) {
               if (snapshot.hasError) print(snapshot.error);
               if(snapshot.hasData) {
                  List<DocumentSnapshot>
                  documents = snapshot.data.documents;

                  List<Product>
                  items = List<Product>();

                  for(var i = 0; i < documents.length; i++) {
                     DocumentSnapshot document = documents[i];
                     items.add(Product.fromMap(document.data));
                  }
                  return ProductBoxList(items: items);
               } else {
                  return Center(child: CircularProgressIndicator());
               }
            },
         ),
      )
   );
}
在這裡,我們已將產品資訊作為 List<DocumentSnapshot> 型別獲取。由於我們的 Widget ProductBoxList 與文件不相容,因此我們將文件轉換為 List<Product> 型別,並進一步使用它。
最後,執行應用程式並檢視結果。由於我們使用了與SQLite 應用程式相同的 product 資訊,並且僅更改了儲存介質,因此生成的應用程式與SQLite 應用程式應用程式看起來相同。
Flutter - 國際化
如今,移動應用程式被來自不同國家的客戶使用,因此應用程式需要以不同的語言顯示內容。使應用程式能夠以多種語言工作稱為國際化應用程式。
為了使應用程式能夠以不同的語言工作,它首先應該找到正在執行應用程式的系統的當前區域設定,然後需要以該特定區域設定顯示其內容,此過程稱為本地化。
Flutter 框架為本地化提供了三個基本類和從基本類派生的擴充套件實用程式類,以本地化應用程式。
基本類如下 -
Locale - Locale 是一個用於識別使用者語言的類。例如,en-us 表示美式英語,可以建立為。
Locale en_locale = Locale('en', 'US')
這裡,第一個引數是語言程式碼,第二個引數是國家/地區程式碼。建立阿根廷西班牙語 (es-ar)區域設定的另一個示例如下 -
Locale es_locale = Locale('es', 'AR')
Localizations - Localizations 是一個通用的 Widget,用於設定其子級的區域設定和本地化資源。
class CustomLocalizations {
   CustomLocalizations(this.locale);
   final Locale locale;
   static CustomLocalizations of(BuildContext context) {
      return Localizations.of<CustomLocalizations>(context, CustomLocalizations);
   }
   static Map<String, Map<String, String>> _resources = {
      'en': {
         'title': 'Demo',
         'message': 'Hello World'
      },
      'es': {
         'title': 'Manifestación',
         'message': 'Hola Mundo',
      },
   };
   String get title {
      return _resources[locale.languageCode]['title'];
   }
   String get message {
      return _resources[locale.languageCode]['message'];
   }
}
這裡,CustomLocalizations 是一個新建立的自定義類,專門用於為 Widget 獲取某些本地化內容(標題和訊息)。of 方法使用 Localizations 類返回新的 CustomLocalizations 類。
LocalizationsDelegate<T> - LocalizationsDelegate<T> 是一個工廠類,透過它載入 Localizations Widget。它有三個可重寫的方法 -
isSupported - 接受一個區域設定並返回指定的區域設定是否受支援。
@override
bool isSupported(Locale locale) => ['en', 'es'].contains(locale.languageCode);
load - 接受一個區域設定並開始載入指定區域設定的資源。
這裡,委託僅適用於 en 和 es 區域設定。
@override
Future<CustomLocalizations> load(Locale locale) {
   return SynchronousFuture<CustomLocalizations>(CustomLocalizations(locale));
}
shouldReload - 指定當其 Localizations Widget 重建時是否需要重新載入 CustomLocalizations。
這裡,load 方法返回 CustomLocalizations。返回的 CustomLocalizations 可用於獲取英語和西班牙語中標題和訊息的值
@override
bool shouldReload(CustomLocalizationsDelegate old) => false;
CustomLocalizationDelegate 的完整程式碼如下 -
class CustomLocalizationsDelegate extends
LocalizationsDelegate<CustomLocalizations> {
   const CustomLocalizationsDelegate();
   @override
   bool isSupported(Locale locale) => ['en', 'es'].contains(locale.languageCode);
   @override
   Future<CustomLocalizations> load(Locale locale) {
      return SynchronousFuture<CustomLocalizations>(CustomLocalizations(locale));
   }
   @override bool shouldReload(CustomLocalizationsDelegate old) => false;
}
通常,Flutter 應用程式基於兩個根級 Widget,MaterialApp 或 WidgetsApp。Flutter 為這兩個 Widget 提供了現成的本地化,它們分別是 MaterialLocalizations 和 WidgetsLocaliations。此外,Flutter 還提供委託來載入 MaterialLocalizations 和 WidgetsLocaliations,它們分別是 GlobalMaterialLocalizations.delegate 和 GlobalWidgetsLocalizations.delegate。
讓我們建立一個簡單的啟用國際化的應用程式來測試和理解該概念。
建立一個新的 Flutter 應用程式,flutter_localization_app。
Flutter 使用專用的 Flutter 包 flutter_localizations 支援國際化。其理念是從主 SDK 中分離本地化內容。開啟 pubspec.yaml 並新增以下程式碼以啟用國際化包 -
dependencies:
   flutter:
      sdk: flutter
   flutter_localizations:
      sdk: flutter
Android Studio 將顯示以下警報,表明 pubspec.yaml 已更新。

點選獲取依賴項選項。Android Studio 將從 Internet 獲取包併為應用程式正確配置它。
在 main.dart 中匯入 flutter_localizations 包,如下所示 -
import 'package:flutter_localizations/flutter_localizations.dart';
import 'package:flutter/foundation.dart' show SynchronousFuture;
這裡,SynchronousFuture 的目的是同步載入自定義本地化。
建立自定義本地化及其相應的委託,如下所示 -
class CustomLocalizations {
   CustomLocalizations(this.locale);
   final Locale locale;
   static CustomLocalizations of(BuildContext context) {
      return Localizations.of<CustomLocalizations>(context, CustomLocalizations);
   }
   static Map<String, Map<String, String>> _resources = {
      'en': {
         'title': 'Demo',
         'message': 'Hello World'
      },
      'es': {
         'title': 'Manifestación',
         'message': 'Hola Mundo',
      },
   };
   String get title {
      return _resources[locale.languageCode]['title'];
   }
   String get message {
      return _resources[locale.languageCode]['message'];
   }
}
class CustomLocalizationsDelegate extends
LocalizationsDelegate<CustomLocalizations> {
   const CustomLocalizationsDelegate();

   @override
   bool isSupported(Locale locale) => ['en', 'es'].contains(locale.languageCode);

   @override
   Future<CustomLocalizations> load(Locale locale) {
      return SynchronousFuture<CustomLocalizations>(CustomLocalizations(locale));
   }
   @override bool shouldReload(CustomLocalizationsDelegate old) => false;
}
這裡,建立 CustomLocalizations 以支援應用程式中標題和訊息的本地化,並使用 CustomLocalizationsDelegate 載入 CustomLocalizations。
使用 MaterialApp 屬性 localizationsDelegates 和 supportedLocales 新增 MaterialApp、WidgetsApp 和 CustomLocalization 的委託,如下所示 -
localizationsDelegates: [
   const CustomLocalizationsDelegate(),
   GlobalMaterialLocalizations.delegate,
   GlobalWidgetsLocalizations.delegate,
],
supportedLocales: [
   const Locale('en', ''),
   const Locale('es', ''),
],
使用 CustomLocalizations 方法 of 獲取標題和訊息的本地化值,並在適當的位置使用它,如下所示 -
class MyHomePage extends StatelessWidget {
   MyHomePage({Key key, this.title}) : super(key: key);
   final String title;
   @override
   Widget build(BuildContext context) {
      return Scaffold(
         appBar: AppBar(title: Text(CustomLocalizations .of(context) .title), ),
         body: Center(
            child: Column(
               mainAxisAlignment: MainAxisAlignment.center,
               children: <Widget>[
                  Text( CustomLocalizations .of(context) .message, ),
               ],
            ),
         ),
      );
   }
}
這裡,為了簡單起見,我們將 MyHomePage 類從 StatefulWidget 修改為 StatelessWidget,並使用 CustomLocalizations 獲取標題和訊息。
編譯並執行應用程式。應用程式將以英語顯示其內容。
關閉應用程式。轉到設定 → 系統 → 語言和輸入 → 語言*。
單擊“新增語言”選項並選擇西班牙語。這將安裝西班牙語,然後將其列為選項之一。
選擇西班牙語並將其移到英語上方。這將設定西班牙語為第一語言,所有內容都將更改為西班牙語文字。
現在重新啟動國際化應用程式,您將看到標題和訊息為西班牙語。
我們可以透過在設定中將英語選項移到西班牙語選項上方來將語言恢復為英語。
應用程式的結果(西班牙語)顯示在下面給出的螢幕截圖中 -
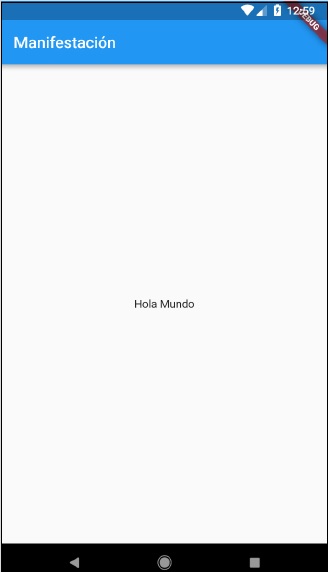
使用 intl 包
Flutter 提供 intl 包以進一步簡化本地化移動應用程式的開發。intl 包提供特殊方法和工具以半自動生成特定於語言的訊息。
讓我們使用 intl 包建立一個新的本地化應用程式,並瞭解該概念。
建立一個新的 Flutter 應用程式,flutter_intl_app。
開啟 pubspec.yaml 並新增包詳細資訊。
dependencies:
   flutter:
      sdk: flutter
   flutter_localizations:
      sdk: flutter
   intl: ^0.15.7
   intl_translation: ^0.17.3
Android Studio 將顯示如下所示的警報,通知 pubspec.yaml 已更新。

點選獲取依賴項選項。Android Studio 將從 Internet 獲取包併為應用程式正確配置它。
從以前的示例 flutter_internationalization_app 複製 main.dart。
匯入 intl 包,如下所示 -
import 'package:intl/intl.dart';
更新 CustomLocalization 類,如以下程式碼所示 -
class CustomLocalizations {
   static Future<CustomLocalizations> load(Locale locale) {
      final String name = locale.countryCode.isEmpty ? locale.languageCode : locale.toString();
      final String localeName = Intl.canonicalizedLocale(name);

      return initializeMessages(localeName).then((_) {
         Intl.defaultLocale = localeName;
         return CustomLocalizations();
      });
   }
   static CustomLocalizations of(BuildContext context) {
      return Localizations.of<CustomLocalizations>(context, CustomLocalizations);
   }
   String get title {
      return Intl.message(
         'Demo',
         name: 'title',
         desc: 'Title for the Demo application',
      );
   }
   String get message{
      return Intl.message(
         'Hello World',
         name: 'message',
         desc: 'Message for the Demo application',
      );
   }
}
class CustomLocalizationsDelegate extends
LocalizationsDelegate<CustomLocalizations> {
   const CustomLocalizationsDelegate();

   @override
   bool isSupported(Locale locale) => ['en', 'es'].contains(locale.languageCode);
   @override
   Future<CustomLocalizations> load(Locale locale) {
      return CustomLocalizations.load(locale);
   }
   @override
   bool shouldReload(CustomLocalizationsDelegate old) => false;
}
這裡,我們使用了 intl 包中的三個方法,而不是自定義方法。否則,概念相同。
Intl.canonicalizedLocale - 用於獲取正確的區域設定名稱。
Intl.defaultLocale - 用於設定當前區域設定
Intl.message - 用於定義新訊息。
匯入l10n/messages_all.dart檔案。我們將在稍後生成此檔案
import 'l10n/messages_all.dart';
現在,建立一個資料夾,lib/l10n
開啟命令提示符並轉到應用程式根目錄(其中 pubspec.yaml 可用),然後執行以下命令 -
flutter packages pub run intl_translation:extract_to_arb --output-
   dir=lib/l10n lib/main.dart
這裡,該命令將生成 intl_message.arb 檔案,這是一個用於在不同區域設定中建立訊息的模板。檔案內容如下 -
{
   "@@last_modified": "2019-04-19T02:04:09.627551",
   "title": "Demo",
   "@title": {
      "description": "Title for the Demo application",
      "type": "text",
      "placeholders": {}
   },
   "message": "Hello World",
   "@message": {
      "description": "Message for the Demo
      application",
      "type": "text",
      "placeholders": {}
   }
}
複製 intl_message.arb 並建立新檔案 intl_en.arb。
複製 intl_message.arb 並建立新檔案 intl_es.arb,並將內容更改為西班牙語,如下所示 -
{
   "@@last_modified": "2019-04-19T02:04:09.627551",
   "title": "Manifestación",
   "@title": {
      "description": "Title for the Demo application",
      "type": "text",
      "placeholders": {}
   },
   "message": "Hola Mundo",
   "@message": {
      "description": "Message for the Demo application",
      "type": "text",
      "placeholders": {}
   }
}
現在,執行以下命令以建立最終訊息檔案 messages_all.dart。
flutter packages pub run intl_translation:generate_from_arb
--output-dir=lib\l10n --no-use-deferred-loading
lib\main.dart lib\l10n\intl_en.arb lib\l10n\intl_es.arb
編譯並執行應用程式。它的工作原理與上述應用程式 flutter_localization_app 類似。
Flutter - 測試
測試是應用程式開發生命週期中非常重要的階段。它確保應用程式質量高。測試需要仔細的計劃和執行。它也是開發中最耗時的階段。
Dart 語言和 Flutter 框架為應用程式的自動化測試提供了廣泛的支援。
測試型別
通常,有三種類型的測試流程可用於完全測試應用程式。它們如下 -
單元測試
單元測試是測試應用程式最簡單的方法。它基於確保程式碼片段(通常是函式)或類的某個方法的正確性。但是,它沒有反映真實環境,因此是查詢錯誤的選擇最少的選項。
Widget 測試
Widget 測試基於確保 Widget 建立、渲染和與其他 Widget 互動的正確性,如預期的那樣。它更進一步,並提供接近即時環境以查詢更多錯誤。
整合測試
整合測試涉及單元測試和 Widget 測試以及應用程式的外部元件,如資料庫、Web 服務等,它模擬或模擬真實環境以查詢幾乎所有錯誤,但它是最複雜的過程。
Flutter 支援所有型別的測試。它為 Widget 測試提供了廣泛且獨有的支援。在本章中,我們將詳細討論 Widget 測試。
Widget 測試
Flutter 測試框架提供 testWidgets 方法來測試 Widget。它接受兩個引數 -
- 測試描述
- 測試程式碼
testWidgets('test description: find a widget', '<test code>');
涉及的步驟
Widget 測試涉及三個不同的步驟 -
在測試環境中渲染 Widget。
WidgetTester 是 Flutter 測試框架提供的用於構建和渲染 Widget 的類。WidgetTester 類的 pumpWidget 方法接受任何 Widget 並將其渲染在測試環境中。
testWidgets('finds a specific instance', (WidgetTester tester) async {
   await tester.pumpWidget(MaterialApp(
      home: Scaffold(
         body: Text('Hello'),
      ),
   ));
});
查詢我們需要測試的 Widget。
Flutter 框架提供了許多選項來查詢測試環境中渲染的小部件,它們通常被稱為查詢器(Finders)。最常用的查詢器是 find.text、find.byKey 和 find.byWidget。
find.text 查詢包含指定文字的小部件。
find.text('Hello')
find.byKey 根據其特定的鍵查詢小部件。
find.byKey('home')
find.byWidget 根據其例項變數查詢小部件。
find.byWidget(homeWidget)
確保小部件按預期工作。
Flutter 框架提供了許多選項來將小部件與預期的小部件進行匹配,它們通常被稱為匹配器(Matchers)。我們可以使用測試框架提供的 expect 方法來匹配小部件,我們在第二步中找到的小部件與我們選擇任何匹配器得到的預期小部件進行匹配。一些重要的匹配器如下所示。
findsOneWidget - 驗證找到單個小部件。
expect(find.text('Hello'), findsOneWidget);
findsNothing - 驗證未找到任何小部件
expect(find.text('Hello World'), findsNothing);
findsWidgets - 驗證找到多個小部件。
expect(find.text('Save'), findsWidgets);
findsNWidgets - 驗證找到 N 個小部件。
expect(find.text('Save'), findsNWidgets(2));
完整的測試程式碼如下所示:
testWidgets('finds hello widget', (WidgetTester tester) async {
   await tester.pumpWidget(MaterialApp(
      home: Scaffold(
         body: Text('Hello'),
      ),
   ));
   expect(find.text('Hello'), findsOneWidget);
});
在這裡,我們渲染了一個 MaterialApp 小部件,並在其主體中使用 Text 小部件顯示文字 Hello。然後,我們使用 find.text 查詢小部件,然後使用 findsOneWidget 進行匹配。
工作示例
讓我們建立一個簡單的 Flutter 應用程式並編寫一個 Widget 測試,以便更好地理解所涉及的步驟和概念。
在 Android Studio 中建立一個新的 Flutter 應用程式,命名為 flutter_test_app。
開啟 test 資料夾中的 widget_test.dart 檔案。它包含如下所示的示例測試程式碼:
testWidgets('Counter increments smoke test', (WidgetTester tester) async {
   // Build our app and trigger a frame.
   await tester.pumpWidget(MyApp());

   // Verify that our counter starts at 0.
   expect(find.text('0'), findsOneWidget);
   expect(find.text('1'), findsNothing);

   // Tap the '+' icon and trigger a frame.
   await tester.tap(find.byIcon(Icons.add));
   await tester.pump();

   // Verify that our counter has incremented.
   expect(find.text('0'), findsNothing);
   expect(find.text('1'), findsOneWidget);
});
在這裡,測試程式碼執行以下功能:
使用 tester.pumpWidget 渲染 MyApp 小部件。
使用 findsOneWidget 和 findsNothing 匹配器確保計數器最初為零。
使用 find.byIcon 方法查詢計數器遞增按鈕。
使用 tester.tap 方法點選計數器遞增按鈕。
使用 findsOneWidget 和 findsNothing 匹配器確保計數器已遞增。
讓我們再次點選計數器遞增按鈕,然後檢查計數器是否增加到 2。
await tester.tap(find.byIcon(Icons.add));
await tester.pump();

expect(find.text('2'), findsOneWidget);
點選執行選單。
點選 widget_test.dart 檔案中的測試選項。這將執行測試並在結果視窗中報告結果。
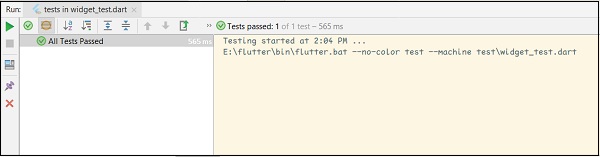
Flutter - 部署
本章介紹如何在 Android 和 iOS 平臺上部署 Flutter 應用程式。
Android 應用程式
使用 Android 清單檔案中的 android:label 條目更改應用程式名稱。Android 應用程式清單檔案 AndroidManifest.xml 位於 <app dir>/android/app/src/main 中。它包含有關 Android 應用程式的全部詳細資訊。我們可以使用 android:label 條目設定應用程式名稱。
使用清單檔案中的 android:icon 條目更改啟動器圖示。
根據需要使用標準選項簽署應用程式。
根據需要使用標準選項啟用 Proguard 和混淆。
透過執行以下命令建立釋出版 APK 檔案:
cd /path/to/my/application
flutter build apk
您可以看到如下所示的輸出:
Initializing gradle...                                            8.6s
Resolving dependencies...                                        19.9s
Calling mockable JAR artifact transform to create file:
/Users/.gradle/caches/transforms-1/files-1.1/android.jar/
c30932f130afbf3fd90c131ef9069a0b/android.jar with input
/Users/Library/Android/sdk/platforms/android-28/android.jar
Running Gradle task 'assembleRelease'...
Running Gradle task 'assembleRelease'...
Done                                                             85.7s
Built build/app/outputs/apk/release/app-release.apk (4.8MB).
使用以下命令將 APK 安裝到裝置上:
flutter install
透過建立應用程式包並使用標準方法將其推送到 Play 商店,將應用程式釋出到 Google Play 商店。
flutter build appbundle
iOS 應用程式
使用標準方法在App Store Connect中註冊 iOS 應用程式。儲存註冊應用程式時使用的Bundle ID。
更新 XCode 專案設定中的顯示名稱以設定應用程式名稱。
更新 XCode 專案設定中的 Bundle Identifier 以設定 Bundle ID,我們在步驟 1 中使用過。
根據需要使用標準方法進行程式碼簽名。
根據需要使用標準方法新增新的應用程式圖示。
使用以下命令生成 IPA 檔案:
flutter build ios
現在,您可以看到以下輸出:
Building com.example.MyApp for device (ios-release)...
Automatically signing iOS for device deployment
using specified development team in Xcode project:
Running Xcode build...                                   23.5s
......................
透過將應用程式 IPA 檔案推送到 TestFlight 使用標準方法測試應用程式。
最後,使用標準方法將應用程式推送到App Store。
Flutter - 開發工具
本章詳細介紹了 Flutter 開發工具。跨平臺開發工具包的第一個穩定版本於 2018 年 12 月 4 日釋出,即 Flutter 1.0。谷歌一直在不斷改進和增強 Flutter 框架,並提供不同的開發工具。
Widget 集
Google 更新了 Material 和 Cupertino Widget 集,以在元件設計中提供畫素級完美質量。Flutter 1.2 的即將釋出的版本將設計為支援桌面鍵盤事件和滑鼠懸停支援。
使用 Visual Studio Code 進行 Flutter 開發
Visual Studio Code 支援 Flutter 開發,並提供廣泛的快捷方式以實現快速高效的開發。以下是 Visual Studio Code 為 Flutter 開發提供的一些主要功能:
程式碼輔助 - 當您想檢查選項時,可以使用Ctrl+Space獲取程式碼完成選項列表。
快速修復 - Ctrl+. 是快速修復工具,有助於修復程式碼。
編碼時的快捷方式。
在註釋中提供詳細的文件。
除錯快捷方式。
熱重啟。
Dart DevTools
我們可以使用 Android Studio 或 Visual Studio Code 或任何其他 IDE 來編寫程式碼並安裝外掛。谷歌的開發團隊一直在開發另一個名為 Dart DevTools 的開發工具,它是一個基於 Web 的程式設計套件。它支援 Android 和 iOS 平臺。它基於時間線檢視,因此開發人員可以輕鬆分析其應用程式。
安裝 DevTools
要安裝 DevTools,請在控制檯中執行以下命令:
flutter packages pub global activate devtools
現在您可以看到以下輸出:
Resolving dependencies...
+ args 1.5.1
+ async 2.2.0
+ charcode 1.1.2
+ codemirror 0.5.3+5.44.0
+ collection 1.14.11
+ convert 2.1.1
+ devtools 0.0.16
+ devtools_server 0.0.2
+ http 0.12.0+2
+ http_parser 3.1.3
+ intl 0.15.8
+ js 0.6.1+1
+ meta 1.1.7
+ mime 0.9.6+2
..................
..................
Installed executable devtools.
Activated devtools 0.0.16.
執行伺服器
您可以使用以下命令執行 DevTools 伺服器:
flutter packages pub global run devtools
現在,您將收到類似於此的響應:
Serving DevTools at http://127.0.0.1:9100
啟動您的應用程式
轉到您的應用程式,開啟模擬器並使用以下命令執行:
flutter run --observatory-port=9200
現在,您已連線到 DevTools。
在瀏覽器中啟動 DevTools
現在在瀏覽器中訪問以下 URL 以啟動 DevTools:
https://:9100/?port=9200
您將收到如下所示的響應:
Flutter SDK
要更新 Flutter SDK,請使用以下命令:
flutter upgrade
您可以看到如下所示的輸出:
要升級 Flutter 包,請使用以下命令:
flutter packages upgrade
您可以看到以下響應:
Running "flutter packages upgrade" in my_app... 7.4s
Flutter Inspector
它用於探索 Flutter Widget 樹。為此,請在控制檯中執行以下命令:
flutter run --track-widget-creation
您可以看到如下所示的輸出:
Launching lib/main.dart on iPhone X in debug mode...
─Assembling Flutter resources...                       3.6s
Compiling, linking and signing...                      6.8s
Xcode build done.                                     14.2s
2,904ms (!)
To hot reload changes while running, press "r". To hot restart (and rebuild state), press "R".
An Observatory debugger and profiler on iPhone X is available at: http://127.0.0.1:50399/
For a more detailed help message, press "h". To detach, press "d"; to quit, press "q".
現在轉到 URL http://127.0.0.1:50399/,您可以看到以下結果:
Flutter - 編寫高階應用程式
在本章中,我們將學習如何編寫一個完整的移動應用程式 expense_calculator。expense_calculator 的目的是儲存我們的支出資訊。應用程式的完整功能如下:
支出列表。
輸入新支出的表單。
編輯/刪除現有支出的選項。
任何時刻的總支出。
我們將使用 Flutter 框架下面提到的高階功能來編寫 expense_calculator 應用程式。
高階 ListView 用法來顯示支出列表。
表單程式設計。
SQLite 資料庫程式設計來儲存我們的支出。
scoped_model 狀態管理來簡化我們的程式設計。
讓我們開始編寫expense_calculator應用程式。
在 Android Studio 中建立一個新的 Flutter 應用程式,命名為 expense_calculator。
開啟 pubspec.yaml 並新增包依賴項。
dependencies:
   flutter:
      sdk: flutter
   sqflite: ^1.1.0
   path_provider: ^0.5.0+1
   scoped_model: ^1.0.1
   intl: any
在此處觀察這些要點:
sqflite 用於 SQLite 資料庫程式設計。
path_provider 用於獲取特定於系統的應用程式路徑。
scoped_model 用於狀態管理。
intl 用於日期格式化。
Android Studio 將顯示以下警報,表明 pubspec.yaml 已更新。

點選獲取依賴項選項。Android Studio 將從 Internet 獲取包併為應用程式正確配置它。
刪除 main.dart 中的現有程式碼。
新增新檔案 Expense.dart 以建立 Expense 類。Expense 類將具有以下屬性和方法。
屬性:id - 在 SQLite 資料庫中表示支出條目的唯一 ID。
屬性:amount - 支出金額。
屬性:date - 支出日期。
屬性:category - 類別表示支出領域,例如食品、旅行等。
formattedDate - 用於格式化 date 屬性
fromMap - 用於將資料庫表中的欄位對映到支出物件中的屬性,並建立新的支出物件。
factory Expense.fromMap(Map<String, dynamic> data) {
   return Expense(
      data['id'],
      data['amount'],
      DateTime.parse(data['date']),
      data['category']
   );
}
toMap - 用於將支出物件轉換為 Dart Map,可進一步用於資料庫程式設計
Map<String, dynamic> toMap() => {
   "id" : id,
   "amount" : amount,
   "date" : date.toString(),
   "category" : category,
};
columns - 用於表示資料庫欄位的靜態變數。
將以下程式碼輸入 Expense.dart 檔案並儲存。
import 'package:intl/intl.dart'; class Expense {
   final int id;
   final double amount;
   final DateTime date;
   final String category;
   String get formattedDate {
      var formatter = new DateFormat('yyyy-MM-dd');
      return formatter.format(this.date);
   }
   static final columns = ['id', 'amount', 'date', 'category'];
   Expense(this.id, this.amount, this.date, this.category);
   factory Expense.fromMap(Map<String, dynamic> data) {
      return Expense(
         data['id'],
         data['amount'],
         DateTime.parse(data['date']), data['category']
      );
   }
   Map<String, dynamic> toMap() => {
      "id" : id,
      "amount" : amount,
      "date" : date.toString(),
      "category" : category,
   };
}
以上程式碼簡單明瞭,不言自明。
新增新檔案 Database.dart 以建立 SQLiteDbProvider 類。SQLiteDbProvider 類的目的是:
使用 getAllExpenses 方法獲取資料庫中所有可用的支出。它將用於列出所有使用者的支出資訊。
Future<List<Expense>> getAllExpenses() async {
   final db = await database;

   List<Map> results = await db.query(
      "Expense", columns: Expense.columns, orderBy: "date DESC"
   );
   List<Expense> expenses = new List();
   results.forEach((result) {
      Expense expense = Expense.fromMap(result);
      expenses.add(expense);
   });
   return expenses;
}
使用 getExpenseById 方法根據資料庫中可用的支出 ID 獲取特定支出資訊。它將用於向用戶顯示特定的支出資訊。
Future<Expense> getExpenseById(int id) async {
   final db = await database;
   var result = await db.query("Expense", where: "id = ", whereArgs: [id]);

   return result.isNotEmpty ?
   Expense.fromMap(result.first) : Null;
}
使用 getTotalExpense 方法獲取使用者的總支出。它將用於向用戶顯示當前的總支出。
Future<double> getTotalExpense() async {
   final db = await database;
   List<Map> list = await db.rawQuery(
      "Select SUM(amount) as amount from expense"
   );
   return list.isNotEmpty ? list[0]["amount"] : Null;
}
使用 insert 方法將新的支出資訊新增到資料庫中。它將用於透過使用者將新的支出條目新增到應用程式中。
Future<Expense> insert(Expense expense) async {
   final db = await database;
   var maxIdResult = await db.rawQuery(
      "SELECT MAX(id)+1 as last_inserted_id FROM Expense"
   );
   var id = maxIdResult.first["last_inserted_id"];
   var result = await db.rawInsert(
      "INSERT Into Expense (id, amount, date, category)"
      " VALUES (?, ?, ?, ?)", [
         id, expense.amount, expense.date.toString(), expense.category
      ]
   );
   return Expense(id, expense.amount, expense.date, expense.category);
}
使用 update 方法更新現有支出資訊。它將用於透過使用者編輯和更新系統中可用的現有支出條目。
update(Expense product) async {
   final db = await database;

   var result = await db.update("Expense", product.toMap(),
   where: "id = ?", whereArgs: [product.id]);
   return result;
}
使用 delete 方法刪除現有支出資訊。它將用於透過使用者刪除系統中可用的現有支出條目。
delete(int id) async {
   final db = await database;
   db.delete("Expense", where: "id = ?", whereArgs: [id]);
}
SQLiteDbProvider 類的完整程式碼如下:
import 'dart:async';
import 'dart:io';
import 'package:path/path.dart';
import 'package:path_provider/path_provider.dart';
import 'package:sqflite/sqflite.dart';
import 'Expense.dart';

class SQLiteDbProvider {
   SQLiteDbProvider._();
   static final SQLiteDbProvider db = SQLiteDbProvider._();

   static Database _database; Future<Database> get database async {
      if (_database != null)
         return _database;
      _database = await initDB();
      return _database;
   }
   initDB() async {
      Directory documentsDirectory = await getApplicationDocumentsDirectory();
      String path = join(documentsDirectory.path, "ExpenseDB2.db");
      return await openDatabase(
         path, version: 1, onOpen:(db){}, onCreate: (Database db, int version) async {
            await db.execute(
               "CREATE TABLE Expense (
                  ""id INTEGER PRIMARY KEY," "amount REAL," "date TEXT," "category TEXT""
               )
            ");
            await db.execute(
               "INSERT INTO Expense ('id', 'amount', 'date', 'category')
               values (?, ?, ?, ?)",[1, 1000, '2019-04-01 10:00:00', "Food"]
            );
            /*await db.execute(
               "INSERT INTO Product ('id', 'name', 'description', 'price', 'image')
               values (?, ?, ?, ?, ?)", [
                  2, "Pixel", "Pixel is the most feature phone ever", 800, "pixel.png"
               ]
            );
            await db.execute(
               "INSERT INTO Product ('id', 'name', 'description', 'price', 'image')
               values (?, ?, ?, ?, ?)", [
                  3, "Laptop", "Laptop is most productive development tool", 2000, "laptop.png"
               ]
            );
            await db.execute(
               "INSERT INTO Product ('id', 'name', 'description', 'price', 'image')
               values (?, ?, ?, ?, ?)", [
                  4, "Tablet", "Laptop is most productive development tool", 1500, "tablet.png"
               ]
            );
            await db.execute(
               "INSERT INTO Product ('id', 'name', 'description', 'price', 'image')
               values (?, ?, ?, ?, ?)", [
                  5, "Pendrive", "iPhone is the stylist phone ever", 100, "pendrive.png"
               ]
            );
            await db.execute(
               "INSERT INTO Product ('id', 'name', 'description', 'price', 'image')
               values (?, ?, ?, ?, ?)", [
                  6, "Floppy Drive", "iPhone is the stylist phone ever", 20, "floppy.png"
               ]
            ); */
         }
      );
   }
   Future<List<Expense>> getAllExpenses() async {
      final db = await database;
      List<Map>
      results = await db.query(
         "Expense", columns: Expense.columns, orderBy: "date DESC"
      );
      List<Expense> expenses = new List();
      results.forEach((result) {
         Expense expense = Expense.fromMap(result);
         expenses.add(expense);
      });
      return expenses;
   }
   Future<Expense> getExpenseById(int id) async {
      final db = await database;
      var result = await db.query("Expense", where: "id = ", whereArgs: [id]);
      return result.isNotEmpty ? Expense.fromMap(result.first) : Null;
   }
   Future<double> getTotalExpense() async {
      final db = await database;
      List<Map> list = await db.rawQuery(
         "Select SUM(amount) as amount from expense"
      );
      return list.isNotEmpty ? list[0]["amount"] : Null;
   }
   Future<Expense> insert(Expense expense) async {
      final db = await database;
      var maxIdResult = await db.rawQuery(
         "SELECT MAX(id)+1 as last_inserted_id FROM Expense"
      );
      var id = maxIdResult.first["last_inserted_id"];
      var result = await db.rawInsert(
         "INSERT Into Expense (id, amount, date, category)"
         " VALUES (?, ?, ?, ?)", [
            id, expense.amount, expense.date.toString(), expense.category
         ]
      );
      return Expense(id, expense.amount, expense.date, expense.category);
   }
   update(Expense product) async {
      final db = await database;
      var result = await db.update(
         "Expense", product.toMap(), where: "id = ?", whereArgs: [product.id]
      );
      return result;
   }
   delete(int id) async {
      final db = await database;
      db.delete("Expense", where: "id = ?", whereArgs: [id]);
   }
}
這裡,
database 是獲取 SQLiteDbProvider 物件的屬性。
initDB 是用於選擇和開啟 SQLite 資料庫的方法。
建立一個新的檔案 ExpenseListModel.dart 以建立 ExpenseListModel。該模型的目的是在記憶體中儲存使用者支出的完整資訊,並在使用者記憶體中的支出發生變化時更新應用程式的使用者介面。它基於 scoped_model 包中的 Model 類。它具有以下屬性和方法:
_items - 支出的私有列表。
items - 作為 UnmodifiableListView<Expense> 的 _items 的 getter,以防止意外或意外更改列表。
totalExpense - 基於 items 變數的總支出的 getter。
double get totalExpense {
   double amount = 0.0;
   for(var i = 0; i < _items.length; i++) {
      amount = amount + _items[i].amount;
   }
   return amount;
}
load - 用於從資料庫載入完整的支出並載入到 _items 變數中。它還會呼叫 notifyListeners 以更新 UI。
void load() {
   Future<List<Expense>>
   list = SQLiteDbProvider.db.getAllExpenses();
   list.then( (dbItems) {
      for(var i = 0; i < dbItems.length; i++) {
         _items.add(dbItems[i]);
      } notifyListeners();
   });
}
byId - 用於從 _items 變數獲取特定支出。
Expense byId(int id) {
   for(var i = 0; i < _items.length; i++) {
      if(_items[i].id == id) {
         return _items[i];
      }
   }
   return null;
}
add - 用於將新的支出項新增到 _items 變數以及資料庫中。它還會呼叫 notifyListeners 以更新 UI。
void add(Expense item) {
   SQLiteDbProvider.db.insert(item).then((val) {
      _items.add(val); notifyListeners();
   });
}
Update - 用於將支出項更新到 _items 變數以及資料庫中。它還會呼叫 notifyListeners 以更新 UI。
void update(Expense item) {
   bool found = false;
   for(var i = 0; i < _items.length; i++) {
      if(_items[i].id == item.id) {
         _items[i] = item;
         found = true;
         SQLiteDbProvider.db.update(item); break;
      }
   }
   if(found) notifyListeners();
}
delete - 用於從 _items 變數以及資料庫中刪除現有的支出項。它還會呼叫 notifyListeners 以更新 UI。
void delete(Expense item) {
   bool found = false;
   for(var i = 0; i < _items.length; i++) {
      if(_items[i].id == item.id) {
         found = true;
         SQLiteDbProvider.db.delete(item.id);
         _items.removeAt(i); break;
      }
   }
   if(found) notifyListeners();
}
ExpenseListModel 類的完整程式碼如下:
import 'dart:collection';
import 'package:scoped_model/scoped_model.dart';
import 'Expense.dart';
import 'Database.dart';

class ExpenseListModel extends Model {
   ExpenseListModel() {
      this.load();
   }
   final List<Expense> _items = [];
   UnmodifiableListView<Expense> get items =>
   UnmodifiableListView(_items);

   /*Future<double> get totalExpense {
      return SQLiteDbProvider.db.getTotalExpense();
   }*/

   double get totalExpense {
      double amount = 0.0;
      for(var i = 0; i < _items.length; i++) {
         amount = amount + _items[i].amount;
      }
      return amount;
   }
   void load() {
      Future<List<Expense>> list = SQLiteDbProvider.db.getAllExpenses();
      list.then( (dbItems) {
         for(var i = 0; i < dbItems.length; i++) {
            _items.add(dbItems[i]);
         }
         notifyListeners();
      });
   }
   Expense byId(int id) {
      for(var i = 0; i < _items.length; i++) {
         if(_items[i].id == id) {
            return _items[i];
         }
      }
      return null;
   }
   void add(Expense item) {
      SQLiteDbProvider.db.insert(item).then((val) {
         _items.add(val);
         notifyListeners();
      });
   }
   void update(Expense item) {
      bool found = false;
      for(var i = 0; i < _items.length; i++) {
         if(_items[i].id == item.id) {
            _items[i] = item;
            found = true;
            SQLiteDbProvider.db.update(item);
            break;
         }
      }
      if(found) notifyListeners();
   }
   void delete(Expense item) {
      bool found = false;
      for(var i = 0; i < _items.length; i++) {
         if(_items[i].id == item.id) {
            found = true;
            SQLiteDbProvider.db.delete(item.id);
            _items.removeAt(i); break;
         }
      }
      if(found) notifyListeners();
   }
}
開啟 main.dart 檔案。匯入如下指定的類:
import 'package:flutter/material.dart';
import 'package:scoped_model/scoped_model.dart';
import 'ExpenseListModel.dart';
import 'Expense.dart';
新增 main 函式並透過傳遞 ScopedModel<ExpenseListModel> 小部件來呼叫 runApp。
void main() {
   final expenses = ExpenseListModel();
   runApp(
      ScopedModel<ExpenseListModel>(model: expenses, child: MyApp(),)
   );
}
這裡,
expenses 物件從資料庫載入所有使用者支出資訊。此外,當應用程式第一次開啟時,它將建立具有適當表的所需資料庫。
ScopedModel 在應用程式的整個生命週期中提供支出資訊,並確保在任何例項中維護應用程式的狀態。它使我們能夠使用 StatelessWidget 而不是 StatefulWidget。
使用 MaterialApp 小部件建立一個簡單的 MyApp。
class MyApp extends StatelessWidget {
   // This widget is the root of your application.
   @override
   Widget build(BuildContext context) {
      return MaterialApp(
         title: 'Expense',
         theme: ThemeData(
            primarySwatch: Colors.blue,
         ),
         home: MyHomePage(title: 'Expense calculator'),
      );
   }
}
建立 MyHomePage 小部件以顯示所有使用者的支出資訊以及頂部的總支出。右下角的浮動按鈕將用於新增新的支出。
class MyHomePage extends StatelessWidget {
   MyHomePage({Key key, this.title}) : super(key: key);
   final String title;
   @override
   Widget build(BuildContext context) {
      return Scaffold(
         appBar: AppBar(
            title: Text(this.title),
         ),
         body: ScopedModelDescendant<ExpenseListModel>(
            builder: (context, child, expenses) {
               return ListView.separated(
                  itemCount: expenses.items == null ? 1
                  : expenses.items.length + 1,
                  itemBuilder: (context, index) {
                     if (index == 0) {
                        return ListTile(
                           title: Text("Total expenses: "
                           + expenses.totalExpense.toString(),
                           style: TextStyle(fontSize: 24,
                           fontWeight: FontWeight.bold),)
                        );
                     } else {
                        index = index - 1;
                        return Dismissible(
                           key: Key(expenses.items[index].id.toString()),
                              onDismissed: (direction) {
                              expenses.delete(expenses.items[index]);
                              Scaffold.of(context).showSnackBar(
                                 SnackBar(
                                    content: Text(
                                       "Item with id, "
                                       + expenses.items[index].id.toString() +
                                       " is dismissed"
                                    )
                                 )
                              );
                           },
                           child: ListTile( onTap: () {
                              Navigator.push(
                                 context, MaterialPageRoute(
                                    builder: (context) => FormPage(
                                       id: expenses.items[index].id,
                                       expenses: expenses,
                                    )
                                 )
                              );
                           },
                           leading: Icon(Icons.monetization_on),
                           trailing: Icon(Icons.keyboard_arrow_right),
                           title: Text(expenses.items[index].category + ": " +
                           expenses.items[index].amount.toString() +
                           " \nspent on " + expenses.items[index].formattedDate,
                           style: TextStyle(fontSize: 18, fontStyle: FontStyle.italic),))
                        );
                     }
                  },
                  separatorBuilder: (context, index) {
                     return Divider();
                  },
               );
            },
         ),
         floatingActionButton: ScopedModelDescendant<ExpenseListModel>(
            builder: (context, child, expenses) {
               return FloatingActionButton( onPressed: () {
                  Navigator.push(
                     context, MaterialPageRoute(
                        builder: (context) => ScopedModelDescendant<ExpenseListModel>(
                           builder: (context, child, expenses) {
                              return FormPage( id: 0, expenses: expenses, );
                           }
                        )
                     )
                  );
                  // expenses.add(new Expense(
                     // 2, 1000, DateTime.parse('2019-04-01 11:00:00'), 'Food')
                  );
                  // print(expenses.items.length);
               },
               tooltip: 'Increment', child: Icon(Icons.add), );
            }
         )
      );
   }
}
這裡,
ScopedModelDescendant 用於將支出模型傳遞到 ListView 和 FloatingActionButton 小部件。
ListView.separated 和 ListTile 小部件用於列出支出資訊。
Dismissible 小部件用於使用滑動手勢刪除支出條目。
Navigator 用於開啟支出條目的編輯介面。可以透過點選支出條目來啟用它。
建立一個 FormPage 小部件。FormPage 小部件的目的是新增或更新支出條目。它也處理支出條目的驗證。
class FormPage extends StatefulWidget {
   FormPage({Key key, this.id, this.expenses}) : super(key: key);
   final int id;
   final ExpenseListModel expenses;

   @override _FormPageState createState() => _FormPageState(id: id, expenses: expenses);
}
class _FormPageState extends State<FormPage> {
   _FormPageState({Key key, this.id, this.expenses});

   final int id;
   final ExpenseListModel expenses;
   final scaffoldKey = GlobalKey<ScaffoldState>();
   final formKey = GlobalKey<FormState>();

   double _amount;
   DateTime _date;
   String _category;

   void _submit() {
      final form = formKey.currentState;
      if (form.validate()) {
         form.save();
         if (this.id == 0) expenses.add(Expense(0, _amount, _date, _category));
            else expenses.update(Expense(this.id, _amount, _date, _category));
         Navigator.pop(context);
      }
   }
   @override
   Widget build(BuildContext context) {
      return Scaffold(
         key: scaffoldKey, appBar: AppBar(
            title: Text('Enter expense details'),
         ),
         body: Padding(
            padding: const EdgeInsets.all(16.0),
            child: Form(
               key: formKey, child: Column(
                  children: [
                     TextFormField(
                        style: TextStyle(fontSize: 22),
                        decoration: const InputDecoration(
                           icon: const Icon(Icons.monetization_on),
                           labelText: 'Amount',
                           labelStyle: TextStyle(fontSize: 18)
                        ),
                        validator: (val) {
                           Pattern pattern = r'^[1-9]\d*(\.\d+)?$';
                           RegExp regex = new RegExp(pattern);
                           if (!regex.hasMatch(val))
                           return 'Enter a valid number'; else return null;
                        },
                        initialValue: id == 0
                        ? '' : expenses.byId(id).amount.toString(),
                        onSaved: (val) => _amount = double.parse(val),
                     ),
                     TextFormField(
                        style: TextStyle(fontSize: 22),
                        decoration: const InputDecoration(
                           icon: const Icon(Icons.calendar_today),
                           hintText: 'Enter date',
                           labelText: 'Date',
                           labelStyle: TextStyle(fontSize: 18),
                        ),
                        validator: (val) {
                           Pattern pattern = r'^((?:19|20)\d\d)[- /.]
                              (0[1-9]|1[012])[- /.](0[1-9]|[12][0-9]|3[01])$';
                           RegExp regex = new RegExp(pattern);
                           if (!regex.hasMatch(val))
                              return 'Enter a valid date';
                           else return null;
                        },
                        onSaved: (val) => _date = DateTime.parse(val),
                        initialValue: id == 0
                        ? '' : expenses.byId(id).formattedDate,
                        keyboardType: TextInputType.datetime,
                     ),
                     TextFormField(
                        style: TextStyle(fontSize: 22),
                        decoration: const InputDecoration(
                           icon: const Icon(Icons.category),
                           labelText: 'Category',
                           labelStyle: TextStyle(fontSize: 18)
                        ),
                        onSaved: (val) => _category = val,
                        initialValue: id == 0 ? ''
                        : expenses.byId(id).category.toString(),
                     ),
                     RaisedButton(
                        onPressed: _submit,
                        child: new Text('Submit'),
                     ),
                  ],
               ),
            ),
         ),
      );
   }
}
這裡,
TextFormField 用於建立表單條目。
TextFormField 的 validator 屬性用於使用正則表示式模式驗證表單元素。
_submit 函式與 expenses 物件一起使用,用於將支出新增到資料庫或更新資料庫中的支出。
main.dart 檔案的完整程式碼如下所示:
import 'package:flutter/material.dart';
import 'package:scoped_model/scoped_model.dart';
import 'ExpenseListModel.dart';
import 'Expense.dart';

void main() {
   final expenses = ExpenseListModel();
   runApp(
      ScopedModel<ExpenseListModel>(
         model: expenses, child: MyApp(),
      )
   );
}
class MyApp extends StatelessWidget {
   // This widget is the root of your application.
   @override
   Widget build(BuildContext context) {
      return MaterialApp(
         title: 'Expense',
         theme: ThemeData(
            primarySwatch: Colors.blue,
         ),
         home: MyHomePage(title: 'Expense calculator'),
      );
   }
}
class MyHomePage extends StatelessWidget {
   MyHomePage({Key key, this.title}) : super(key: key);
   final String title;

   @override
   Widget build(BuildContext context) {
      return Scaffold(
         appBar: AppBar(
            title: Text(this.title),
         ),
         body: ScopedModelDescendant<ExpenseListModel>(
            builder: (context, child, expenses) {
               return ListView.separated(
                  itemCount: expenses.items == null ? 1
                  : expenses.items.length + 1, itemBuilder: (context, index) {
                     if (index == 0) {
                        return ListTile( title: Text("Total expenses: "
                        + expenses.totalExpense.toString(),
                        style: TextStyle(fontSize: 24,fontWeight:
                        FontWeight.bold),) );
                     } else {
                        index = index - 1; return Dismissible(
                           key: Key(expenses.items[index].id.toString()),
                           onDismissed: (direction) {
                              expenses.delete(expenses.items[index]);
                              Scaffold.of(context).showSnackBar(
                                 SnackBar(
                                    content: Text(
                                       "Item with id, " +
                                       expenses.items[index].id.toString()
                                       + " is dismissed"
                                    )
                                 )
                              );
                           },
                           child: ListTile( onTap: () {
                              Navigator.push( context, MaterialPageRoute(
                                 builder: (context) => FormPage(
                                    id: expenses.items[index].id, expenses: expenses,
                                 )
                              ));
                           },
                           leading: Icon(Icons.monetization_on),
                           trailing: Icon(Icons.keyboard_arrow_right),
                           title: Text(expenses.items[index].category + ": " +
                           expenses.items[index].amount.toString() + " \nspent on " +
                           expenses.items[index].formattedDate,
                           style: TextStyle(fontSize: 18, fontStyle: FontStyle.italic),))
                        );
                     }
                  },
                  separatorBuilder: (context, index) {
                     return Divider();
                  },
               );
            },
         ),
         floatingActionButton: ScopedModelDescendant<ExpenseListModel>(
            builder: (context, child, expenses) {
               return FloatingActionButton(
                  onPressed: () {
                     Navigator.push(
                        context, MaterialPageRoute(
                           builder: (context)
                           => ScopedModelDescendant<ExpenseListModel>(
                              builder: (context, child, expenses) {
                                 return FormPage( id: 0, expenses: expenses, );
                              }
                           )
                        )
                     );
                     // expenses.add(
                        new Expense(
                           // 2, 1000, DateTime.parse('2019-04-01 11:00:00'), 'Food'
                        )
                     );
                     // print(expenses.items.length);
                  },
                  tooltip: 'Increment', child: Icon(Icons.add),
               );
            }
         )
      );
   }
}
class FormPage extends StatefulWidget {
   FormPage({Key key, this.id, this.expenses}) : super(key: key);
   final int id;
   final ExpenseListModel expenses;

   @override
   _FormPageState createState() => _FormPageState(id: id, expenses: expenses);
}
class _FormPageState extends State<FormPage> {
   _FormPageState({Key key, this.id, this.expenses});
   final int id;
   final ExpenseListModel expenses;
   final scaffoldKey = GlobalKey<ScaffoldState>();
   final formKey = GlobalKey<FormState>();
   double _amount; DateTime _date;
   String _category;
   void _submit() {
      final form = formKey.currentState;
      if (form.validate()) {
         form.save();
         if (this.id == 0) expenses.add(Expense(0, _amount, _date, _category));
         else expenses.update(Expense(this.id, _amount, _date, _category));
         Navigator.pop(context);
      }
   }
   @override
   Widget build(BuildContext context) {
      return Scaffold(
         key: scaffoldKey, appBar: AppBar(
            title: Text('Enter expense details'),
         ),
         body: Padding(
            padding: const EdgeInsets.all(16.0),
            child: Form(
               key: formKey, child: Column(
                  children: [
                     TextFormField(
                        style: TextStyle(fontSize: 22),
                        decoration: const InputDecoration(
                           icon: const Icon(Icons.monetization_on),
                           labelText: 'Amount',
                           labelStyle: TextStyle(fontSize: 18)
                        ),
                        validator: (val) {
                           Pattern pattern = r'^[1-9]\d*(\.\d+)?$';
                           RegExp regex = new RegExp(pattern);
                           if (!regex.hasMatch(val)) return 'Enter a valid number';
                           else return null;
                        },
                        initialValue: id == 0 ? ''
                        : expenses.byId(id).amount.toString(),
                        onSaved: (val) => _amount = double.parse(val),
                     ),
                     TextFormField(
                        style: TextStyle(fontSize: 22),
                        decoration: const InputDecoration(
                           icon: const Icon(Icons.calendar_today),
                           hintText: 'Enter date',
                           labelText: 'Date',
                           labelStyle: TextStyle(fontSize: 18),
                        ),
                        validator: (val) {
                           Pattern pattern = r'^((?:19|20)\d\d)[- /.]
                           (0[1-9]|1[012])[- /.](0[1-9]|[12][0-9]|3[01])$';
                           RegExp regex = new RegExp(pattern);
                           if (!regex.hasMatch(val)) return 'Enter a valid date';
                           else return null;
                        },
                        onSaved: (val) => _date = DateTime.parse(val),
                        initialValue: id == 0 ? '' : expenses.byId(id).formattedDate,
                        keyboardType: TextInputType.datetime,
                     ),
                     TextFormField(
                        style: TextStyle(fontSize: 22),
                        decoration: const InputDecoration(
                           icon: const Icon(Icons.category),
                           labelText: 'Category',
                           labelStyle: TextStyle(fontSize: 18)
                        ),
                        onSaved: (val) => _category = val,
                        initialValue: id == 0 ? '' : expenses.byId(id).category.toString(),
                     ),
                     RaisedButton(
                        onPressed: _submit,
                        child: new Text('Submit'),
                     ),
                  ],
               ),
            ),
         ),
      );
   }
}
現在,執行應用程式。
使用浮動按鈕新增新的支出。
透過點選支出條目來編輯現有的支出。
透過向任何方向滑動支出條目來刪除現有的支出。
應用程式的一些螢幕截圖如下所示:
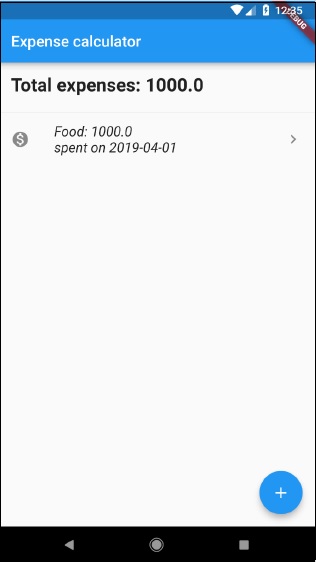
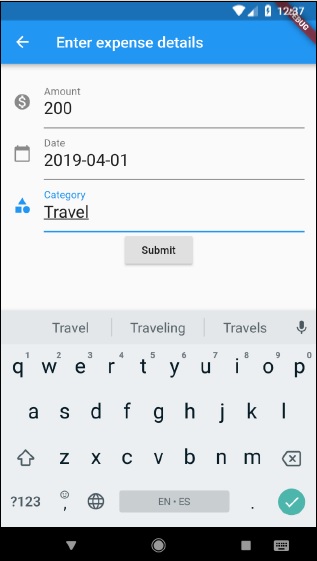
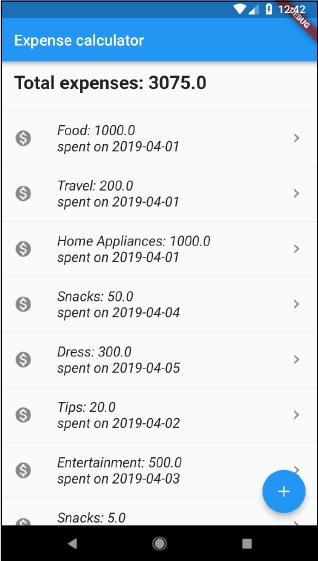
Flutter - 總結
Flutter 框架透過提供一個出色的框架來構建真正平臺獨立的移動應用程式,做了一件很棒的事情。透過簡化開發過程,提高生成的移動應用程式的效能,為 Android 和 iOS 平臺提供豐富且相關的使用者介面,Flutter 框架必將使許多新開發人員能夠在不久的將來開發高效能且功能豐富的移動應用程式。