- Flutter 教程
- Flutter - 首頁
- Flutter - 簡介
- Flutter - 安裝
- 在 Android Studio 中建立簡單的應用程式
- Flutter - 架構應用程式
- Dart 程式設計入門
- Flutter - Widget 入門
- Flutter - 佈局入門
- Flutter - 手勢入門
- Flutter - 狀態管理
- Flutter - 動畫
- Flutter - 編寫 Android 特定程式碼
- Flutter - 編寫 IOS 特定程式碼
- Flutter - 包入門
- Flutter - 訪問 REST API
- Flutter - 資料庫概念
- Flutter - 國際化
- Flutter - 測試
- Flutter - 部署
- Flutter - 開發工具
- Flutter - 編寫高階應用程式
- Flutter - 結論
- Flutter 有用資源
- Flutter - 快速指南
- Flutter - 有用資源
- Flutter - 討論
Flutter - 動畫
動畫在任何移動應用程式中都是一個複雜的過程。儘管其複雜性,動畫將使用者體驗提升到一個新的水平,並提供豐富的使用者互動。由於其豐富性,動畫成為現代移動應用程式不可或缺的一部分。Flutter 框架認識到動畫的重要性,並提供了一個簡單直觀的框架來開發各種型別的動畫。
介紹
動畫是在特定時間內按特定順序顯示一系列影像/圖片,以產生運動錯覺的過程。動畫最重要的方面如下:
動畫有兩個不同的值:起始值和結束值。動畫從起始值開始,經過一系列中間值,最終在結束值處結束。例如,要將小部件淡出,初始值為完全不透明,最終值為零不透明。
中間值可以是線性的或非線性的(曲線)的,並且可以進行配置。請理解動畫按配置的方式工作。每個配置都會為動畫提供不同的感覺。例如,淡出小部件本質上是線性的,而球的彈跳本質上是非線性的。
動畫過程的持續時間會影響動畫的速度(緩慢或快速)。
控制動畫過程的能力,例如啟動動畫、停止動畫、重複動畫特定次數、反轉動畫過程等。
在 Flutter 中,動畫系統不執行任何真實的動畫。相反,它僅提供渲染影像時每一幀所需的數值。
基於動畫的類
Flutter 動畫系統基於 Animation 物件。核心動畫類及其用法如下:
動畫
在特定時間內生成兩個數字之間的插值值。最常見的 Animation 類如下:
Animation<double> - 在兩個十進位制數之間插值
Animation<Color> - 在兩種顏色之間插值顏色
Animation<Size> - 在兩種尺寸之間插值尺寸
AnimationController - 特殊的 Animation 物件,用於控制動畫本身。它在應用程式準備好新幀時生成新值。它支援基於線性的動畫,並且值從 0.0 到 1.0 開始
controller = AnimationController(duration: const Duration(seconds: 2), vsync: this);
在這裡,controller 控制動畫,duration 選項控制動畫過程的持續時間。vsync 是一個特殊的選項,用於最佳化動畫中使用的資源。
CurvedAnimation
類似於 AnimationController,但支援非線性動畫。CurvedAnimation 可以與 Animation 物件一起使用,如下所示:
controller = AnimationController(duration: const Duration(seconds: 2), vsync: this);
animation = CurvedAnimation(parent: controller, curve: Curves.easeIn)
Tween<T>
派生自 Animatable<T>,用於生成除 0 和 1 之外的任何兩個數字之間的數字。它可以透過使用 animate 方法並將實際的 Animation 物件傳遞給它來與 Animation 物件一起使用。
AnimationController controller = AnimationController(
   duration: const Duration(milliseconds: 1000),
vsync: this); Animation<int> customTween = IntTween(
   begin: 0, end: 255).animate(controller);
Tween 也可以與 CurvedAnimation 一起使用,如下所示:
AnimationController controller = AnimationController(
   duration: const Duration(milliseconds: 500), vsync: this);
final Animation curve = CurvedAnimation(parent: controller, curve: Curves.easeOut);
Animation<int> customTween = IntTween(begin: 0, end: 255).animate(curve);
這裡,controller 是實際的動畫控制器。curve 提供非線性的型別,customTween 提供從 0 到 255 的自定義範圍。
Flutter 動畫的工作流程
動畫的工作流程如下:
在 StatefulWidget 的 initState 中定義並啟動動畫控制器。
AnimationController(duration: const Duration(seconds: 2), vsync: this);
animation = Tween<double>(begin: 0, end: 300).animate(controller);
controller.forward();
新增基於動畫的偵聽器,新增 addListener 以更改小部件的狀態。
animation = Tween<double>(begin: 0, end: 300).animate(controller) ..addListener(() {
   setState(() {
      // The state that has changed here is the animation object’s value.
   });
});
內建小部件 AnimatedWidget 和 AnimatedBuilder 可用於跳過此過程。這兩個小部件都接受 Animation 物件並獲取動畫所需的當前值。
在小部件的構建過程中獲取動畫值,然後將其應用於寬度、高度或任何相關屬性,而不是原始值。
child: Container(
   height: animation.value,
   width: animation.value,
   child: <Widget>,
)
工作應用程式
讓我們編寫一個簡單的基於動畫的應用程式,以瞭解 Flutter 框架中動畫的概念。
在 Android studio 中建立一個新的Flutter 應用程式,product_animation_app。
將 assets 資料夾從 product_nav_app 複製到 product_animation_app,並在 pubspec.yaml 檔案中新增 assets。
flutter:
   assets:
   - assets/appimages/floppy.png
   - assets/appimages/iphone.png
   - assets/appimages/laptop.png
   - assets/appimages/pendrive.png
   - assets/appimages/pixel.png
   - assets/appimages/tablet.png
刪除預設的啟動程式碼 (main.dart)。
新增匯入和基本 main 函式。
import 'package:flutter/material.dart';
void main() => runApp(MyApp());
建立從 StatefulWidgtet 派生的 MyApp 小部件。
class MyApp extends StatefulWidget {
   _MyAppState createState() => _MyAppState();
}
建立 _MyAppState 小部件,並在預設 build 方法之外實現 initState 和 dispose。
class _MyAppState extends State<MyApp> with SingleTickerProviderStateMixin {
   Animation<double> animation;
   AnimationController controller;
   @override void initState() {
      super.initState();
      controller = AnimationController(
         duration: const Duration(seconds: 10), vsync: this
      );
      animation = Tween<double>(begin: 0.0, end: 1.0).animate(controller);
      controller.forward();
   }
   // This widget is the root of your application.
   @override
   Widget build(BuildContext context) {
      controller.forward();
      return MaterialApp(
         title: 'Flutter Demo',
         theme: ThemeData(primarySwatch: Colors.blue,),
         home: MyHomePage(title: 'Product layout demo home page', animation: animation,)
      );
   }
   @override
   void dispose() {
      controller.dispose();
      super.dispose();
   }
}
這裡,
在 initState 方法中,我們建立了一個動畫控制器物件 (controller),一個動畫物件 (animation),並使用 controller.forward 啟動了動畫。
在 dispose 方法中,我們處置了動畫控制器物件 (controller)。
在 build 方法中,透過建構函式將動畫傳送到 MyHomePage 小部件。現在,MyHomePage 小部件可以使用動畫物件來對其內容進行動畫處理。
現在,新增 ProductBox 小部件
class ProductBox extends StatelessWidget {
   ProductBox({Key key, this.name, this.description, this.price, this.image})
      : super(key: key);
   final String name;
   final String description;
   final int price;
   final String image;

   Widget build(BuildContext context) {
      return Container(
         padding: EdgeInsets.all(2),
         height: 140,
         child: Card(
            child: Row(
               mainAxisAlignment: MainAxisAlignment.spaceEvenly,
               children: <Widget>[
                  Image.asset("assets/appimages/" + image),
                  Expanded(
                     child: Container(
                        padding: EdgeInsets.all(5),
                        child: Column(
                           mainAxisAlignment: MainAxisAlignment.spaceEvenly,
                           children: <Widget>[
                              Text(this.name, style:
                                 TextStyle(fontWeight: FontWeight.bold)),
                              Text(this.description),
                                 Text("Price: " + this.price.toString()),
                           ],
                        )
                     )
                  )
               ]
            )
         )
      );
   }
}
建立一個新的小部件 MyAnimatedWidget,使用不透明度執行簡單的淡入淡出動畫。
class MyAnimatedWidget extends StatelessWidget {
   MyAnimatedWidget({this.child, this.animation});

   final Widget child;
   final Animation<double> animation;

   Widget build(BuildContext context) => Center(
   child: AnimatedBuilder(
      animation: animation,
      builder: (context, child) => Container(
         child: Opacity(opacity: animation.value, child: child),
      ),
      child: child),
   );
}
在這裡,我們使用了 AniatedBuilder 來執行動畫。AnimatedBuilder 是一個小部件,它在同時執行動畫時構建其內容。它接受一個 animation 物件以獲取當前動畫值。我們使用了動畫值 animation.value 來設定子小部件的不透明度。實際上,小部件將使用不透明度概念對子小部件進行動畫處理。
最後,建立 MyHomePage 小部件並使用動畫物件對其任何內容進行動畫處理。
class MyHomePage extends StatelessWidget {
   MyHomePage({Key key, this.title, this.animation}) : super(key: key);

   final String title;
   final Animation<double>
   animation;

   @override
   Widget build(BuildContext context) {
      return Scaffold(
         appBar: AppBar(title: Text("Product Listing")),body: ListView(
            shrinkWrap: true,
            padding: const EdgeInsets.fromLTRB(2.0, 10.0, 2.0, 10.0),
            children: <Widget>[
               FadeTransition(
                  child: ProductBox(
                     name: "iPhone",
                     description: "iPhone is the stylist phone ever",
                     price: 1000,
                     image: "iphone.png"
                  ), opacity: animation
               ),
               MyAnimatedWidget(child: ProductBox(
                  name: "Pixel",
                  description: "Pixel is the most featureful phone ever",
                  price: 800,
                  image: "pixel.png"
               ), animation: animation),
               ProductBox(
                  name: "Laptop",
                  description: "Laptop is most productive development tool",
                  price: 2000,
                  image: "laptop.png"
               ),
               ProductBox(
                  name: "Tablet",
                  description: "Tablet is the most useful device ever for meeting",
                  price: 1500,
                  image: "tablet.png"
               ),
               ProductBox(
                  name: "Pendrive",
                  description: "Pendrive is useful storage medium",
                  price: 100,
                  image: "pendrive.png"
               ),
               ProductBox(
                  name: "Floppy Drive",
                  description: "Floppy drive is useful rescue storage medium",
                  price: 20,
                  image: "floppy.png"
               ),
            ],
         )
      );
   }
}
在這裡,我們使用了 FadeAnimation 和 MyAnimationWidget 對列表中的前兩個專案進行動畫處理。FadeAnimation 是一個內建的動畫類,我們使用它來使用不透明度概念對其子項進行動畫處理。
完整的程式碼如下:
import 'package:flutter/material.dart';
void main() => runApp(MyApp());

class MyApp extends StatefulWidget {
   _MyAppState createState() => _MyAppState();
}
class _MyAppState extends State<MyApp> with SingleTickerProviderStateMixin {
   Animation<double> animation;
   AnimationController controller;

   @override
   void initState() {
      super.initState();
      controller = AnimationController(
         duration: const Duration(seconds: 10), vsync: this);
      animation = Tween<double>(begin: 0.0, end: 1.0).animate(controller);
      controller.forward();
   }
   // This widget is the root of your application.
   @override
   Widget build(BuildContext context) {
      controller.forward();
      return MaterialApp(
         title: 'Flutter Demo', theme: ThemeData(primarySwatch: Colors.blue,),
         home: MyHomePage(title: 'Product layout demo home page', animation: animation,)
      );
   }
   @override
   void dispose() {
      controller.dispose();
      super.dispose();
   }
}
class MyHomePage extends StatelessWidget {
   MyHomePage({Key key, this.title, this.animation}): super(key: key);
   final String title;
   final Animation<double> animation;

   @override
   Widget build(BuildContext context) {
      return Scaffold(
         appBar: AppBar(title: Text("Product Listing")),
         body: ListView(
            shrinkWrap: true,
            padding: const EdgeInsets.fromLTRB(2.0, 10.0, 2.0, 10.0),
            children: <Widget>[
               FadeTransition(
                  child: ProductBox(
                     name: "iPhone",
                     description: "iPhone is the stylist phone ever",
                     price: 1000,
                     image: "iphone.png"
                  ),
                  opacity: animation
               ),
               MyAnimatedWidget(
                  child: ProductBox(
                     name: "Pixel",
                     description: "Pixel is the most featureful phone ever",
                     price: 800,
                     image: "pixel.png"
                  ),
                  animation: animation
               ),
               ProductBox(
                  name: "Laptop",
                  description: "Laptop is most productive development tool",
                  price: 2000,
                  image: "laptop.png"
               ),
               ProductBox(
                  name: "Tablet",
                  description: "Tablet is the most useful device ever for meeting",
                  price: 1500,
                  image: "tablet.png"
               ),
               ProductBox(
                  name: "Pendrive",
                  description: "Pendrive is useful storage medium",
                  price: 100,
                  image: "pendrive.png"
               ),
               ProductBox(
                  name: "Floppy Drive",
                  description: "Floppy drive is useful rescue storage medium",
                  price: 20,
                  image: "floppy.png"
               ),
            ],
         )
      );
   }
}
class ProductBox extends StatelessWidget {
   ProductBox({Key key, this.name, this.description, this.price, this.image}) :
      super(key: key);
   final String name;
   final String description;
   final int price;
   final String image;
   Widget build(BuildContext context) {
      return Container(
         padding: EdgeInsets.all(2),
         height: 140,
         child: Card(
            child: Row(
               mainAxisAlignment: MainAxisAlignment.spaceEvenly,
               children: <Widget>[
                  Image.asset("assets/appimages/" + image),
                  Expanded(
                     child: Container(
                        padding: EdgeInsets.all(5),
                        child: Column(
                           mainAxisAlignment: MainAxisAlignment.spaceEvenly,
                           children: <Widget>[
                              Text(
                                 this.name, style: TextStyle(
                                    fontWeight: FontWeight.bold
                                 )
                              ),
                              Text(this.description), Text(
                                 "Price: " + this.price.toString()
                              ),
                           ],
                        )
                     )
                  )
               ]
            )
         )
      );
   }
}
class MyAnimatedWidget extends StatelessWidget {
   MyAnimatedWidget({this.child, this.animation});
   final Widget child;
   final Animation<double> animation;

   Widget build(BuildContext context) => Center(
      child: AnimatedBuilder(
         animation: animation,
         builder: (context, child) => Container(
            child: Opacity(opacity: animation.value, child: child),
         ),
         child: child
      ),
   );
}
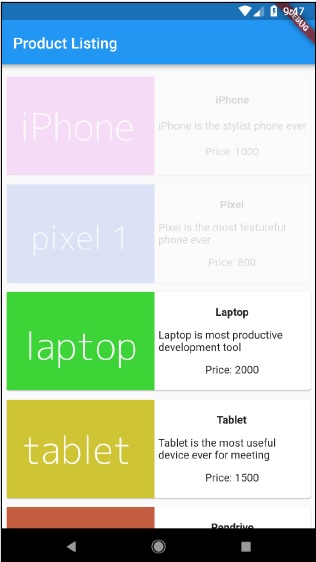
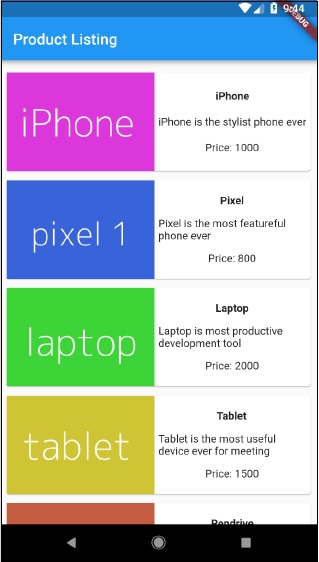
編譯並執行應用程式以檢視結果。應用程式的初始版本和最終版本如下: