- Flutter 教程
- Flutter - 首頁
- Flutter - 簡介
- Flutter - 安裝
- 在 Android Studio 中建立簡單的應用程式
- Flutter - 架構應用程式
- Dart 程式設計入門
- Flutter - Widget 入門
- Flutter - 佈局入門
- Flutter - 手勢入門
- Flutter - 狀態管理
- Flutter - 動畫
- Flutter - 編寫 Android 特定程式碼
- Flutter - 編寫 iOS 特定程式碼
- Flutter - 包入門
- Flutter - 訪問 REST API
- Flutter - 資料庫概念
- Flutter - 國際化
- Flutter - 測試
- Flutter - 部署
- Flutter - 開發工具
- Flutter - 編寫高階應用程式
- Flutter - 總結
- Flutter 有用資源
- Flutter - 快速指南
- Flutter - 有用資源
- Flutter - 討論
Flutter - 國際化
如今,移動應用程式被來自不同國家的客戶使用,因此,應用程式需要以不同的語言顯示內容。使應用程式能夠以多種語言工作稱為應用程式的國際化。
為了使應用程式能夠以不同的語言工作,它首先應該找到執行應用程式的系統的當前區域設定,然後需要以該特定區域設定顯示其內容,此過程稱為本地化。
Flutter 框架為本地化提供了三個基礎類和從基礎類派生的廣泛實用程式類,以本地化應用程式。
基礎類如下所示:
Locale - Locale 是一個用於識別使用者語言的類。例如,en-us 表示美式英語,可以建立如下所示:
Locale en_locale = Locale('en', 'US')
這裡,第一個引數是語言程式碼,第二個引數是國家/地區程式碼。建立阿根廷西班牙語 (es-ar)區域設定的另一個示例如下所示:
Locale es_locale = Locale('es', 'AR')
Localizations - Localizations 是一個通用 Widget,用於設定其子級的區域設定和本地化資源。
class CustomLocalizations {
   CustomLocalizations(this.locale);
   final Locale locale;
   static CustomLocalizations of(BuildContext context) {
      return Localizations.of<CustomLocalizations>(context, CustomLocalizations);
   }
   static Map<String, Map<String, String>> _resources = {
      'en': {
         'title': 'Demo',
         'message': 'Hello World'
      },
      'es': {
         'title': 'Manifestación',
         'message': 'Hola Mundo',
      },
   };
   String get title {
      return _resources[locale.languageCode]['title'];
   }
   String get message {
      return _resources[locale.languageCode]['message'];
   }
}
這裡,CustomLocalizations 是一個專門為 Widget 獲取某些本地化內容(標題和訊息)而建立的新自定義類。of 方法使用 Localizations 類返回新的 CustomLocalizations 類。
LocalizationsDelegate<T> - LocalizationsDelegate<T> 是一個工廠類,透過它載入 Localizations Widget。它有三個可覆蓋的方法:
isSupported - 接受一個區域設定並返回指定的區域設定是否受支援。
@override
bool isSupported(Locale locale) => ['en', 'es'].contains(locale.languageCode);
load - 接受一個區域設定並開始載入指定區域設定的資源。
這裡,委託僅適用於 en 和 es 區域設定。
@override
Future<CustomLocalizations> load(Locale locale) {
   return SynchronousFuture<CustomLocalizations>(CustomLocalizations(locale));
}
shouldReload - 指定當 Localizations Widget 重建時是否需要重新載入 CustomLocalizations。
這裡,load 方法返回 CustomLocalizations。返回的 CustomLocalizations 可用於獲取英語和西班牙語中標題和訊息的值
@override
bool shouldReload(CustomLocalizationsDelegate old) => false;
CustomLocalizationDelegate 的完整程式碼如下所示:
class CustomLocalizationsDelegate extends
LocalizationsDelegate<CustomLocalizations> {
   const CustomLocalizationsDelegate();
   @override
   bool isSupported(Locale locale) => ['en', 'es'].contains(locale.languageCode);
   @override
   Future<CustomLocalizations> load(Locale locale) {
      return SynchronousFuture<CustomLocalizations>(CustomLocalizations(locale));
   }
   @override bool shouldReload(CustomLocalizationsDelegate old) => false;
}
通常,Flutter 應用程式基於兩個根級 Widget,MaterialApp 或 WidgetsApp。Flutter 為這兩個 Widget 提供了現成的本地化,它們是 MaterialLocalizations 和 WidgetsLocaliations。此外,Flutter 還提供了委託來載入 MaterialLocalizations 和 WidgetsLocaliations,它們分別是 GlobalMaterialLocalizations.delegate 和 GlobalWidgetsLocalizations.delegate。
讓我們建立一個簡單的啟用國際化的應用程式來測試和理解這個概念。
建立一個新的 flutter 應用程式,flutter_localization_app。
Flutter 使用專用的 flutter 包 flutter_localizations 支援國際化。其理念是從主 SDK 中分離本地化內容。開啟 pubspec.yaml 並新增以下程式碼以啟用國際化包:
dependencies:
   flutter:
      sdk: flutter
   flutter_localizations:
      sdk: flutter
Android studio 將顯示以下警報,提示 pubspec.yaml 已更新。

單擊獲取依賴項選項。Android studio 將從 Internet 獲取包併為應用程式正確配置它。
在 main.dart 中匯入 flutter_localizations 包,如下所示:
import 'package:flutter_localizations/flutter_localizations.dart';
import 'package:flutter/foundation.dart' show SynchronousFuture;
這裡,SynchronousFuture 的目的是同步載入自定義本地化。
建立自定義本地化及其相應的委託,如下所示:
class CustomLocalizations {
   CustomLocalizations(this.locale);
   final Locale locale;
   static CustomLocalizations of(BuildContext context) {
      return Localizations.of<CustomLocalizations>(context, CustomLocalizations);
   }
   static Map<String, Map<String, String>> _resources = {
      'en': {
         'title': 'Demo',
         'message': 'Hello World'
      },
      'es': {
         'title': 'Manifestación',
         'message': 'Hola Mundo',
      },
   };
   String get title {
      return _resources[locale.languageCode]['title'];
   }
   String get message {
      return _resources[locale.languageCode]['message'];
   }
}
class CustomLocalizationsDelegate extends
LocalizationsDelegate<CustomLocalizations> {
   const CustomLocalizationsDelegate();

   @override
   bool isSupported(Locale locale) => ['en', 'es'].contains(locale.languageCode);

   @override
   Future<CustomLocalizations> load(Locale locale) {
      return SynchronousFuture<CustomLocalizations>(CustomLocalizations(locale));
   }
   @override bool shouldReload(CustomLocalizationsDelegate old) => false;
}
這裡,建立 CustomLocalizations 以支援應用程式中標題和訊息的本地化,並使用 CustomLocalizationsDelegate 來載入 CustomLocalizations。
使用 MaterialApp 屬性 localizationsDelegates 和 supportedLocales 新增 MaterialApp、WidgetsApp 和 CustomLocalization 的委託,如下所示:
localizationsDelegates: [
   const CustomLocalizationsDelegate(),
   GlobalMaterialLocalizations.delegate,
   GlobalWidgetsLocalizations.delegate,
],
supportedLocales: [
   const Locale('en', ''),
   const Locale('es', ''),
],
使用 CustomLocalizations 方法 of 獲取標題和訊息的本地化值,並在適當的位置使用它,如下所示:
class MyHomePage extends StatelessWidget {
   MyHomePage({Key key, this.title}) : super(key: key);
   final String title;
   @override
   Widget build(BuildContext context) {
      return Scaffold(
         appBar: AppBar(title: Text(CustomLocalizations .of(context) .title), ),
         body: Center(
            child: Column(
               mainAxisAlignment: MainAxisAlignment.center,
               children: <Widget>[
                  Text( CustomLocalizations .of(context) .message, ),
               ],
            ),
         ),
      );
   }
}
這裡,為了簡化起見,我們將 MyHomePage 類從 StatefulWidget 修改為 StatelessWidget,並使用 CustomLocalizations 獲取標題和訊息。
編譯並執行應用程式。應用程式將以英語顯示其內容。
關閉應用程式。轉到設定 → 系統 → 語言和輸入 → 語言*。
單擊新增語言選項並選擇西班牙語。這將安裝西班牙語並將其列為選項之一。
選擇西班牙語並將其移到英語上方。這將把西班牙語設定為第一語言,並且所有內容都將更改為西班牙語文字。
現在重新啟動國際化應用程式,您將看到標題和訊息以西班牙語顯示。
我們可以透過在設定中將英語選項移到西班牙語選項上方來將語言恢復為英語。
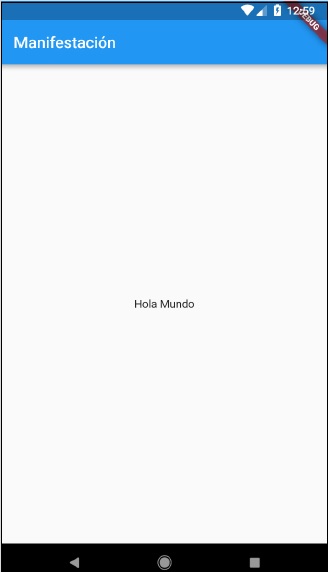
應用程式(西班牙語)的結果顯示在下面給出的螢幕截圖中:
使用 intl 包
Flutter 提供了 intl 包來進一步簡化本地化移動應用程式的開發。intl 包提供了特殊方法和工具來半自動生成特定於語言的訊息。
讓我們使用 intl 包建立一個新的本地化應用程式,並瞭解這個概念。
建立一個新的 flutter 應用程式,flutter_intl_app。
開啟 pubspec.yaml 並新增包詳細資訊。
dependencies:
   flutter:
      sdk: flutter
   flutter_localizations:
      sdk: flutter
   intl: ^0.15.7
   intl_translation: ^0.17.3
Android studio 將顯示如下所示的警報,通知 pubspec.yaml 已更新。

單擊獲取依賴項選項。Android studio 將從 Internet 獲取包併為應用程式正確配置它。
複製上一個示例 flutter_internationalization_app 中的 main.dart。
匯入 intl 包,如下所示:
import 'package:intl/intl.dart';
更新 CustomLocalization 類,如以下程式碼所示:
class CustomLocalizations {
   static Future<CustomLocalizations> load(Locale locale) {
      final String name = locale.countryCode.isEmpty ? locale.languageCode : locale.toString();
      final String localeName = Intl.canonicalizedLocale(name);

      return initializeMessages(localeName).then((_) {
         Intl.defaultLocale = localeName;
         return CustomLocalizations();
      });
   }
   static CustomLocalizations of(BuildContext context) {
      return Localizations.of<CustomLocalizations>(context, CustomLocalizations);
   }
   String get title {
      return Intl.message(
         'Demo',
         name: 'title',
         desc: 'Title for the Demo application',
      );
   }
   String get message{
      return Intl.message(
         'Hello World',
         name: 'message',
         desc: 'Message for the Demo application',
      );
   }
}
class CustomLocalizationsDelegate extends
LocalizationsDelegate<CustomLocalizations> {
   const CustomLocalizationsDelegate();

   @override
   bool isSupported(Locale locale) => ['en', 'es'].contains(locale.languageCode);
   @override
   Future<CustomLocalizations> load(Locale locale) {
      return CustomLocalizations.load(locale);
   }
   @override
   bool shouldReload(CustomLocalizationsDelegate old) => false;
}
這裡,我們使用了 intl 包中的三個方法,而不是自定義方法。否則,概念相同。
Intl.canonicalizedLocale - 用於獲取正確的區域設定名稱。
Intl.defaultLocale - 用於設定當前區域設定
Intl.message - 用於定義新訊息。
匯入l10n/messages_all.dart檔案。我們很快就會生成此檔案
import 'l10n/messages_all.dart';
現在,建立一個資料夾,lib/l10n
開啟命令提示符並轉到應用程式根目錄(其中 pubspec.yaml 可用)並執行以下命令:
flutter packages pub run intl_translation:extract_to_arb --output-
   dir=lib/l10n lib/main.dart
這裡,該命令將生成 intl_message.arb 檔案,這是一個在不同區域設定中建立訊息的模板。檔案內容如下所示:
{
   "@@last_modified": "2019-04-19T02:04:09.627551",
   "title": "Demo",
   "@title": {
      "description": "Title for the Demo application",
      "type": "text",
      "placeholders": {}
   },
   "message": "Hello World",
   "@message": {
      "description": "Message for the Demo
      application",
      "type": "text",
      "placeholders": {}
   }
}
複製 intl_message.arb 並建立新檔案 intl_en.arb。
複製 intl_message.arb 並建立新檔案 intl_es.arb,並將內容更改為西班牙語,如下所示:
{
   "@@last_modified": "2019-04-19T02:04:09.627551",
   "title": "Manifestación",
   "@title": {
      "description": "Title for the Demo application",
      "type": "text",
      "placeholders": {}
   },
   "message": "Hola Mundo",
   "@message": {
      "description": "Message for the Demo application",
      "type": "text",
      "placeholders": {}
   }
}
現在,執行以下命令以建立最終訊息檔案 messages_all.dart。
flutter packages pub run intl_translation:generate_from_arb
--output-dir=lib\l10n --no-use-deferred-loading
lib\main.dart lib\l10n\intl_en.arb lib\l10n\intl_es.arb
編譯並執行應用程式。它將與上面的應用程式 flutter_localization_app 類似。