- Flutter 教程
- Flutter - 首頁
- Flutter - 簡介
- Flutter - 安裝
- 在 Android Studio 中建立簡單的應用程式
- Flutter - 架構應用程式
- Dart 程式設計入門
- Flutter - Widget 入門
- Flutter - 佈局入門
- Flutter - 手勢入門
- Flutter - 狀態管理
- Flutter - 動畫
- Flutter - 編寫 Android 特定程式碼
- Flutter - 編寫 iOS 特定程式碼
- Flutter - 包入門
- Flutter - 訪問 REST API
- Flutter - 資料庫概念
- Flutter - 國際化
- Flutter - 測試
- Flutter - 部署
- Flutter - 開發工具
- Flutter - 編寫高階應用程式
- Flutter - 結論
- Flutter 有用資源
- Flutter - 快速指南
- Flutter - 有用資源
- Flutter - 討論
Flutter - 資料庫概念
Flutter 提供了許多用於處理資料庫的高階包。最重要的包是:
sqflite - 用於訪問和操作 SQLite 資料庫,以及
firebase_database - 用於訪問和操作來自 Google 的雲託管 NoSQL 資料庫。
在本章中,我們將詳細討論每個包。
SQLite
SQLite 資料庫是事實上的標準 SQL 基嵌入式資料庫引擎。它是一個小型且經過時間考驗的資料庫引擎。sqflite 包提供了許多功能,可以高效地使用 SQLite 資料庫。它提供標準方法來操作 SQLite 資料庫引擎。sqflite 包提供的核心功能如下:
建立/開啟 (openDatabase 方法) SQLite 資料庫。
執行針對 SQLite 資料庫的 SQL 語句 (execute 方法)。
高階查詢方法 (query 方法) 以減少查詢和獲取 SQLite 資料庫資訊所需的程式碼。
讓我們建立一個產品應用程式,使用 sqflite 包從標準 SQLite 資料庫引擎儲存和獲取產品資訊,並瞭解 SQLite 資料庫和 sqflite 包背後的概念。
在 Android Studio 中建立一個新的 Flutter 應用程式,命名為 product_sqlite_app。
將預設啟動程式碼 (main.dart) 替換為我們的 product_rest_app 程式碼。
將 product_nav_app 中的 assets 資料夾複製到 product_rest_app,並在 *pubspec.yaml` 檔案中新增 assets。
flutter:
   assets:
      - assets/appimages/floppy.png
      - assets/appimages/iphone.png
      - assets/appimages/laptop.png
      - assets/appimages/pendrive.png
      - assets/appimages/pixel.png
      - assets/appimages/tablet.png
在 pubspec.yaml 檔案中配置 sqflite 包,如下所示:
dependencies: sqflite: any
使用 sqflite 的最新版本號替換任何
在 pubspec.yaml 檔案中配置 path_provider 包,如下所示:
dependencies: path_provider: any
這裡,path_provider 包用於獲取系統的臨時資料夾路徑和應用程式的路徑。使用 sqflite 的最新版本號替換 any。
Android Studio 將提示 pubspec.yaml 已更新。

點選“獲取依賴項”選項。Android Studio 將從網際網路獲取包併為應用程式正確配置它。
在資料庫中,我們需要主鍵 id 作為附加欄位,以及產品屬性(如名稱、價格等)。因此,在 Product 類中新增 id 屬性。此外,新增一個新方法 toMap,用於將 product 物件轉換為 Map 物件。fromMap 和 toMap 用於序列化和反序列化 Product 物件,它用於資料庫操作方法。
class Product {
   final int id;
   final String name;
   final String description;
   final int price;
   final String image;
   static final columns = ["id", "name", "description", "price", "image"];
   Product(this.id, this.name, this.description, this.price, this.image);
   factory Product.fromMap(Map<String, dynamic> data) {
      return Product(
         data['id'],
         data['name'],
         data['description'],
         data['price'],
         data['image'],
      );
   }
   Map<String, dynamic> toMap() => {
      "id": id,
      "name": name,
      "description": description,
      "price": price,
      "image": image
   };
}
在 lib 資料夾中建立一個新檔案 Database.dart,用於編寫 SQLite 相關的功能。
在 Database.dart 中匯入必要的匯入語句。
import 'dart:async';
import 'dart:io';
import 'package:path/path.dart';
import 'package:path_provider/path_provider.dart';
import 'package:sqflite/sqflite.dart';
import 'Product.dart';
注意以下幾點:
async 用於編寫非同步方法。
io 用於訪問檔案和目錄。
path 用於訪問與檔案路徑相關的 Dart 核心實用程式函式。
path_provider 用於獲取臨時路徑和應用程式路徑。
sqflite 用於操作 SQLite 資料庫。
建立一個新類 SQLiteDbProvider
宣告一個基於單例的靜態 SQLiteDbProvider 物件,如下所示:
class SQLiteDbProvider {
   SQLiteDbProvider._();
   static final SQLiteDbProvider db = SQLiteDbProvider._();
   static Database _database;
}
可以透過靜態變數 db 訪問 SQLiteDBProvoider 物件及其方法。
SQLiteDBProvoider.db.<emthod>
建立一個方法來獲取資料庫 (Future 選項),型別為 Future<Database>。在資料庫建立過程中建立產品表並載入初始資料。
Future<Database> get database async {
   if (_database != null)
   return _database;
   _database = await initDB();
   return _database;
}
initDB() async {
   Directory documentsDirectory = await getApplicationDocumentsDirectory();
   String path = join(documentsDirectory.path, "ProductDB.db");
   return await openDatabase(
      path,
      version: 1,
      onOpen: (db) {},
      onCreate: (Database db, int version) async {
         await db.execute(
            "CREATE TABLE Product ("
            "id INTEGER PRIMARY KEY,"
            "name TEXT,"
            "description TEXT,"
            "price INTEGER,"
            "image TEXT" ")"
         );
         await db.execute(
            "INSERT INTO Product ('id', 'name', 'description', 'price', 'image')
            values (?, ?, ?, ?, ?)",
            [1, "iPhone", "iPhone is the stylist phone ever", 1000, "iphone.png"]
         );
         await db.execute(
            "INSERT INTO Product ('id', 'name', 'description', 'price', 'image')
            values (?, ?, ?, ?, ?)",
            [2, "Pixel", "Pixel is the most feature phone ever", 800, "pixel.png"]
         );
         await db.execute(
            "INSERT INTO Product ('id', 'name', 'description', 'price', 'image')
            values (?, ?, ?, ?, ?)",
            [3, "Laptop", "Laptop is most productive development tool", 2000, "laptop.png"]\
         );
         await db.execute(
            "INSERT INTO Product ('id', 'name', 'description', 'price', 'image')
            values (?, ?, ?, ?, ?)",
            [4, "Tablet", "Laptop is most productive development tool", 1500, "tablet.png"]
         );
         await db.execute(
            "INSERT INTO Product
            ('id', 'name', 'description', 'price', 'image')
            values (?, ?, ?, ?, ?)",
            [5, "Pendrive", "Pendrive is useful storage medium", 100, "pendrive.png"]
         );
         await db.execute(
            "INSERT INTO Product
            ('id', 'name', 'description', 'price', 'image')
            values (?, ?, ?, ?, ?)",
            [6, "Floppy Drive", "Floppy drive is useful rescue storage medium", 20, "floppy.png"]
         );
      }
   );
}
這裡,我們使用了以下方法:
getApplicationDocumentsDirectory - 返回應用程式目錄路徑
join - 用於建立系統特定的路徑。我們用它來建立資料庫路徑。
openDatabase - 用於開啟 SQLite 資料庫
onOpen - 用於在開啟資料庫時編寫程式碼
onCreate - 用於在第一次建立資料庫時編寫程式碼
db.execute - 用於執行 SQL 查詢。它接受一個查詢。如果查詢有佔位符 (?),則它在第二個引數中接受值作為列表。
編寫一個方法來獲取資料庫中的所有產品:
Future<List<Product>> getAllProducts() async {
   final db = await database;
   List<Map>
   results = await db.query("Product", columns: Product.columns, orderBy: "id ASC");

   List<Product> products = new List();
   results.forEach((result) {
      Product product = Product.fromMap(result);
      products.add(product);
   });
   return products;
}
這裡,我們做了以下工作:
使用 query 方法獲取所有產品資訊。query 提供了一種快捷方式來查詢表資訊,而無需編寫整個查詢。query 方法將使用我們的輸入(如列、orderBy 等)自行生成正確的查詢。
使用 Product 的 fromMap 方法透過迴圈 results 物件來獲取產品詳細資訊,該物件儲存表中的所有行。
編寫一個方法來獲取特定於 id 的產品
Future<Product> getProductById(int id) async {
   final db = await database;
   var result = await db.query("Product", where: "id = ", whereArgs: [id]);
   return result.isNotEmpty ? Product.fromMap(result.first) : Null;
}
這裡,我們使用了 where 和 whereArgs 來應用過濾器。
建立三個方法 - insert、update 和 delete 方法,用於插入、更新和從資料庫刪除產品。
insert(Product product) async {
   final db = await database;
   var maxIdResult = await db.rawQuery(
      "SELECT MAX(id)+1 as last_inserted_id FROM Product");

   var id = maxIdResult.first["last_inserted_id"];
   var result = await db.rawInsert(
      "INSERT Into Product (id, name, description, price, image)"
      " VALUES (?, ?, ?, ?, ?)",
      [id, product.name, product.description, product.price, product.image]
   );
   return result;
}
update(Product product) async {
   final db = await database;
   var result = await db.update("Product", product.toMap(),
   where: "id = ?", whereArgs: [product.id]); return result;
}
delete(int id) async {
   final db = await database;
   db.delete("Product", where: "id = ?", whereArgs: [id]);
}
Database.dart 的最終程式碼如下:
import 'dart:async';
import 'dart:io';
import 'package:path/path.dart';
import 'package:path_provider/path_provider.dart';
import 'package:sqflite/sqflite.dart';
import 'Product.dart';

class SQLiteDbProvider {
   SQLiteDbProvider._();
   static final SQLiteDbProvider db = SQLiteDbProvider._();
   static Database _database;

   Future<Database> get database async {
      if (_database != null)
      return _database;
      _database = await initDB();
      return _database;
   }
   initDB() async {
      Directory documentsDirectory = await
      getApplicationDocumentsDirectory();
      String path = join(documentsDirectory.path, "ProductDB.db");
      return await openDatabase(
         path, version: 1,
         onOpen: (db) {},
         onCreate: (Database db, int version) async {
            await db.execute(
               "CREATE TABLE Product ("
               "id INTEGER PRIMARY KEY,"
               "name TEXT,"
               "description TEXT,"
               "price INTEGER,"
               "image TEXT"")"
            );
            await db.execute(
               "INSERT INTO Product ('id', 'name', 'description', 'price', 'image')
               values (?, ?, ?, ?, ?)",
               [1, "iPhone", "iPhone is the stylist phone ever", 1000, "iphone.png"]
            );
            await db.execute(
               "INSERT INTO Product ('id', 'name', 'description', 'price', 'image')
               values (?, ?, ?, ?, ?)",
               [2, "Pixel", "Pixel is the most feature phone ever", 800, "pixel.png"]
            );
            await db.execute(
               "INSERT INTO Product ('id', 'name', 'description', 'price', 'image')
               values (?, ?, ?, ?, ?)",
               [3, "Laptop", "Laptop is most productive development tool", 2000, "laptop.png"]
            );
            await db.execute(
               "INSERT INTO Product ('id', 'name', 'description', 'price', 'image')
               values (?, ?, ?, ?, ?)",
               [4, "Tablet", "Laptop is most productive development tool", 1500, "tablet.png"]
            );
            await db.execute(
               "INSERT INTO Product ('id', 'name', 'description', 'price', 'image')
               values (?, ?, ?, ?, ?)",
               [5, "Pendrive", "Pendrive is useful storage medium", 100, "pendrive.png"]
            );
            await db.execute(
               "INSERT INTO Product ('id', 'name', 'description', 'price', 'image')
               values (?, ?, ?, ?, ?)",
               [6, "Floppy Drive", "Floppy drive is useful rescue storage medium", 20, "floppy.png"]
            );
         }
      );
   }
   Future<List<Product>> getAllProducts() async {
      final db = await database;
      List<Map> results = await db.query(
         "Product", columns: Product.columns, orderBy: "id ASC"
      );
      List<Product> products = new List();
      results.forEach((result) {
         Product product = Product.fromMap(result);
         products.add(product);
      });
      return products;
   }
   Future<Product> getProductById(int id) async {
      final db = await database;
      var result = await db.query("Product", where: "id = ", whereArgs: [id]);
      return result.isNotEmpty ? Product.fromMap(result.first) : Null;
   }
   insert(Product product) async {
      final db = await database;
      var maxIdResult = await db.rawQuery("SELECT MAX(id)+1 as last_inserted_id FROM Product");
      var id = maxIdResult.first["last_inserted_id"];
      var result = await db.rawInsert(
         "INSERT Into Product (id, name, description, price, image)"
         " VALUES (?, ?, ?, ?, ?)",
         [id, product.name, product.description, product.price, product.image]
      );
      return result;
   }
   update(Product product) async {
      final db = await database;
      var result = await db.update(
         "Product", product.toMap(), where: "id = ?", whereArgs: [product.id]
      );
      return result;
   }
   delete(int id) async {
      final db = await database;
      db.delete("Product", where: "id = ?", whereArgs: [id]);
   }
}
更改 main 方法以獲取產品資訊。
void main() {
   runApp(MyApp(products: SQLiteDbProvider.db.getAllProducts()));
}
這裡,我們使用了 getAllProducts 方法從資料庫中獲取所有產品。
執行應用程式並檢視結果。它將與之前的示例“訪問產品服務 API”類似,只是產品資訊儲存在本地 SQLite 資料庫中並從中獲取。
雲 Firestore
Firebase 是一個 BaaS 應用開發平臺。它提供了許多功能來加快移動應用程式的開發,例如身份驗證服務、雲端儲存等。Firebase 的主要功能之一是 Cloud Firestore,一個基於雲的即時 NoSQL 資料庫。
Flutter 提供了一個特殊的包 cloud_firestore 用於與 Cloud Firestore 程式設計。讓我們在 Cloud Firestore 中建立一個線上產品商店,並建立一個應用程式來訪問該產品商店。
在 Android Studio 中建立一個新的 Flutter 應用程式,命名為 product_firebase_app。
將預設啟動程式碼 (main.dart) 替換為我們的 product_rest_app 程式碼。
將 product_rest_app 中的 Product.dart 檔案複製到 lib 資料夾。
class Product {
   final String name;
   final String description;
   final int price;
   final String image;

   Product(this.name, this.description, this.price, this.image);
   factory Product.fromMap(Map<String, dynamic> json) {
      return Product(
         json['name'],
         json['description'],
         json['price'],
         json['image'],
      );
   }
}
將 product_rest_app 中的 assets 資料夾複製到 product_firebase_app,並在 pubspec.yaml 檔案中新增 assets。
flutter:
   assets:
   - assets/appimages/floppy.png
   - assets/appimages/iphone.png
   - assets/appimages/laptop.png
   - assets/appimages/pendrive.png
   - assets/appimages/pixel.png
   - assets/appimages/tablet.png
在 pubspec.yaml 檔案中配置 cloud_firestore 包,如下所示:
dependencies: cloud_firestore: ^0.9.13+1
這裡,使用 cloud_firestore 包的最新版本。
Android Studio 將提示 pubspec.yaml 已更新,如下所示:

點選“獲取依賴項”選項。Android Studio 將從網際網路獲取包併為應用程式正確配置它。
使用以下步驟在 Firebase 中建立一個專案:
透過在 https://firebase.google.com/pricing/. 選擇免費計劃來建立一個 Firebase 帳戶。
建立 Firebase 帳戶後,它將重定向到專案概述頁面。它列出了所有基於 Firebase 的專案,並提供了一個建立新專案的選項。
點選“新增專案”,它將開啟一個專案建立頁面。
輸入 products app db 作為專案名稱,然後點選“建立專案”選項。
轉到 *Firebase 控制檯。
點選“專案概述”。它將開啟專案概述頁面。
點選 Android 圖示。它將開啟特定於 Android 開發的專案設定。
輸入 Android 包名,com.tutorialspoint.flutterapp.product_firebase_app。
點選“註冊應用”。它將生成一個專案配置檔案,google_service.json。
下載 google_service.json,然後將其移動到專案的 android/app 目錄。此檔案是我們的應用程式和 Firebase 之間的連線。
開啟 android/app/build.gradle 幷包含以下程式碼:
apply plugin: 'com.google.gms.google-services'
開啟 android/build.gradle 幷包含以下配置:
buildscript {
   repositories {
      // ...
   }
   dependencies {
      // ...
      classpath 'com.google.gms:google-services:3.2.1' // new
   }
}
開啟 android/app/build.gradle 幷包含以下程式碼。
這裡,外掛和類路徑用於讀取 google_service.json 檔案。
android {
   defaultConfig {
      ...
      multiDexEnabled true
   }
   ...
}
dependencies {
   ...
   compile 'com.android.support: multidex:1.0.3'
}
按照 Firebase 控制檯中的其餘步驟操作,或者跳過。
使用以下步驟在新建立的專案中建立一個產品商店:
轉到 Firebase 控制檯。
開啟新建立的專案。
點選左側選單中的“資料庫”選項。
點選“建立資料庫”選項。
點選“以測試模式啟動”,然後點選“啟用”。
點選“新增集合”。輸入 product 作為集合名稱,然後點選“下一步”。
輸入此處影像中顯示的示例產品資訊:
此依賴項使 Android 應用程式能夠使用多 dex 功能。
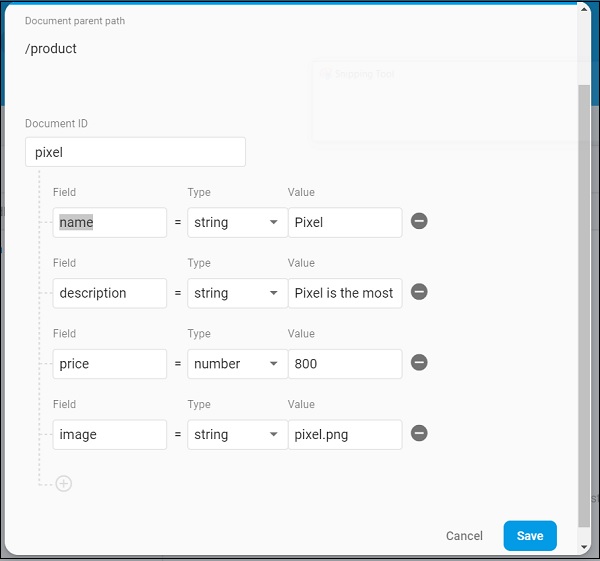
使用 新增文件 選項新增其他產品資訊。
開啟 main.dart 檔案並匯入 Cloud Firestore 外掛檔案,並刪除 http 包。
import 'package:cloud_firestore/cloud_firestore.dart';
刪除 parseProducts 並更新 fetchProducts 以從 Cloud Firestore 而不是產品服務 API 獲取產品。
Stream<QuerySnapshot> fetchProducts() {
   return Firestore.instance.collection('product').snapshots(); }
這裡,Firestore.instance.collection 方法用於訪問雲端儲存中可用的 product 集合。Firestore.instance.collection 提供了許多選項來過濾集合以獲取必要的文件。但是,我們沒有應用任何過濾器來獲取所有產品資訊。
Cloud Firestore 透過 Dart Stream 概念提供集合,因此將 MyApp 和 MyHomePage widget 中的產品型別從 Future<list<Product>> 修改為 Stream<QuerySnapshot>。
更改 MyHomePage widget 的 build 方法以使用 StreamBuilder 而不是 FutureBuilder。
@override
Widget build(BuildContext context) {
   return Scaffold(
      appBar: AppBar(title: Text("Product Navigation")),
      body: Center(
         child: StreamBuilder<QuerySnapshot>(
            stream: products, builder: (context, snapshot) {
               if (snapshot.hasError) print(snapshot.error);
               if(snapshot.hasData) {
                  List<DocumentSnapshot>
                  documents = snapshot.data.documents;

                  List<Product>
                  items = List<Product>();

                  for(var i = 0; i < documents.length; i++) {
                     DocumentSnapshot document = documents[i];
                     items.add(Product.fromMap(document.data));
                  }
                  return ProductBoxList(items: items);
               } else {
                  return Center(child: CircularProgressIndicator());
               }
            },
         ),
      )
   );
}
這裡,我們已將產品資訊作為 List<DocumentSnapshot> 型別獲取。由於我們的 widget ProductBoxList 與文件不相容,我們已將文件轉換為 List<Product> 型別,然後進一步使用它。
最後,執行應用程式並檢視結果。由於我們使用了與 SQLite 應用程式 相同的產品資訊,並且僅更改了儲存介質,因此生成的應用程式與 SQLite 應用程式 應用程式看起來相同。