- BabylonJS 教程
- BabylonJS - 首頁
- BabylonJS - 簡介
- BabylonJS - 環境設定
- BabylonJS - 概述
- BabylonJS - 基本元素
- BabylonJS - 材質
- BabylonJS - 動畫
- BabylonJS - 相機
- BabylonJS - 光照
- BabylonJS - 引數化形狀
- BabylonJS - 網格
- 向量位置和旋轉
- BabylonJS - 貼花
- BabylonJS - Curve3
- BabylonJS - 動態紋理
- BabylonJS - 視差貼圖
- BabylonJS - 鏡頭光暈
- BabylonJS - 建立螢幕截圖
- BabylonJS - 反射探針
- 標準渲染管線
- BabylonJS - ShaderMaterial
- BabylonJS - 骨骼和骨架
- BabylonJS - 物理引擎
- BabylonJS - 播放聲音和音樂
- BabylonJS 有用資源
- BabylonJS - 快速指南
- BabylonJS - 有用資源
- BabylonJS - 討論
BabylonJS - 拉伸
拉伸有助於將二維形狀轉換為三維體積形狀。假設你想建立一個二維星形,它將具有x、y座標,而z座標為0。利用二維座標進行拉伸將將其轉換為三維形狀。因此,二維星形透過拉伸將變成三維形狀。你可以嘗試不同的二維形狀並將它們轉換為三維形狀。
語法
BABYLON.Mesh.ExtrudeShape(name, shape, path, scale, rotation, cap, scene, updatable?, sideOrientation)
引數
考慮以下拉伸引數:
名稱 - 網格名稱。
形狀 - 要拉伸的形狀;它是一個向量陣列。
路徑 - 拉伸形狀的路徑。用於繪製形狀的向量陣列。
縮放 - 預設值為1。縮放是縮放初始形狀的值。
旋轉 - 在每個路徑點旋轉形狀。
封蓋 - BABYLON.Mesh.NO_CAP, BABYLON.Mesh.CAP_START, BABYLON.Mesh.CAP_END, BABYLON.Mesh.CAP_ALL。
場景 - 將繪製網格的當前場景。
可更新 - 預設值為false。如果設定為true,則網格將可更新。
側面方向 - 側面方向 - 正面、背面或雙面。
演示 - 使用建立線條
<!doctype html>
<html>
   <head>
      <meta charset = "utf-8">
      <title>BabylonJs - Basic Element-Creating Scene</title>
      <script src = "babylon.js"></script>
      <style>
         canvas {width: 100%; height: 100%;}
      </style>
   </head>

   <body>
      <canvas id = "renderCanvas"></canvas>
      <script type = "text/javascript">
         var canvas = document.getElementById("renderCanvas");
         var engine = new BABYLON.Engine(canvas, true);
         var createScene  = function() {

            var scene = new BABYLON.Scene(engine);
            scene.clearColor = new BABYLON.Color3( .5, .5, .5);

            // camera
            var camera = new BABYLON.ArcRotateCamera("camera1",  0, 0, 0, new BABYLON.Vector3(0, 0, -0), scene);
            camera.setPosition(new BABYLON.Vector3(0, 0, -10));
            camera.attachControl(canvas, true);
            // lights

            var light = new BABYLON.HemisphericLight("light1", new BABYLON.Vector3(1, 0.5, 0), scene);
            light.intensity = 0.7;

            var spot = new BABYLON.SpotLight("spot", new BABYLON.Vector3(25, 15, -10), new BABYLON.Vector3(-1, -0.8, 1), 15, 1, scene);
            spot.diffuse = new BABYLON.Color3(1, 1, 1);
            spot.specular = new BABYLON.Color3(0, 0, 0);
            spot.intensity = 0.8;

            // shape
            var shape = [
               new BABYLON.Vector3(2, 0, 0),
               new BABYLON.Vector3(2, 2, 0),
               new BABYLON.Vector3(1, 2, 0),
               new BABYLON.Vector3(0, 3, 0),
               new BABYLON.Vector3(-1, 2, 0),
               new BABYLON.Vector3(-2, 2, 0),
               new BABYLON.Vector3(-2, 0, 0),
               new BABYLON.Vector3(-2, -2, 0),
               new BABYLON.Vector3(-1, -2, 0),
               new BABYLON.Vector3(0, -3, 0),
               new BABYLON.Vector3(1, -2, 0),
               new BABYLON.Vector3(2, -2, 0),
            ];
            shape.push(shape[0]);

            var shapeline = BABYLON.Mesh.CreateLines("sl", shape, scene);
            shapeline.color = BABYLON.Color3.Green();
            return scene;
         };
         var scene = createScene();
         engine.runRenderLoop(function() {
            scene.render();
         });
      </script>
   </body>
</html>
輸出
以上程式碼行生成以下輸出:
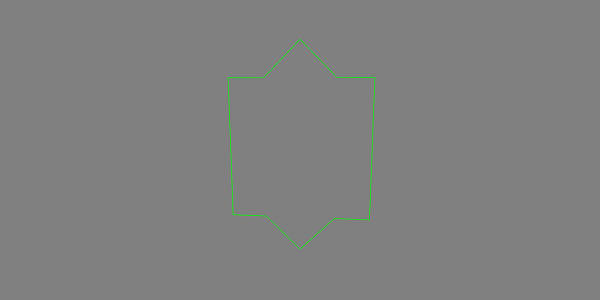
在上面的例子中,線條繪製在x,y座標系中。現在讓我們藉助拉伸應用三維效果。為此,babylonjs有一個拉伸類,如下所述。
應用拉伸的演示
<!doctype html>
<html>
<head>
<meta charset = "utf-8">
<title>BabylonJs - Basic Element-Creating Scene</title>
<script src = "babylon.js"></script>
<style>
canvas {width: 100%; height: 100%;}
</style>
</head>
<body>
<canvas id = "renderCanvas"></canvas>
<script type = "text/javascript">
var canvas = document.getElementById("renderCanvas");
var engine = new BABYLON.Engine(canvas, true);
var createScene = function() {
var scene = new BABYLON.Scene(engine);
scene.clearColor = new BABYLON.Color3( .5, .5, .5);
// camera
var camera = new BABYLON.ArcRotateCamera("camera1", 0, 0, 0, new BABYLON.Vector3(0, 0, -0), scene);
camera.setPosition(new BABYLON.Vector3(0, 0, -10));
camera.attachControl(canvas, true);
// lights
var light = new BABYLON.HemisphericLight("light1", new BABYLON.Vector3(1, 0.5, 0), scene);
light.intensity = 0.7;
var spot = new BABYLON.SpotLight("spot", new BABYLON.Vector3(25, 15, -10), new BABYLON.Vector3(-1, -0.8, 1), 15, 1, scene);
spot.diffuse = new BABYLON.Color3(1, 1, 1);
spot.specular = new BABYLON.Color3(0, 0, 0);
spot.intensity = 0.8;
var mat = new BABYLON.StandardMaterial("mat1", scene);
mat.alpha = 1.0;
mat.diffuseColor = new BABYLON.Color3(0.5, 0.5, 1.0);
mat.backFaceCulling = false;
// shape
var shape = [
new BABYLON.Vector3(2, 0, 0),
new BABYLON.Vector3(2, 2, 0),
new BABYLON.Vector3(1, 2, 0),
new BABYLON.Vector3(0, 3, 0),
new BABYLON.Vector3(-1, 2, 0),
new BABYLON.Vector3(-2, 2, 0),
new BABYLON.Vector3(-2, 0, 0),
new BABYLON.Vector3(-2, -2, 0),
new BABYLON.Vector3(-1, -2, 0),
new BABYLON.Vector3(0, -3, 0),
new BABYLON.Vector3(1, -2, 0),
new BABYLON.Vector3(2, -2, 0),
];
shape.push(shape[0]);
var path = [ BABYLON.Vector3.Zero(), new BABYLON.Vector3(0, 0, -1) ];
var shapeline = BABYLON.Mesh.CreateLines("sl", shape, scene);
shapeline.color = BABYLON.Color3.Green();
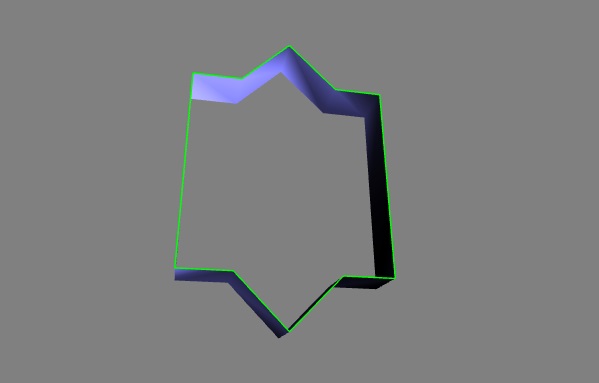
var extruded = BABYLON.Mesh.ExtrudeShape("extruded", shape, path, 1, 0, 0, scene);
extruded.material = mat;
return scene;
};
var scene = createScene();
engine.runRenderLoop(function() {
scene.render();
});
</script>
</body>
</html>
輸出
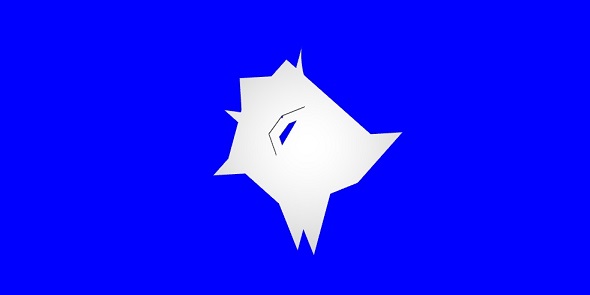
PolygonMeshBuilder演示
PolygonMeshBuilder使用earcut結構,為了使其正常工作,我們需要一個額外的檔案,可以從cdn (https://unpkg.com/earcut@2.1.1/dist/earcut.min.js) 或npm包(https://github.com/mapbox/earcut#install)獲取。
<!doctype html>
<html>
   <head>
      <meta charset = "utf-8">
      <title>BabylonJs - Basic Element-Creating Scene</title>
      <script src="https://unpkg.com/earcut@2.1.1/dist/earcut.min.js"></script>
      <script src = "babylon.js"></script>
      <style>
         canvas {width: 100%; height: 100%;}
      </style>
   </head>

   <body>
      <canvas id = "renderCanvas"></canvas>
      <script type = "text/javascript">
         var canvas = document.getElementById("renderCanvas");
         var engine = new BABYLON.Engine(canvas, true);

         var createScene  = function() {
            var scene = new BABYLON.Scene(engine);
            scene.clearColor = new BABYLON.Color3(0, 0, 1);

            var camera = new BABYLON.ArcRotateCamera("Camera", -Math.PI/2, Math.PI/4, 25, BABYLON.Vector3.Zero(), scene);
            camera.attachControl(canvas, true);

            var light = new BABYLON.HemisphericLight("light1", new BABYLON.Vector3(0, 10, 0), scene);
            light.intensity = 0.5;

            var corners = [
               new BABYLON.Vector2(4, 0),
               new BABYLON.Vector2(3, 1),
               new BABYLON.Vector2(2, 3),
               new BABYLON.Vector2(2, 4),
               new BABYLON.Vector2(1, 3),
               new BABYLON.Vector2(0, 3),
               new BABYLON.Vector2(-1, 3),
               new BABYLON.Vector2(-3, 4),
               new BABYLON.Vector2(-2, 2),
               new BABYLON.Vector2(-3, 0),
               new BABYLON.Vector2(-3, -2),
               new BABYLON.Vector2(-3, -3),
               new BABYLON.Vector2(-2, -2),
               new BABYLON.Vector2(0, -2),
               new BABYLON.Vector2(3, -2),
               new BABYLON.Vector2(3, -1),
            ];

            var hole = [
               new BABYLON.Vector2(1, -1),
               new BABYLON.Vector2(1.5, 0),
               new BABYLON.Vector2(1.4, 1),
               new BABYLON.Vector2(0.5, 1.5)
            ]

            var poly_tri = new BABYLON.PolygonMeshBuilder("polytri", corners, scene);
            poly_tri.addHole(hole);
            var polygon = poly_tri.build(null, 0.5);
            polygon.position.y = + 4;

            var poly_path = new BABYLON.Path2(2, 0);
            poly_path.addLineTo(5, 2);
            poly_path.addLineTo(1, 2);
            poly_path.addLineTo(-5, 5);
            poly_path.addLineTo(-3, 1);
            poly_path.addLineTo(-4, -4);
            poly_path.addArcTo(0, -2, 4, -4, 100);

            var poly_tri2 = new BABYLON.PolygonMeshBuilder("polytri2", poly_path, scene);
            poly_tri2.addHole(hole);

            var polygon2 = poly_tri2.build(false, 0.5); //updatable, extrusion depth - both optional
            polygon2.position.y = -4;
            return scene;
         };
         var scene = createScene();
         engine.runRenderLoop(function() {
            scene.render();
         });
      </script>
   </body>
</html>
輸出
語法
以下是PolygonMeshBuilder的語法:
var poly_tri2 = new BABYLON.PolygonMeshBuilder("polytri2", poly_path, scene);
babylonjs_parametric_shapes.htm
廣告