- BabylonJS 教程
- BabylonJS - 首頁
- BabylonJS - 簡介
- BabylonJS - 環境設定
- BabylonJS - 概述
- BabylonJS - 基本元素
- BabylonJS - 材質
- BabylonJS - 動畫
- BabylonJS - 相機
- BabylonJS - 光源
- BabylonJS - 引數化形狀
- BabylonJS - 網格
- 向量位置和旋轉
- BabylonJS - 貼花
- BabylonJS - Curve3
- BabylonJS - 動態紋理
- BabylonJS -視差貼圖
- BabylonJS - 鏡頭光暈
- BabylonJS - 建立螢幕截圖
- BabylonJS - 反射探針
- 標準渲染管線
- BabylonJS - ShaderMaterial
- BabylonJS - 骨骼和骨架
- BabylonJS - 物理引擎
- BabylonJS - 播放聲音和音樂
- BabylonJS 有用資源
- BabylonJS - 快速指南
- BabylonJS - 有用資源
- BabylonJS - 討論
BabylonJS -視差貼圖
視差貼圖也稱為偏移貼圖。它使用高度圖,該高度圖作為材質紋理的偏移量應用,以增強幾何體表面浮雕效果。在 3D 世界中,帶有深度應用的石牆將具有更明顯的視覺效果,並且對終端使用者來說看起來更逼真。在較陡的視角下,紋理座標會發生更大的位移,由於視差效果,隨著視角的變化,會產生深度的錯覺。
視差貼圖與標準材質一起使用。我們在標準材質章節學習了這一點。
視差貼圖有三個屬性。
material.useParallax = true; − 這將啟用視差貼圖。要使用此屬性,您需要先將凹凸紋理分配給材質。
material.useParallaxOcclusion = true; − 要使用此屬性,您必須將 useParallax 設定為 true。它啟用視差遮擋。
material.parallaxScaleBias = 0.1; − 為要分配給網格的深度應用縮放因子。對於視差,0.05 到 0.1 之間的值很好。對於遮擋,您可以達到 0.2。
演示
<!doctype html>
<html>
   <head>
      <meta charset = "utf-8">
      <title>BabylonJs - Basic Element-Creating Scene</title>
      <script src = "babylon.js"></script>
      <style>
         canvas {width: 100%; height: 100%;}
      </style>
   </head>

   <body>
      <canvas id = "renderCanvas"></canvas>
      <script type = "text/javascript">
         var canvas = document.getElementById("renderCanvas");
         var engine = new BABYLON.Engine(canvas, true);

         var createScene  = function() {
            // This creates a basic Babylon Scene object (non-mesh)
            var scene = new BABYLON.Scene(engine);

            // This creates and positions a free camera (non-mesh)
            var camera = new BABYLON.ArcRotateCamera("camera1", 0, Math.PI / 2, 100, new BABYLON.Vector3(0, 0, 0), scene);
            camera.attachControl(canvas, false);

            // This targets the camera to scene origin
            camera.setTarget(BABYLON.Vector3.Zero());

            // This creates a light, aiming 0,1,0 - to the sky (non-mesh)
            var light = new BABYLON.HemisphericLight("light1", new BABYLON.Vector3(0, 1, 0), scene);

            // Default intensity is 1. Let's dim the light a small amount
            light.intensity = 0.7;

            var mesh = BABYLON.Mesh.CreateBox("box01", 25, scene);
            mesh.position = new BABYLON.Vector3(0, 0, 0);

            var brickWallDiffURL = "images/a1.png";
            var brickWallNHURL = "images/a2.png";
            var stoneDiffURL = "images/pebble.jpg";
            var stoneNHURL = "images/a3.png";

            var stoneDiffuseTexture = new BABYLON.Texture(stoneDiffURL, scene);

            var stoneNormalsHeightTexture = new BABYLON.Texture(stoneNHURL, scene);

            var wallDiffuseTexture = new BABYLON.Texture(brickWallDiffURL, scene);

            var wallNormalsHeightTexture = new BABYLON.Texture(brickWallNHURL, scene);

            var normalsHeightTexture = stoneNormalsHeightTexture;

            var material = new BABYLON.StandardMaterial("mtl01", scene);
            material.diffuseTexture = stoneDiffuseTexture;
            material.bumpTexture = stoneNormalsHeightTexture;

            material.useParallax = true;
            material.useParallaxOcclusion = true;
            material.parallaxScaleBias = 0.1;
            material.specularPower = 1000.0;
            material.specularColor = new BABYLON.Color3(0.5, 0.5, 0.5);
            mesh.material = material;
            return scene;
         };
         var scene = createScene();
         engine.runRenderLoop(function() {
            scene.render();
         });
      </script>
   </body>
</html>
輸出
以上程式碼行將生成以下輸出:
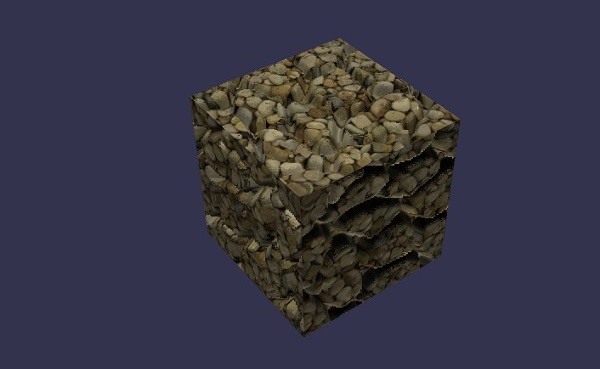
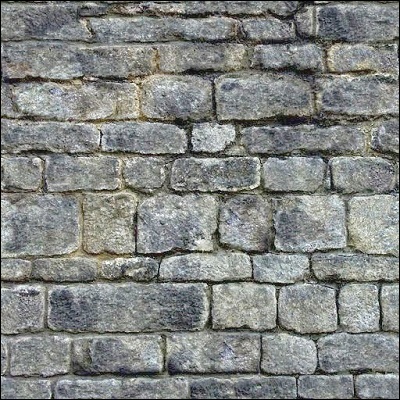
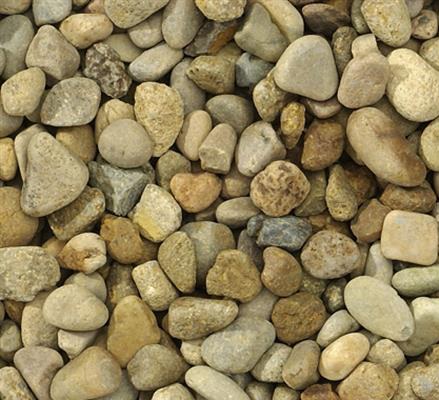
在此演示中,我們使用了影像a1.png、a2.png、pebble.jpg和a3.png。這些影像儲存在本地 images/ 資料夾中,並在下面貼上以供參考。您可以下載任何您選擇的影像並在演示連結中使用。
Images/a1.png
Images/a2.png

Images/pebble.jpg
images/a3.png

廣告