- BabylonJS 教程
- BabylonJS - 主頁
- BabylonJS - 介紹
- BabylonJS - 環境設定
- BabylonJS - 概覽
- BabylonJS - 基本元素
- BabylonJS - 材質
- BabylonJS - 動畫
- BabylonJS - 攝像機
- BabylonJS - 燈光
- BabylonJS - 引數形狀
- BabylonJS - 網格
- VectorPosition 和旋轉
- BabylonJS - 貼花
- BabylonJS - Curve3
- BabylonJS - 動態紋理
- BabylonJS - 視差對映
- BabylonJS - 鏡面光暈
- BabylonJS - 匯出螢幕快照
- BabylonJS - 反射探測
- 標準渲染管道
- BabylonJS - ShaderMaterial
- BabylonJS - 骨骼和骨架
- BabylonJS - 物理引擎
- BabylonJS - 播放聲音和音樂
- BabylonJS 有用資源
- BabylonJS - 快速指南
- BabylonJS - 有用資源
- BabylonJS - 討論
BabylonJS - 網格例項
如果您希望在場景中繪製相同的網格,請使用例項。
語法
var newInstance = mesh.createInstance("i" + index); // creates new instance
演示
<!doctype html>
<html>
   <head>
      <meta charset = "utf-8">
      <title>BabylonJs - Basic Element-Creating Scene</title>
      <script src = "babylon.js"></script>
      <style>
         canvas {width: 100%; height: 100%;}
      </style>
   </head>

   <body>
      <canvas id = "renderCanvas"></canvas>
      <script type = "text/javascript">
         var canvas = document.getElementById("renderCanvas");
         var engine = new BABYLON.Engine(canvas, true);

         var createScene  = function() {
            var scene = new BABYLON.Scene(engine);
            scene.clearColor = BABYLON.Color3.Gray();

            // This creates and positions a free camera (non-mesh)
            var camera = new BABYLON.FreeCamera("camera1", new BABYLON.Vector3(0, 5, -10), scene);

            // This targets the camera to scene origin
            camera.setTarget(BABYLON.Vector3.Zero());

            // This attaches the camera to the canvas
            camera.attachControl(canvas, true);

            var light = new BABYLON.DirectionalLight("dir01", new BABYLON.Vector3(0, -1, -0.3), scene);
            light.position = new BABYLON.Vector3(20, 60, 30);

            // Ground
            var ground = BABYLON.Mesh.CreateGround("ground1", 50, 50, 2, scene);
            ground.receiveShadows = true;

            var array_instances = [];
            // Trees
            BABYLON.SceneLoader.ImportMesh("", "scenes/", "Rabbit.babylon", scene, function (newMeshes, particleSystems, skeletons) {
               var rabbit = newMeshes[1];
               rabbit.isVisible = false;

               var range = 50;
               var count = 100;
               for (var index = 0; index < count; index++) {
                  var newInstance = rabbit.createInstance("i" + index);
                  var x = range / 2 - Math.random() * range;
                  var z = range / 2 - Math.random() * range;

                  newInstance.position = new BABYLON.Vector3(x, 0, z);
                  newInstance.scaling = new BABYLON.Vector3(0.05, 0.05, 0.05);
                  array_instances.push(newInstance);
               }
            });
            return scene;
         };
         var scene = createScene();
         engine.runRenderLoop(function() {
            scene.render();
         });
      </script>
   </body>
</html>
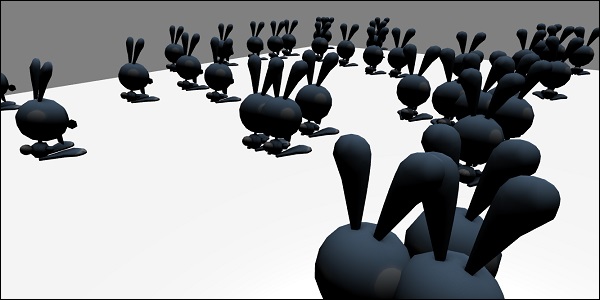
在上述演示連結中,我們使用了 **Rabbit.babylon 網格**。您可以從此處下載 Rabbit.babylon 的 json 檔案
將檔案儲存在場景中以獲取以下所示的輸出。
輸出
上述程式碼行將生成以下輸出 −
說明
以下程式碼可幫助您在場景中繪製相同網格 −
var array_instances = [];

// Trees
BABYLON.SceneLoader.ImportMesh("", "scenes/", "Rabbit.babylon", scene, function (newMeshes, particleSystems, skeletons) {
   var rabbit = newMeshes[1];
   rabbit.isVisible = false;

   var range = 50;
   var count = 100;
   for (var index = 0; index < count; index++) {
      var newInstance = rabbit.createInstance("i" + index); // creates new instance
      var x = range / 2 - Math.random() * range;
      var z = range / 2 - Math.random() * range;

      newInstance.position = new BABYLON.Vector3(x, 0, z); // sets the position of the instance created.
      newInstance.scaling = new BABYLON.Vector3(0.05, 0.05, 0.05);//scaling the instanc on x,y and z axis.
      array_instances.push(newInstance);
   }
});
return scene;
babylonjs_mesh.htm
廣告