- Zend Framework 教程
- Zend Framework - 首頁
- Zend Framework - 簡介
- Zend Framework - 安裝
- 框架應用
- Zend Framework - MVC 架構
- Zend Framework - 概念
- Zend Framework - 服務管理器
- Zend Framework - 事件管理器
- Zend Framework - 模組系統
- 應用程式結構
- Zend Framework - 建立模組
- Zend Framework - 控制器
- Zend Framework - 路由
- Zend Framework - 檢視層
- Zend Framework - 佈局
- 模型和資料庫
- 不同的資料庫
- 表單和驗證
- Zend Framework - 檔案上傳
- Zend Framework - Ajax
- Cookie 管理
- 會話管理
- Zend Framework - 身份驗證
- 郵件管理
- Zend Framework - 單元測試
- Zend Framework - 錯誤處理
- Zend Framework - 工作示例
- Zend Framework 有用資源
- Zend Framework 快速指南
- Zend Framework - 有用資源
- Zend Framework - 討論
Zend Framework 快速指南
Zend Framework - 簡介
PHP Web 框架是一組類,有助於開發 Web 應用程式。Zend 是最流行的 PHP 框架之一。它是一個開源的 MVC 框架,用於快速開發現代 Web 應用程式。Zend Framework 具有多個鬆散耦合的元件,因此被稱為“元件庫”。Zend Framework 提供任何 PHP 堆疊和 Zend 伺服器來執行 Zend 框架應用程式。
Zend Studio 是一款 IDE,包含與 Zend Framework 整合的功能。它提供 MVC 檢視和程式碼生成。當前的 Zend 框架 3.0 包括新的元件,例如 JSON RPC 伺服器、XML 到 JSON 轉換器、PSR-7 功能以及與 PHP 7 的相容性。
Zend Framework 2 是一個開源框架,用於使用 PHP 5.3+ 開發 Web 應用程式和服務。Zend Framework 2 使用 100% 面向物件的程式碼,並利用 PHP 5.3 的大多數新功能,即名稱空間、Lambda 函式和閉包。
Zend Framework 2 發展自 Zend Framework 1,這是一個成功的 PHP 框架,下載量超過 1500 萬次。Zend Server 具有免費社群版和商業版。
Zend Framework 特性
Zend Framework 的一些主要特性如下所示:
- 純面向物件的 Web 應用程式框架
- 高階 MVC 實現
- 支援多種資料庫,包括 PostgreSQL、SQLite 等。
- 簡單的雲 API
- 會話管理
- 資料加密
- 靈活的 URI 路由
- Zend 提供 RESTful API 開發支援。
- 程式碼可重用且易於維護。
為什麼選擇 Zend Framework?
是什麼使 Zend Framework 成為 PHP 開發人員使用的首要框架之一?因為它提供了乾淨且穩定的程式碼,並附帶智慧財產權。它也使程式設計更容易。它是一個快速、易於學習且方便的框架。Zend 支援強大的加密工具和密碼雜湊技術。
Zend 目標
以下是 Zend Framework 的目標。
- 靈活性
- 簡單高效
- 相容性
- 可擴充套件性 - 程式設計師可以輕鬆擴充套件所有框架類。
- 可移植性 - 支援多種環境
Zend 應用程式
以下流行產品是使用 Zend Framework 開發的。
- McAfee 公司網站
- IBM 公司網站
- Magento - 一個流行的購物車網站。
Zend Framework 的優勢
Zend Framework 的一些優勢列在下面。
鬆散耦合 - Zend 提供了刪除應用程式中不需要的模組或元件的選項。
效能 - Zend Framework 對效能進行了高度最佳化。Zend Framework 3 比其前一個版本快 4 倍。
安全性 - 框架支援行業標準加密。
測試 - PHPUnit 整合到 Zend 中,因此您可以輕鬆測試框架。
在下一章中,我們將學習如何安裝 Zend Framework。
Zend Framework - 安裝
要安裝 Zend Framework,我們必須首先安裝 Composer 和最新版本的 PHP,如下面的步驟所示。
安裝 Composer - Zend 使用 Composer 來管理其依賴項,因此請確保您的機器上已安裝 Composer。如果未安裝 Composer,請訪問 Composer 的官方網站並安裝它。
安裝最新版本的 PHP - 要獲得 Zend Framework 的最大收益,請安裝最新版本的 PHP。Zend Framework 3 的最低要求版本為 PHP 5.6 或更高版本。
安裝 Zend Framework
Zend Framework 可以透過兩種方式安裝。它們如下所示:
- 手動安裝
- 基於 Composer 的安裝
讓我們詳細討論這兩種安裝。
手動安裝
透過訪問以下連結下載最新版本的 Zend Framework:https://framework.zend.com/downloads/archives
將下載的壓縮檔案的內容解壓縮到您想要儲存的資料夾中。一旦您的本地機器上有 Zend Framework 的副本,基於 Zend Framework 的 Web 應用程式就可以訪問框架類。雖然有多種方法可以實現此目的,但您的 PHP include_path 需要包含到分發版中 /library 目錄下 Zend Framework 類的路徑。此方法僅適用於 Zend Framework 2.4 及更早版本。
基於 Composer 的安裝
要輕鬆安裝 Zend Framework,請使用 Composer 工具。這是安裝最新版本 Zend Framework 的首選方法。要安裝 Zend Framework 的所有元件,請使用以下 Composer 命令:
$ composer require zendframework/zendframework
每個 Zend Framework 模組/元件也可以單獨安裝。例如,要安裝 Zend Framework 的MVC 元件,請使用以下composer命令:
$ composer require zendframework/zend-mvc
Zend Framework - 框架應用
讓我們使用 Zend Framework MVC 層和模組系統建立一個框架應用。
使用 Composer 安裝
建立新 Zend Framework 專案的最簡單方法是使用 Composer。它定義如下:
$ cd /path/to/install
$ composer create-project -n -sdev zendframework/skeleton-application myapp
您將在螢幕上看到以下結果:
Installing zendframework/skeleton-application (dev-master
   941da45b407e4f09e264f000fb537928badb96ed)
   - Installing zendframework/skeleton-application (dev-master master)
   Cloning master

Created project in myapp
Loading composer repositories with package information
Installing dependencies (including require-dev) from lock file
   - Installing zendframework/zend-component-installer (0.3.0)
   Loading from cache

   - Installing zendframework/zend-stdlib (3.0.1)
   Loading from cache

   - Installing zendframework/zend-config (2.6.0)
   Loading from cache

   - Installing zendframework/zend-loader (2.5.1)
   Loading from cache

   - Installing zendframework/zend-eventmanager (3.0.1)
   Loading from cache

   - Installing zendframework/zend-view (2.8.0)
   Loading from cache

   - Installing container-interop/container-interop (1.1.0)
   Loading from cache

   - Installing zendframework/zend-servicemanager (3.1.0)
   Loading from cache

   - Installing zendframework/zend-validator (2.8.1)
   Loading from cache

   - Installing zendframework/zend-escaper (2.5.1)
   Loading from cache

   - Installing zendframework/zend-uri (2.5.2)
   Loading from cache

   - Installing zendframework/zend-http (2.5.4)
   Loading from cache

   - Installing zendframework/zend-router (3.0.2)
   Loading from cache

   - Installing zendframework/zend-modulemanager (2.7.2)
   Loading from cache

   - Installing zendframework/zend-mvc (3.0.1)
   Loading from cache

   - Installing zendframework/zend-skeleton-installer (0.1.3)
   Loading from cache

   - Installing zfcampus/zf-development-mode (3.0.0)
   Loading from cache
zendframework/zend-config suggests installing zendframework/zend-filter
   (Zend\Filter component)
zendframework/zend-config suggests installing zendframework/zend-i18n
   (Zend\I18n component)
zendframework/zend-config suggests installing zendframework/zend-json
   (Zend\Json to use the Json reader or writer classes)
zendframework/zend-view suggests installing zendframework/zend-authentication
   (Zend\Authentication component)
zendframework/zend-view suggests installing zendframework/zend-feed
   (Zend\Feed component)
zendframework/zend-view suggests installing zendframework/zend-filter
   (Zend\Filter component)
zendframework/zend-view suggests installing zendframework/zend-i18n
   (Zend\I18n component)
zendframework/zend-view suggests installing zendframework/zend-json
   (Zend\Json component)
zendframework/zend-view suggests installing zendframework/zend-navigation
   (Zend\Navigation component)
zendframework/zend-view suggests installing zendframework/zend-paginator
   (Zend\Paginator component)
zendframework/zend-view suggests installing zendframework/zend-permissions-acl
   (Zend\Permissions\Acl component)
zendframework/zend-servicemanager suggests installing ocramius/proxy-manager
   (ProxyManager 1.* to handle lazy initialization of services)
zendframework/zend-validator suggests installing zendframework/zend-db
   (Zend\Db component)
zendframework/zend-validator suggests installing zendframework/zend-filter
   (Zend\Filter component, required by the Digits validator)
zendframework/zend-validator suggests installing zendframework/zend-i18n
   (Zend\I18n component to allow translation of validation error messages as well as
   to use the various Date validators)
zendframework/zend-validator suggests installing zendframework/zend-i18nresources
   (Translations of validator messages)
zendframework/zend-validator suggests installing zendframework/zend-math
   (Zend\Math component)
zendframework/zend-validator suggests installing zendframework/zend-session
   (Zend\Session component)
zendframework/zend-router suggests installing zendframework/zend-i18n
   (^2.6, if defining translatable HTTP path segments)

zendframework/zend-modulemanager suggests installing zendframework/zend-console
   (Zend\Console component)
zendframework/zend-mvc suggests installing zendframework/zend-json ((^2.6.1 ||
   ^3.0) To auto-deserialize JSON body content in AbstractRestfulController
   extensions, when json_decode is unavailable)
zendframework/zend-mvc suggests installing zendframework/zend-mvc-console
   (zend-mvc-console provides the ability to expose zend-mvc as a console application)
zendframework/zend-mvc suggests installing zendframework/zend-mvc-i18n
   (zendmvc-i18n provides integration with zend-i18n, including a translation bridge
   and translatable route segments)
zendframework/zend-mvc suggests installing zendframework/zend-mvc-pluginfileprg
   (To provide Post/Redirect/Get functionality around forms that container
   file uploads)
zendframework/zend-mvc suggests installing zendframework/zend-mvc-pluginflashmessenger
   (To provide flash messaging capabilities between requests)
zendframework/zend-mvc suggests installing zendframework/zend-mvc-pluginidentity
   (To access the authenticated identity (per zend-authentication) in controllers)
zendframework/zend-mvc suggests installing zendframework/zend-mvc-plugin-prg
   (To provide Post/Redirect/Get functionality within controllers)
zendframework/zend-mvc suggests installing zendframework/zend-psr7bridge
   ((^0.2) To consume PSR-7 middleware within the MVC workflow)
zendframework/zend-mvc suggests installing zendframework/zend-servicemanager-di
   (zend-servicemanager-di provides utilities for integrating zend-di and
   zendservicemanager in your zend-mvc application)

Generating autoload files
   Removing optional packages from composer.json
   Updating composer.json
Removing zendframework/zend-skeleton-installer...
   - Removing zendframework/zend-skeleton-installer (0.1.3)
   Removed plugin zendframework/zend-skeleton-installer.
   Removing from composer.json
   Complete!
> zf-development-mode enable
You are now in development mode.
現在應用程式已安裝,您可以立即使用PHP 的內建 Web 伺服器對其進行測試:
$ cd path/to/install/myapp
$ composer serve
然後您將看到以下響應:
> php -S 0.0.0.0:8080 -t public/ public/index.php
這將在埠 8080 上啟動 PHP 內建 CLI 伺服器。啟動開發伺服器後,您可以訪問位於(https://:8080/)的站點。內建 CLI 伺服器僅用於開發。
單元測試
要執行框架單元測試,請在終端中鍵入以下命令。
$ composer require --dev zendframework/zend-test
它將產生以下響應:
Using version ^3.0 for zendframework/zend-test
   ./composer.json has been updated
Loading composer repositories with package information
Updating dependencies (including require-dev)
   - Installing zendframework/zend-dom (2.6.0)
   Loading from cache

   - Installing zendframework/zend-console (2.6.0)
   Loading from cache

   - Installing sebastian/version (2.0.1)
   Loading from cache

   - Installing symfony/yaml (v3.2.1)
   Downloading: 100%

   - Installing sebastian/resource-operations (1.0.0)
   Loading from cache

   - Installing sebastian/recursion-context (2.0.0)
   Loading from cache

   - Installing sebastian/object-enumerator (2.0.0)
   Loading from cache

   - Installing sebastian/global-state (1.1.1)
   Loading from cache

   - Installing sebastian/exporter (2.0.0)
   Loading from cache

   - Installing sebastian/environment (2.0.0)
   Loading from cache

   - Installing sebastian/diff (1.4.1)
   Loading from cache

   - Installing sebastian/comparator (1.2.2)
   Loading from cache

   - Installing phpunit/php-text-template (1.2.1)
   Loading from cache

   - Installing doctrine/instantiator (1.0.5)
   Loading from cache

   - Installing phpunit/phpunit-mock-objects (3.4.3)
   Downloading: 100%

   - Installing phpunit/php-timer (1.0.8)
   Loading from cache

   - Installing phpunit/php-file-iterator (1.4.2)
   Loading from cache

   - Installing sebastian/code-unit-reverse-lookup (1.0.0)
   Loading from cache

   - Installing phpunit/php-token-stream (1.4.9)
   Loading from cache

   - Installing phpunit/php-code-coverage (4.0.4)
   Downloading: 100%

   - Installing webmozart/assert (1.2.0)
   Loading from cache

   - Installing phpdocumentor/reflection-common (1.0)
   Loading from cache

   - Installing phpdocumentor/type-resolver (0.2.1)
   Loading from cache

   - Installing phpdocumentor/reflection-docblock (3.1.1)
   Loading from cache

   - Installing phpspec/prophecy (v1.6.2)
   Loading from cache

   - Installing myclabs/deep-copy (1.5.5)
   Loading from cache

   - Installing phpunit/phpunit (5.7.4)
   Downloading: 100%

   - Installing zendframework/zend-test (3.0.2)
   Loading from cache

zendframework/zend-console suggests installing zendframework/zend-filter
   (To support DefaultRouteMatcher usage)
symfony/yaml suggests installing symfony/console (For validating YAML files
   using the lint command)
sebastian/global-state suggests installing ext-uopz (*)
phpunit/phpunit-mock-objects suggests installing ext-soap (*)
phpunit/php-code-coverage suggests installing ext-xdebug (>=2.4.0)
phpunit/phpunit suggests installing phpunit/php-invoker (~1.1)
phpunit/phpunit suggests installing ext-xdebug (*)
zendframework/zend-test suggests installing zendframework/zend-mvc-console
   (^1.1.8, to test MVC <-> console integration)
Writing lock file
Generating autoload files
現在測試支援已啟用,因此您可以使用以下命令執行測試。
$ ./vendor/bin/phpunit
Apache Web 伺服器
在生產環境中託管基於 Zend Framework 的應用程式非常簡單直接。只需在 Apache 配置檔案中建立一個虛擬主機,並將DocumentRoot指向 Zend Framework 應用程式的Public資料夾即可。
下面給出一個示例配置 (myapp):
<VirtualHost *:80>
   ServerName myapp.localhost
   DocumentRoot /path/to/install/myapp/public
   <Directory /path/to/install/myapp/public>
      DirectoryIndex index.php
      AllowOverride All
      Order allow,deny
      Allow from all
      <IfModule mod_authz_core.c>
         Require all granted
      </IfModule>
   </Directory>
</VirtualHost>
Zend Framework - MVC 架構
在繼續下一章之前,讓我們簡要了解一下 MVC。模型-檢視-控制器是一種軟體方法,它將應用程式邏輯與表示分離。在實踐中,它允許網頁包含最少的 PHP 指令碼,因為表示與它分離。
MVC 元件的簡要描述如下
模型 - 模型表示應用程式資料的結構。通常,模型類包含有助於在後端資料庫(MySQL、PostgreSQL 等)中檢索、插入和更新業務資料的函式。
檢視 - 檢視是 MVC 應用程式的表示層。它透過控制器獲取模型資料並根據需要顯示它。它與控制器和模型鬆散耦合,因此可以更改它而不會影響模型和控制器。
控制器 - 控制器是 MVC 架構的主要元件。每個請求首先都會到達控制器。換句話說,控制器處理所有請求,並充當模型、檢視和處理 HTTP 請求並生成響應所需的任何其他資源之間的中介。
在下一章中,我們將瞭解 Zend Framework 的不同概念。
Zend Framework - 概念
Zend Framework 是一個包含 60 多個元件的集合。它們彼此鬆散連線。它們既可以作為獨立元件使用,也可以作為一組元件作為一個單元工作。
Zend Framework 提供了三個最重要的元件,它們是:
- zend-servicemanager
- zend-eventmanager 和
- zend-modulemanager。
它們使 Zend 元件能夠有效地與其他元件整合。
事件管理器 - 它提供了建立基於事件的程式設計的能力。這有助於建立、注入和管理新事件。
服務管理器 - 它提供了無需太多努力即可從任何地方使用任何服務(PHP 類)的能力。
模組管理器 - 將具有相似功能的 PHP 類集合轉換為稱為模組的單個單元的能力。新建立的模組可以作為單個單元進行使用、維護和配置。
我們將在後續章節中詳細介紹這些概念。
Zend Framework - 服務管理器
Zend Framework 包含一個強大的服務定位器模式實現,稱為zend-servicemanager。Zend 框架廣泛使用服務管理器來實現其所有功能。服務管理器為 Zend Framework 提供了高階抽象。它還可以很好地與 Zend Framework 的所有其他元件整合。
安裝服務管理器
可以使用composer工具安裝服務管理器元件。
composer require zendframework/zend-servicemanager
示例
首先,所有服務都需要註冊到服務管理器中。一旦服務註冊到伺服器管理器系統中,就可以在任何時候以最少的努力訪問它。服務管理器提供了許多註冊服務的選項。一個簡單的示例如下所示:
use Zend\ServiceManager\ServiceManager;
use Zend\ServiceManager\Factory\InvokableFactory;
use stdClass;
$serviceManager = new ServiceManager([
   'factories' => [stdClass::class => InvokableFactory::class,],
]);
上面的程式碼使用Factory選項將stdClass註冊到系統中。現在,我們可以使用服務管理器的get()方法隨時獲取 stdClass 的例項,如下所示。
use Zend\ServiceManager\ServiceManager;
$object = $serviceManager->get(stdClass::class);
get() 方法共享檢索到的物件,因此多次呼叫 get() 方法返回的物件是同一個例項。要每次獲取不同的例項,服務管理器提供了另一種方法,即build()方法。
use Zend\ServiceManager\ServiceManager;
$a = $serviceManager->build(stdClass::class);
$b = $serviceManager->build(stdClass::class);
服務管理器註冊
服務管理器提供了一組註冊元件的方法。一些最重要的方法如下所示:
- 工廠方法
- 抽象工廠方法
- 初始化方法
- 委託工廠方法
我們將在接下來的章節中詳細討論每一個方法。
工廠方法
工廠基本上是任何可呼叫物件或任何實現了FactoryInterface(Zend\ServiceManager\Factory\FactoryInterface)的類。
FactoryInterface 具有一個方法:
public function __invoke(ContainerInterface $container, $requestedName, array
   $options = null)
FactoryInterface 的引數詳細資訊如下:
container (ContainerInterface) - 它是 ServiceManager 的基本介面。它提供了一個獲取其他服務的選項。
requestedName - 它是服務名稱。
options - 它提供了服務所需的其他選項。
讓我們建立一個實現 FactoryInterface 的簡單類,並看看如何註冊該類。
類 Test - 要檢索的物件
use stdClass;
class Test {
   public function __construct(stdClass $sc) {
      // use $sc
   }
}
Test類依賴於 stdClass。
類 TestFactory - 初始化測試物件的類
class TestFactory implements FactoryInterface {
   public function __invoke(ContainerInterface $container, $requestedName,
      array $options = null) {
      $dep = $container->get(stdClass::class);
      return new Test($dep);
   }
}
TestFactory 使用容器檢索 stdClass,建立 Test 類的例項並返回。
Zend Framework 的註冊和使用
現在讓我們瞭解如何註冊和使用 Zend Framework。
serviceManager $sc = new ServiceManager([
   'factories' => [stdClass::class => InvokableFactory::class,
      Test::class => TestFactory::class]
]);
$test = $sc->get(Test::class);
服務管理器提供了一個名為 **InvokableFactory** 的特殊工廠來檢索任何沒有依賴關係的類。例如,**stdClass** 可以使用 InvokableFactory 進行配置,因為 stdClass 不依賴於任何其他類。
serviceManager $sc = new ServiceManager([
   'factories' => [stdClass::class => InvokableFactory::class]
]);
$stdC = $sc->get(stdClass::class);
另一種無需實現 **FactoryInterface** 或使用 **InvokableFactory** 即可檢索物件的方法是使用如下所示的內聯方法。
$serviceManager = new ServiceManager([
   'factories' => [
      stdClass::class => InvokableFactory::class,
      Test::class => function(ContainerInterface $container, $requestedName) {
         $dep = $container->get(stdClass::class);
         return new Test($dep);
      },
   ],
]);
抽象工廠方法
有時,我們可能需要建立只有在執行時才知道的物件。這種情況可以使用 **AbstractFactoryInterface** 來處理,它派生自 FactoryInterface。
AbstractFactoryInterface 定義了一個方法來檢查物件是否可以在請求的例項中建立。如果可以建立物件,它將使用 FactoryInterface 的 **__invoke** 方法建立物件並返回。
AbstractFactoryInterface 的簽名如下:
public function canCreate(ContainerInterface $container, $requestedName)
初始化器方法
初始化器方法是一個特殊的選項,用於為已建立的服務注入額外的依賴項。它實現了 **InitializerInterface**,並且可用的唯一方法的簽名如下:
public function(ContainerInterface $container, $instance)
function(ContainerInterface $container, $instance) {
   if (! $instance instanceof EventManagerAwareInterface) {
      return;
   }
   $instance->setEventManager($container->get(EventManager::class));
}
在上面的例子中,該方法檢查例項是否為 EventManagerAwareInterface 型別。如果它是 **EventManagerAwareInterface** 型別,則設定事件管理器物件,否則不設定。由於該方法可能設定也可能不設定依賴項,因此它不可靠,並會導致許多執行時問題。
委託工廠方法
Zend Framework 透過 **DelegatorFactoryInterface** 支援委託模式。它可以用來裝飾服務。
此函式的簽名如下:
public function __invoke(ContainerInterface $container,
   $name, callable $callback, array $options = null
);
這裡,**$callback** 負責裝飾服務例項。
延遲服務
延遲服務是在建立時不會完全初始化的服務之一。它們只是被引用,只有在真正需要時才會被初始化。一個最好的例子是資料庫連線,它可能並非在所有地方都需要。它是一種昂貴的資源,並且建立過程也需要花費時間。Zend framework 提供了派生自 **DelegatorFactoryInterface** 的 **LazyServiceFactory**,它可以藉助 **Delegator** 概念和一個稱為 **ocramius proxy manager** 的第三方代理管理器來生成延遲服務。
外掛管理器
外掛管理器擴充套件了服務管理器,並提供了額外的功能,如例項驗證。Zend Framework 廣泛使用外掛管理器。
例如,所有驗證服務都位於 **ValidationPluginManager** 下。
配置選項
服務管理器提供了一些選項來擴充套件服務管理器的功能。它們是 **shared、shared_by_default** 和 **aliases**。正如我們之前討論的,檢索到的物件預設情況下在請求的物件之間共享,我們可以使用 **build()** 方法獲取一個不同的物件。我們也可以使用 **shared** 選項來指定哪些服務需要共享。**shared_by_default** 與 **shared** 功能相同,只是它適用於所有服務。
$serviceManager = new ServiceManager([
   'factories' => [
      stdClass::class => InvokableFactory::class
   ],
   'shared' => [
      stdClass::class => false // will not be shared
   ],
   'shared_by_default' => false, // will not be shared and applies to all service
]);
**aliases** 選項可以用來為註冊的服務提供一個替代名稱。這既有優點也有缺點。從好的方面來說,我們可以為服務提供替代的簡短名稱。但同時,名稱也可能脫離上下文並引入錯誤。
aliases' => ['std' => stdClass::class, 'standard' => 'std']
Zend Framework - 事件管理器
所有現代應用程式都需要強大而靈活的事件元件。Zend Framework 提供了一個這樣的元件,**zend-eventmanager**。zend-eventmanager 有助於設計高階架構,並支援釋出/訂閱模式和麵向方面的程式設計。
安裝事件管理器
可以使用如下所示的 **Composer** 安裝事件管理器:
composer require zendframework/zend-eventmanager
事件管理器的概念
事件管理器的核心概念如下:
**事件** - 事件是任意命名的動作,例如 **greet**。
**監聽器** - 任何 PHP 回撥。它們附加到事件上,並在事件觸發時被呼叫。監聽器的預設簽名為:
function(EventInterface $e)
**EventInterface 類** - 用於指定事件本身。它具有設定和獲取事件資訊的方法,如名稱(set/getName)、目標(get/setTarget)和引數(get/setParams)。
**EventManager 類** - EventManager 的例項跟蹤應用程式中所有定義的事件及其對應的監聽器。EventManager 提供了一個方法 **attach** 來將監聽器附加到事件上,並提供了一個方法 **trigger** 來觸發任何預定義的事件。一旦觸發被呼叫,EventManager 就會呼叫附加到它的監聽器。
**EventManagerAwareInterface** - 為了讓一個類支援基於事件的程式設計,它需要實現 EventManagerAwareInterface。它提供了兩個方法,**setEventManager** 和 **getEventManager** 來獲取和設定事件管理器。
示例
讓我們編寫一個簡單的 PHP 控制檯應用程式來理解事件管理器的概念。請按照以下步驟操作。
建立一個名為“eventapp”的資料夾。
使用 composer 安裝 **zend-eventmanager**。
在“eventapp”資料夾內建立一個 PHP 檔案 **Greeter.php**。
建立類 **Greeter** 並實現 **EventManagerAwareInterface**。
require __DIR__ . '/vendor/autoload.php';
class Greeter implements EventManagerAwareInterface {
   // code
}
這裡,**require** 用於自動載入所有 composer 安裝的元件。
在類 **Greeter** 中編寫 **setEventManager** 方法,如下所示:
public function setEventManager(EventManagerInterface $events) {
   $events->setIdentifiers([ __CLASS__, get_called_class(),]);
   $this->events = $events;
   return $this;
}
此方法將當前類設定到給定的事件管理器($events 引數)中,然後將事件管理器設定到本地變數 **$events** 中。
下一步是在類 **Greeter** 中編寫 **getEventManager** 方法,如下所示:
public function getEventManager() {
   if (null === $this->events) {
      $this->setEventManager(new EventManager());
   }
   return $this->events;
}
該方法從本地變數獲取事件管理器。如果它不可用,則建立一個事件管理器的例項並返回它。
在類 **Greeter** 中編寫一個方法 **greet**。
public function greet($message) {
   printf("\"%s\" from class\n", $message);
   $this->getEventManager()->trigger(__FUNCTION__, $this, $message ]);
}
此方法獲取事件管理器並觸發/觸發附加到它的事件。
下一步是建立 **Greeter** 類的例項並將監聽器附加到其方法 **greet** 上。
$greeter = new Greeter();
$greeter->getEventManager()->attach('greet', function($e) {
   $event_name = $e->getName();
   $target_name = get_class($e->getTarget());
   $params_json = json_encode($e->getParams());
   printf("\"%s\" event of class \"%s\" is called." .
      " The parameter supplied is %s\n",
      $event_name,
      $target_name,
      $params_json);
});
監聽器回撥只打印事件的名稱、目標和提供的引數。
**Greeter.php** 的完整列表如下:
<?php
require __DIR__ . '/vendor/autoload.php';

use Zend\EventManager\EventManagerInterface;
use Zend\EventManager\EventManager;
use Zend\EventManager\EventManagerAwareInterface;

class Greeter implements EventManagerAwareInterface {
   protected $events;
   public function setEventManager(EventManagerInterface $events) {
      $events->setIdentifiers([__CLASS__, get_called_class(), ]);
      $this->events = $events;
      return $this;
   }
   public function getEventManager() {
      if (null === $this->events) {
         $this->setEventManager(new EventManager());
      }
      return $this->events;
   }
   public function greet($message) {
      printf("\"%s\" from class\n", $message);
      $this->getEventManager()->trigger(__FUNCTION__, $this, [$message ]);
   }
}

$greeter = new Greeter();
$greeter->greet("Hello");
$greeter->getEventManager()->attach('greet', function($e) {
   $event_name = $e->getName();
   $target_name = get_class($e->getTarget());
   $params_json = json_encode($e->getParams());
   printf("\"%s\" event of class \"%s\" is called." . " The parameter supplied is %s\n",
      $event_name,
      $target_name,
      $params_json);
});
$greeter->greet("Hello");
現在,在命令提示符 php **Greeter.php** 中執行應用程式,結果將如下所示:
"Hello" from class
"Hello" from class
"greet" event of class "Greeter" is called. The parameter supplied is ["Hello"]
上述示例應用程式僅解釋了事件管理器的基礎知識。事件管理器提供了更多高階選項,例如 **監聽器優先順序、自定義回撥原型/簽名、短路** 等。事件管理器在 Zend MVC 框架中被廣泛使用。
Zend Framework - 模組系統
Zend Framework 提供了一個強大的模組系統。模組系統有三個元件。它們如下:
**模組自動載入器** - 模組自動載入器負責從各種來源查詢和載入模組。它也可以載入打包為 **Phar 檔案** 的模組。模組自動載入器的實現位於 myapp/vendor/zendframework/zend-loader/src/ModuleAutoloader.php 中。
**模組管理器** - 一旦模組自動載入器找到模組,模組管理器就會為每個模組觸發一系列事件。模組管理器的實現位於 myapp/vendor/zendframework/zendmodulemanager/src/ModuleManager.php 中。
**模組管理器監聽器** - 它們可以附加到模組管理器觸發的事件上。透過附加到模組管理器的事件,它們可以執行從解析和載入模組到為每個模組執行復雜工作的所有操作。
MVC Web 模組系統
Zend Framework 中的 MVC Web 應用程式通常編寫為模組。單個網站可以包含一個或多個按功能分組的模組。面向 MVC 的模組的推薦結構如下:
module_root/
   Module.php
   autoload_classmap.php
   autoload_function.php
   autoload_register.php
   config/
      module.config.php
   public/
      images/
      css/
      js/
   src/
      <module_namespace>/
      <code files>
   test/
      phpunit.xml
      bootstrap.php
      <module_namespace>/
         <test code files>
   view/
      <dir-named-after-module-namespace>/
         <dir-named-after-a-controller>/
            <.phtml files>
該結構與上一章中討論的相同,但這裡它是通用的。**autoload_ 檔案** 可以用作自動載入模組中可用類的預設機制,而無需使用 **zend-modulemanager** 中提供的先進 **模組管理器**。
**autoload_classmap.php** - 返回一個類名及其對應檔名陣列。
**autoload_function.php** - 返回一個 PHP 回撥。這可以利用 autoload_classmap.php 返回的類。
**autoload_register.php** - 註冊 autoload_function.php 返回的 PHP 回撥。
這些自動載入檔案不是必需的,但建議使用。在框架應用程式中,我們沒有使用 **autoload_ 檔案**。
模組類
模組類應該命名為 **Module**,並且模組類的名稱空間應該為 **模組名稱**。這將有助於 Zend Framework 輕鬆解析和載入模組。框架應用程式(myapp)中的 **Application** 模組程式碼,myapp/module/Application/src/Module.php 如下所示:
namespace Application;
class Module {
   const VERSION = '3.0.2dev';
   public function getConfig() {
      return include __DIR__ . '/../config/module.config.php';
   }
}
Zend Framework 模組管理器將自動呼叫 **getConfig()** 函式並執行必要的步驟。
Zend Framework - 應用程式結構
在本章中,讓我們瞭解 Zend Framework 應用程式的結構。**myapp** 應用程式的結構如下:
├── composer.json
├── composer.lock
├── CONDUCT.md
├── config
│   ├── application.config.php
│   ├── autoload
│   │   ├── development.local.php
│   │   ├── development.local.php.dist
│   │   ├── global.php
│   │   ├── local.php.dist
│   │   ├── README.md
│   │   └── zend-developer-tools.local-development.php
│   ├── development.config.php
│   ├── development.config.php.dist
│   └── modules.config.php
├── CONTRIBUTING.md
├── data
│   └── cache
│       └── module-classmap-cache.application.module.cache.php ├── docker-compose.yml
├── Dockerfile
├── LICENSE.md
├── module
│   └── Application
│       ├── config
│       ├── src
│       ├── test
│       └── view
├── phpcs.xml
├── phpunit.xml.dist
├── public
│   ├── css
│   │   ├── bootstrap.css
│   │   ├── bootstrap.css.map
│   │   ├── bootstrap.min.css
│   │   ├── bootstrap.min.css.map
│   │   ├── bootstrap-theme.css
│   │   ├── bootstrap-theme.css.map
│   │   ├── bootstrap-theme.min.css
│   │   ├── bootstrap-theme.min.css.map
│   │   └── style.css
│   ├── fonts
│   │   ├── glyphicons-halflings-regular.eot
│   │   ├── glyphicons-halflings-regular.svg
│   │   ├── glyphicons-halflings-regular.ttf
│   │   ├── glyphicons-halflings-regular.woff
│   │   └── glyphicons-halflings-regular.woff2
│   ├── img
│   │   ├── favicon.ico
│   │   └── zf-logo-mark.svg
│   ├── index.php
│   ├── js
│   │   ├── bootstrap.js
│   │   ├── bootstrap.min.js
│   │   └── jquery-3.1.0.min.js
│   └── web.config
├── README.md
├── TODO.md
├── Vagrantfile
└── vendor
├── autoload.php
├── bin
│   ├── phpunit -> ../phpunit/phpunit/phpunit
│   ├── templatemap_generator.php -> ../zendframework/zend-
view/bin/templatemap_generator.php
│   └── zf-development-mode -> ../zfcampus/zf-development-mode/bin/zf-
development-mode
├── composer
│   ├── autoload_classmap.php
│   ├── autoload_namespaces.php
│   ├── autoload_psr4.php
│   ├── autoload_real.php
│   ├── ClassLoader.php
│   ├── installed.json
│   └── LICENSE
├── container-interop
│   └── container-interop
├── doctrine
│   └── instantiator
├── myclabs
│   └── deep-copy
├── phpdocumentor
│   ├── reflection-common
│   ├── reflection-docblock
│   └── type-resolver
├── phpspec
│   └── prophecy
├── phpunit
│   ├── php-code-coverage
│   ├── php-file-iterator
│   ├── php-text-template
│   ├── php-timer
│   ├── php-token-stream
│   ├── phpunit
│   └── phpunit-mock-objects
├── sebastian
│   ├── code-unit-reverse-lookup
│   ├── comparator
│   ├── diff
│   ├── environment
│   ├── exporter
│   ├── global-state
│   ├── object-enumerator
│   ├── recursion-context
│   ├── resource-operations
│   └── version
├── symfony
│   └── yaml
├── webmozart
│   └── assert
├── zendframework
│   ├── zend-component-installer
│   ├── zend-config
│   ├── zend-console
│   ├── zend-dom
│   ├── zend-escaper
│   ├── zend-eventmanager
│   ├── zend-http
│   ├── zend-loader
│   ├── zend-modulemanager
│   ├── zend-mvc
│   ├── zend-router
│   ├── zend-servicemanager
│   ├── zend-stdlib
│   ├── zend-test
│   ├── zend-uri
│   ├── zend-validator
│   └── zend-view
└── zfcampus
└── zf-development-mode

73 directories, 55 files
Zend Framework 應用程式由不同的資料夾組成。它們如下:
**Application** - 此目錄包含您的應用程式。它將容納 MVC 系統,以及使用的配置、服務和您的引導檔案。
**Config** - 此目錄包含應用程式的配置檔案。
**Data** - 此目錄提供了一個儲存應用程式資料的位置,這些資料是易失的,並且可能是臨時的。
**Module** - 模組允許開發人員將一組相關的控制器分組到一個邏輯上組織的組中。
**Public** - 這是應用程式的文件根目錄。它啟動 Zend 應用程式。它還包含應用程式的資產,如 JavaScript、CSS、影像等。
**Vendor** - 此目錄包含 composer 依賴項。
應用程式模組的結構
這是應用程式的主目錄。Zend Framework 2 引入了一個強大而靈活的模組系統,以有效地組織應用程式。框架應用程式的 **Application** 模組為整個應用程式提供了引導、錯誤和路由配置。**Application** 模組的結構如下所示:
├── module
│   └── Application
│       ├── config
│       │   └── module.config.php
│       ├── src
│       │   ├── Controller
│       │   │   └── IndexController.php
│       │   └── Module.php
│       ├── test
│       │   └── Controller
│       │       └── IndexControllerTest.php
│       └── view
│           ├── application
│           │   └── index
│           │       └── index.phtml
│           ├── error
│           │   ├── 404.phtml
│           │   └── index.phtml
│           └── layout
│               └── layout.phtml
讓我們詳細介紹每個模組目錄:
**Application** - 這是模組的根目錄。資料夾的名稱將與模組的名稱匹配,並且該名稱也用作模組內所有定義類的 PHP 名稱空間。它將容納 MVC 系統,以及使用的配置、服務和您的引導檔案。
**Config** - 模組的獨立配置。
**Src** - 應用程式的主要業務邏輯。
**View** - 包含設計/演示(HTML)檔案。例如,index.phtml。
**src/Module.php** - 它是模組的核心。它充當模組的“前端控制器”。Zend 在處理此模組中的任何 PHP 類之前處理 **src/Module.php** 檔案。
**Application/config/module.config.php** - 它用於路由器配置和自動載入檔案。
應用/檢視/佈局 - 佈局表示多個檢視的公共部分。例如,頁面頁首和頁尾。預設情況下,佈局應儲存在views/layouts資料夾中。
所有模組都共享與上述應用模組相同或相似的結構。
Zend Framework - 建立模組
在本章中,我們將學習如何在 Zend Framework 中建立基於 MVC 的模組。讓我們建立一個名為Tutorial的模組來了解模組建立過程。
在 –myapp/module/Tutorial/src/ 目錄中建立一個名為Module的新 PHP 類,並實現 ConfigProviderInterface 介面。
將Tutorial設定為Module類的名稱空間。
在Module類中編寫一個公共函式getConfig,並返回Tutorial模組的配置檔案。
Module類的完整程式碼如下所示:
<?php
namespace Tutorial;
use Zend\ModuleManager\Feature\ConfigProviderInterface;
class Module implements ConfigProviderInterface {
   public function getConfig() {
      return include __DIR__ . '/../config/module.config.php';
   }
}
使用以下程式碼在composer.json的autoload部分配置Tutorial模組。
"autoload": {
   "psr-4": {
      "Application\\": "module/Application/src/",
      "Tutorial\\": "module/Tutorial/src/"
   }
}
使用 composer update命令更新應用程式,如下所示。
composer update
composer命令將對應用程式進行必要的更改,並在命令提示符中顯示日誌,如下所示:
Loading composer repositories with package information
Updating dependencies (including require-dev)
   - Removing zendframework/zend-component-installer (0.3.0)
   - Installing zendframework/zend-component-installer (0.3.1)
   Downloading: 100%

   - Removing zendframework/zend-stdlib (3.0.1)
   - Installing zendframework/zend-stdlib (3.1.0)
   Loading from cache

   - Removing zendframework/zend-eventmanager (3.0.1)
   - Installing zendframework/zend-eventmanager (3.1.0)
   Downloading: 100%

   - Removing zendframework/zend-view (2.8.0)
   - Installing zendframework/zend-view (2.8.1)
   Loading from cache

   - Removing zendframework/zend-servicemanager (3.1.0)
   - Installing zendframework/zend-servicemanager (3.2.0)
   Downloading: 100%

   - Removing zendframework/zend-escaper (2.5.1)
   - Installing zendframework/zend-escaper (2.5.2)
   Loading from cache

   - Removing zendframework/zend-http (2.5.4)
   - Installing zendframework/zend-http (2.5.5)
   Loading from cache

   - Removing zendframework/zend-mvc (3.0.1)
   - Installing zendframework/zend-mvc (3.0.4)
   Downloading: 100%

   - Removing phpunit/phpunit (5.7.4)
   - Installing phpunit/phpunit (5.7.5)
   Downloading: 100%

Writing lock file
Generating autoload files
在/config/處建立模組配置檔案“module.config.php”,程式碼如下:
<?php
namespace Tutorial;

use Zend\ServiceManager\Factory\InvokableFactory;
use Zend\Router\Http\Segment;
return [
   'controllers' => [
      'factories' => [Controller\TutorialController::class => InvokableFactory::class,],
   ],
   'view_manager' => [
      'template_path_stack' => ['tutorial' => __DIR__ . '/../view',],
   ],
];
配置檔案包含三個部分,如下所示:
控制器配置 - 指定模組內可用的控制器。
路由配置 - 指定如何將模組中的控制器解析為 URL。
檢視配置 - 指定與檢視引擎相關的配置,例如檢視的位置等。
在應用程式級配置檔案 – myapp/config/modules.config.php 中配置Tutorial模組。
return ['Zend\Router', 'Zend\Validator', 'Application', 'Tutorial'];
在應用程式資料夾的根目錄執行composer serve來執行應用程式。
我們已成功添加了一個新模組,但我們仍需要新增控制器、路由和檢視才能成功執行Tutorial模組。
Zend Framework - 控制器
如前所述,控制器在 Zend MVC 框架中發揮著重要作用。應用程式中的所有網頁都需要由控制器處理。
在 Zend MVC 框架中,控制器是實現了 – Zend/Stdlib/DispatchableInterface 介面的物件。DispatchableInterface只有一個方法dispatch,它以Request物件作為輸入,執行一些邏輯並返回Response物件作為輸出。
dispatch(Request $request, Response $response = null)
返回“Hello World”的控制器物件的簡單示例如下:
use Zend\Stdlib\DispatchableInterface;
use Zend\Stdlib\RequestInterface as Request;
use Zend\Stdlib\ResponseInterface as Response;
class HelloWorld implements DispatchableInterface {
   public function dispatch(Request $request, Response $response = null) {
      $response->setContent("Hello World!");
   }
}
DispatchableInterface是基本的,它需要許多其他接口才能編寫高階控制器。其中一些介面如下:
InjectApplicationEventInterface - 用於注入事件(Zend EventManager)
ServiceLocatorAwareInterface - 用於定位服務(Zend ServiceManager)
EventManagerAwareInterface - 用於管理事件(Zend EventManager)
牢記這些要點,Zend Framework 提供了許多實現這些介面的現成控制器。最重要的控制器如下所述。
AbstractActionController
AbstractActionController(Zend/Mvc/Controller/AbstractActionController)是 Zend MVC 框架中使用最廣泛的控制器。它具有編寫典型網頁所需的所有必要功能。它允許路由(路由將請求 URL 與控制器及其方法之一匹配)匹配操作。匹配後,將呼叫以操作命名的控制器方法。
例如,如果匹配路由test,並且路由test為操作返回hello,則將呼叫helloAction方法。
讓我們使用AbstractActionController編寫我們的TutorialController。
建立一個名為TutorialController的新 PHP 類,擴充套件AbstractActionController,並將其放置在module/Tutorial/src/Controller/目錄中。
將Tutorial\Controller設定為名稱空間。
編寫一個indexAction方法。
從indexAction方法返回ViewModel物件。ViewModel物件用於將資料從控制器傳送到檢視引擎,我們將在後續章節中看到。
完整的程式碼清單如下:
?php
namespace Tutorial\Controller;
use Zend\Mvc\Controller\AbstractActionController;
use Zend\View\Model\ViewModel;
class TutorialController extends AbstractActionController {
   public function indexAction() {
      return new ViewModel();
   }
}
我們已成功添加了新的TutorialController。
AbstractRestfulController
AbstractRestfulController(Zend\Mvc\Controller\AbstractRestfulController)檢查傳入請求的 HTTP方法,並透過考慮 HTTP 方法匹配操作(方法)。
例如,使用 GET HTTP 方法的請求要麼匹配getList()方法,要麼匹配get()方法(如果在請求中找到id引數)。
AbstractConsoleController
AbstractConsoleController(Zend\Mvc\Controller\AbstractConsoleController)類似於 AbstractActionController,除了它只在控制檯環境而不是瀏覽器中執行。
Zend Framework - 路由
路由將請求 URI對映到特定控制器的某個方法。在本章中,我們將瞭解如何在 Zend Framework 中實現路由。
一般來說,任何 URI 都有三個部分:
- 主機名部分,
- 路徑部分,以及
- 查詢部分。
例如,在 URI/URL - http://www.example.com/index?q=data 中,www.example.com是主機名部分,index是路徑部分,q=data是查詢部分。通常,路由會根據一組約束檢查路徑部分。如果任何約束匹配,則它會返回一組值。其中一個主要值是控制器。
路由還會在某些情況下檢查主機部分、查詢部分、請求 HTTP 方法、請求 HTTP 標頭等。
路由和路由棧
路由是路由中的主要物件。Zend Framework 為路由物件提供了一個特殊的介面RouteInterface。所有路由物件都需要實現 RouteInterface。RouteInterface 的完整列表如下:
namespace Zend\Mvc\Router;
use Zend\Stdlib\RequestInterface as Request;
interface RouteInterface {
   public static function factory(array $options = []);
   public function match(Request $request);
   public function assemble(array $params = [], array $options = []);
}
主要方法是match。此 match 方法根據其中定義的約束檢查給定的請求。如果找到任何匹配項,則它會返回RouteMatch物件。此 RouteMatch 物件提供匹配請求的詳細資訊作為引數。這些引數可以使用getParams方法從RouteObject中提取。
RouteObject 的完整列表如下:
namespace Zend\Mvc\Router;
class RouteMatch {
   public function __construct(array $params);
   public function setMatchedRouteName($name);
   public function getMatchedRouteName();
   public function setParam($name, $value);
   public function getParams();
   public function getParam($name, $default = null);
}
通常,一個典型的 MVC 應用程式有很多路由。每個路由將按後進先出 (LIFO) 順序處理,並且將匹配並返回單個路由。如果沒有任何路由匹配/返回,則應用程式將返回“頁面未找到”錯誤。Zend Framework 提供了一個處理路由的介面RouteStackInterface。此 RouteStackInterface 具有新增/刪除路由的選項。
RouteStackInterface 的完整列表如下:
namespace Zend\Mvc\Router;
interface RouteStackInterface extends RouteInterface {
   public function addRoute($name, $route, $priority = null);
   public function addRoutes(array $routes);
   public function removeRoute($name);
   public function setRoutes(array $routes);
}
Zend 框架提供了RouteStack介面的兩個實現,它們分別是:
- SimpleRouteStack
- TreeRouteStack
路由型別
Zend 框架為“Zend\Mvc\Router\Http”名稱空間下的所有情況提供了許多現成的路由物件。為給定情況選擇和使用正確的路由物件就足夠了。
可用的路由如下:
Hostname - 用於匹配 URI 的主機部分。
Literal - 用於匹配精確的 URI。
Method - 用於匹配傳入請求的 HTTP 方法。
Part - 使用自定義邏輯匹配 URI 路徑部分。
Regex - 使用正則表示式模式匹配 URI 路徑部分。
Schema - 用於匹配 URI 方案,例如 http、https 等。
Segment - 用於透過將其拆分為多個部分來匹配 URI 路徑。
讓我們看看如何編寫最常用的文字和分段路由。路由通常在每個模組的配置檔案 - module.config.php 中指定。
文字路由
通常,路由按後進先出 (LIFO) 順序查詢。文字路由用於對 URI 路徑進行精確匹配。
其定義如下:
$route = Literal::factory(array(
   'route' => '/path',
   'defaults' => array('controller' => 'Application\Controller\IndexController',
      'action' => 'index',),
));
以上路由匹配請求 url 中的/path,並返回index作為操作和IndexController作為控制器。
分段路由
當您的 url 應該包含可變引數時,使用分段路由。
其描述如下:
$route = Segment::factory(array(
   'route' => '/:controller[/:action]',
   'constraints' => array(
      'controller' => '[a-zA-Z][a-zA-Z0-9_-]+',
      'action' => '[a-zA-Z][a-zA-Z0-9_-]+',
   ),
   'defaults' => array(
      'controller' => 'Application\Controller\IndexController',
      'action' => 'index',),
));
這裡,分段由冒號表示,後跟字母數字字元。如果您將某個分段設定為可選,則將其括在方括號中。每個分段可能與其關聯的約束。每個約束都是一個正則表示式。
在 Tutorial 模組中配置路由
讓我們在我們的 Tutorial 模組中新增一個分段路由。更新 Tutorial 模組配置檔案 - module.config.php(位於myapp/module/Tutorial/config)。
<?php
namespace Tutorial;
use Zend\ServiceManager\Factory\InvokableFactory;
use Zend\Router\Http\Segment;
return [
   'controllers' => [
      'factories' => [
         Controller\TutorialController::class => InvokableFactory::class,
      ],
   ],
   'router' => [
      'routes' => [
         'tutorial' => [
            'type'    => Segment::class,
               'options' => [
                  'route' => '/tutorial[/:action[/:id]]',
                  'constraints' => [
                     'action' => '[a-zA-Z][a-zA-Z0-9_-]*',
                     'id'     => '[0-9]+',
                  ],
                  'defaults' => [
                     'controller' => Controller\TutorialController::class,
                     'action'     => 'index',
                  ],
               ],
            ],
      ],
   ],
   'view_manager' => [
      'template_path_stack' => ['tutorial' => __DIR__ . '/../view',],
   ],
];
我們已成功為Tutorial模組添加了路由。我們距離完成 Tutorial 模組只有一步之遙。我們需要為我們的模組新增檢視,我們將在後續章節中學習。
Zend Framework - 檢視層
檢視層是 MVC 應用程式的表示層。它將應用程式邏輯與表示邏輯分離。在典型的 PHP Web 應用程式中,所有業務邏輯和設計都混合在一起。混合可以在小型專案中實現更快的開發。但是,它在大規模專案中慘敗,在大規模專案中涉及許多高階架構。要更改 Web 應用程式的設計,開發人員也需要處理業務邏輯。這可能很災難性,導致業務邏輯中斷。
Zend Framework 提供了一個經過深思熟慮、簡潔、靈活且可擴充套件的檢視層。檢視層作為單獨的模組Zend/View提供,並與Zend/Mvc模組完美整合。Zend 檢視層被分為多個元件,彼此很好地互動。
其各種元件如下:
變數容器 - 儲存檢視層的資料。
檢視模型 - 儲存變數容器和設計模板。
渲染器 - 處理來自檢視模型的資料和模板,並輸出設計表示,可能是最終的 html 輸出。
解析器 - 以渲染器可以使用的形式解析檢視模型中可用的模板。
檢視 (Zend\View\View) − 將請求對映到渲染器,然後將渲染器對映到響應。
渲染策略 − 檢視用來將請求對映到渲染器的。
響應策略 − 檢視用來將渲染器對映到響應的。
檢視層,View 處理 ViewModel,使用 Resolver 解析模板,使用 Rendering Strategy 渲染它,最後使用 Response Renderer 輸出它。
檢視層配置
像控制器一樣,檢視層可以在模組的配置檔案中配置,稱為 – module.config.php。主要配置是指定模板將放置的位置。這可以透過在“module.config.php”中新增以下配置來實現。
'view_manager' => [
   'template_path_stack' => ['tutorial' => __DIR__ . '/../view',],
]
預設情況下,檢視層對其所有元件都有預設行為。例如,ViewModel 根據“小寫模組名/小寫控制器名/小寫動作名”規則在模板根目錄中解析控制器動作的模板名稱。但是,這可以透過 ViewModel 的 setTemplate() 方法覆蓋。
控制器和檢視層
預設情況下,控制器不需要向檢視層傳送任何資料。將模板寫入正確的位置就足夠了。
例如,在我們的示例中,TutorialController,模板需要放置在 myapp/module/Tutorial/view/tutorial/tutorial/index.phtml。index.phtml 指的是基於 PHP 的模板,它將由 PHPRenderer 渲染。還有其他渲染器,例如 JsonRenderer 用於 json 輸出和 FeedRenderer 用於 rss 和 atom 輸出。
完整的列表如下所示:
<?php
namespace Tutorial\Controller;
use Zend\Mvc\Controller\AbstractActionController;
use Zend\View\Model\ViewModel;
class TutorialController extends AbstractActionController {
   public function indexAction() {
   }
}
Zend 應用程式模板
<div class = "row content">
   <h3>This is my first Zend application</h3>
</div>
最後,我們已成功完成了 Tutorial 模組,我們可以使用 url 訪問它 – https://:8080/tutorial。
將資料傳遞到檢視層
將資料傳送到檢視層最簡單的方法是使用 ViewModel 引數。修改後的 indexAction 方法如下所示:
public function indexAction() {
   $view = new ViewModel([
      'message' => 'Hello, Tutorial'
   ]);
   return $view;
}
現在,修改 index.phtml 檔案如下:
<div class = "row content">
   <h3>This is my first Zend application</h3>
   <h4><?php echo $this->message?></h4>
</div>
檢視助手
檢視助手用於編寫小的、原子化的函式,以便在模板中使用。Zend 框架提供了一個介面,Zend\View\Helper\HelperInterface 用於編寫標準的檢視助手。
HelperInterface 只有兩個方法,
setView() − 此方法接受 Zend\View\Renderer\RendererInterface 例項/實現。
getView() − 用於檢索該例項。
HelperInterface 的完整程式碼列表如下:
namespace Zend\View\Helper;
use Zend\View\Renderer\RendererInterface as Renderer;
interface HelperInterface {
   /**
      * Set the View object
      *
      * @param  Renderer $view
      * @return HelperInterface
   */
   public function setView(Renderer $view);
   /**
      * Get the View object
      *
      * @return Renderer
   */
   public function getView();
}
要在檢視指令碼中使用助手,請使用 $this->helperName() 訪問它。
內建助手
Zend Framework 為各種目的提供了許多內建的助手函式。zend-mvc 中提供的一些檢視助手如下:
URL
URL 助手用於生成與應用程式中定義的路由匹配的 URL。
URL 助手的定義為:
$this->url($name, $params, $options, $reuseMatchedParameters)
例如,在 tutorial 模組中,路由名為 tutorial,它有兩個引數 action 和 id。我們可以使用 URL 助手生成兩個不同的 URL,如下所示:
<a href = "<? = $this->url('tutorial'); ?>">Tutorial Index</a>
<a href = "<? = $this->url('tutorial', ['action' => 'show', 'id' =>10]); ?>">
   Details of Tutorial #10
</a>
結果將如下所示:
<a href = "/tutorial">Tutorial Index</a>
<a href = "/tutorial/show/10"> Details of Tutorial #10</a>
佔位符
佔位符助手用於在檢視指令碼和檢視例項之間保留內容。它提供了最初設定資料然後在後續階段使用它的選項。
例如,我們可以設定“公司名稱”,然後在所有其他地方使用它。
<?php $this->placeholder('companyname')->set("TutorialsPoint") ?>
<?= $this->placeholder('companyname'); ?>
佔位符提供了一些高階選項,可以從 PHP 陣列和物件生成複雜內容。它還可以選擇捕獲模板本身的某些部分。
例如,以下程式碼捕獲中間的模板結果並將其儲存在 productlist 佔位符中。
類 – 產品
class Product {
   public $name;
   public $description;
}
控制器
$p1 = new Product();
$p1->name = 'Car';
$p1->description = 'Car';
$p2 = new Product();
$p2->name = 'Cycle';
$p2->description = 'Cycle';
$view = new ViewModel(['products' => $products]);
模板
<!-- start capture -->
<?php $this->placeholder('productlist')->captureStart();
   foreach ($this->products as $product): ?>
<div>
   <h2><?= $product->name ?></h2>
   <p><?= $product->description ?></p>
</div>
<?php endforeach; ?>
<?php $this->placeholder('productlist')->captureEnd() ?>
<!-- end capture -->
<?= $this->placeholder('productlist') ?>
結果
<div class = "foo">
   <h2>Car</h2>
   <p>Car</p>
</div>
<div class = "foo">
   <h2>Cycle</h2>
   <p>Cycle</p>
</div>
文件型別
Doctype 助手用於生成各種 html 文件型別。它是 Placeholder 助手 的具體實現。文件型別可以在引導檔案和配置檔案中設定。
基本用法如下所示:
應用程式引導檔案
use Zend\View\Helper\Doctype;
$doctypeHelper = new Doctype();
$doctypeHelper->doctype('XHTML5');
模組配置
// module/Application/config/module.config.php:
return [
   /* ... */
   'view_manager' => [
      'doctype' => 'html5',
      /* ... */
   ],
];
模板
<?php echo $this->doctype() ?>
HeadTitle
HeadTitle 助手用於生成 html 標題元素。它是 Placeholder 助手 的具體實現。Zend 提供了一個選項可以在模組配置檔案中設定標題,並且可以在任何級別設定,例如站點、模組、控制器、動作等。HeadTitle 的部分程式碼如下:
模組
headTitleHelper->append($action);
$headTitleHelper->append($controller);
$headTitleHelper->append($module);
$headTitleHelper->append($siteName);
模板
<?= $this->headTitle() ?>
結果
action - controller - module - Zend Framework
HeadMeta
HeadMeta 助手用於生成 html 元標記。它是 Placeholder 助手 的具體實現。
模板 −
<?php
   $this->headMeta()->appendName('keywords', 'turorialspoint, zend framework, php');
   echo $this->headMeta()
?>
結果
<meta name = "keywords" content = "tutorialspoint, zend framework, php" />
HeadLink
HeadLink 助手用於生成包含外部資源的 html 連結。它是 Placeholder 助手 的具體實現。
模板
<?php
   // setting links in a view script:
   $this->headLink(['rel' => 'icon', 'href' => '/img/favicon.ico'], 'PREPEND')
      ->appendStylesheet('/styles/site.css')
      ->prependStylesheet('/styles/mystyle.css', 'screen', true, ['id' => 'mystyle']);

   // rendering the links from the layout:
   echo $this->headLink();
?>
結果
<link href = "/styles/mystyle.css" media = "screen" rel = "stylesheet"
   type = "text/css" id = "mystyle">
<link href = "/img/favicon.ico" rel = "icon">
<link href = "/styles/site.css" media = "screen" rel = "stylesheet" type = "text/css">
HeadStyle
HeadStyle 助手用於生成內聯 CSS 樣式。它是 Placeholder 助手 的具體實現。
模板
<?php $this->headStyle()->appendStyle($styles); ?>
<?php echo $this->headStyle() ?>
HeadScript
HeadScript 用於生成內聯指令碼或包含外部指令碼。它是 Placeholder 助手 的具體實現。
模板
<? $this->headScript()->appendFile(‘/js/sample.js’);?>
<?php echo $this->headScript() ?>
InlineScript
InlineScript 用於在 html 模板的頭部和主體部分生成指令碼。它派生自 HeadScript。
HTMLList
HTMLList 用於生成有序和無序列表。HTMLList 的定義如下:
定義
htmlList($items, $ordered, $attribs, $escape)
模板
$items = [
   '2015',
   ['March', 'November'],
   '2016',
];
echo $this->htmlList($items);
結果
<ul>
   <li>2015
      <ul>
         <li>March</li>
         <li>November</li>
      </ul>
   </li>
   <li>2016</li>
</ul>
迴圈
迴圈用於在迴圈環境中生成備選方案。它有 assign、next 和 prev 函式。
控制器
$view = new ViewModel(['message' => 'Hello, Tutorial', 'data' => array('One', 'Two')]);
模板
<?php $this->cycle()->assign(['#F0F0F0', '#FFF'], 'colors'); ?>

<table>
   <?php foreach ($this->data as $datum): ?>
   <tr style = "background-color: <?= $this->cycle()->setName('colors')>next() ?>">
      <td><?= $this->escapeHtml($datum) ?></td>
   </tr>
   <?php endforeach ?>
</table>
結果
<table>
   <tr style = "background-color: #F0F0F0">
      <td>One</td>
   </tr>
   <tr style = "background-color: #FFF">
      <td>Two</td>
   </tr>
</table>
其他一些重要的內建助手如下:
BasePath − BasePath 用於生成應用程式根目錄的 public 資料夾的路徑。
Partial − Partial 用於在其自己的變數作用域中渲染特定模板。
PartialLoop − PartialLoop 類似於 Partial,但在迴圈環境中使用。
Identity − Identity 用於從身份驗證服務中檢索已登入使用者的身份。
JSON − JSON 在 restful 環境中使用,其中輸出為 JSON 格式。它發出正確的 HTTP 標頭並停用佈局概念。
Zend Framework 中還有許多其他助手,例如 i18n 助手、表單助手、分頁助手、導航助手等。
建立檢視助手
Zend Framework 提供了一個內建的 AbstractHelper 實現 HelperInterface 來編寫檢視助手。
編寫新助手的步驟如下:
步驟 1 − 擴充套件類 Zend\View\Helper\AbstractHelper。
步驟 2 − 覆蓋 __invoke() 函式。
步驟 3 − 在 module.config.php 檔案 中設定配置。
步驟 4 − 在檢視指令碼中使用檢視助手。
現在讓我們建立一個 TestHelper
在 myapp/module/Tutorial/src/View 目錄 中建立 Helper 資料夾。在 Helper 目錄中編寫 TestHelper,TestHelper.php。
完整的列表如下所示:
<?php
namespace Tutorial\View\Helper;
use Zend\View\Helper\AbstractHelper;
class TestHelper extends AbstractHelper {
   public function __invoke() {
      $output = "I am from test helper";
      return htmlspecialchars($output, ENT_QUOTES, 'UTF-8');
   }
}
在 module.config.php 中設定配置。
'view_helpers' => [
   'aliases' => [
      'testHelper' => View\Helper\TestHelper::class,
   ],
   'factories' => [
      View\Helper\TestHelper::class => InvokableFactory::class,
   ],
],
在 about 檢視指令碼中使用新建立的 TestHelper。
<?= $this->testHelper() ?>
Zend Framework - 佈局
佈局表示多個檢視的公共部分,例如頁面標題和頁尾。預設情況下,佈局應儲存在 view/layout 資料夾中。
佈局配置在模組的 module.config.php 中的 view_manager 部分下定義。
骨架應用程式的預設配置如下:
'view_manager' => array(
   'display_not_found_reason' => true,
   'display_exceptions' => true,
   'doctype' => 'HTML5',
   'not_found_template' => 'error/404',
   'exception_template' => 'error/index',
   'template_map' => array(
      'layout/layout' => __DIR__ . '/../view/layout/layout.phtml',
      'application/index/index' => __DIR__ . '/../view/application/index/index.phtml',
      'error/404' => __DIR__ . '/../view/error/404.phtml',
      'error/index' => __DIR__ . '/../view/error/index.phtml',
   ),
   'template_path_stack' => array(
   __DIR__ . '/../view',
),
這裡,template_map 用於指定佈局。如果找不到佈局,則它將返回錯誤。讓我們看看骨架應用程式的主要佈局。
Layout.phtml
<?= $this->doctype() ?>
<html lang = "en">
   <head>
      <meta charset = "utf-8">
      <?= $this->headTitle('ZF Skeleton Application')->setSeparator(' - ')>
         setAutoEscape(false) ?>
      <?= $this->headMeta()
         ->appendName('viewport', 'width = device-width, initial-scale = 1.0')
         ->appendHttpEquiv('X-UA-Compatible', 'IE = edge')
      ?>

      <!-- Le styles -->
      <?= $this->headLink(['rel' => 'shortcut icon', 'type' =>
         'image/vnd.microsoft.icon',
         'href' => $this->basePath() . '/img/favicon.ico'])
         ->prependStylesheet($this->basePath('css/style.css'))
         ->prependStylesheet($this->basePath('css/bootstraptheme.min.css'))
         ->prependStylesheet($this->basePath('css/bootstrap.min.css'))
      ?>

      <!-- Scripts -->
      <?= $this->headScript()
         ->prependFile($this->basePath('js/bootstrap.min.js'))
         ->prependFile($this->basePath('js/jquery-3.1.0.min.js'))
      ?>
   </head>

   <body>
      <nav class = "navbar navbar-inverse navbar-fixed-top" role = "navigation">
         <div class = "container">
            <div class = "navbar-header">
               <button type = "button" class = "navbar-toggle" data-
                  toggle = "collapse" data-target = ".navbar-collapse">
                  <span class = "icon-bar"></span>
                  <span class = "icon-bar"></span>
                  <span class = "icon-bar"></span>
               </button>

               <a class = "navbar-brand" href = "<?= $this->url('home') ?>">
                  <img src = "<?= $this->basePath('img/zf-logo-mark.svg') ?>
                     " height = "28" alt = "Zend Framework <?= \Application\Module::
                     VERSION ?>"/> Skeleton Application
               </a>
            </div>

            <div class = "collapse navbar-collapse">
               <ul class = "nav navbar-nav">
                  <li class = "active"><a href = "<?=
                     $this->url('home') ?>">Home</a></li>
               </ul>
            </div>
         </div>
      </nav>

      <div class = "container">
         <?= $this->content ?>
         <hr>
         <footer>
            <p>© 2005 - <?= date('Y') ?> by Zend Technologies Ltd.
               All rights reserved.</p>
         </footer>
      </div>
      <?= $this->inlineScript() ?>
   </body>
</html>
當您分析佈局時,它主要使用我們在上一章中討論的檢視助手。當我們仔細觀察時,佈局使用了一個特殊的變數 $this->content。此變數很重要,因為它將被實際請求頁面的檢視指令碼(模板)替換。
建立新的佈局
讓我們為我們的 Tutorial 模組建立一個新的佈局。
首先,讓我們在“public/css”目錄下建立一個 tutorial.css 檔案。
 body {
   background-color: lightblue;
}
h1 {
   color: white;
   text-align: center;
}
在 /myapp/module/Tutorial/view/layout/ 中建立一個新的佈局檔案 newlayout.phtml,並從現有佈局中複製內容。然後,使用 HeadLink 助手類在佈局頭部部分新增 tutorial.css 樣式表。
<?php echo $this->headLink()->appendStylesheet('/css/tutorial.css');?>
使用 URL 助手在導航部分新增一個新的 about 連結。
<li><a href = "<?= $this->url('tutorial', ['action' => 'about']) ?>">About</a></li>
此佈局頁面是 tutorial 模組應用程式的通用頁面。更新 tutorial 模組配置檔案的 view_manager 部分。
'view_manager' => array(
   'template_map' => array(
      'layout/layout' => __DIR__ . '/../view/layout/newlayout.phtml'),
   'template_path_stack' => array('tutorial' => __DIR__ . '/../view',),
)
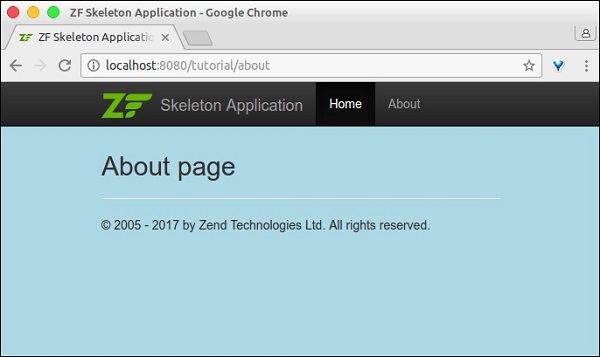
在 TutorialController 中新增 aboutAction 函式。
 public function aboutAction() {
}
在 myapp/module/Tutorial/view/tutorial/tutorial/ 中新增 about.phtml,內容如下。
<h2>About page</h2>
現在,您可以準備執行應用程式了 – https://:8080/tutorial/about.
Zend Framework - 模型和資料庫
在本章中,我們將討論 Zend Framework 的各種模型和資料庫。
Zend Framework 中的模型
模型定義了應用程式的邏輯資料表示。例如,在購物車應用程式中 – 產品、客戶、購物車和訂單是模型。它們定義了其所持實體的屬性。模型的一些概念如下:
控制器與模型通訊並要求它們檢索它們需要的資訊。然後,控制器將檢索到的資訊傳遞給檢視。最後,檢視將模型呈現為使用者可消費的表示資料。
模型直接與檢視互動的情況非常少見,但有時可能會發生。
模型可以相互通訊,並且不是自包含的。它們彼此之間存在關係。這些關係使控制器更容易、更快速地獲取資訊,因為它不必與不同的模型互動;模型本身可以做到這一點。
讓我們看一下一個簡單的模型 – MyModel
<?php
namespace Tutorial\Model;
class Book {
   public $id;
   public $author;
   public $title;
}
Zend Framework 中的資料庫
Zend 框架提供了一個簡單且功能豐富的類,Zend\Db\TableGateway\TableGateway,用於查詢、插入、更新和刪除資料庫表中的資料。
讓我們看看如何透過以下步驟透過 PHP 的 PDO 驅動程式在 Zend 框架中連線 MySqlservice。
步驟 1:在 MySQL 中建立資料庫
在本地 MySQL 伺服器中建立資料庫 tutorials。我們可以為此目的使用 phpmyadmin 或任何其他 MySQL GUI 工具。讓我們在命令提示符中使用 MySQL 客戶端。連線到 mysql 伺服器並執行以下命令以建立 tutorial 資料庫。
create database tutorials
步驟 2:在 tutorials 資料庫中建立表
現在讓我們使用以下 SQL 命令在 tutorials 資料庫中建立一個名為 book 的資料庫。
use tutorials;
CREATE TABLE book (
   id int(11) NOT NULL auto_increment,
   author varchar(100) NOT NULL,
   title varchar(100) NOT NULL,
   PRIMARY KEY (id)
);
步驟 3:在 book 表中填充資料
使用示例資料填充 book 表。使用以下 SQL 命令。
INSERT INTO book (author, title) VALUES ('Dennis Ritchie', 'C Programming');
INSERT INTO book (author, title) VALUES ('James gosling', 'Java Programming');
INSERT INTO book (author, title) VALUES ('Rasmus Lerdorf', 'Programming PHP');
步驟 4:更新資料庫連線
更新全域性配置檔案,即 – myapp/config/autoload/global.php,並提供必要的資料庫驅動資訊。
<?php
return array(
   'db' => array(
      'driver' => 'Pdo',
      'dsn' => 'mysql:dbname = tutorials;host = localhost',
      'driver_options' => array(
         PDO::MYSQL_ATTR_INIT_COMMAND => 'SET NAMES \'UTF8\''
      ),
   ),
   'service_manager' => array(
      'factories' => array(
         'Zend\Db\Adapter\Adapter' => 'Zend\Db\Adapter\AdapterServiceFactory',
      ),
   ),
);
步驟 5:更新資料庫憑據
在本地配置檔案中更新資料庫憑據,該檔案為 – myapp/config/autoload/local.php。透過這種方式,我們可以分離本地和生產環境的資料庫連線憑據。
<?php
return array(
   'db' => array(
      'username' => '<user_name>',
      'password' => '<password>',
   ),
);
步驟 6:建立圖書模型
讓我們在模組 src 目錄中建立一個名為 Book 的模型。通常,模型會被分組到 Model 資料夾下 – /myapp/module/Tutorial/src/Model/Book.php。
<?php
namespace Tutorial\Model;
class Book {
   public $id;
   public $author;
   public $title;
}
步驟 7:在圖書模型中實現 exchangeArray
TableGateway 透過 exchangeArray 函式與模型進行互動。exchangeArray 函式的標準引數是儲存為 PHP 陣列的資料庫結果集。使用 exchangeArray 函式,可以輕鬆地將模型的屬性與相應的資料庫表同步。
更新模型 Book,如下所示:
<?php
namespace Tutorial\Model;
class Book {
   public $id;
   public $author;
   public $title;
   public function exchangeArray($data) {
      $this->id = (!empty($data['id'])) ? $data['id'] : null;
      $this->Author = (!empty($data['author'])) ? $data['author'] : null;
      $this->Title = (!empty($data['title'])) ? $data['title'] : null;
   }
}
步驟 8:使用 TableGateway 獲取圖書
建立一個名為 BookTable 的類,用於從資料庫中獲取圖書資訊。在 Model 資料夾中建立 BookTable 類。
<?php
namespace Tutorial\Model;
use Zend\Db\TableGateway\TableGatewayInterface;
class BookTable {
   protected $tableGateway;
   public function __construct(TableGatewayInterface $tableGateway) {
      $this->tableGateway = $tableGateway;
   }
   public function fetchAll() {
      $resultSet = $this->tableGateway->select();
      return $resultSet;
   }
}
我們使用了 TableGateway 類的 select() 方法從資料庫中獲取圖書資訊。但是,我們在程式碼中沒有使用任何對 book 表的引用。TableGateway 本質上是通用的,它可以透過某些配置從任何表中獲取資料。通常,這些配置是在 module.config.php 檔案中完成的,我們將在後續步驟中討論。
步驟 9:配置 BookTable 類
使用 getServiceConfig() 方法更新教程模組的 Module.php。
<?php
namespace Tutorial;
use Zend\Db\Adapter\AdapterInterface;
use Zend\Db\ResultSet\ResultSet;
use Zend\Db\TableGateway\TableGateway;
use Zend\ModuleManager\Feature\ConfigProviderInterface;

class Module implements ConfigProviderInterface {

   public function getConfig() {
      return include __DIR__ . '/../config/module.config.php';
   }
   public function getServiceConfig() {
      return [
         'factories' => [
            Model\BookTable::class => function ($container) {
               $tableGateway = $container->get(Model\BookTableGateway::class);
               $table = new Model\BookTable($tableGateway);
               return $table;
            },
            Model\BookTableGateway::class => function ($container) {
               $dbAdapter = $container->get(AdapterInterface::class);
               $resultSetPrototype = new ResultSet();
               $resultSetPrototype->setArrayObjectPrototype(new Model\Book());
               return new TableGateway('book', $dbAdapter, null, $resultSetPrototype);
            },
         ],
      ];
   }
}
在這裡,我們使用服務管理器註冊了 BookTable 類。BookTable 類用於獲取圖書資訊,透過註冊它,我們可以在任何需要的地方訪問它。由於註冊的服務是共享的,因此它們可以提高效能,減少記憶體消耗等。
另一個專案 Model\BookTableGateway::class 是專門用於 Book 模型的 TableGateway 物件,並且是 BookTable 的依賴項。
步驟 10:更新 TutorialController 配置
我們需要在教程控制器中使用 BookTable 服務來獲取圖書資訊。要獲取 BookTable 服務,請將其作為建構函式依賴項註冊到 TutorialController 中。
此建構函式依賴項有助於在控制器本身處於初始化階段時獲取 BookTable 服務。更新教程模組配置的控制器部分,即 module.config.php,如下所示。
'controllers' => [
   'factories' => [
      Controller\TutorialController::class => function($container) {
         return new Controller\TutorialController(
            $container->get(Model\BookTable::class)
         );
      },
   ],
],
步驟 11:更新 Tutorial Controller
這可以透過遵循以下三個步驟來完成。
- 新增以 BookTable 作為引數的建構函式。
private $table;
public function __construct(BookTable $table) {
   $this->table = $table;
}
使用 BookTable 的 fetchAll() 方法獲取圖書資訊,並將其註冊到檢視中。
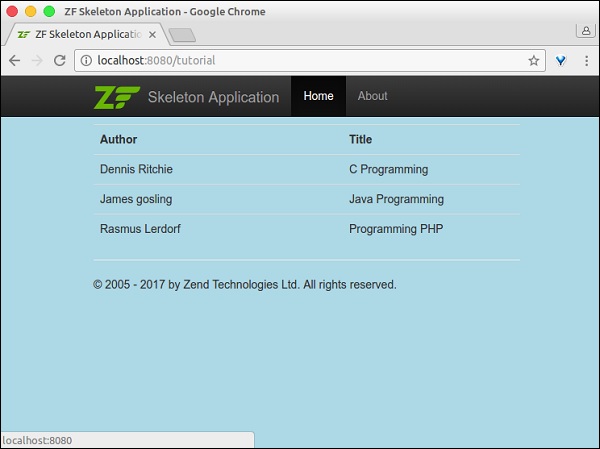
public function indexAction() {
   $view = new ViewModel([
      'data' => $this->table->fetchAll(),
   ]);
   return $view;
}
在檢視指令碼中顯示圖書資訊。
<table class = "table">
   <tr>
      <th>Author</th>
      <th>Title</th>
      <th> </th>
   </tr>
   <?php foreach ($data as $sampledata) : ?>
   <tr>
      <td><?php echo $this->escapeHtml($data->author);?></td>
      <td><?php echo $this->escapeHtml($data->title);?></td>
   </tr>
   <?php endforeach ?>
</table>
步驟 12:執行應用程式
透過執行以下命令檢查應用程式:https://:8080/tutorial。
Zend Framework - 不同的資料庫
如上一章所述,Zend 框架提供了一種使用 資料庫驅動程式 概念通用訪問資料庫的方法。與資料庫的互動完全取決於驅動程式資訊,因此,連線到不同的資料庫只需更改驅動程式資訊即可。
現在讓我們將 book 示例更改為連線到 postgresql 資料庫,並遵循以下步驟。
步驟 1 - 使用以下命令在本地 postgresql 資料庫中建立一個名為 tutorials 的資料庫:
CREATE DATABASE tutorials
步驟 2 - 新增 book 表。切換到新資料庫並執行表建立指令碼。
\c tutorials
CREATE TABLE book (
   id SERIAL NOT NULL,
   author varchar(100) NOT NULL,
   title varchar(100) NOT NULL,
   PRIMARY KEY (id)
);
步驟 3 - 使用以下指令碼新增示例圖書資訊:
INSERT INTO book (author, title) VALUES ('Dennis Ritchie', 'C Programming');
INSERT INTO book (author, title) VALUES ('James gosling', 'Java Programming');
INSERT INTO book (author, title) VALUES ('Rasmus Lerdorf', 'Programming PHP');
步驟 4 - 更改 global.config 檔案中的驅動程式資訊。
<?php
return array (
   'db' => array (
      'driver' => 'Pdo',
      'dsn' => 'pgsql:dbname = tutorials;host = localhost',
      'driver_options' => array (
      ),
   ),
);
步驟 5 - 更改 local.config 檔案中的資料庫憑據。
return array (
   'db' => array(
      'username' => '<username>',
      'password' => '<password>',
   ),
);
步驟 6 - 最後,執行應用程式 https://:8080/tutorial。結果與 MySQL 應用程式相同。
Zend Framework - 表單和驗證
Zend Framework 提供了一個單獨的元件 zend-form 來加速表單建立和驗證過程。它連線模型和檢視層。它提供了一組表單元素,可以從預定義的模型中建立完整的 html 表單,一個 InputFilter 類來根據表單驗證模型,以及將資料從表單繫結到模型並反之亦然的功能。
安裝表單元件
可以使用以下指定的 Composer 命令安裝 Zend 表單元件:
composer require zendframework/zend-form
Zend 表單框架有三個子元件來管理表單。它們在下面詳細解釋:
元素 - 用於定義對映到模型中屬性的單個 html 輸入控制元件。
欄位集 - 用於以巢狀方式對元素和其他 欄位集 進行分組。
表單 - 用於建立 html 表單,幷包含元素和欄位集。
Zend 表單通常在 module//src/Form 目錄下建立。
示例
現在讓我們建立一個簡單的表單來將 book 新增到資料庫中。為此,我們應該遵循以下步驟:
步驟 1:建立 BookForm
在 *myapp/module/Tutorial/src/Form” 目錄下建立“BookForm.php”。在檔案中新增以下更改:
<?php
namespace Tutorial\Form;
use Zend\Form\Form;

class BookForm extends Form {

   public function __construct($name = null) {
      parent::__construct('book');
      $this->add(array(
         'name' => 'id',
         'type' => 'Hidden',
      ));
      $this->add(array(
         'name' => 'author',
         'type' => 'Text',
         'options' => array(
            'label' => 'Author',
         ),
      ));
      $this->add(array(
         'name' => 'title',
         'type' => 'Text',
         'options' => array(
            'label' => 'Title',
         ),
      ));
      $this->add(array(
         'name' => 'submit',
         'type' => 'Submit',
         'attributes' => array(
            'value' => 'Go',
            'id' => 'submitbutton',
         ),
      ));
   }
}
Form 類提供了一個 add 方法來對映模型及其對應的表單詳細資訊。我們透過擴充套件 Form 類建立了 BookForm,並添加了 Book 模型的表單詳細資訊。
步驟 2:更新圖書模型 Book.php
更新模型 ‘Book’,新增過濾器和驗證,如下所示:
<?php
namespace Tutorial\Model;
use Zend\InputFilter\InputFilterInterface;
use Zend\InputFilter\InputFilterAwareInterface;
use Zend\InputFilter\InputFilter;

class Book implements InputFilterAwareInterface {
   public $id;
   public $author;
   public $title;
   protected $inputFilter;
   public function setInputFilter(InputFilterInterface $inputFilter) {
      throw new \Exception("Not used");
   }
   public function getInputFilter() {
      if (!$this->inputFilter) {
         $inputFilter = new InputFilter();
         $inputFilter->add(array(
            'name' => 'id',
            'required' => true,
            'filters' => array(
               array('name' => 'Int'),
            ),
         ));
         $inputFilter->add(array(
            'name' => 'author',
            'required' => true,
            'filters' => array(
               array('name' => 'StripTags'),
               array('name' => 'StringTrim'),
            ),
            'validators' => array(
               array(
                  'name' => 'StringLength',
                  'options' => array(
                     'encoding' => 'UTF-8',
                     'min' => 1,
                     'max' => 100,
                  ),
               ),
            ),
         ));
         $inputFilter->add(array(
            'name' => 'title',
            'required' => true,
            'filters' => array(
               array('name' => 'StripTags'),
               array('name' => 'StringTrim'),
            ),
            'validators' => array(
               array(
                  'name' => 'StringLength',
                  'options' => array(
                     'encoding' => 'UTF-8',
                     'min' => 1,
                     'max' => 100,
                  ),
               ),
            ),
         ));
         $this->inputFilter = $inputFilter;
      }
      return $this->inputFilter;
   }
   public function exchangeArray($data) {
      $this->id = (!empty($data['id'])) ? $data['id'] : null;
      $this->author = (!empty($data['author'])) ? $data['author'] : null;
      $this->title = (!empty($data['title'])) ? $data['title'] : null;
   }
}
每個模型都應該實現 InputFilterAwareInterface。InputFilterAwareInterface 提供了兩個方法,setInputFilter() 和 getInputFilter()。
getInputFilter 用於獲取模型的驗證詳細資訊。Zend 框架提供了一套豐富的過濾器和驗證器來驗證表單。在圖書模型中使用的一些過濾器和驗證器如下:
StripTags - 刪除不需要的 HTML。
StringTrim - 刪除不必要的空格。
StringLength 驗證器 - 確保使用者輸入的字元數不超過指定的限制。
步驟 3:更新 BookTable 類
包含 saveBook 方法以將圖書新增到資料庫。
BookTable.php
<?php
namespace Tutorial\Model;
use Zend\Db\TableGateway\TableGatewayInterface;

class BookTable {
   protected $tableGateway;
   public function __construct(TableGatewayInterface $tableGateway) {
      $this->tableGateway = $tableGateway;
   }
   public function fetchAll() {
      $resultSet = $this->tableGateway->select();
      return $resultSet;
   }
   public function getBook($id) {
      $id  = (int) $id;
      $rowset = $this->tableGateway->select(array('id' => $id));
      $row = $rowset->current();
      if (!$row) {
         throw new \Exception("Could not find row $id");
      }
      return $row;
   }
   public function saveBook(Book $book) {
      $data = array (
         'author' => $book->author,
         'title'  => $book->title,
      );
      $id = (int) $book->id;
      if ($id == 0) {
         $this->tableGateway->insert($data);
      } else {
         if ($this->getBook($id)) {
            $this->tableGateway->update($data, array('id' => $id));
         } else {
            throw new \Exception('Book id does not exist');
         }
      }
   }
}
步驟 4:更新 TutorialController 類
在教程控制器中新增一個新的操作 addAction – myapp/module/Tutorial/src/Controller/TutorialController.php。
public function addAction() {
   $form = new BookForm();
   $form->get('submit')->setValue('Add');
   $request = $this->getRequest();
   if ($request->isPost()) {
      $book = new Book();
      $form->setInputFilter($book->getInputFilter());
      $form->setData($request->getPost());
      if ($form->isValid()) {
         $book->exchangeArray($form->getData());
         $this->bookTable->saveBook($book);

         // Redirect to list of Tutorial
         return $this->redirect()->toRoute('tutorial');
      }
   }
   return array('form' => $form);
}
addAction 方法執行以下過程:
獲取請求物件。
檢查請求的 http 方法是否為 post 方法。
如果請求的 http 方法不是 post,則只渲染模板 add.phtml。
如果請求的 http 方法不是 post,則設定 inputfilter,獲取請求資料並將其設定為 inputfiler。
使用 Form 類的 isValid() 方法檢查表單是否有效。
如果表單無效,則再次渲染模板 add.phtml。
如果表單有效,則將圖書儲存到資料庫中並重定向到主頁。
步驟 5:新增 add.phtml 模板
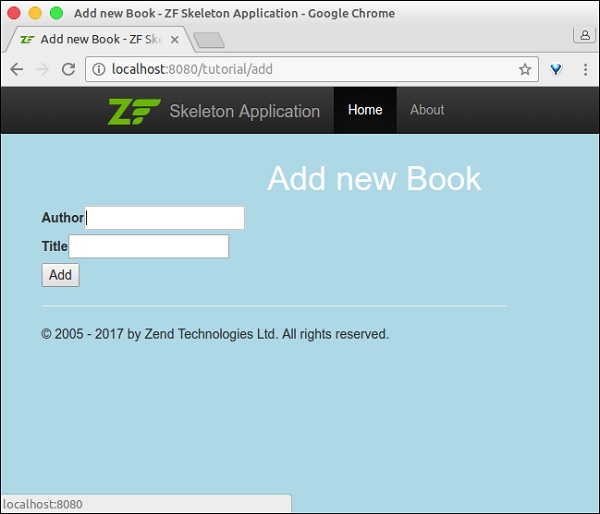
在 myapp/module/Tutorial/view/tutorial/tutorial/add.phtml 下建立一個模板 – add.phtml。
Add.phtml
<?php
$title = 'Add new Book';
$this->headTitle($title);
?>
<h1><?php echo $this->escapeHtml($title); ?></h1>
<?php
if(!empty($form)) {
   $form->setAttribute('action', $this->url('tutorial', array('action' => 'add')));
   $form->prepare();
   echo $this->form()->openTag($form);
   echo $this->formHidden($form->get('id'));
   echo $this->formRow($form->get('author'))."<br>";
   echo $this->formRow($form->get('title'))."<br>";
   echo $this->formSubmit($form->get('submit'));
   echo $this->form()->closeTag();
}
在這裡,我們使用 Form 例項 $form 渲染圖書表單。
步驟 6:執行應用程式
現在,我們可以執行應用程式 – https://:8080/tutorial/add。
表單頁面
驗證錯誤頁面

Zend Framework - 檔案上傳
檔案上傳是表單程式設計中的一個主要概念。Zend 框架提供了透過 zend-form 和 zend-inputfilter 元件上傳檔案所需的所有專案。
FileInput 類
zend-inputfilter 元件提供 Zend\InputFilter\FileInput 類來處理 html 檔案輸入元素 – <input type = 'file' />。FileInput 與其他輸入過濾器類似,但有一些例外。它們如下:
由於 PHP 將上傳的檔案詳細資訊儲存在 $_FILES 全域性陣列中,因此 FileInput 只通過 $_FILES 收集上傳的檔案資訊。
在 FileInput 類處理資料之前需要進行驗證。這與其他輸入過濾器的行為相反。
Zend\Validator\File\UploadFile 是要使用的預設驗證器。UploadFile 驗證檔案輸入詳細資訊。
要在表單中新增檔案上傳型別,我們需要使用輸入型別 File。部分程式碼如下:
$form->add(array(
   'name' => 'imagepath',
   'type' => 'File',
   'options' => array('label' => 'Picture',),
));
檔案上傳中使用的另一個類是 Zend\Filter\File\RenameUpload。RenameUpload 用於將上傳的檔案移動到我們期望的位置。使用檔案過濾器的部分類如下:
$file = new FileInput('imagepath');
$file->getValidatorChain()->attach(new UploadFile());
$file->getFilterChain()->attach(
   new RenameUpload([
      'target'    => './public/tmpuploads/file',
      'randomize' => true,
      'use_upload_extension' => true
   ]));
$inputFilter->add($file);
這裡,RenameUpload 的選項如下:
target - 上傳檔案的目標路徑。
randomize - 新增隨機字串以防止上傳檔案重複。
use_upload_extension - 將上傳檔案的副檔名追加到目標。
檔案上傳 - 工作示例
讓我們修改教程模組幷包含一個圖片上傳功能。
修改資料庫表
讓我們透過執行以下 SQL 命令將 imagepath 列新增到 book 表中:
ALTER TABLE `book` ADD `imagepath` VARCHAR(255) NOT NULL AFTER 'imagepath';
更新 BookForm.php
在圖書表單中新增檔案輸入元素以上傳圖片 – myapp/module/Tutorial/src/Model/BookForm.php。
在 BookForm 類的 __construct 方法中包含以下程式碼。
$this->add(array(
   'name' => 'imagepath',
   'type' => 'File',
   'options' => array ('label' => 'Picture',),
));
更新 Book.php
在 Book 類中進行以下更改 – myapp/module/Tutorial/src/Model/Book.php。
為圖片新增一個新的屬性 imagepath。
public $imagepath;
更新 getInputFilter 方法,如下所示:
為檔案輸入元素新增 FileInput 過濾器。
設定 UploadFile 驗證以驗證檔案輸入元素。
配置 RenameUpload 將上傳的檔案移動到正確的位置。
部分程式碼清單如下:
$file = new FileInput('imagepath');
$file->getValidatorChain()->attach(new UploadFile());
$file->getFilterChain()->attach(
   new RenameUpload([
      'target'    => './public/tmpuploads/file',
      'randomize' => true, 'use_upload_extension' => true
   ]));
$inputFilter->add($file);
更新 exchangeArray 方法以包含 imagepath 屬性。imagepath 可能來自表單或資料庫。如果 imagepath 來自表單,則格式將是一個具有以下規範的陣列:
array(1) {
   ["imagepath"] => array(5) {
      ["name"]     => string "myimage.png"
      ["type"]     => string "image/png"
      ["tmp_name"] => string
         "public/tmpuploads/file_<random_string>.<image_ext>"
      ["error"]    => int <error_number>
      ["size"]     => int <size>
   }
}
如果 imagepath 來自資料庫,則它將是一個簡單的字串。解析 imagepath 的部分程式碼清單如下:
if(!empty($data['imagepath'])) {
   if(is_array($data['imagepath'])) {
      $this->imagepath = str_replace("./public", "", $data['imagepath']['tmp_name']);
   } else {
      $this->imagepath = $data['imagepath'];
   }
} else {
   $data['imagepath'] = null;
}
Book 模型的完整程式碼清單如下:
<?php
namespace Tutorial\Model;
use Zend\InputFilter\InputFilterInterface;
use Zend\InputFilter\InputFilterAwareInterface;
use Zend\Filter\File\RenameUpload;
use Zend\Validator\File\UploadFile;
use Zend\InputFilter\FileInput;
use Zend\InputFilter\InputFilter;

class Book implements InputFilterAwareInterface {
   public $id;
   public $author;
   public $title;
   public $imagepath;
   protected $inputFilter;
   public function setInputFilter(InputFilterInterface $inputFilter) {
      throw new \Exception("Not used");
   }
   public function getInputFilter() {
      if (!$this->inputFilter) {
         $inputFilter = new InputFilter();
         $inputFilter->add(array(
            'name' => 'id',
            'required' => true,
            'filters' => array(
               array('name' => 'Int'),
            ),
         ));
         $inputFilter->add(array(
            'name' => 'author',
            'required' => true,
            'filters' => array(
               array('name' => 'StripTags'),
               array('name' => 'StringTrim'),
            ),
            'validators' => array(
               array(
                  'name' => 'StringLength',
                  'options' => array(
                     'encoding' => 'UTF-8',
                     'min' => 1,
                     'max' => 100,
                  ),
               ),
            ),
         ));
         $inputFilter->add(array(
            'name' => 'title',
            'required' => true,
            'filters' => array(
               array('name' => 'StripTags'),
               array('name' => 'StringTrim'),
            ),
            'validators' => array(
               array(
                  'name' => 'StringLength',
                  'options' => array(
                     'encoding' => 'UTF-8',
                     'min' => 1,
                     'max' => 100,
                  ),
               ),
            ),
         ));
         $file = new FileInput('imagepath');
         $file->getValidatorChain()->attach(new UploadFile());
         $file->getFilterChain()->attach(
            new RenameUpload([
               'target'    => './public/tmpuploads/file',
               'randomize' => true,
               'use_upload_extension' => true
            ]));
            $inputFilter->add($file);
            $this->inputFilter = $inputFilter;
      }
      return $this->inputFilter;
   }
   public function exchangeArray($data) {
      $this->id = (!empty($data['id'])) ? $data['id'] : null;
      $this->author = (!empty($data['author'])) ? $data['author'] : null;
      $this->title = (!empty($data['title'])) ? $data['title'] : null;

      if(!empty($data['imagepath'])) {
         if(is_array($data['imagepath'])) {
            $this->imagepath = str_replace("./public", "",
               $data['imagepath']['tmp_name']);
         } else {
            $this->imagepath = $data['imagepath'];
         }
      } else {
         $data['imagepath'] = null;
      }
   }
}
更新 BookTable.php
我們已經更新了 BookForm 和 Book 模型。現在,我們更新 BookTable 並修改 saveBook 方法。這足以將 imagepath 條目包含在資料陣列 $data 中。
部分程式碼清單如下:
$data = array('author' => $book->author, 'title'  => $book->title,
   'imagepath' => $book->imagepath
);
BookTable 類的完整程式碼清單如下:
<?php
namespace Tutorial\Model;
use Zend\Db\TableGateway\TableGatewayInterface;

class BookTable {
   protected $tableGateway;
   public function __construct(TableGatewayInterface $tableGateway) {
      $this->tableGateway = $tableGateway;
   }
   public function fetchAll() {
      $resultSet = $this->tableGateway->select();
      return $resultSet;
   }
   public function getBook($id) {
      $id  = (int) $id;
      $rowset = $this->tableGateway->select(array('id' => $id));
      $row = $rowset->current();
      if (!$row) {
         throw new \Exception("Could not find row $id");
      }
      return $row;
   }
   public function saveBook(Book $book) {
      $data = array (
         'author' => $book->author,
         'title'  => $book->title,
         'imagepath' => $book->imagepath
      );
      $id = (int) $book->id;
      if ($id == 0) {
         $this->tableGateway->insert($data);
      } else {
         if ($this->getBook($id)) {
            $this->tableGateway->update($data, array('id' => $id));
         } else {
            throw new \Exception('Book id does not exist');
         }
      }
   }
}
更新 TutorialController.php 中的 addAction 方法:檔案上傳資訊將儲存在全域性陣列 $_FILES 中,並且可以使用 Request 的 getFiles() 方法訪問。因此,將提交的資料和檔案上傳資訊合併,如下所示。
$post = array_merge_recursive(
   $request->getPost()->toArray(),
   $request->getFiles()->toArray()
);
addAction() 方法的完整程式碼如下所示:
public function addAction() {
   $form = new BookForm();
   $form->get('submit')->setValue('Add');
   $request = $this->getRequest();
   if ($request->isPost()) {
      $book = new Book();
      $form->setInputFilter($book->getInputFilter());
      $post = array_merge_recursive(
         $request->getPost()->toArray(),
         $request->getFiles()->toArray()
      );
      $form->setData($post);
      if ($form->isValid()) {
         $book->exchangeArray($form->getData());
         $this->bookTable->saveBook($book);

         // Redirect to list of Tutorial
         return $this->redirect()->toRoute('tutorial');
      }
   }
   return array('form' => $form);
}
更新 add.phtml 的檢視
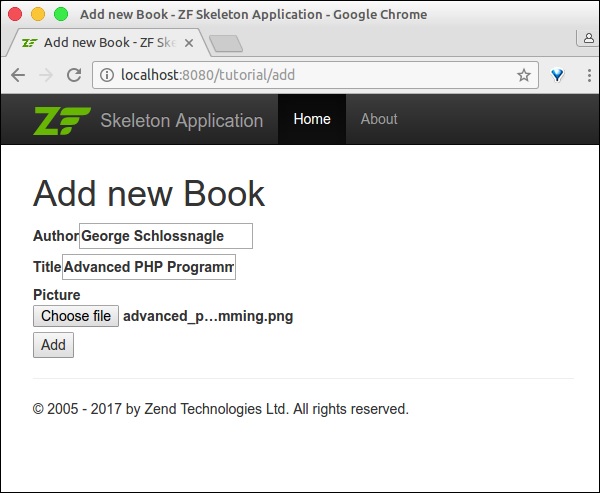
最後,修改 “add.phtml” 幷包含如下所示的 imagepath 檔案輸入元素:
echo $this->formRow($form->get('imagepath'))."<br>";
完整的列表如下所示:
<?php
$title = 'Add new Book';
$this->headTitle($title);
?>
<h1><?php echo $this->escapeHtml($title); ?></h1>
<?php
if(!empty($form)) {
   $form->setAttribute('action', $this->url('tutorial', array('action' => 'add')));
   $form->prepare();
   echo $this->form()->openTag($form);
   echo $this->formHidden($form->get('id'));
   echo $this->formRow($form->get('author'))."<br>";
   echo $this->formRow($form->get('title'))."<br>";
   echo $this->formRow($form->get('imagepath'))."<br>";
   echo $this->formSubmit($form->get('submit'));
   echo $this->form()->closeTag();
}
執行應用程式
最後,在 https://:8080/tutorial/add 執行應用程式,並新增新的記錄。
結果將如以下截圖所示:
表單頁面
首頁
Zend Framework - Ajax
AJAX 是 Web 程式設計中的一項現代技術。它提供了一種在網頁中非同步傳送和接收資料而不重新整理頁面的選項。Zend 框架提供了一個透過 zend-view 和 zend-json 元件使用 json 模型的選項。讓我們在本節中學習 Zend AJAX 程式設計。
安裝 json 元件
可以使用以下 Composer 命令安裝 Zend json 元件:
composer require zendframework/zend-json
概念
Zend 框架提供了兩種方法來輕鬆編寫支援 AJAX 的 Web 應用程式。它們如下所示:
Request 物件中的 isXmlHttpRequest() 方法 - 如果發出了 AJAX 請求,則請求物件的 isXmlHttpRequest() 方法返回 true,否則返回 false。此方法用於在伺服器端正確處理 AJAX 請求。
if ($request->isXmlHttpRequest()) {
   // Ajax request
} else {
   // Normal request
}
Zend/View/Model/JsonModel - JsonModel 是 ViewModel 的替代方案,專門用於 AJAX 和 REST API 場景。JsonModel 以及 JsonStrategy(在模組的檢視管理器塊中配置)將模型資料編碼為 Json 並將其作為響應返回,而不是檢視 (phtml)。
AJAX - 工作示例
讓我們在 tutorial 模組中新增一個新的 ajax 頁面 ajax,並非同步獲取圖書資訊。為此,我們應遵循以下步驟。
步驟 1:在模組配置中新增 JsonStrategy
更新 tutorial 模組配置檔案 myapp/module/Tutorial/config/module.config.php 中的檢視管理器塊。然後,JsonStrategy 將與 JsonModel 協同工作以編碼併發送 json 資料。
'view_manager' => [
   'template_map' => array
      ('layout/layout' => __DIR__ . '/../view/layout/newlayout.phtml'),
   'template_path_stack' => [
      'tutorial' => __DIR__ . '/../view',
   ],
   'strategies' => array('ViewJsonStrategy',),
],
步驟 2:在 TutorialController.php 中新增 ajaxAction 方法
使用以下程式碼在 TutorialController.php 中新增 ajaxAction 方法:
public function ajaxAction() {
   $data = $this->bookTable->fetchAll();
   $request = $this->getRequest();
   $query = $request->getQuery();
   if ($request->isXmlHttpRequest() || $query->get('showJson') == 1) {
      $jsonData = array();
      $idx = 0;
      foreach($data as $sampledata) {
         $temp = array(
            'author' => $sampledata->author,
            'title' => $sampledata->title,
            'imagepath' => $sampledata->imagepath
         );
         $jsonData[$idx++] = $temp;
      }
      $view = new JsonModel($jsonData);
      $view->setTerminal(true);
   } else {
      $view = new ViewModel();
   }
   return $view;
}
在這裡,ajaxAction 將檢查傳入的請求是否為 AJAX 請求。如果傳入的請求是 AJAX 請求,則將建立 JsonModel。否則,將建立一個普通的 ViewModel。
在這兩種情況下,都將從資料庫中獲取圖書資訊並填充到模型中。如果模型是 JsonModel,則將呼叫 JsonStrategy,它將資料編碼為 json 並作為響應返回。
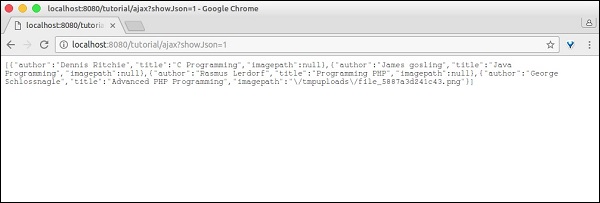
$query->get('showJson') == 1 用於除錯目的。只需在 url 中新增 showJson=1,頁面就會顯示 json 資料。
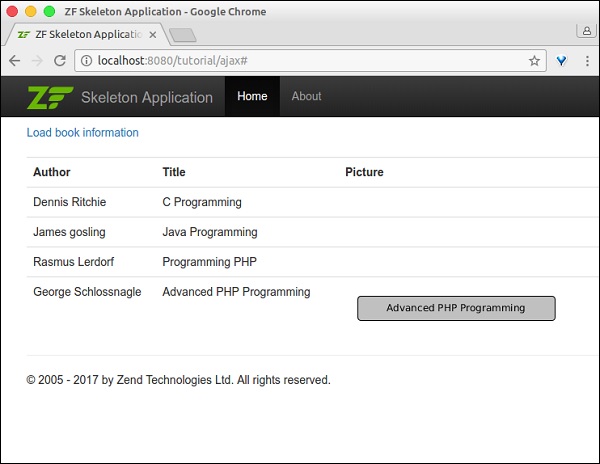
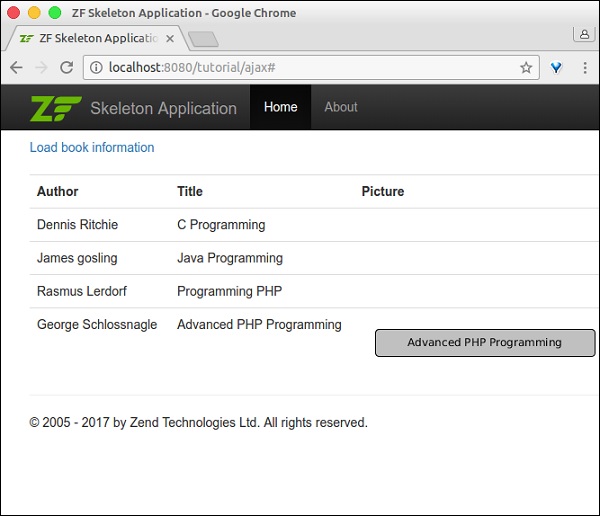
步驟 3:新增 ajax.phtml
現在,為 ajaxAction 方法新增檢視指令碼 ajax.phtml。此頁面將包含一個標籤為“載入圖書資訊”的連結。
單擊該連結將發出 AJAX 請求,該請求將以 Json 資料的形式獲取圖書資訊,並以格式化表格的形式顯示圖書資訊。AJAX 處理是使用 JQuery 完成的。
完整的程式碼清單如下:
<a id = "loadbook" href = "#">Load book information</a>
</br> </br>

<table class = "table">
   <tbody id = "book">
   </tbody>
</table>

<script language = "javascript">
$(document).ready(function(){
   $("#loadbook").on("click", function(event){
      $.ajax({
         url:        '/tutorial/ajax',
         type:       'POST',
         dataType:   'json',
         async:      true,

         success: function(data, status) {
            var e = $('<tr><th>Author</th><th>Title</th><th>Picture</th></tr>');
            $('#book').html('');
            $('#book').append(e);

            for(i = 0; i < data.length; i++) {
               book = data[i];
               var e = $('<tr><td id = "author"></td><td id = "title"></td>
               <td id="imagepath"><img src = ""/></td></tr>');
               $('#author', e).html(book['author']);
               $('#title', e).html(book['title']);
               $('#imagepath img', e).attr('src', book['imagepath']);
               $('#book').append(e);
            }
         },
         error : function(xhr, textStatus, errorThrown) {
            alert('Ajax request failed.');
         }
      });
   });
});
</script>
步驟 4:執行應用程式
最後,執行應用程式 - https://:8080/tutorial/ajax 並單擊“載入圖書資訊”連結。
結果將如下所示:
Ajax 頁面 -

包含圖書資訊的 Ajax 頁面
包含除錯資訊的 Ajax 頁面
Zend Framework - Cookie 管理
Cookie 是 Web 應用程式中一個非常重要的概念。它提供了一個選項,可以在瀏覽器本身中持久儲存使用者資料(通常是一小段資訊),且持續時間有限。
Cookie 用於維護 Web 應用程式的狀態。Zend 框架在 zend-http 元件中提供了一個 cookie 模組。此 zend-http 提供了 HTTP 抽象及其實現。
安裝 HTTP 元件
可以使用以下程式碼中指定的 Composer 輕鬆安裝 HTTP 元件。
composer require zendframework/zend-http
概念
zend-http 提供了 Zend\Http\Cookies 類來管理 cookie。它與 Zend\Http\Client 類一起使用,後者用於向 Web 伺服器傳送請求。可以像以下程式碼中所示初始化 cookie:
use Zend\Http\Cookies
$c = new Cookies();
當 HTTP 客戶端 (Zend\Http\Client) 首次向 Web 伺服器傳送 URI 請求時,它沒有任何 cookie。Web 伺服器接收到請求後,會在其響應物件中包含 cookie 作為 HTTP 標頭 Set-Cookie 並將其傳送到 HTTP 客戶端。HTTP 客戶端將從 http 響應中提取 cookie,並在後續請求中將其作為相同的 HTTP 標頭重新發送。通常,每個 cookie 都將對映到一個域和該域的路徑。
Cookies 類中可用的方法如下:
addCookie(uri) - 用於將 cookie 新增到給定 URI 的請求物件中。
getCookie(cookieName, $cookieForm) - 用於獲取給定 URI $uri 中可用的 cookie $cookieName。第三個引數是 cookie 的返回方式,可以是字串或陣列。
fromResponse(uri) - 用於從給定 URI 的響應物件中提取 cookie。
addCookiesFromResponse - 與 fromResponse 相同,但它會提取 cookie 並將其重新新增到給定 URI 的請求物件中。
isEmpty() - 用於查詢給定的 Cookie 物件是否包含任何 cookie。
reset() - 用於清除給定 URI 中的所有 cookie。
在下一章中,我們將討論 Zend Framework 中的會話管理。
Zend Framework - 會話管理
會話是 Web 應用程式中一個非常重要的概念。它提供了一個選項,可以在 Web 伺服器中持久儲存使用者資料,持續時間有限。Zend 框架提供了一個單獨的元件 zend-session 來處理會話資訊。
安裝會話元件
可以使用以下 Composer 命令安裝會話元件:
composer require zendframework/zend-session
會話元件
Zend 框架提供了六個元件來處理會話管理。所有這些元件都在下面進行了說明:
Zend\Session\Container - 讀取和寫入會話資訊的主要 API。
Zend\Session\SessionManager - 用於管理會話的整個生命週期。
Zend\Session\Storage - 用於指定會話資料如何在記憶體中儲存。
Zend\Session\SaveHandler - 用於將會話資料儲存和檢索到物理位置,如 RDBMS、Redis、MangoDB 等。
Zend\Session\Validator - 用於透過交叉檢查初始請求和後續請求的遠端地址和使用者代理來保護會話免遭劫持。
Zend\Session\Config\SessionConfig - 用於配置會話的行為方式。
預設配置足以使用會話。使用上述元件,可以輕鬆處理會話的所有方面。
會話元件示例
讓我們遵循以下幾點來建立一個新頁面以瞭解 Zend 框架中的會話。預設情況下,建立 Container 類的例項足以管理會話。
在 TutorialController 中建立一個新的操作 sessionAction。
初始化一個 Container 物件。
$c = new Container();
檢查任意鍵 count 是否存在。如果該鍵不可用,則將 count 初始化為 1。如果可用,則按以下程式碼所示遞增其值。
if (!isset($c->count)) {
   $c->count = 0;
} else {
   $c->count++;
}
在 ViewModel 中註冊 count。
為 sessionAction 建立一個模板檔案 - session.phtml,位於 myapp/module/Tutorial/view/tutorial/tutorial/session.phtml 中,然後呈現 count 值。
重新整理頁面將增加會話中 count 的值。完整列表如下所示:
TutorialController.php
public function sessionAction() {
   $c = new Container();
   if (!isset($c->count)) {
      $c->count = 0;
   } else {
      $c->count++;
   }
   $view = new ViewModel([
      'count' => $c->count,
   ]);
   return $view;
}
session.pthml
Session data, COUNT = <?= $this->count ?>
示例結果
Session data, Count = 5
Zend Framework - 身份驗證
身份驗證是任何 Web 應用程式中最重要且必不可少的特性之一。Zend Framework 提供了一個單獨的元件來處理身份驗證,稱為 zend-authentication。
安裝身份驗證元件
可以使用以下 Composer 命令安裝身份驗證元件。
composer require zendframework/zend-authentication
概念
通常,開發人員會編寫一個 php 函式來根據資料來源對使用者詳細資訊進行身份驗證。身份驗證完成後,身份驗證詳細資訊將保留以供後續請求使用。Zend Framework 將此概念泛化,並提供了兩個類,如下所述:
類 1 Zend\Authentication\Adaptor\AdaptorInterface
此類提供了一個名為 authenticate 的單一方法來編寫身份驗證邏輯。authenticate 方法返回 Zend\Authentication\Result 類的例項。
此 Result 物件包含身份驗證狀態;如果身份驗證成功則為身份,如果身份驗證失敗則為錯誤訊息。authenticate 介面和 result 類的簽名如下所示:
AdaptorInterface
namespace Zend\Authentication\Adaptor;
public function authenticate() {
   // code
}
Result 類
namespace Zend\Authentication;
class Result {
   public function __construct($code, $identity, array $messages = []);
}
Zend Framework 提供了一個預設實現,用於針對資料庫、ldap、http 基本憑據和摘要憑據進行身份驗證。Adaptor 會進行身份驗證,但不會將詳細資訊保留以供任何未來請求使用。
類 2 Zend\Authentication\AuthenticationService
AuthenticationService 是主要元件,它使用已配置的介面卡進行身份驗證。身份驗證完成後,它會保留身份驗證詳細資訊並提供方法 hasIdentity() 來檢查身份是否可用、getIdentity() 來獲取身份驗證詳細資訊以及 clearIdentity() 來清除身份驗證詳細資訊。
使用此 AuthenticationService 的部分程式碼列表如下所示:
$adap = new Adapter($username, $password);
$auth = new AuthenticationService();
$result = $auth->authenticate($adap);
if($result->isValid) {
   $identity = $auth->getIdentity();
} else {
   // process $result->getMessages()
}
// clear
$auth->clearIdentity();
與授權相關的內容被打包為兩個單獨的模組,它們是 - zend-permissions-acl 和 zend-permissions-rbac。zend-permissions-acl 基於訪問控制列表,zend-permissions-rbac 基於基於角色的訪問控制列表。它們提供了 ACL 和 RBAC 概念的高階抽象,並有助於編寫企業級應用程式。
Zend Framework - 郵件管理
Zend Framework 提供了一個名為 zend-mail 的單獨元件來發送郵件訊息。zend-mail 元件還提供了一個選項,可以使用文字和 html 格式讀取和編寫帶附件的郵件訊息。在 Zend 中傳送郵件非常容易且配置簡單。
讓我們在本節中瞭解郵件概念、基本設定、高階設定(如 SMTP 傳輸)等。
安裝郵件元件
可以使用以下 Composer 命令安裝郵件元件。
composer require zendframework/zend-mail
基本郵件配置
基本郵件包含一個或多個收件人、主題、正文和發件人。Zend 提供了 Zend\Mail\Message 類來建立新的郵件訊息。要使用 zend-mail 傳送郵件,必須至少指定一個收件人和郵件正文。
建立新郵件訊息的部分程式碼如下所示:
use Zend\Mail;
$mail = new Mail\Message();
$mail->setSubject('Zend email sample');
$mail->setBody('This is content of the mail message');
$mail->setFrom('sender@example.com', "sender-name");
$mail->addTo('recipient@test.com', "recipient-name");
Zend 提供了 Zend\Mail\Sendmail 類來發送郵件訊息。Sendmail 使用 php 本機郵件函式 mail 來發送郵件訊息,並且我們可以使用 php 配置檔案配置傳輸層。
使用 Sendmail 的部分程式碼如下所示:
$transport = new Mail\Transport\Sendmail();
$transport->send($mail);
zend-mail 提供了許多傳輸層,並且每個傳輸層可能需要許多其他引數,例如使用者名稱、密碼等。
郵件管理方法
一些值得注意的郵件管理方法如下:
isValid − 缺少“發件人”地址的郵件無效。
isValid() : bool
setEncoding − 設定郵件編碼。
setEncoding(string $encoding) : void
getEncoding − 獲取郵件編碼。
getEncoding() : string
setHeaders − 編寫郵件頭。
setHeaders(Zend\Mail\Headers $headers) : void
getHeaders − 訪問郵件頭集合。
getHeaders() : Zend\Mail\Headers
setFrom − 設定(覆蓋)發件人地址。它包含鍵值對,其中鍵是可讀的名稱,值是電子郵件地址。
setFrom(
   string|AddressInterface|array|AddressList|Traversable $emailOrAddressList,
      string|null $name
) : void
addFrom − 新增“發件人”地址。
addFrom(
   string|AddressInterface|array|AddressList|Traversable $emailOrAddressOrList,
      string|null $name
) : void
getFrom − 獲取“發件人”列表。
getFrom() : AddressList
setTo - Overwrite the address list in the To recipients.
setTo(
   string|AddressInterface|array|AddressList|Traversable $emailOrAddressList,
      null|string $name
) : void
setSubject − 設定郵件主題頭值。
setSubject(string $subject) :void
setBody − 設定郵件正文。
setBody(null|string|Zend\Mime\Message|object $body) : void
SMTP 傳輸層
zend-mail 提供了使用 SMTP 伺服器傳送郵件的選項,透過 Zend\Mail\Transport\Smtpclass 類實現。它類似於 Sendmail,但有一些額外的選項可以配置 SMTP 主機、埠、使用者名稱、密碼等。
部分程式碼如下:
use Zend\Mail\Transport\Smtp as SmtpTransport;
use Zend\Mail\Transport\SmtpOptions;
$transport = new SmtpTransport();
$options = new SmtpOptions([
   'name' => 'localhost',
   'host' =>'smtp.gmail.com',
   'port' => 465,
]);
$transport->setOptions($options);
這裡:
name − SMTP 主機的名稱。
host − 遠端主機名或 IP 地址。
port − 遠端主機監聽的埠。
郵件概念 - 示例
讓我們按照以下步驟編寫一個簡單的 PHP 控制檯應用程式來理解郵件概念。
建立一個名為“mailapp”的資料夾。
使用 composer 工具安裝 zend-mail。
在“mailapp”資料夾內建立一個名為 Mail.php 的 PHP 檔案。
使用 Zend\Mail\Message 建立郵件。
$message = new Message();
$message->addTo('user1@gmail.com');
$message->addFrom('user2@gmail.com');
$message->setSubject('Hello!');
$message->setBody("My first Zend-mail application!");
建立 SMTP 傳輸層並新增必要的配置。
// Setup SMTP transport using LOGIN authentication
$transport = new SmtpTransport();
$options = new SmtpOptions([
   'name' => 'localhost',
   'host' => 'smtp.gmail.com', // or any SMTP server
   'port' => 465, // port on which the SMTP server is listening
   'connection_class' => 'login',
   'connection_config' => [
      username' => '<your username>', 'password' => '<your password>',
      'ssl' => 'ssl'],
]);
$transport->setOptions($options);
使用 send 方法傳送郵件。
$transport->send($message);
完整列表,Mail.php 如下:
<?php
require __DIR__ . '/vendor/autoload.php';

use Zend\Mail\Message;
use Zend\Mail\Transport\Smtp as SmtpTransport;
use Zend\Mail\Transport\SmtpOptions;

$message = new Message();
$message->addTo('user1@gmail.com');
$message->addFrom('user2@gmail.com');
$message->setSubject('Hello!');
$message->setBody("My first Zend-mail application!");

// Setup SMTP transport using LOGIN authentication
$transport = new SmtpTransport();
$options = new SmtpOptions([
   'name' => 'localhost',
   'host' => 'smtp.gmail.com', // or any SMTP server
   'port' => 465, // port on which the SMTP server is listening
   'connection_class' => 'login',
   'connection_config' => [
      'username' => '<your username>', 'password' => '<your password>',
      'ssl' => 'ssl'],
]);
$transport->setOptions($options);
$transport->send($message);
現在,在命令提示符中執行應用程式 php Mail.php。這將根據應用程式中配置的內容傳送郵件。
Zend Framework - 單元測試
通常,我們可以使用 高階除錯工具 或簡單的命令如 echo 和 die 來除錯 PHP 應用程式。在 Web 場景中,我們需要測試業務邏輯以及表示層。Web 應用程式中的表單可以透過輸入相關的測試資料來測試,以確保表單按預期工作。
網站的設計可以透過瀏覽器手動測試。這些型別的測試過程可以使用單元測試自動化。單元測試在大型專案中至關重要。這些單元測試將有助於自動化測試過程並在出現問題時提醒開發人員。
設定 PHPUnit
Zend 框架集成了 PHPUnit 單元測試框架。要為 Zend 框架編寫單元測試,我們需要設定 PHPUnit,這可以透過以下 Composer 命令輕鬆完成。
$ composer require --dev phpunit/phpunit
執行上述命令後,您將收到如下程式碼塊所示的響應。
Using version ^5.7 for phpunit/phpunit
./composer.json has been updated
Loading composer repositories with package information
Updating dependencies (including require-dev)
Nothing to install or update
Writing lock file
Generating autoload files
現在,當您開啟“composer.json”檔案時,您將看到以下更改:
"require-dev": {
   "phpunit/phpunit": "^5.7"
}
TestCase 和斷言
Zend 框架提供了輔助類來對控制器進行單元測試。TestCase 是 PHPUnit 框架中編寫測試用例的主要元件,Zend 框架提供了 TestCase 的抽象實現,稱為 AbstractHttpControllerTestCase。
此 AbstractHttpControllerTestCase 提供各種 Assert 方法,並且可以按功能分組。它們如下:
請求斷言 − 用於斷言 HTTP 請求。例如,assertControllerName。
CSS 選擇器斷言 − 使用 HTML DOM 模型檢查響應 HTML。
XPath 斷言 − 基於 XPath 的 CSS 選擇器斷言的替代方法。
重定向斷言 − 用於檢查頁面重定向。
響應頭斷言 − 用於檢查響應頭,如狀態程式碼 (assertResponseStatusCode)
建立測試目錄
可以為每個模組單獨編寫單元測試。所有與測試相關的編碼都需要在模組根目錄下的 test 資料夾內建立。
例如,要為 Tutorial 模組下可用的 TutorialController 編寫測試,測試類需要放在 myapp/module/Tutorial/test/Controller/ 目錄下。
示例
讓我們編寫一個測試類來對 TutorialController 進行單元測試。
首先,我們應該編寫一個名為 TutorialControllerTest 的類並將其擴充套件到 AbstractHttpControllerTestCase。
下一步是編寫一個 Setup 方法來設定測試環境。這可以透過呼叫 setApplicationConfig 方法並傳遞我們的主應用程式配置檔案 myapp/config/application.config.php 來完成。
public function setUp() {
   $configOverrides = [];
   $this->setApplicationConfig(ArrayUtils::merge(
      include __DIR__ . '/../../../../config/application.config.php',
         $configOverrides
   ));
   parent::setUp();
}
編寫一個或多個方法並根據需要呼叫各種斷言方法。
$this->assertMatchedRouteName('tutorial');
我們已經編寫了測試類,完整列表如下:
<?php
namespace TutorialTest\Controller;
use Tutorial\Controller\TutorialController;
use Zend\Stdlib\ArrayUtils;
use Zend\Test\PHPUnit\Controller\AbstractHttpControllerTestCase;

class TutorialControllerTest extends AbstractHttpControllerTestCase {
   public function setUp() {
      $configOverrides = [];
      $this->setApplicationConfig(ArrayUtils::merge(
         include __DIR__ . '/../../../../config/application.config.php',
            $configOverrides
      ));
      parent::setUp();
   }
   public function testIndexActionCanBeAccessed() {
      $this->dispatch('/tutorial', 'GET');
      $this->assertResponseStatusCode(200);
      $this->assertModuleName('tutorial');
      $this->assertControllerName(TutorialController::class);
      $this->assertControllerClass('TutorialController');
      $this->assertMatchedRouteName('tutorial');
   }
}
現在,開啟命令提示符,移動到應用程式根目錄並執行 vendor 資料夾中可用的 phpunit 可執行檔案。
cd /path/to/app
./vendor/bin/phpunit ./vendor/bin/phpunit module/
   Tutorial/test/Controller/TutorialControllerTest.php
結果將如下程式碼塊所示:
PHPUnit 5.7.5 by Sebastian Bergmann and contributors.
.1 / 1 (100%)
Time: 96 ms, Memory: 8.00MB
OK (1 test, 5 assertions)
Zend Framework - 錯誤處理
為了系統的順利執行,需要有效地處理系統故障。Zend 框架帶有一個 預設錯誤捕獲,它會在錯誤發生時列印並記錄錯誤。此相同的錯誤處理程式用於捕獲 異常。
當除錯為真時,錯誤處理程式顯示錯誤,當除錯為假時,錯誤處理程式記錄錯誤。Zend 框架有幾個異常類,內建的異常處理將捕獲任何未捕獲的異常並呈現一個有用的頁面。
預設錯誤處理
我們可以在應用程式配置檔案 myapp/module/Application/config/module.config.php 中配置預設錯誤設定。
部分程式碼示例如下:
'view_manager' => [
   'display_not_found_reason' => true,
   'display_exceptions'       => true,
   'doctype'                  => 'HTML5',
   'not_found_template'       => 'error/404',
   'exception_template'       => 'error/index',
   'template_map' => [
      'layout/layout'           => __DIR__ . '/../view/layout/layout.phtml',
      'application/index/index' => __DIR__ . '/../view/application/index/index.phtml',
      'error/404'               => __DIR__ . '/../view/error/404.phtml',
      'error/index'             => __DIR__ . '/../view/error/index.phtml',
   ],
   'template_path_stack' => [
      __DIR__ . '/../view',
   ],
],
這裡,display_exception、not_found_template、exception_template、error/404 和 error/index 是與錯誤相關的配置項,並且不言自明。
其中最重要的專案是 error/index。這是在系統中發生異常時顯示的模板。我們可以修改此模板 myapp/module/Application/view/error/index.phtml 來控制顯示的錯誤數量。
Zend Framework - 工作示例
在本章中,我們將學習如何在 Zend 框架中建立一個完整的基於 MVC 的員工應用程式。請按照以下步驟操作。
步驟 1:Module.php
首先,我們應該在 – myapp/module/Employee/src/ 目錄內建立一個 Employee 模組,然後實現 ConfigProviderInterface 介面。
Module 類的完整程式碼如下:
<?php
namespace Employee;
use Zend\ModuleManager\Feature\ConfigProviderInterface;
class Module implements ConfigProviderInterface {
   public function getConfig() {
      return include __DIR__ . '/../config/module.config.php';
   }
}
步驟 2:composer.json
在 autoload 部分使用以下程式碼在 composer.json 中配置 Tutorial 模組。
"autoload": {
   "psr-4": {
      "Application\\": "module/Application/src/",
      "Tutorial\\": "module/Tutorial/src/",
      "Employee\\": "module/Employee/src/"
   }
}
現在,使用 composer update 命令更新應用程式。
composer update
Composer 命令將對應用程式進行必要的更改並在以下命令提示符中顯示日誌。
Loading composer repositories with package information
Updating dependencies (including require-dev)
   - Removing zendframework/zend-component-installer (0.3.0)
   - Installing zendframework/zend-component-installer (0.3.1)
   Downloading: 100%

   - Removing zendframework/zend-stdlib (3.0.1)
   - Installing zendframework/zend-stdlib (3.1.0)
   Loading from cache

   - Removing zendframework/zend-eventmanager (3.0.1)
   - Installing zendframework/zend-eventmanager (3.1.0)
   Downloading: 100%

   - Removing zendframework/zend-view (2.8.0)
   - Installing zendframework/zend-view (2.8.1)
   Loading from cache

   - Removing zendframework/zend-servicemanager (3.1.0)
   - Installing zendframework/zend-servicemanager (3.2.0)
   Downloading: 100%

   - Removing zendframework/zend-escaper (2.5.1)
   - Installing zendframework/zend-escaper (2.5.2)
   Loading from cache

   - Removing zendframework/zend-http (2.5.4)
   - Installing zendframework/zend-http (2.5.5)
   Loading from cache

   - Removing zendframework/zend-mvc (3.0.1)
   - Installing zendframework/zend-mvc (3.0.4)
   Downloading: 100%

   - Removing phpunit/phpunit (5.7.4)
   - Installing phpunit/phpunit (5.7.5)
   Downloading: 100%

Writing lock file
Generating autoload files
步驟 3:Employee 模組的 module.config.php
使用以下程式碼建立模組配置檔案“module.config.php”,位於 myapp/module/Employee/config 下。
<?php
namespace Employee;
use Zend\ServiceManager\Factory\InvokableFactory;
use Zend\Router\Http\Segment;
return [
   'controllers' => [
      'factories' => [
         Controller\EmployeeController::class => InvokableFactory::class,
      ],
   ],
   'view_manager' => [
      'template_path_stack' => ['employee' => __DIR__ . '/../view',],
   ],
];
現在,在應用程式級配置檔案 myapp/config/modules.config.php 中配置 Employee 模組。
return ['Zend\Router', 'Zend\Validator', 'Application', 'Tutorial', 'Employee'];
步驟 4:EmployeeController
建立一個新的 PHP 類 EmployeeController,透過擴充套件 AbstractActionController 並將其放在 myapp/module/Employee/src/Controller 目錄下。
完整的程式碼清單如下:
<?php
namespace Employee\Controller;
use Zend\Mvc\Controller\AbstractActionController;
use Zend\View\Model\ViewModel;
class EmployeeController extends AbstractActionController {
   public function indexAction() {
      return new ViewModel();
   }
}
步驟 5:路由器配置
讓我們在 Employee 模組中新增一個分段路由。更新 Employee 模組配置檔案 module.config.php,位於 myapp/module/Employee/config 下。
<?php
namespace Employee;
use Zend\ServiceManager\Factory\InvokableFactory;
use Zend\Router\Http\Segment;
return [
   'controllers' => [
      'factories' => [
         Controller\EmployeeController::class => InvokableFactory::class,
      ],
   ],
   'router' => [
      'routes' => [
         'employee' => [
            'type' => Segment::class,
            'options' => [
               'route' => '/employee[/:action[/:id]]',
               'constraints' => [
                  'action' => '[a-zA-Z][a-zA-Z0-9_-]*',
                  'id' => '[0-9]+',
               ],
               'defaults' => [
                  'controller' => Controller\EmployeeController::class,
                  'action' => 'index',
               ],
            ],
         ],
      ],
   ],
   'view_manager' => [
      'template_path_stack' => [
         'employee' => __DIR__ . '/../view',
      ],
   ],
];
我們已成功添加了 Employee 模組的路由。下一步是為 Employee 應用程式建立檢視指令碼。
步驟 6:建立 ViewModel
在 myapp/module/Employee/view/employee/employee 目錄下建立一個名為“index.phtml”的檔案。
在檔案中新增以下更改:
<div class = "row content">
   <h3>This is my first Zend application</h3>
</div>
Move to “EmployeeController.php” file and edit the following changes,

<?php
namespace Employee\Controller;
use Zend\Mvc\Controller\AbstractActionController;
use Zend\View\Model\ViewModel;
class EmployeeController extends AbstractActionController {
   public function indexAction() {
      return new ViewModel();
   }
}
最後,我們已成功完成 Employee 模組。我們可以使用以下 URL 訪問它:https://:8080/employee。
結果
在下一步中,我們將執行員工應用程式中的新增、編輯和刪除資料操作。要執行這些操作,我們應該首先建立一個數據庫模型。將在下一步中進行描述。
步驟 7:建立模型
讓我們在模組的src 目錄中建立一個名為 Employee 的模型。通常,模型在 Model 資料夾下分組 (myapp/module/Employee/src/Model/Employee.php)
<?php
namespace Employee\Model;
class Employee {
   public $id;
   public $emp_name;
   public $emp_job;
}
步驟 8:MySQL 表
使用以下命令在本地 MYSQL 伺服器中建立一個名為tutorials的資料庫:
create database tutorials;
讓我們使用以下 SQL 命令在資料庫中建立一個名為employee的表:
use tutorials;
CREATE TABLE employee (
   id int(11) NOT NULL auto_increment,
   emp_name varchar(100) NOT NULL,
   emp_job varchar(100) NOT NULL,
   PRIMARY KEY (id)
);
使用以下查詢將資料插入employee表:
INSERT INTO employee (emp_name, emp_job) VALUES ('Adam',  'Tutor');
INSERT INTO employee (emp_name, emp_job) VALUES ('Bruce',  'Programmer');
INSERT INTO employee (emp_name, emp_job) VALUES ('David',  'Designer');
步驟 9:更新資料庫配置
使用必要的資料庫驅動程式資訊更新全域性配置檔案 myapp/config/autoload/global.php。
return [
   'db' => [
      'driver' => 'Pdo',
      'dsn' => 'mysql:dbname = tutorials;host=localhost',
      'driver_options' => [PDO::MYSQL_ATTR_INIT_COMMAND => 'SET NAMES \'UTF8\''],
   ],
];
現在,在本地配置檔案 myapp/config/autoload/local.php 中更新資料庫憑據。這樣,我們可以分離本地和即時資料庫連線憑據。
<?php
return array(
   'db' => array('username' => '<user_name>', 'password' => '<password>',),
);
步驟 10:實現 exchangeArray
在 Employee 模型中實現 exchangeArray 函式。
<?php
namespace Employee\Model;
class Employee {
   public $id;
   public $emp_name;
   public $emp_job;
   public function exchangeArray($data) {
      $this->id = (!empty($data['id'])) ? $data['id'] : null;
      $this->emp_name = (!empty($data['emp_name'])) ? $data['emp_name'] : null;
      $this->emp_job = (!empty($data['emp_job'])) ? $data['emp_job'] : null;
   }
}
步驟 11:使用 TableGateway 獲取員工資料
在 Model 資料夾本身中建立類 EmployeeTable。它在以下程式碼塊中定義。
<?php
namespace Employee\Model;
use Zend\Db\TableGateway\TableGatewayInterface;
class EmployeeTable {
   protected $tableGateway;
   public function __construct(TableGatewayInterface $tableGateway) {
      $this->tableGateway = $tableGateway;
   }
   public function fetchAll() {
      $resultSet = $this->tableGateway->select();
      return $resultSet;
   }
}
步驟 12:配置 EmployeeTable 類
使用 getServiceConfig() 方法更新 Module.php 中的員工服務。
<?php
namespace Employee;
use Zend\Db\Adapter\AdapterInterface;
use Zend\Db\ResultSet\ResultSet;
use Zend\Db\TableGateway\TableGateway;
use Zend\ModuleManager\Feature\ConfigProviderInterface;

class Module implements ConfigProviderInterface {
   public function getConfig() {
      return include __DIR__ . '/../config/module.config.php';
   }
   public function getServiceConfig() {
      return [
         'factories' => [
            Model\EmployeeTable::class => function (    $container) {
               $tableGateway = $container>get( Model\EmployeeTableGateway::class);
               $table = new Model\EmployeeTable($tableGateway);
               return $table;
            },
            Model\EmployeeTableGateway::class => function ($container) {
               $dbAdapter = $container->get(AdapterInterface::class);
               $resultSetPrototype = new ResultSet();
               $resultSetPrototype->setArrayObjectPrototype(new Model\Employee());
               return new TableGateway('employee', $dbAdapter, null, $resultSetPrototype);
            },
         ],
      ];
   }
}
步驟 13:在控制器中新增員工服務
更新 myapp/module/config/module.config.php 中 Employee 模組配置的控制器部分,如下所示。
'controllers' => [
   'factories' => [
      Controller\EmployeeController::class => function($container) {
         return new Controller\EmployeeController(
            $container->get(Model\EmployeeTable::class)
         );
      },
   ],
]
步驟 14:為 EmployeeController 新增建構函式
新增帶有 EmployeeTable 作為引數的建構函式並編輯以下更改。
<?php
namespace Employee\Controller;
use Zend\Mvc\Controller\AbstractActionController;
use Zend\View\Model\ViewModel;
use Employee\Model\Employee;
use Employee\Model\EmployeeTable;

class EmployeeController extends AbstractActionController {
   private $table;
   public function __construct(EmployeeTable $table) {
      $this->table = $table;
   }
   public function indexAction() {
      $view = new ViewModel([
         'data' => $this->table->fetchAll(),
      ]);
      return $view;
   }
}
步驟 15:在檢視指令碼“index.phtml”中顯示員工資訊
轉到檔案index.phtml並進行以下更改:
<?php
$title = 'Employee application';
$this->headTitle($title);
?>

<table class="table">
   <tr>
      <th>Employee Name</th>
      <th>Employee Job</th>
      <th>Edit/Delete operations</th>
   </tr>
   <?php foreach ($data as $empdata) : ?>
   <tr>
      <td><?php echo $this->escapeHtml($empdata->emp_name);?></td>
      <td><?php echo $this->escapeHtml($empdata->emp_job);?></td>
      <td>
         <a href="<?php echo $this->url('employee',
            array('action'=>'edit', 'id' =>$empdata->id));?>">Edit</a>
         <a href="<?php echo $this->url('employee',
            array('action'=>'delete', 'id' => $empdata->id));?>">Delete</a>
      </td>
   </tr>
   <?php endforeach; ?>
</table>
現在我們已經成功建立了資料庫模型,並且可以在應用程式中獲取記錄。
使用 URL 請求應用程式:https://:8080/employee。
結果

下一步說明了員工模組中的插入、編輯和刪除資料操作。
步驟 16:建立員工表單
在 myapp/module/Employee/src/Form 目錄下建立一個名為 EmployeeForm.php 的檔案。它在下面的程式碼塊中描述。
<?php
namespace Employee\Form;
use Zend\Form\Form;

class EmployeeForm extends Form {
   public function __construct($name = null) {
      /
      / we want to ignore the name passed
      parent::__construct('employee');
      $this->add(array(
         'name' => 'id',
         'type' => 'Hidden',
      ));
      $this->add(array(
         'name' => 'emp_name',
         'type' => 'Text',
         'options' => array(
            'label' => 'Name',
         ),
      ));
      $this->add(array(
         'name' => 'emp_job',
         'type' => 'Text',
         'options' => array(
            'label' => 'Job',
         ),
      ));
      $this->add(array(
         'name' => 'submit',
         'type' => 'Submit',
         'attributes' => array(
            'value' => 'Go',
            'id' => 'submitbutton',
         ),
      ));
   }
}
步驟 17:更新員工模型
更新員工模型並實現 InputFilterAwareInterface。轉到目錄 myapp/module/Employee/src/Employee/Model 並將以下更改新增到Employee.php檔案中。
<?php
namespace Employee\Model;

// Add these import statements
use Zend\InputFilter\InputFilter;
use Zend\InputFilter\InputFilterAwareInterface;
use Zend\InputFilter\InputFilterInterface;

class Employee implements InputFilterAwareInterface {
   public $id;
   public $emp_name;
   public $emp_job;
   protected $inputFilter;
   public function exchangeArray($data) {
      $this->id = (isset($data['id'])) ? $data['id'] : null;
      $this->emp_name = (isset($data['emp_name'])) ? $data['emp_name'] : null;
      $this->emp_job = (isset($data['emp_job']))  ? $data['emp_job'] : null;
   }

   // Add content to these methods:
   public function setInputFilter(InputFilterInterface $inputFilter) {
      throw new \Exception("Not used");
   }
   public function getInputFilter() {
      if (!$this->inputFilter) {
         $inputFilter = new InputFilter();
         $inputFilter->add(array(
            'name' => 'id',
            'required' => true,
            'filters' => array(
               array('name' => 'Int'),
            ),
         ));
         $inputFilter->add(array(
            'name' => 'emp_name',
            'required' => true,
            'filters' => array(
               array('name' => 'StripTags'),
               array('name' => 'StringTrim'),
            ),
            'validators' => array(
               array('name' => 'StringLength',
                        'options' => array(
                           'encoding' => 'UTF-8',
                           'min' => 1,
                           'max' => 50,
                        ),
                    ),
                ),
            ));
         $inputFilter->add(array(
            'name' => 'emp_job',
            'required' => true,
            'filters' => array(
               array('name' => 'StripTags'),
               array('name' => 'StringTrim'),
            ),
            'validators' => array(
               array('name' => 'StringLength',
                  'options' => array(
                     'encoding' => 'UTF-8',
                     'min' => 1,
                     'max' => 50,
                  ),
                  ),
               ),
         ));
         $this->inputFilter = $inputFilter;
      }
      return $this->inputFilter;
   }
}
步驟 18:在 Employee Controller 中新增 addAction
在EmployeeController類中新增以下更改。
<?php
use Zend\Mvc\Controller\AbstractActionController;
use Zend\View\Model\ViewModel;
use Employee\Model\Employee;
use Employee\Model\EmployeeTable;
use Employee\Form\EmployeeForm;

public function addAction() {
   $form = new EmployeeForm();
   $form->get('submit')->setValue('Add');
   $request = $this->getRequest();

   if ($request->isPost()) {
      $employee = new Employee();
      $form->setInputFilter($employee->getInputFilter());
      $form->setData($request->getPost());

      if ($form->isValid()) {
         $employee->exchangeArray($form->getData());
         $this->table->saveEmployee($employee);

         // Redirect to list of employees
         return $this->redirect()->toRoute('employee');
      }
   }
   return array('form' => $form);
}
步驟 19:在 EmployeeTable 類中新增儲存功能
在 EmployeeTable 類中新增以下兩個函式 – myapp/module/Employee/src/Model/EmployeeTable.php
public function getEmployee($id) {
   $id  = (int) $id;
   $rowset = $this->tableGateway->select(array('id' => $id));
   $row = $rowset->current();
   if (!$row) {
      throw new \Exception("Could not find row $id");
   }
   return $row;
}
public function saveEmployee(Employee $employee) {
   $data = array (
      'emp_name' => $employee->emp_name,
      'emp_job'  => $employee->emp_job,
   );
   $id = (int) $employee->id;
   if ($id == 0) {
      $this->tableGateway->insert($data);
   } else {
      if ($this->getEmployee($id)) {
         $this->tableGateway->update($data, array('id' => $id));
      } else {
         throw new \Exception('Employee id does not exist');
      }
   }
}
步驟 20:為 AddAction 方法建立檢視指令碼 Add.phtml
在 myapp/module/view/employee/employee 中的“Add.phtml”檔案中新增以下更改。
<?php
   $title = 'Add new employee';
   $this->headTitle($title);
?>
<h1><?php echo $this->escapeHtml($title); ?></h1>

<?php
   $form->setAttribute('action', $this->url('employee', array('action' => 'add')));
   $form->prepare();
   echo $this->form()->openTag($form);
   echo $this->formHidden($form->get('id'));
   echo $this->formRow($form->get('emp_name'))."<br>";
   echo $this->formRow($form->get('emp_job'))."<br>";
   echo $this->formSubmit($form->get('submit'));
   echo $this->form()->closeTag();
Request the application using the url, https://:8080/employee/add
結果
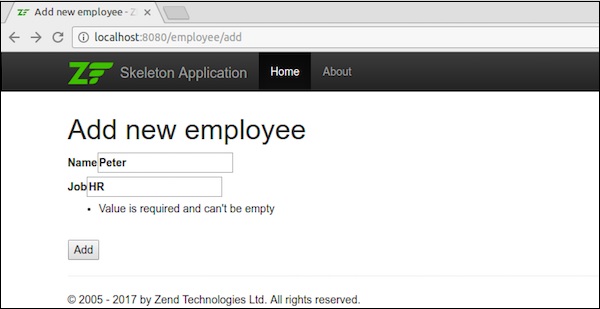
新增資料後,它將重定向到主頁。
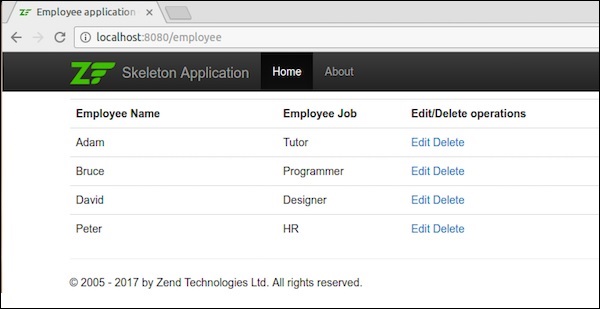
步驟 21:編輯員工記錄
讓我們在 Employee 模組中執行編輯資料操作。在Employeecontroller.php中更新以下更改。
public function editAction() {
   $id = (int) $this->params()->fromRoute('id', 0);
   if (!$id) {
      return $this->redirect()->toRoute('employee', array(
         'action' => 'add'
      ));
   }
   try {
      $employee = $this->table->getEmployee($id);
   } catch (\Exception $ex) {
      return $this->redirect()->toRoute('employee', array(
         'action' => 'index'
      ));
   }
   $form = new EmployeeForm();
   $form->bind($employee);
   $form->get('submit')->setAttribute('value', 'Edit');
   $request = $this->getRequest();

   if ($request->isPost()) {
      $form->setInputFilter($employee->getInputFilter());
      $form->setData($request->getPost());
      if ($form->isValid()) {
         $this->table->saveEmployee($employee);

         // Redirect to list of employees
         return $this->redirect()->toRoute('employee');
      }
   }
   return array('id' => $id, 'form' => $form,);
}
在這裡,我們查詢匹配路由中的id,然後載入員工詳細資訊以進行編輯操作。
步驟 22:Employee.php
現在在“Employee.php”檔案中新增以下更改,該檔案位於myapp/module/Employee/src/Employee/Model/目錄下。
public function getArrayCopy() {
   return get_object_vars($this);
}
這裡,Zend\Stdlib\Hydrator\ArraySerializable 期望在模型中找到兩個方法:getArrayCopy() 和 exchangeArray()。
其中,exchangeArray() 用於迭代。此函式用於繫結來自員工表的資料。
現在,我們需要為editAction()建立一個檢視指令碼。
步驟 23:建立 Edit.phtml
在 module/Employee/view/employee/employee/edit.phtml 中建立一個檢視指令碼檔案。
<?php
   $title = 'Edit employee records';
   $this->headTitle($title);
?>
<h1><?php echo $this->escapeHtml($title); ?></h1>

<?php
$form = $this->form;
$form->setAttribute('action', $this->url(
   'employee',
   array('action' => 'edit', 'id' => $this->id,)
));
$form->prepare();
echo $this->form()->openTag($form);
echo $this->formHidden($form->get('id'));
echo $this->formRow($form->get('emp_name'))."<br>";
echo $this->formRow($form->get('emp_job'))."<br>";
echo $this->formSubmit($form->get('submit'));
echo $this->form()->closeTag();
編輯員工詳細資訊如下面的螢幕截圖所示。
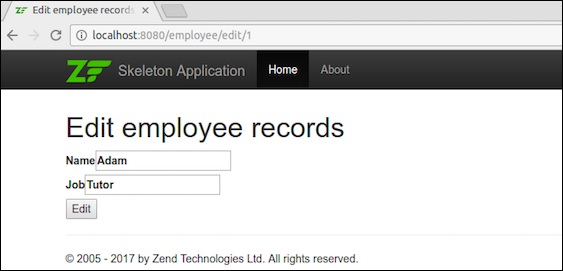
編輯資料後,它將重定向到主頁。

步驟 24:新增 deleteEmployee 方法
在 EmployeeTable 類中新增 deleteEmployee 方法 – myapp/module/Employee/src/Model/EmployeeTable.php
public function deleteEmployee($id) {
   $this->tableGateway->delete(['id' => (int) $id]);
}
步驟 25:刪除員工記錄
現在讓我們在 Employee 模組中執行刪除資料操作。在 EmployeeController 類中新增以下方法 deleteAction。
public function deleteAction() {
   $id = (int) $this->params()->fromRoute('id', 0);
   if (!$id) {
      return $this->redirect()->toRoute('employee');
   }
   $request = $this->getRequest();
   if ($request->isPost()) {
      $del = $request->getPost('del', 'No');
      if ($del == 'Yes') {
         $id = (int) $request->getPost('id');
         $this->table->deleteEmployee($id);
      }
      return $this->redirect()->toRoute('employee');
   }
   return array(
      'id' => $id,
      'employee' => $this->table->getEmployee($id)
   );
}
這裡,deleteEmployee() 方法透過員工的id刪除員工,並重定向到員工列表頁面(主頁)。
現在讓我們為 deleteAction() 方法建立相應的檢視指令碼。
步驟 26:建立檢視指令碼
在 - myapp/module/Employee/view/employee/employee/delete.phtml 中建立一個名為 delete.phtml 的檔案,並在其中新增以下程式碼。
<?php
   $title = 'Delete an employee record';
   $this->headTitle($title);
?>
<h1><?php echo $this->escapeHtml($title); ?></h1>

'<?php echo $this->escapeHtml($employee->emp_name); ?>' by
'<?php echo $this->escapeHtml($employee->emp_job); ?&'?
<?php
   $url = $this->url('employee', array('action' => 'delete', 'id' => $this->id,));
?>

<form action ="<?php echo $url; ?>" method = "post">
   <div>
      <input type = "hidden" name = "id" value = "<?php echo (int) $employee->id; ?>" />
      <input type = "submit" name = "del" value = "Yes" />
      <input type = "submit" name = "del" value = "No" />
   </div>
</form>
現在,使用主頁中的編輯連結刪除任何員工,結果將如以下螢幕截圖所示。
結果
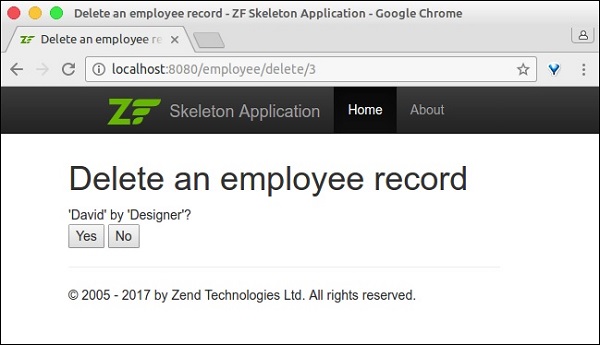
我們透過實現所有必要的功能成功完成了 Employee 模組。
結論
在當前競爭激烈的環境中,Zend 框架被開發人員置於首位。它為 PHP 語言中的任何程式或任何型別的應用程式提供抽象。它是一個成熟的框架,並支援現代 PHP 語言特性。它有趣、專業、不斷發展,並與當前技術保持同步。