- Zend Framework 教程
- Zend Framework - 首頁
- Zend Framework - 簡介
- Zend Framework - 安裝
- 框架應用程式
- Zend Framework - MVC 架構
- Zend Framework - 概念
- Zend Framework - 服務管理器
- Zend Framework - 事件管理器
- Zend Framework - 模組系統
- 應用程式結構
- Zend Framework - 建立模組
- Zend Framework - 控制器
- Zend Framework - 路由
- Zend Framework - 檢視層
- Zend Framework - 佈局
- 模型與資料庫
- 不同的資料庫
- 表單與驗證
- Zend Framework - 檔案上傳
- Zend Framework - Ajax
- Cookie 管理
- 會話管理
- Zend Framework - 身份驗證
- 郵件管理
- Zend Framework - 單元測試
- Zend Framework - 錯誤處理
- Zend Framework - 工作示例
- Zend Framework 有用資源
- Zend Framework - 快速指南
- Zend Framework - 有用資源
- Zend Framework - 討論
Zend Framework - 模型與資料庫
在本章中,我們將討論 Zend Framework 的各種模型和資料庫。
Zend Framework 中的模型
模型定義了應用程式的邏輯資料表示。例如,在購物車應用程式中 - 產品、客戶、購物車和訂單都是模型。它們定義了實體所具有的屬性。模型的一些概念如下:
控制器與模型通訊並要求它們檢索所需的資訊。然後,控制器將檢索到的資訊傳遞給檢視。最後,檢視將模型呈現為使用者可消費的表示資料。
模型很少直接與檢視互動,但有時可能會發生。
模型可以相互通訊,並且不是自包含的。它們彼此之間存在關係。這些關係使控制器更容易、更快速地獲取資訊,因為它不必與不同的模型互動;模型本身可以做到這一點。
讓我們來看一個簡單的模型 - **MyModel**
<?php
namespace Tutorial\Model;
class Book {
   public $id;
   public $author;
   public $title;
}
Zend Framework 中的資料庫
Zend 框架提供了一個簡單且功能豐富的類,Zend\Db\TableGateway\TableGateway,用於查詢、插入、更新和刪除資料庫表中的資料。
讓我們看看如何透過以下步驟在 Zend 框架中透過 PHP 的 PDO 驅動程式連線 **MySqlservice**。
步驟 1:在 MySQL 中建立資料庫
在本地 MySQL 伺服器中建立資料庫 **tutorials**。我們可以為此目的使用 **phpmyadmin** 或任何其他 MySQL GUI 工具。讓我們在命令提示符中使用 **MySQL 客戶端**。連線到 mysql 伺服器並執行以下命令以建立 **tutorial** 資料庫。
create database tutorials
步驟 2:在 tutorials 資料庫中建立表
現在讓我們使用以下 SQL 命令在 **tutorials** 資料庫中建立一個數據庫 **book**。
use tutorials;
CREATE TABLE book (
   id int(11) NOT NULL auto_increment,
   author varchar(100) NOT NULL,
   title varchar(100) NOT NULL,
   PRIMARY KEY (id)
);
步驟 3:填充 book 表中的資料
使用示例資料填充 **book** 表。使用以下 SQL 命令。
INSERT INTO book (author, title) VALUES ('Dennis Ritchie', 'C Programming');
INSERT INTO book (author, title) VALUES ('James gosling', 'Java Programming');
INSERT INTO book (author, title) VALUES ('Rasmus Lerdorf', 'Programming PHP');
步驟 4:更新資料庫連線
更新全域性配置檔案,即 – myapp/config/autoload/global.php,其中包含必要的資料庫驅動程式資訊。
<?php
return array(
   'db' => array(
      'driver' => 'Pdo',
      'dsn' => 'mysql:dbname = tutorials;host = localhost',
      'driver_options' => array(
         PDO::MYSQL_ATTR_INIT_COMMAND => 'SET NAMES \'UTF8\''
      ),
   ),
   'service_manager' => array(
      'factories' => array(
         'Zend\Db\Adapter\Adapter' => 'Zend\Db\Adapter\AdapterServiceFactory',
      ),
   ),
);
步驟 5:更新資料庫憑據
更新本地配置檔案中的資料庫憑據,即 – myapp/config/autoload/local.php。這樣,我們可以分離本地和即時資料庫連線憑據。
<?php
return array(
   'db' => array(
      'username' => '<user_name>',
      'password' => '<password>',
   ),
);
步驟 6:為 Book 建立模型
讓我們在模組 **src** 目錄中建立一個模型 **Book**。通常,模型在 Model 資料夾下分組 - /myapp/module/Tutorial/src/Model/Book.php。
<?php
namespace Tutorial\Model;
class Book {
   public $id;
   public $author;
   public $title;
}
步驟 7:在 book 模型中實現 exchangeArray
**TableGateway** 透過 **exchangeArray** 函式與模型互動。exchangeArray 函式的標準引數是儲存為 PHP 陣列的資料庫結果集。使用 **exchangeArray 函式**,可以輕鬆地將模型的屬性與相應的資料庫表同步。
如下所示更新模型 **Book**:
<?php
namespace Tutorial\Model;
class Book {
   public $id;
   public $author;
   public $title;
   public function exchangeArray($data) {
      $this->id = (!empty($data['id'])) ? $data['id'] : null;
      $this->Author = (!empty($data['author'])) ? $data['author'] : null;
      $this->Title = (!empty($data['title'])) ? $data['title'] : null;
   }
}
步驟 8:使用 TableGateway 獲取 book
建立一個類 **BookTable** 以從資料庫中獲取 book 資訊。在 **Model** 資料夾中建立類 BookTable。
<?php
namespace Tutorial\Model;
use Zend\Db\TableGateway\TableGatewayInterface;
class BookTable {
   protected $tableGateway;
   public function __construct(TableGatewayInterface $tableGateway) {
      $this->tableGateway = $tableGateway;
   }
   public function fetchAll() {
      $resultSet = $this->tableGateway->select();
      return $resultSet;
   }
}
我們使用了 TableGateway 類的 **select()** 方法從資料庫中獲取 book 資訊。但是,我們在程式碼中沒有使用任何對錶 **book** 的引用。TableGateway 本質上是通用的,它可以透過使用某些配置從任何表中獲取資料。通常,這些配置是在 **module.config.php** 檔案中完成的,我們將在後續步驟中討論。
步驟 9:配置 BookTable 類
使用 **getServiceConfig()** 方法更新教程模組 **Module.php**。
<?php
namespace Tutorial;
use Zend\Db\Adapter\AdapterInterface;
use Zend\Db\ResultSet\ResultSet;
use Zend\Db\TableGateway\TableGateway;
use Zend\ModuleManager\Feature\ConfigProviderInterface;

class Module implements ConfigProviderInterface {

   public function getConfig() {
      return include __DIR__ . '/../config/module.config.php';
   }
   public function getServiceConfig() {
      return [
         'factories' => [
            Model\BookTable::class => function ($container) {
               $tableGateway = $container->get(Model\BookTableGateway::class);
               $table = new Model\BookTable($tableGateway);
               return $table;
            },
            Model\BookTableGateway::class => function ($container) {
               $dbAdapter = $container->get(AdapterInterface::class);
               $resultSetPrototype = new ResultSet();
               $resultSetPrototype->setArrayObjectPrototype(new Model\Book());
               return new TableGateway('book', $dbAdapter, null, $resultSetPrototype);
            },
         ],
      ];
   }
}
在這裡,我們使用服務管理器註冊了 **BookTable** 類。BookTable 類用於獲取 book 資訊,透過註冊它,我們可以在任何需要的地方訪問它。由於註冊的服務是共享的,因此它們提高了效能,減少了記憶體消耗等。
另一個專案 Model\BookTableGateway::class 是專門用於 **Book** 模型的 TableGateway 物件,並且是 **BookTable** 的依賴項。
步驟 10:更新 TutorialController 配置
我們需要教程控制器中的 **BookTable** 服務來獲取 book 資訊。要獲取 BookTable 服務,請將其註冊為 TutorialController 中的建構函式依賴項。
此建構函式依賴項有助於在控制器本身處於初始化階段時獲取 BookTable 服務。如下所示更新教程模組配置 **module.config.php** 中的控制器部分。
'controllers' => [
   'factories' => [
      Controller\TutorialController::class => function($container) {
         return new Controller\TutorialController(
            $container->get(Model\BookTable::class)
         );
      },
   ],
],
步驟 11:更新 Tutorial 控制器
這是透過遵循以下三個步驟完成的。
- 新增以 *BookTable* 作為引數的建構函式。
private $table;
public function __construct(BookTable $table) {
   $this->table = $table;
}
使用 **BookTable 的 fetchAll()** 方法獲取 book 資訊並將其註冊到檢視中。
public function indexAction() {
   $view = new ViewModel([
      'data' => $this->table->fetchAll(),
   ]);
   return $view;
}
在檢視指令碼中顯示 book 資訊。
<table class = "table">
   <tr>
      <th>Author</th>
      <th>Title</th>
      <th> </th>
   </tr>
   <?php foreach ($data as $sampledata) : ?>
   <tr>
      <td><?php echo $this->escapeHtml($data->author);?></td>
      <td><?php echo $this->escapeHtml($data->title);?></td>
   </tr>
   <?php endforeach ?>
</table>
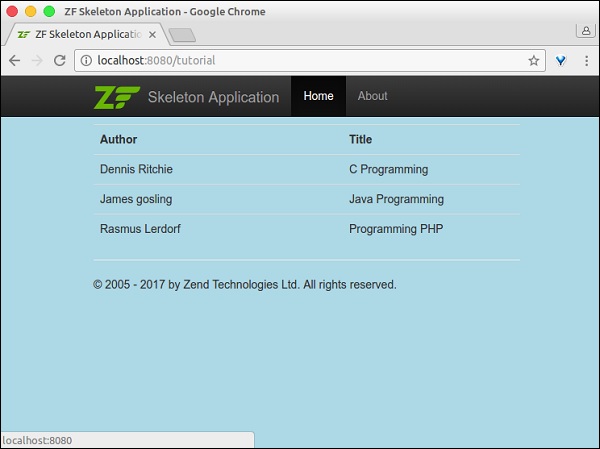
步驟 12:執行應用程式
透過執行以下命令檢查應用程式:**https://:8080/tutorial**。