- RichFaces 教程
- RichFaces - 首頁
- RichFaces - 概述
- RichFaces - 環境設定
- RichFaces - 架構
- RichFaces - 基本概念
- RichFaces - 豐富介面
- RichFaces - 輸入元件
- RichFaces - 輸出元件
- RichFaces - 迭代元件
- RichFaces - 選擇元件
- RichFaces - 選單元件
- RichFaces - 富樹
- RichFaces - 錯誤處理
- RichFaces 有用資源
- RichFaces - 快速指南
- RichFaces - 有用資源
- RichFaces - 討論
RichFaces - 富樹
在本章中,我們將瞭解 RichFaces 中的樹形處理。RichFaces 提供了建立和操作樹所需的所有元件。
<rich:treeNode>
此標記用於建立層次樹。<treeNode> 內提供的每個節點都將成為樹的子節點。此標記將與另一個名為 <rich:tree> 的標記一起使用。我們用於建立樹的所有例項變數都必須實現以下三個介面之一 - **org.richfaces.model.TreeNode、org.richfaces.model.TreeDataModel** 和 **javax.swing.tree.TreeNode**。
在以下示例中,我們將使用 <rich:treeNode> 標記從後端填充樹。
<?xml version = "1.0" encoding = "UTF-8"?>
<!DOCTYPE html>
<html xmlns = "http://www.w3.org/1999/xhtml"
   xmlns:h = "http://java.sun.com/jsf/html"
   xmlns:f = "http://java.sun.com/jsf/core"
   xmlns:ui = "http://java.sun.com/jsf/facelets"
   xmlns:a4j = "http://richfaces.org/a4j"
   xmlns:rich = "http://richfaces.org/rich">

   <h:head>
      <title>TreeNode Example</title>
      <meta name = "viewport" content = "width = device-width, initial-scale = 1.0"/>
   </h:head>

   <h:body>
      <h:form>
         <rich:tree value = "#{tree.populateNode}" var = "tree">
            <rich:treeNode>
               <rich:treeModelRecursiveAdaptor>
               </rich:treeModelRecursiveAdaptor>
               <h:outputText value = "#{tree.data}" />
            </rich:treeNode>
         </rich:tree>
      </h:form>
   </h:body>

</html>
以下是實現 **“TreeNodeImpl”** 介面的 Java 相關類。
import javax.faces.bean.ManagedBean;
import javax.faces.bean.RequestScoped;
import org.richfaces.model.TreeNodeImpl;

@ManagedBean
@RequestScoped

public class Tree extends TreeNodeImpl {
   private Tree stationRoot;
   private Tree populateNode;
   private Object data;

   public Tree() {
      super();
   }
   public Tree(boolean leaf, Object data) {
      super(leaf);
      this.data = data;
   }
   public Object getData() {
      return data;
   }
   public Tree getPopulateNode() {
      if (populateNode == null) {
         String[] List_OF_Node = {
            "Frist Node", "Second Node", "Third Node", "Fourth Node", "Fifth Node"};
         stationRoot = new Tree(false, "Example Of Tree");

         for (int i = 0; i < List_OF_Node.length; i++) {
            Tree child = new Tree(true, List_OF_Node[i]);
            stationRoot.addChild(i, child);
         }
         populateNode = new Tree();
         populateNode.addChild(0, stationRoot);
      }
      return populateNode;
   }
}
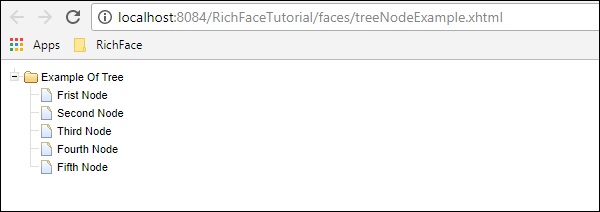
以上程式碼段將在瀏覽器中生成以下輸出。
<rich:treeModelAdaptor>
該元件將 Map 作為輸入,對其進行迭代,並在瀏覽器中生成所需輸出。每當我們需要填充遞迴對映時,我們都可以使用另一個稱為 **<rich:recursiveTreeModelAdaptor>** 的標記。
以下示例顯示瞭如何在瀏覽器中渲染專案結構。在 RichFaces 3 中,這兩個標記是 <rich:treeNodeAdaptor> 和 <rich:recursiveTreeNodeAdaptor>。
<?xml version = "1.0" encoding = "UTF-8"?>
<!DOCTYPE html>
<html xmlns = "http://www.w3.org/1999/xhtml"
   xmlns:h = "http://java.sun.com/jsf/html"
   xmlns:f = "http://java.sun.com/jsf/core"
   xmlns:ui = "http://java.sun.com/jsf/facelets"
   xmlns:a4j = "http://richfaces.org/a4j"
   xmlns:rich = "http://richfaces.org/rich">

   <h:head>
      <title>Tree Model and Recursive Model Example</title>
   </h:head>

   <h:body>
      <h:form id = "form">
         <rich:tree toggleType = "AJAX" var = "item" style = "max-width: 400px">
            <rich:treeModelRecursiveAdaptor roots = "#{fileSystemBean.sourceRoots}"
               nodes = "#{item.directories}">

               <rich:treeNode>
                  #{item.shortPath}
               </rich:treeNode>

               <rich:treeModelAdaptor nodes = "#{item.files}">
                  <rich:treeNode>#{item}</rich:treeNode>
               </rich:treeModelAdaptor>
            </rich:treeModelRecursiveAdaptor>

         </rich:tree>
      </h:form>
   </h:body>

</html>
對於此示例,我們需要建立兩個新的 Java Bean。以下是 Bean 類 “FileSystemBean.java” 的程式碼片段,其中包含所需的資料夾名稱。
import java.util.List;
import javax.faces.bean.ManagedBean;
import javax.faces.bean.RequestScoped;

@ManagedBean
@RequestScoped

public class FileSystemBean {
   private static final String SRC_PATH = "/WEB-INF";
   private List<FileSystemNode> srcRoots;

   public synchronized List<FileSystemNode> getSourceRoots() {
      if (srcRoots == null) {
         srcRoots = new FileSystemNode(SRC_PATH).getDirectories();
      }
      return srcRoots;
   }
}
以下是 Bean 類 “FileSystemNode.java” 的程式碼片段,其中包含所需的專案葉節點。
import static com.google.common.base.Predicates.containsPattern;
import static com.google.common.base.Predicates.not;
import static com.google.common.collect.Iterables.filter;
import static com.google.common.collect.Iterables.transform;

import java.util.ArrayList;
import java.util.Collections;
import java.util.List;
import java.util.Set;

import javax.faces.context.ExternalContext;
import javax.faces.context.FacesContext;

import com.google.common.base.Function;
import com.google.common.collect.Iterables;
import com.google.common.collect.Lists;

public class FileSystemNode {
   private static final Function<String, FileSystemNode>
      FACTORY = new Function<String, FileSystemNode>() {

      public FileSystemNode apply(String from) {
         return new FileSystemNode(from.substring(0, from.length() - 1));
      };
   };
   private static final Function<String, String>
      TO_SHORT_PATH = new Function<String, String>() {

      public String apply(String from) {
         int idx = from.lastIndexOf('/');
         if (idx < 0) {
            return from;
         }
         return from.substring(idx + 1);
      };
   };
   private String path;
   private List<FileSystemNode> directories;
   private List<String> files;
   private String shortPath;

   public FileSystemNode(String path) {
      this.path = path;
      int idx = path.lastIndexOf('/');

      if (idx != -1) {
         shortPath = path.substring(idx + 1);
      } else {
         shortPath = path;
      }
   }
   public synchronized List<FileSystemNode> getDirectories() {
      if (directories == null) {
         directories = Lists.newArrayList();

         Iterables.addAll(directories, transform(filter(
            getResourcePaths(), containsPattern("/$")), FACTORY));
      }
      return directories;
   }
   public synchronized List<String> getFiles() {
      if (files == null) {
         files = new ArrayList<String>();

         Iterables.addAll(files, transform(filter(
            getResourcePaths(), not(containsPattern("/$"))), TO_SHORT_PATH));
      }
      return files;
   }
   private Iterable<String> getResourcePaths() {
      FacesContext facesContext = FacesContext.getCurrentInstance();
      ExternalContext externalContext = facesContext.getExternalContext();
      Set<String> resourcePaths = externalContext.getResourcePaths(this.path);

      if (resourcePaths == null) {
         resourcePaths = Collections.emptySet();
      }
      return resourcePaths;
   }
   public String getShortPath() {
      return shortPath;
   }
}
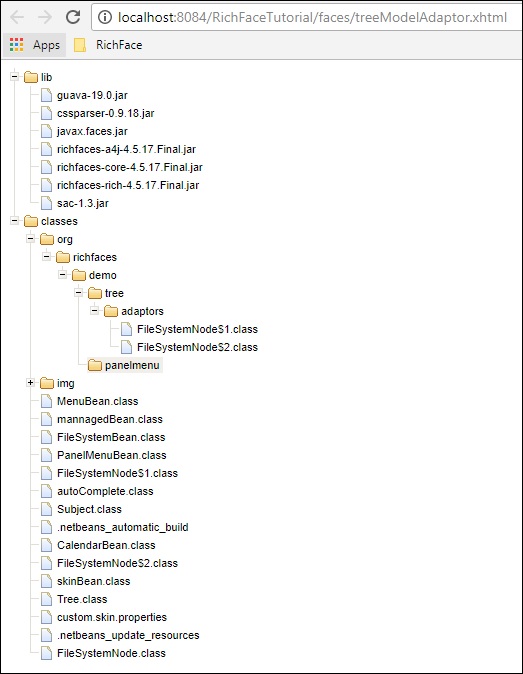
以上示例將在瀏覽器中生成以下輸出。
廣告