- RichFaces 教程
- RichFaces - 首頁
- RichFaces - 概述
- RichFaces - 環境設定
- RichFaces - 架構
- RichFaces - 基本概念
- RichFaces - 富皮膚
- RichFaces - 輸入元件
- RichFaces - 輸出元件
- RichFaces - 迭代元件
- RichFaces - 選擇元件
- RichFaces - 選單元件
- RichFaces - 富樹
- RichFaces - 錯誤處理
- RichFaces 有用資源
- RichFaces - 快速指南
- RichFaces - 有用資源
- RichFaces - 討論
RichFaces - 富皮膚
RichFaces 帶有一個新的功能,可以集中控制網站的外觀和感覺,稱為 Rich Skin(富皮膚)。皮膚是對舊 CSS 檔案的高階實現,對於後端開發人員來說,它更方便地控制網站的外觀和感覺。有一些內建的皮膚可用,可以根據您的選擇進行自定義。
內建皮膚
RichFaces 元件 jar 檔案中提供許多內建皮膚。以下是可用的部分內建富皮膚。
- 預設
- 樸素
- 翡翠鎮
- 藍天
- 酒紅
- 日本櫻花
- 紅寶石
- 經典
- 深海藍
- 空值
在下面的示例中,我們將實現“經典”皮膚。實現上述任何皮膚都非常容易。在繼續之前,請使用下面給出的程式碼行在“web.xml”檔案中新增皮膚。我們可以從上面的列表中新增任何我們選擇的皮膚。我們只需要使用適當的皮膚名稱修改`
<context-param>
   <param-name>org.richfaces.skin</param-name>
   <param-value>classic</param-value>
</context-param>
新增此內容後,請建立一個“SkinExample.xhtml”檔案並將以下程式碼行新增到其中。
<?xml version = '1.0' encoding = 'UTF-8' ?>
<ui:composition xmlns = "http://www.w3.org/1999/xhtml"
   xmlns:h = "http://java.sun.com/jsf/html"
   xmlns:f = "http://java.sun.com/jsf/core"
   xmlns:ui = "http://java.sun.com/jsf/facelets"
   xmlns:a4j = "http://richfaces.org/a4j"
   xmlns:rich = "http://richfaces.org/rich">

   <f:view>
      <h:head>
         <title>Rich Faces Built in Skin</title>
      </h:head>

      <h:body>
         <h:form>
            <rich:panel style = "width:60%">
               <rich:tabPanel switchType = "AJAX">
                  <rich:tab header = "Name">
                     Tutorials Point
                  </rich:tab>

                  <rich:tab header = "Features">
                     Best Place to learn
                  </rich:tab>
               </rich:tabPanel>
            </rich:panel>
         </h:form>
      </h:body>

   </f:view>
</ui:composition>
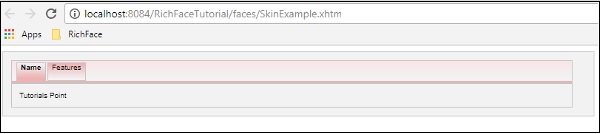
執行此頁面後,瀏覽器中將顯示以下輸出,其中每個選項卡都會動態地傳播以生成不同的輸出。點選下一個選項卡後,它將顯示不同的輸出。

在上面的示例中,`
建立/修改皮膚
皮膚只不過是 CSS 設計的擴充套件版本,它將在執行時應用於網頁。在上一節中,我們學習了皮膚的一些基本的內建功能。在本節中,我們將建立自己的皮膚或修改現有皮膚。RichFaces 中的皮膚可以在以下三個級別進行自定義。
皮膚屬性檔案 - 所有皮膚都是透過“rechfaces-a4j-4.5.17.Final”jar 檔案下提到的不同屬性檔案生成的。我們所需要做的就是建立一個相同的屬性檔案,將其儲存在我們的原始檔夾下並編輯其屬性。我們需要相應地更改我們的“web.xml”以反映我們網站上的新皮膚屬性。
元件樣式表 - 實現新的 CSS 檔案並將其用於應用程式。
覆蓋樣式類 - 可以透過直接在 xhtml 檔案中提及樣式屬性來覆蓋樣式。
讓我們來看一個例子。我們將自定義我們之前的“經典”皮膚。在“source”包內建立一個屬性檔案,並將其命名為“custom.skin.properties”。以下是此屬性檔案的條目,這些條目是從上面提到的 jar 檔案中其他屬性檔案複製的。
#Colors
headerBackgroundColor = #black
headerGradientColor = #DF5858
headerTextColor = #FFFFFF
headerWeightFont = bold

generalBackgroundColor = #f1f1f1
generalTextColor = #000000
generalSizeFont = 10px
generalFamilyFont = Arial, Verdana, sans-serif

controlTextColor = #000000
controlBackgroundColor = #ffffff
additionalBackgroundColor = #F9E4E4

shadowBackgroundColor = #000000
shadowOpacity = 1
panelBorderColor = #C0C0C0
subBorderColor = #ffffff

tabBackgroundColor = #EDAEAE
tabDisabledTextColor = #C47979
trimColor = #F7C4C4
tipBackgroundColor = #FAE6B0
tipBorderColor = #E5973E

selectControlColor = #FF9409
generalLinkColor = #CF0000
hoverLinkColor = #FF0000
visitedLinkColor = #CF0000

# Fonts
headerSizeFont = 11px
headerFamilyFont = Arial, Verdana, sans-serif
tabSizeFont = 11
tabFamilyFont = Arial, Verdana, sans-serif
buttonSizeFont = 11
CHAPTER 11 ■ SKINS 223
buttonFamilyFont = Arial, Verdana, sans-serif

tableBackgroundColor = #FFFFFF
tableFooterBackgroundColor = #cccccc
tableSubfooterBackgroundColor = #f1f1f1
tableBorderColor = #C0C0C0
tableBorderWidth = 1px

#Calendar colors
calendarWeekBackgroundColor = #f5f5f5
calendarHolidaysBackgroundColor = #FFF1F1
calendarHolidaysTextColor = #980808
calendarCurrentBackgroundColor = #808080
calendarCurrentTextColor = #ffffff
calendarSpecBackgroundColor = #f1f1f1
calendarSpecTextColor = #000000

warningColor = #FFE6E6
warningBackgroundColor = #FF0000
editorBackgroundColor = #F1F1F1
editBackgroundColor = #FEFFDA

#Gradients
Gradient Type = plain
根據技能水平,我們可以更改此屬性檔案中的任何屬性。我們可以新增新的樣式類或編輯現有的樣式類。完成新屬性檔案的建立後,是時候將其新增到“web.xml”檔案中了。以下是“web.xml”的條目,它應該指向我們的皮膚。
<context-param>
   <param-name>org.richfaces.skin</param-name>
   <param-value>custom</param-value>
</context-param>
注意 - 確保新的屬性檔案位於源目錄中,否則它將丟擲一個“NoClassFoundException”執行時錯誤。
繼續執行之前名為“SkinExample.xhtml”的檔案。瀏覽器中將顯示以下輸出,我們將能夠看到整個網站的外觀和感覺已更改為“Ruby”,因為從 ruby.properties 檔案複製了一個新的屬性檔案。
執行時更改皮膚
在這個例子中,我們將執行時更改皮膚。建立一個如下所示的皮膚類。
import javax.faces.bean.ManagedBean;
import javax.faces.bean.RequestScoped;

@ManagedBean
@RequestScoped

public class skinBean {
   private String skin;
   public skinBean() {
      this.skin="plane";
   }
   public String getSkin() {
      return skin;
   }
   public void setSkin(String skin) {
      this.skin = skin;
   }
}
然後更改“web.xml”檔案,如下所示,以便在執行時填充皮膚名稱。
<context-param>
   <param-name>org.richfaces.skin</param-name>
   <param-value>#{skinBean.skin}</param-value>
</context-param>
完成此操作後,我們需要更改 JSF 應用程式的配置檔案。這些檔案可以位於 web-INF 資料夾下。向其中新增以下 bean 屬性。
<managed-bean>
   <managed-bean-name>skinBean</managed-bean-name>
   <managed-bean-class>SkinBean</managed-bean-class>>
   <managed-bean-scope>session</managed-bean-scope>

   <managed-property>
      <property-name>skin</property-name>
      <value>plain</value>
   </managed-property>
</managed-bean>
以下是 xhtml 檔案程式碼。
<?xml version = "1.0" encoding = "UTF-8"?>
<!DOCTYPE html>
<html xmlns = "http://www.w3.org/1999/xhtml"
   xmlns:h = "http://java.sun.com/jsf/html"
   xmlns:a4j = "http://richfaces.org/a4j"
   xmlns:f = "http://java.sun.com/jsf/core"
   xmlns:rich = "http://richfaces.org/rich">

   <h:head>
      <title>TODO supply a title</title>
   </h:head>

   <h:body>
      <h:form>
         <div style = "display: block; float: left">
            <h:selectOneRadio value = "#{skinBean.skin}" border = "0"
               layout = "pageDirection" title = "Changing skin" style = "font-size: 8;
               font-family: comic" onchange = "submit()">
               <f:selectItem itemLabel = "plain" itemValue = "plain" />
               <f:selectItem itemLabel = "emeraldTown" itemValue = "emeraldTown" />
               <f:selectItem itemLabel = "blueSky" itemValue = "blueSky" />
               <f:selectItem itemLabel = "wine" itemValue = "wine" />
               <f:selectItem itemLabel = "japanCherry" itemValue = "japanCherry" />
               <f:selectItem itemLabel = "ruby" itemValue = "ruby" />
               <f:selectItem itemLabel = "deepMarine" itemValue = "deepMarine" />
            </h:selectOneRadio>
         </div>

         <div style = "display: block; float: left">
            <rich:panel >
               <rich:panelMenu style = "font-family: monospace; font-size: 12;">
                  Changing skin in runtime
               </rich:panelMenu>

               <rich:panelMenu  style = "font-family: monospace; font-size: 12;">
                  This is a result of the modification "blueSky" skin
               </rich:panelMenu>
            </rich:panel>
         </div>
      </h:form>
   </h:body>

</html>
以上程式碼段將在瀏覽器中產生以下輸出。
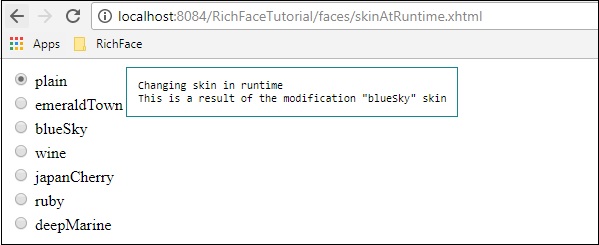
在上面的例子中,我們最初選擇“樸素”,因此它指向“樸素”。一旦您透過單選按鈕傳播,它將相應地更改顏色。