- RichFaces 教程
- RichFaces - 首頁
- RichFaces - 概述
- RichFaces - 環境搭建
- RichFaces - 架構
- RichFaces - 基本概念
- RichFaces - 富皮膚
- RichFaces - 輸入元件
- RichFaces - 輸出元件
- RichFaces - 迭代元件
- RichFaces - 選擇元件
- RichFaces - 選單元件
- RichFaces - 富樹
- RichFaces - 錯誤處理
- RichFaces 有用資源
- RichFaces - 快速指南
- RichFaces - 有用資源
- RichFaces - 討論
RichFaces - 輸出元件
在上一章中,我們學習了不同的輸入欄位或標籤,它們幫助使用者透過瀏覽器提供輸入。本章我們將學習 RichFaces 提供的不同輸出元件。
<rich:Panel>
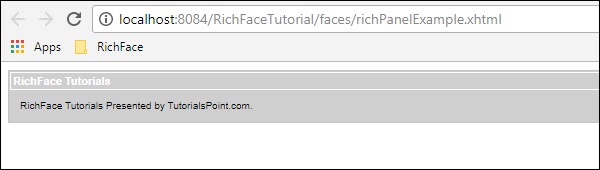
在我們之前的幾個示例中,我們已經遇到過 panel 標籤。<rich:panel> 在網頁內建立一個矩形區域,其中可以包含任何資訊。你可以在一個面板內包含其他面板、影像和任何其他 Rich 元件。
在下面的示例中,我們將根據選擇建立一個自定義面板,並使用“header”屬性為面板提供標題。請建立一個 xhtml 檔案並將其命名為“richPanelExamlple.xhtml”。將以下程式碼放入其中。
<?xml version = "1.0" encoding = "UTF-8"?>
<!DOCTYPE html>
<html xmlns = "http://www.w3.org/1999/xhtml"
   xmlns:h = "http://java.sun.com/jsf/html"
   xmlns:f = "http://java.sun.com/jsf/core"
   xmlns:ui = "http://java.sun.com/jsf/facelets"
   xmlns:a4j = "http://richfaces.org/a4j"
   xmlns:rich = "http://richfaces.org/rich">

   <h:head>
      <title>Panel Example</title>
   </h:head>

   <h:body>
      <rich:panel header = "RichFace Tutorials " style = "font-size: 500px;
         align-items:center; background-color: activecaption">

         RichFace Tutorials Presented by TutorialsPoint.com.
      </rich:panel>
   </h:body>
</html>
以上程式碼將在瀏覽器中產生以下輸出。
<rich:simpleTogglePanel>
simpleTogglePanel 為開發人員提供了以動態方式更改面板內容的機會。但是,在 RichFaces 4 中,此標籤已被移除。JBoss 引入了更高階的標籤,例如 <rich:togglePanel>、<rich:tab> 和 <rich:tabPanel>。建議使用更新版本的 RichFaces 標籤以獲得更多功能。如果你仍在使用 RichFaces 3,則可以使用以下標籤。
<ui:composition xmlns = "http://www.w3.org/1999/xhtml"
   xmlns:ui = "http://java.sun.com/jsf/facelets"
   xmlns:h = "http://java.sun.com/jsf/html"
   xmlns:f = "http://java.sun.com/jsf/core"
   xmlns:a4j = "http://richfaces.org/a4j"
   xmlns:rich = "http://richfaces.org/rich">

   <rich:simpleTogglePanel switchType = "client" label = "SimpleToggle">
      The simple example of SimpleToggle tag
   </rich:simpleTogglePanel>
</ui:composition>
<rich:tabPanel>
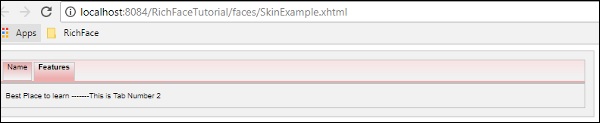
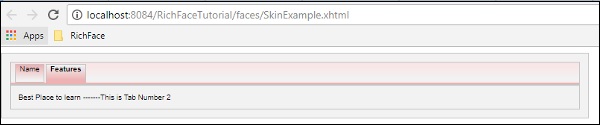
此標籤幫助開發人員在面板內建立不同的選項卡。我們在皮膚章節中使用了此標籤,我們在另一個面板內建立了兩個單獨的標籤。以下程式碼將描述我們如何使用 <rich:tabPanel>。
<?xml version = '1.0' encoding = 'UTF-8' ?>
<ui:composition xmlns = "http://www.w3.org/1999/xhtml"
   xmlns:h = "http://java.sun.com/jsf/html"
   xmlns:f = "http://java.sun.com/jsf/core"
   xmlns:ui = "http://java.sun.com/jsf/facelets"
   xmlns:a4j = "http://richfaces.org/a4j"
   xmlns:rich = "http://richfaces.org/rich">

   <f:view>
      <h:head>
         <title>Rich Faces Tab Example</title>
      </h:head>

      <h:body>
         <h:form>
            <rich:panel style = "width:60%">

               <rich:tabPanel switchType = "AJAX">
                  <rich:tab header = "Name">
                     Tutorials Point----This is Tab Number 1
                  </rich:tab>

                  <rich:tab header = "Features">
                     Best Place to learn -------This is Tab Number 2
                  </rich:tab>
               </rich:tabPanel>
            </rich:panel>

         </h:form>
      </h:body>

   </f:view>
</ui:composition>
在這個例子中,我們建立了兩個帶有不同標題的選項卡,分別稱為“名稱”和“功能”。這兩個標籤將在 <rich:panel> 內建立。以上程式碼將產生以下輸出。
<rich:panelBar>
與 simpleToggleBar 一樣,它允許開發人員根據某些 JS 事件實現垂直切換。此標籤在 RichFaces 4 中也被移除。但是,如果你使用的是 RichFaces 3.0,則可以按如下所示使用它。
<ui:composition xmlns = "http://www.w3.org/1999/xhtml"
   xmlns:ui = "http://java.sun.com/jsf/facelets"
   xmlns:h = "http://java.sun.com/jsf/html"
   xmlns:f = "http://java.sun.com/jsf/core"
   xmlns:a4j = "http://richfaces.org/a4j"
   xmlns:rich = "http://richfaces.org/rich">

   <rich:panelBar height = "400" width = "500">
      <rich:panelBarItem   label = "Toggle1”>
         First vertical toggle
      </rich:panelBarItem>

      <rich:panelBarItem  label = ”Toggle2”>
         Second Vertical Toggle
      </rich:panelBarItem>
   </rich:panelBar >

</ ui:composition >
在 RichFaces 4 中,相同的功能已使用 <rich:PanelMenu> 標籤實現。
<rich:tab>
我們已經熟悉這個標籤了。在 <rich:tabPanel> 的示例中,我們使用此標籤建立了不同的選項卡。在下面的示例中,我們建立了兩個標籤。
<?xml version = '1.0' encoding = 'UTF-8' ?>
<ui:composition xmlns = "http://www.w3.org/1999/xhtml"
   xmlns:h = "http://java.sun.com/jsf/html"
   xmlns:f = "http://java.sun.com/jsf/core"
   xmlns:ui = "http://java.sun.com/jsf/facelets"
   xmlns:a4j = "http://richfaces.org/a4j"
   xmlns:rich = "http://richfaces.org/rich">

   <f:view>
      <h:head>
         <title>Rich Faces Tab Example</title>
      </h:head>

      <h:body>
         <h:form>

            <rich:panel style = "width:60%">
               <rich:tabPanel switchType = "AJAX">
                  <rich:tab header = "Name">
                     Tutorials Point----This is Tab Number 1
                  </rich:tab>

                  <rich:tab header = "Features">
                     Best Place to learn -------This is Tab Number 2
                  </rich:tab>
               </rich:tabPanel>
            </rich:panel>

         </h:form>
      </h:body>

   </f:view>
</ui:composition>
以上程式碼將在瀏覽器中生成以下輸出。
<rich:panelMenu>
Panel Menu 幫助開發人員在面板區域內建立一個垂直下拉切換。以下示例將幫助我們更好地理解此標籤。建立“richPanelMenu.xhtml”檔案並將以下程式碼放入其中。
<?xml version = "1.0" encoding = "UTF-8"?>
<!DOCTYPE html>
<html xmlns = "http://www.w3.org/1999/xhtml"
   xmlns:h = "http://java.sun.com/jsf/html"
   xmlns:f = "http://java.sun.com/jsf/core"
   xmlns:ui = "http://java.sun.com/jsf/facelets"
   xmlns:a4j = "http://richfaces.org/a4j"
   xmlns:rich = "http://richfaces.org/rich">

   <h:head>
      <title>Panel Menu example</title>
   </h:head>

   <h:body>
      <h:form id = "form">
         <h:panelGrid columns = "2" columnClasses = "cols,cols" width = "400">
            <rich:panelMenu style = "width:200px">

               <rich:panelMenuGroup label = "Group 1">
                  <rich:panelMenuItem label = "Database" action = "#{managedBean.subjectList}">
                     <f:param name = "current" value = "DB"/>
                  </rich:panelMenuItem>

                  <rich:panelMenuItem label = "Oracle" action = "#{managedBean.subjectList}">
                     <f:param name = "current" value = "Oracle"/>
                  </rich:panelMenuItem>

                  <rich:panelMenuItem label = "JAVA" action = "#{managedBean.subjectList}">
                     <f:param name = "current" value = "JAVA"/>
                  </rich:panelMenuItem>
               </rich:panelMenuGroup>

            </rich:panelMenu>
         </h:panelGrid>
      </h:form>
   </h:body>

</html>
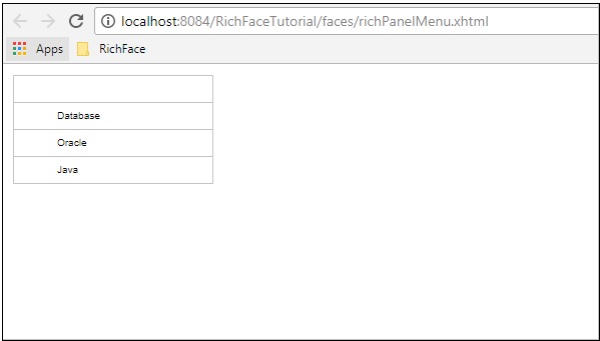
如以上示例所示,panelMenu 帶有一些其他關聯標籤,這些標籤以不同的方式提供幫助。<panelGrid> 幫助在面板內建立網格。<panelMenuGroup> 幫助對我們將要填充的不同元件進行分組。<panelMenuItem> 是將呈現給瀏覽器的實際專案。使用“action”屬性,你可以根據選擇的專案呼叫不同的操作方法。“label”屬性用於在前端填充值,一旦呼叫指定的 action 類,呈現的值將被處理到後端。
以上程式碼將在瀏覽器中產生以下輸出。
<rich:TogglePanel>
此標籤用於呈現不同的輸出,可以使用 Toggle 控制方法進行切換。此切換控制方法可以實現或自定義。在下面的示例中,我們將實現此方法。
建立一個 xhtml 檔案並將其命名為“richTogglePanel.xhtml”。將以下程式碼放入其中。
<?xml version = "1.0" encoding = "UTF-8"?>
<!DOCTYPE html>
<html xmlns = "http://www.w3.org/1999/xhtml"
   xmlns:h = "http://java.sun.com/jsf/html"
   xmlns:f = "http://java.sun.com/jsf/core"
   xmlns:ui = "http://java.sun.com/jsf/facelets"
   xmlns:a4j = "http://richfaces.org/a4j"
   xmlns:rich = "http://richfaces.org/rich">

   <h:head>
      <title>Rich Toggle Panel Example</title>
      <meta name = "viewport" content = "width = device-width, initial-scale = 1.0"/>
   </h:head>

   <h:body>
      <h:form id = "form">
         <rich:togglePanel id = "panel1" activeItem = "item1"
            itemChangeListener = "#{panelMenuBean.updateCurrent}">

            <rich:togglePanelItem name = "item1">
               <p>Content of the toggle 1</p>
            </rich0:togglePanelItem>

            <rich:togglePanelItem name = "item2">
                <p>Content of the toggle 2</p>
            </rich:togglePanelItem>
         </rich:togglePanel>

         <a4j:outputPanel id = "tabs" layout = "block">
            <a4j:outputPanel layout = "block" styleClass = "tabDiv">
               <rich:toggleControl event = "click" targetPanel = "panel1" targetItem = "item1" />
               <a4j:commandButton value = "Toggle1"/>
            </a4j:outputPanel>

            <a4j:outputPanel layout = "block" styleClass = "tabDiv">
               <rich:toggleControl event = "click" targetPanel = "panel1" targetItem = "item2" />
               <a4j:commandButton value = "Toggle2"/>
            </a4j:outputPanel>
         </a4j:outputPanel>

      </h:form>
   </h:body>

</html>
我們還需要建立一個 bean 類來控制網站的轉換。建立“MenuBean.java”類,如下所示。
import javax.faces.bean.ManagedBean;
import javax.faces.bean.ViewScoped;
import org.richfaces.event.ItemChangeEvent;

@ManagedBean
@ViewScoped

public class MenuBean {
   private String current;
   private boolean singleMode;

   public boolean isSingleMode() {
      return singleMode;
   }
   public void setSingleMode(boolean singleMode) {
      this.singleMode = singleMode;
   }
   public String getCurrent() {
      return this.current;
   }
   public void setCurrent(String current) {
      this.current = current;
   }
   public void updateCurrent(ItemChangeEvent event) {
      setCurrent(event.getNewItemName());
   }
}
以上程式碼將在瀏覽器中產生以下輸出。
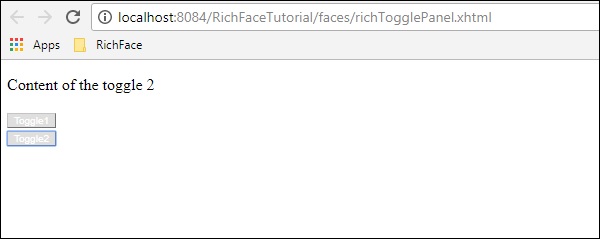
在上面的示例中,網頁的內容將根據使用者點選的按鈕而改變。“updateCurrent()”是處理 JS 事件內容並動態設定網站內容的方法。
<rich:toolBar>
toolBar 用於在面板中建立水平條。它用於在網頁中建立頂級選單。在下面的示例中,我們將學習如何在網頁中使用此標籤。建立一個“xhtml”檔案並將其命名為“toolbar.xhml”。將以下程式碼放入其中。
<?xml version = "1.0" encoding = "UTF-8"?>
<!DOCTYPE html>
<html xmlns = "http://www.w3.org/1999/xhtml"
   xmlns:h = "http://java.sun.com/jsf/html"
   xmlns:f = "http://java.sun.com/jsf/core"
   xmlns:ui = "http://java.sun.com/jsf/facelets"
   xmlns:a4j = "http://richfaces.org/a4j"
   xmlns:rich = "http://richfaces.org/rich">

   <h:head>
      <title>ToolBar Example</title>
   </h:head>

   <h:body>
      <rich:panel>
         <rich:toolbar height = "26" itemSeparator = "grid">
            <rich:toolbarGroup location = "left">
               <h:commandButton styleClass = "barsearchbutton"
                  onclick = "return false;" value = "TAB" />
            </rich:toolbarGroup>

            <rich:toolbarGroup location = "left">
               <h:commandButton styleClass = "barsearchbutton"
                  onclick = "return false;" value = "TAB2" />
            </rich:toolbarGroup>

            <rich:toolbarGroup location = "left">
               <h:commandButton styleClass = "barsearchbutton"
                  onclick = "return false;" value = "TAB3" />
            </rich:toolbarGroup>
         </rich:toolbar>

      </rich:panel>
   </h:body>

</html>
以上程式碼將在瀏覽器中產生以下輸出。
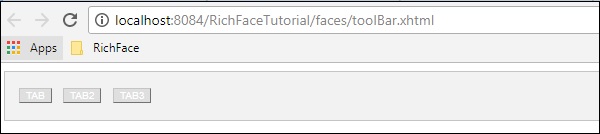
在上面的示例中,<toolbarGroup> 標籤用於對不同型別的工具進行分組。可以建立任意數量的組。Location 提供網頁上按鈕將放置的位置。
<rich:separator>
顧名思義,它用於分隔網頁上的不同元件。此標籤在 RichFaces 4 中已被移除,但是,如果你仍在使用 RichFaces 3,則可以使用以下標籤。
<rich:separator lineType = "beveled" height = "8" width = "75%" align = "center"/>
<p>Here is more examples of different line types:</p>

<rich:separator height = "2" lineType = "dotted"/><br/>
<rich:separator height = "2" lineType = "dashed"/><br/>
<rich:separator height = "4" lineType = "double"/><br/>
<rich:separator height = "2" lineType = "solid"/><br/>
在上面的示例中,LineType 是一個屬性,它幫助我們確定要使用的分隔符型別。所有這些分隔符名稱本質上都是不言自明的。
<rich:Spacer>
Spacer 是一個自描述標籤,它幫助開發人員在兩個元件之間提供空間。此標籤也與其他標籤一起在 RichFaces4 中被移除,但是,如果你使用的是 RichFaces 3,則可以使用以下程式碼。
<rich:spacer width = "1" height = "5" title = "Here is a spacer..."/>
<rich:modalPanel>
Modal Panel 用於動態顯示彈出視窗。在 RichFaces 4 中,modal panel 標籤已更改為 **popupPanel**。在下面的示例中,我們將看到它的工作原理。建立一個 xhtml 檔案並將其命名為“PopingUp.xhtml”。將以下程式碼放入其中。
<?xml version = "1.0" encoding = "UTF-8"?>
<!DOCTYPE html>
<html xmlns = "http://www.w3.org/1999/xhtml"
xmlns:h = "http://java.sun.com/jsf/html"
xmlns:f = "http://java.sun.com/jsf/core"
xmlns:ui = "http://java.sun.com/jsf/facelets"
xmlns:a4j = "http://richfaces.org/a4j"
xmlns:rich = "http://richfaces.org/rich">
<h:head>
<title>ModalPanel and popupPanel</title>
</h:head>
<h:body>
<h:form>
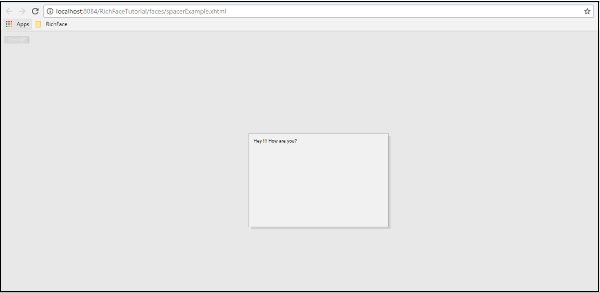
<h:commandButton value = "Click ME">
<rich:componentControl target = "popup" operation = "show" />
</h:commandButton>
<rich:popupPanel id = "popup" modal = "true" autosized = "false"
resizeable = "false">
Hey !!!
How are you?
</rich:popupPanel>
</h:form>
</h:body>
</html>
當點選“ClickMe”按鈕時,以上示例將生成以下輸出。