- Python Pyramid 教程
- Python Pyramid - 首頁
- Python Pyramid - 概述
- Pyramid - 環境設定
- Python Pyramid - Hello World
- Pyramid - 應用配置
- Python Pyramid - URL 路由
- Python Pyramid - 檢視配置
- Python Pyramid - 路由字首
- Python Pyramid - 模板
- Pyramid - HTML 表單模板
- Python Pyramid - 靜態資源
- Python Pyramid - 請求物件
- Python Pyramid - 響應物件
- Python Pyramid - 會話
- Python Pyramid - 事件
- Python Pyramid - 訊息閃現
- Pyramid - 使用 SQLAlchemy
- Python Pyramid - Cookiecutter
- Python Pyramid - 建立專案
- Python Pyramid - 專案結構
- Python Pyramid - 包結構
- 手動建立專案
- 命令列 Pyramid
- Python Pyramid - 測試
- Python Pyramid - 日誌
- Python Pyramid - 安全
- Python Pyramid - 部署
- Python Pyramid 有用資源
- Python Pyramid - 快速指南
- Python Pyramid - 有用資源
- Python Pyramid - 討論
Python Pyramid - HTML 表單模板
在本章中,我們將瞭解 Pyramid 如何從 HTML 表單讀取資料。讓我們將以下 HTML 指令碼儲存為myform.html。我們將使用它來獲取 Template 物件並渲染它。
<html>
<body>
   <form method="POST" action="https://:6543/students">
   <p>Student Id: <input type="text" name="id"/> </p>
   <p>student Name: <input type="text" name="name"/> </p>
   <p>Percentage: <input type="text" name="percent"/> </p>
   <p><input type="submit" value="Submit"> </p>
</body>
</html>
在 Pyramid 物件的配置中新增的“index”路由對映到以下 index() 函式,該函式渲染上述 HTML 表單:
@view_config(route_name='index', renderer='templates/myform.html')
def index(request):
   return {}
正如我們所看到的,使用者輸入的資料透過 POST 請求傳遞到 /students URL。因此,我們將新增一個“students”路由來匹配 /students 模式,並將其與 add() 檢視函式關聯,如下所示:
@view_config(route_name='students', renderer='templates/marklist.html')
def add(request):
   student={'id':request.params['id'],
      'name':request.params['name'],
      'percent':int(request.params['percent'])} 9. Pyramid – HTML Form Template
   students.append(student)
   return {'students':students}
POST 請求傳送的資料以request.params物件的格式在 HTTP 請求物件中可用。它是一個 HTML 表單屬性及其值的字典,這些值由使用者輸入。這些資料被解析並附加到字典物件的學生列表中。更新後的 students 物件作為上下文資料傳遞給 marklist.html 模板。
marklist.html網頁模板與上一個示例中使用的相同。它顯示了一個學生資料表以及計算結果列。
<html>
<body>
   <table border=1>
      <thead>
         <tr>
            <th>Student ID</th> <th>Student Name</th>
            <th>percentage</th>
            <th>Result</th>
         </tr>
      </thead>
      <tbody>
         {% for Student in students %}
            <tr>
               <td>{{ Student.id }}</td>
               <td>{{ Student.name }}</td>
               <td>{{ Student.percent }}</td>
               <td>
                  {% if Student.percent>=50 %}
                  Pass
                  {% else %}
                  Fail
                  {% endif %}
               </td>
            </tr>
         {% endfor %}
      </tbody>
   </table>
</body>
</html>
示例
下面給出了包含用於渲染 HTML 表單、解析表單資料和生成顯示學生成績單表的頁面的完整程式碼:
from wsgiref.simple_server import make_server
from pyramid.config import Configurator
from pyramid.response import Response
from pyramid.view import view_config

students = [
   {"id": 1, "name": "Ravi", "percent": 75},
   {"id": 2, "name": "Mona", "percent": 80},
   {"id": 3, "name": "Mathews", "percent": 45},
]

@view_config(route_name='index', renderer='templates/myform.html')
def index(request):
   return {}
@view_config(route_name='students', renderer='templates/marklist.html')
def add(request):
   student={'id':request.params['id'], 'name':request.params['name'],
'percent':int(request.params['percent'])}
   students.append(student)
   return {'students':students}

if __name__ == '__main__':
   with Configurator() as config:
      config.include('pyramid_jinja2')
      config.add_jinja2_renderer(".html")
      config.add_route('index', '/')
      config.add_route('students','/students')
      config.scan()
      app = config.make_wsgi_app()
   server = make_server('0.0.0.0', 6543, app)
   server.serve_forever()
輸出
要啟動伺服器,請從命令列執行上述 Python 程式碼。在您的瀏覽器中,訪問https://:6543/以獲取如下所示的表單:
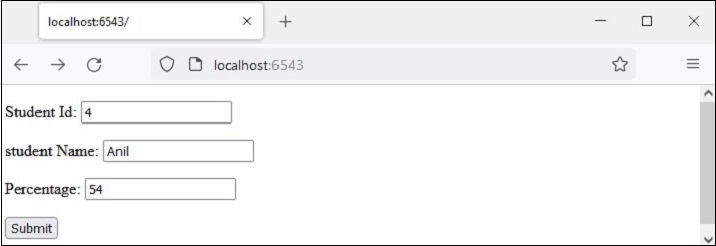
輸入一個示例資料,如所示,然後按下提交按鈕。瀏覽器將重定向到 /students URL,該 URL 又會呼叫add()檢視。結果是一個成績單表,顯示新輸入的新學生的資料。

廣告