- GWT 教程
- GWT - 首頁
- GWT - 概述
- GWT - 環境設定
- GWT - 應用程式
- GWT - 建立應用程式
- GWT - 部署應用程式
- GWT - 使用 CSS 設定樣式
- GWT - 基本小部件
- GWT - 表單小部件
- GWT - 複雜小部件
- GWT - 佈局面板
- GWT - 事件處理
- GWT - 自定義小部件
- GWT - UIBinder
- GWT - RPC 通訊
- GWT - JUnit 整合
- GWT - 除錯應用程式
- GWT - 國際化
- GWT - 歷史類
- GWT - 書籤支援
- GWT - 日誌框架
- GWT 有用資源
- GWT - 問答
- GWT - 快速指南
- GWT - 有用資源
- GWT - 討論
GWT - 彈出面板小部件
介紹
PopupPanel 小部件表示一個可以彈出到其他小部件之上的面板。它覆蓋瀏覽器的客戶端區域(以及任何先前建立的彈出視窗)。
類宣告
以下是com.google.gwt.user.client.ui.PopupPanel類的宣告:
public class PopupPanel
   extends SimplePanel
      implements SourcesPopupEvents, EventPreview,
         HasAnimation, HasCloseHandlers<PopupPanel>
類建構函式
| 序號 | 建構函式和描述 |
|---|---|
| 1 |
PopupPanel() 建立一個空彈出面板。 |
| 2 |
PopupPanel(boolean autoHide) 建立一個空彈出面板,並指定其自動隱藏屬性。 |
| 3 |
PopupPanel(boolean autoHide, boolean modal) 建立一個空彈出面板,並指定其自動隱藏和模態屬性。 |
類方法
| 序號 | 函式名稱和描述 |
|---|---|
| 1 |
void addAutoHidePartner(Element partner) 在自動隱藏夥伴內發生的滑鼠事件不會隱藏設定為自動隱藏的面板。 |
| 2 |
HandlerRegistration addCloseHandler( CloseHandler <PopupPanel> handler) 新增一個 CloseEvent 處理程式。 |
| 3 |
void addPopupListener(PopupListener listener) 已棄用。請改用 addCloseHandler(com.google.gwt.event.logical.shared.CloseHandler) |
| 4 |
void center() 將彈出視窗居中在瀏覽器視窗中並顯示它。 |
| 5 |
protected Element getContainerElement() 重寫此方法以指定面板的子小部件的容器不是根元素。 |
| 6 |
protected Element getGlassElement() 獲取此 PopupPanel 使用的玻璃元素。 |
| 7 |
java.lang.String getGlassStyleName() 獲取要在玻璃元素上使用的樣式名稱。 |
| 8 |
int getOffsetHeight() 獲取面板的偏移高度(以畫素為單位)。 |
| 9 |
int getOffsetWidth() 獲取面板的偏移寬度(以畫素為單位)。 |
| 10 |
int getPopupLeft() 獲取彈出視窗相對於瀏覽器客戶端區域的左側位置。 |
| 11 |
int getPopupTop() 獲取彈出視窗相對於瀏覽器客戶端區域的頂部位置。 |
| 12 |
protected Element getStyleElement() 模板方法,返回將應用樣式名稱的元素。 |
| 13 |
java.lang.String getTitle() 獲取與此物件關聯的標題。 |
| 14 |
void hide() 隱藏彈出視窗並將其從頁面上分離。 |
| 15 |
void hide(boolean autoClosed) 隱藏彈出視窗並將其從頁面上分離。 |
| 16 |
boolean isAnimationEnabled() 如果啟用了動畫,則返回 true,否則返回 false。 |
| 17 |
boolean isAutoHideEnabled() 如果使用者單擊彈出視窗外部時應自動隱藏彈出視窗,則返回 true。 |
| 18 |
boolean isAutoHideOnHistoryEventsEnabled( ) 如果歷史記錄標記更改時(例如,當用戶按下瀏覽器的後退按鈕時)應自動隱藏彈出視窗,則返回 true。 |
| 19 |
boolean isGlassEnabled() 如果將在 PopupPanel 下顯示玻璃元素,則返回 true。 |
| 20 |
boolean isModal() 如果未將鍵盤或滑鼠事件定位到 PopupPanel 或其子級,則應忽略這些事件,則返回 true。 |
| 21 |
boolean isPreviewingAllNativeEvents( ) 如果彈出視窗應預覽所有本機事件,即使事件已被另一個彈出視窗使用,則返回 true。 |
| 22 |
boolean isShowing() 確定此彈出視窗是否正在顯示。 |
| 23 |
boolean isVisible() 確定此彈出視窗是否可見。 |
| 24 |
boolean onEventPreview(Event event) 已棄用。請改用 onPreviewNativeEvent(com.google.gwt.user.client.Event.NativePreviewEvent) |
| 25 |
boolean onKeyDownPreview(char key, int modifiers) 已棄用。請改用 onPreviewNativeEvent(com.google.gwt.user.client.Event.NativePreviewEvent) |
| 26 |
boolean onKeyPressPreview(char key, int modifiers) 已棄用。請改用 onPreviewNativeEvent(com.google.gwt.user.client.Event.NativePreviewEvent) |
| 27 |
boolean onKeyUpPreview(char key, int modifiers) 已棄用。請改用 onPreviewNativeEvent(com.google.gwt.user.client.Event.NativePreviewEvent) |
| 28 |
protected void onPreviewNativeEvent(Event.NativePreviewEvent event) |
| 29 |
protected void onUnload() 此方法在小部件將從瀏覽器的文件中分離之前立即呼叫。 |
| 30 |
void removeAutoHidePartner(Element partner) 刪除自動隱藏夥伴。 |
| 31 |
void removePopupListener(PopupListener listener) 已棄用。請改用 addCloseHandler(com.google.gwt.event.logical.shared.CloseHandler) 返回的物件上的 HandlerRegistration.removeHandler() 方法 |
| 32 |
void setAnimationEnabled(boolean enable) 啟用或停用動畫。 |
| 33 |
void setAutoHideEnabled(boolean autoHide) 啟用或停用自動隱藏功能。 |
| 34 |
void setAutoHideOnHistoryEventsEnabled( boolean enabled) 啟用或停用歷史記錄更改事件上的自動隱藏。 |
| 35 |
void setGlassEnabled(boolean enabled) 啟用後,下次顯示時,背景將被半透明的面板阻塞。 |
| 36 |
void setGlassStyleName(java.lang.String glassStyleName) 設定要在玻璃元素上使用的樣式名稱。 |
| 37 |
void setHeight(java.lang.String height) 設定面板的子小部件的高度。 |
| 38 |
void setModal(boolean modal) 當彈出視窗為模態時,未將鍵盤或滑鼠事件定位到 PopupPanel 或其子級的事件將被忽略。 |
| 39 |
void setPopupPosition(int left, int top) 設定彈出視窗相對於瀏覽器客戶端區域的位置。 |
| 40 |
void setPopupPositionAndShow(PopupPanel.PositionCallback callback) 使用 PopupPanel.PositionCallback 設定彈出視窗的位置,並顯示彈出視窗。 |
| 41 |
void setPreviewingAllNativeEvents(boolean previewAllNativeEvents) 啟用後,彈出視窗將預覽所有本機事件,即使在此彈出視窗之後打開了另一個彈出視窗。 |
| 42 |
void setTitle(java.lang.String title) 設定與此物件關聯的標題。 |
| 43 |
void setVisible(boolean visible) 設定此物件是否可見。 |
| 44 |
void setWidget(Widget w) 設定此面板的小部件。 |
| 45 |
void setWidth(java.lang.String width) 設定面板的子小部件的寬度。 |
| 46 |
void show() 顯示彈出視窗並將其附加到頁面上。 |
| 47 |
void showRelativeTo(UIObject target) 通常,彈出視窗將直接位於相對目標下方,其左邊緣與目標的左邊緣對齊。 |
繼承的方法
此類繼承自以下類:
com.google.gwt.user.client.ui.UIObject
com.google.gwt.user.client.ui.Widget
com.google.gwt.user.client.ui.Panel
com.google.gwt.user.client.ui.SimplePanel
java.lang.Object
PopupPanel 小部件示例
此示例將引導您完成顯示如何在 GWT 中使用 PopupPanel 小部件的簡單步驟。按照以下步驟更新我們在GWT - 建立應用程式章節中建立的 GWT 應用程式:
| 步驟 | 描述 |
|---|---|
| 1 | 在GWT - 建立應用程式章節中說明的包com.tutorialspoint下建立一個名為HelloWorld的專案。 |
| 2 | 修改HelloWorld.gwt.xml、HelloWorld.css、HelloWorld.html和HelloWorld.java,如下所述。保持其餘檔案不變。 |
| 3 | 編譯並執行應用程式以驗證已實現邏輯的結果。 |
以下是修改後的模組描述符src/com.tutorialspoint/HelloWorld.gwt.xml的內容。
<?xml version = "1.0" encoding = "UTF-8"?>
<module rename-to = 'helloworld'>
   <!-- Inherit the core Web Toolkit stuff.                        -->
   <inherits name = 'com.google.gwt.user.User'/>

   <!-- Inherit the default GWT style sheet.                       -->
   <inherits name = 'com.google.gwt.user.theme.clean.Clean'/>

   <!-- Specify the app entry point class.                         -->
   <entry-point class = 'com.tutorialspoint.client.HelloWorld'/>

   <!-- Specify the paths for translatable code                    -->
   <source path = 'client'/>
   <source path = 'shared'/>

</module>
以下是修改後的樣式表文件war/HelloWorld.css的內容。
body {
   text-align: center;
   font-family: verdana, sans-serif;
}

h1 {
   font-size: 2em;
   font-weight: bold;
   color: #777777;
   margin: 40px 0px 70px;
   text-align: center;
}

.gwt-PopupPanel {
   border: 3px solid #000000;
   padding: 3px;
   background: white;
}

.gwt-PopupPanelGlass {
   background-color: #000;
   opacity: 0.3;
   filter: alpha(opacity=30);
}

.gwt-PopupPanel .popupContent {
   border: none;
   padding: 3px;
   background: gray;
}
以下是修改後的 HTML 主機檔案war/HelloWorld.html的內容。
<html>
   <head>
      <title>Hello World</title>
      <link rel = "stylesheet" href = "HelloWorld.css"/>
      <script language = "javascript" src = "helloworld/helloworld.nocache.js">
      </script>
   </head>

   <body>
      <h1>PopupPanel Widget Demonstration</h1>
      <div id = "gwtContainer"></div>
   </body>
</html>
讓我們在 Java 檔案src/com.tutorialspoint/HelloWorld.java中包含以下內容,它將演示 PopupPanel 小部件的使用。
package com.tutorialspoint.client;

import com.google.gwt.core.client.EntryPoint;
import com.google.gwt.event.dom.client.ClickEvent;
import com.google.gwt.event.dom.client.ClickHandler;
import com.google.gwt.user.client.Window;
import com.google.gwt.user.client.ui.Button;
import com.google.gwt.user.client.ui.DecoratorPanel;
import com.google.gwt.user.client.ui.HasHorizontalAlignment;
import com.google.gwt.user.client.ui.Label;
import com.google.gwt.user.client.ui.PopupPanel;
import com.google.gwt.user.client.ui.RootPanel;
import com.google.gwt.user.client.ui.VerticalPanel;

public class HelloWorld implements EntryPoint {

   private static class MyPopup extends PopupPanel {

      public MyPopup() {
         // PopupPanel's constructor takes 'auto-hide' as its boolean
         // parameter. If this is set, the panel closes itself
         // automatically when the user clicks outside of it.
         super(true);

         // PopupPanel is a SimplePanel, so you have to set it's widget
         // property to whatever you want its contents to be.
         setWidget(new Label("Click outside of this popup to close it"));
      }
   }

   public void onModuleLoad() {
      Button b1 = new Button("Click me to show popup");
      b1.addClickHandler(new ClickHandler() {
         public void onClick(ClickEvent event) {
            // Instantiate the popup and show it.
             new MyPopup().show();
         }
      });

      Button b2 = new Button("Click me to show popup partway"
         +" across the screen");
      b2.addClickHandler(new ClickHandler() {
         public void onClick(ClickEvent event) {

            // Create the new popup.
            final MyPopup popup = new MyPopup();

            // Position the popup 1/3rd of the way down and across
            // the screen, and show the popup. Since the position
            // calculation is based on the offsetWidth and offsetHeight
            // of the popup, you have to use the
            // setPopupPositionAndShow(callback)  method. The alternative
            // would be to call show(), calculate  the left and
            // top positions, and call setPopupPosition(left, top).
            // This would have the ugly side effect of the popup jumping

            // from its original position to its new position.
            popup.setPopupPositionAndShow(new PopupPanel.PositionCallback(){
               public void setPosition(int offsetWidth, int offsetHeight) {
                  int left = (Window.getClientWidth() - offsetWidth) / 3;
                  int top = (Window.getClientHeight() - offsetHeight) / 3;
                  popup.setPopupPosition(left, top);
               }
            });
         }
      });
      VerticalPanel panel = new VerticalPanel();
      panel.setHorizontalAlignment(HasHorizontalAlignment.ALIGN_CENTER);
      panel.setSpacing(10);
      panel.add(b1);
      panel.add(b2);

      DecoratorPanel decoratorPanel = new DecoratorPanel();
      decoratorPanel.add(panel);

      // Add the widgets to the root panel.
      RootPanel.get().add(decoratorPanel);
   }
}
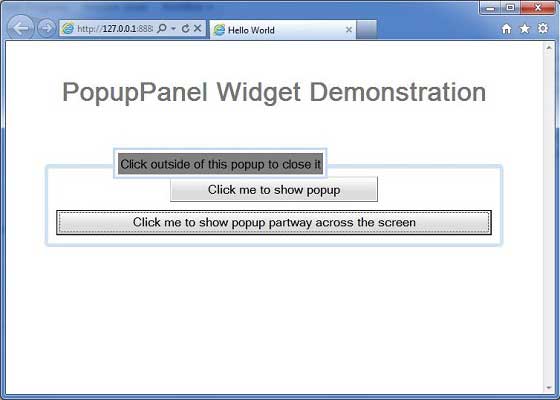
準備好所有更改後,讓我們像在GWT - 建立應用程式章節中一樣,在開發模式下編譯並執行應用程式。如果應用程式一切正常,則將產生以下結果: