- GWT 教程
- GWT - 首頁
- GWT - 概述
- GWT - 環境設定
- GWT - 應用程式
- GWT - 建立應用程式
- GWT - 部署應用程式
- GWT - 使用 CSS 樣式
- GWT - 基本元件
- GWT - 表單元件
- GWT - 複雜元件
- GWT - 佈局面板
- GWT - 事件處理
- GWT - 自定義元件
- GWT - UIBinder
- GWT - RPC 通訊
- GWT - JUnit 整合
- GWT - 除錯應用程式
- GWT - 國際化
- GWT - History 類
- GWT - 書籤支援
- GWT - 日誌框架
- GWT 有用資源
- GWT - 問題與解答
- GWT - 快速指南
- GWT - 有用資源
- GWT - 討論
GWT - DockPanel 元件
簡介
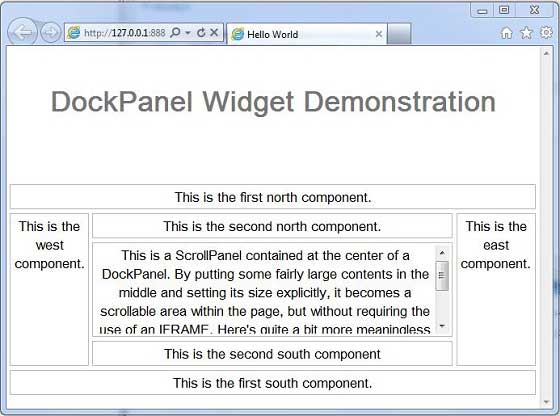
DockPanel 元件表示一個面板,它將其子元件“停靠”在其外邊緣佈局,並允許其最後一個元件佔據其中心剩餘的空間。
類宣告
以下是 com.google.gwt.user.client.ui.DockPanel 類的宣告:
@Deprecated
public class DockPanel
   extends CellPanel
      implements HasAlignment
類建構函式
| 序號 | 建構函式及描述 |
|---|---|
| 1 |
DockPanel() DockPanel 的建構函式。 |
類方法
| 序號 | 函式名稱及描述 |
|---|---|
| 1 |
void add(Widget widget, DockPanel. DockLayoutConstant direction) 已棄用。將元件新增到停靠區的指定邊緣。 |
| 2 |
HasHorizontalAlignment. HorizontalAlignmentConstant getHorizontalAlignment() 已棄用。獲取水平對齊方式。 |
| 3 |
HasVerticalAlignment. VerticalAlignmentConstant getVerticalAlignment() 已棄用。獲取垂直對齊方式。 |
| 4 |
DockPanel. DockLayoutConstant getWidgetDirection(Widget w) 已棄用。獲取給定子元件的佈局方向。 |
| 5 |
protected void onEnsureDebugId(java.lang. String baseID) 已棄用。DockPanel 支援在一個方向上新增多個單元格,因此除錯 ID 的末尾將附加一個整數。 |
| 6 |
boolean remove(Widget w) 已棄用。移除子元件。 |
| 7 |
void setCellHeight(Widget w, java.lang.String height) 已棄用。設定與給定元件關聯的單元格的高度,相對於整個面板。 |
| 8 |
void set Cell Horizontal Alignment(Widget w, Has Horizontal Alignment. Horizontal Alignment Constant align) 已棄用。設定給定元件在其單元格內的水平對齊方式。 |
| 9 |
void set Cell Vertical Alignment (Widget w, HasVertical Alignment. Vertical Alignment Constant align) 已棄用。設定給定元件在其單元格內的垂直對齊方式。 |
| 10 |
void setCellWidth(Widget w, java.lang.String width) 已棄用。設定與給定元件關聯的單元格的寬度,相對於整個面板。 |
| 11 |
void set Horizontal Alignment (Has Horizontal Alignment. Horizontal Alignment Constant align) 已棄用。設定新增到此面板的元件要使用的預設水平對齊方式。 |
| 12 |
void setVerticalAlignment(HasVerticalAlignment. VerticalAlignmentConstant align) 已棄用。設定新增到此面板的元件要使用的預設垂直對齊方式。 |
繼承的方法
此類繼承自以下類:
com.google.gwt.user.client.ui.UIObject
com.google.gwt.user.client.ui.Widget
com.google.gwt.user.client.ui.Panel
com.google.gwt.user.client.ui.ComplexPanel
com.google.gwt.user.client.ui.CellPanel
java.lang.Object
DockPanel 元件示例
此示例將引導您完成簡單的步驟,以演示如何在 GWT 中使用 DockPanel 元件。請按照以下步驟更新我們在“GWT - 建立應用程式”章節中建立的 GWT 應用程式:
| 步驟 | 描述 |
|---|---|
| 1 | 在 com.tutorialspoint 包下建立一個名為 HelloWorld 的專案,如“GWT - 建立應用程式”章節中所述。 |
| 2 | 修改 HelloWorld.gwt.xml、HelloWorld.css、HelloWorld.html 和 HelloWorld.java,如下所述。保持其餘檔案不變。 |
| 3 | 編譯並執行應用程式以驗證已實現邏輯的結果。 |
以下是修改後的模組描述符 src/com.tutorialspoint/HelloWorld.gwt.xml 的內容。
<?xml version = "1.0" encoding = "UTF-8"?>
<module rename-to = 'helloworld'>
   <!-- Inherit the core Web Toolkit stuff.                        -->
   <inherits name = 'com.google.gwt.user.User'/>

   <!-- Inherit the default GWT style sheet.                       -->
   <inherits name = 'com.google.gwt.user.theme.clean.Clean'/>

   <!-- Specify the app entry point class.                         -->
   <entry-point class = 'com.tutorialspoint.client.HelloWorld'/>

   <!-- Specify the paths for translatable code                    -->
   <source path = 'client'/>
   <source path = 'shared'/>

</module>
以下是修改後的樣式表文件 war/HelloWorld.css 的內容。
body {
   text-align: center;
   font-family: verdana, sans-serif;
}

h1 {
   font-size: 2em;
   font-weight: bold;
   color: #777777;
   margin: 40px 0px 70px;
   text-align: center;
}
.dockpanel td {
   border: 1px solid #BBBBBB;
   padding: 3px;
}
以下是修改後的 HTML 主機檔案 war/HelloWorld.html 的內容。
<html>
   <head>
      <title>Hello World</title>
      <link rel = "stylesheet" href = "HelloWorld.css"/>
      <script language = "javascript" src = "helloworld/helloworld.nocache.js">
      </script>
   </head>

   <body>
      <h1>DockPanel Widget Demonstration</h1>
      <div id = "gwtContainer"></div>
   </body>
</html>
讓我們將以下內容作為 Java 檔案 src/com.tutorialspoint/HelloWorld.java 的內容,它將演示 DockPanel 元件的使用。
package com.tutorialspoint.client;

import com.google.gwt.core.client.EntryPoint;
import com.google.gwt.user.client.ui.DockPanel;
import com.google.gwt.user.client.ui.HTML;
import com.google.gwt.user.client.ui.RootPanel;
import com.google.gwt.user.client.ui.ScrollPanel;
import com.google.gwt.user.client.ui.VerticalPanel;

public class HelloWorld implements EntryPoint {

   public void onModuleLoad() {
      DockPanel dockPanel = new DockPanel();
      dockPanel.setStyleName("dockpanel");
      dockPanel.setSpacing(4);
      dockPanel.setHorizontalAlignment(DockPanel.ALIGN_CENTER);

      // Add text all around
      dockPanel.add(new HTML("This is the first north component."),
      DockPanel.NORTH);
      dockPanel.add(new HTML("This is the first south component."),
      DockPanel.SOUTH);
      dockPanel.add(new HTML("This is the east component."),
      DockPanel.EAST);
      dockPanel.add(new HTML("This is the west component."),
      DockPanel.WEST);
      dockPanel.add(new HTML("This is the second north component."),
      DockPanel.NORTH);
      dockPanel.add(new HTML("This is the second south component"),
      DockPanel.SOUTH);

      // Add scrollable text in the center
      HTML contents = new HTML("This is a ScrollPanel contained"
         +" at the center of a DockPanel. "
         +" By putting some fairly large contents in the middle"
         +" and setting its size explicitly, it becomes a scrollable area"
         +" within the page, but without requiring the use of an IFRAME."
         +" Here's quite a bit more meaningless text that will serve primarily"
         +" to make this thing scroll off the bottom of its visible area."
         +" Otherwise, you might have to make it really, really"
         +" small in order to see the nifty scroll bars!");
      ScrollPanel scroller = new ScrollPanel(contents);
      scroller.setSize("400px", "100px");
      dockPanel.add(scroller, DockPanel.CENTER);


      VerticalPanel vPanel = new VerticalPanel();
      vPanel.add(dockPanel);

      // Add the widgets to the root panel.
      RootPanel.get().add(vPanel);
   }
}
準備好所有更改後,讓我們像在 GWT - 建立應用程式 章節中一樣,在開發模式下編譯並執行該應用程式。如果應用程式一切正常,則將產生以下結果: